Product Auction App for Shopify enables the feature of a bid or auction on your e-commerce website.
Moreover, the admin can enable the bidding feature on products he wants to go for auction and can monitor all the bids happening on the store from the app itself and much more.
The app, namely Auction, will enable the feature of bidding and auction of products on your e-commerce website. So don’t wait, install the Product Auction app & start bidding.
Check the introduction video of the product auction app for Shopify:
How to add an auction in the product auction app for Shopify:
Features
- Admin can create and manage auction for any product.
- Make the auction process legitimate on your store by enabling the Join Fee feature.
- Enable the proxy-bidding feature within the app to have a less time-consuming bidding process in the app.
- Also, allow customers to place a normal & proxy bid with a single button. Explore!
- This app also includes the feature of popcorn bidding.
- Real-time bid update:- Once a bidder places a bid for a product, the bids will get updated on the auction window page for all the other bidders who are live on auction.
- Admin can create multiple auctions at a time just by uploading them via CSV.
- You can configure your own SMTP to send emails to the customers from your own mail engine.
- Automatic emails sent to the winner & loser of the bid.
- Bid On Multiple Units feature, where admin can enable it for the bidder to bid for a number of units of product.
- This app also includes Multiple Winner & Autopay features
- Option to manually end the bid, also, to start auction automatically.
- Admin can even restart the unsuccessful auctions. Explore
- Set increment rules and the increment gaps while creating Auctions.
- This app is now compatible with the Product Dreamlist app
More…
- You must set a reserve price—the minimum amount a bid must reach for a winner to be declared.
- Enable the option to stop Auction if the product gets out of stock.
- Enable the option to edit customer’s bid.
- You can enable the option to disable the Add to cart once the bid amount exceeds the actual price of the product.
- Admin can also view all the bids and happenings in the notification section.
- Admin can also edit the labels for the front end.
- The customer can view the bidding history.
- Admin can also enable/disable the ‘Add To Cart’ button if the bid amount exceeds the actual price.
- Admin can choose to display the following information on the storefront: bid count, current bid (product and collection page), Sort Running Auctions on the basis of Recently Added, No. of Bids, or About to End.
- Top of all, this Product Auction app for Shopify also integrates with the Multi-Vendor Marketplace app for Shopify!- Explore!
- Get the option to authenticate your 3D Secure customer’s card details in the case of AutoPay.
- You can now show the start date on the product page for the upcoming auctions.
Updates:
- Enable this for showing the start bid on upcoming auctions.
Benefits
- Putting auctions on your products rather than just displaying them for a simple purchase can give you the opportunity to score big savings. This app will help you do the same.
- If you want to check the real-time value of a product, you can set products up for auction.
- The product Auction app is now integrated with the Multi-vendor Marketplace app. Thus, you can create an e-auction marketplace and allow sellers to add auctions to products.
- Use in Online Charity Auction to raise funds.
Installation
On Landing Page, you will find the “install” button. Enter the shop URL where you want to install the Product Auction app.

After that, you need to select the plan as per your need as shown in the below image.
Currently, we are having three different plans: Basic plan, Executive plan and Pro plan.

Pause plan: If you do not want to use the app for a while, you can pause the plan.
You will be charged 7USD per month for the paused plan.
Once the payment is done for the plan, the Product Auction will be listed here:
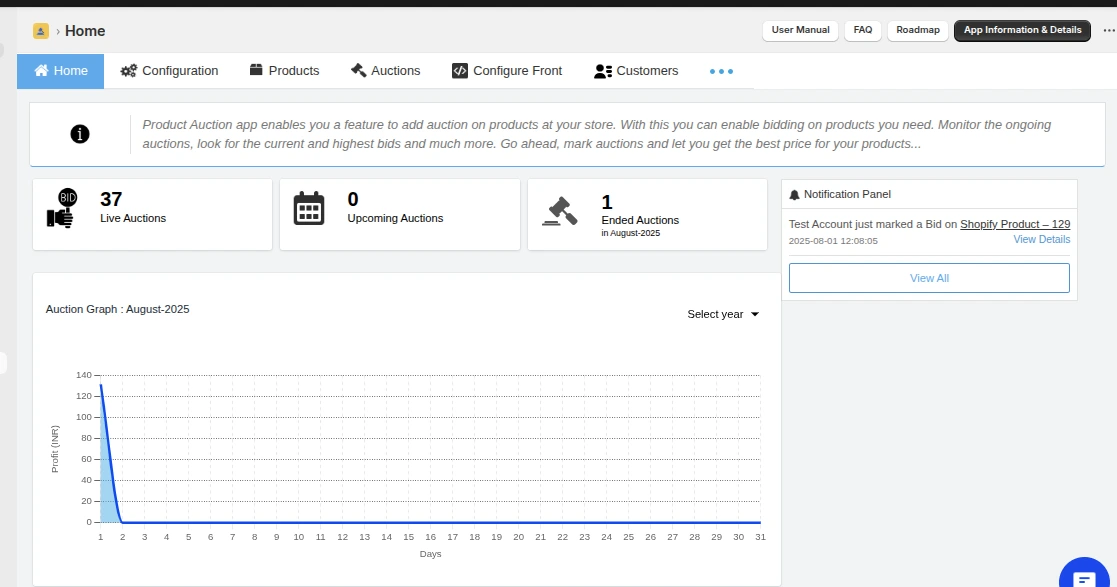
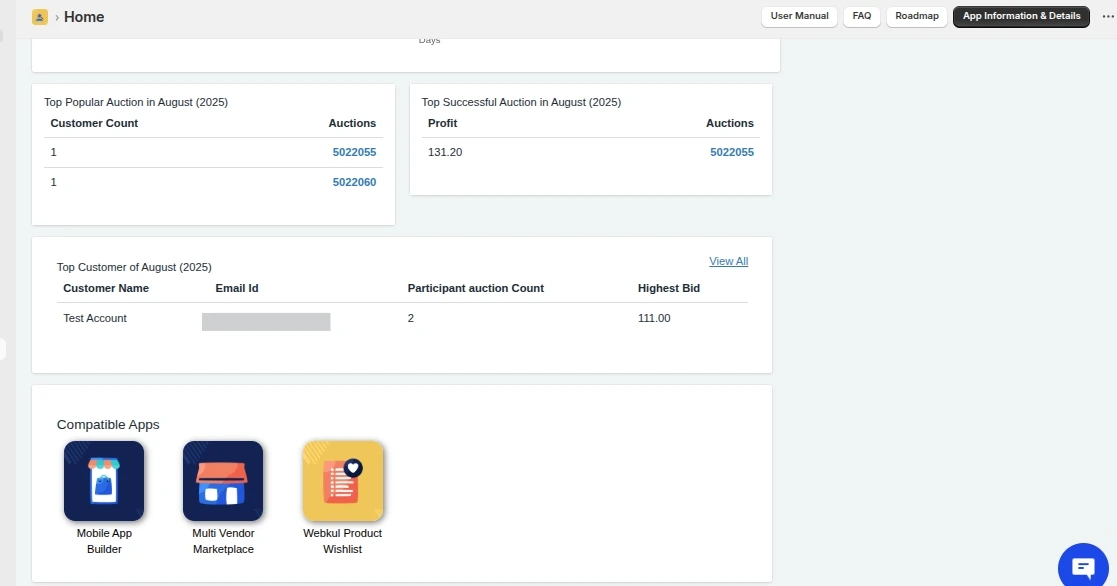
Workflow

Clicking on which you will be redirected to the Auction page.
On the home page itself, you will find few codes to be pasted in .liquid files and other files of HTML/CSS to have the Auction bar displayed at the frontend.
Configuring Product Auction For Shopify
The configuration of Product Auction is very simple and divided into 05 sections:
- General Configuration
- Auction Configuration
- Widget Configuration
- Mail Configuration
- Label Configuration
- Design Configuration
- SMTP Configuration
General Configuration:
Enter your email and upload your shop logo in this section. The shop logo’s image dimension should be 197 x 52. Extensions Supported: jpg, jpeg, png, JPG, JPEG, PNG.

Auction Configuration:
Configure the auction/bidding configurations like enable/disable start auction automatically, send automatic emails to the bidders to notify their loss.


- Product Auction for Shopify: Proxy Bidding Feature
- Popcorn Bidding Feature: Product Auction
- Product Auction for Shopify: Bid On Multiple Units feature
- Multiple Winner Feature:- Product Auction for Shopify | Multiple Winner & Autopay
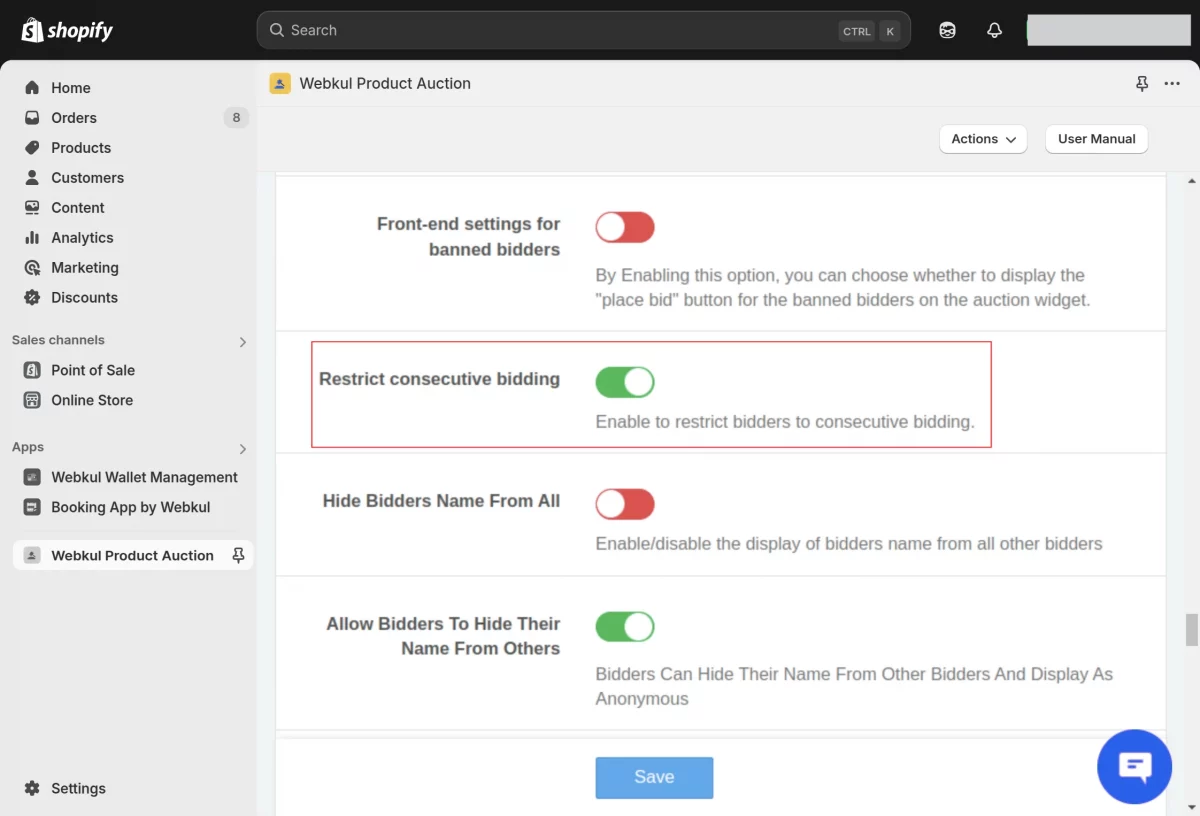
Restrict consecutive bidding
We have introduced a new feature that allows the Admin to restrict consecutive bidding in auctions. Another bidder must outbid a bidder before they can place a new bid.
Bidders are not allowed to place consecutive bids unless they have been outbid first.
For this kindly go to the Product Auction Admin panel >> Configuration >> Auction Configuration
Highlight Current Bid On Collection & Product Page
You can now configure the color to highlight the current bid on your auction products.
You can have different colors for the bids on the collection & product page for the customer who leads the auction, participated in the auction, or has not yet participated in the auction.
To configure this, you need to visit the Auction Configuration menu of the admin panel>>Configure the color of your choice>>Save the settings.

This is how it appears on the collection page of your store:

This is how it appears on the product page of your store:

Confirmation Pop-up while placing Bid
You can now have the option to show a confirmation pop-up on the product page when a customer places a bid. Just visit the Auction Configuration and enable this option.

This is how the confirmation pop-up appears once a bid is placed.

Amount To Be Paid By The Auction Winner
Once the bidder wins the auction, it depends on admin how he/she wants the bidder to pay the winning amount.
The winner will either pay the auction winning amount or some percentage of the winning amount set by the admin.
If the admin selects the % of winning bid, he/she needs to enter the percentage amount. Admin can also enter the Capped amount if he/she wants the auction winner to pay the maximum amount.
“Capped Amount is the maximum amount to be paid by the auction winner”.
NOTE:-
In the case of % of winning bid:
-If Entered Percentage of (Auction winning amount)>Capped Amount
Then, the Auction winner will pay the Capped Amount.
-If Entered Percentage of (Auction winning amount)<Capped Amount
Then, the Auction winner will pay the entered Percentage of the winning amount.

Hide Buy Now Button for Purchasing Auction Products
In case you want to charge the winning amount outside the app, you can hide the “Buy Now” button for purchasing auction products of the winners.
Then, you can manually update the purchase status in the app.
To hide the option, You need to visit the Auction Configuration and enable the tab as shown in the below screenshot.

This way, no Buy Now button appears for the winners but, the purchase status can be update in the app once the payment is confirmed outside the app.

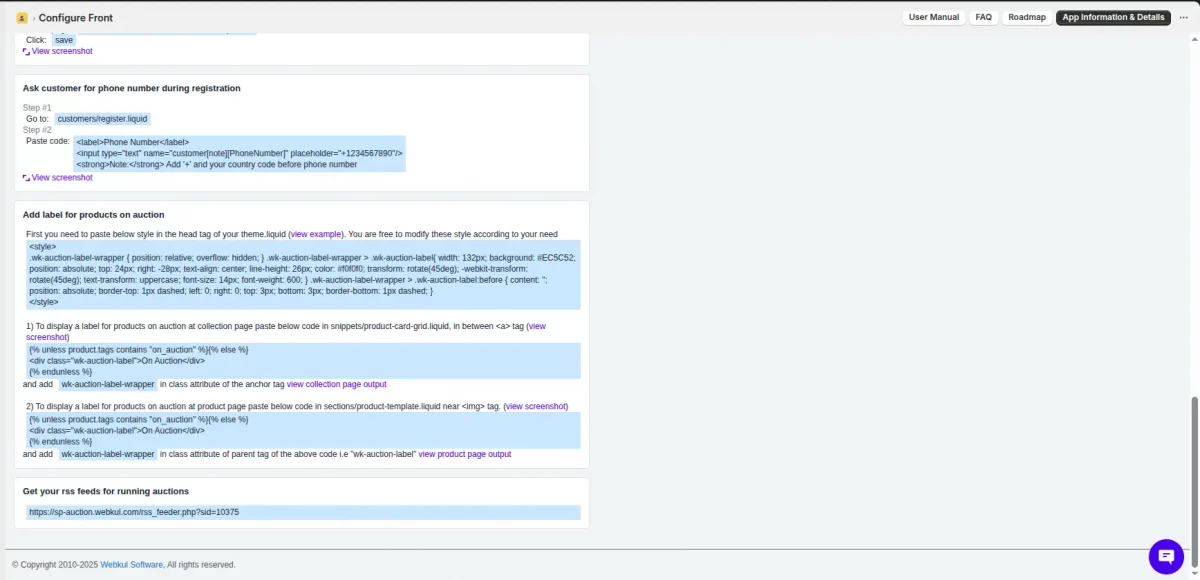
Mandate Customer Address and Phone Number
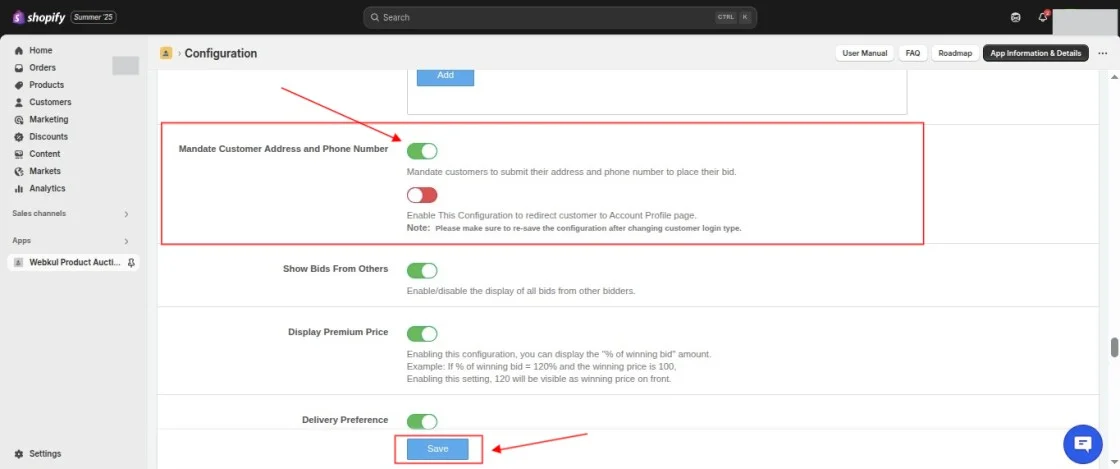
When the ‘Mandate Customer Address and Phone Number’ configuration is enabled.
Customers visiting the website who haven’t yet provided their address and phone number in their profile will be prompted to complete this information.
A pop-up form will appear when they try to place a bid. The form will require them to enter their name, address, and contact number, and then click “Submit” to save the information.
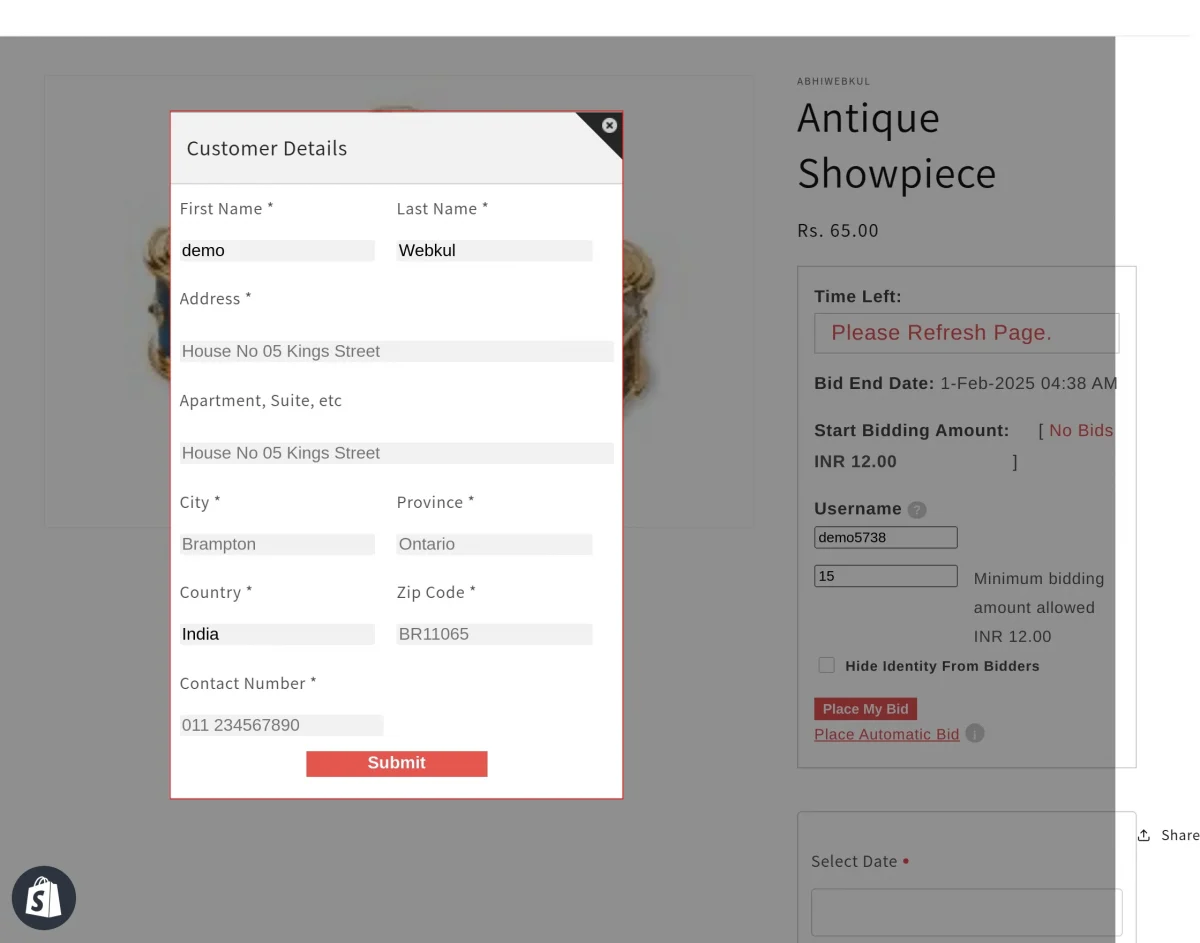
Once submitted, the provided details will be automatically updated in their account section.
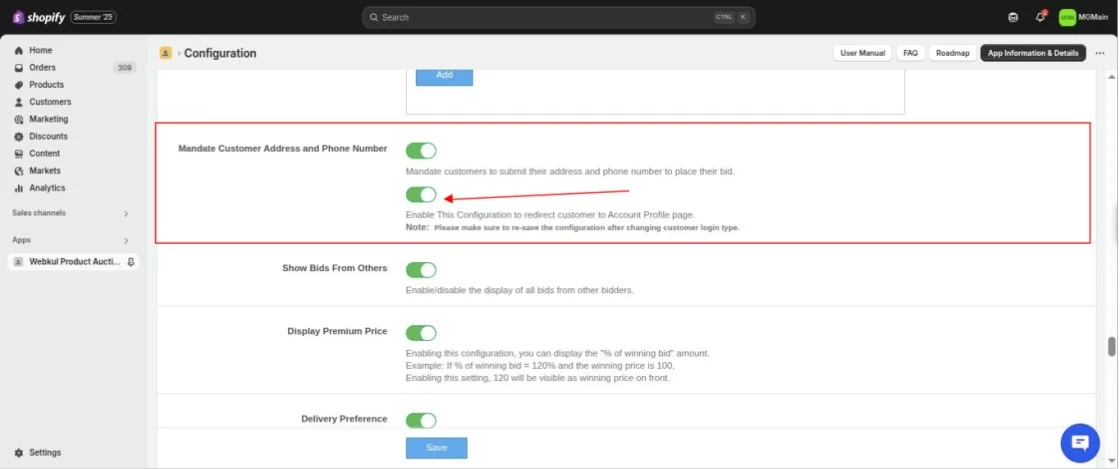
If you enable another configuration under ‘Mandate Customer Address and Phone Number’, a validation check will be enforced on the website.
Any customer who tries to place a bid without having their address or phone number saved in their profile will encounter a validation prompt.
They will see a pop-up message:
“Phone number or address details are missing. Kindly fill in these details to place your bid.”
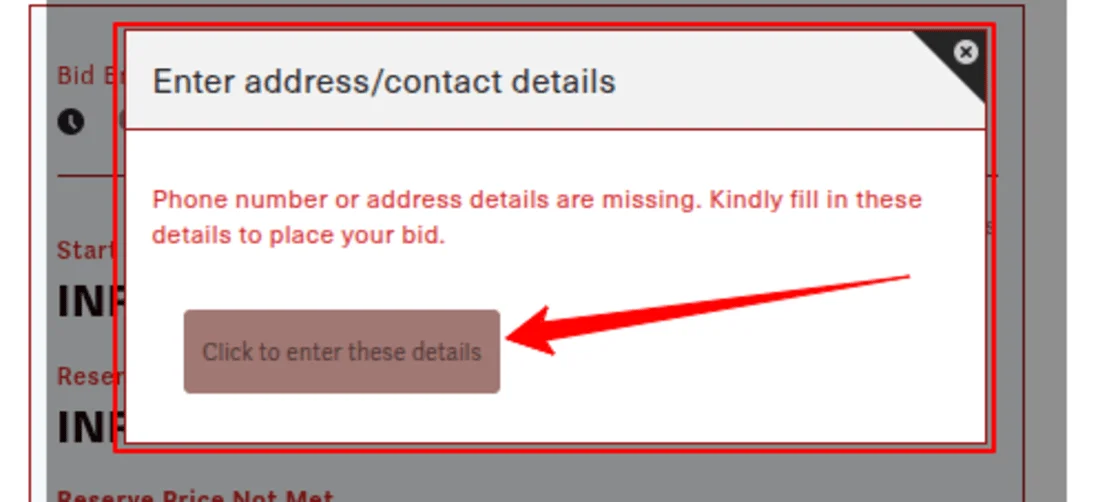
Upon clicking the “Click to enter these details” button in the pop-up, the customer will be redirected to their account page, where they can update and complete the required information.
Widget Configuration
CHANGE AUCTION WIDGET LAYOUT
You can now change the layout of the auction widget shown on the product description page.

This is how the widgets look:

Layout 1
Default Widget

Configure Bid End Date Format
You can now configure the format of the “End Date” of the auctions on your products. For this, You just need to visit the Configuration>>Widget Configuration.

Configure the date format and click the Save button.

That’s all.
Design Configuration:
Change or reset the look of the front end and design by changing the color of the background, themes, button text, label, and much more.

Label Configuration:
Edit the labels of buttons on the front and rename them as per your requirements such as changing the label of time end, bid end date, place my bid and much more.

Mail Configuration:
Configure the after win, purchase reminder, after proxy loses mail content such as mail subject and content. You can also disable these different event’s email status.

SMTP Configuration:
Popcorn Bidding
Popcorn Bidding, also known as Dynamic Bidding, is a way of giving the bidders who were outbid an opportunity to rebid.
Enable this option, enter the time within which you want to extend the auction deadline.
Enter the time by which you want to extend the auction deadline and lastly, enter the number of times this whole popcorn bidding scenario can reoccur.

Note: To make the popcorn bidding feature by default enabled for all the future auctions, you can enable the popcorn bidding feature from the app’s Configuration > Auction Configuration Section:

Real-time Bid Update
The product auction app is now upgraded with the feature of real-time bid update.
So, from now onwards, once a bidder places a bid for a product, the bids will get updated on the auction window page for all the other bidders who are live on auction.
No need to refresh the page again & again to update the last bid placed for any item.
Proxy Bidding
The Admin can enable the functionality of proxy bidding using the Product Auction app on his Shopify store.
So to configure this, visit the Product Auction app from Shopify backend > Configuration > Auction Configuration.

You can notify customers once a proxy bid is placed. For this, you need to enable the settings from the Auction Configuration menu of the app.

Once enabled, you will get an option to configure the mail template on your own.

Allow Customers To Place Normal & Proxy Bid With A Single Button
You can now allow customers to place a normal and a proxy bid using a single button for an auction product.
If the bid amount is greater than Bid Price + 2*(Increment) then, it will be considered as a proxy bid.
Let’s take an example:-
If the current bid amount is 100 and the minimum increment allowed is 10, then if the customer places the bid for 120 [Bid Price + 2*Increment]
or more then it will be considered as a proxy bid for the auction, but in case the customer bids less than 120 then it will be added as a normal bid.
You just need to enable the option from the “Auction Configuration” menu of the app.

Enabling this option will let you choose whether you want to enable Proxy bidding for all the running & upcoming auctions OR only for newly created auctions products.

StoreFront View
Customers will place both normal & proxy bids with the same button.

NOTE:- If the bidding value is greater than and equal to Current Bid + 2*(minimum allowed bid- Current Bid) then, this will be placed as a proxy bid.
Default Bid Rule
Now, the admin can set the default bid rules for the auctioned products of his store.
From this, you can maintain the gap between the bidding amount.
If no specific rule is defined for a particular bid, the nearest applicable increment rule will be applied.
For this, visit Product Auction App > Configuration > Auction Configuration

Once you save the added bid rules, a dialog box will appear. Here, you can decide whether you want these bid rules to be effective on all the auctions or just on future auctions.

The added bid rules will be by default added to all your future auction. Moreover, you can alter the by-default bid rule for any individual auction while adding/editing it.
How To Add Product For Auction?
Firstly, the admin needs to add auction on products and then, the customer will bid on any of those products.
Click here to know how to add a product for auction.
This section of the Product Auction lists the products set for auction by the store owner.
From here each product auction details can be viewed by clicking on the view button in front of the products.
Clicking on view auction in front of the product will redirect you to the auction detail page for that product.

Once you will click on View Auction section, it will list the products with their auction’s start and end date, current bid, and the auction status.
Click ‘view’ to see a detailed structure of product bidding history, bidder details and even the remaining time for auctions in the running phase.

Clicking on add auction button will let you create an auction for that product by filling up auction form containing bid start-end date and time and much more.
After creating auctions, you can view all its entered details.
Add Auctions in Bulk
Add multiple auctions at one go by following these steps:
Product Auction App Backend > Auctions > Add Auctions

Further, on the redirected page, click on the Select Products button.

Now, select the products on which you want to add auction from the product listing pop-up & click on Add. Refer:

Furthermore, fill the add auction form with the required details as usual.
The admin will receive an email once the auction is added successfully to all the selected products.
In case any product auction fails to update, the information will be included in the received email with the reason for failure.
Update, finish and delete Auction in bulk.
Now, if the admin wants to update, delete and finish the auctions in bulk then he can do it from Product Auction App >> Auctions >> select the auctions >> Click on “bulk auctions”
From the bulk actions, you have “Update auction”, “delete auction” and “finish auction” options to select.

Suppose, the admin has clicked on update auction then the admin will enable the update time duration and
update the pricing toggle button to update the new time duration and pricing then click update button below.

To know more:
Auction
This section lists the products with their auction’s start and end date, current bid, and the auction status.
Click ‘view’ to see a detailed structure of product bidding history, bidder details and also the remaining time for auctions in the running phase.
Moreover, on this page, there is a filter using which the admin can sort out auctions based on ‘Have Winners‘ & ‘Purchased‘.
Have Winners: This will sort out a list of all the auctions on the store which have winners.
Purchased: This will list down the auction products which are bought by their winners.

Moreover, by clicking on ‘View’, you will be redirected to a page that contains all the details about the app.

Declare New Winner
In the Product Auction app, you now have the option to declare a new winner even if the bidder has not met the reserve price.
Once the auction ends, you can visit the Auction section & choose the auction to view its winner details.

On the auction detail page, you will get a button “Declare New Winner“. Clicking that button, you can view the list of all the bidders.
Select a bidder whom you want to declare as a winner for that particular auction product.

Clicking the Declare New Winner button, you need to select a bidder & approve him/her as the Auction Winner.

Export Auctions
You can now export all the auctions from the app via CSV. You need to visit the App>>Go to Auctions menu>>In the Bulk Action>>Click Export Auction (in the drop-down menu).
This way, you can export the auction CSV from the app and send it to the email configured in the app.

Select whether you want to export the specifically selected auctions or export auctions based on their end date.

Select the Auction type from drop-down menu.

Click the Proceed button and the Auction CSV gets exported and sent to the admin’s email ID.
Mail Counter
As per our app’s mail policy, you will be charged for the extra mails in case your mail count reaches the threshold limit. You just need to proceed to the payment page and accept the capped amount.
Note:- You will be charged an additional amount only if you use extra emails.
Important Points:-
- The renewal date will be the last date of each month.
- You will be charged for the emails up to the current date.
- The final charges will be counted up to the last date of the month as per the usage.
- Once your mail count reaches the limit of 2000 free mails, you will get charged an additional amount as per the usage per 1000 mails.
- If the merchant is using his/her own SMTP then, no additional charges will be deducted for the additional emails.

Configure Front End
You need to configure your theme to make this Product Auction work. Copy the below-given code and paste it into their respective files as specified.
Product Auction for Shopify: How to Paste Codes in Liquid File
To get Auction displayed on the front end for selected products, follow the below process:
- Click on Online Store.
- Go To Themes.
- Click on the Action button on the top right.

- Select the Edit code button.
Then paste the below-given codes in the files as stated below.
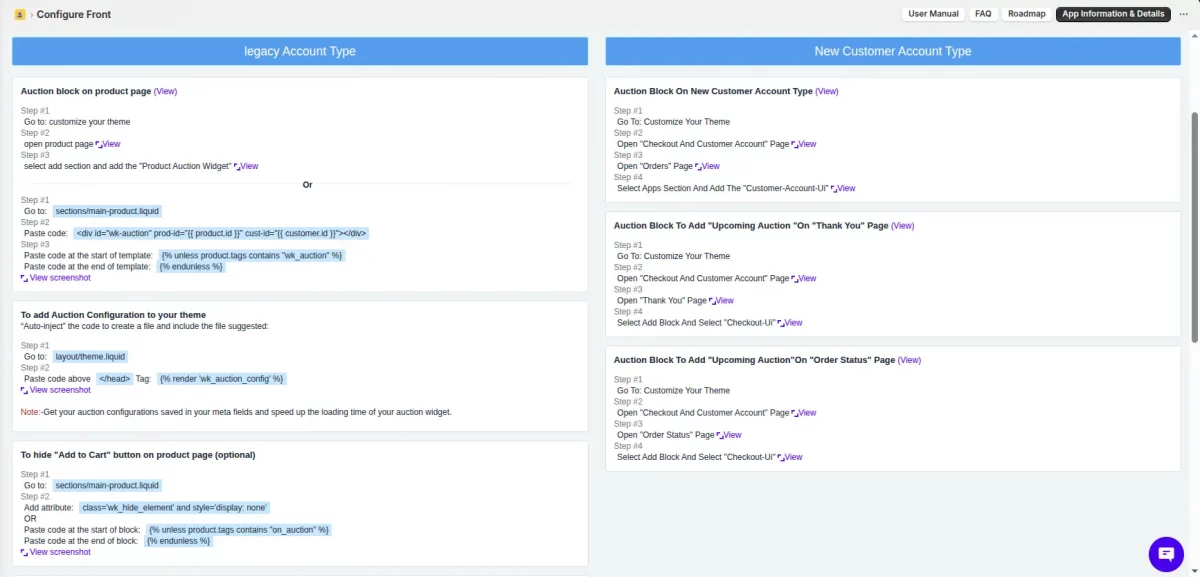
Online Store 2.0 – Instruction Codes
In case you are using Online store 2.0 (Example- Dawn), you need to follow the steps to add the codes.
To show auction block on product page, add the below code into main-product.liquid template file:-
<div id="wk-auction" prod-id="{{ product.id }}" cust-id="{{ customer.id }}"></div>
Paste code at the start of template:-
{% unless product.tags contains "wk_auction" %}
Paste code at the end of template:-
{% endunless %}
To add Auction Configuration to your theme, add the codes to layout/theme.liquid file:-
Add code after <body> tag:
{% render 'wk_auction_config' %}
To hide “Add to Cart” button on product page, add the codes to sections/main-product.liquid file:-
Add attribute: class='wk_hide_element' and style='display: none'
Paste code at the start of block:-
{% unless product.tags contains "on_auction" %}
Paste code at the end of block:-
{% endunless %}
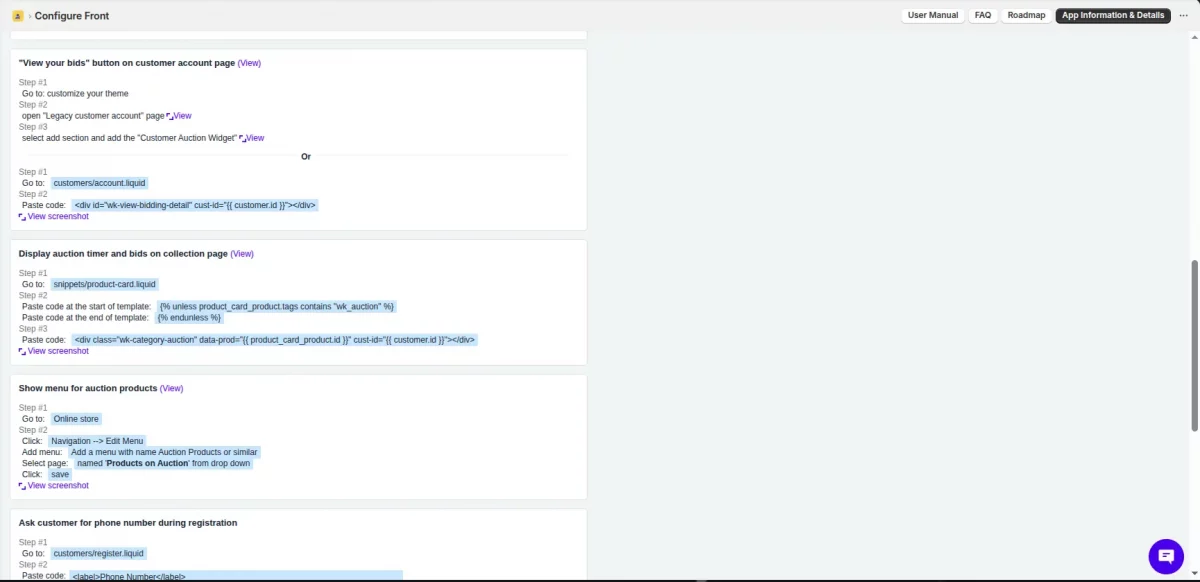
“View your bids” button on customer account page, add the codes to customers/account.liquid file:-
<div id="wk-auction" cust-id="{{ customer.id }}"></div>
Display auction timer and bids on collection page, add codes to snippets/product-card.liquid file:-
Paste code at the start of template:
{% unless product_card_product.tags contains "wk_auction" %}
Paste code at the end of template:-
{% endunless %}
<div class="wk-category-auction" data-prod="{{ product_card_product.id }}" cust-id="{{ customer.id }}"></div>
Bidders
The bidders menu provided the list of all the customers who have placed their bids on the auctions.

Here, we have provided the following options for the admin –
1 -Ban bidder
2 -Remove Card
Ban Bidder
The admin has the option to ban the bidders which he seem unfit to place bids on the auctions set up by them.

Remove Card
The admin has the option to remove the card for the bidders in the case of auto-pay

Initially, only the customer had the option to remove their card from their customer Account page.

However, they could not remove their card while they have placed their bid for a running auction.
The bidders can now request the Admin to remove the card while they have placed their bid in a running action.

Once requested, an e-mail will be sent to the Admin to remove the card.
Current Bid as a meta field
Once you enable this configuration, the Admin’s store will create the current bid for the auctioned product as a metafield.

The Admin can view the meta field on their Shopify store

Once an auction ends the last current bid’s value for the auctioned product will be stored in the metafield.
When the system creates a new auction on a product, it updates the metafield value to the current bid of the new auction.
Purpose – This meta field can be used by the Admin to create a filter on the collection page.
Note – The functionality will exclusively cater to clients who are subscribed to the Shopify Plus plan and have opted for the pro plan of the Product Auction application
Bidder End
Any buyer can bid on a product when the store owner enables the auction, requiring only a buyer account to participate.
The bidder will see this auction window(ref below image) for the product on which the auction is enabled. The bidder will have to log in and start bidding.

A brief history of bids made can be viewed by the bidder by click on a number of bids section just above place my bid.

History of all the bids made by bidders can be viewed by visiting my account section of the eCommerce store.

Clicking on View your bids button on my account page of the customer will make him view the history of bids made along with current bids,
lost bids and won bids in separate dedicated sections.

Important Note
For the products on which store owner wants to enable auction,
the store owner will have to visit that product from Shopify backend’s product section and have to enable auction by clicking on the three dots on the top right.
Once the auction is selected, that product will start getting reflected in the product section of the Product Auction and the auction can be configured from there.
Refer to the image below:

Winning Flow
Winning flow is simple for a product auction product. As soon as the Auction is finished, the Winner is declared automatically based on the admin configuration.
Winner gets the automatic email from admin that “You have Won an Auction. Proceed further and buy this product”. Admin can modify winner email content from configuration.

As soon as the winner clicks on the ‘Buy Now’ button, they are redirected to their customer account page. From there, they can view the details of the auction they’ve won.
The ‘Buy Now’ button is displayed in front of the corresponding auction product, making it easy for the winner to proceed with the purchase.

Once the winner clicks the Buy Now button, the system redirects them to the cart page, where they can proceed with checkout.

Note: Winner Product at Shopify Back-end
When Admin creates the Auction Product, our app creates a product having the name Shopify Auction during initial configuration.
As an admin, you should never delete or move this product to the Draft state, as doing so will cause the Product Auction feature to stop working.
Additionally, this product must remain available on the Online Store sales channel at all times.
Moreover, if the product is not Active or is Disabled, auction winners will encounter an “Out of Stock” error on the checkout page.


The system creates the auction product as a variation but applies the auction widget to the actual product that customers see on the front end.
As a result customer placed the bid on the actual product and received an email if declared as the winner to buy a variation product.
Place bid on behalf of customers
Now, the admin can place bids on behalf of customers using a CSV file.
for this, go to the AUCTIONS section >> click on “Place bid”

Now, you will have the option to upload a CSV file to bid place on behalf of the customer and you will find an option to download a sample CSV file
but go through instructions for the CSV file then upload the CSV file to place a bid.

Restrict Consecutive Bidding
Now merchant can restrict consecutive normal and proxy bidding.
In order to enable this feature you need to navigate in product auction app configuration >> auction confiq >> restrict consecutive bidding

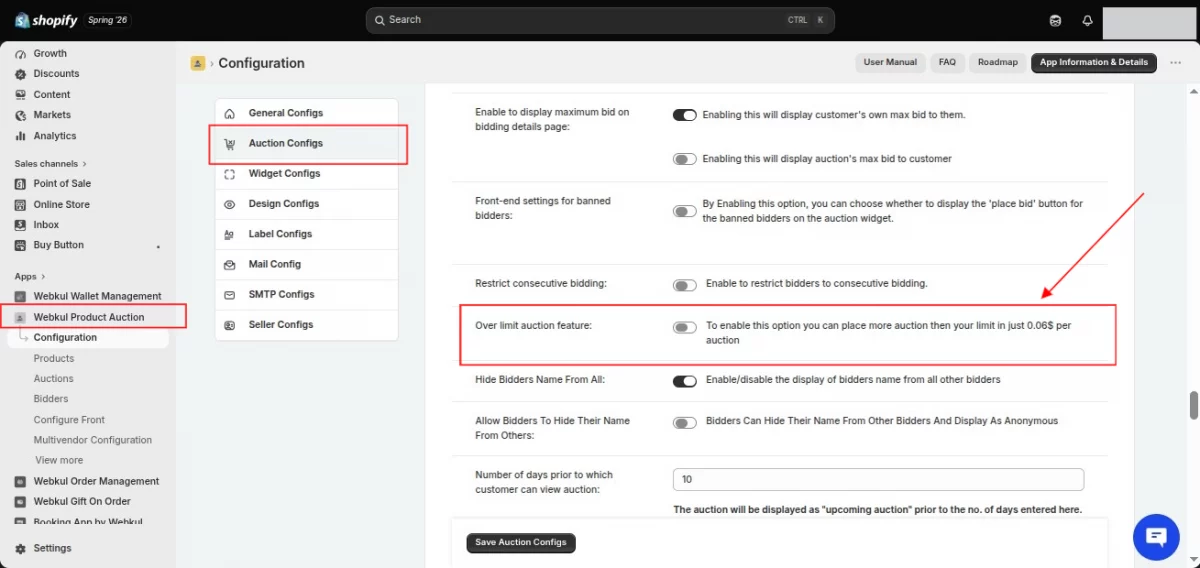
Over limit auction feature
The Product Auction plan includes support for up to 500 live auctions running simultaneously.
If your business requires more than 500 live auctions at the same time, you can easily extend this limit by enabling the Over Limit Auction feature available in the Product Auction app.
Once this feature is enabled, you can create and run more than 500 live auctions on your store.
For every auction beyond the included 500 live auction limit, an additional charge of $0.06 USD per auction will apply.
For example, if you want to run 1,000 live auctions simultaneously, simply enable the Over Limit Auction feature.
The first 500 live auctions are covered under your plan, while the remaining 500 auctions will be billed at $0.06 USD per auction.
How to Enable the Over Limit Auction Feature
To enable this feature, navigate to:
Product Auction Dashboard → Configuration → Auction Configuration → Enable “Over Limit Auction feature”
Reconcile Order
When an auction ends, the highest bidder is declared the winner. If the winning bidder successfully completes the purchase, the Product Auction app will update the status to ‘Purchased’ accordingly.
However, in some cases, even though the product status appears as ‘Purchased’ in the app, the ‘View’ button—which links to the order page—may not be visible in the Winner Details section.
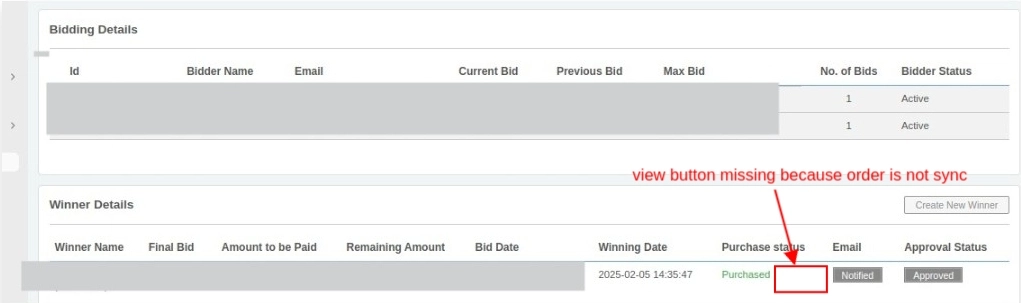
If the ‘View’ button is missing, it indicates that the winner has purchased the product, but the order was not successfully synced with the user’s account or the store.
This may have occurred either because the customer used a different email during checkout, or possibly due to a sync failure resulting from some other issue..
As a result, the ‘Purchased’ status will not appear on the winner’s account, and the ‘Buy Now’ option will still be visible.
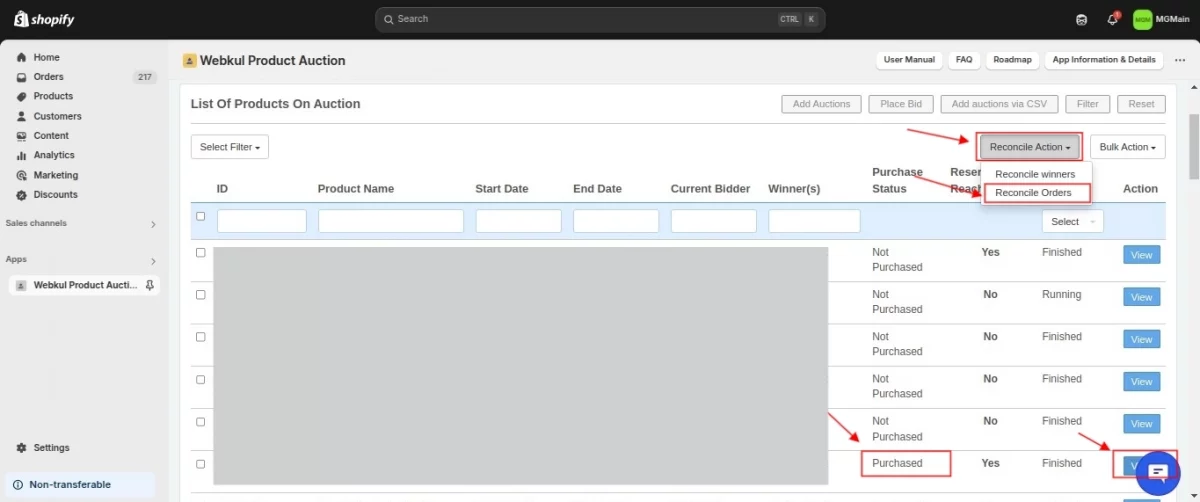
To resolve this issue, we have provided a feature called ‘Reconcile Order’ in the Product Auction app, which helps manually sync the order.
You can access this feature by navigating to:
Product Auction App > Auctions > Reconcile Action > Reconcile Orders

How it works:
When you click on ‘Reconcile Order’, a pop-up will appear where you can select the desired date range.
After clicking ‘Proceed’, the system will attempt to reconcile the order—provided that the product was indeed purchased by the winning bidder.
Once reconciliation is successful:
The product status will be marked as ‘Purchased’.
A ‘View’ button will appear in the Winner Details section. Clicking on this button will redirect you to the corresponding order for the product.
The order will also be reflected as ‘Purchased’ on the customer’s account page.
In addition, you will receive a confirmation email with a CSV file attached.
This file will contain the details of all reconciled orders, including the auction ID, the email of the customer assigned to the order, and the email used during checkout:
Auction ID
Customer Email (Assigned To)
Customer Email (Order With)
This process ensures proper alignment of all auction order records and effectively resolves any discrepancies between auction wins and order creation.
Manage Orders
If you want to manage orders either within the store or outside the store, we provide a ‘Manage Orders’ configuration in the Product Auction app, through which you can select your preferred option.

When you set ‘Manage Orders’ to Within the store, the winning product can be purchased directly through the store using the standard ‘Buy Now’ option.
In this case, Shopify will handle the order processing as usual.
However, when you set ‘Manage Orders’ to Outside of the store, the winner will purchase the product directly from the seller or admin outside of the app.
Please note that this feature is primarily designed for the Multivendor Marketplace.
In this kind of setup, individual sellers typically prefer to auction their own products and, furthermore, manage their sales independently.
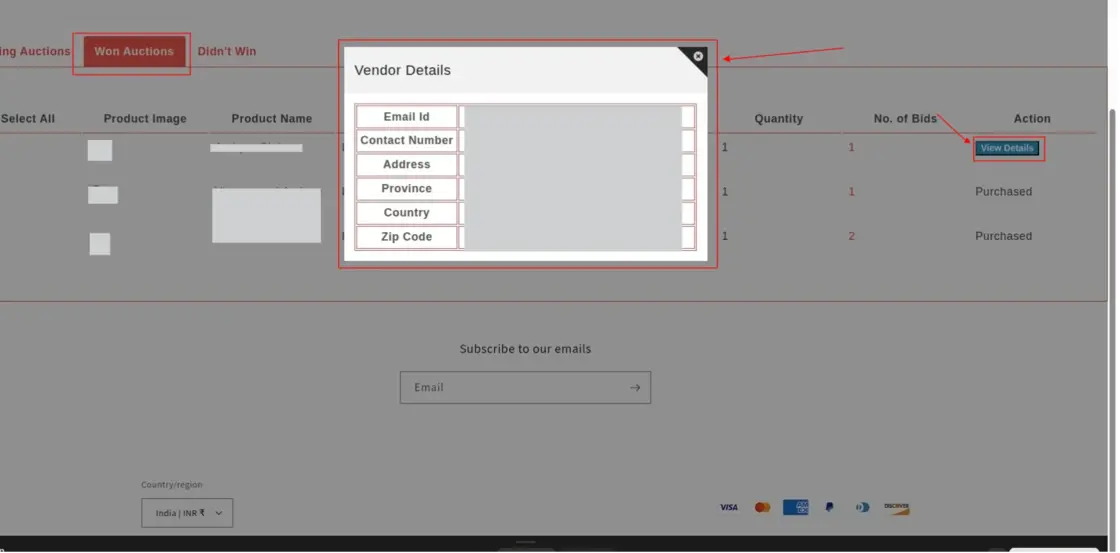
In the ‘Outside of the store’ setup, instead of the ‘Buy Now’ button, the winner (customer) will see a ‘View Details’ button.
When clicked, it will immediately display the vendor’s details—such as name, email, phone number, and address—for quick reference.
We’ve introduced a new feature for upcoming auction products.
With this update, you can now display upcoming auction products on the checkout page. To learn more, check out our detailed blog here.
DEMO
Moreover, you can use the following link to access the demo of this app:
https://auction-10.myshopify.com/pages/demo
Support
If you need any kind of support/consultancy, then please raise a ticket at http://webkul.uvdesk.com/ or drop a mail at [email protected]
Thanks for reading this blog!!! 🙂

8 comments
We have created a ticket on your behalf and our team will soon revert to your queries over it.
Thanks.
This guide will help you paste the code in the liquid files : https://webkul.com/blog/shopify-product-auction-paste-codes-liquid-file/
Still you have any issues, create a ticket on webkul.uvdesk.com
Regards,
Neha
Thank you for writing us,
I would request you to please raise your ticket for this query here on this link below and we will surely resolve your query.
https://webkul.uvdesk.com
Best Regards
Nitika
WEBKUL