Customers love to avail discounts on the products they purchase online.
So, we thought of introducing the discount feature in the Split cart feature app of the Multi-vendor Marketplace app for Shopify.
Using this feature, you can now allow your sellers to add discounts to selected products or overall order. Thus, customers will get discounts on products.
Limitations:
There are few limitations which needs to be kept in mind while using this feature app:
- In case of Draft orders, Discount Box won’t show on checkout page.
- In case product properties are getting added on cart page then,Discount Box won’t show on checkout page.
- If merchants are using Custom option Or Store Pickup feature apps then, Discount Box won’t show on checkout page.
Let’s understand it in detail.
Firstly, the admin needs to activate the Split Cart feature from the feature app section of the app.

Create Discount on Product
ADMIN END CONFIGURATION
Once you enable the Split Cart feature app, you need to follow some simple steps to configure the discount feature in the app. And thus, allow sellers to add discounts to products.
STEP 1
Go to the Configuration menu.
STEP 2
Click the Split Cart Configuration menu and enable the Split Cart feature.

STEP 3
Now, click Allow Seller to Create Discounts on Products and save the settings.

As soon as the admin configures the settings, the sellers will get the option to create discounts on products from their respective seller panels.
SELLER CREATING DISCOUNT ON PRODUCT
Now, the seller needs to follow these simple steps to add discounts to products.
STEP 1
The seller needs to visit the “Product” section of his/her respective seller panel.
STEP 2
Now, select the “Discount” from the drop-down menu.

STEP 3
Click the “Add Discount” button.

STEP 4
Select the discount type (Percentage or Fixed) and enter the discount value, then choose the products to apply it to.
Set the start and end date with time to define the validity period of the discount.
STEP 5
Save Changes.
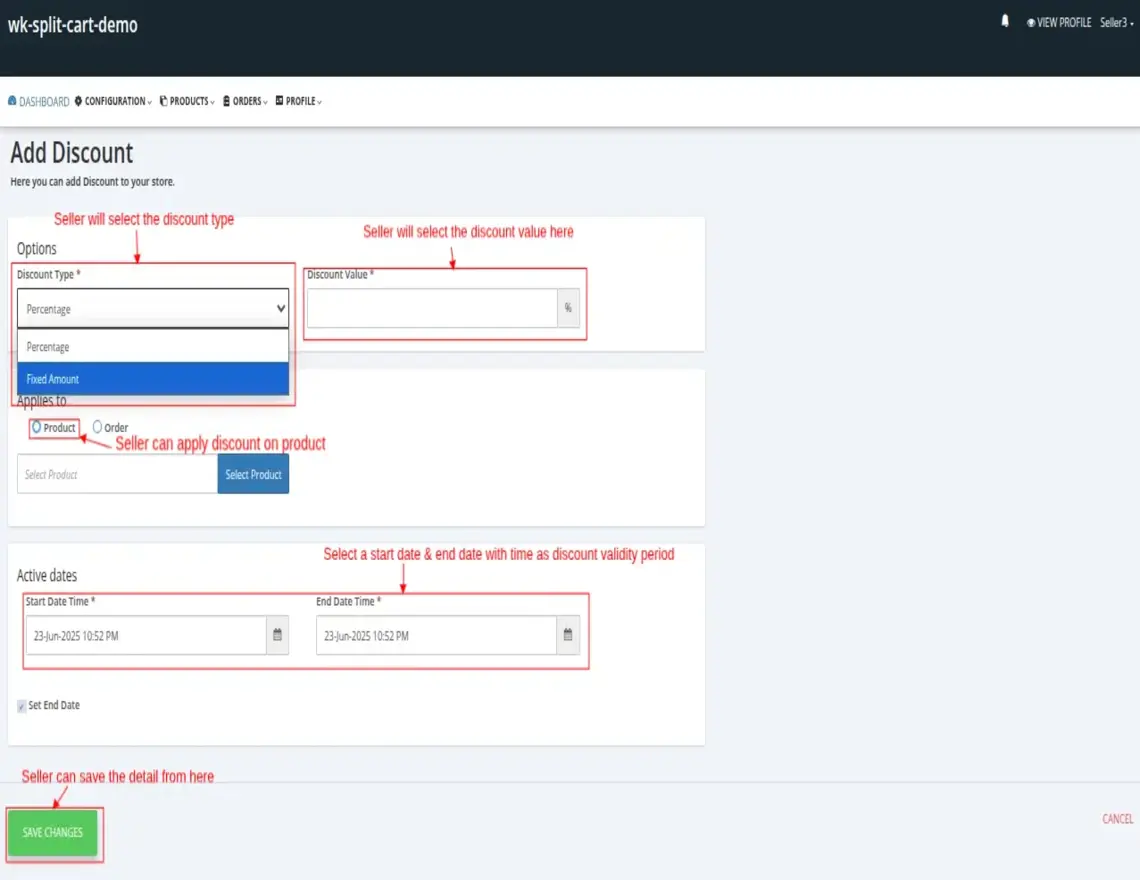
Thus, the seller will get all the discounts added to his store in the Discount section.
Similarly, you can allow sellers to create discounts on the overall order.
Create Discount On Order
The admin needs to follow the below-given steps to create discounts on overall orders.
Configuration: Admin End
STEP 1
Go to the Configuration menu.
STEP 2
Click the Split Cart Configuration menu and enable the Split Cart feature.

STEP 3
Now, click Allow Seller to Create Discounts on Overall Order and save the settings.

As soon as the admin configures the settings, the sellers will get the option to create discounts on products from their respective seller panels.
Let’s see how the seller can create a discount on order.
SELLER CREATING DISCOUNT ON ORDER
Now, the seller needs to follow these simple steps to create discount codes for the overall order.
STEP 1
The seller needs to visit the “Product” section of his/her respective seller panel.
STEP 2
Now, select the “Discount” from the drop-down menu.
STEP 3
Click the “Add Discount” button.
STEP 4
Select the “Discount Type” as Percentage or Fixed & enter “Discount Value”>>Choose the discount applies for “Order“>>Set the start & end date of your discount as validity discount period.
STEP 5
Save Changes.
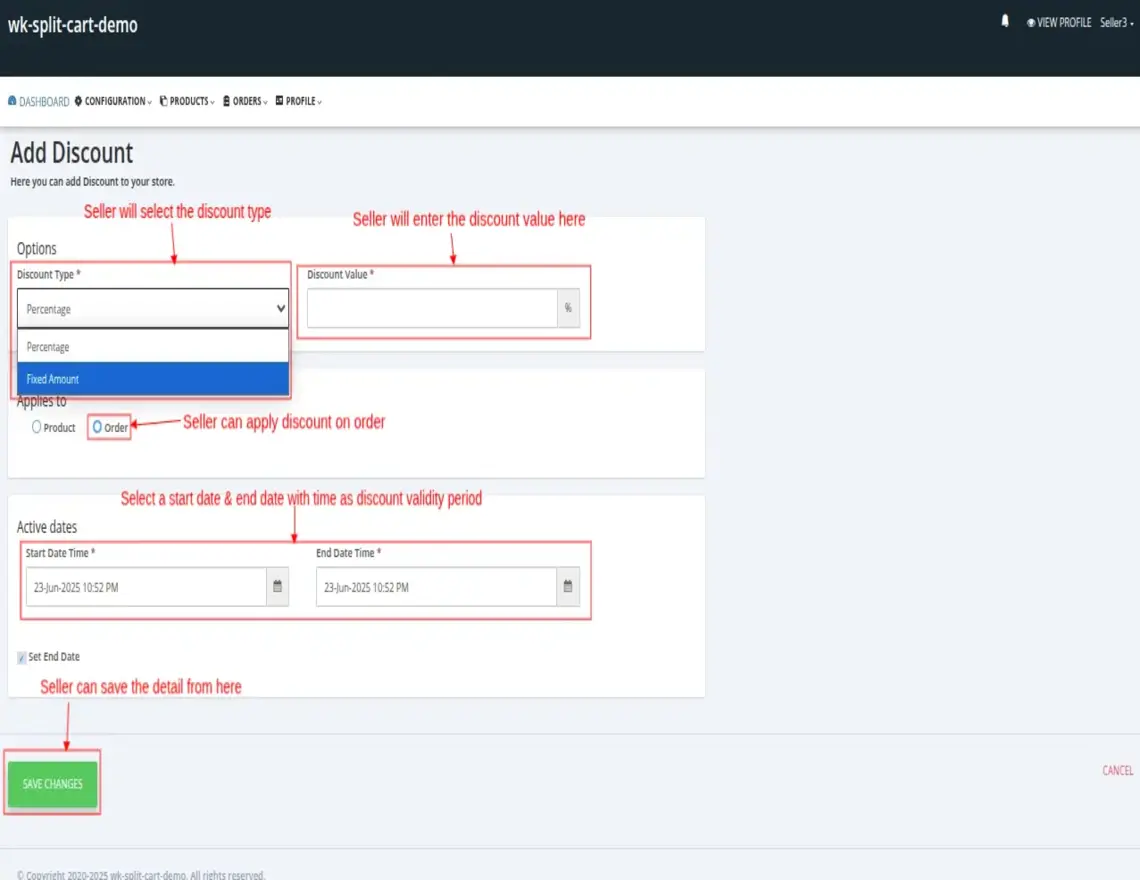
This way, the seller will get all the discount codes added to his store in the Discount section.
A discount is Scheduled If its start date is in the future, Active If it has started but not yet ended, and Expired if both the start and end dates have passed.

Once the seller creates a discount in the app, the same discount will be created in the Shopify admin. Now, the admin will be responsible for how he/she will share the discount code with the customer.

The customer will apply discount codes at the time of checkout.

Demo
You can refer the below-given link to check the Demo of Split Cart Feature App: https://wk-split-cart-demo.myshopify.com/pages/split-cart-vendor-wise
Need Help?
Furthermore, if you have any queries/issues then please raise a ticket at http://webkul.uvdesk.com/ . You can also drop a mail at [email protected].

Be the first to comment.