Introduction
Magento 2 POS Barcode Inventory Label Print is an add-on of Magento 2 POS Extension, which can help the store owner create labels/stickers for products.
A Zebra Barcode Printer is used for printing the stickers.
These stickers can be attached to the respective physical products in the store. The sticker contains a barcode that allows Unique identification of the product in the store.
The store owner can easily select the information that is required to be displayed on the sticker and in which order the information will appear.
So, these stickers are useful for the sales agents as they can now easily scan through the barcode and add the product to the cart.
Here, the Zebra Barcode Printer works on the QZ Tray program which must be installed in your system.
The QZ Tray is a cross-browser and cross-platform plugin meant for printing with the Zebra Barcode Printer.
So, it is like any other drive-based program that builds a communication link between hardware and system operating system.
If you want to print the Logo Status, Rule Character, and Logo Image over the order invoice via thermal printer. You can check the POS Thermal Printer.
Check the working of the plugin in the video mentioned below –
Features
- It allows the admin and sales agents to manage the inventory in an efficient way.
- The admin can customize the Product slip as per requirement.
- The Product Slip displays other information related to the product as set by the admin like the product attribute, product price, product name, and date.
- The admin can sort the order of the content appearing in the slip.
- The Product slip or label can be printed with the Zebra Barcode Printer or can be saved as PDF and attached to the Product.
- The admin can print the slips or labels individually or in bulk as per the requirement.
- The module supports all the products of default Magento.
Pre- Requisite Of The Barcode Inventory Label Print
The must-have components that make the module functional are-
- Zebra Barcode Printer is compulsory for the printing of the slip or label.
- QZ Tray program should be downloaded into the system for the printer to work.
- The module is an add-on to Magento 2 POS Extension, so it must be with you.
Installation
Customers will get a zip folder and they have to extract the contents of this zip folder on their system.
Then the extracted folder has src folder, inside the src folder you have the app folder. You need to transfer this app folder into the Magento 2 root directory on the server as shown below.

After the successful installation, you have to run the command on Magento2 root directory-
php bin/magento setup:upgrade
Now, run this command in the Magento 2 Root-
php bin/magento setup:di:compile
Also, run this command into the Magento2 Root
php bin/magento setup:static-content:deploy
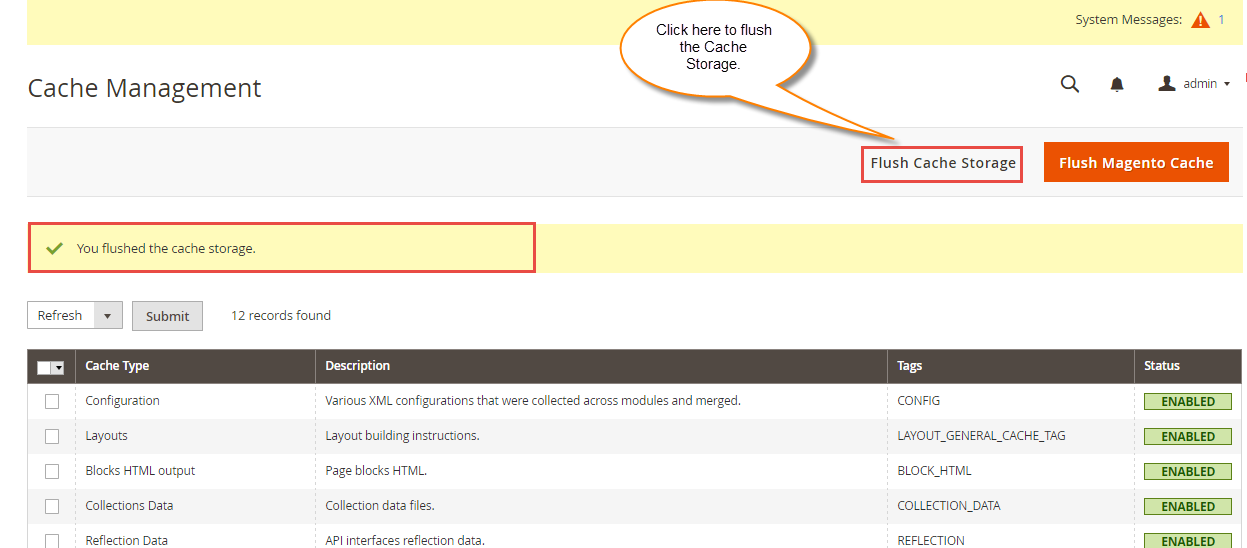
Now, after running the commands, you have to flush the cache from the Magento admin panel by navigating through->System->Cache management as shown below.
Language Translation-Magento 2 Point of Sale
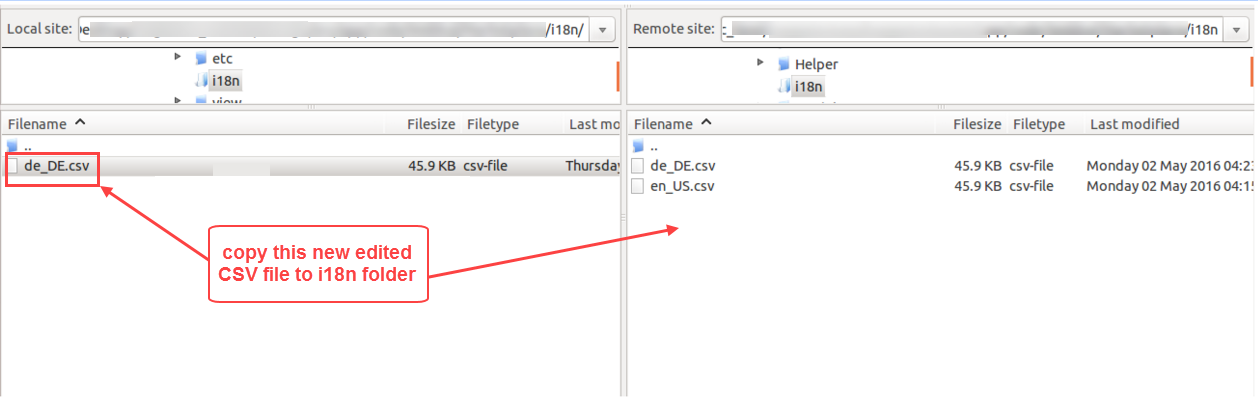
For module translation, navigate to the following path in your system src/app/code/Webkul/PosZebraPrint/i18n.
Open the file name en_US.CSV for editing as shown in the below screenshot:

Then replace the words after the comma(,) on the right in the file with your translated words.

After editing and translating the CSV file, the users need to save the translated file name according to their region language and country code such as – de_DE.CSV.
Followed by uploading the translated file to the same folder from where the users have obtained it.
Thus, module translation is completed.
Configuration
Hence, post successful installation of the module, the admin can configure it as per requirement for this admin has two options.
POS>POS Barcode Label

or
Store>Configuration>POS Barcode Label.
 So, now the admin will alter the module as per requirement by entering the following details

General Settings-
- Display Product Name- The admin can select if the product label will be visible on the label or not.
- Product Name Sort Order- The admin can set an order in which the Product Name will appear on the label.
- Display Price- The admin can select if the price of the product will be visible on the label.
- Display Date- The admin can allow the display of the date on the label.
Attribute Settings-
- Display Barcode Text- The admin can hide or display the barcode text from the label of the product.
- Barcode Sort Order- The admin can enter the order number of the barcode as it will appear on the label.
- Display Product Custom Attribute- The admin can select to display or hide the Product attribute on the label.
- Select Product Attribute- Here, the admin can select the product attributes that will be visible on the product label.
- Custom Attribute Sort Order- The admin can even set the order in which the attribute will appear on the label.
Print to PDF BarCode Label Settings
- Label Height:- The admin can set the height of the label.
- Label Width:- The admin can set the width of the label.
Zebra Print Barcode Label Adjustment Settings-
- Top Adjustment:- The admin can adjust the zebra print from the top.
- Left Adjustment:- The admin can adjust the zebra print from the left.
POS Barcode Product Label
Hence, the admin can now go to the Product Page as in default Magento. Here, the admin can easily select the products for which the label needs to be printed.
The admin can Print the Label Individually or in Bulk as per requirement.
Individual Label Print
Here, the product for which a barcode is required could be selected individually.

Now, after product selection, the admin can select an Action that is ‘Print Barcode‘.

Henceforth, the admin can Preview all the barcode slips or labels, which could be printed by clicking on Print to Zebra Printer or Print to PDF.
Thus, the POS Barcode slip will have details like the organization, barcode, and other product details.

Multiple Label Print-
However, the store owner can select multiple products on the Product Collection Page and select the action as ‘Print Barcode‘.

Post previewing the Barcodes the store owner can again click on ‘Print to Zebra Printer’ or ‘Print to PDF’.

Once the Printing is done the admin can add the slips easily to the products.
So, that’s all for Magento 2 POS Barcode Inventory Label Print module. Still, have any issues please feel free to add a ticket at https://webkul.uvdesk.com/
Current Product Version - 5.0.1
Supported Framework Version - Magento 2.0.x, 2.1.x, 2.2.x,2.3.x, 2.4.x

2 comments
Hello Anubhav,
The hardware connectivity depends on the device. If the device supports the Bluetooth printer, barcode reader, and RFID card reader then the POS will also support the same.
The recommended printer is Zebra Barcode Printer. For more information please email us at [email protected] so that we can assist you accordingly.
Thanks,
Webkul Team.