Magento Marketplace Mass Upload Products add-on is useful for bulk/mass upload of products. Using this Marketplace add-on, Seller can upload the bulk products using CSV/XML/XLS file and even the admin can bulk upload into Seller store.
Using this add-on, the admin and vendors can upload mass/bulk products (simple, configurable, virtual & downloadable).
**Note:
- For uploading the images, you have to put all the images in a separate folder and then archive that folder and then you can upload that zip folder for uploading images.
- This module is an add-on of Marketplace Module. To use this module you must have installed first the Marketplace Module.
- For uploading products with custom attributes, you need to install Custom Attribute Marketplace Add-On
- For uploading products with custom options, you need to install Custom Option Marketplace Add-On
- This Module is also available for Magento2.
Features of Magento MarketPlace Mass Upload
- Product can be upload by CSV / XML / XLS files.
- The seller can add bulk product.
- Admin can add bulk products for individual Seller.
- This module is fully dynamic.
- Image attachment with the product within CSV/XML/XLS.
- Multi-Lingual support / All language working including RTL.
- The code is fully open & you can customize it according to your need.
- Compatible with Multistore.
- If there is an error in the CSV / XML / XLS file, then products will not be uploaded and hence seller/admin will come to know about the error.
- Export Products through CSV via Seller Panel Product Type Wise.
- Mass Update via Product SKU.
- Each Attribute has a Different Column.
- Data Profile Creation feature for Both Admin and Sellers.
MARKETPLACE MOBILE APP
Mobikul Marketplace: Mobikul Marketplace converts your Magento Marketplace store into a mobile app. Your customers can easily purchase products on the go. They don’t need to have a laptop or desktop, they can easily explore your store through their smartphones. It will not only benefit the store owner and customer it will benefit the sellers too. Sellers can see their dashboard, order history and can contact the admin through the mobile app. So what are you waiting for, you must now have a Mobikul marketplace to be a step ahead.
Highlighted Features:
- Seller Profile.
- Seller Dashboard.
- Seller Order History.
- Marketplace Landing Page Where Popular sellers and Description about the marketplace is mentioned.
Note: The MOBIKUL Marketplace Mobile app is a different module. You have to install it separately.
Installation of Magento MarketPlace Mass Upload
Installation of the module is very easy. You need to move the app, media and skin folder into the Magento root directory.

After moving both the folder flush the cache from Magento admin module. Under System > Cache Management

After those primary step, you just need to configure the module.
Language translation of Magento MarketPlace Mass Upload
After the module installation, the user will unzip the folder and click on src folder. Inside that folder, you will find app folder. Click on the app folder and you will get locale and inside that, you will find the language folder in the English language as en_US. Now follow the same path and open the locale folder where you have installed the Magento Marketplace add-on and go inside the locale folder and create a new folder and name with the language for which you want to convert your module content. Now edit the Webkul_Mpmassuploadaddons.csv and then upload to your server inside the locale folder.
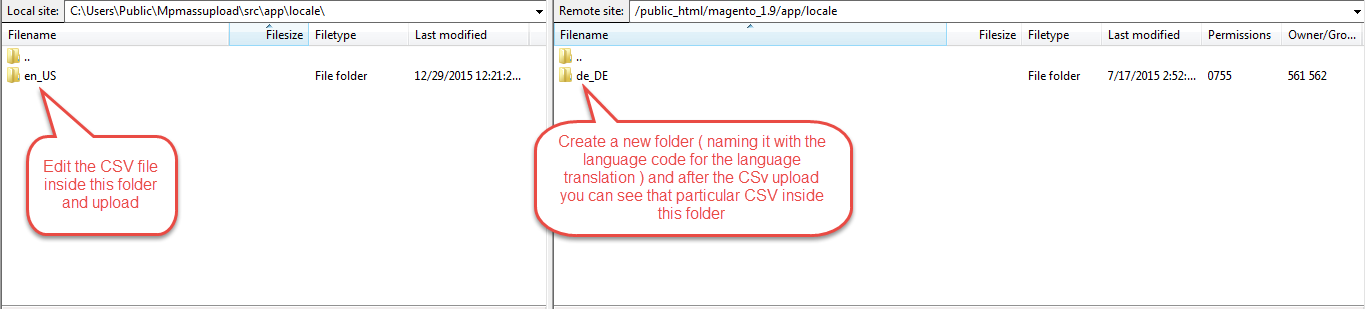
Before uploading the CSV file, open and edit it with the translated keywords. Please check the below image for the better understanding.

Front-End Management of Marketplace Mass Upload
After the installation of the module, the vendor can find two options under the Marketplace block –
- Mass Upload Product
- Mass Upload Data Flow Profile.
Mass Upload Data Flow Profile:
Here, the vendors can create any number of profiles and can select the associated Attribute Set that will be applicable for the created profile names. This profile is to be selected while Mass Uploading the products from the vendor account. To create a profile, enter the name for the profile and select the attribute set name applicable for the profile name and then click the “Save Profile” button to save.
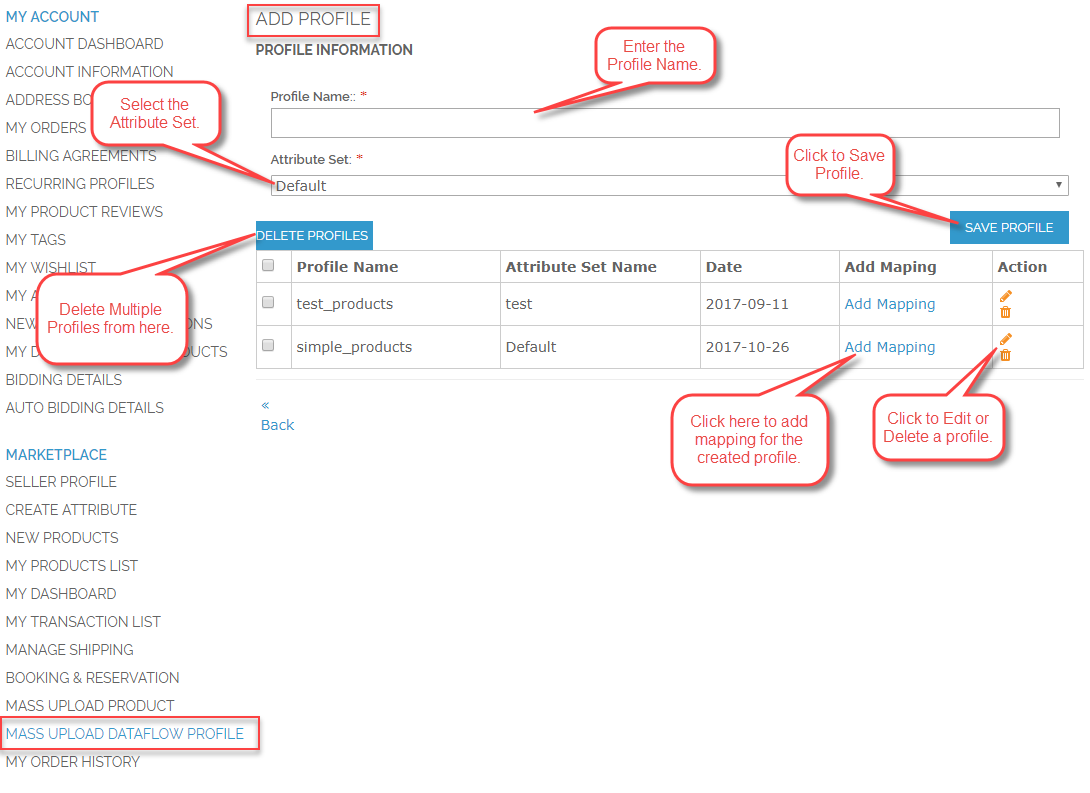
Now after creating the profile, the seller has to add the Mapping for the profile. Seller will click the “Add Mapping” link and a new page will open where the seller can map the Magento Attributes to the File Attributes. The seller will be able to use these file attributes in place of the Magento Attributes in the CSV file columns.
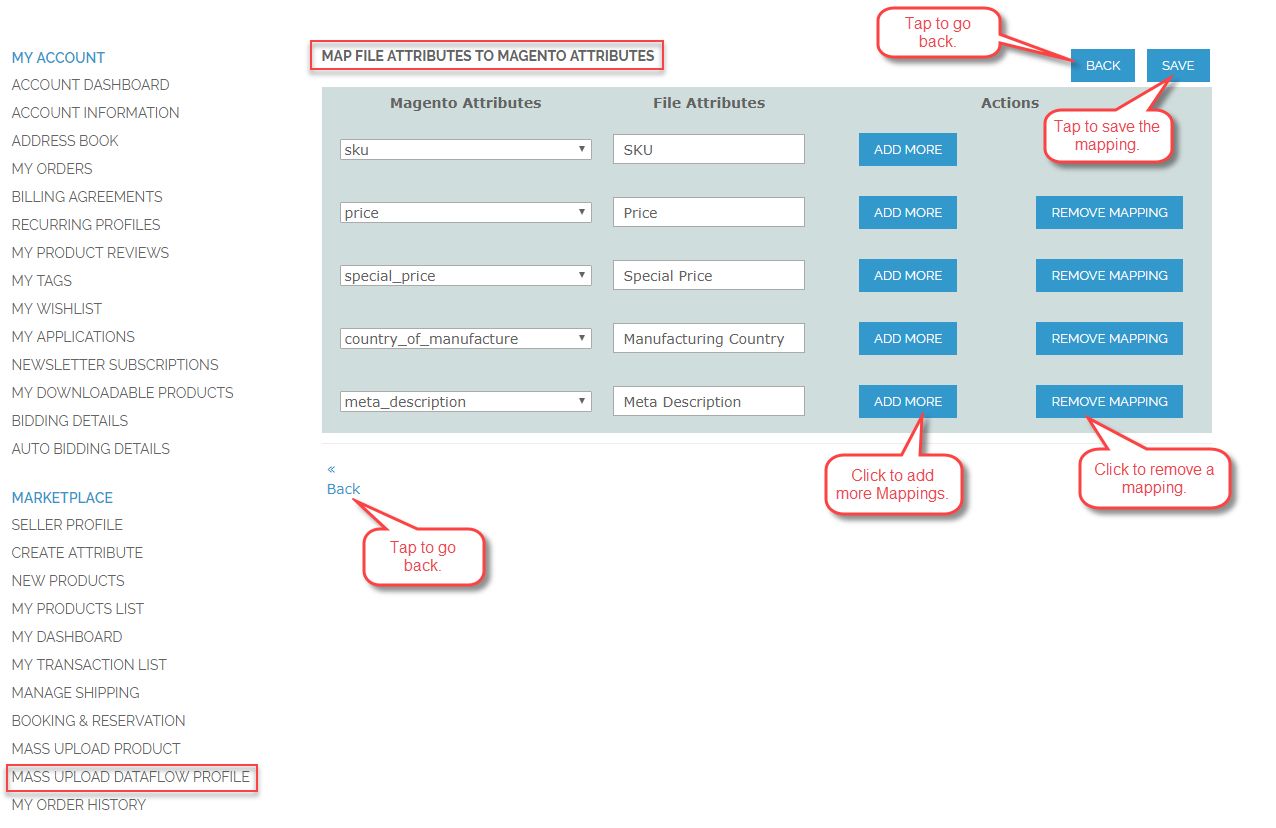
After creating the mappings, when the seller downloads the sample CSV file for uploading his products, he can change the CSV file column names corresponding to the File attributes.
For Example –
The sample CSV downloaded by the seller for the Simple Products is shown below.

In this CSV, the seller can now easily change the column names that correspond to the file attributes for the Magento Attributes as shown below in the snapshot.

Mass Upload Product:
Here, the vendor can select any type of sample file (CSV/XML/XLS) from the drop-down as per the requirement.
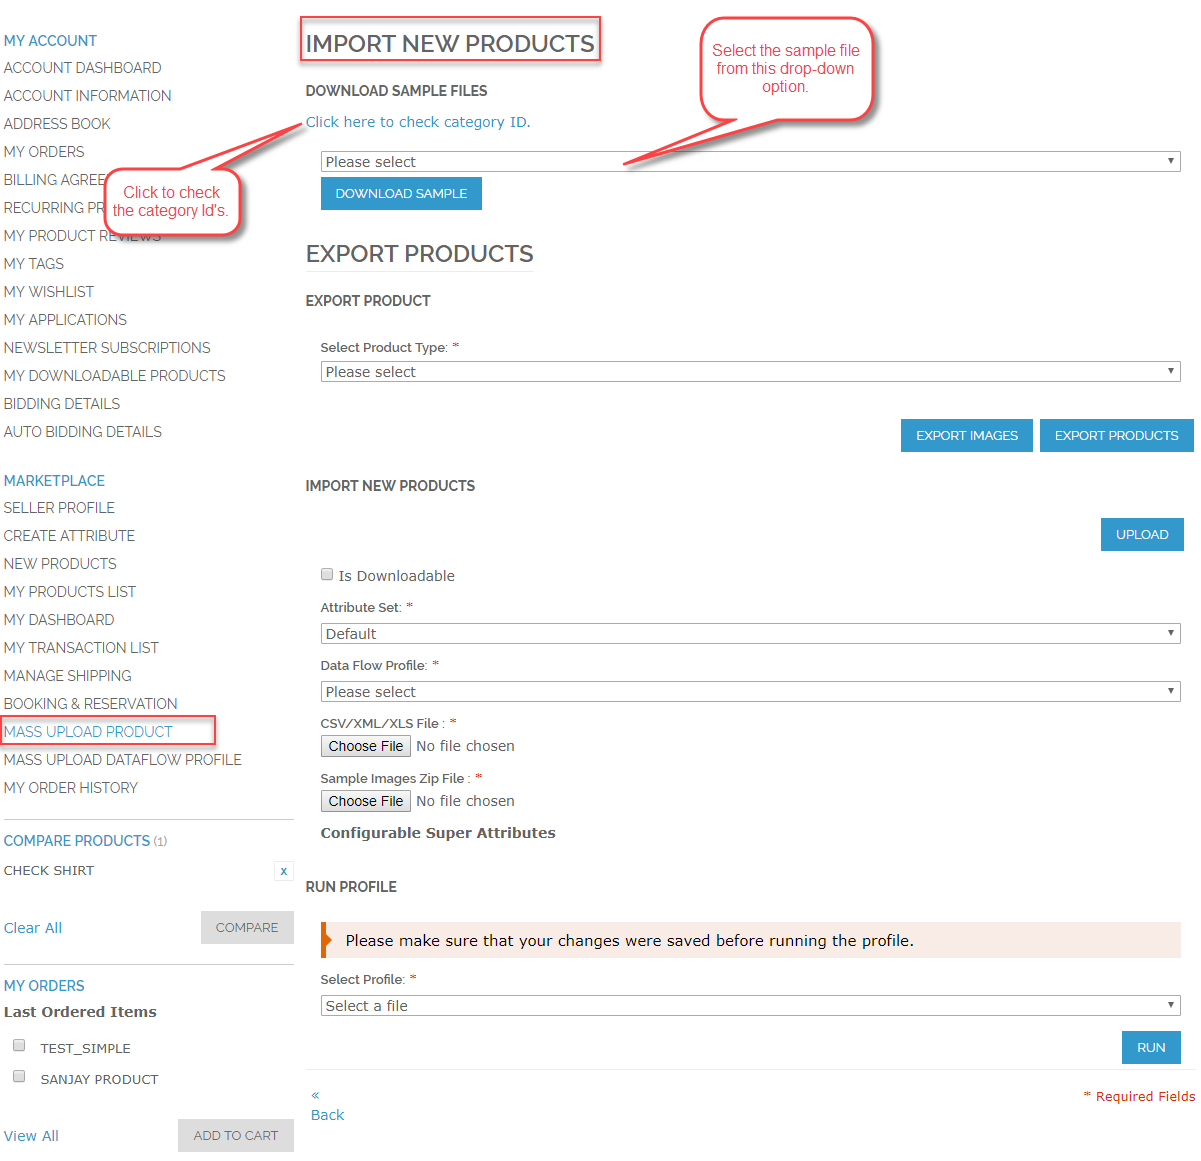
The sample files will be displayed like the image below.

After selecting and downloading the sample file, you can see the below page with other options.

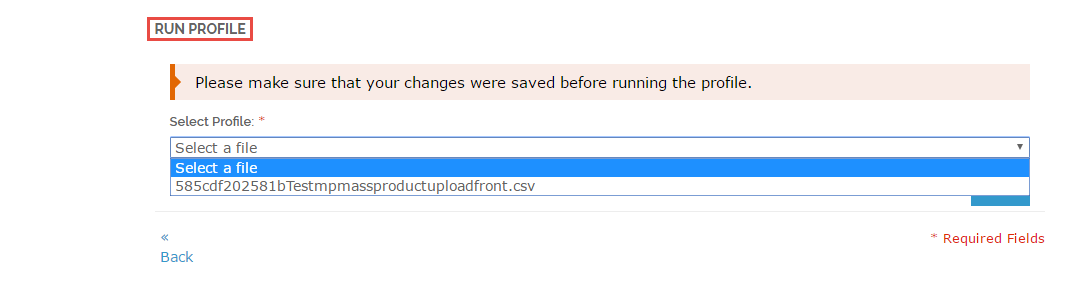
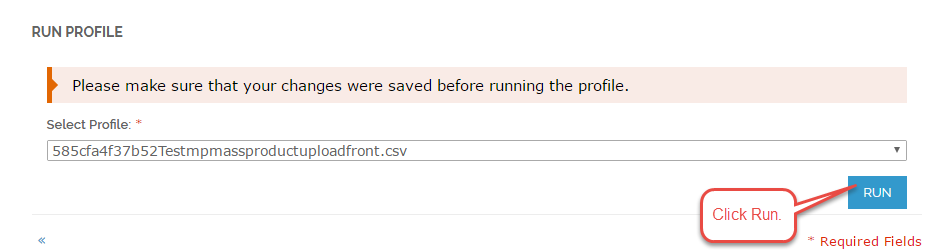
After selecting the Data Flow Profile, Uploading the Product File & Image Zip and clicking the Upload button, a profile will be created. Select the profile from the drop-down and click on the “Run” button.
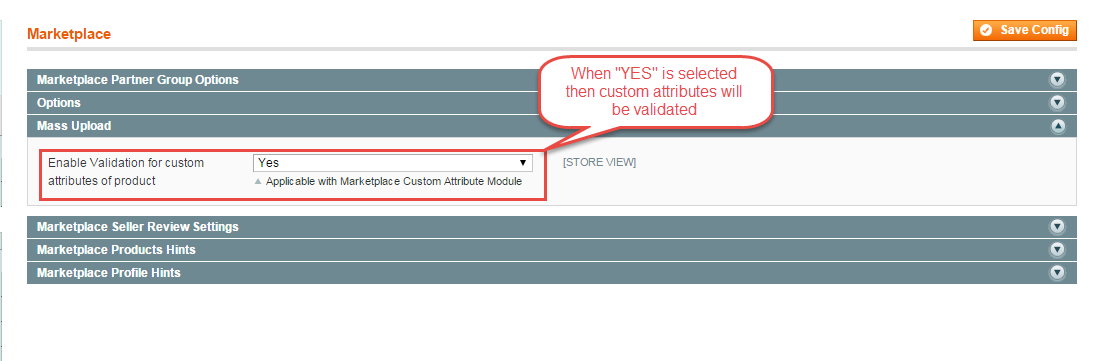
From the backend, the admin will do the setting for the validation of the Custom Attributes as per the image below.
The seller can export the Images and the Products at any time by clicking the Export Images & Export Products option button available on the mass upload page.

The seller needs to select the product type from the drop-down option and then the seller can click on the “Export Images” button to export the selected product type images as a zip file. Similarly, the seller will select the product type and then click the “Export Products” to download the selected product type as a CSV.
How to upload mass product with custom attributes –
You can see a “Column Name for Custom Attribute”, this feature will only be available if you have installed Magento Marketplace Custom Attributes
After installing Marketplace Custom Attribute, you can see an additional field for the attributes. Only those additional attributes will be displayed in the CSV / XML / XLS files, which will be selected by the user. Also, each attribute has a separate column as shown in the image below.

Here the seller can see various options like selecting “Attribute Set”, “option for uploading CSV files”, “option for uploading images” and if “Downloadable Product” option is selected then a new option appears for uploading Downloadable zip file
NOTE: In the following screenshots, “Column for Custom Attribute” will not appear as we have removed this module from the back-end.
We will show you how to upload mass products for Simple, Configurable, Virtual & Downloadable without installing the Marketplace Custom Attribute module.
The seller can add the custom option by installing the add-on called Magento Marketplace Custom Option
Now we will see how to upload product through CSV / XML / XLS files. If you are having two categories – P1 & P2 and if you are uploading product via CSV file, then the product will be added to both the categories P1 & P2.
Seller will select the attribute set, Data flow profile name, upload the CSV/XML/XLS file and images zip files and then click on the upload button.

Now, the vendor will select the created profile and then click on the “Run” option. You can see the screenshot for the same.
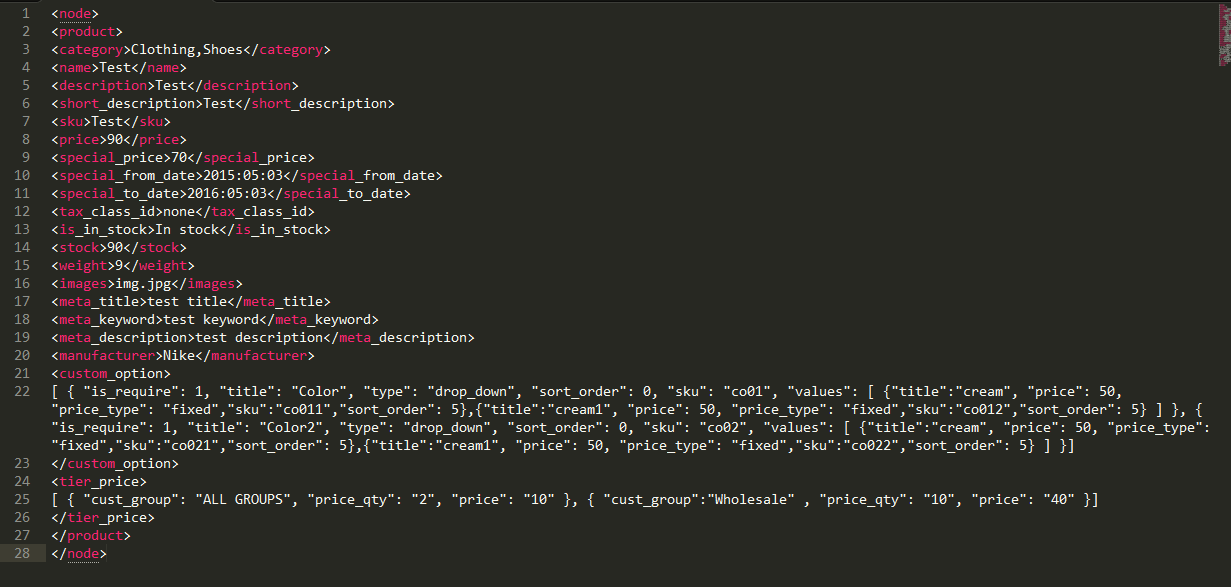
CSV / XLS file for the simple products-

XML file for the simple products-
When profile run will be successful then you can see this message:

Now the seller can see the uploaded products under the option called “My Product List“.

Seller will select the attribute set, Data flow profile name, upload the CSV / XML /XLS file and images zip files and then click on the upload button as shown below in the snapshot.
You can also see “Configurable Super Attributes“, which are for the configurable product. In our case, the “Configurable Super Attributes” is Shoe_Size.

After this, a profile will be created like as shown in the screen below. Seller will select that profile and then click on the “Run” option.
CSV / XLS for Configurable product

XML for Configurable product

You can also see the message when the profile runs successfully.

Now the seller can see the uploaded products under the option called “My Product List“.

For uploading downloadable product, the seller will first tick the checkbox for the downloadable product as shown in the screen below:
Seller will then select the attribute set, Data flow profile, then upload the CSV/XML/XLS file, images zip files, Downloadable Product Zip File and then click on the upload button.

After this, a profile will be created like as shown in the screen below. Seller will select that profile and then click on the “Run” option. You can see the screenshot for the same.

CSV / XLS for Downloadable Product

XML for Downloadable Product

When the profile runs successfully then you will see this message:

Now the vendor can see the uploaded products under the option called “My Product List“.

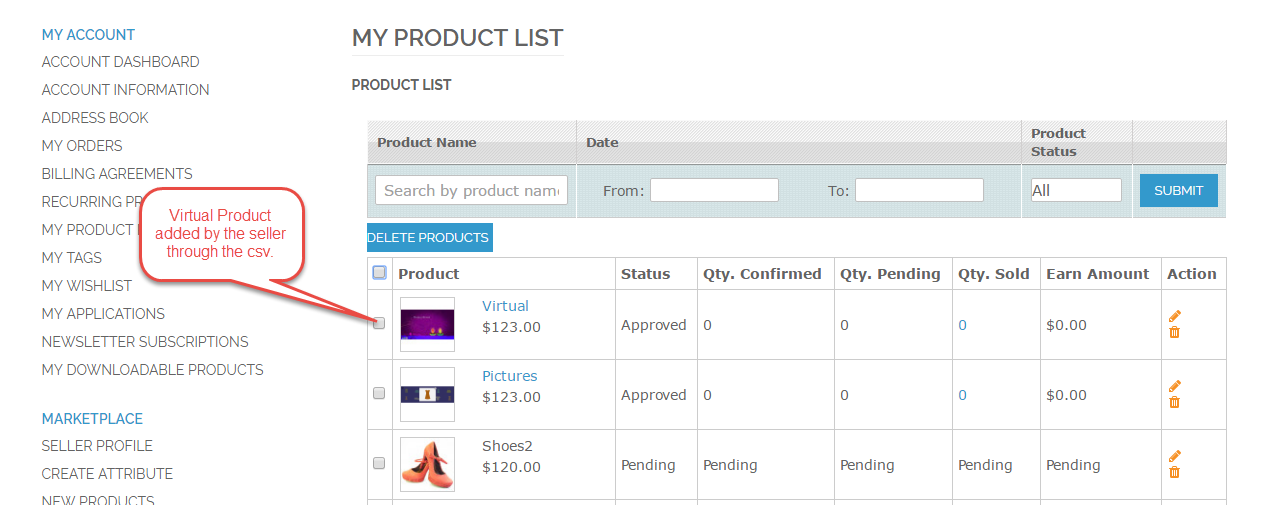
For uploading virtual product, the vendor will select the attribute set, Data flow profile, then upload the CSV / XML /XLS file and images zip files and then click on the upload button.

After this, a profile will be created like the screen below. The vendor will select that profile and then click on the “Run” option.

When the profile runs successfully, you can see the message.

CSV / XLS for Virtual Products

XML for Virtual Products

Now the vendor can see the uploaded products under the option called “My Product List“.
NOTE: If there is any type of error in the file then you will get an error message at the top of the mass upload page. By this error detection technique, the uploader can see the error and can rectify those error.
The product will not be uploaded if there is any error. So this module provides 100% error free mass upload. You can see one of the error messages below:

Admin Management of Magento MarketPlace Mass Upload
Admin can also mass upload the products for the individual vendor. Under Marketplace Management > Manage Mass Upload. From the backend, admin can upload any product (simple, virtual, downloadable, configurable).
Step 1:
Admin will select the Vendor for which the admin wants to upload the product, then select the Attribute set, select the Data flow profile, upload the CSV / XML / XLS file and Image ZIP file, and lastly, click the Save button.

Step 2:
Now, go to the Run Profile tab and select the profile from the drop-down and tap the Run Profile in Popup button as per the snapshot below.
**Note: Please make sure to save your changes in step 1.

After clicking the Run Profile in Popup button, you can also see Profile running and executing like in the image shown below

You can see in the image below that admin has uploaded a Simple product called “Heels” for the seller, John Doe. Like this way, even admin can upload mass products (simple, configurable, virtual, downloadable) from the back-end for any of its sellers.

That’s all for the base Magento Marketplace Mass Upload Products Module, still have any issue feel free to add a ticket and let us know your views to make the module better https://webkul.uvdesk.com/en/
Current Product Version - 1.0.0
Supported Framework Version - 1.6.x.x, 1.7.x.x, 1.8.x.x, 1.9.x.x

function not supporting