Bagisto Marketplace Store Locator lets the store admin and every marketplace seller publish their physical branches as pickup stores. Shoppers then find the nearest one and collect their order, instead of waiting for a courier.
Every Marketplace Store Locator branch carries its own coordinates, contact details, opening hours and holiday closures. Checkout then offers each branch within the configured radius as its own shipping method. The order keeps the branch the customer picked, for both the shopper and the admin to see.
Please Note – This extension runs on top of the Laravel Multi Vendor Marketplace. Its admin menu is registered only while the Marketplace module is switched on, so install and enable Marketplace first. This release is built for Bagisto v2.4.10 and Marketplace v2.4.10.
Marketplace Store Locator Features
- Admin can enable or disable the whole extension with a single Status toggle.
- Create unlimited pickup stores, each with a name, description, status, latitude and longitude.
- A “Get current location lat long” button fills the coordinates straight from the browser’s geolocation.
- Three opening modes per store: Open 24×7, custom days with same timing, or custom days with custom timing.
- Full contact block and postal address per store: person name, email, mobile, fax, country, state, city, street and postal code.
- Holiday calendar covering a single day or an inclusive date range.
- A store observing an enabled holiday today drops out of the customer’s search results and out of checkout automatically.
- Assign products to stores from either direction — from the store’s own product list, or from the Assign Pickup Locators panel on the product edit screen.
- Variants follow their parent product, so assigning a configurable product covers every variant.
- Marketplace sellers manage their own stores and holidays from the seller panel, and each seller sees only its own records.
Storefront, Checkout and Order Features
- Storefront finder page that lists branches nearest first and tags the closest one.
- The module calculates distances offline with the haversine formula, so ranking needs no third-party API call.
- Optional Google map on the finder — add a Maps JavaScript API key and results also plot as markers with an info window.
- Browser geolocation or manual latitude and longitude entry, remembered for the session and clearable at any time.
- “Get directions” on every result opens the route in Google Maps.
- Store Pickup shipping method offering one rate per in-range branch, each labelled with the store name, address and distance.
- Optional handling fee, charged as a fixed amount per order or as a percentage of the cart sub total.
- Search radius configurable from 1 to 50 kilometres, defaulting to 25.
- Dedicated Pickup Store Orders grid in the admin panel, with searching, filtering and sorting.
- The chosen branch, its address, contact and opening hours appear on the customer’s order view and the admin order view.
- Order history survives store deletion — the order keeps the store description frozen onto it at checkout.
- Separate admin and seller ACL entries for every action, so access can be granted per role.
- Mass delete and mass status update on the store and holiday grids.
- Console commands for installation, configuration reset and demo data seeding.
- Translated into all 22 Bagisto locales, covering the admin, seller and storefront screens.
Installation: Bagisto Marketplace Store Locator
Unzip the respective extension zip and then merge the “packages” folder into the project root directory.
Goto bootstrap/providers.php file and add following line under ‘providers’.
return [
    Webkul\MpStoreLocator\Providers\MpStoreLocatorServiceProvider::class,
]
Next, goto composer.json file and add following line under ‘psr-4’
"Webkul\\MpStoreLocator\\": "packages/Webkul/MpStoreLocator/src"
Run the commands below to complete the setup:
composer dump-autoload
php artisan mp-store-locator:install
The Marketplace Store Locator install command runs the module migrations and seeds the default configuration. It also publishes the module assets and clears the caches. No separate publish or optimize step is needed.
Admin Configuration:
Once you successfully execute the commands, you will see the Marketplace Store Locator settings by navigating through Configure → Store Locator → Settings → Store Pickup.
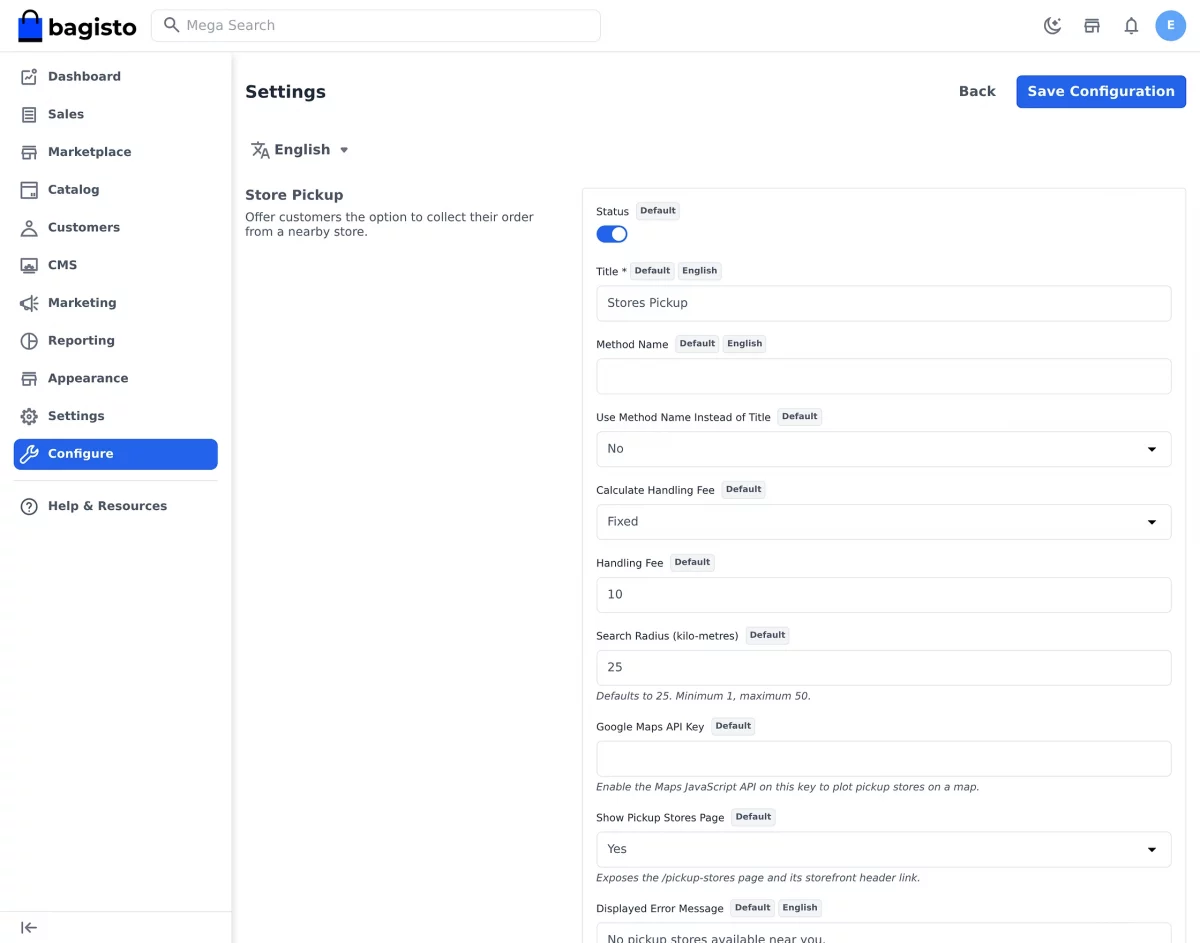
Marketplace Store Locator Settings
Here, the store admin will be able to configure the initial Marketplace Store Locator settings –
- Status – Turn the module on or off. While it is off, the admin menu, the shipping method and the storefront page all disappear.
- Title – The carrier name shown to customers at checkout. It is locale based, so each language can carry its own wording.
- Method Name – An alternative label for the individual pickup rates.
- Use Method Name Instead of Title – Set it to Yes and the rates are labelled with the Method Name; leave it at No and they use the Title.
- Calculate Handling Fee – Choose Fixed for a flat charge per order, or Percent to take a share of the cart sub total.
- Handling Fee – The number itself. Leave it at zero and collection is free.
- Search Radius (kilo-metres) – How far the finder looks. Values run from 1 to 50, and the module falls back to 25 when the field is empty.
- Google Maps API Key – Enable the Maps JavaScript API on this key to plot the pickup stores on a map. Without a key the module simply omits the map and keeps the store list working.
- Show Pickup Stores Page – Exposes the
/pickup-storespage and its storefront header link.
Six more fields appear on the configuration screen. They are Displayed Error Message, Ship to Allowed Countries, Ship to Applicable Countries, Enable Address Search, Enable Scheduling Emails and Order Scheduling Template. The Distance Provider and Google Distance Provider groups sit there too. The current release does not read any of them. They are retained so values saved by earlier versions survive an upgrade. The nearest store is always resolved offline.
After setting all configuration, click on Save Configuration button.
Manage Store – Admin Backend
Once Marketplace Store Locator is enabled, a Store Pickup section appears inside the Marketplace menu with three entries: Manage Store, Pickup Store Orders and Manage Holidays.
Navigate to Marketplace → Store Pickup → Manage Store. The grid lists every branch on the marketplace, whether the admin created it or a seller did. Columns cover ID, Store name, Status, Latitude, Longitude, Person Name, Seller and Created At.
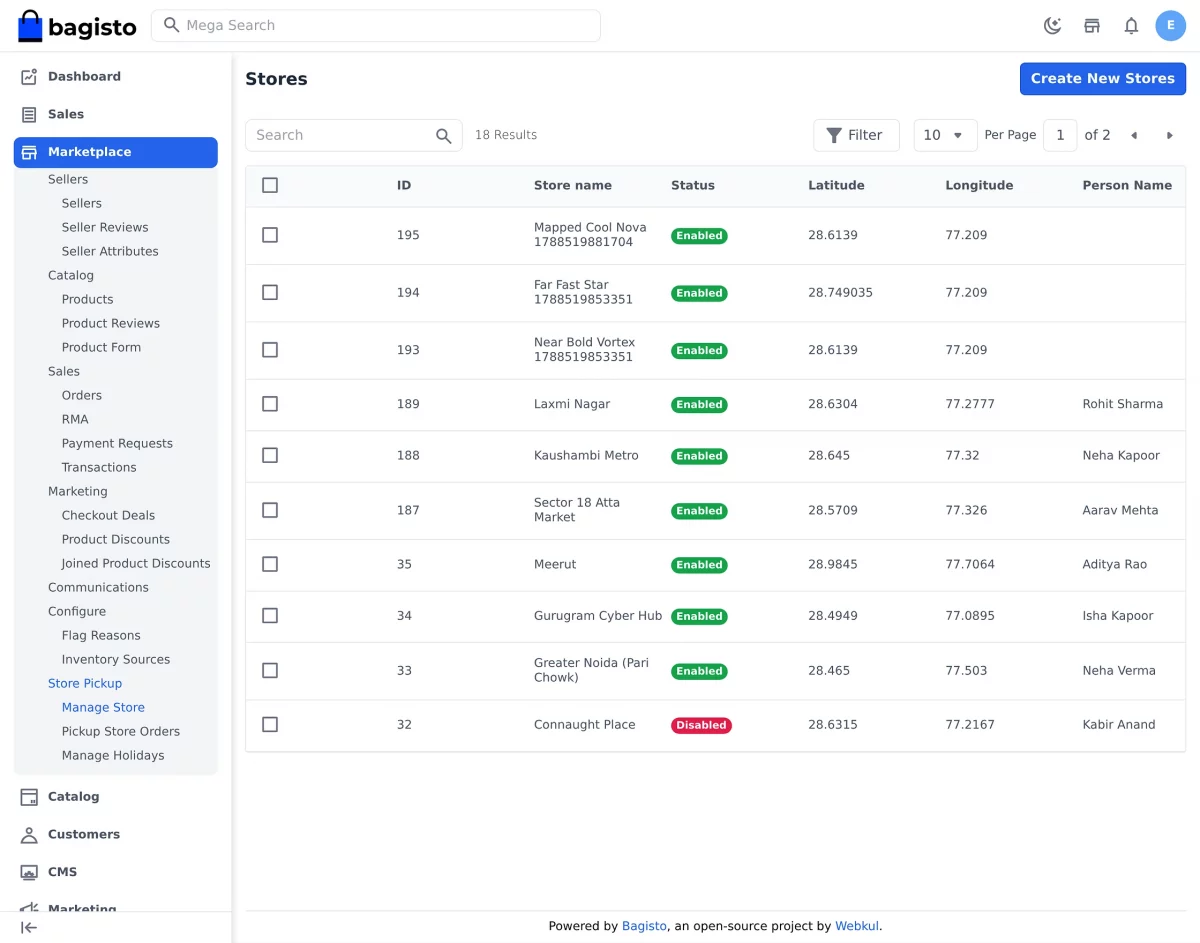
Each row carries Assign Products, Edit and Delete actions. The grid also supports mass delete and a mass Change Status action. That action flips a batch of branches between Enabled and Disabled.
Click Create New Stores to add a branch. The form groups its fields into General, Store location details, Store Timing, Address Data, Settings and Contact Info.
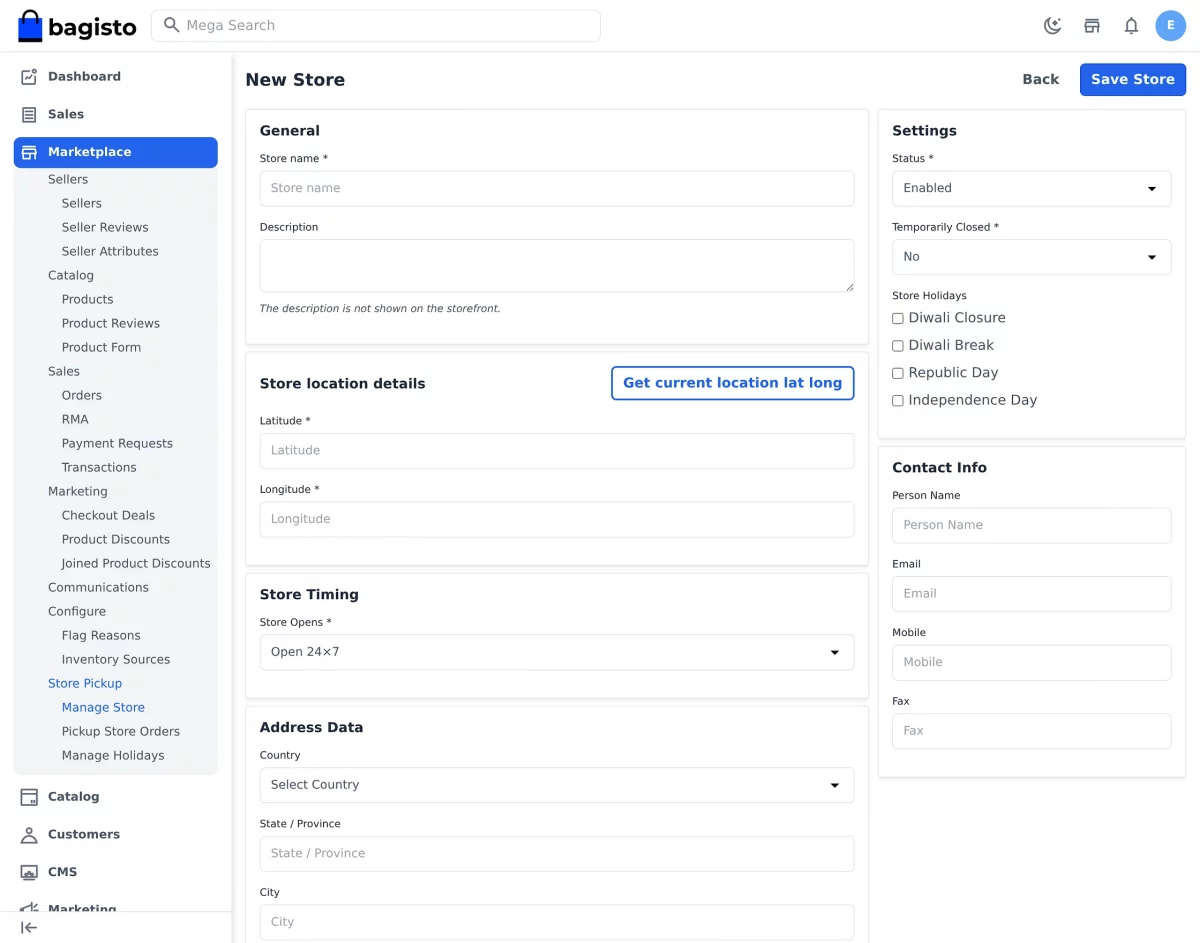
- Store name – Required, and the name shoppers see in the finder and at checkout.
- Description – An internal note. It is not shown on the storefront.
- Latitude and Longitude – Both required, and the values the finder ranks branches from. The Get current location lat long button fills them from the browser.
- Store Opens – Open 24×7, Custom day with same timing, or Custom day with custom timing. The second choice asks for one Start Time, one End Time and the Days they apply to; the third asks for a separate time range per weekday.
- Address Data – Country, State / Province, City, Street and Postal Code.
- Status – The finder returns, and checkout offers, only Enabled branches.
- Temporarily Closed – A Yes or No flag stored against the branch.
- Store Holidays – Tick the holidays this branch observes. The form lists only enabled holidays.
- Contact Info – Person Name, Email, Mobile and Fax.
Click Save Store to finish. Editing works the same way, except the edit screen adds a Manage Products button that jumps straight to the branch’s catalogue.
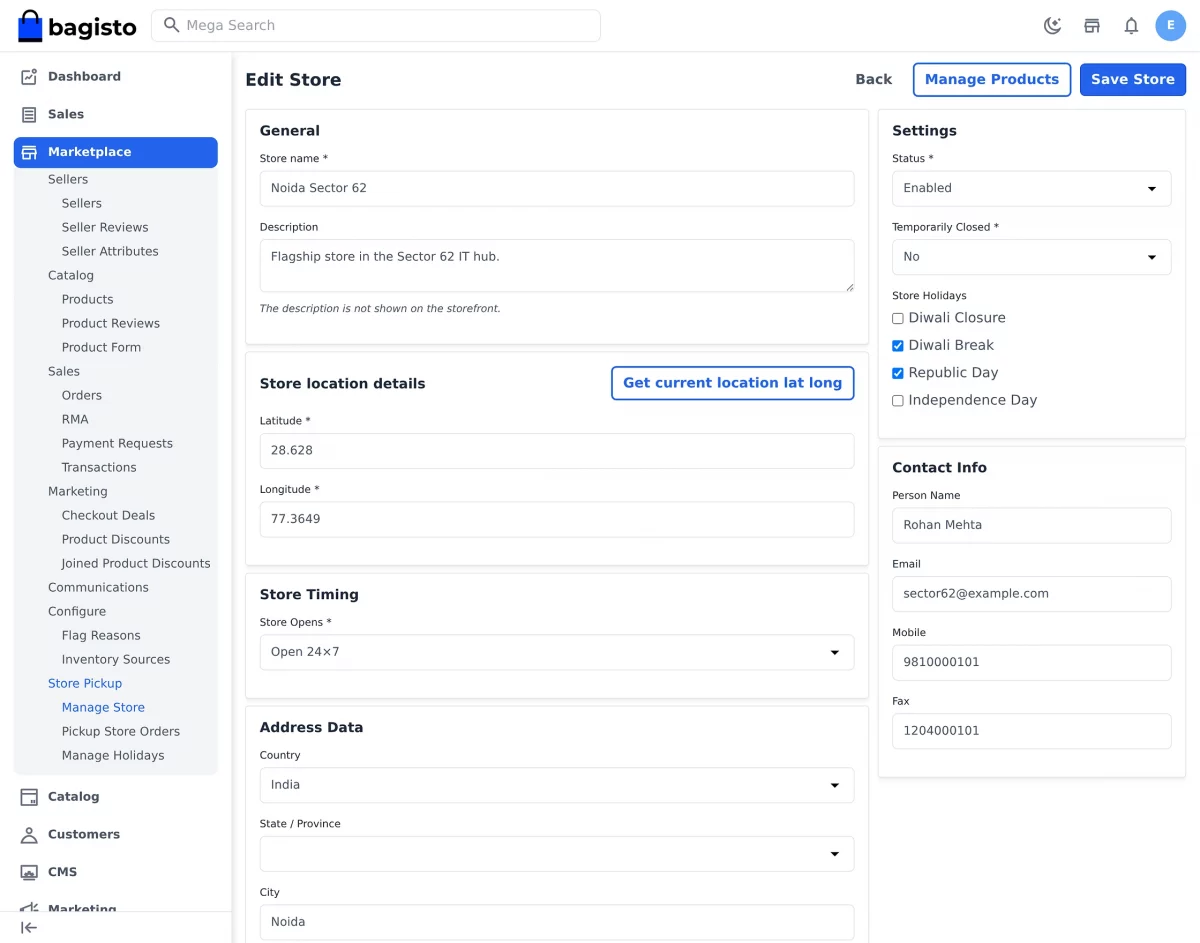
Assign Products to a Store
Not every branch stocks every product, so Marketplace Store Locator keeps a product list per store. Reach it from the grid’s Assign Products action or from the Manage Products button on the edit screen.
The list shows the ID, Name, SKU, Attribute Family and Cost Price of every product available for pickup there. A remove icon on each row detaches one.
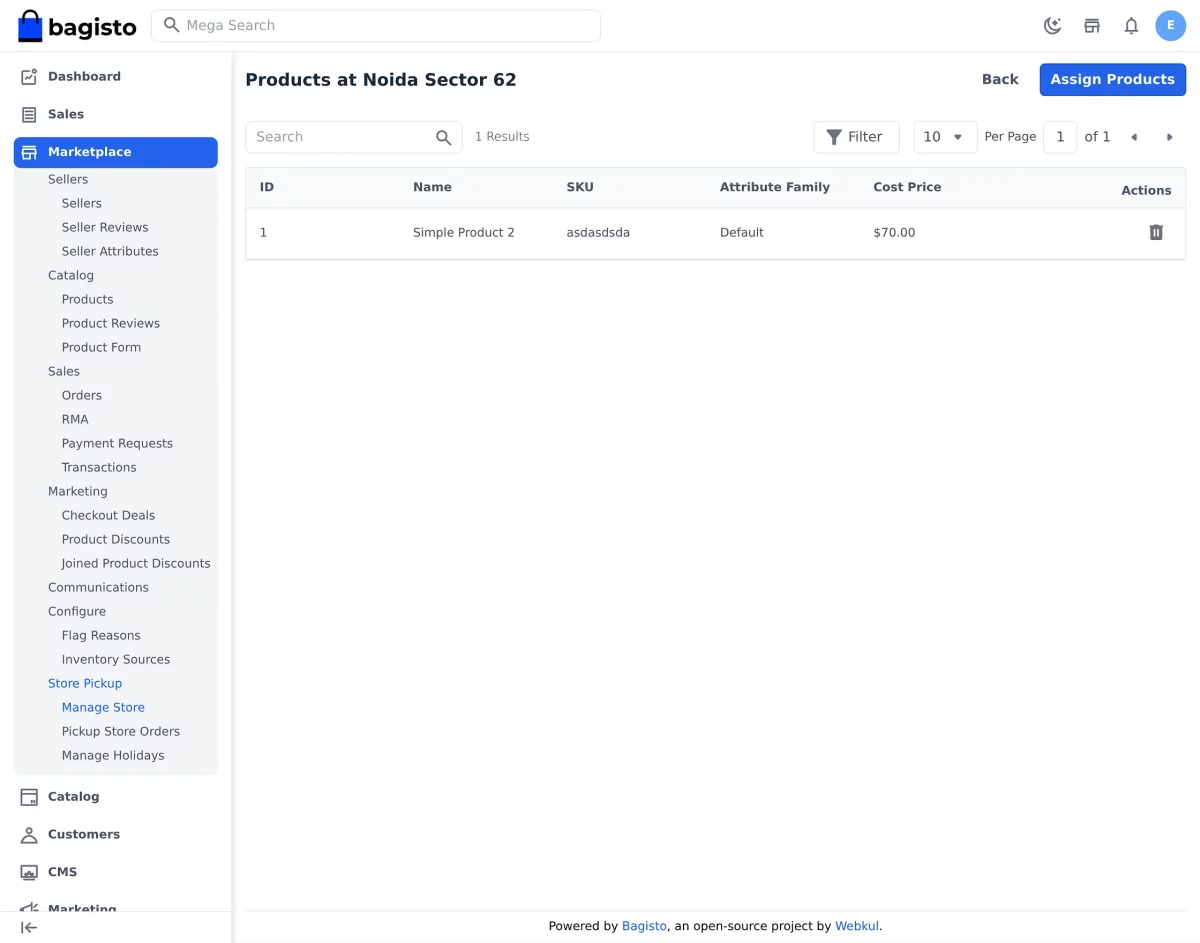
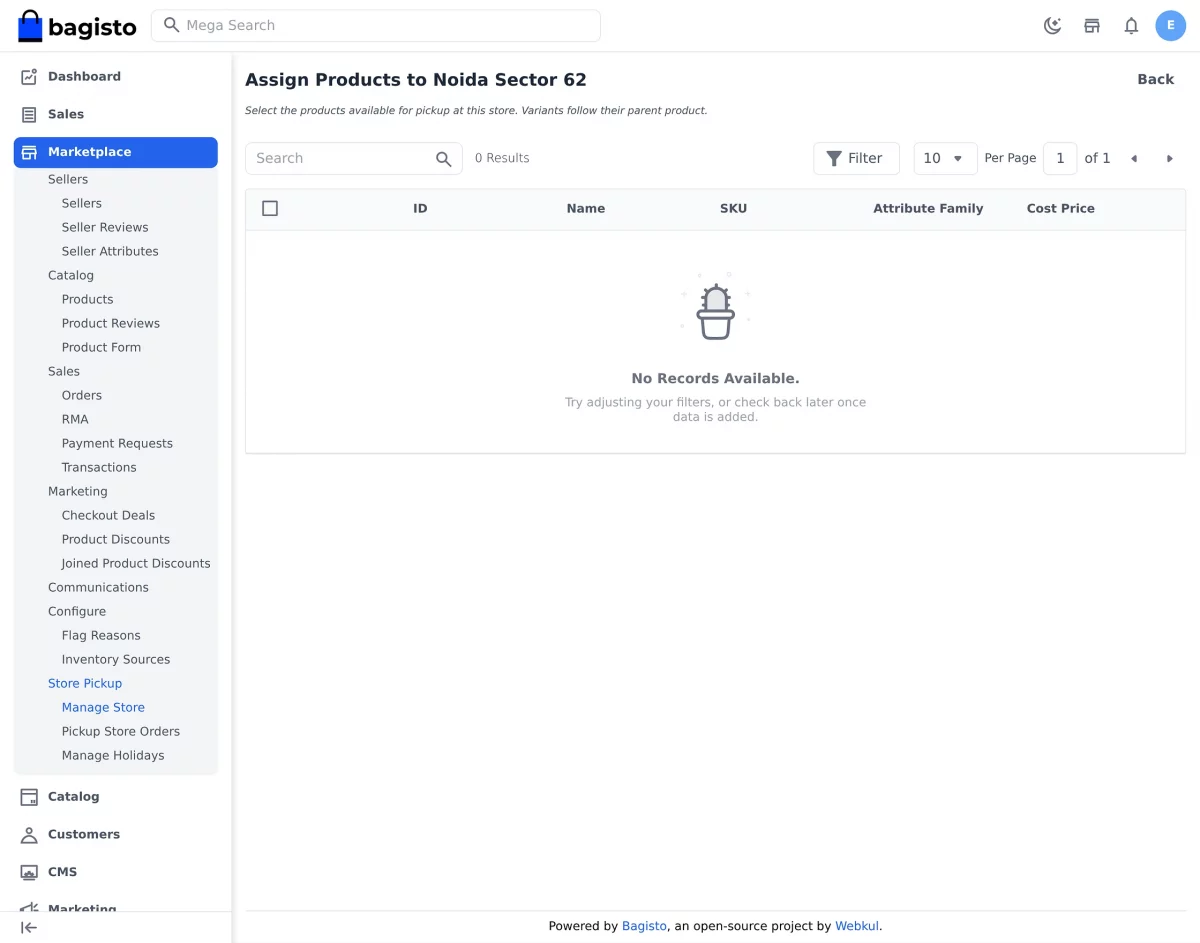
Press Assign Products to add more. The screen lists only the products the branch does not already carry; tick them and run the Assign Products mass action.
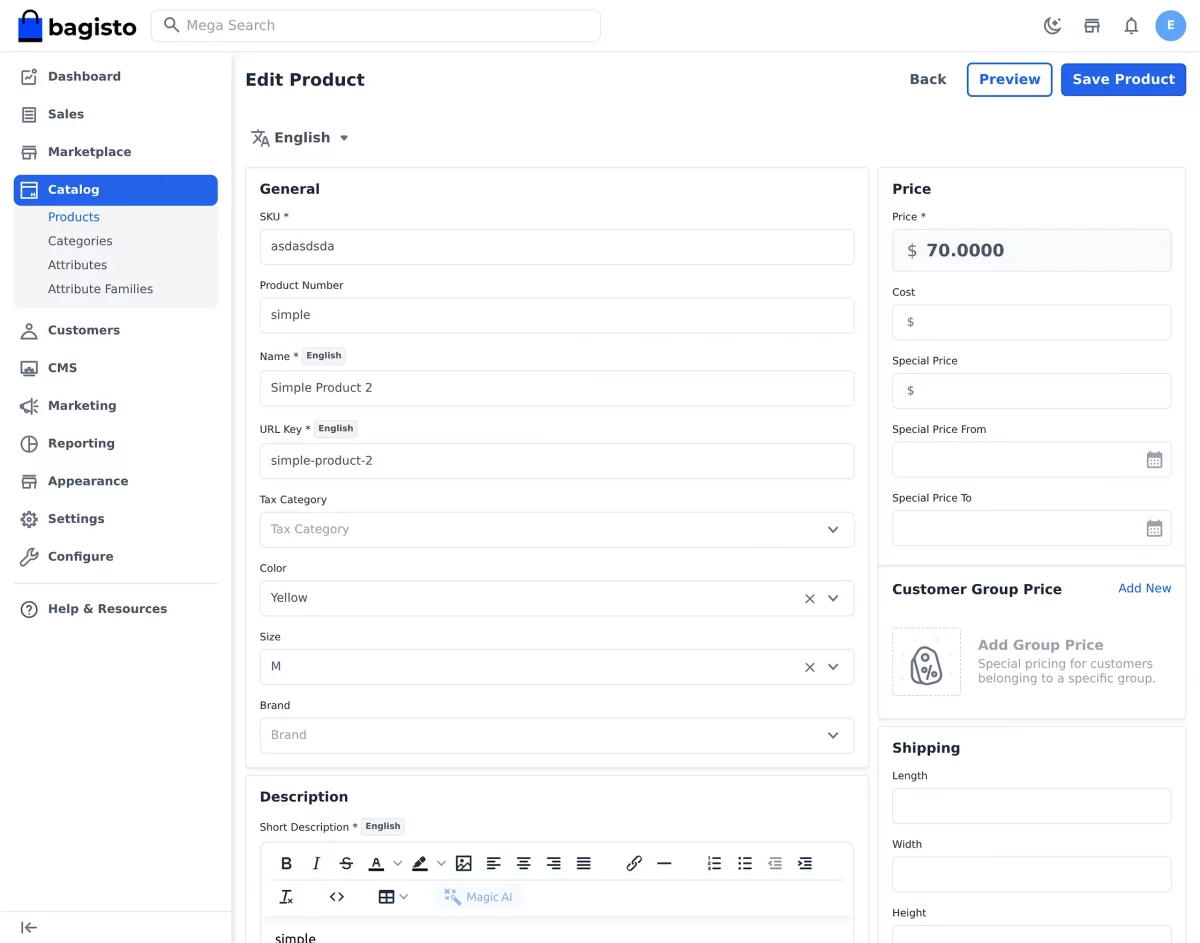
The same relationship works from the other direction. Open any product under Catalog → Products. An Assign Pickup Locators panel sits below the product form. It lists every branch that stocks the product, with links to edit or detach each one.
Its Assign Stores button opens a grid of the branches the product is not yet available at, showing ID, Store name, Status, City, Country and Person Name. Variants are never listed on their own, because they always follow whichever stores their parent product belongs to.
Manage Holidays
Holidays close branches on the dates when nobody can hand an order over. Navigate to Marketplace → Store Pickup → Manage Holidays to see them, listed by ID, Name, Status, Date Type, Holiday Date and Seller.
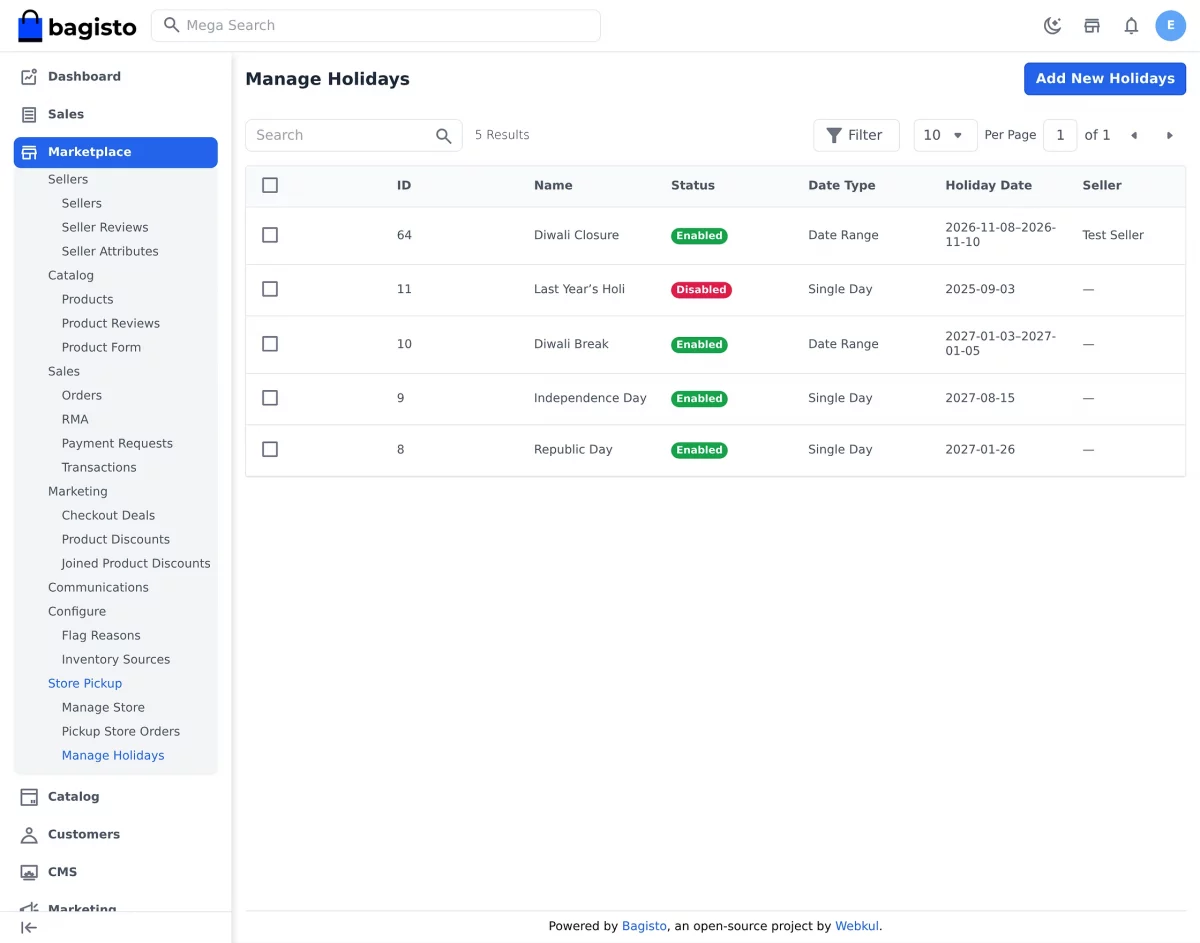
Click Add New Holidays to create one. Enter a Holiday Name, set the Status, then choose the Date Type.
A Single Day holiday closes a branch for one date and asks only for a Holiday Date. A Date Range holiday covers an inclusive span such as a week-long refit, and asks for Date From and Date To.
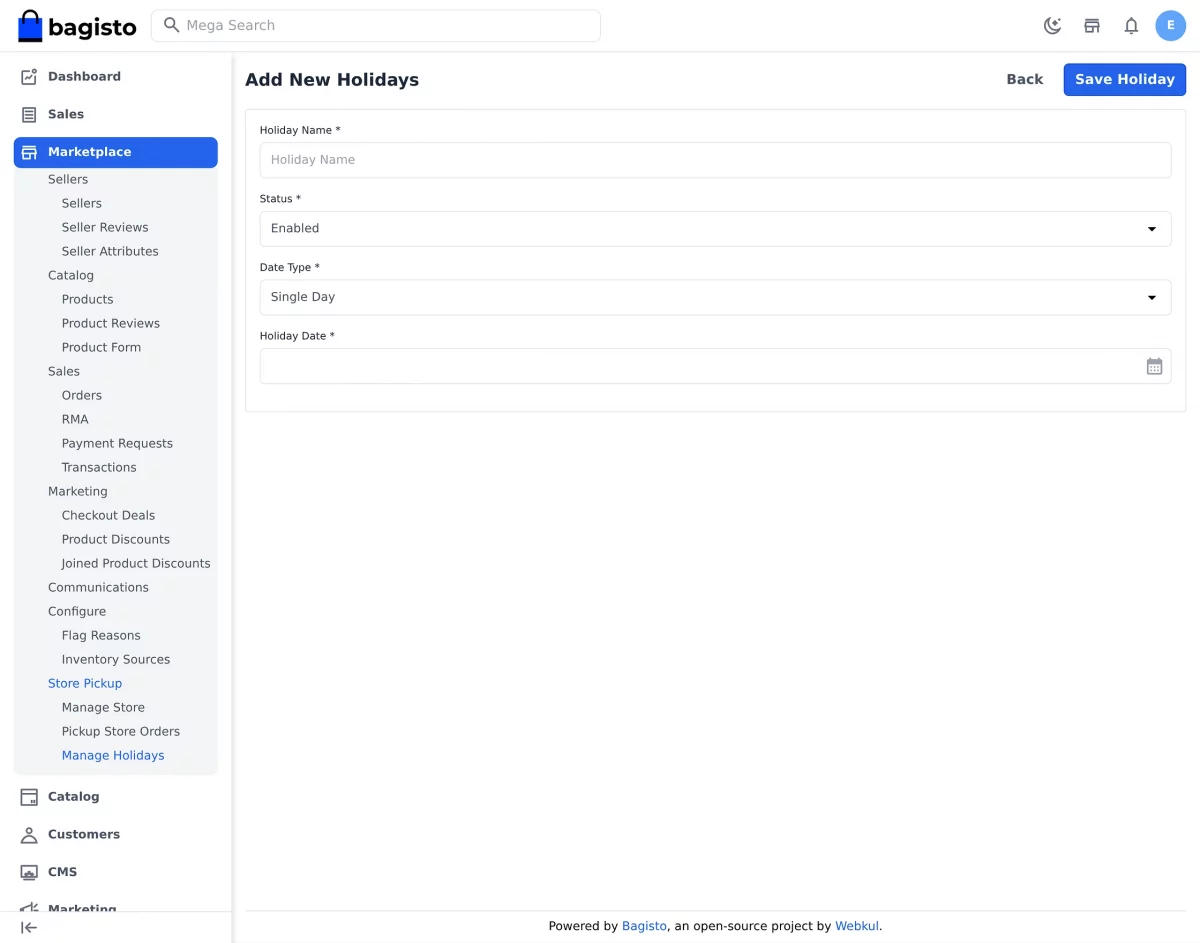
Click Save Holiday, then open a store and tick the new holiday under Store Holidays to apply it. Holidays also support mass delete and mass Change Status from the grid.
The effect reaches the storefront immediately. A branch observing an enabled holiday that covers today drops out of every Marketplace Store Locator search. Checkout never offers it as a shipping rate. Nobody travels to a closed shop.
Marketplace Store Locator Seller Panel
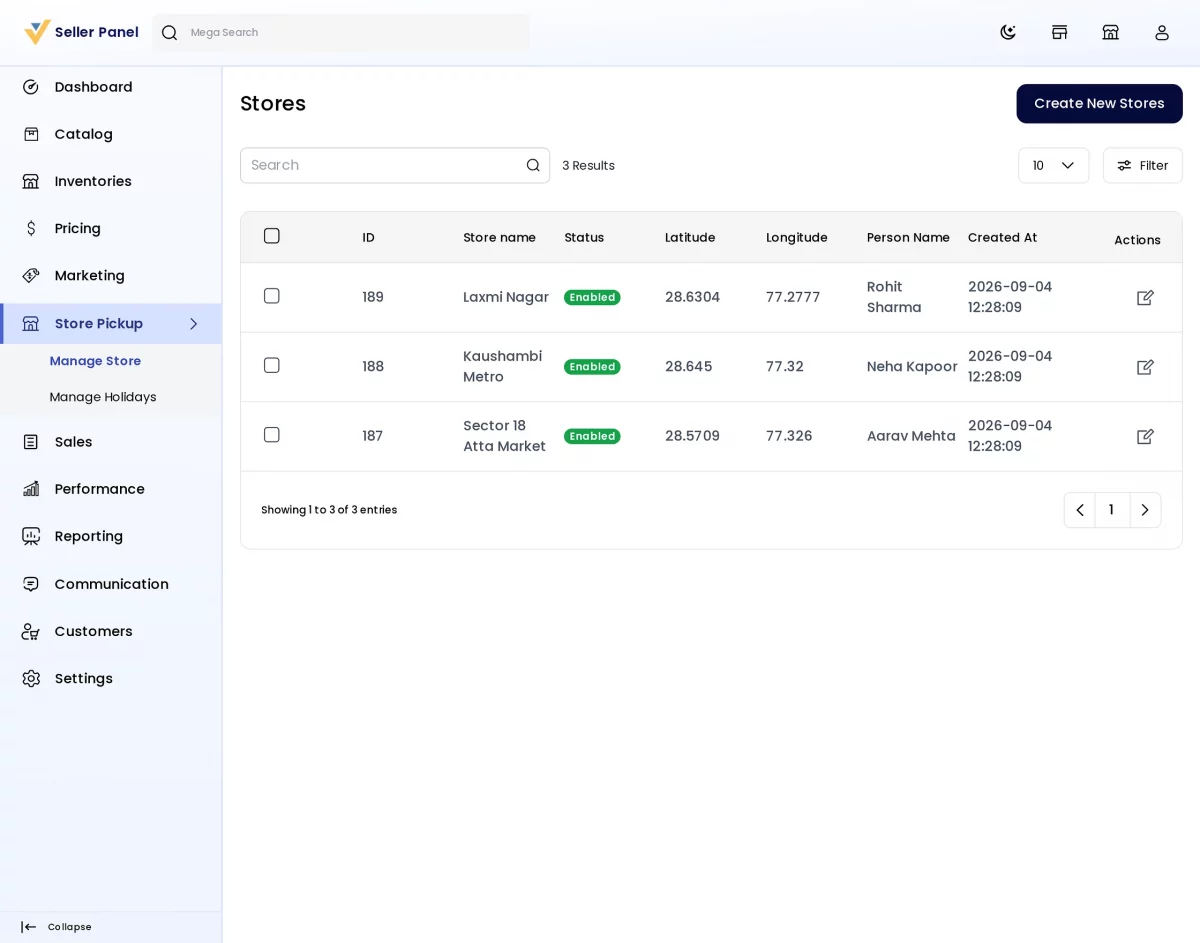
Sellers get their own copy of the Marketplace Store Locator tools. A Store Pickup section appears in the seller panel with two entries, Manage Store and Manage Holidays.
Each seller sees only the branches it owns, and opening a record belonging to another seller returns a 404, so vendors stay properly separated.
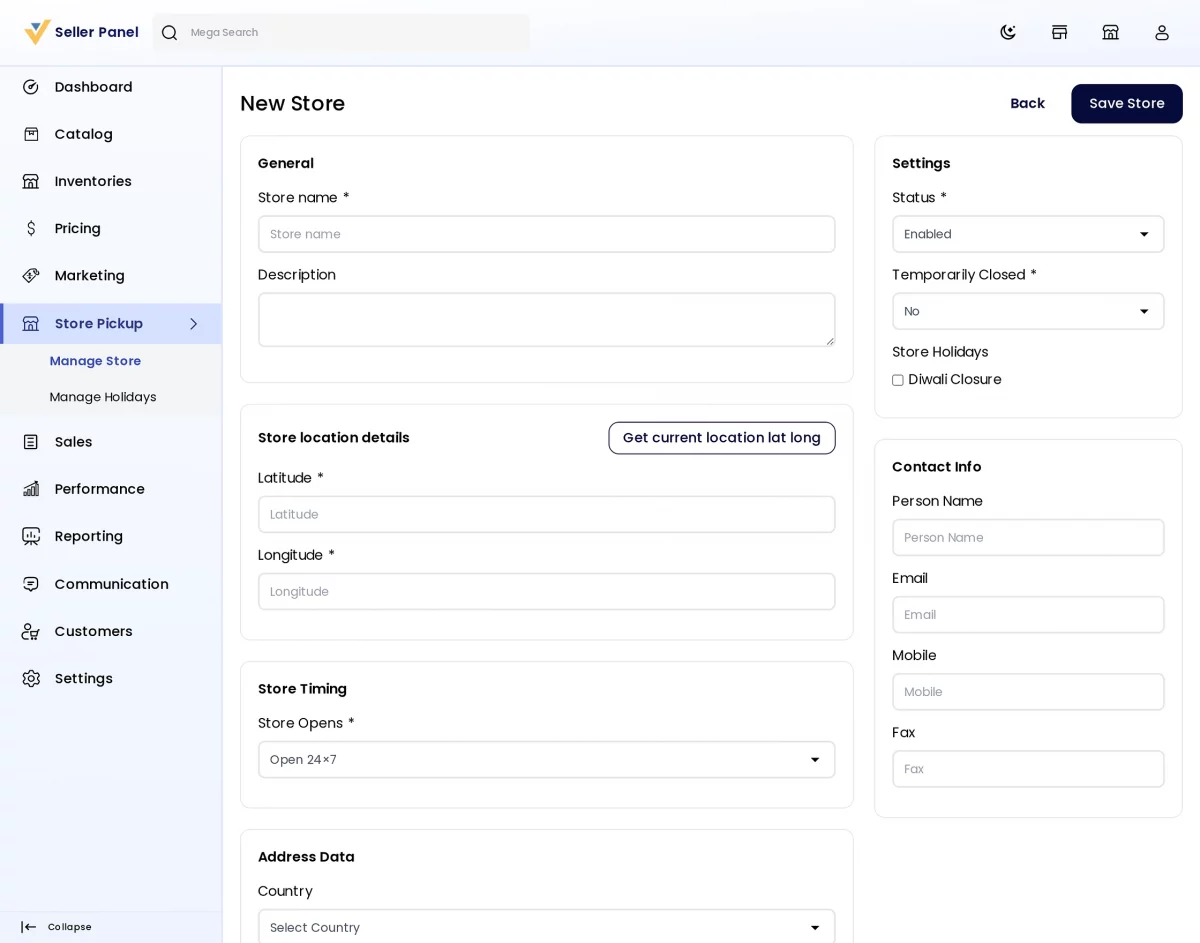
The create and edit forms mirror the admin versions, with the same General, Store location details, Store Timing, Address Data, Settings and Contact Info sections. The panel stamps ownership automatically, so a seller never picks who a branch belongs to.
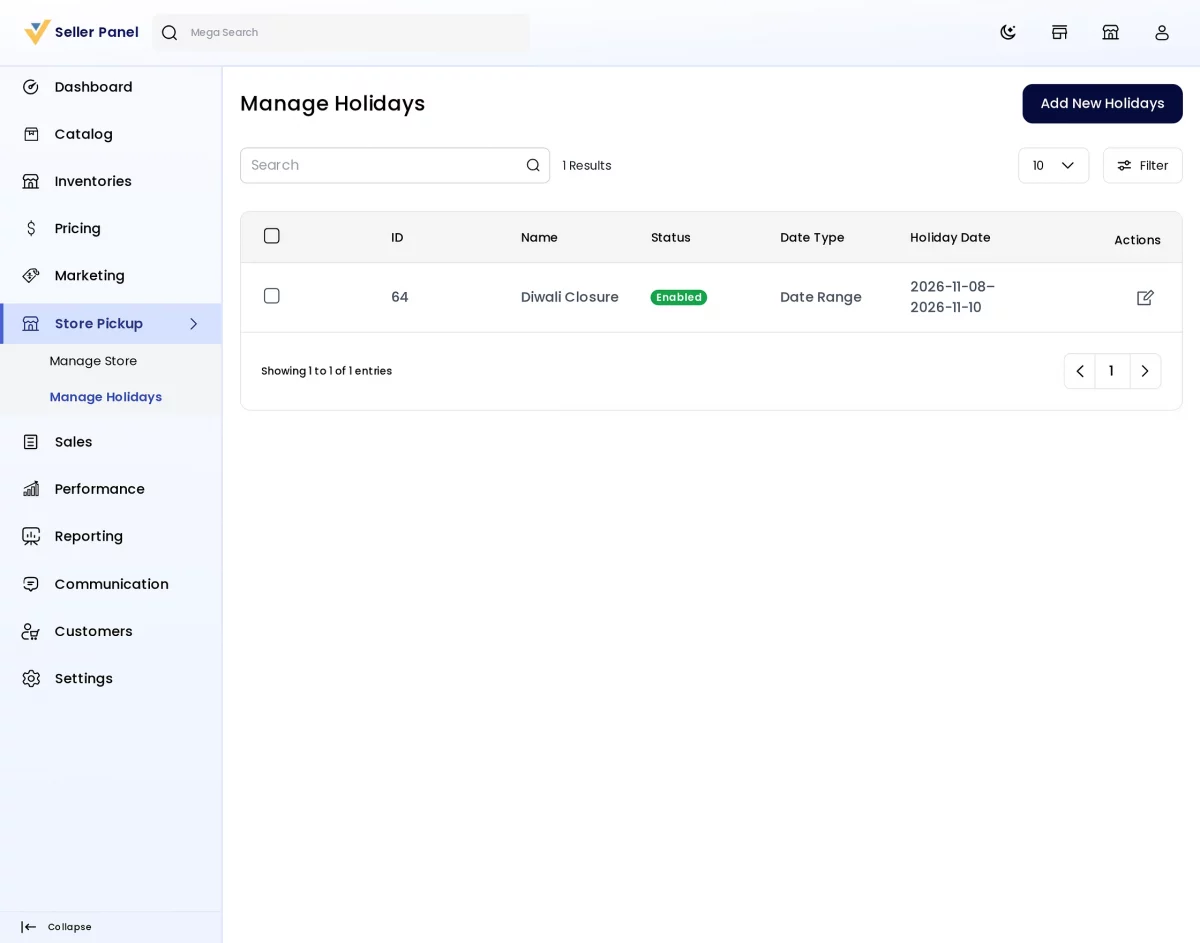
Sellers keep a private holiday calendar too. A seller can attach only its own holidays to its own branches, which stops one vendor’s closure from touching another’s.
Product assignment stays with the admin. Sellers publish and maintain their branches, while the admin decides which products each branch stocks.
Storefront
With Show Pickup Stores Page set to Yes, a location icon linking to Pickup Stores appears in the storefront header on both desktop and mobile.
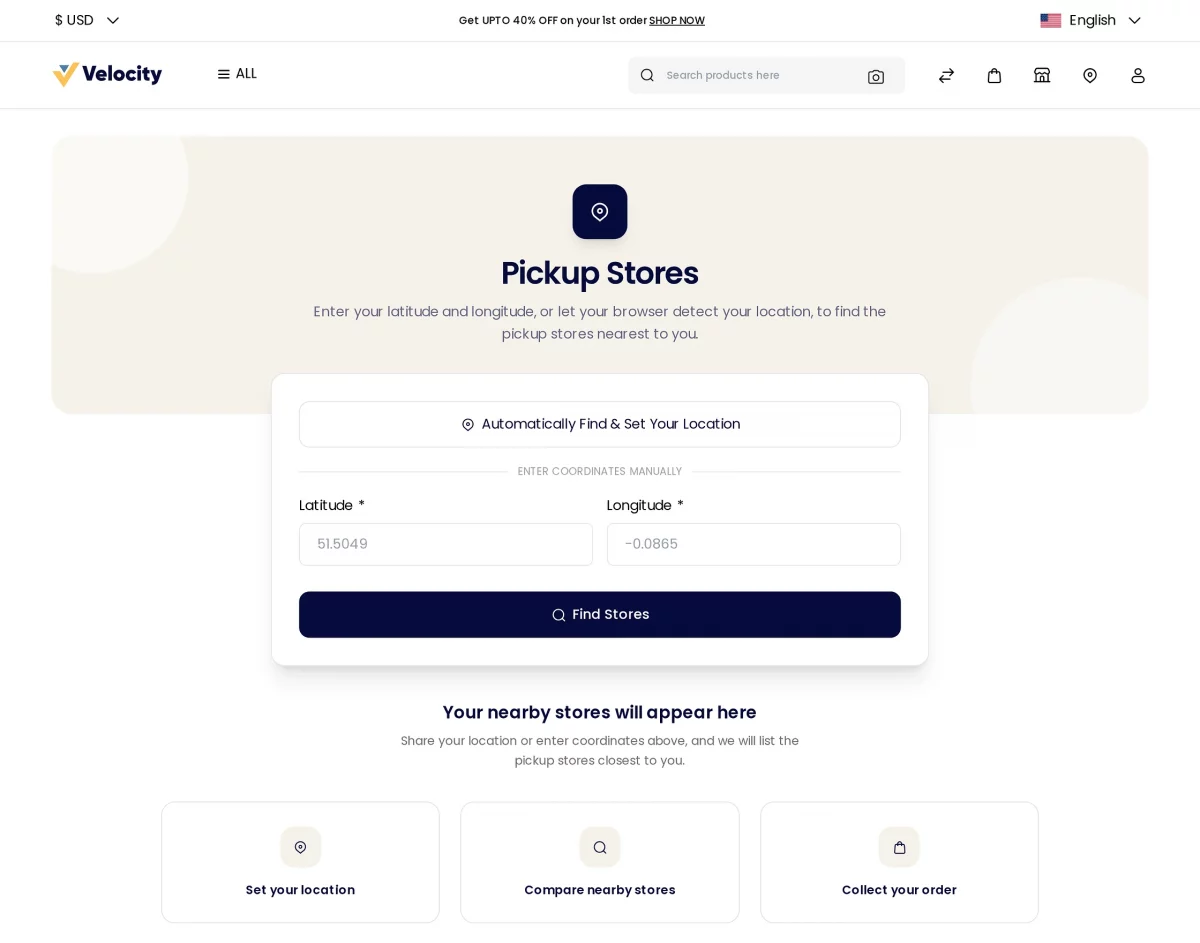
The finder offers two ways to search: tap Automatically Find & Set Your Location and allow the browser prompt, or type a Latitude and Longitude and tap Find Stores.
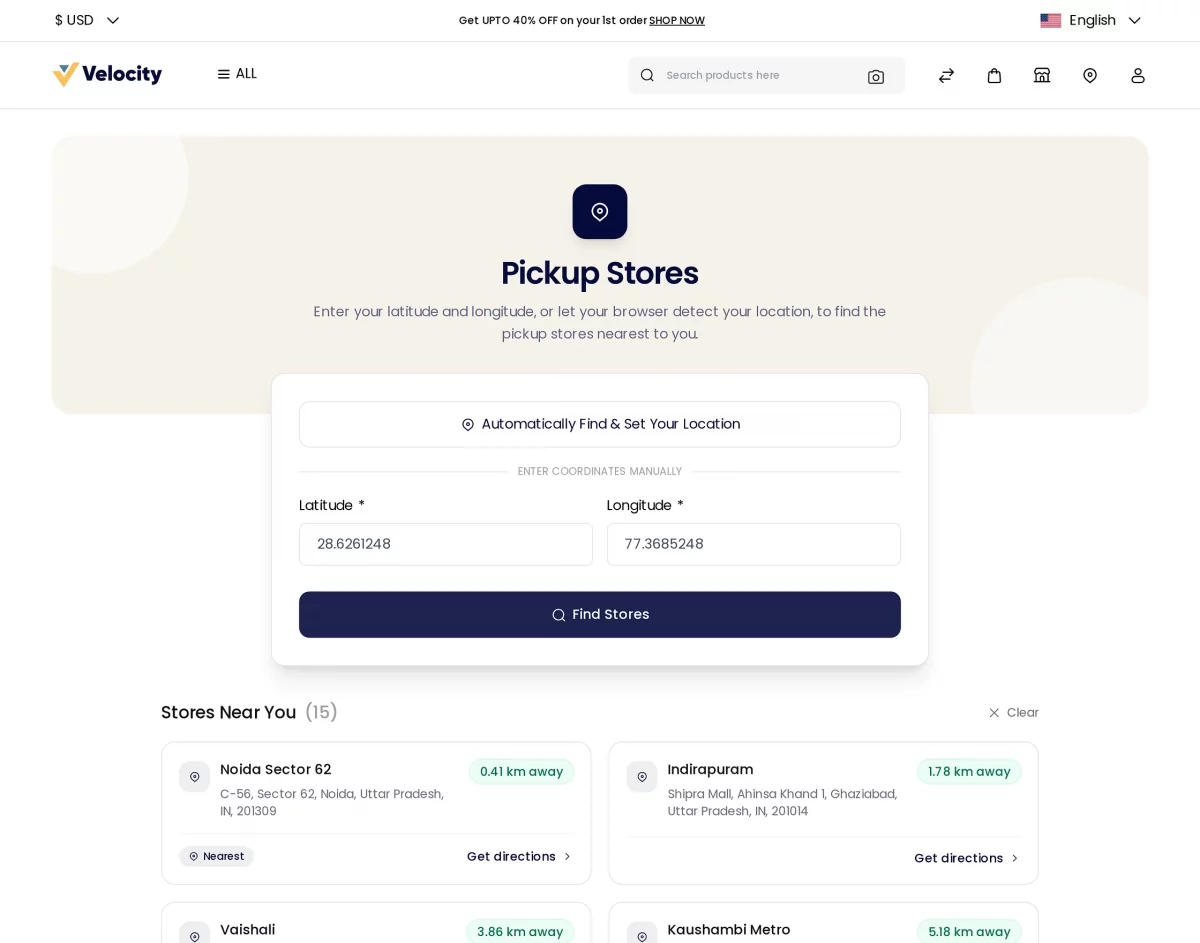
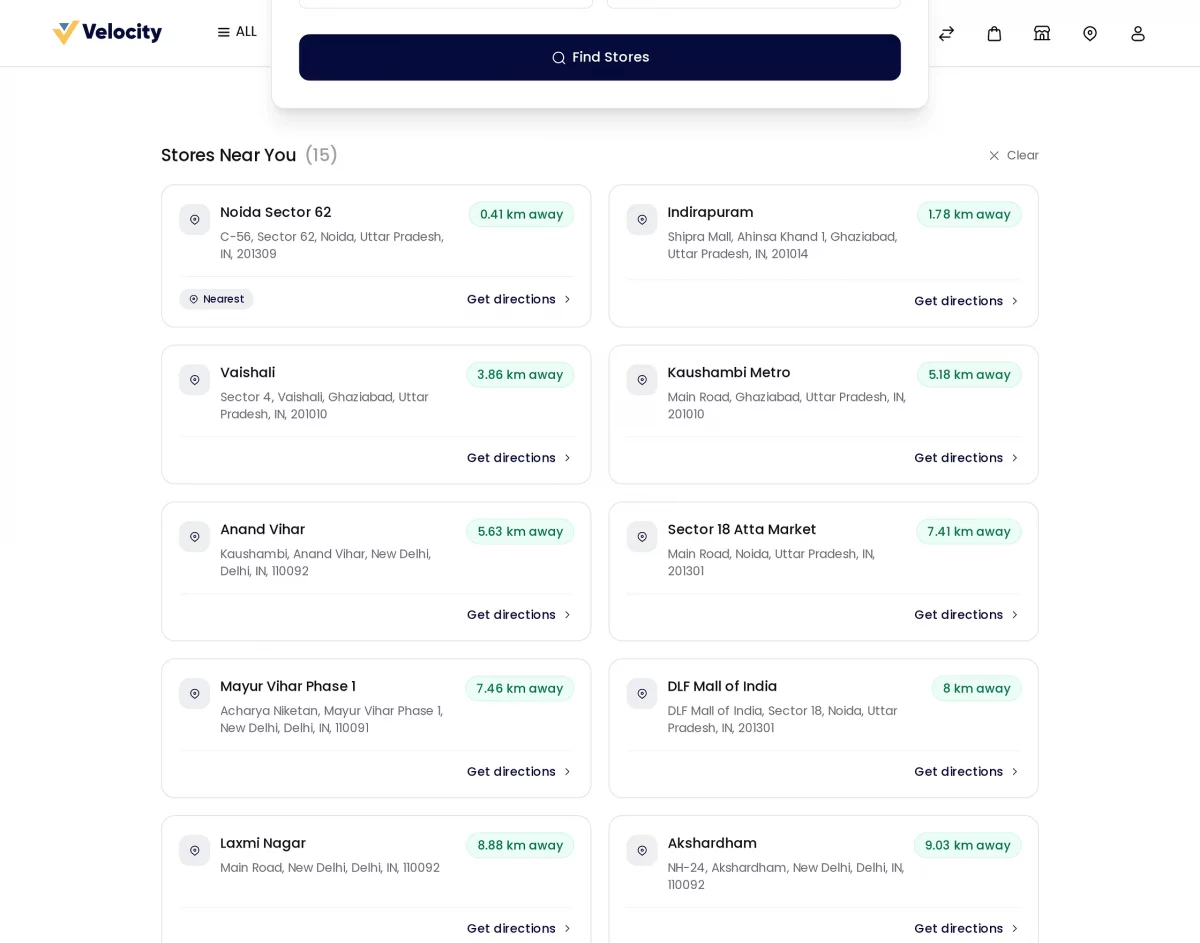
Results arrive under Stores Near You, ranked by real distance. Each card names the branch, prints its full address and shows how many kilometres away it sits, the closest one carrying a Nearest tag.
Every card links to Get directions, which opens the route in Google Maps, and a Clear button forgets the saved location. When a Google Maps API key is configured, the results also plot on a map above the list.
Admin-owned and seller-owned branches appear side by side, so a shopper simply sees the nearest options and never needs to think about who runs each one.
Once the customer has set a location, Marketplace Store Locator turns collection into a normal shipping choice. Add a product to the cart, continue to checkout and confirm the address. Every branch within the configured radius then appears at the shipping step as its own rate. Each rate carries the store name, address and distance.
Setting a location is what makes those rates appear, so a customer who has not searched yet will not see them.
Handling fees follow the configuration: a fixed fee applies once per order, while a percentage fee comes out of the cart sub total.
After the customer places the order, the module records the chosen branch against it. The customer can see it under My Account → Orders. A Pickup Location line names the branch. An information icon opens its address, phone and opening hours.
Order Details – Admin Backend
Marketplace Store Locator keeps every order placed for collection in a dedicated grid. Find it at Marketplace → Store Pickup → Pickup Store Orders. Columns cover Order ID, Customer, Stores, Sub Total, Grand Total, Status, Channel and Order Date.
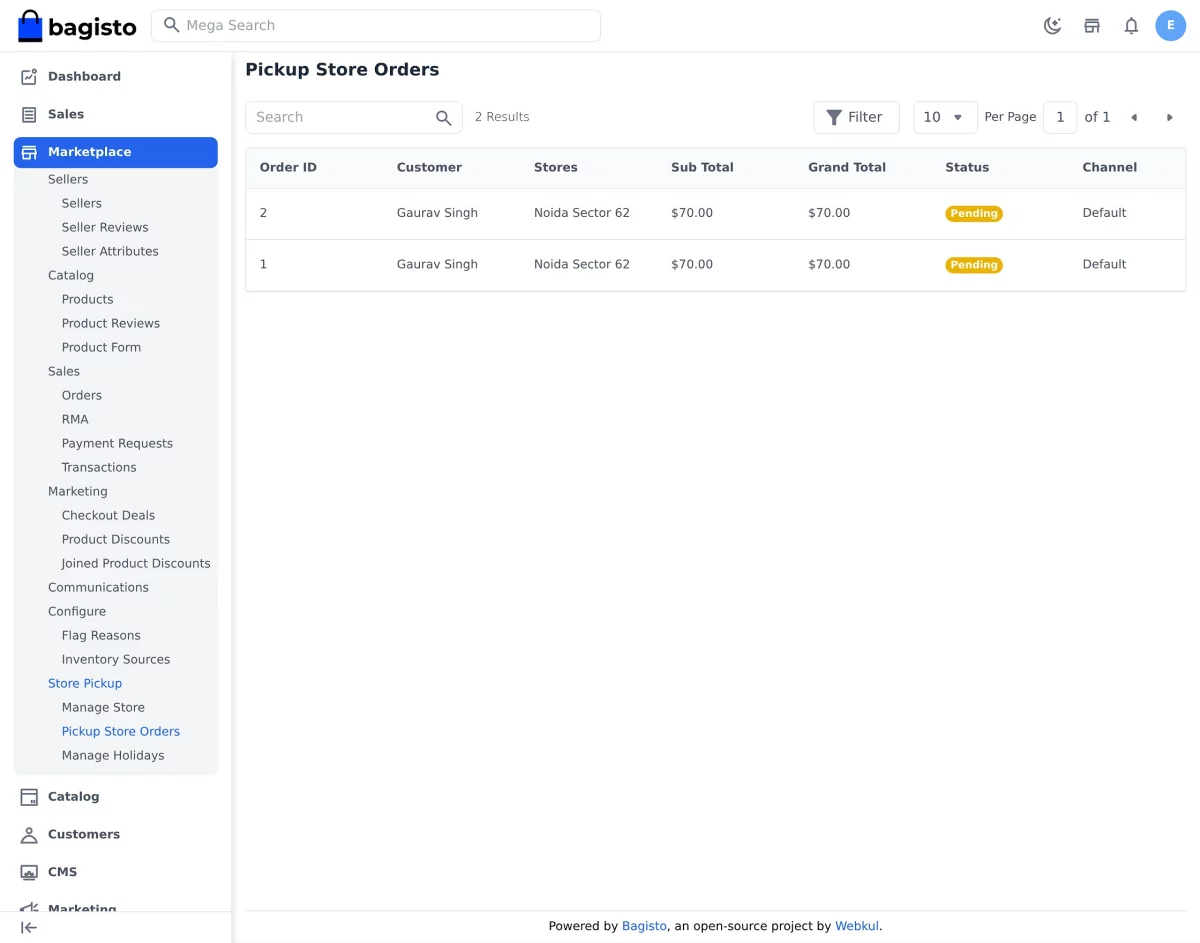
Filter by Status or Stores to narrow the list, then use the view action to open an order.
Beside the shipping method, a Pickup Location line names the branch. Its information icon opens a panel with the store name, full address, contact person, mobile and email. The panel also shows the opening hours and a View store link straight to the branch record.
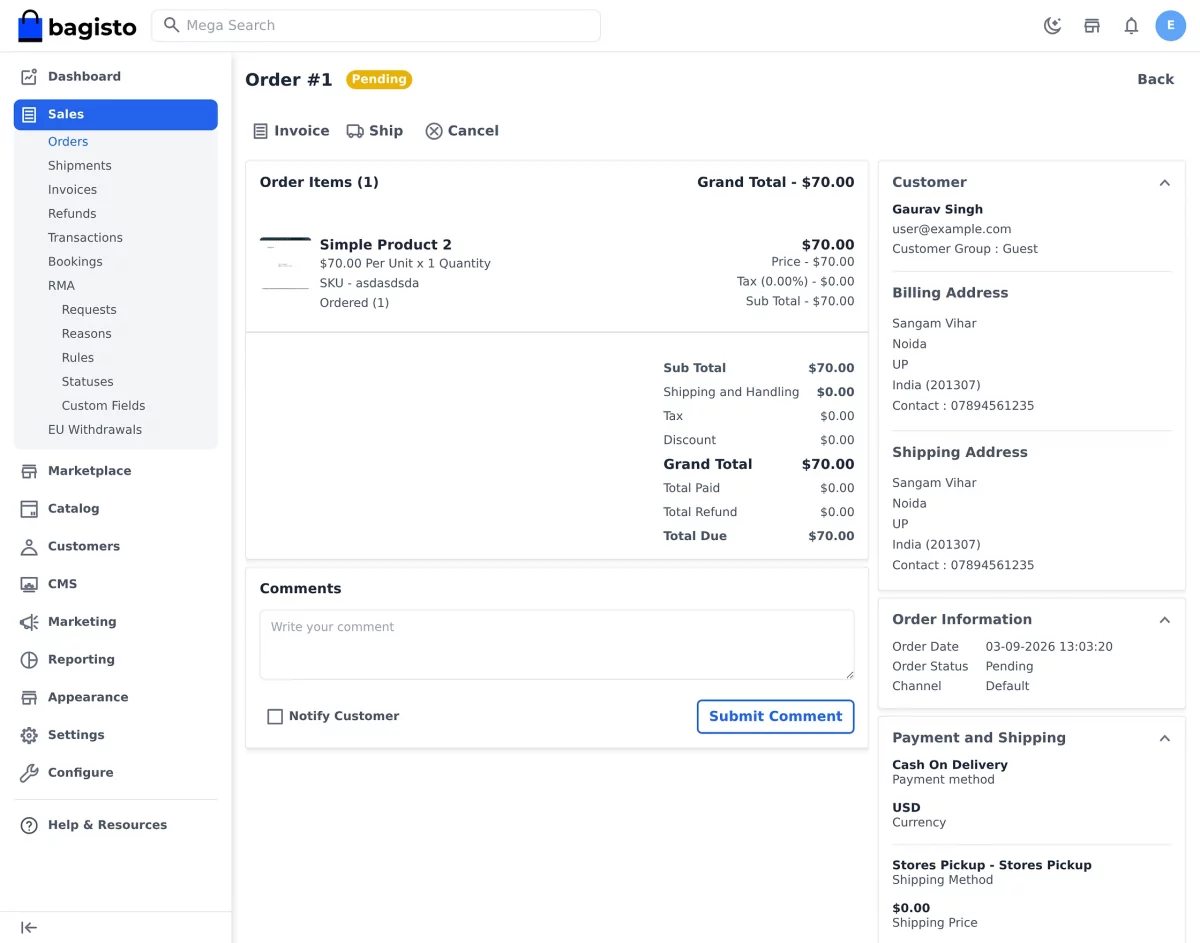
Order history survives store deletion. If a branch is removed later, the panel does not go blank. It falls back to the store description frozen onto the order at checkout. It also notes that the pickup store is no longer available.
Support
That’s all for the Bagisto Marketplace Store Locator. You may also like our Laravel Marketplace Store Pickup guide and our Marketplace ShipRocket Shipping guide.
If you still face any issues, feel free to raise a ticket and share your feedback at bagisto.uvdesk.com

Be the first to comment.