We have now introduced the most awaited feature app i.e. Shopify-Magento Connector in Multivendor Marketplace app for Shopify.
The feature app is available for Magento 2.
Using this featured app, you can sellers to connect their Magento store with your Shopify store.
Thus, sellers can easily auto-sync their Magento store’s products with Shopify. Else, they can import the products from Magento via SKU’s CSV file.
Accordingly, manage inventories at both the ends. Once an order is created/updated for the Seller’s product at Magento or at Shopify.
You can visit the “Feature App” section and approve the additional charge of $25 USD/month and above your current plan of the Multivendor app.
NOTE:-
Now, you will get a “Delivery URL” and “Magento Module“. You need to share the URL with sellers. Thus, Seller will enter this URL while setting the Magento Module.
Thus, get the complete data through this URL.
Moreover, Magento is an Open source platform. That is, Seller will get the complete source code from that module to manage every update at Magento end.
Let’s Explore this Feature App in detail.
Features of Shopify-Magento Connector
- Admin can allow the marketplace sellers to connect their Magento stores with the admin’s store.
- Also, products created at Magento and auto-sync is turned “ON” then the product will be created at Multivendor App with “approval pending” state.
- The Seller can import products from their Magento store by SKU(s) and by uploading SKU(s) CSV file.
- When the synced product will be ordered at Shopify, the same order will be created at Magento end.
- Also, when the synced product will be ordered at Magento and that order will be updated at Magento then, Quantity will be managed at Multivendor app as well as Shopify.
- When the synced products will be updated at Magento, Products & Variant details with their image will also be updated at the Multivendor app as well as at Shopify end.
- Once any product is deleted at Magento, the same product will be deleted at Shopify also.
- Moreover, Slot Pricing is compatible with this connector.
- Both admin & seller can now sync the seller’s products in any state from the “Product Listing” section of their respective panels.
- Also, this feature app is available for Magento 2.

Limitations
- The app allows only Active, Simple and Configurable products.
- If the Seller changes the product type other than “Simple” or “Configurable” on Magento store, those products will be disabled at Multivendor App.
- Variations should be less than OR equal to 100.
- Also, the option name should be less than OR equal to 3.
- Visibility of Simple Products created under any Configurable product can be selected as “Not Visible Individually” at Magento end as those products will be imported as Variants at Shopify.
- Admin can import maximum of 250 Products at once from Magento to Shopify.
- Also, the admin cannot sync the Sales Tax.
How to Activate?
To activate the Shopify-Magento Connector feature app, first, you need to visit the Feature Apps section of the Multivendor App.

There, you will get the app named “Shopify Magento Connector”.

Now, clicking on the Enable button, You can activate the Feature app.
Now, Proceed further to approve the additional charge for this feature app.
Once you approve the charges for this feature app, You will get this feature installed in Multivendor app.

As soon as you install this feature app, You need to share a Delivery URL with SID and a Magento Module with your sellers.
Visit the “Instruction for Marketplace” section of the Multivendor app and get the URL and module. You can download the module from here (as shown in the below screenshot).
The Seller will get the “Readme.txt” file using which they will get to know how to install the Magento Module on their Magento Store.

Now, Seller will enter the Delivery URL & SID provided by the admin here:

A Quick Guide on How the Seller Installs the Magento Module
Here is a video guide you can share with your sellers to help them installing Magento Module to their respective Magento stores. Please have a look:
PRODUCT DETAIL CONFIGURATION
Now, the admin needs to select the Magento connector from the “Connector Configuration” menu of the app.
Go to Configuration>>Product Detail Configuration>>Select the Connector.
Now, he can enable/disable other tabs for this section as well.

Sync Customer Details
By enabling this tab, you can sync customer details in order with the seller’s Magento store. Let’s understand this feature with two cases.
CASE 1: Sync Customer Details tab is ON (enabled):
Once a customer places an order, the customer will be created on the seller’s Magento store with complete shipping and billing details.
Also, the customers will receive an email from the seller’s store regarding the same.
NOTE:- In this case, if you don’t want to send an email to the customer, you can configure a dummy email.

CASE 2: Sync Customer Details tab is OFF (disabled):
In case you disable this tab, you will get multiple options to choose whether you want to sync the customer’s shipping address, billing address, name, and email or not.
You can configure the settings as per the requirements with Seller’s Magento store or not.

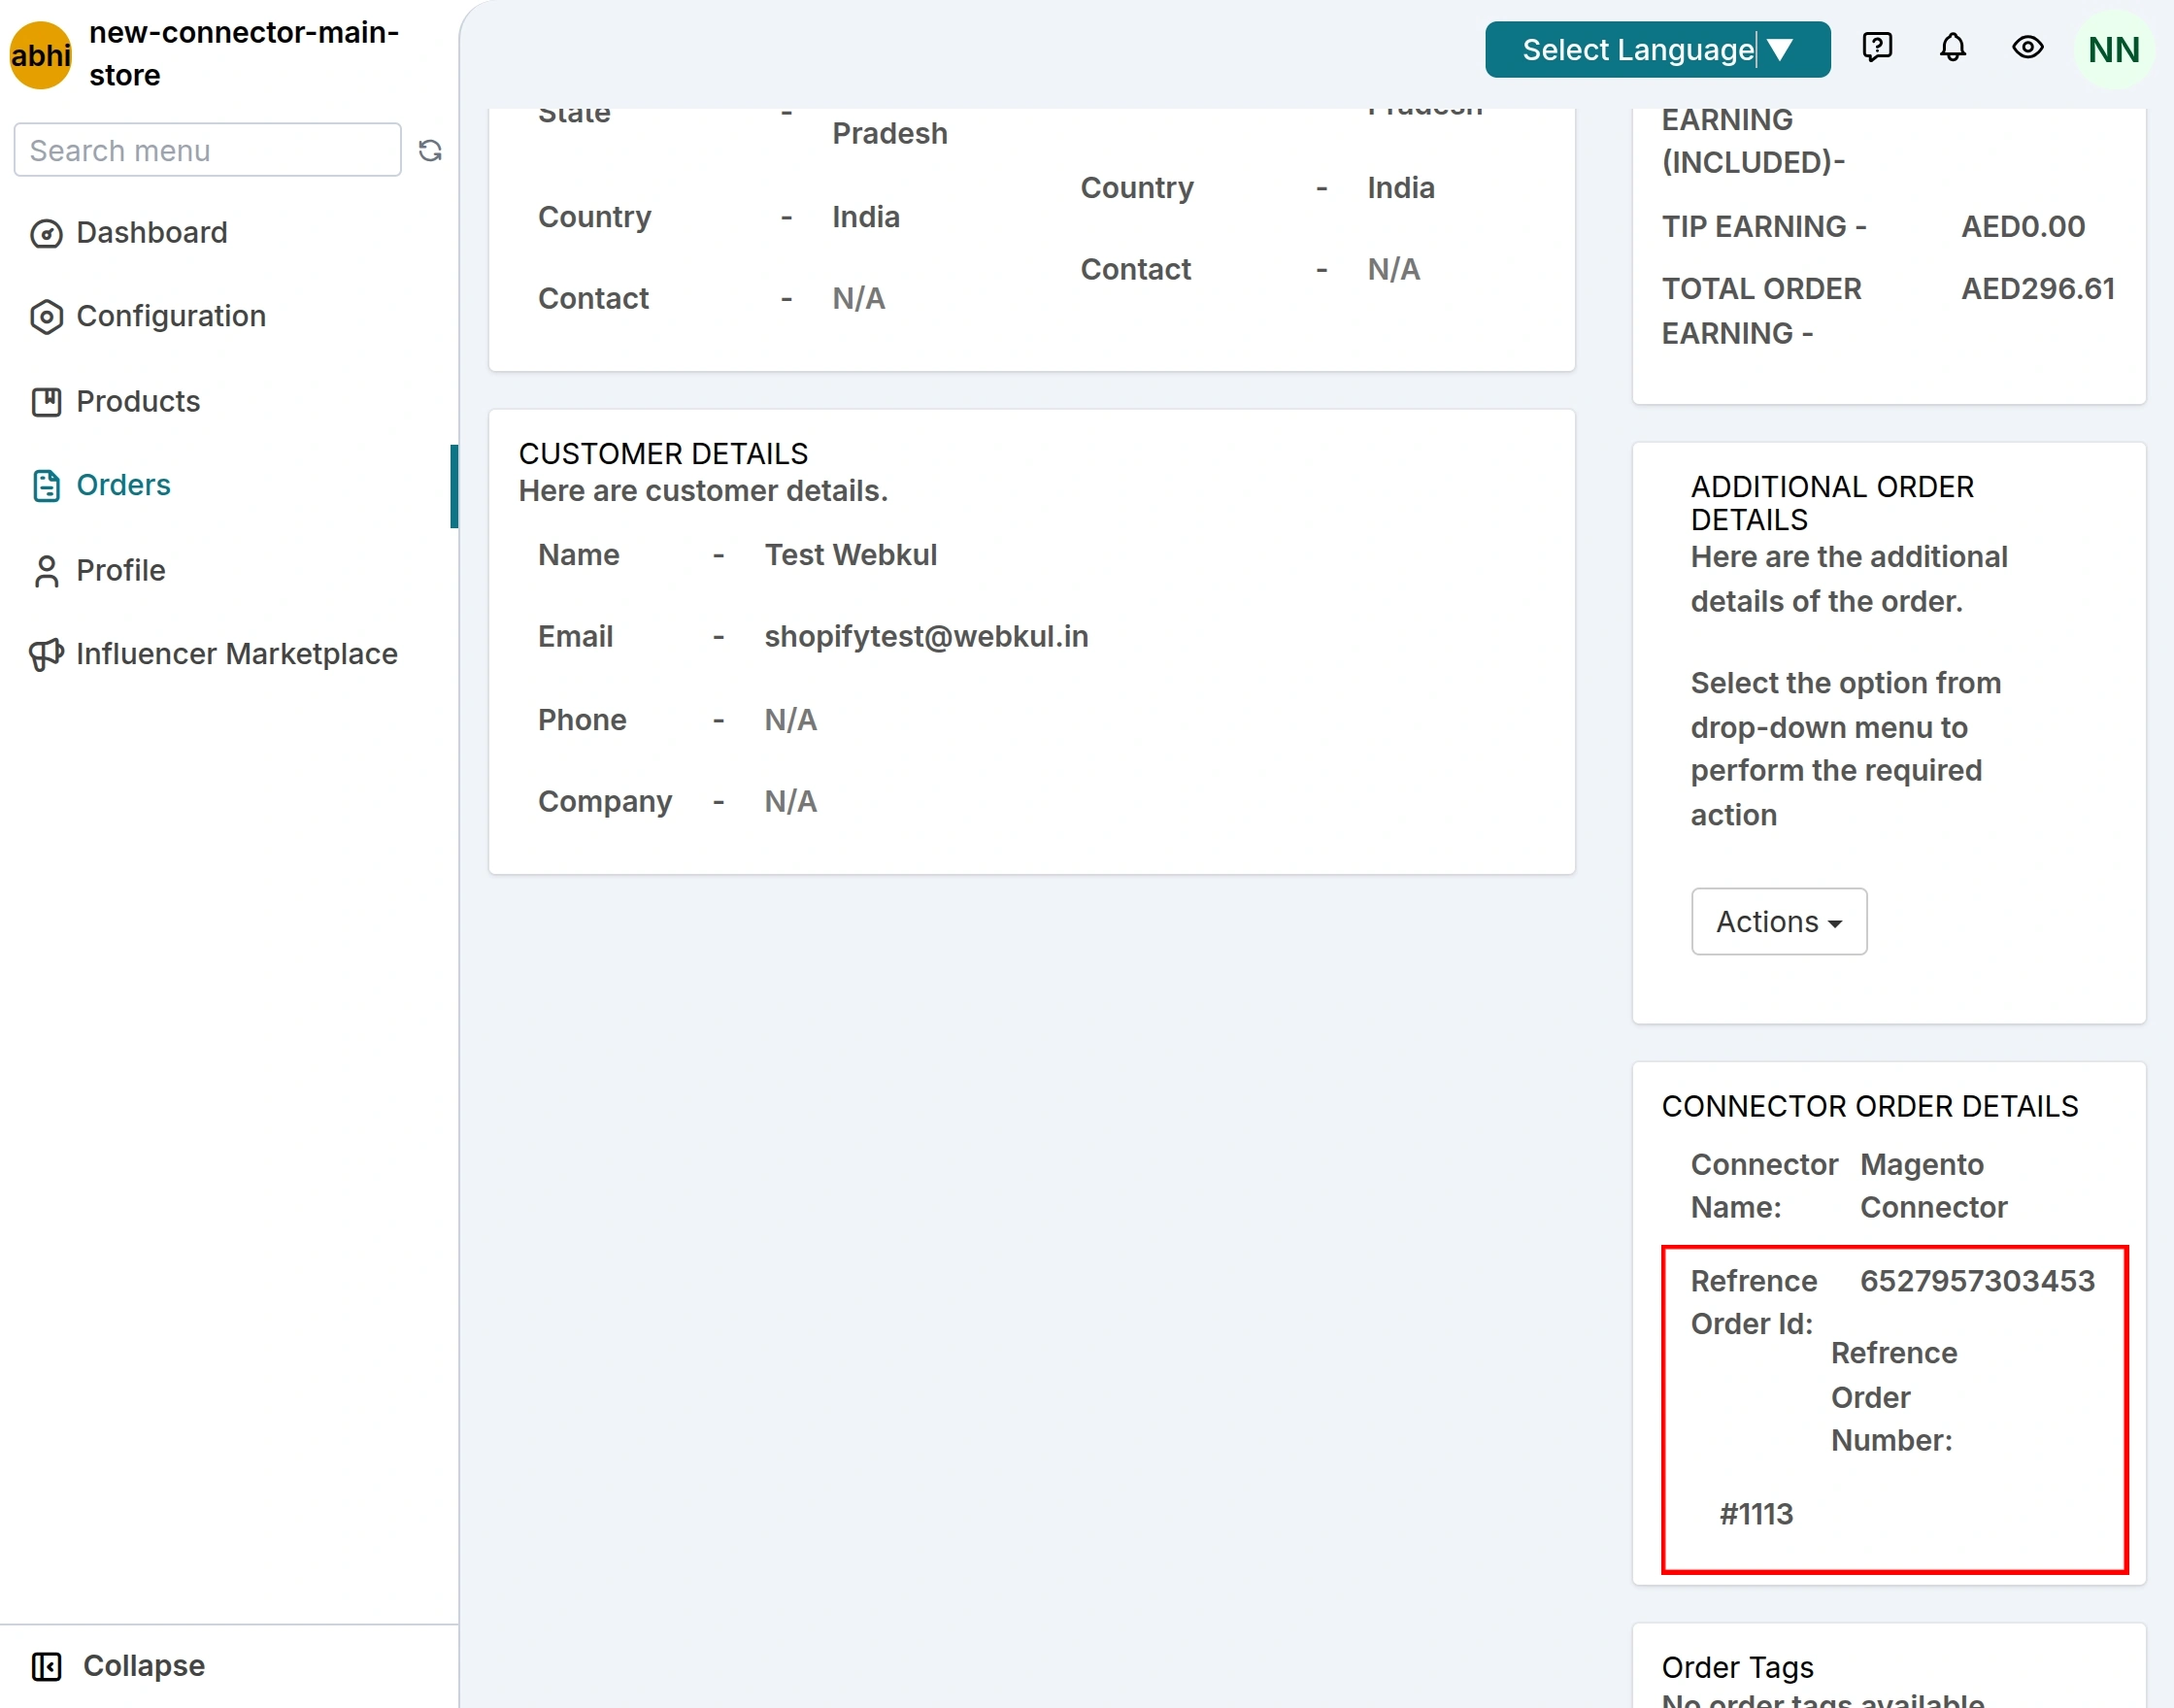
Note:- Once the order is created at the admin Shopify store for the connector product then the same order will be created on seller’s magento store also.
Even, the admin will get a reference order number like below that will be shown order section of the seller’s magento store.
Magento Configuration
SELLER END

Once the admin enables the Shopify-Magento feature app from his/her end, there will be a new sub-menu in the Configuration menu of the Seller Panel i.e. Magento Configuration.
From this section of the app, Seller will configure all the details related to his Magento store.
Auto Sync New product: Auto-sync Magento store products with the admin’s store.
- PLEASE NOTE:-“When a product is created at Magento and auto sync tab is turned OFF then the product will not be created at Multivendor app.
- Also “When a product is updated at Magento then the same product will be updated at Multivendor app even if the auto sync tab is turned OFF.”
- Store URL: Seller needs to provide his Magento Store URL (URL must start with http:// or https://).
Weight Unit of Magento Store: The Weight Unit set on Magento, the same weight units will appear here in drop down menu.
Follow below path to set Weight Unit at Magento:
Stores>>Configuration>>General >>Locale Options>>Set the Weight Unit.

Access Token: Seller needs to enter the access token generated from Magento end.
How to Generate Access Token?
Seller needs to follow below steps to generate access token from Magento store:
Login to Magento, Go to System>>Integration.

Click on Add New Integration.


Now, enter your Shop Name, Shop Email ID and Password>>Save.

Now, in Basic Settings, come to the API section and set the Resource Access as “All”.

Initially, the status will be “Inactive” Mode. Activate it and set it as “Allow all”. There, you will get the Integration details.
Lastly, get the access token from there and paste it in the “Magento Configuration” section of Multivendor app.
This way Magento Seller will get the Access Token.
Import Products from Magento to Shopify
If the Seller has enabled the “Auto Sync to seller” tab from “Magento Configuration” section of the Multivendor app,
then once the Seller creates any product at Magento the same will be created at Multivendor app with “Approval Pending State”.

But if the seller wants to import some selected products from his/her Magento store to Shopify then you can achieve it with the “Import Product” option.
Now, clicking on the Import Products button, the seller can import the maximum of 250 products at a time via product SKU(s).
Seller will have two methods to import products:-
Method 1:- By Single SKU or Comma Separated SKUs

Using this method, Seller will enter his/her Magento product SKU(s) and click on “Import Product” button to import Magento store’s products into Multivendor App.
Method 2:- By CSV File

Moreover, using 2nd method, Seller can upload a CSV file of Magento product SKUs and upload the products in bulk in one go.
This way, Seller can import products from Magento to Multivendor App.
Product Listing
As soon as the Magento Seller’s products get synced into the Multivendor app, initially the products will be in “Approval Pending” state at both admin and seller end.
Furthermore, you can visit the Product Listing section of the Multivendor App to view the newly added products by Magento Sellers.

Admin End
The admin can anytime enable or deny the product from his/her end. He can also edit or delete the product.

Now, if the admin denies any product added by his seller, he needs to mention the reason for the same.
Moreover, once the admin enables the product, product will get approved on seller’s side too.

Orders
Once you place an order at the Shopify store for the seller product, you will have the same order on the Magento store also.
Further, manage inventory at both the ends i.e. at Magento as well as at Multivendor App.
Please Note:- At Magento, the Order amount visible to the seller will be exclusive of the Taxes applied at Shopify end i.e. Sales Tax will not be synced.

Order Placed at Multivendor App
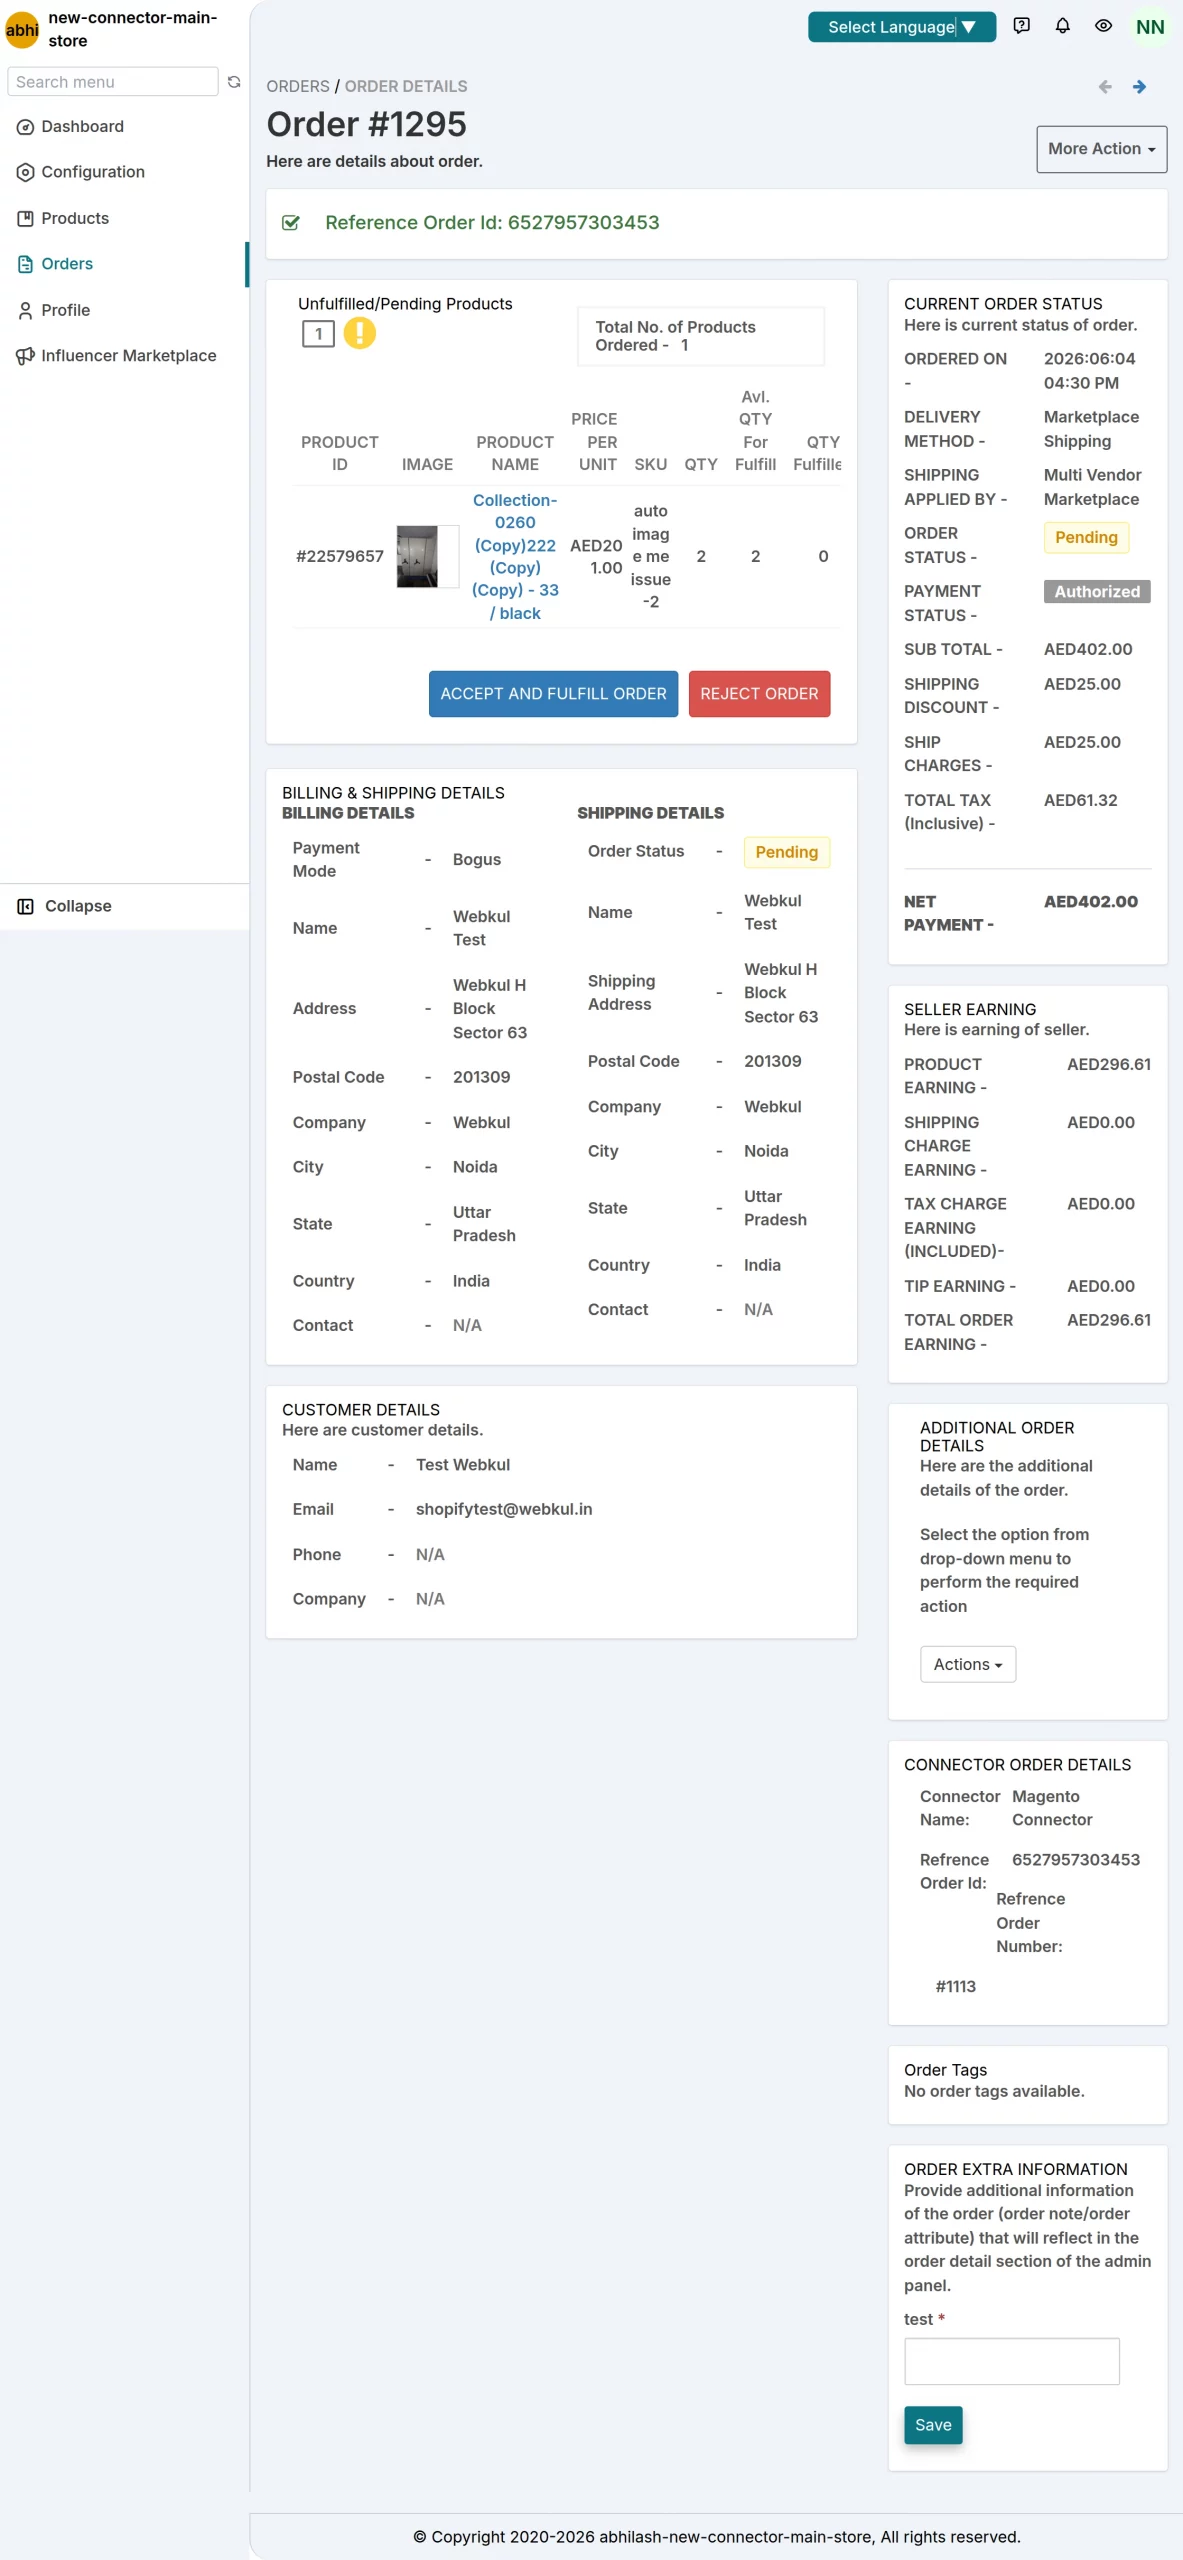
Orders automatically Synced at Magento:

Furthermore, Seller can view the complete order updates at his/her Magento Store:

Create Price Rule
Moreover, you can allow sellers to create price rule to manage product price of their Magento store to the merchant’s Shopify store.

Sellers will have a new menu named Connector Price Rule in the configuration menu of the app.
From here, the seller can create price rules based on which the seller’s product price will be calculated on the merchant’s store.
Clicking the Connector Price Rule, the seller needs to enable “Price Rule” status and select the options as increase/decrease price.
Get price change by a fixed amount or a percentage amount, enter the amount that you want to change.
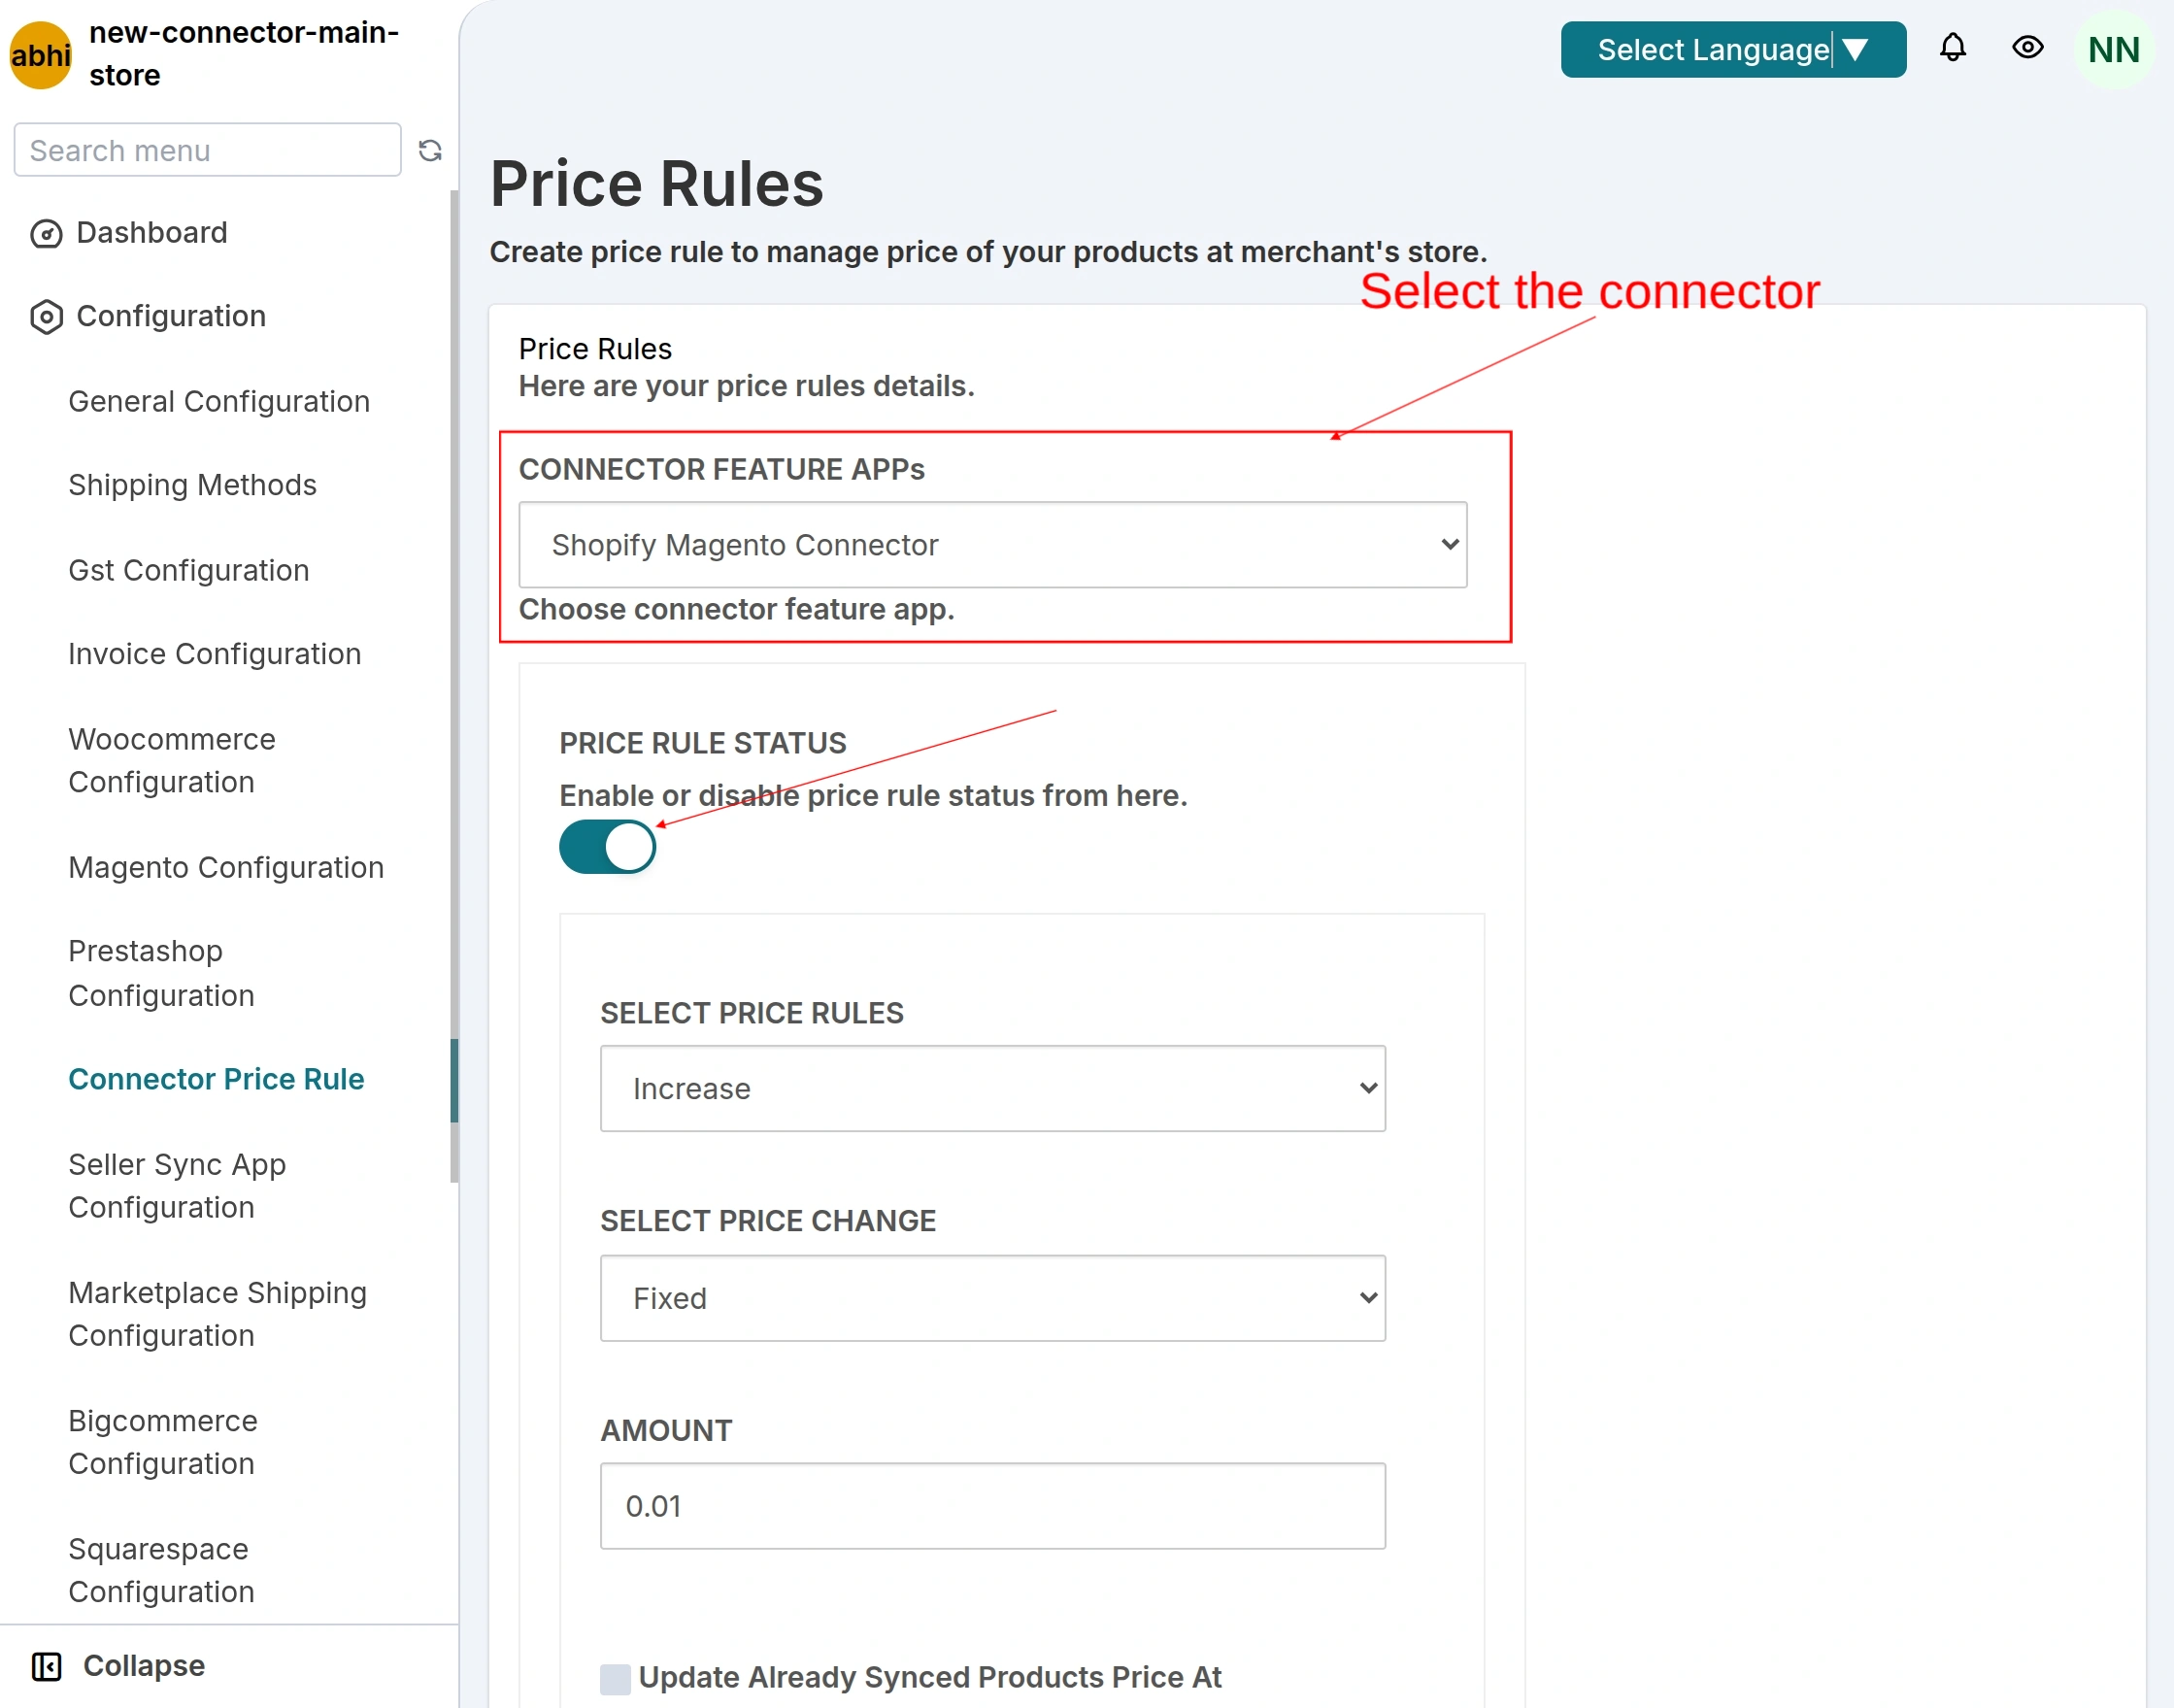
Enable the checkbox to update already synced product’s price at the merchant’s store as per the price rule.
That’s all about Multivendor Marketplace for Shopify-Magento Connector feature app.
Demo Details
Moreover, follow the below links and credentials to check the demo of Magento Connector App: https://egsma.io/shopify-multivendor-marketplace/
Need Help?
Hope you like this blog. To get more interesting blog keep in touch with us.
If you need any kind of support, simply raise a ticket at https://webkul.uvdesk.com/en/. You can contact [email protected] to get proper assistance.
Thanks for reading!

Be the first to comment.