We are here to introduce a new feature app of Multivendor Marketplace for Shopify named Global Product. It enables the store owner to create global products that can be sold by multiple sellers.
The seller can view the list of products added by the admin in the global product section of the seller panel.
There, he/she can click any global product and become the seller of that particular product simply by clicking “sell this product” button.
Admin can enable this feature app with an additional charge of USD 15 per month. This charge will be over and above the monthly subscription charge of your selected multivendor plan.
The merchant can now add global products in bulk via CSV upload.
Note:- You can add custom fields to the global products on your store. Know More
You can also allow sellers to add auctions to global products. EXPLORE
Check the below video of Global Product:
WORKFLOW
INSTALLATION
This Global Product app will be visible in the “feature apps” section of the Multivendor app.
Just click on the three dots available on the upper right corner of the admin’s dashboard. There, you will get “Global Product” in the feature app section.


Click on the “Enable” button to activate the “Global Product” feature of the Multivendor app.
Once you enable this feature, you will add up USD 15 per month in the monthly charges of the multivendor app plan. Now, if you agree with this plan, you need to approve the charge.
Now, the Global Product menu will appear both on admin as well as seller panel.
Global Product Configuration
Go to Configurations>>Visit Global Product Configuration>>Configure the settings>>Save.

As soon as you enable the Global Product Feature app, You will get a new menu added in the “Configuration” i.e. Global Product Configuration.
On the redirected page, Merchant will have the following configurations. Let’s dive into each one at a time.

Sort By
Admin can choose whether he wants to display the sellers of the global product on frontend according to the ascending or descending manner depending on the prices they have set.
Different sellers selling the same global product can set different prices. In other words, sellers can edit the price of the global product once they started selling it.
Frontend View


Now, the customer will be redirected to the seller profile page after clicking on the seller’s name
Toggle visibility of the ‘Detail’ column in the Global Product widget on the frontend.
Admins can control the visibility of four product variant properties on the frontend: Price, Image, Description, and Quantity.
These properties can be enabled or disabled using four corresponding checkboxes in the configuration settings.
By checking or unchecking the boxes, the admin can choose which details appear on the product page.

On frontend, it will look like this.

Manage Variants For Global Product
Using this option, the Admin can add variants to global products. Furthermore, the sellers can sell any particular variant of that global product.
Earlier, we haven’t provided the functionality to add variants to the global products or to import products with variants as global products but now we have introduced this feature also.
So, to add variants, the admin can simply add a new global product & on the ‘add product’ form, he will get an option to add variants.

After the admin adds variants, the seller can choose whichever variant he wants to sell. Multivendor Marketplace Seller Panel > Global Products > Sell Product.

Now, on the following page, the seller will have the list of all the added variants which he is not selling in the Unlisted Variants section.

Sell Global Products in Bulk Using Bulk Actions on the Seller Panel
Sellers can now sell global products in bulk using the Bulk Action option from the Seller Panel.
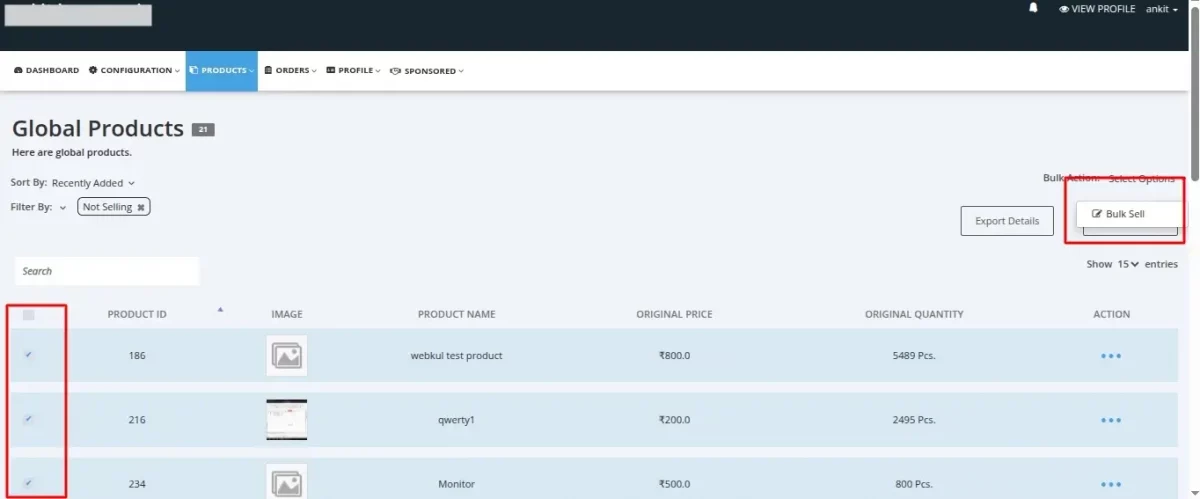
By selecting multiple global products and clicking Bulk Sell, sellers are redirected to a single page where they can add and save the product variants to sell.
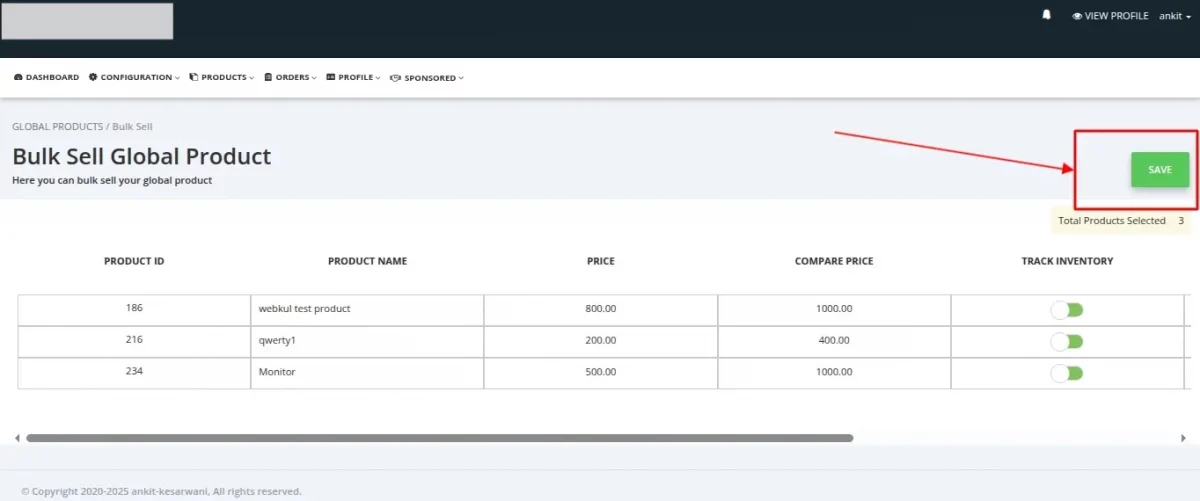
Once saved, the same details are applied to all variants, and the products are made live for sale globally.
Important points to note
- The details entered on the product level will be applied to all variants of that product.
- All variants will be sold with the same details provided at the product level.
This feature helps sellers save time and manage global product listings more efficiently.
Single Variant Selection

Multiple Variant Selection
After clicking on the ‘Sell Variant’ button, the seller will have a pop-up where he can change the price, compare at price, inventory tracking option & quantity of the variant.

Note
If the seller disabled the ‘Track Inventory’ option then the customers can place an order for n number of quantities.
But if the seller has enabled this option then he needs to provide the number of quantity of that variant. Thus, customers can only buy the product within a given quantity.
Next, the variants which the seller is selling will now list in the Variants Details section and rest will remain in the Unlisted Variants section.
(The seller can edit(update price/quantity) the variants he is selling anytime.)

Moving on, if the seller doesn’t want to sell a particular variant of the product anymore then he can unlist the variants from the Variants Details Section anytime.
Note
To unlist the variants from the Variants Details section, the seller needs to have at least one variant other than the one he wants to unlist.

Now, if the seller wants to stop selling that particular global product then instead of unlisted the variants, he needs to unlist the whole product from
Multivendor Seller Panel > Global Products > Unlist

Global Product Variants: Frontend View


Please Make A Note:
The admin can’t add more than 100 variants to a product & each product can have only 3 option. (This is according to Shopify’s limitations.)
Allow Sellers To Manage Global Product Price
Enable this option if you want to grant your sellers the rights to change the global product price.
Disable if you don’t want sellers to change the global product/variant price & sell on the same price as mentioned by you (admin).

Allow Sellers To Manage Global Product Inventory
Enable this option if you want your sellers to update the global product/variant quantity else keep it disabled.

Manage Seller Global Product Via Admin Global Product Inventory
In case you want to manage seller’s global product inventory on the basis of product inventory of your store,
you can disable the “Allow Sellers to Manage Global Product Inventory” tab and enable Manage Seller Global Product Using Admin Inventory tab.

Once you enable this tab, seller’s global product quantity will be managed according to admin’s product inventory.
Note:- The seller product quantity will always be the same as merchant global product quantity.
Enable Sellers to Add Custom Images for Variants
With this feature enabled, sellers can upload a custom image for each variant while setting up their products.
This allows for better product representation and helps buyers easily differentiate between variants. Please note that sellers can upload only one image per variant.

Enable Sellers to Add Custom Descriptions for Variants
This feature allows sellers to add a custom description for each variant when setting up their products. It helps provide detailed information about individual variants.

Track Seller Inventory Status Using Meta fields
Enable this feature to track seller inventory status seamlessly with the help of meta field.
This helps in tracking whether the product is in stock or out of stock using the meta field (wk_track_inventory_for_gb ).

Create Seller Global Product Handle With Seller Shop Name
By enabling this option, sellers can include their shop name in the handle of any global products they sell, ensuring the shop name is automatically added to the product handle (seller’s product).
To enable, Admin needs to navigate to the Admin panel of marketplace>> Configurations>> Global Product configuration>> enable Create Seller Global Product Handle With Seller Shop Name >> save.

To see the seller shop on the seller global product handle,Bulk Selling of Global Products via Bulk Action Admin needs to navigate to the Shopify backend >> Product >> select seller’s Global product
you can see the seller shop name in the URL handle.

Allow Sellers to Manage Global Product SKU
You can now allow sellers to manage SKUs while selling global products from their respective seller panel.
For this, You need to visit Configurations>>Click Global Product Configuration>>Enable the option Allow Sellers to Manage SKUs of Global Product>>Save.

Once this option is enabled, the sellers will get the option to add SKUs while selling global products from their seller panels.
Seller will click the SELL PRODUCT button to sell this global product.

In the product form, the seller will have the option to enter the global product SKU.

Moreover, sellers can update the SKUs of global product variants.

Manage Seller Global Product SKU via Admin Product SKU
You can also allow sellers to manage the seller’s global product SKU through your own product’s SKUs.
For this, you need to enable the option from the Global Product Configuration menu in the app.
In case SKU is blank or null in seller’s products, the admin’s global product SKUs will be updated in the seller’s global products SKU field.

Add Global Product via CSV
You can now add global products to the app via CSV upload in a go. To do this, you need to follow the below-given steps:-
- Visit the admin panel>>Products menu.
- Click the Global Product sub-menu.
- Visiting this section, you need to click the “Add Global Product by CSV” in the Action menu.

You can download the instruction file in the app to know how to prepare your global product CSV file.
Also, we recommend to download the sample CSV from the app, edit the CSV file as per the requirement and then, upload the CSV file for validation in the app.

This way, you can add global products via CSV. In case you need help with the CSV upload, please feel free connect via [email protected].
AVOID MISTAKES WHILE PREPARING CSV
Display the Global Product having the Lowest Price
You will now have the option to display the global product offered by the seller at the least price.
For this, you need to enable an option from the “Global Product Configuration” menu of the app.
Go to Configuration>>Global Product Configuration>>Enable the option “Display the Cheapest Global Product“>>Save.

Note:- In case, two sellers are selling a global product at the same price then the product that is firstly approved by the admin will be displayed on the product page.
Here is the global product with the lowest price:-

Auto Publish Global Products
You will now have an option to choose whether you want to auto-publish the global product right after a seller sells it or not.
For this, Go to the Configuration>>Global Product Configuration>>Enable Auto Publish Global Products>>Save.

After enabling this option, global products will get auto-published once the seller clicks the “Sell Product” button.
NOTE:- Before enabling this option, make sure to publish all the previous products as you will not get the option to publish the unpublished products later.
In case, this tab is disabled, the global product’s variants will remain in unpublished status till the time it is manually published by the admin.

Label Configuration
On the same page, the admin can customize the frontend labels as per his requirements.

The global product menu is visible in the Products section of the admin panel.

Similarly, the Global product menu is visible in the Products menu of the seller panel of the Multivendor app.

Let’s see how this feature works on the admin end.
After clicking on “Global product”, a page appears to you where you will get a “Add Global Product” button. You can click this button to create a global product.

In order to add global products to your store, just click the “Add Global Product” button and fill all the global product details.

Once you fill the details, you will end up creating a new global product that is sold by various sellers.
Now, you can view the list of global products in the “Global Product” menu of the Product section of the multivendor app.
These global products are also visible to the seller on his/her end (in the product section of seller panel)
from where he/she can choose any of the global product for himself/herself and sell it as per his/her choice.
Have a look:

NOTE:- If you want to assign your pre-existing Shopify store product as a Global Product then do refer the below-given procedure:
Multivendor Admin Panel>>Visit Products section>>Click on “Import Products”>>Select the product
which you want to assign as a Global Product>>Click on “Assign Product to Seller” (Action menu)>>Select Global Product from the drop-down menu>>Click on “Assign”.

You can refer the below-given screenshot for the same:

Now Admin can also edit Global product listing in bulk(admin side)
Instructions to perform bulk edits on global product listings through the admin interface.
It is designed to help administrators efficiently update multiple product records in one action, saving time and reducing manual effort.
Steps to Perform Bulk Edit:

-On Admin Panel -> Products -> Global Products -> Select multiple products -> click on ‘Bulk Action’ –>click on Bulk Edit.

Table with listed global products will appear, Edit product’s entry accordingly.
Commissions Types supported in Global Product
The global product supports the following commission types in the Multi-vendor Marketplace app:-
- GLOBAL COMMISSION
- SELLER COMMISSION
- CATEGORY COMMISSION
- PRODUCT COMMISSION
Now, product-wise commission works for global product.
Even if the sales price option is enabled, you can set product wise commission on global products and auto-update the seller’s product price.
For this, you need to enable the checkbox on edit/add global product page. By enabling this checkbox & clicking the submit button,
product price will get auto-updated for sellers as per the product commission configured for the global product.
CLICK HERE to know more about commissions in the multi-vendor app.

Commission will be applied in this manner:
Product commission>category-wise commission>seller commission>global commission.
Let’s see how it works on the seller end.
Once the seller clicks the global product menu from the product section of the seller panel, he will get the same list of global products that the admin has added.

Through this section of the app, the seller can view all the global products that the admin has added and he can sell any of them as per his wish.
The seller just needs to click on the “Sell Product” button in the action menu of the global product section. Now, he can add the product’s detail and finally click on the “Sell” button.

Clicking on the Seller Product button, the seller will get redirected to the edit product section.

The seller can also edit or delete that global product that is sold by him.

Talking about the admin, he can edit, delete, enable/disable the global product which he has created.
Also, he can view the complete details of the seller who has sold the global product.
He just needs to click the “Seller Detail” button on the global product detail page of the admin panel.

Note:- If the admin will make any change in global product details or update any info on his end,
the seller can also see all the updates excluding Global Product Image on his end.

Note:- The global product sold by the seller will now be visible in the product listing section.
Also, admin can also enable or disable the seller who has sold the global product created by the admin.
NOTE:- A new product will be created on the admin end once a seller adds a global product
FrontEnd Display
After enabling the ‘Global Product’ feature app, the Admin needs to do some code pasting.
Admin can get all the instructions and codes from the following page: Multivendor Marketplace Admin Panel > Configuration > Instructions for Marketplace:

1. Display The Global Product On Your Store’s Product Description:
- To display the seller listing on the global product description page then you need to paste this code in the product.liquid template.
<div class=”wk_global_product” data-prod =”{{product.id}}” data-var =”{{product.selected_or_first_available_variant.id}}” style=”display:none; border-bottom:1px solid #ddd; border-top:1px solid ddd; padding:5px;” data-tags=”{{ product.tags }}” >
2. Next, To Hide The “Add To Cart” Button On Your Store’s Product Description Page:
- If the admin wants to hide the ‘Add to Cart’ button from his global product description page then he needs to paste the following code into the product.liquid template > AddToCart button.
{% if product.tags contains ‘wk_global’ %}style=’display:none;'{% endif %}
This is how it appears on front end:

Global Product Label Translation
You can also rename the labels as per your requirement for various sections of the Global Product feature app. Go to the Translation>>Global Product Label-Feature.

In this way, you can translate the labels for various sections of the Global Product feature app.
Compatible with Stock Management App
The Global Product app is now compatible with the Stock Management feature app. Thus, you can now manage the stock of the global products sold by multiple sellers.
For more detail, REFER
Options on Disabling Global Product Feature App
You can now either delete seller’s products or convert the global products to normal products while disabling the feature app.
Once you disable the Global Product feature, you will get two options. You will be asked either to “Convert seller global product to normal product” or “Delete seller global product“.

Once you choose to “Delete seller global products”, you can choose if you want to delete the products from Shopify too or not. Select the option and click the Deactivate button.

Allow Shopify connector sellers to sell global product
This feature enables sellers using Shopify connector to sell global products. To activate this, simply navigate to the global product configuration section.
Admin needs to enable “ Map Global Product with Normal Product”

Upon enabling this configuration, you will get the option to enable/disable the configuration “Seller can sell only global product”
Enabling this configuration the Admin can make it mandatory for the Shopify connector sellers to sell only global products.
Sync Seller Country to Shopify Product Metafield
We’ve introduced a new configuration in the Global Product feature of the Multivendor Marketplace app.
When “Sync Seller Country to Shopify Product Metafield” is enabled, the seller’s country is automatically added to the metafield wk_origin_country.seller_country whenever they list a product for sale.

Unlink the seller page from the global product
Admins can now unlink seller profiles from global products. This gives them greater control over managing seller information across the platform.
To configure this Admin needs to navigate to:
Admin Dashboard>>Configuration>>Global Product Configuration>>Add Seller Profile link on Global Product widget

Once disabled, the seller profile will no longer be linked to the Global Product widget
Seller Panel
Shopify connector sellers will import the products from their shopify store. Products imported will only be approved once they are mapped with the Admin’s global product.


Note: Seller global product will only be mapped with admin product if SKU and option value are the same.
Fetch Global products sold by all the Sellers
We have introduced the Global Product API, which allows you to fetch global products for any seller on our platform.
This public API enables you to retrieve information about global products sold by sellers on the Multivendor Marketplace.
/api/v2/public/global-product.json
Through this API you can get a list of all sellers who sell global products,
for a specific product or variant and retrieve detailed information about global products, including price, availability, etc.
Below is a sample of how you can utilize this API in your code to fetch this information and display it according to your preferences:
{% capture currencyString %}{{ shop.money_format }}{% endcapture %}
{% assign tempArray = currencyString | split: '{' %}
{% assign currencySymbol = tempArray.first %}
<head>
<link rel="stylesheet" href="https://cdnjs.cloudflare.com/ajax/libs/font-awesome/4.7.0/css/font-awesome.min.css">
</head>
<style>
.wk_button {
background-color: #2ebb6f;
border: none;
border-radius:15px;
width:60%;
color: white;
padding: 15px ;
text-align: center;
text-decoration: none;
display: inline-block;
font-size: 16px;
font-weight:400;
cursor: pointer;
}
.offer-card:hover {
border: 1px solid #d3d4db;
}
</style>
<script>
fetch('https://mvmapi.webkul.com/api/v2/public/global-product.json?limit=50&page=0&sort_by=name_ascending&shop_name={shop_name}&product_id={shopify_product_id}&variant_id={shopify_variant_id}')
.then(async(response) => {
if (response.ok) {
var data_res = await response.json();
console.log(data_res.sellers);
let seller_name = "";
let quantity = "";
let is_verified = "";
let price = "";
let test ='';
data_res.sellers.forEach(myFunction);
function myFunction(item, index) {
if(item.is_mail_verified != 0 ){is_verified=" ✅ Verified seller "}
console.log("is_verifield " +item.is_mail_verified );
if(item.quantity>0){quantity = 1}else{quantity = 0}
div_content +='<a>'+
'<div class="offer-card" style="width:50%;border-radius:10px;background-color:white;padding:15px;color:black;text-align:center;margin:auto;height:75px;margin-top:15px;">'+
'<div style="width:25%;background-color:;color:black;float:left;font-weight:600;"><div style="font-size:12px;color:#7b7b7b!important;font-weight:400;margin-bottom: -9px;">Availability</div>'+quantity+' - '+item.quantity+ ' pcs' +'</div>' +
'<div style="width:25%;background-color:;color:black;float:left;font-weight:600; ">'+item.seller_name + ' '+'<div style="font-size:12px!important;color:#7b7b7b!important;font-weight:400;margin-top:-9px;">'+is_verified+'</div></div> '+
'<div style="width:25%;background-color:;color:black;float:left;font-weight:600; ">{{currencySymbol|strip}}'+item.price+' <span style="font-weight:400;color:#7b7b7b!important;font-size:12px;font-weight:400;">/pc</span><div style="font-size:12px;color:#7b7b7b!important;font-weight:400;margin-bottom: -9px;">'+item.country+'</div></div> '+
'<div style="width:25%;float:left;"> <form method="post" action="/cart/add"><input type="hidden" name="id" value="'+item.main_variant_id+'" /><button class="wk_button"><i class="fa fa-solid fa-cart-arrow-down" style="font-size:px;color:white;"></i> Buy</button></div> '+
'</div>'+
'</a> ';
document.getElementById("demo").innerHTML = div_content;
}
} else {
throw new Error('API request failed');
}
})
.catch(error => {
// Handle any errors here
console.error(error); // Example: Logging the error to the console
});
</script>
<p id="demo"></p>
Output:

Get the Demo Links
Follow the below links and credentials to check the demo of the Global Product Feature app: https://multivendor-global-product.myshopify.com/pages/demo
Need Help?
If you need any kind of support, just raise a ticket at http://webkul.uvdesk.com/ or feel free to drop a mail at [email protected].
Hope you like this blog. Keep in touch with us for more interesting blogs.

I installed the multivendor marketplace and the global product add on. Instead of getting one product and a list of sellers of that product, I get a new product per seller that indicates they are selling that product via the global products section.
To hide the add to card button, I need to put that code into the theme code, because it does not work when I put it in the product. Liquid code. Could this have something to do with it?
The theme I use is Fashionopolism. We recently bought this and really want to use this theme. Is it compatible?