What is a custom field?
The Custom field allows a user to provide additional information. Like in Multi-Vendor Marketplace app, you can create custom fields for products, orders as well as sellers.
Using these fields, you can ask your sellers to provide their extra information during signing up on your store.
You can display this information on the frontend, i.e., the seller profile page. Similarly, you can create these fields for the product form.
While adding products to the store, sellers provide the additional information, and the system displays it on the product description page for customers.
There is one more option to add custom fields to the orders. Go through the documentation to know more!
Custom Fields for Seller
These are the by-default Seller Signup page fields: Seller Name, Email, Password & Confirm Password.
Now, if the admin wants to add extra fields on this page, he can do so by creating custom fields from his MultiVendor Admin Panel.
Let’s jump into the process of adding these fields.
Go to MultiVendor Marketplace Admin Panel > Configuration > Custom Fields > +Add Custom Fields

The system will redirect you to the following page:

FIELD FOR: Select SELLER
FIELD NAME: Name of the custom field that you want to add
INPUT TYPE: You can choose the type of input for the added custom field.
REQUIRED: Choose whether you want to make the custom field mandatory or not.
SHOW ON YOUR SHOP: Choose whether you want to show the custom field on your storefront or not.
SEQUENCE: Enter the position of the custom field.
Types of custom fields that can be added:
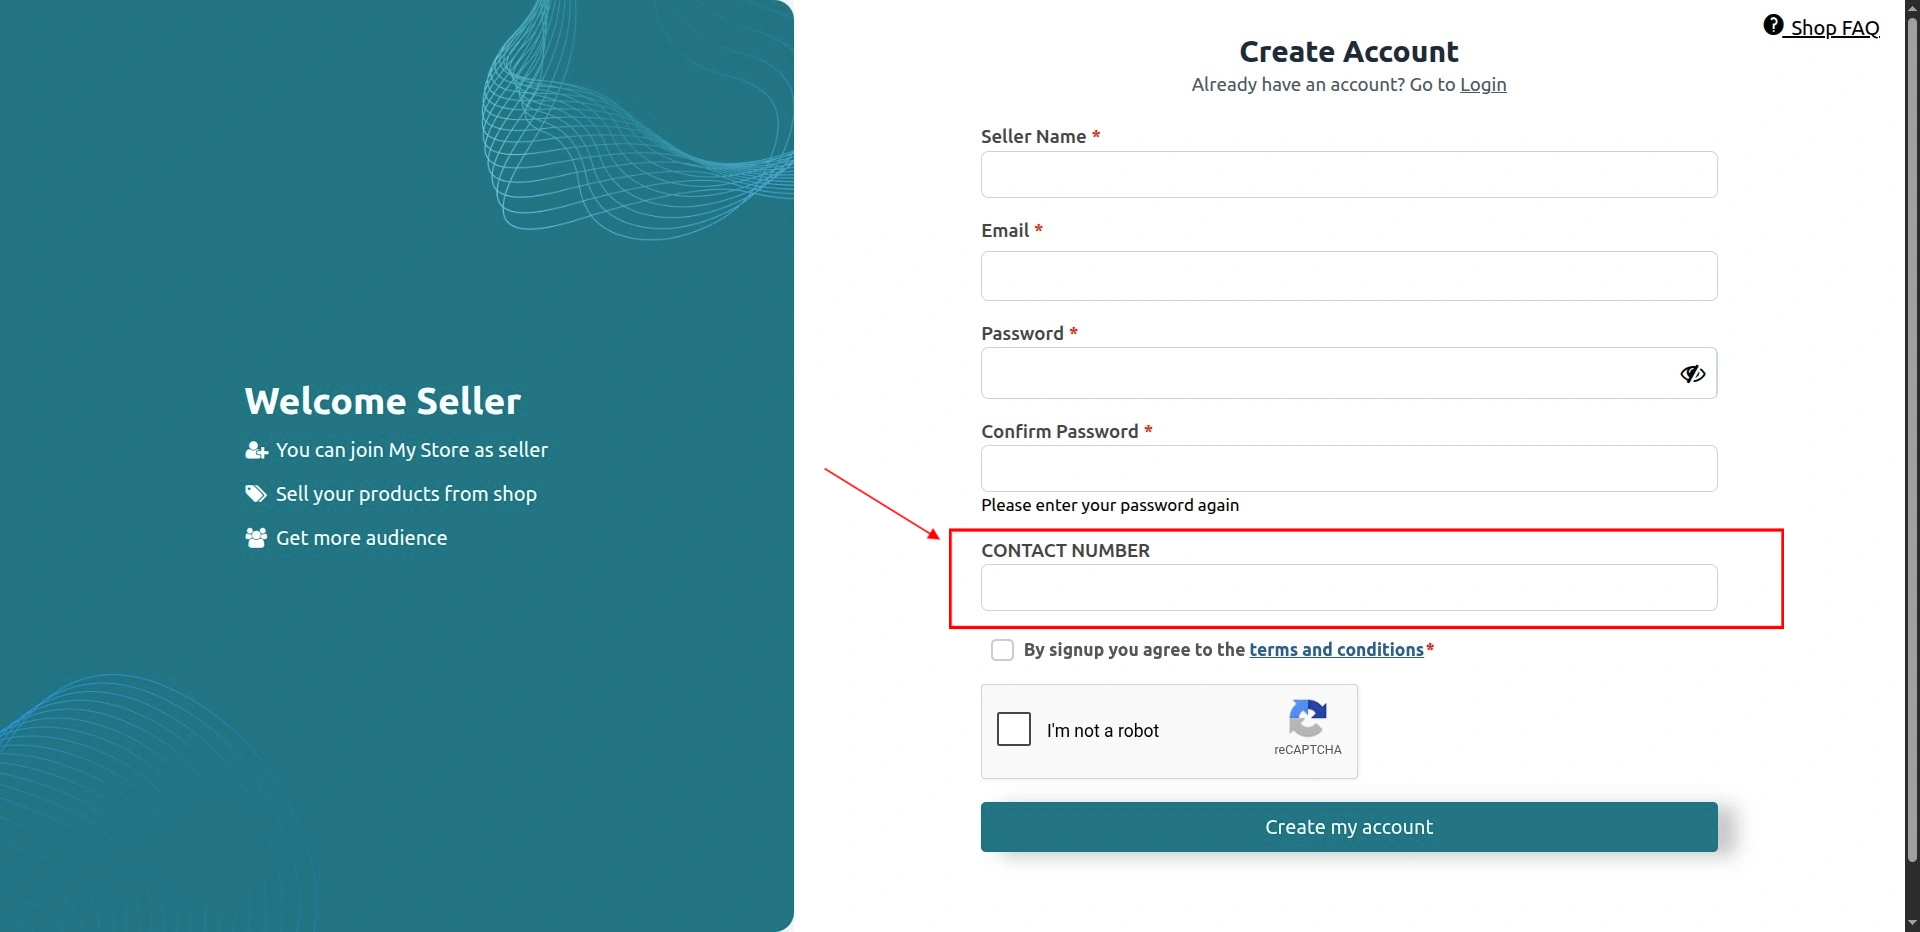
TEXT
Admin can use this to add additional details like the seller’s phone number, city, zip code, and more.
The system displays the TEXT input type on the frontend like this:
Because I have marked this field to be mandatory from the backend, there is an asterisk mark on this field. Making it mandatory for sellers to provide this information for creating the account.
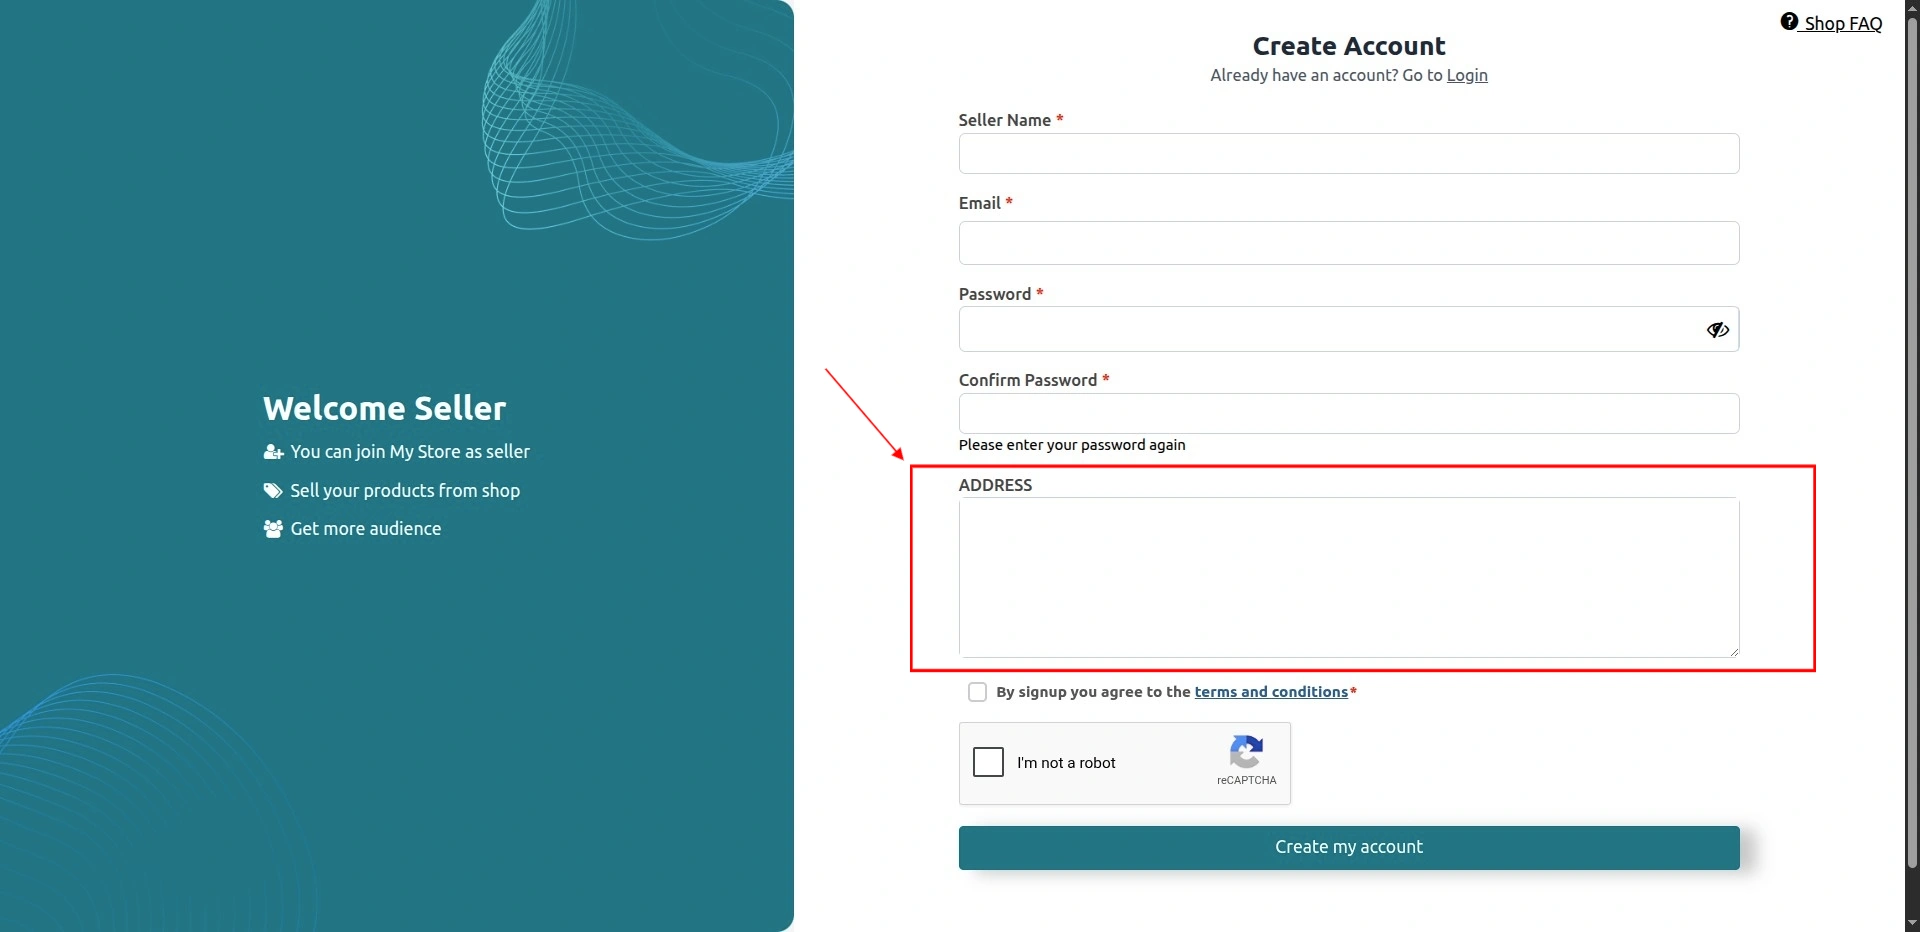
TEXT AREA
Admin can use this to create custom fields for details like the seller’s address or their previous experience.
This input type provides a larger text column to fill up lengthy information.
Frontend:
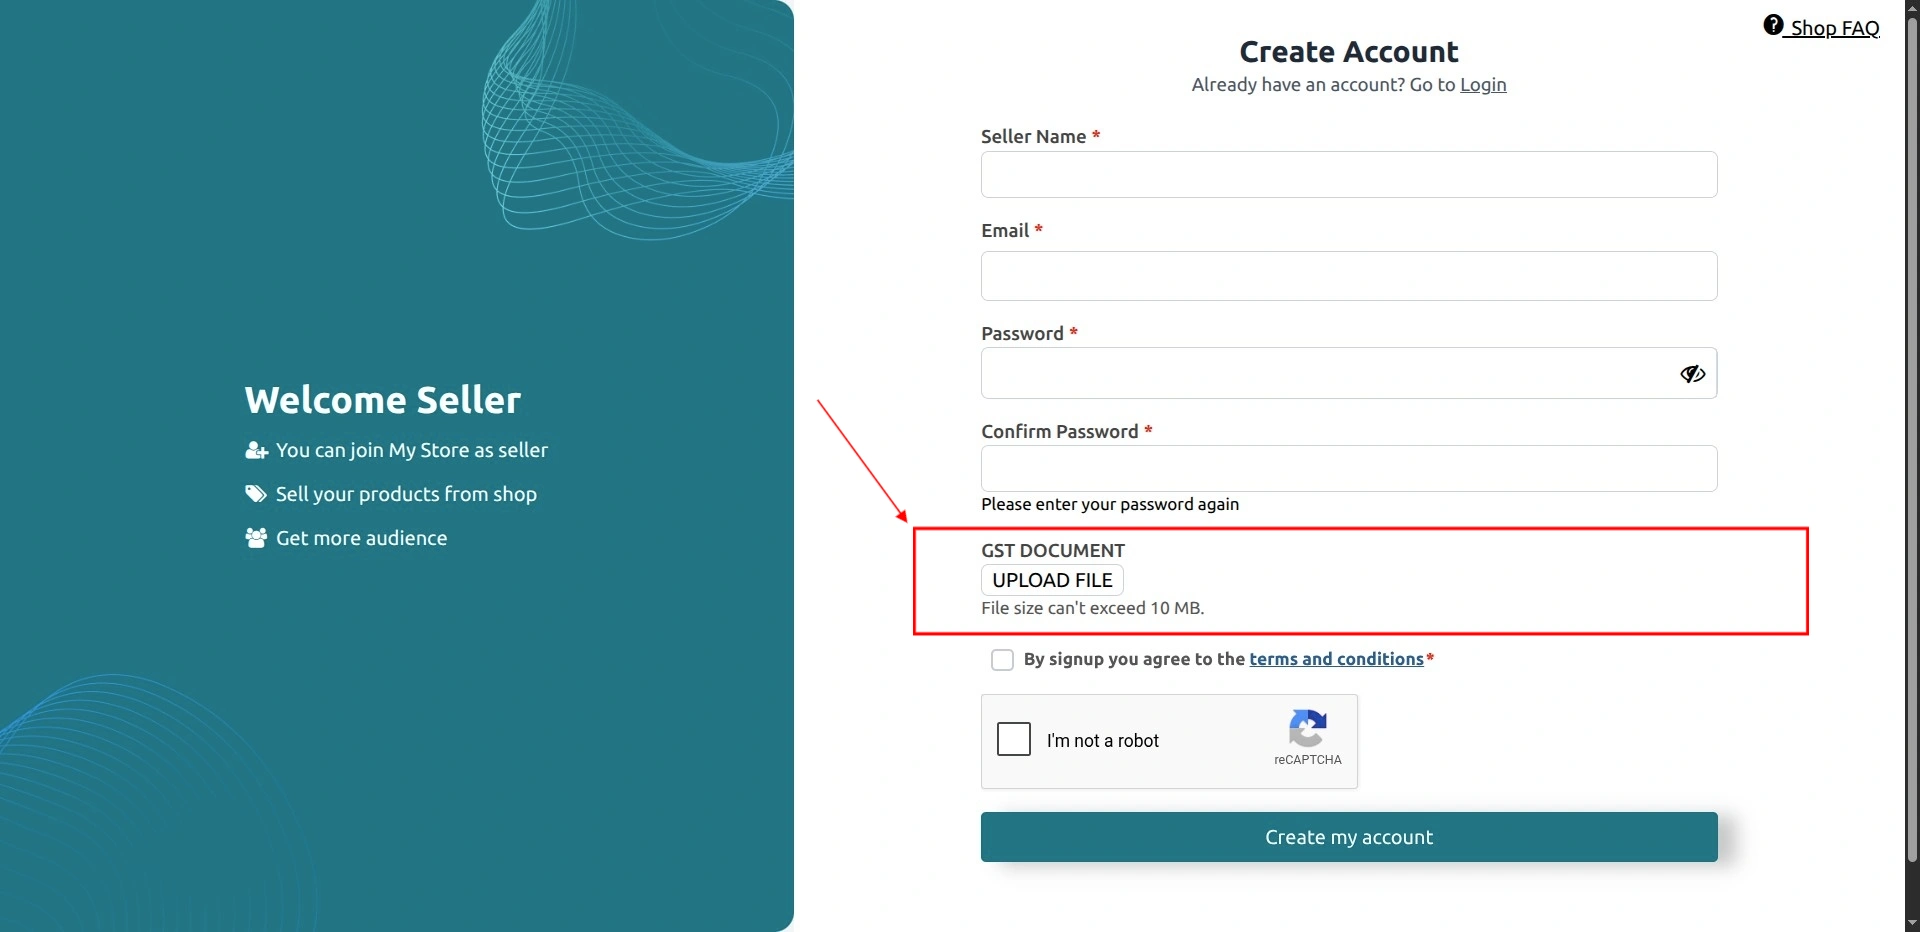
FILE
This input type is used to fetch information like seller’s GST documents, policy documents, profile image or any like of document that you want.
Make sure that the maximum file size which can be upload shouldn’t exceed 3MB.
Frontend:
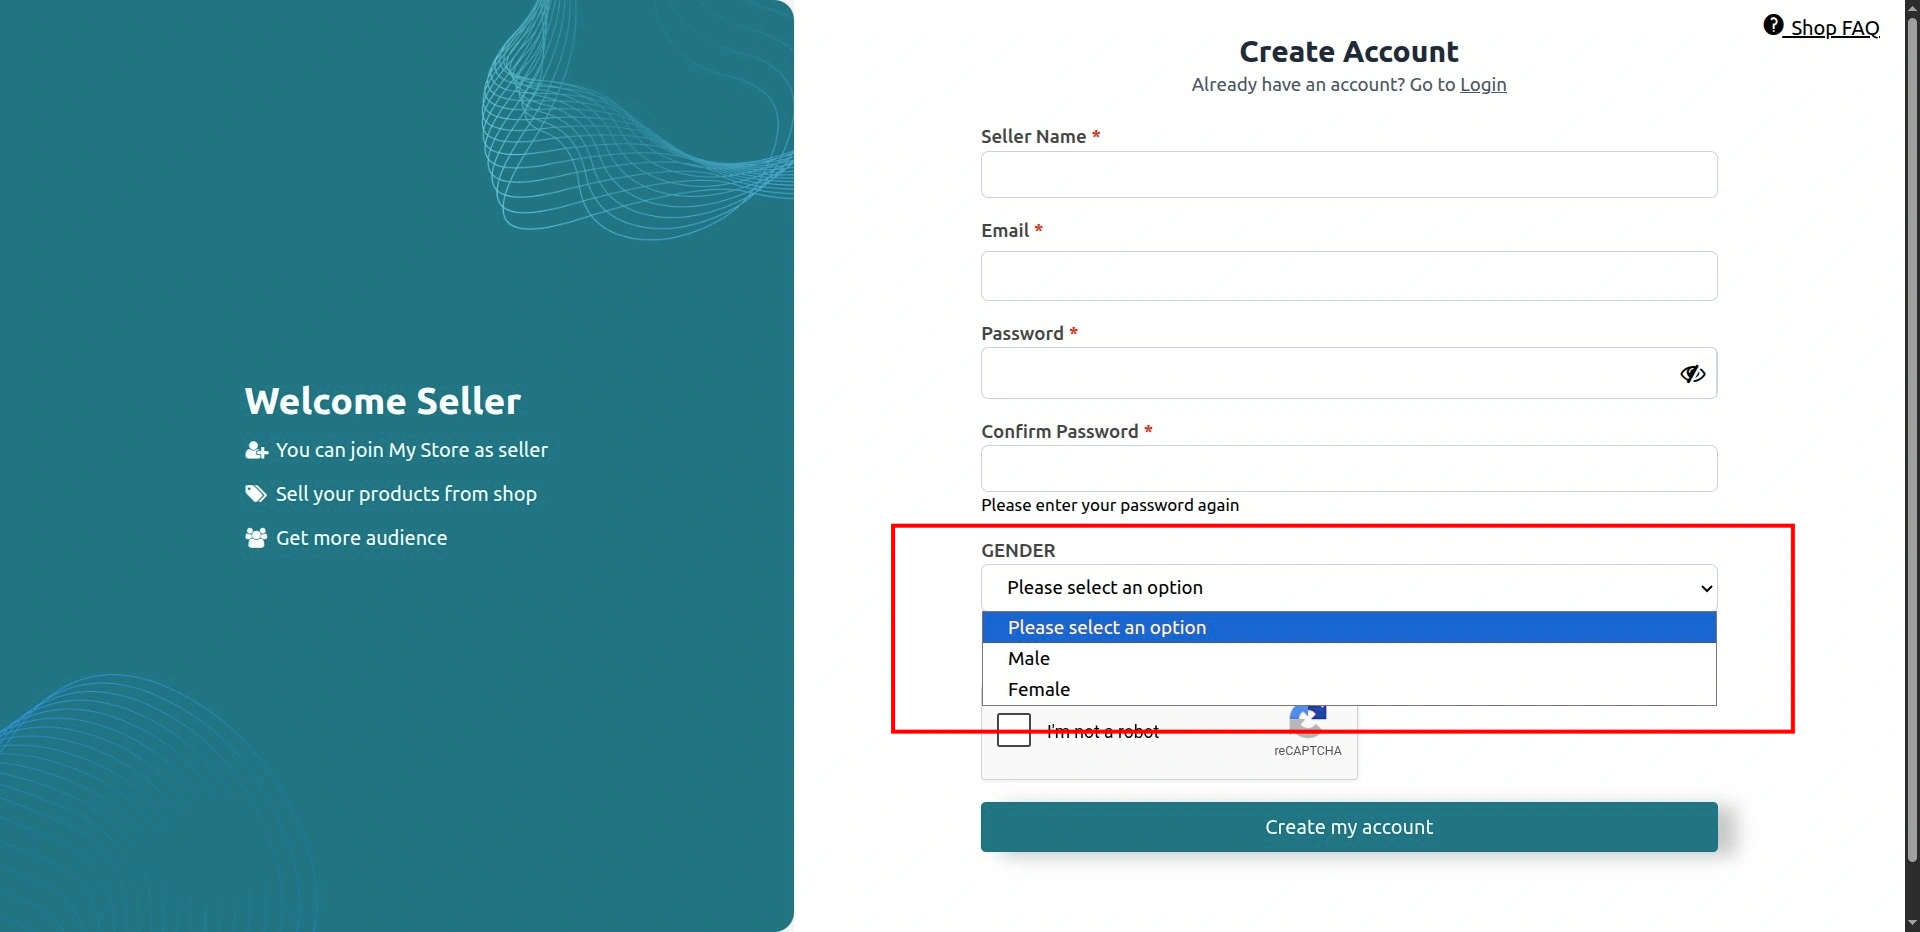
DROPDOWN
This input field is used to create custom fields for entries like DOB, Gender, Country or State.
So, when the admin selects ‘Dropdown’ as the input field, he will get options to add the dropdown menus.
Note: As per the current flow the app can accommodate a maximum of 250 dropdown options.
Refer:

Frontend:
Note: On editing the Custom Field, the admin will not be able to change the type of Custom Field.
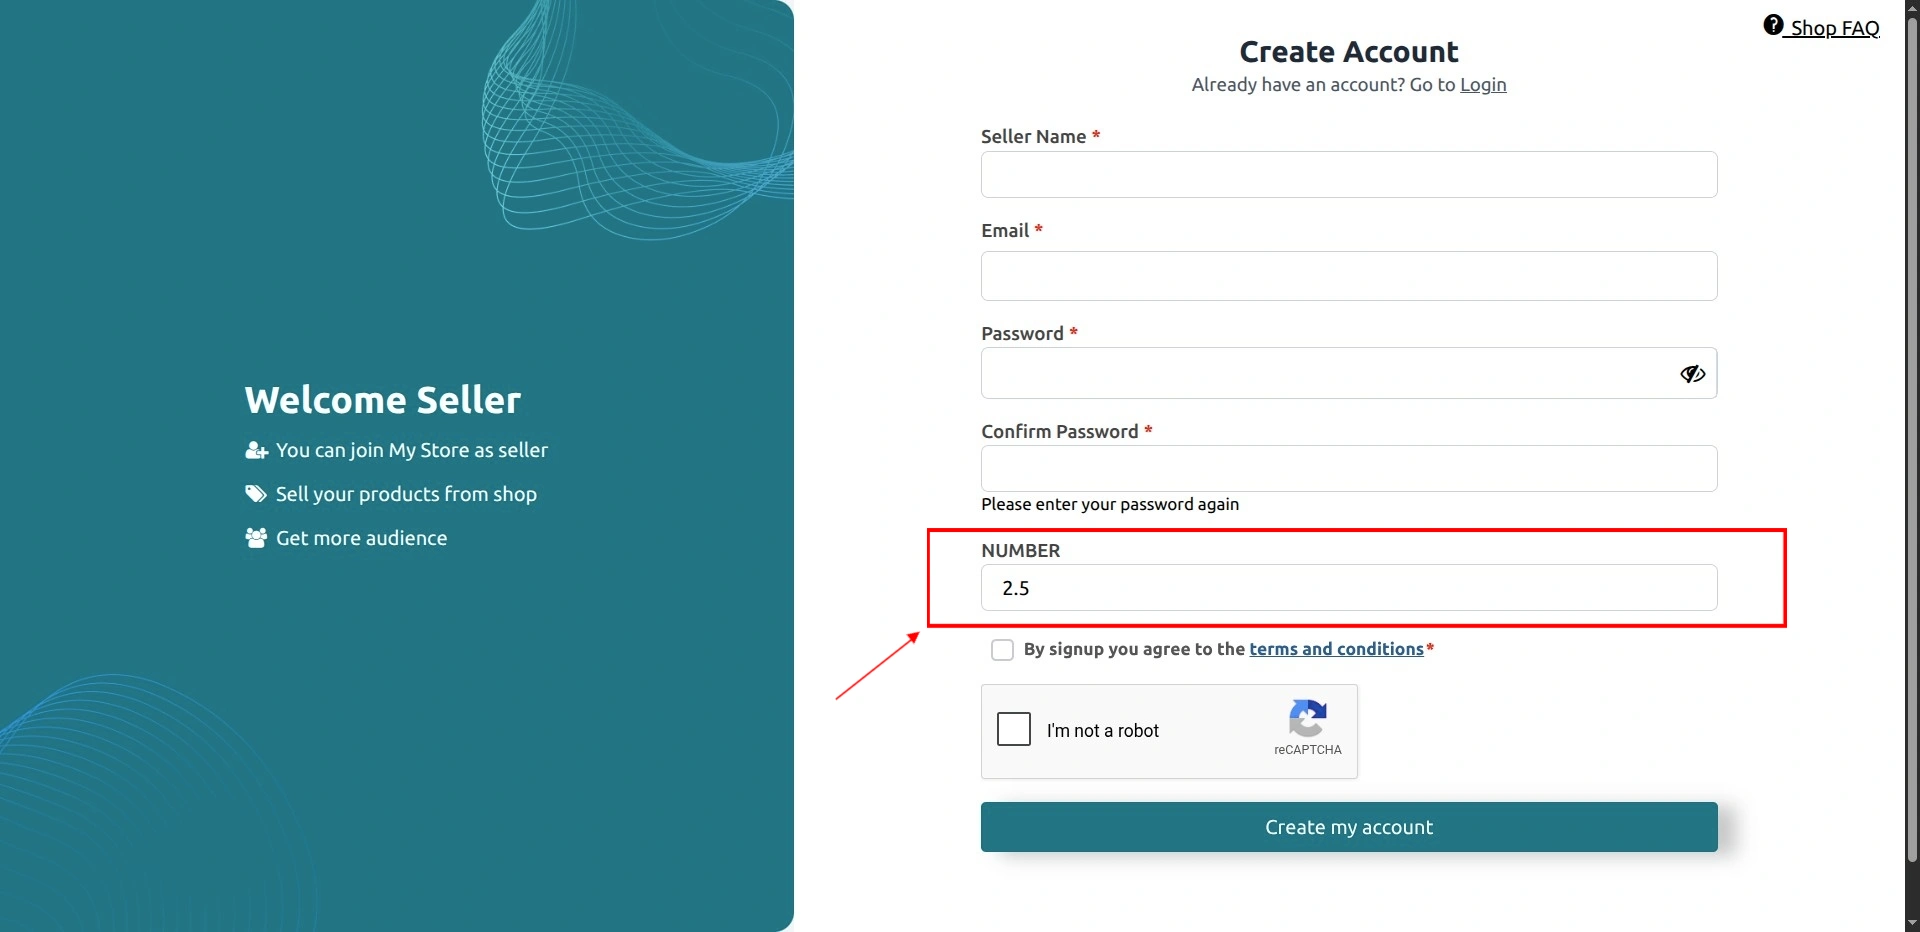
Number
This input type can be used when the seller needs to enter numeric values. It now also supports decimal (real number) format, which allows the seller to provide more precise inputs.
For example, a seller can now enter their expected delivery time in days in decimal format, like 1.5 days (which means 1 day and 12 hours) or 2.75 days (2 days and 18 hours).
The number input field will appear with the ability to accept both whole numbers and decimal values.
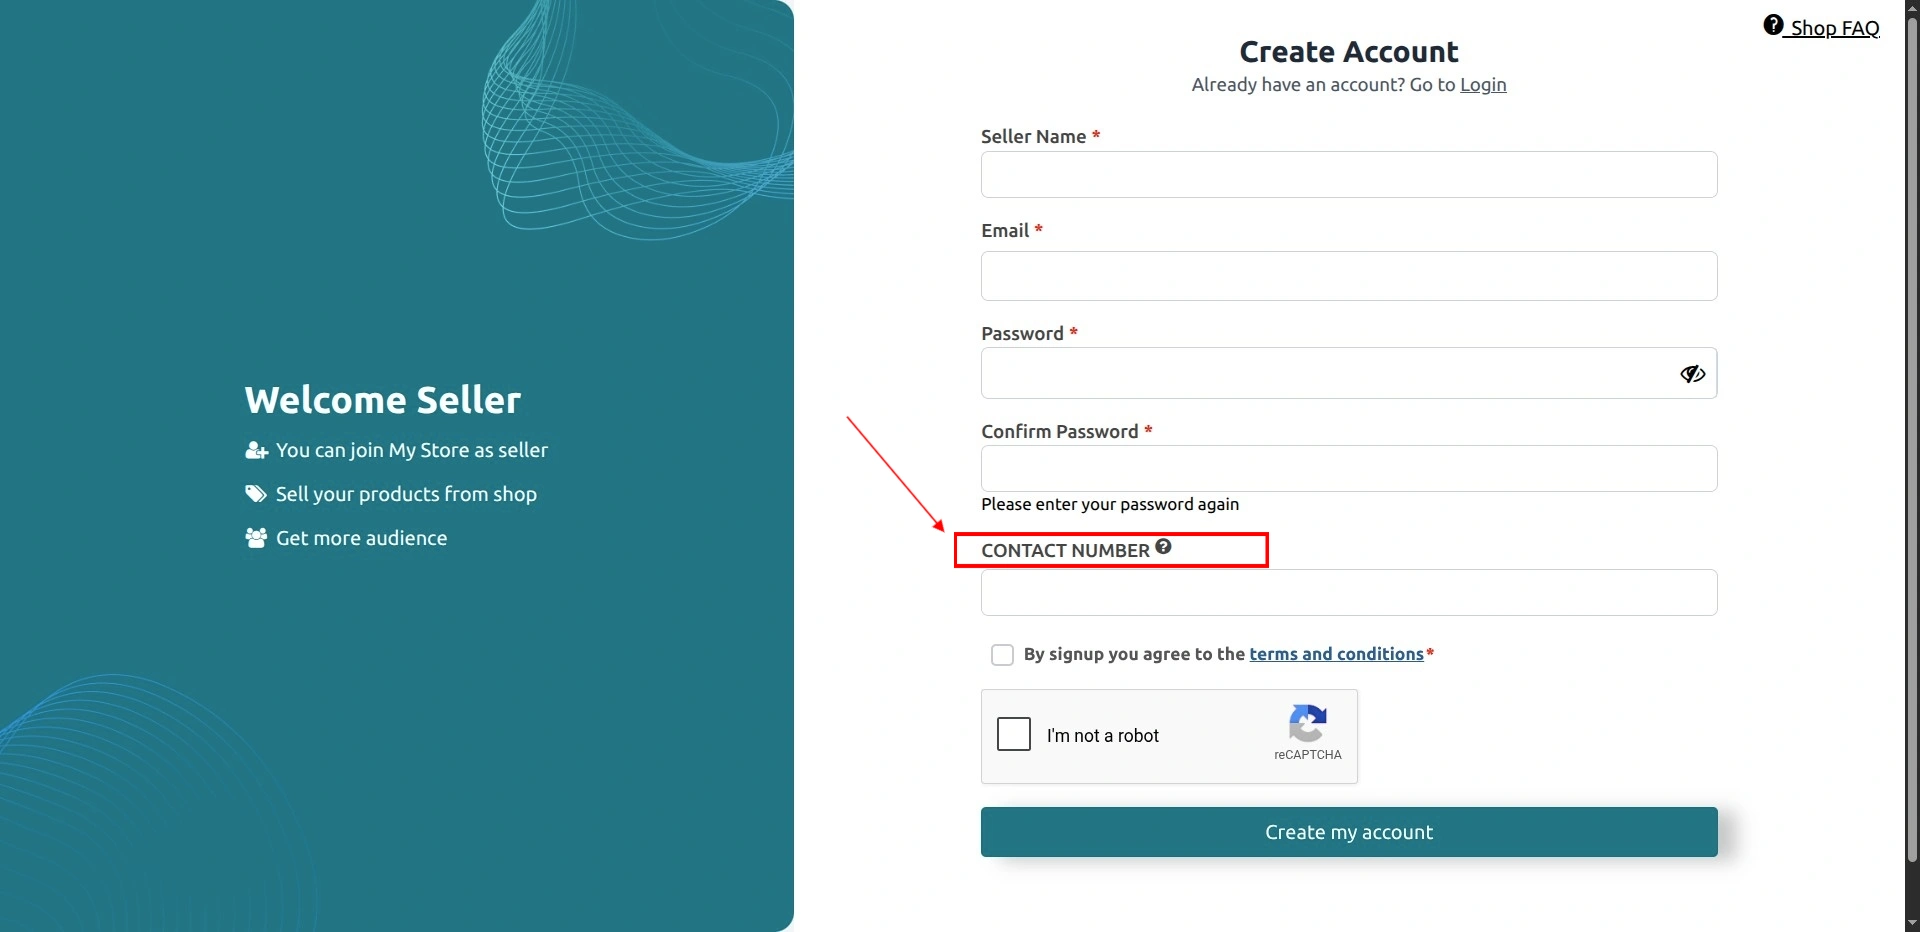
Help Text for Seller Custom fields
- We have added the field “Help Text” to the create custom field for the sellers.
- To add help text to the custom field for the sellers, navigate to the Multivendor Admin panel, then go to Configuration > Custom Field.

If the “Show Custom Field” setting is enabled, the help text will appear directly beneath the custom field title. (making it always visible to users)
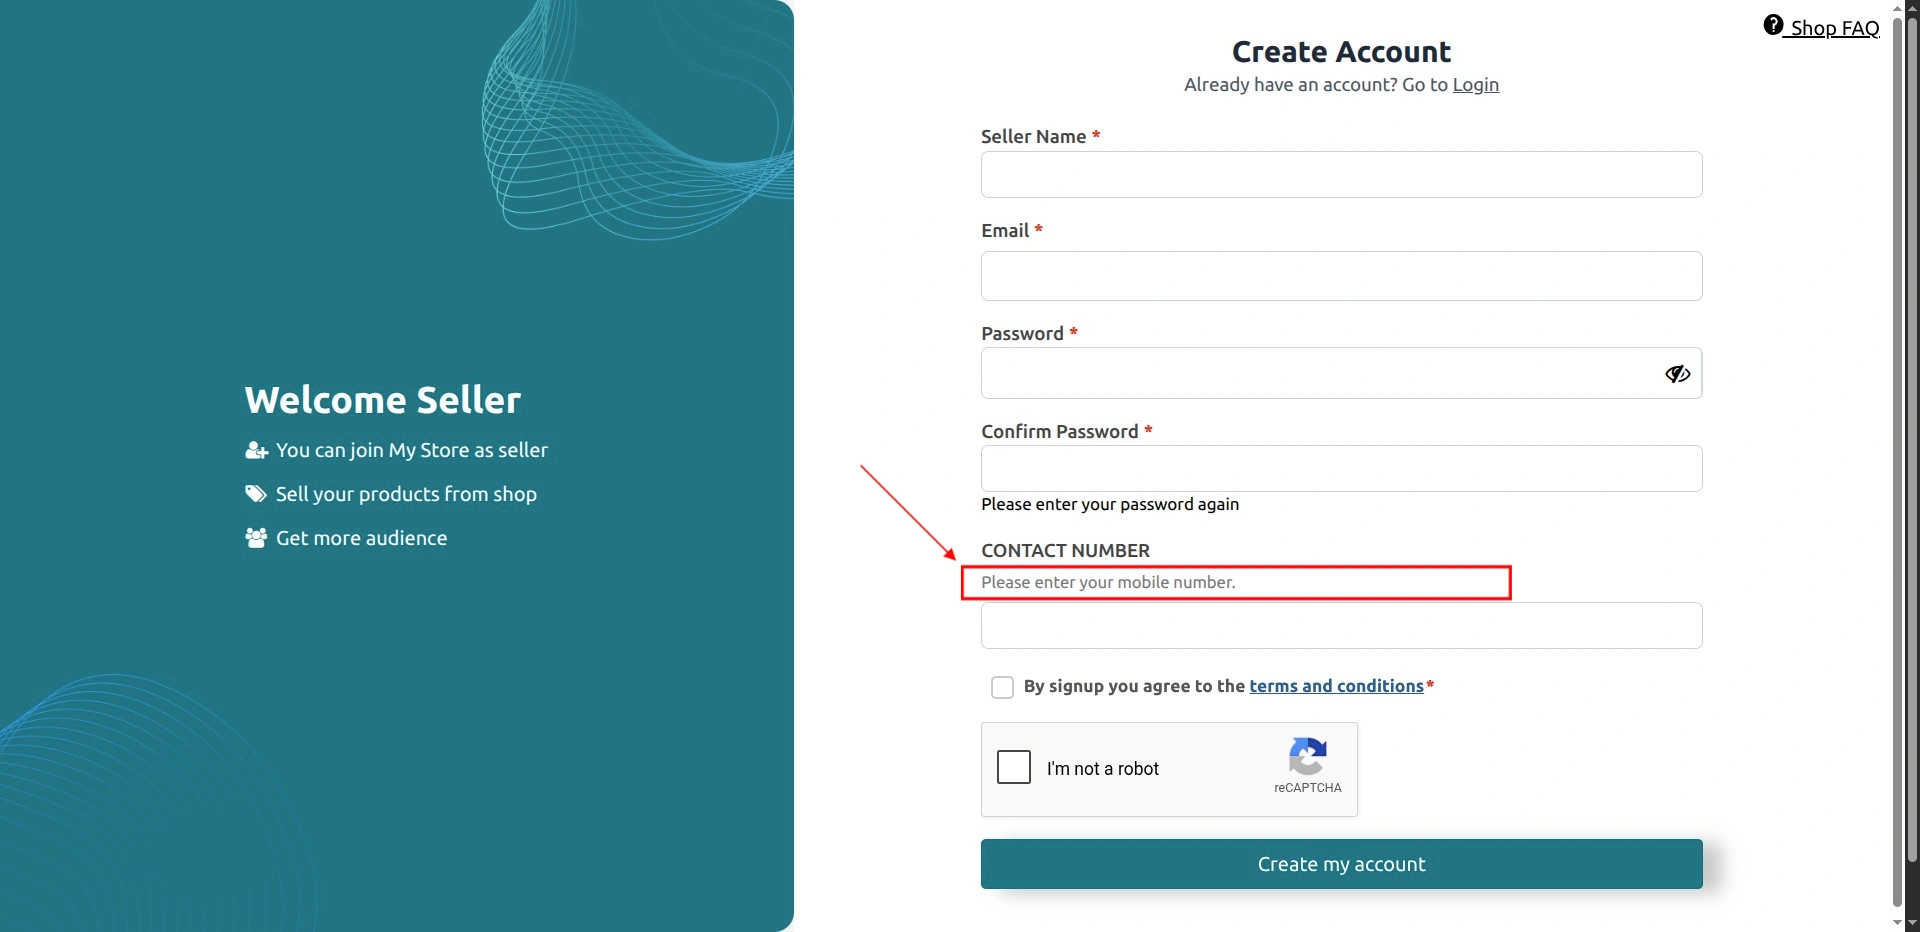
However, if this setting is disabled, the help text will only appear when users click the (?) question mark icon next to the field title.
Custom Fields on the Seller’s Account Page:
After registration, the seller can view the custom fields details on the following page: MultiVendor Marketplace Seller Panel > Profile > My Account:

The seller can update this information from this section.
Custom Field on the Seller’s Profile Page:
This is how the custom details will be present on the storefront for your customers.

How can the admin download the files uploaded by the seller via custom field?
The admin can easily download the files by visiting Multivendor Marketplace Admin Panel > Sellers > Seller Listing > Edit:

The admin can view all the custom fields detail on the following page. Moreover, he can also upload or download the files if any.
Custom Field for Product
Similarly, the admin can add custom fields for fetching extra information regarding the products from the sellers.
While creating custom fields for the products, we have now introduced a new input type i.e, “MULTI_SELECT”.
Multiple- selection
This input is used for multiple selections of the options.
So, when the admin chooses “Multiselect” as the input type, he/she will get the option to add multiple options to select.
The added options will be available for multiple selections while adding/editing product.

The admin can now reorder the options of a dropdown custom field using drag-and-drop.
For example, if the current order of the dropdown options is 1, 2, 3, 4, 5, the admin can rearrange them to any preferred order, such as 1, 3, 5, 4, 2.
The updated order will be reflected wherever the dropdown custom field is used.
This includes the Multivendor Marketplace product page, where sellers will see the dropdown options in the exact order configured by the admin.
On product form:

NOTE: Admin or seller can select multiple options by holding the CTRL key and then clicking on the desired options.
Please note that in accordance with the existing operational flow, the app presently permits a maximum of 50 multi-select options.
Product Custom fields will save as Product Metafields in Shopify
The benefit of adding custom fields as meta fields: It’s useful for storing extra information regarding products.
They can be used to track data for internal use, customize the appearance of your storefront and optimize SEO.
Also, Metafields help to store and transfer data between your store and another ecommerce system such as CRM, ERP, or IMS.
In short, Metafields allows you to add additional custom data in your Shopify store.
Add Product Custom Fields as Product Tags
In case you are adding a product custom field with input type as drop-down, you will get an option to add the custom value as a product tag.
While adding the product custom field, simply enable the ‘Add Tag For Products’ option. Next, when the seller/admin will enter the value in the custom field,
it will also be automatically added as a tag for that particular product.
Note: This is only for ‘product custom fields’ & input type as ‘drop-down’.
IMPORTANT NOTE:- Textarea is not supported in the case of Custom Field for products.

<div class="wk_product_custom_file_type clearfix" data-productid ="{{product.id}}" style="display:none; border-bottom:1px solid #ddd; border-top:1px solid #ddd; padding:5px;"></div>
Find the code on multivendor admin panel > Configuration > Instruction for Marketplace.

Adding Field:
Select the Field For entry as Product. You can choose the input type according to the additional information type. Further, fill the form as described earlier and save.
Once the admin creates the custom product fields from his end, the seller will have all these fields in the add product page.
MultiVendor Marketplace Seller Panel > Products > Products Listing > + Add Product:

Furthermore, once the seller will add a new product with the following details, here is how it will be visible on the storefront:

If the admin has added a file type custom field then he can download the file from the edit product page > multivendor admin panel.
Help Text for Product Custom fields
- We have added the field “Help Text” on the create custom field for the products.
- To add help text to the custom field for the product, navigate to the Multivendor Admin panel, then go to Configuration > Custom Field.
If the “Show Custom Field” setting is enabled, the help text will appear directly beneath the custom field title.
(making it always visible to users)

However, if this setting is disabled, the help text will only appear when users click the (?) question mark icon next to the field title.

Default Value for Product Custom fields
- You can set a Default Value for a custom field for Products. This allows you to pre-fill the field with a specific value, making it easier for sellers to provide consistent information and ensuring a smoother data entry process.
- To enable the default value on the custom field option, you can navigate to the Multivendor Admin panel, and then go to Configuration > Custom Field. When you add a custom field and select “Product” for the field type, then the “Enable default value on Custom field” option will become available.

Note: For the input type “File,” a default value can not be set. However, for the other input type, a default value can be established.
Custom field for ORDERS
For this, firstly the admin needs to enable the following option: ALLOW SELLER TO ADD EXTRA INFORMATION FOR ORDER from the Order Configuration page.
After this, the admin will get the option to add custom fields on orders.
Go to MultiVendor Marketplace Admin Panel > Customization > Order Configuration.

ALLOW SELLER TO ADD EXTRA INFORMATION FOR ORDER: Enable this option to let your sellers add extra information regarding the order.
UPDATE EXTRA INFORMATION ABOUT THE ORDER AT SHOPIFY END: From this option, you can choose whether you want to update extra information at the Shopify end or not.
Now, the admin can add these fields to the order by going to MultiVendor Marketplace Admin Panel > Configuration > Custom Fields > +Add Custom Fields
INPUT TYPE can be Text & File. You can SHOW FIELD either on note attribute or order note.

Code Pasting
To reflect the product custom fields on the product description page, the admin needs to do some code pasting.
Admin will have the code on the following page: MultiVendor Marketplace Admin Panel > Configuration > Instruction for Marketplace:

Display extra information about the product on your store’s product description page by pasting the following code in the product-template.liquid file:
{% include 'wk-custom-meta-field' %}
Note:
If in case, the custom fields aren’t visible on storefront then search for wk-custom-meta-field.liquid file.
Further, if you are unable to find the wk-custom-meta-field.liquid file on Shopify backend, then click on the ‘Regenerate‘ button.
This action will create a template file by the name ‘wk-custom-meta-field.liquid‘.
Note:
Let say that you’ve added five custom fields but you want to display only two of them on the storefront. This can be achieved by pasting the following code in the desired template file:
<p>{{ product.metafields.wk_custom_field["custom field label"] }}</p>
Mind that, before pasting this code, you need to replace ‘custom field label’ text with the label of the custom field that you want to show on the storefront.
Similarly, if you want to display n number of custom fields out of m, you need to add n number of codes with their respective custom labels.
Example- For adding three custom fields, we need to paste the code like this (this is just a demo example):
1st line:
<p>{{ product.metafields.wk_custom_field["shipping charges"] }}</p>
2nd line:
<p>{{product.metafields.wk_custom_field["extra policy"] }}</p>
3rd line:
<p>{{ product.metafields.wk_custom_field["seller info"] }}</p>
To implement the same, you’ll need to have advanced knowledge of Shopify’s Templating Language, i.e., Liquid.
So, ask your developers to do the same.
(Let us know if you want this customized by our developers. Mind that, it will be a paid customization.)
Note:
Let say, for example, if a merchant wants to show a product’s custom detail on that product’s order page, he can paste the same code in the customers/order.liquid file.
Respectively, to show the product custom detail on the desired page, you need to paste the following codes in the respective liquid file templates.
How to find the product-template.liquid file?
Simply, go to Shopify backend > Online Store > Themes > Actions > Edit Code

Search for the file name, paste the codes and save.

If you are having any trouble regarding the code-pasting or any other configuration, please don’t hesitate to contact us at [email protected].
Restrict Custom Field by Product Type
You can now restrict custom fields for your marketplace products based on product type. This feature depends on restrict product type feature.
So, to enable this feature, visit Marketplace Admin Panel > Configuration > Restriction Configuration > Enable the option shown in the image below:

Once the admin enable this configuration, a new option will be added on the Add Product page.
So, the seller/admin can now enable Restrict Custom Field for individual products.
After enabling this option, you can further select which fields you want to display on front end and which don’t.
If you don’t restrict custom fields, all the fields will be displayed by default.

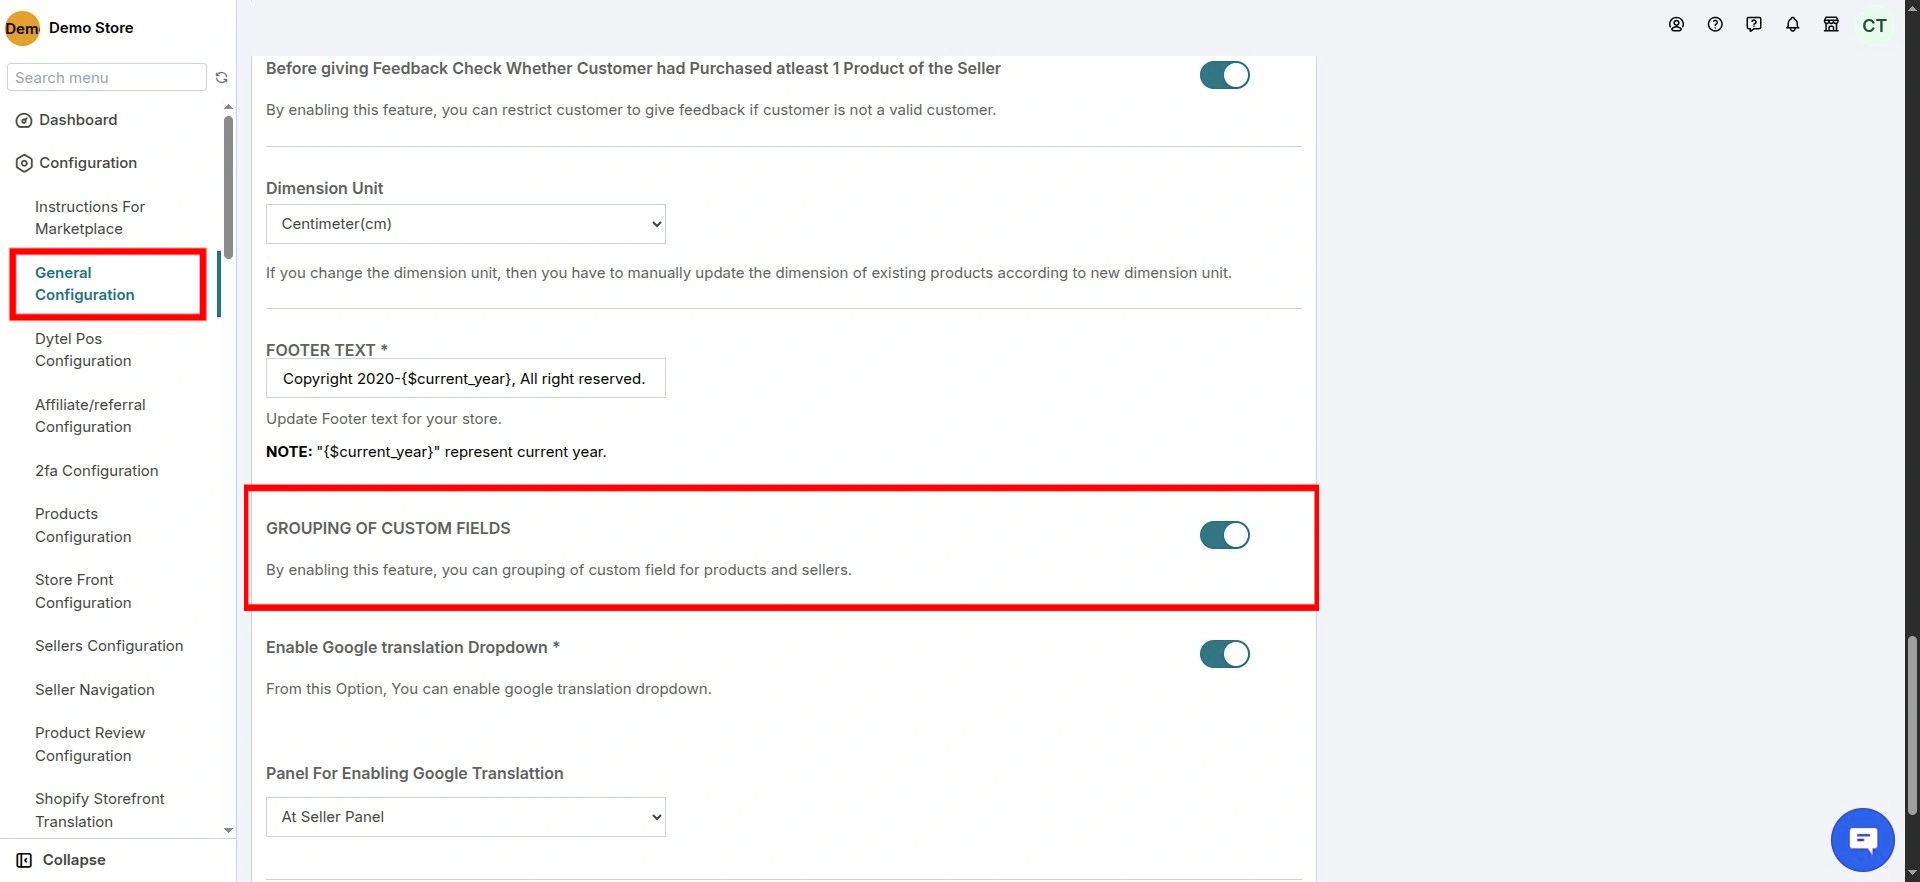
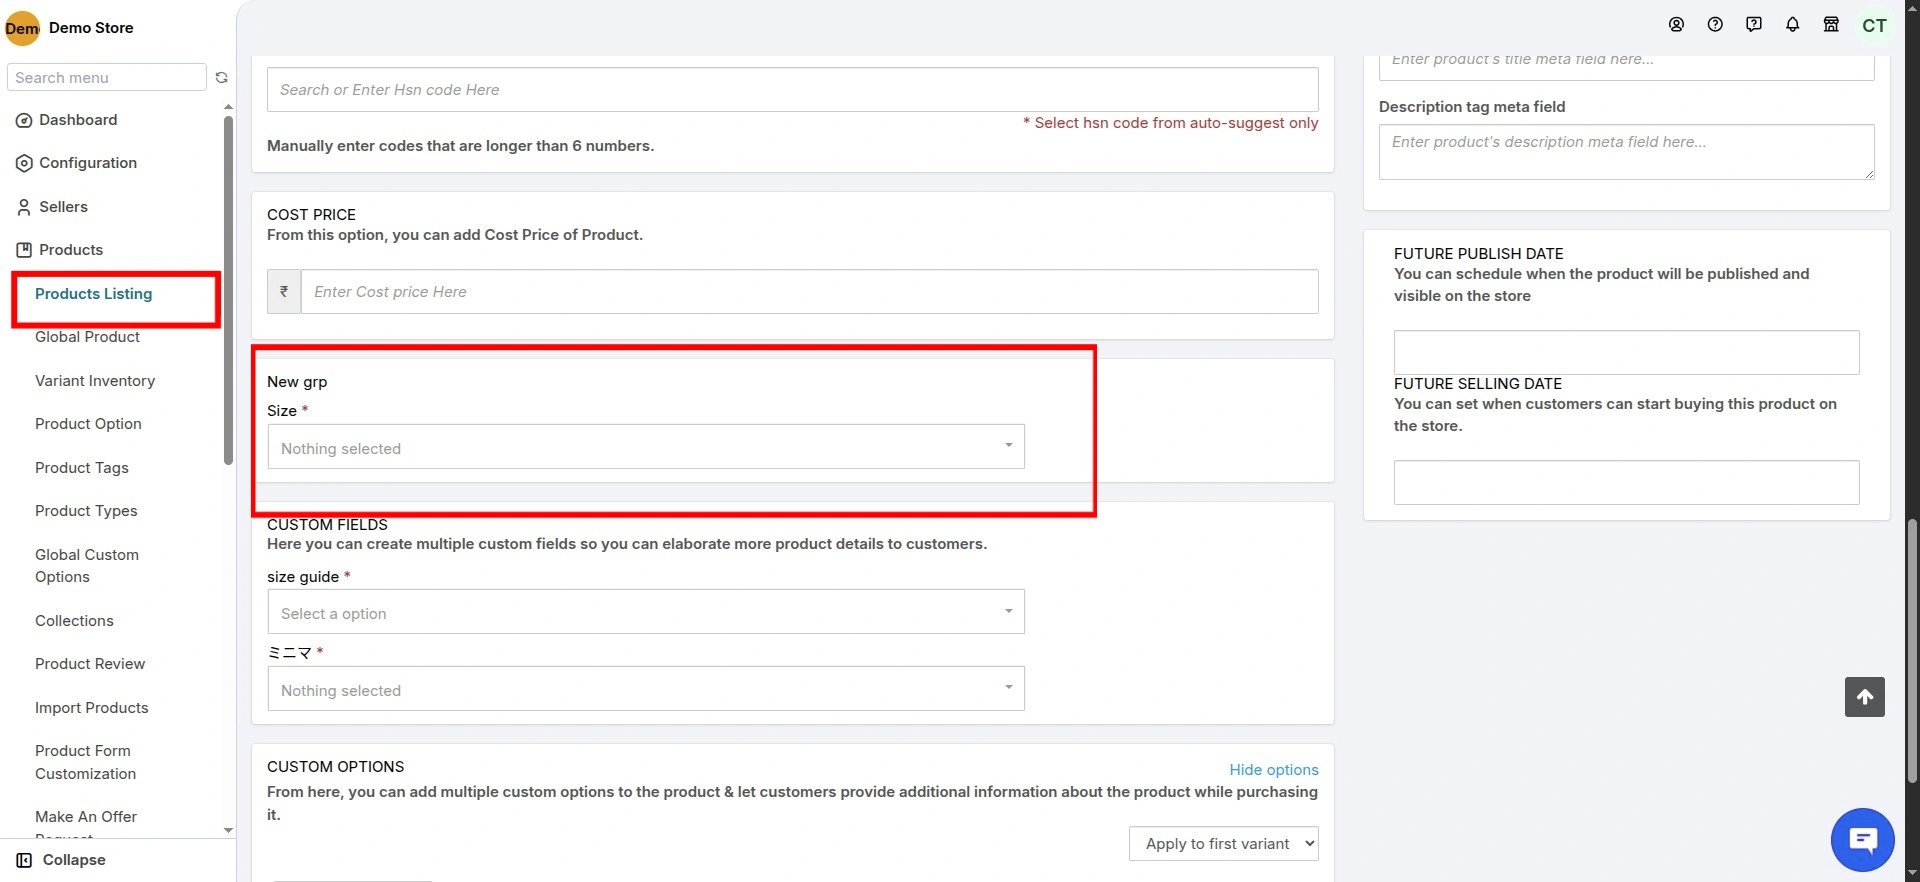
Grouping of Custom Fields
The admin can group multiple custom fields into different groups for improved display structure.
To do that, first, enable this configuration from the Admin Panel>>Configuration>>General configuration
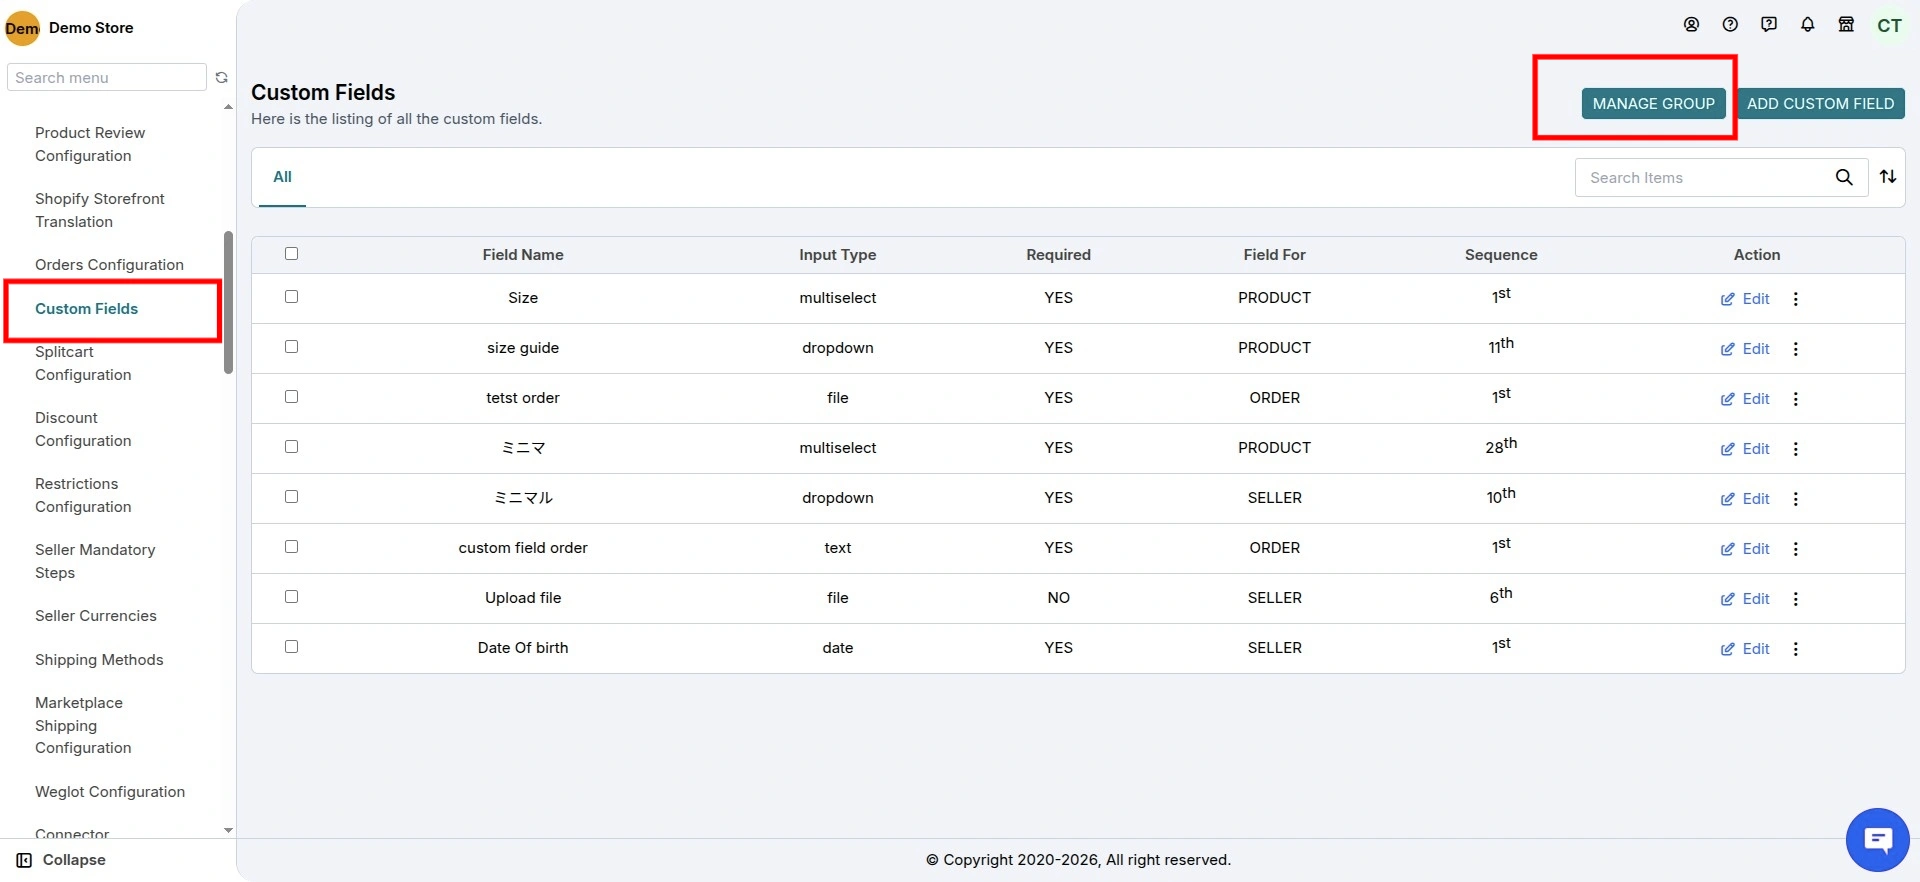
Once this configuration is enabled, an option called “Manage Groups” will start to appear under Configuration>>Custom fields
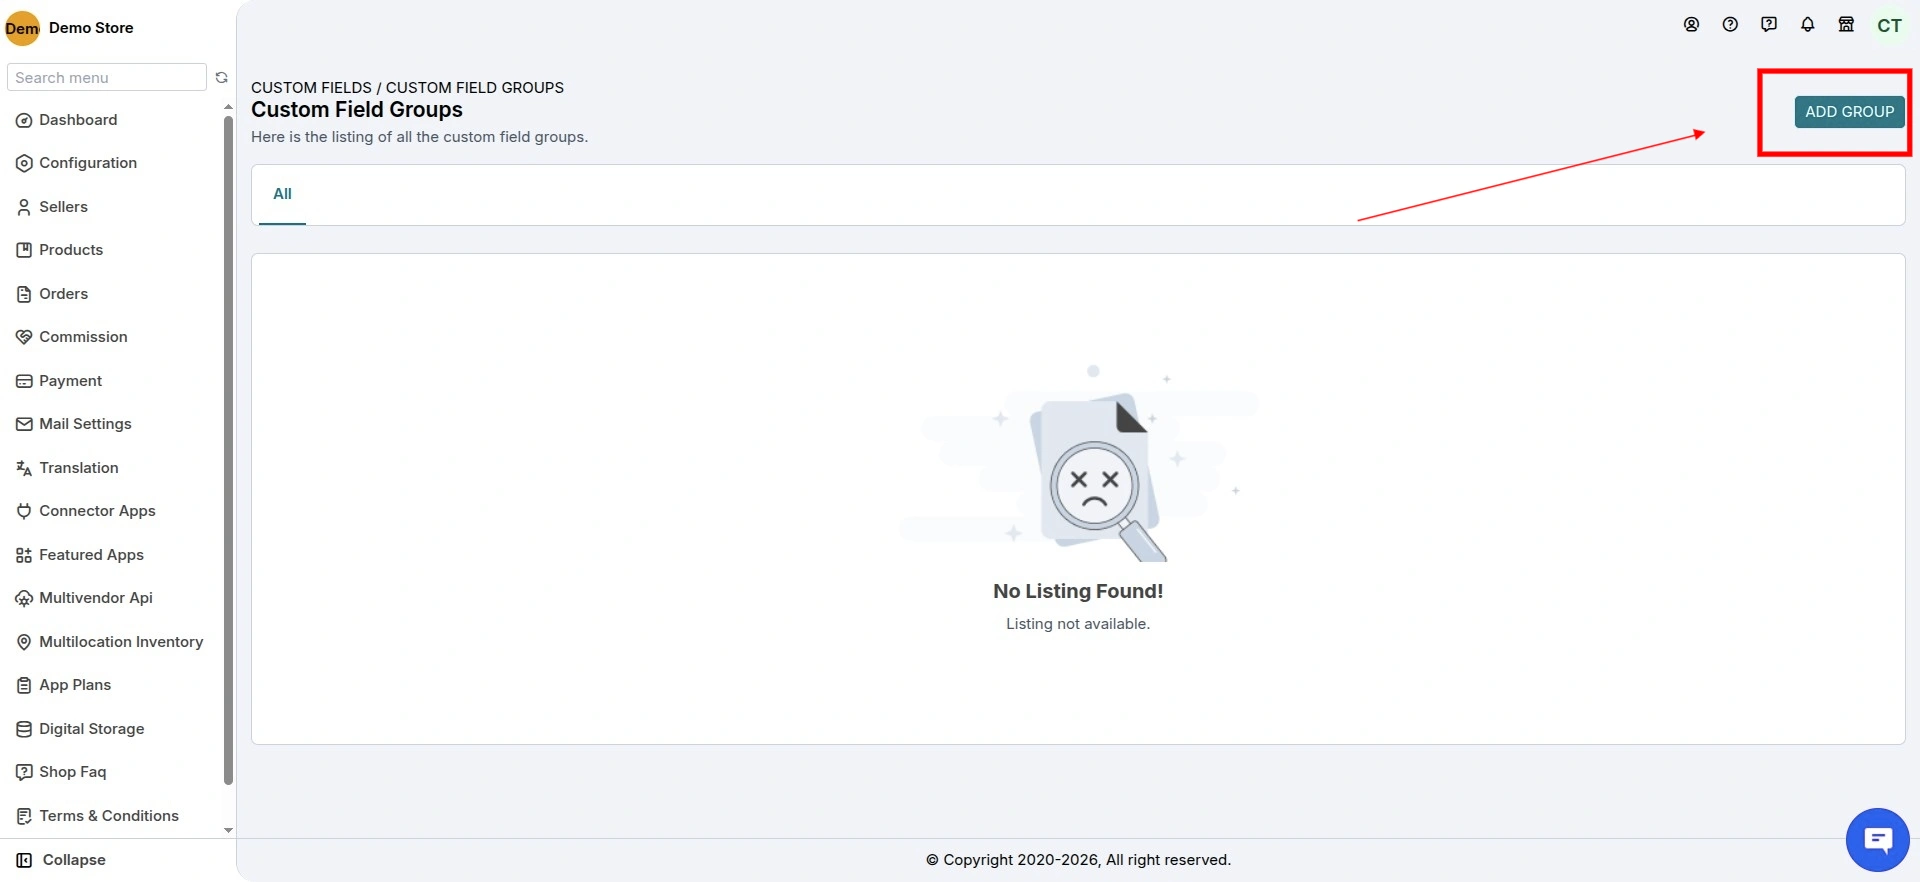
Clicking on manage groups will redirect you to this page, where you can add a group.
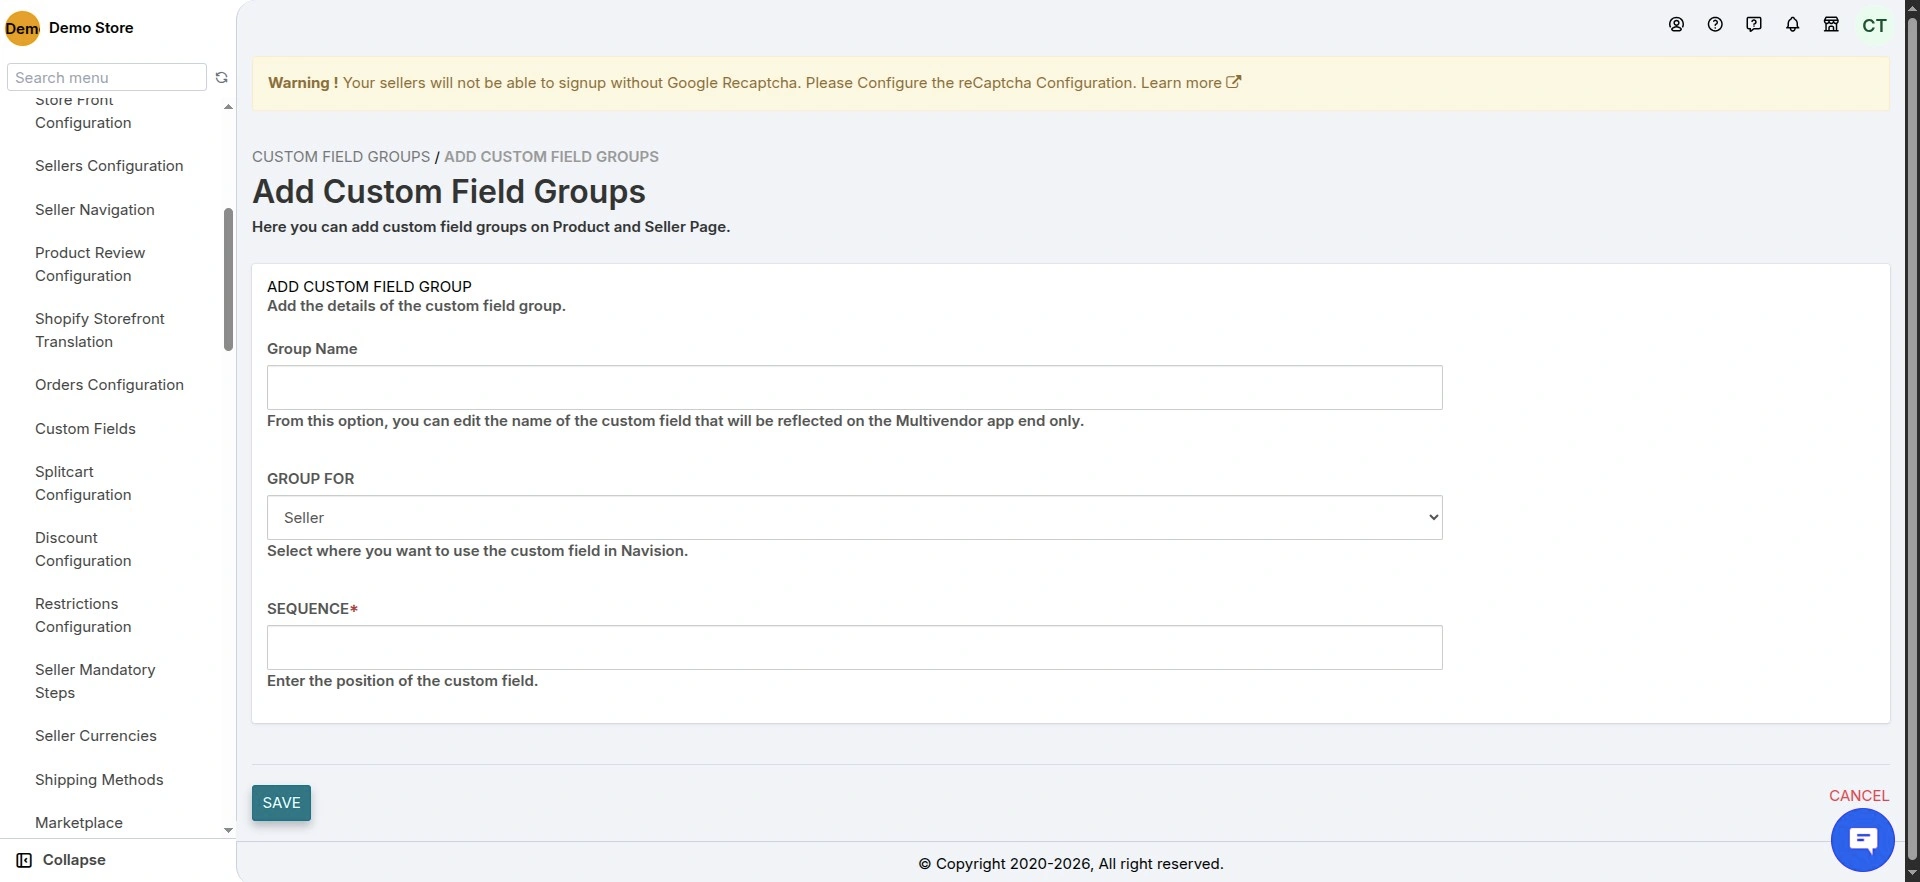
Add the Group Name, select whether it is for Seller or Products, and enter the sequence.
Next, select which custom fields you want to be included in this group.
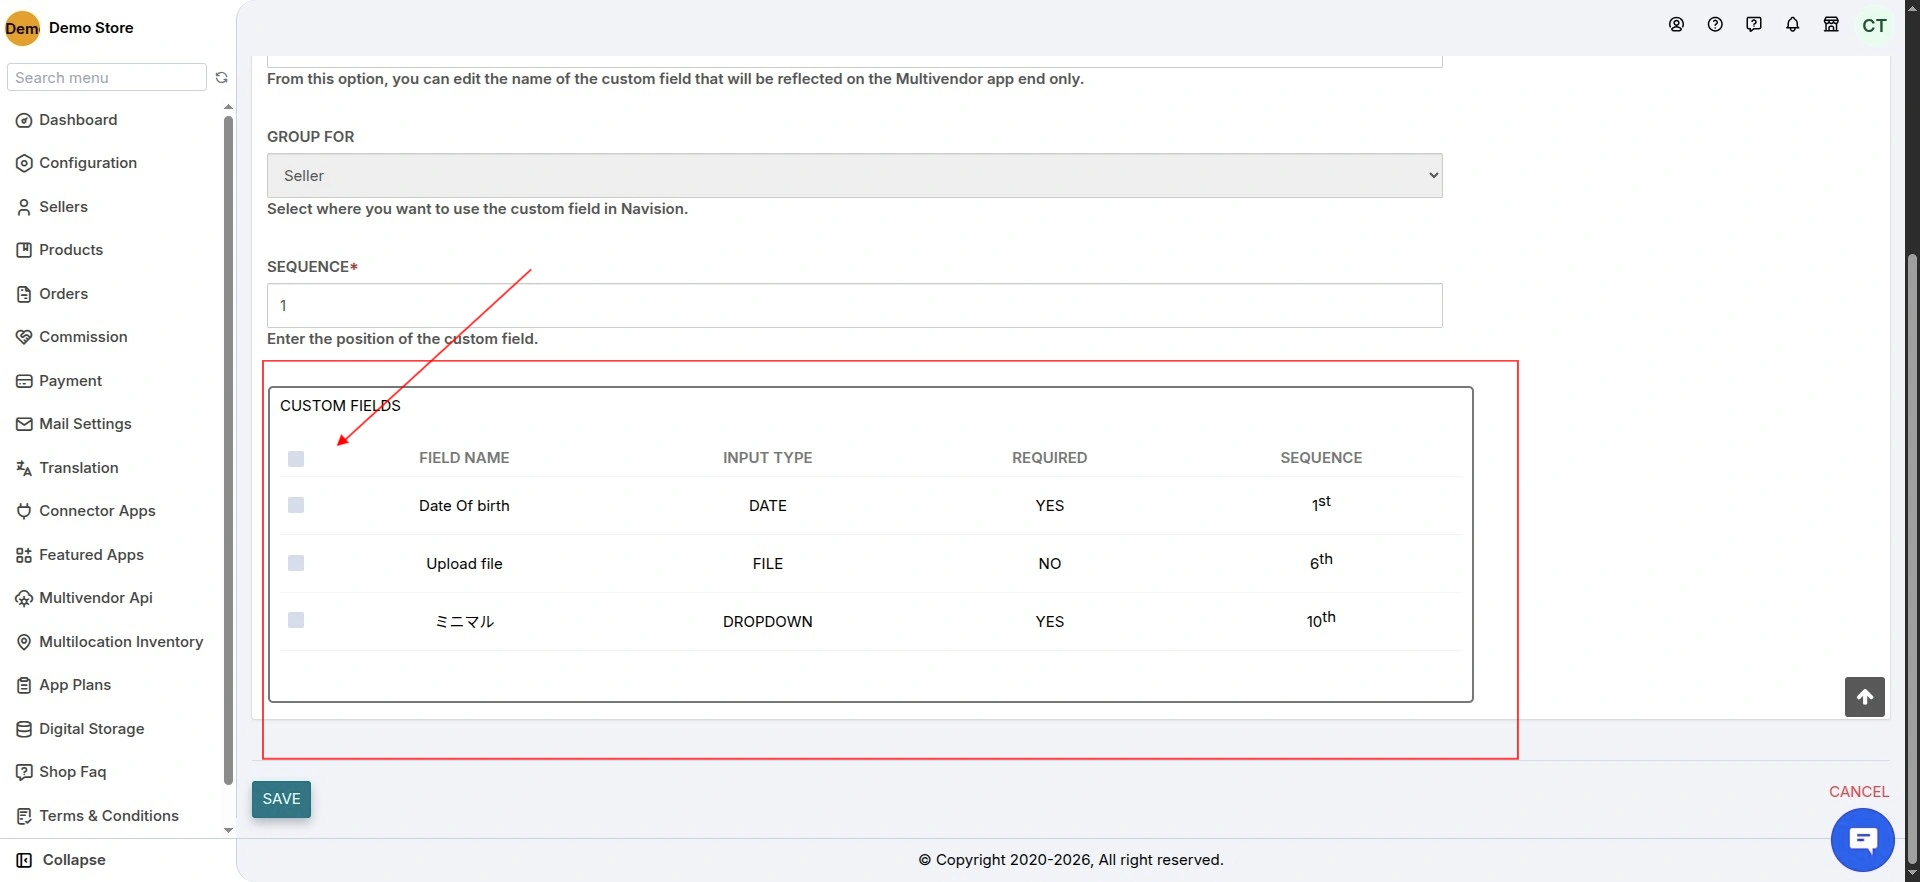
On the Add product page, the custom fields will be displayed in their respective groups.
How to edit Custom Field default value on seller side ?
We have introduce a new configuration ,now, admins can allow sellers to edit the default values of custom fields directly from their seller panel.
How to Enable This Feature:
- Enable the option: “Allow Seller to Edit Custom Field Default Value.”
- Go to the Admin Panel.
- Navigate to Seller Configuration.

Once enabled, sellers will be able to update the default values of their custom fields by following these steps:
- Log in to the Seller Panel.
- Go to Configuration >> Custom Fields.
- Click on the three-dot menu next to a custom field.
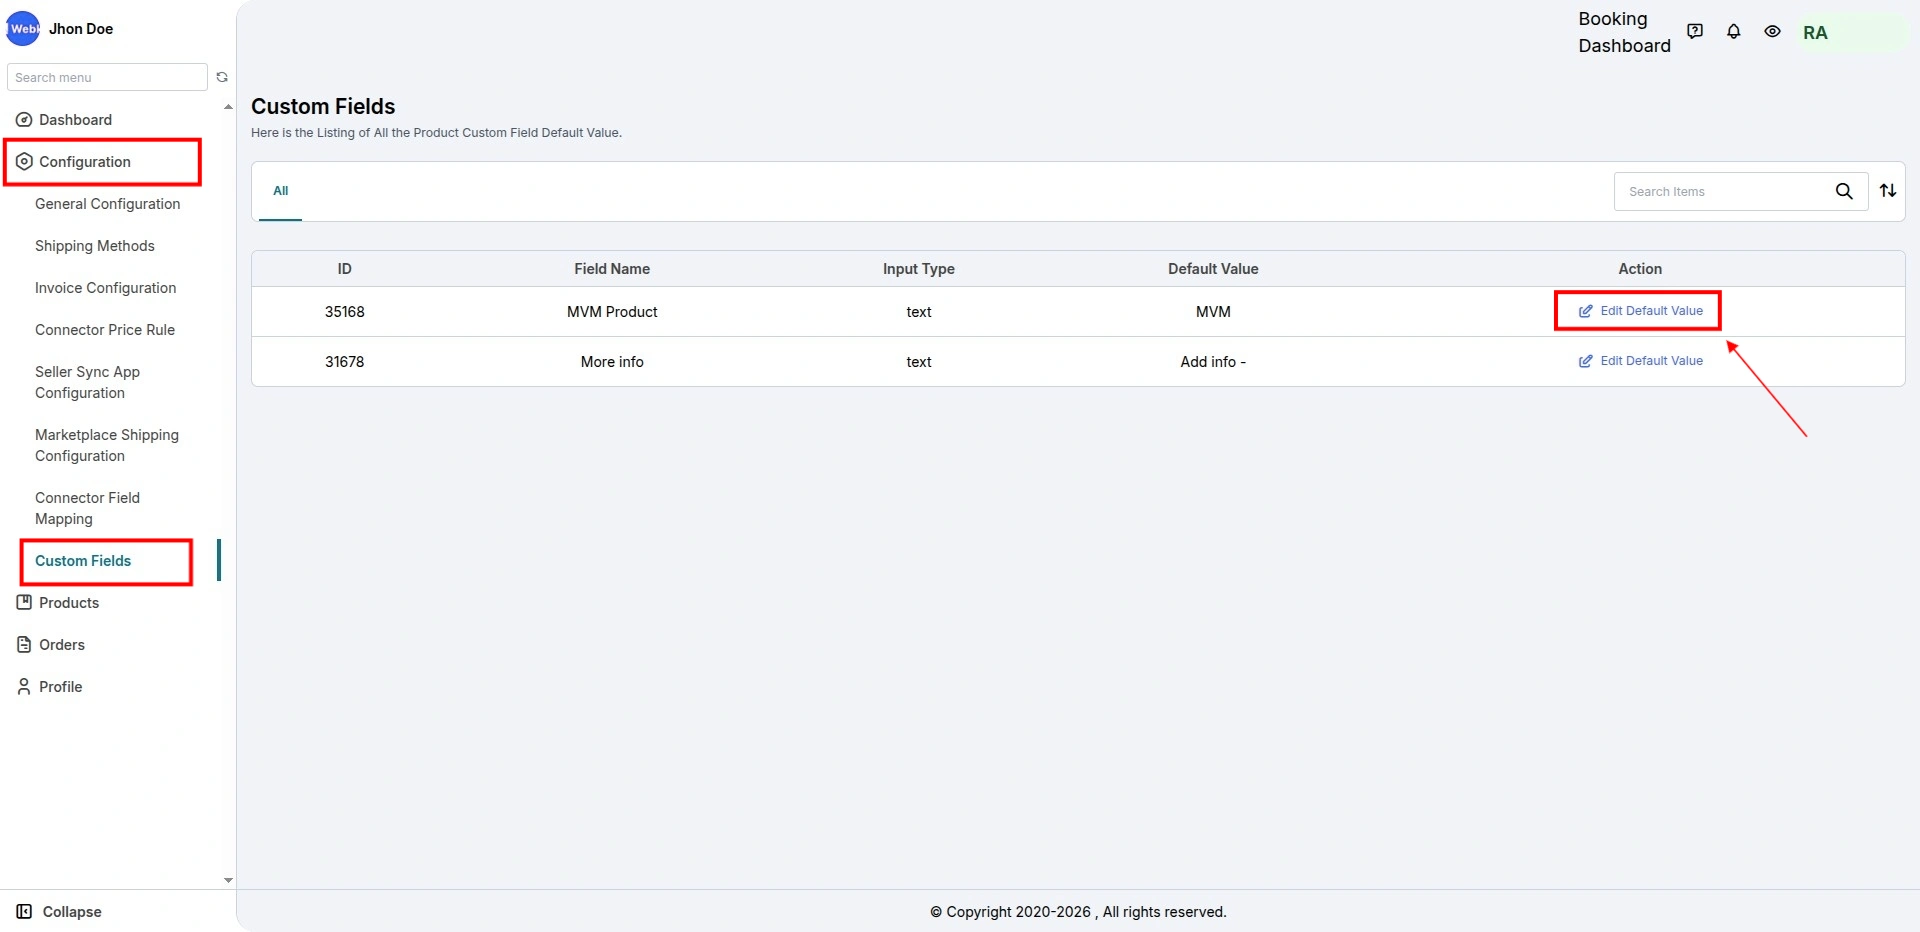
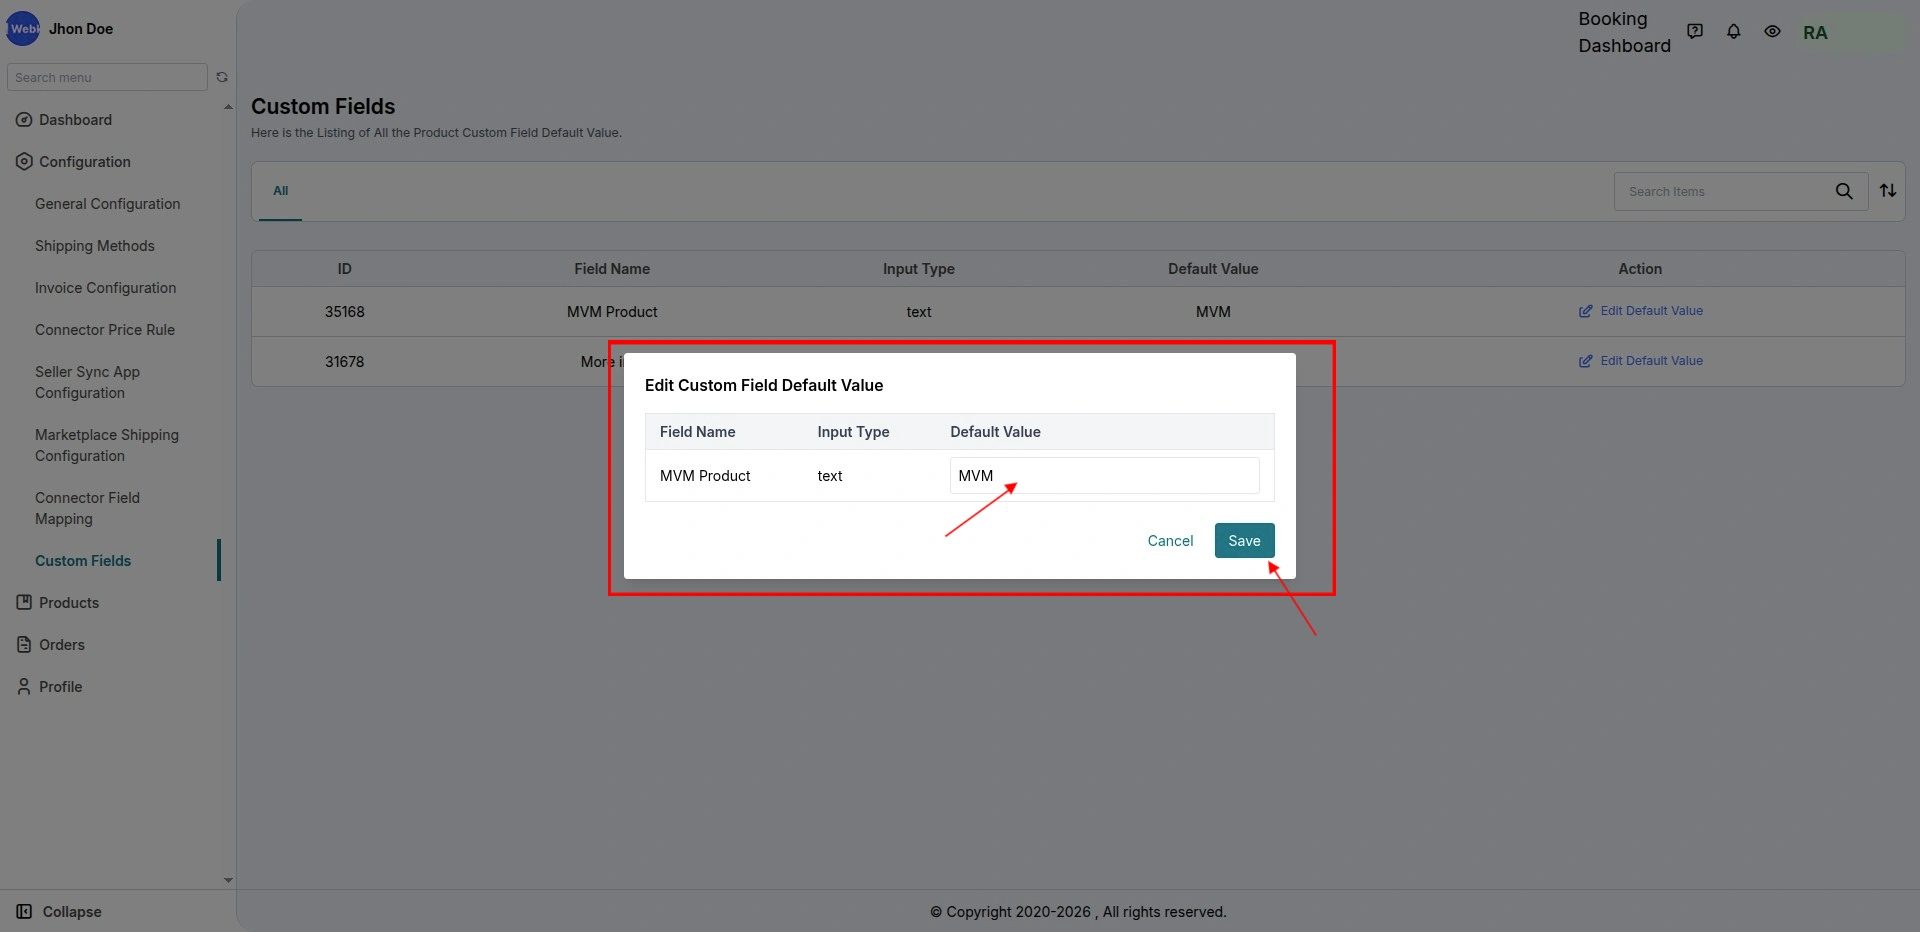
- Select “Edit Default Value” to update the value.

Now if you want to update multiple custom fields at once?
- Select multiple custom fields using the checkboxes.
- Click on Bulk Action > Edit Default Value.
- Enter the updated values and save


Don’t have a marketplace but want to build one?
Get the app: Multi-Vendor Marketplace for Shopify.
💡 Need Help?
Drop your query/suggestion at [email protected] or create your ticket at Webkul UV Desk.
Until next time. 👋

2 comments
I hope you are doing great!
In case you want to hide predefined fields from the ‘Add Product’ form, please do it from the Product Form Customization page: https://prnt.sc/wn468q.
In case of any issues, please drop your query at [email protected]
Regards,
Mansi | Team Webkul