Prestashop Product Attribute Image: Attributes of any product are very vital or (say crucial) features. Variations in the product help to serve a range of customers.
As we all know & it’s a fact too that a single or definite variant of product can not meet the needs of every customer.
Considering such reasons, every shop either offline or online keeps a range of variants for the same product. In the case of an offline shop, a customer has an option to see all the variants.
Whereas, in the case of an online shop, it’s generally not available. But now this will be possible, only because of the Prestashop Product Attribute Image module.
Say, a T-shirt is available in the following three colors i.e. Red, Blue & Green. And, the merchant is also offering various patterns in all these colors.
In a situation like this, it’d be much more beneficial if you can simply use images to signify all kinds of attributes that this T-shirt has.
A customer will also find it useful & convenient to choose the desired product easily by having a look at all the attribute images.
Note: Prestashop Product Attribute Image module is compatible with PrestaShop new catalog page V2.
Features of the Prestashop Product Attribute Image module
- Display product attribute options as images.
- Choose to create a new attribute value or select the pre-existing value while adding the attribute.
- Option to set the product attribute image as the default image of the product.
- Enable or disable the display of attribute names on the product page.
- Add, enable or disable the custom product attributes.
- Choose to edit or delete the custom product attributes.
- Enable or disable the functionality to copy the product along with attributes images.
- Choose to use the existing attribute image for the attribute value if it exists.
- Option to set/add a short description about attributes.
- Allows the admin to add global product attribute images.
- Add global attribute images in bulk via CSV file.
- Apply global attribute images to attributes of individual products.
- Apply global attribute images to attributes of multiple products at once.
- Option to configure product attributes image dimension.
- The module is multi-shop compatible.
How to install the Prestashop Product Attribute Image module
- Firstly, go to the module manager in the back office and click on ‘upload a module’.
- After that, drag and drop the module file or select the file from the system.
- In this way, the module installation will be successful.


How to configure the Prestashop Product Attribute Image module
After the successful installation of the module, proceed to configure the module.
In the configuration settings, that is to choose whether you want to create a copy of the product along with its attribute image or not.
Let’s understand it with a simple example.
Suppose you add images for all the attribute values available on the product. In the future, there might arise a case when you want to create a copy of the product due to some technical issues.
Now, in such a case, you can easily enable the copying option along with attribute images. So that you don’t lose any data.
However, you can also choose to keep it inactive, if you don’t want to copy the product along with product attribute images.
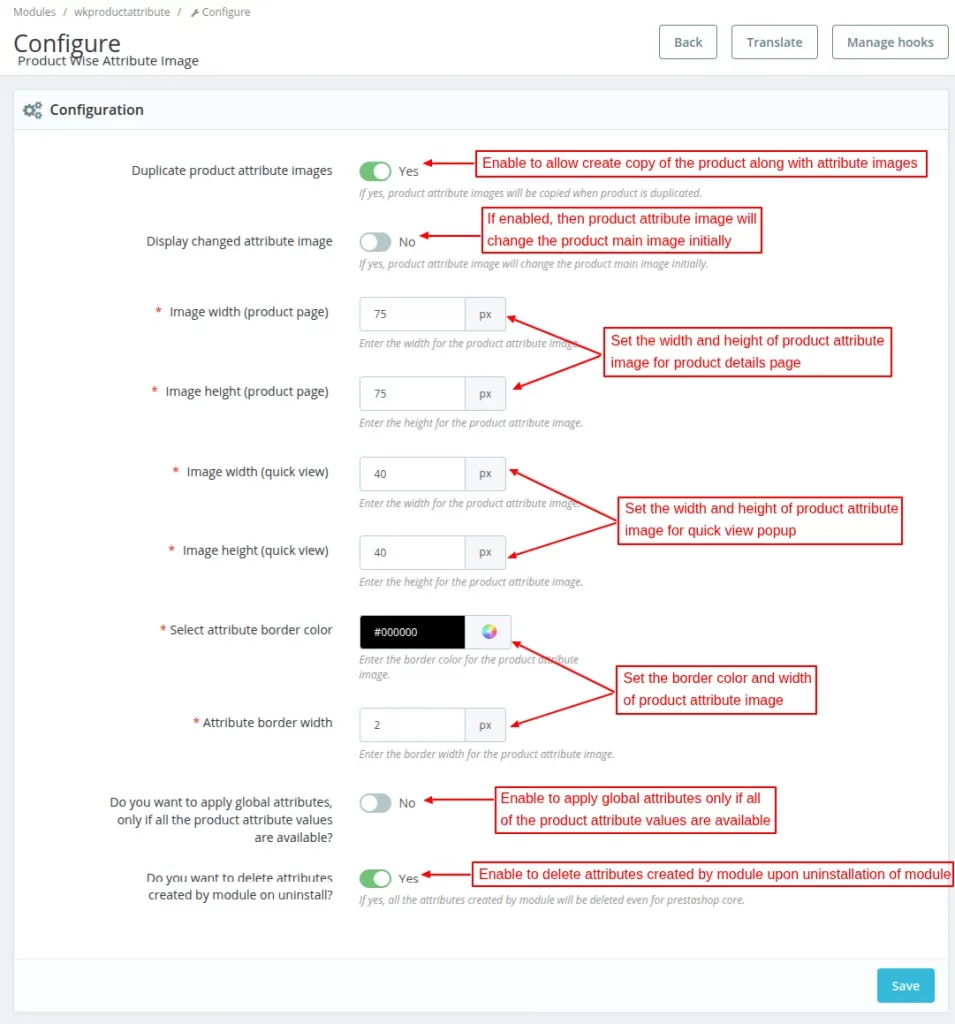
Duplicate product attribute images- Enable to allow the creation of a copy of the product along with the attributes images.
Displayed changed attribute image- Enable/disable product attribute image will change the product main image initially.
Width (product page)- Product attribute image width for the product details page.
Height (product page)- Product attributes images height for the product details page.
Image width (quick view)- Product attributes image width for quick view popup.
Image height (quick view)- Product attribute image height for quick view popup.
Attribute border color and width – Set the border color and width of product attribute image.
Apply Global Attribute
If enabled, then global attributes will apply to the product only if all of the product attribute values are available.
Suppose there are two attribute groups: Color and Size.
There are three values of color attribute black, blue, green and S, M, and L of size attribute.
Suppose the field is enabled.
In this case, if any of value in the groups (color and size) are not available, then global attributes will not be applied to the product.
If the field is disabled.
In this case, if a value from any group is not available suppose size, then that group will not be considered and global attributes containing values of the color group will be applied to the product.
Do you want to delete attributes created by module on uninstall
If enabled, then the attributes created by the admin using this module will delete once the module gets uninstalled.
An Important Note:
For the proper functioning of the module, we need to change some code in the product. the file of theme file of version 1.6.
Create a copy of the product
In order to create a copy of the product, click on the “duplicate” option. And, if the option to copy product along with attribute images is active.
Then, the duplicate or the copy of the product will also have these attribute images.

Add images for attributes of the product
After the installation of the module, you can now add custom product attributes & add images to them. To do so, go to the Attribute Images section under the edit product page.
After that, click on the configure button to proceed.
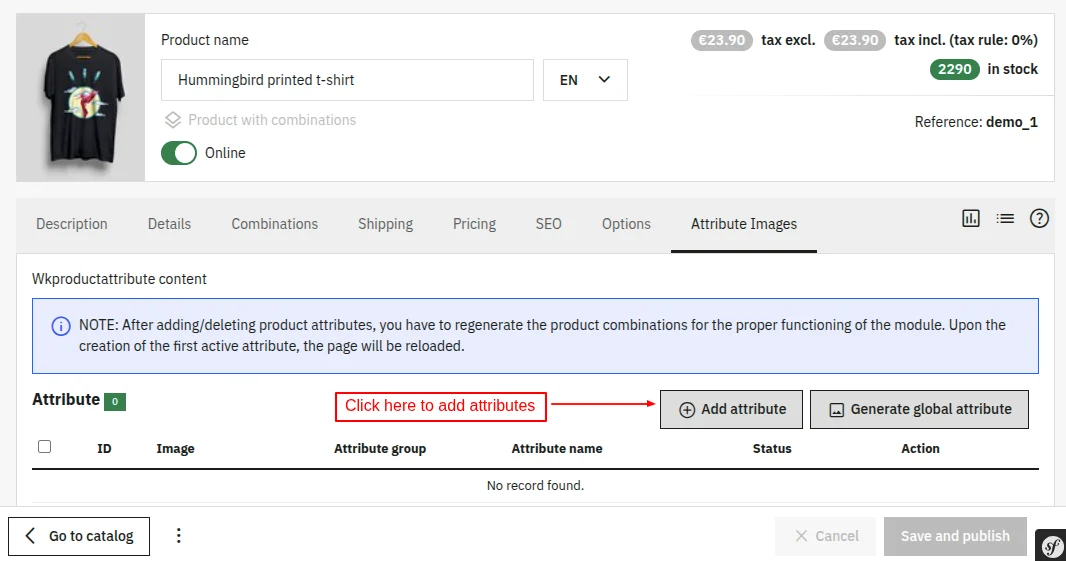
On clicking the configure button, you will land on the following page. Here, you can choose to create attributes along with images.
It is worth noting that you first need to add or create the attributes along with the images here. You can not add the images directly to existing attributes in the “Combinations” section.
However, you can surely use the existing attributes here to add images to them.
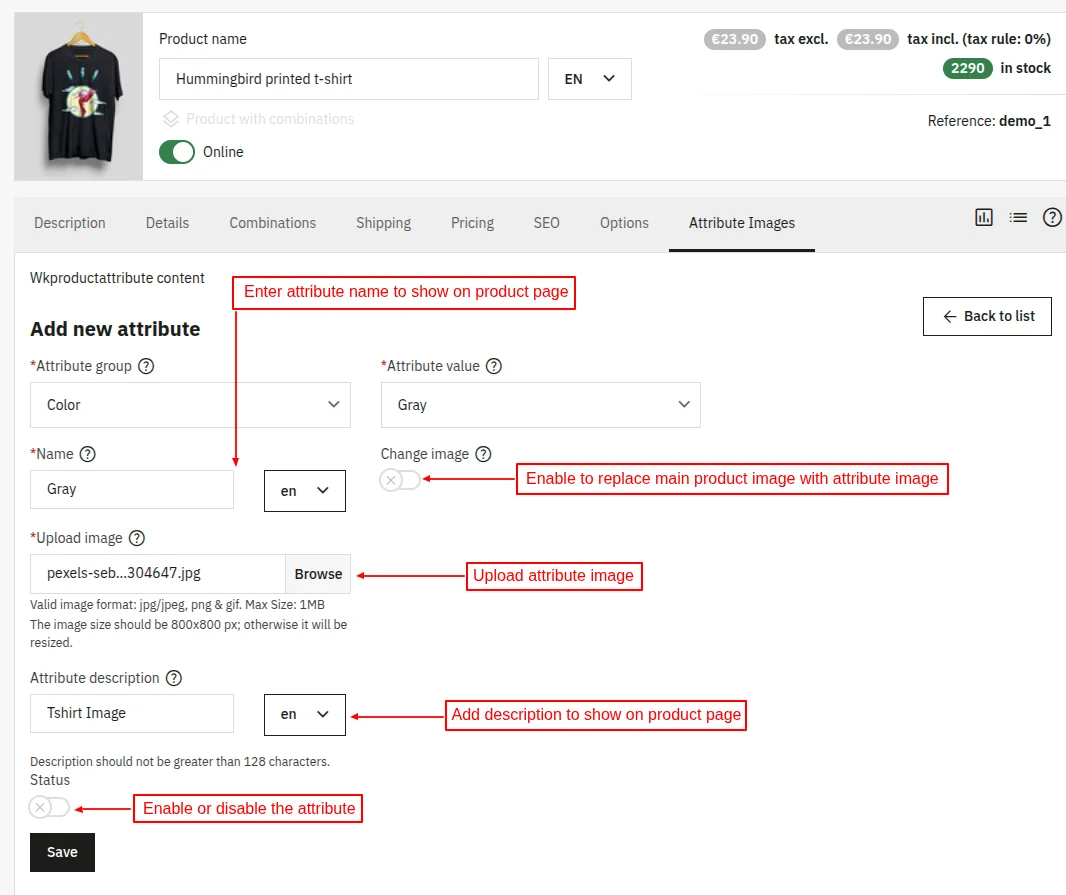
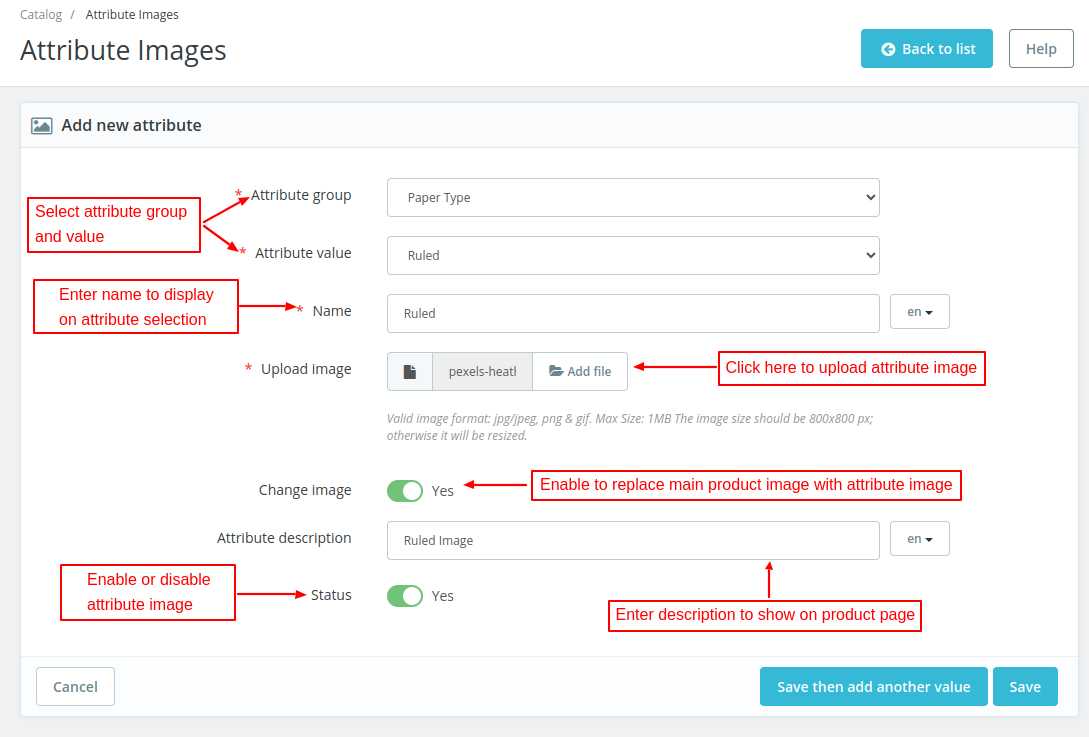
After clicking on the “Add Attribute” button, the following page will open.
Here, you can select the attribute group, and attribute value, enter the description(optional) & fill in other details to add an image to it.
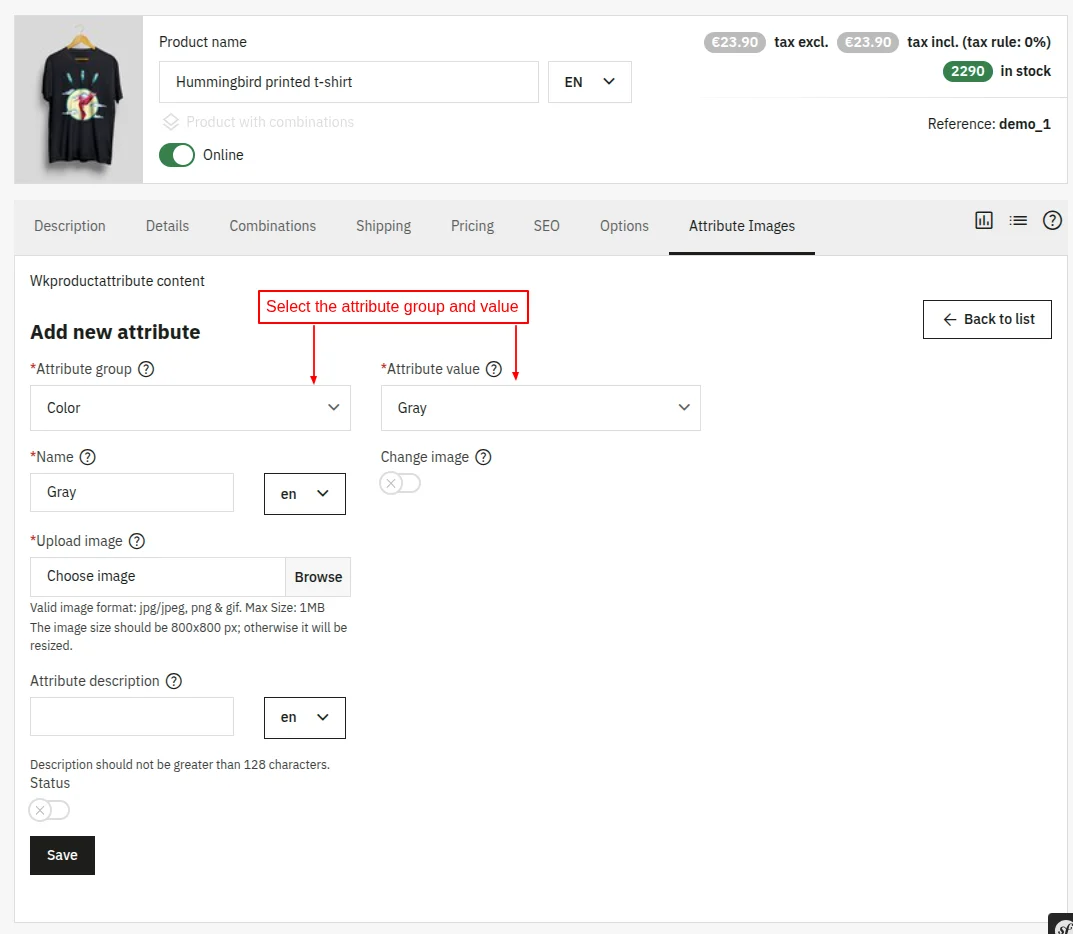
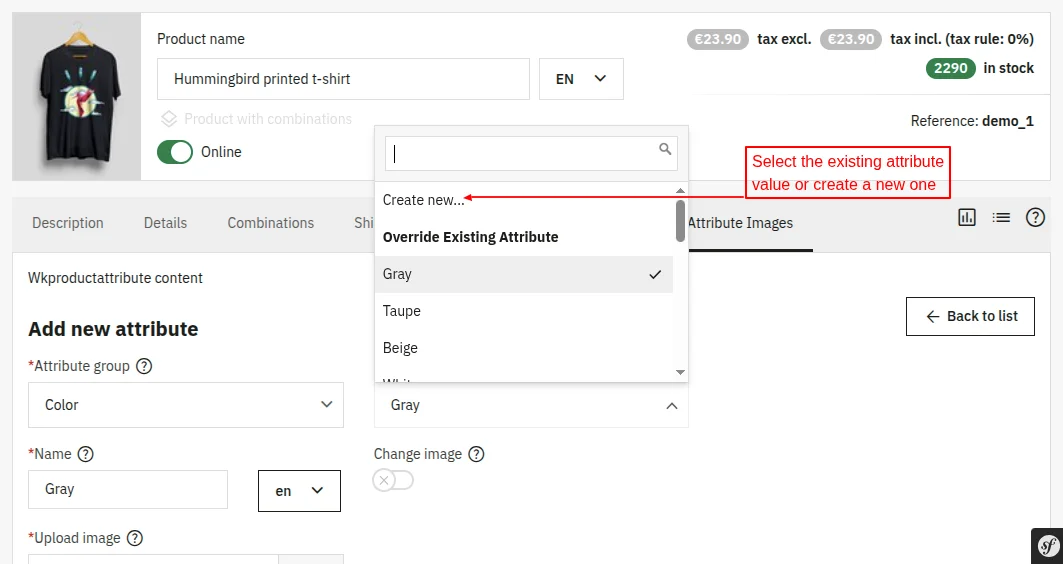
After choosing an attribute group, you can either select an existing attribute value or create a new one.
After selecting the attribute group and value, enter the name of the attribute value, fill in the description(optional), and image to display on the product page.
Also, choose whether you want to display the attribute name on the product page or not.
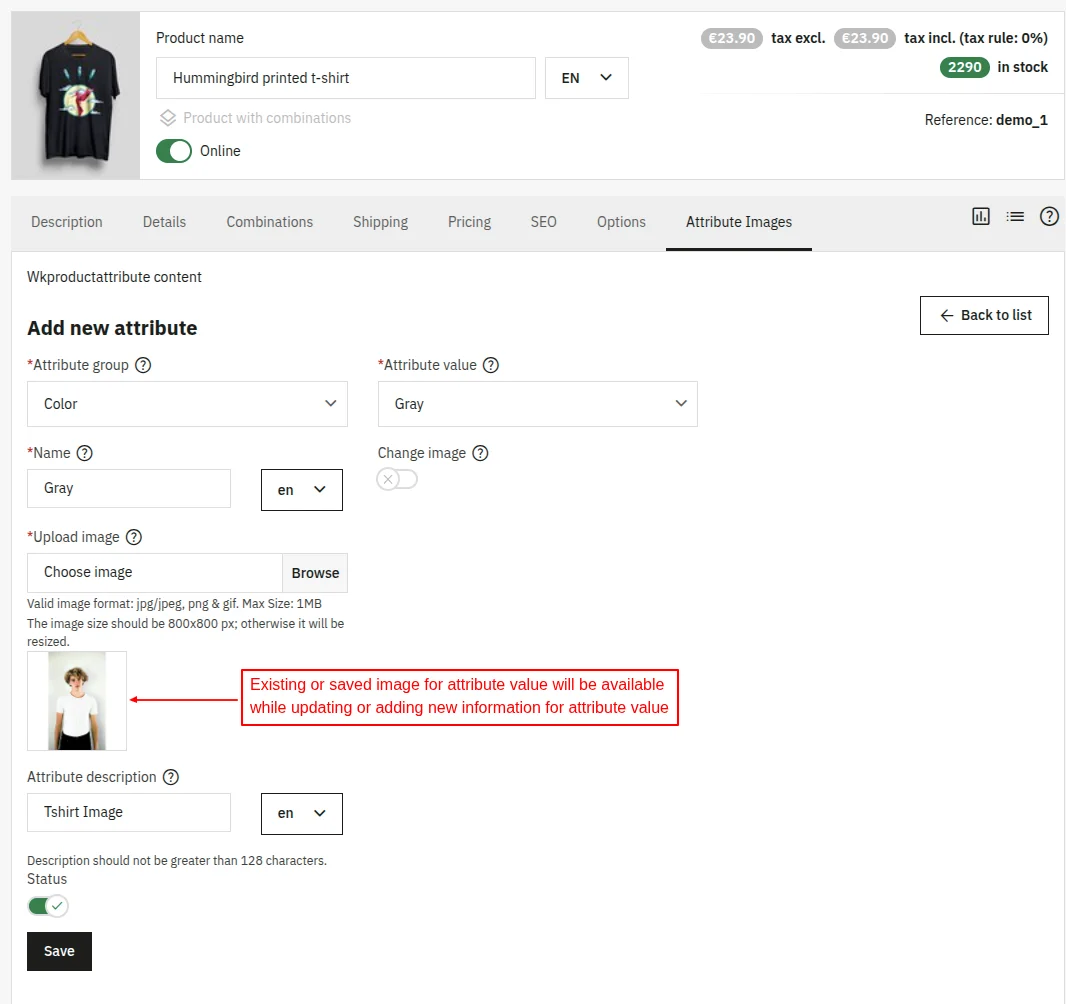
There is another functionality too. Let’s say you want to edit the image of an already created attribute value. Then, in such a case, you will see the first image you used with this same attribute.
While uploading the attribute image, you can also choose to set the attribute image as the main product image. Also, view the attribute value and its image under the “Attribute Images” tab.
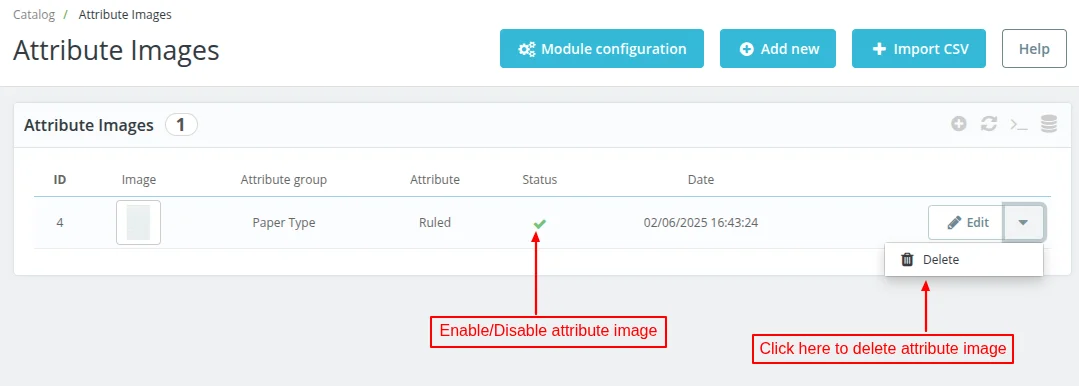
You can also enable/disable or edit/delete the product attribute at your own convenience.

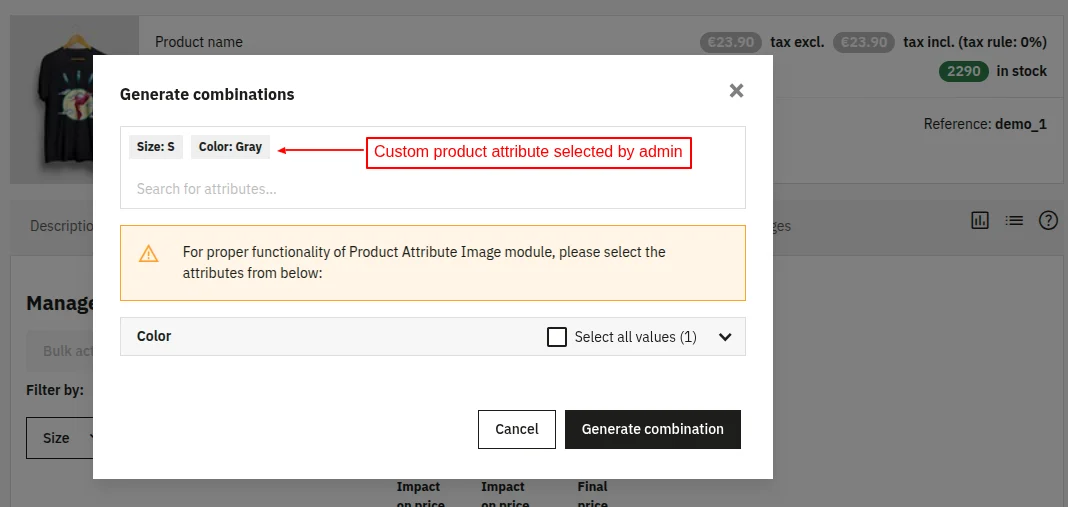
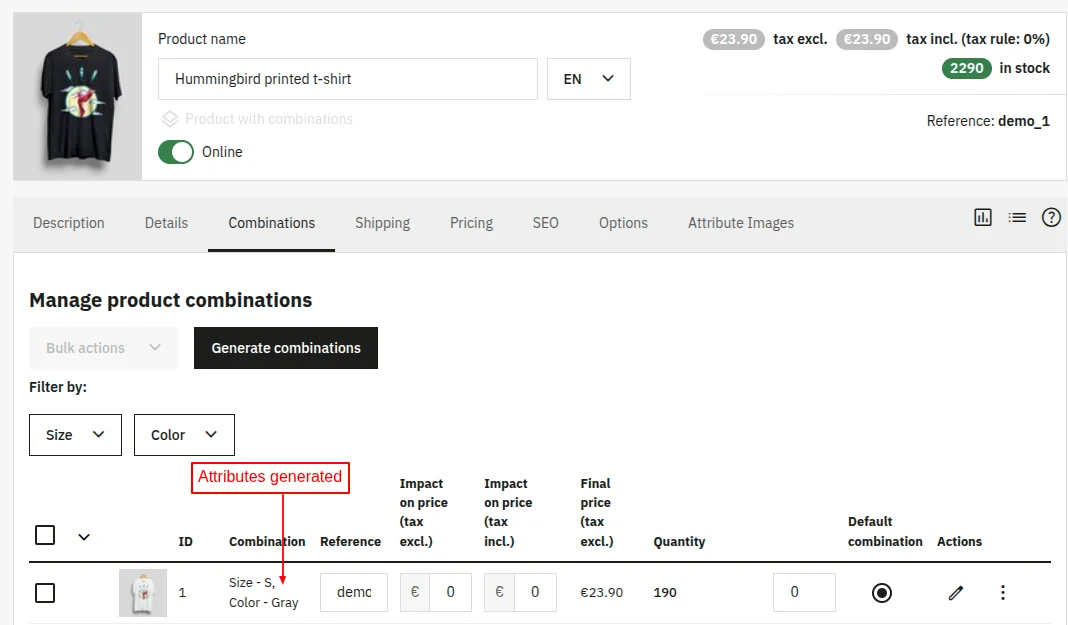
NOTE: After adding/deleting product attributes, an admin needs to regenerate the product combinations for the proper functioning of the module.
Front End View
On the product page, a customer will see all the attributes of the product in the form of an image.
In case, If you have set to use the attribute as the main image too. Then, on clicking the attribute value, the image set on the attribute value will display as the main product image too.

Add Global Attribute Images
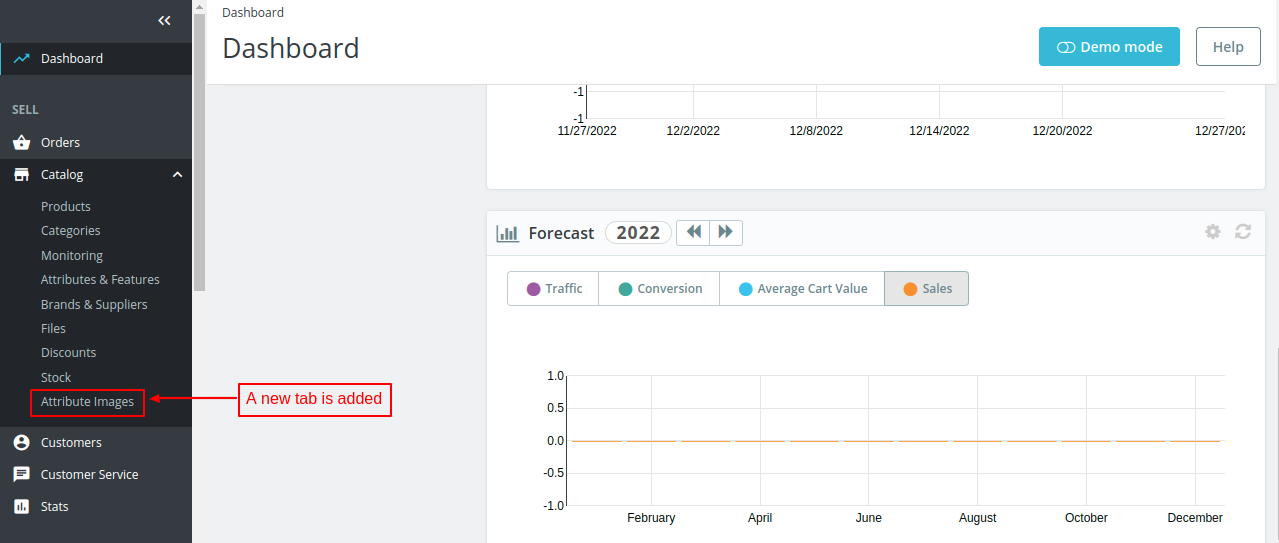
After the successful installation of the module, a new tab ‘Attribute Images’ gets available under Catalog in the back office. From here, the admin can add and manage global attribute images.

Click on ‘Add new’ button to add global attribute image.
Once added, the admin can view it under ‘Attribute Images’ tab.
Similarly, the admin can add as many global attribute images as he wants.
Add Global Attributes via CSV
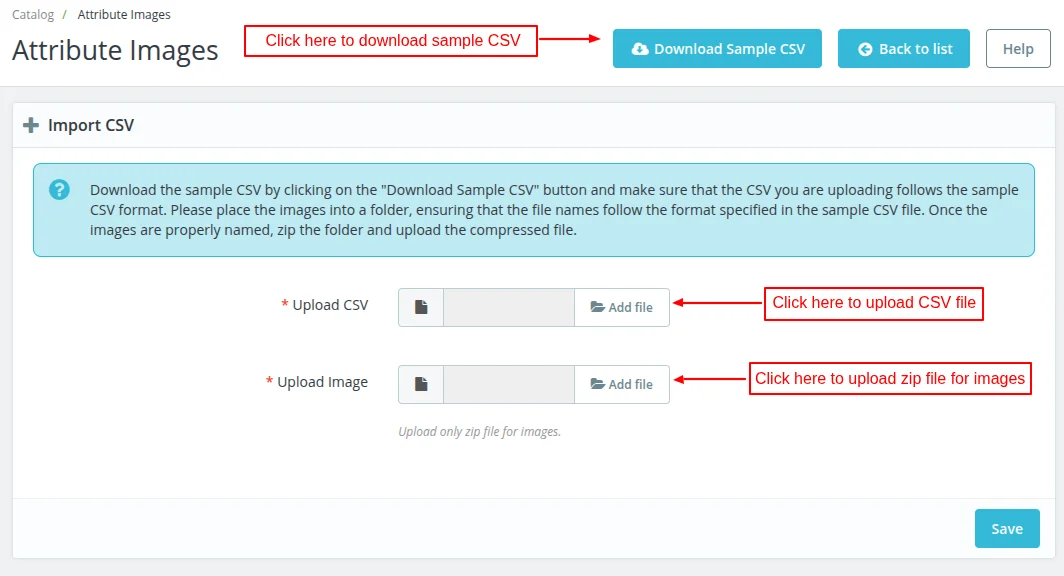
The admin can add multiple global attributes at once by uploading a CSV file.
In a CSV file, the admin needs to mention attribute group id, attribute id, attribute status, attribute image number, and description.
To upload the attribute images, the admin need to prepare a zip file of the images and all the images in a zip file should be named exactly name as mentioned in a CSV file.
Apply Global Attribute Image
Once added, the admin can apply global attribute image to individual as well as multiple products.
Apply to individual products
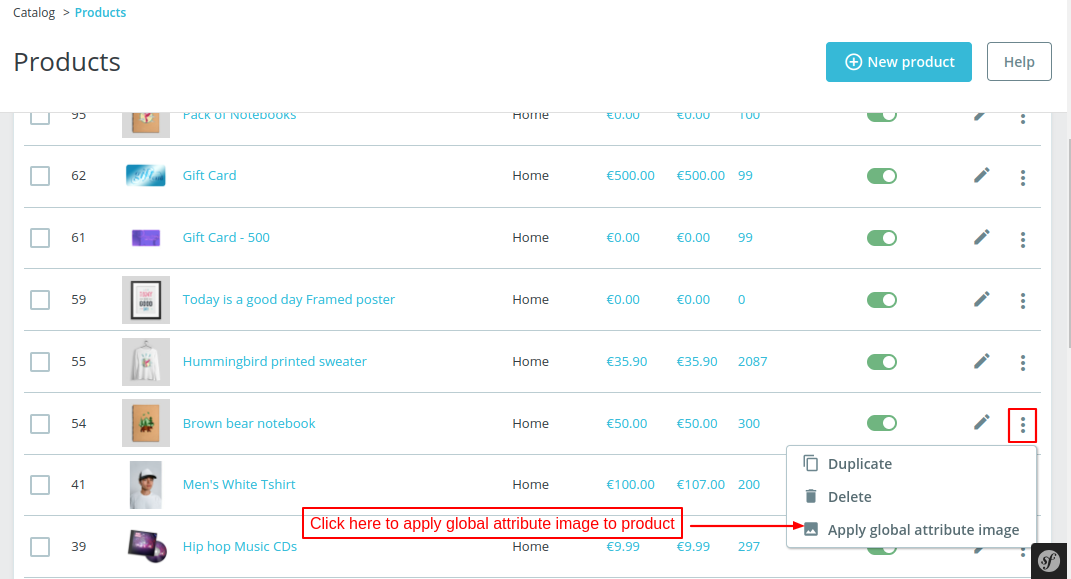
Go to Catalog > Products > Action. Click on ‘Apply global attribute image’ option.
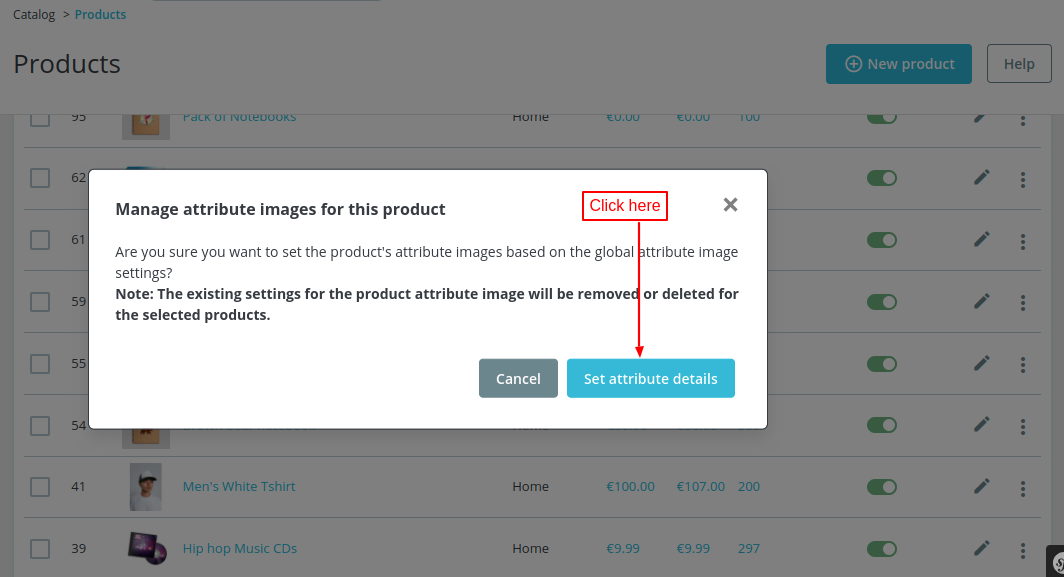
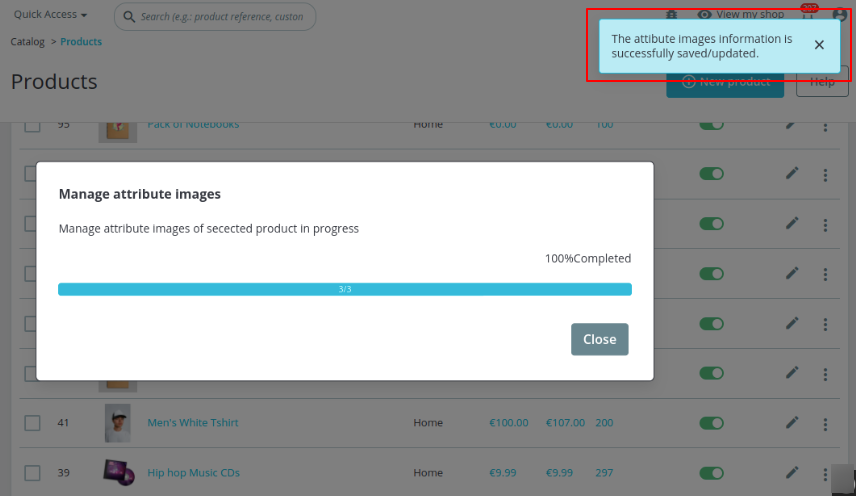
On clicking the option, a popup appears on the page asking for admin’s confirmation for setting attribute images based on global attribute images.
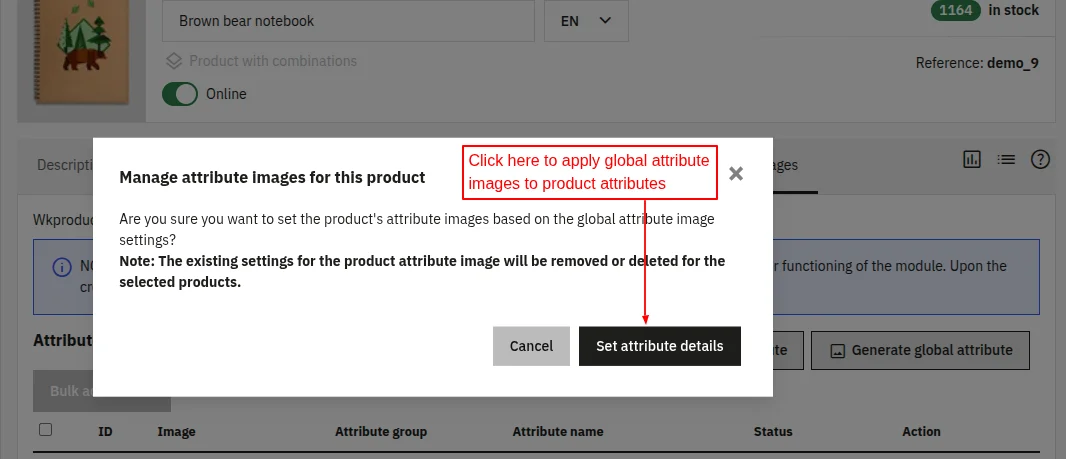
Edit product page
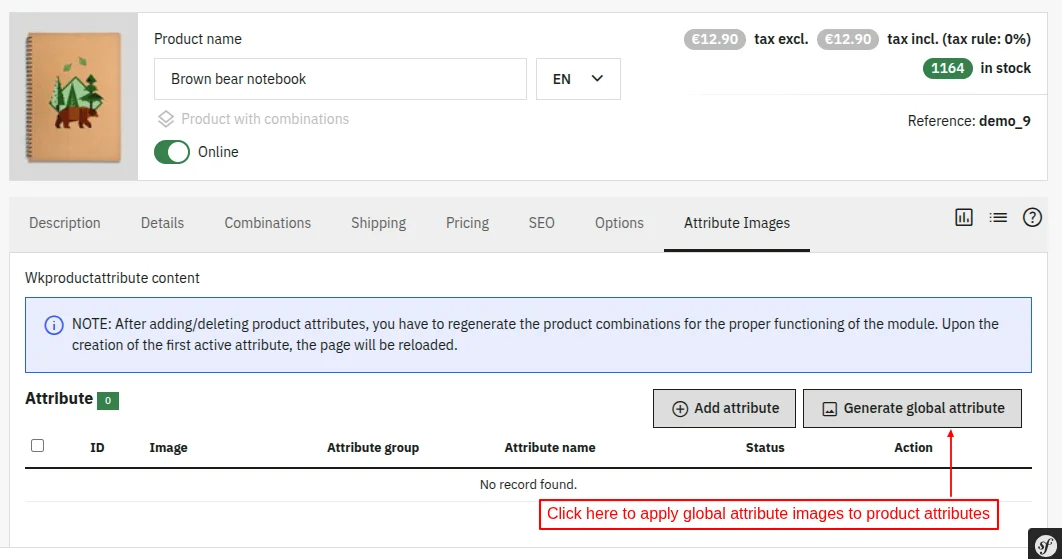
The admin can also apply global attribute images to the attributes of specific product under the Attribute Images tab on edit product page.
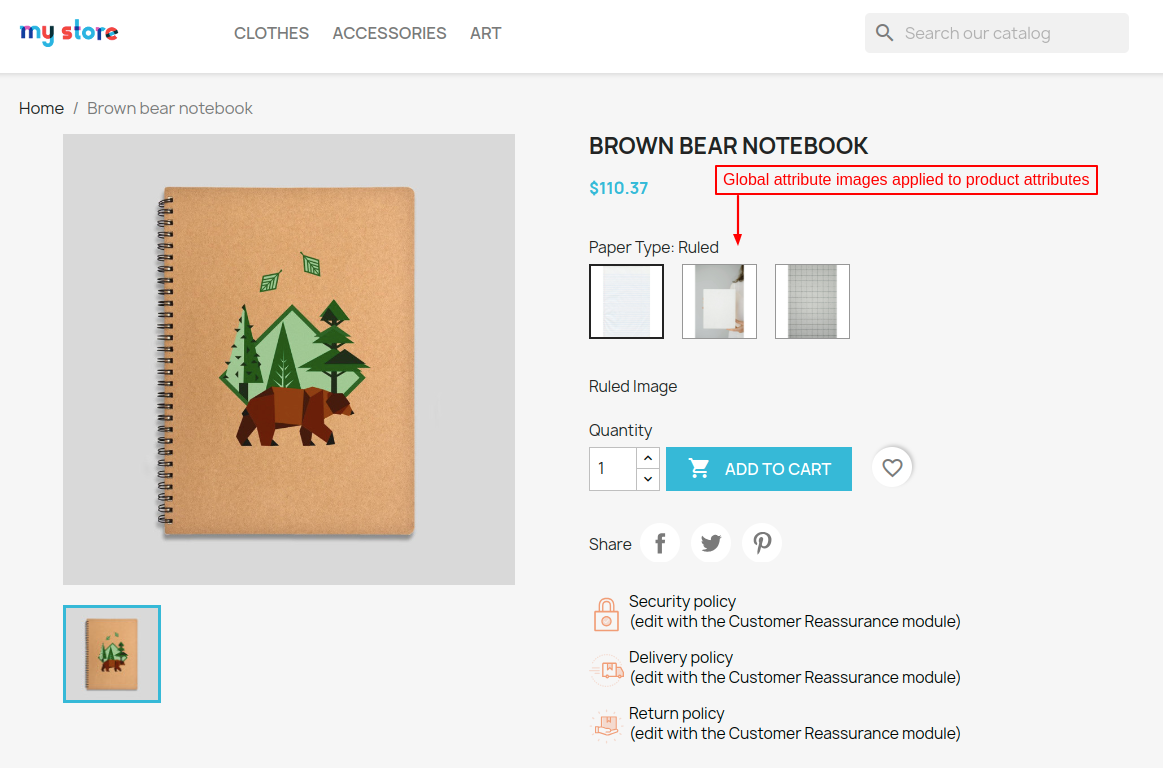
Front End View
On the product page, the customer can view global attribute images applied by admin to product.
Note:
If you update the global settings after generating images for products, you will need to regenerate the images for those products. Otherwise, the updated global settings will not be reflected.
The global settings will only apply to products if all the product attributes are present in the global listing of the module. Otherwise, a validation message will occur.
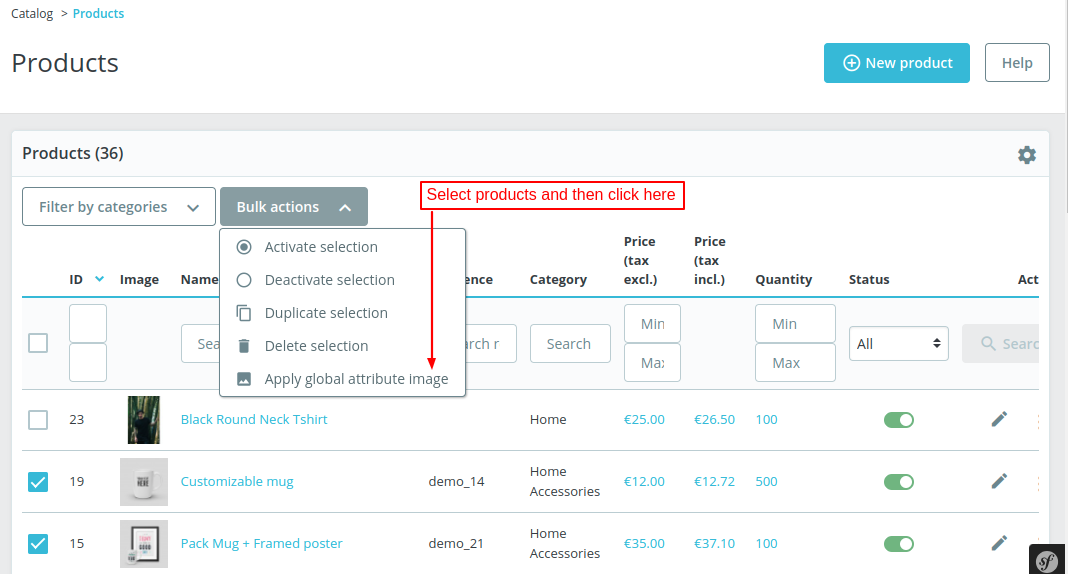
Apply to bulk products
After the successful installation of the module, a new option ‘Apply global attribute image’ gets available under bulk actions on the product listing page.
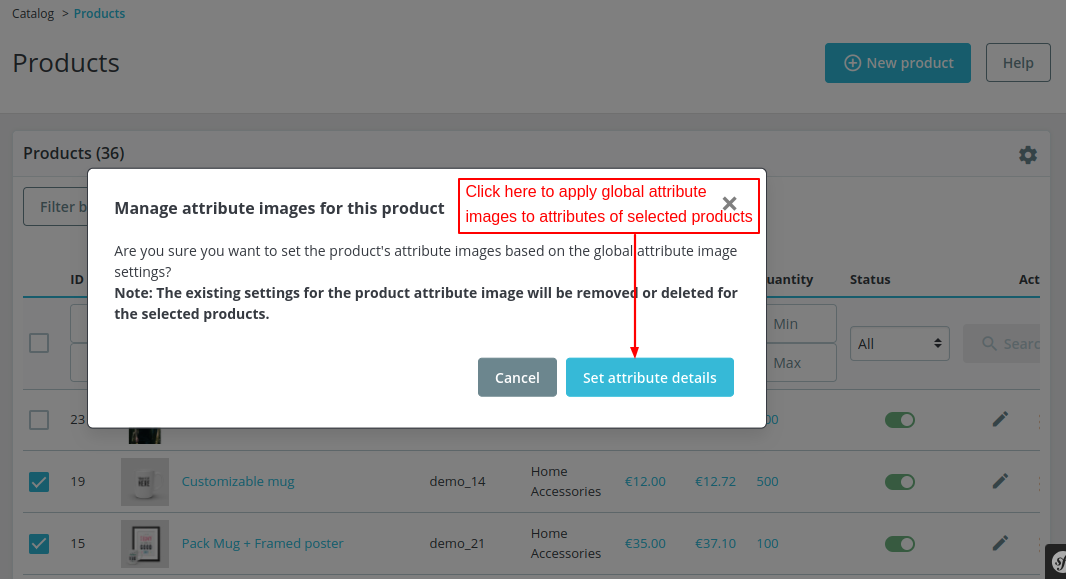
The admin just needs to select the products and click on the option to apply global attribute images to the attributes of selected products.
So, this was all about Prestashop Product Attribute Image Module. I hope this document will help you in checking the functionality of the module in a better way.
Also, do let us know about your views in the comments.
In case, if you are also looking for a module that helps you to disable or hide the attribute. Then, do check out the blog.
Support
For any kind of technical assistance or query, please raise a ticket at http://webkul.uvdesk.com or send us a mail at [email protected]
Also, please explore our Prestashop development services and a vast range of quality Prestashop addons.
Current Product Version - 4.3.2
Supported Framework Version - 9.x.x, 8.x.x, 1.7.x.x

Be the first to comment.