The PrestaShop Import Export module allows you to import/export products, combinations, categories, customers, addresses, brands/manufacturers, suppliers, aliases, stores, discounts, and more.
You can also create many cron jobs for an automated process, like one for categories, another for products, etc.
Why is it different from PrestaShop’s default Import feature
Other than products, combinations, categories, customers, addresses, brands/manufacturers, suppliers, aliases, and stores, it also allows you to import and export discounts, carriers, and groups.
Not only this, but the module also gives you a ton of other options to configure while importing or exporting the entities.
In addition, it also adds other file import methods like FTP, SFTP, and file URL.
Note: The PrestaShop Import Export module is compatible with PrestaShop’s multi-store feature.
Features of the PrestaShop Import Export module
- Import & export 16 PrestaShop entity types — Products, Combinations, Product-specific prices, Categories, Customers, Addresses, Brands/Manufacturers, etc.
- Choose from 8 import methods — File upload, History, FTP, SFTP, URL, Google Sheets, Google Drive, and Dropbox.
- Accept files in CSV, XLS, XLSX, XML, JSON, TXT, and ODS formats for both import and export.
- Schedule automatic imports using cron jobs so your catalogue updates without manual effort.
- Preview your file in a visual mapping screen and match columns to PrestaShop fields before importing.
- Clean and remap data during import or export using find-and-replace rules and value swaps.
- Optimize images automatically during import — resizes to a maximum of 1600×1600 px and compresses JPEG quality from 10–100.
- Import product images from local server URLs for staging or local environments.
- Handle XML files from external systems even when their layout doesn’t match — apply transformation templates to reshape them before importing.
- Update existing products, customers, or orders instead of creating duplicates by matching the reference numbers, EAN, UPC, or other identifiers.
- Choose exactly which columns to export and get the file as CSV, Excel, or XML.
- Send notification emails on import or export completion so team members know an import or export job has finished.
- Limit product imports to selected manufacturers, suppliers, or categories when importing products.
How to install the PrestaShop Import Export module
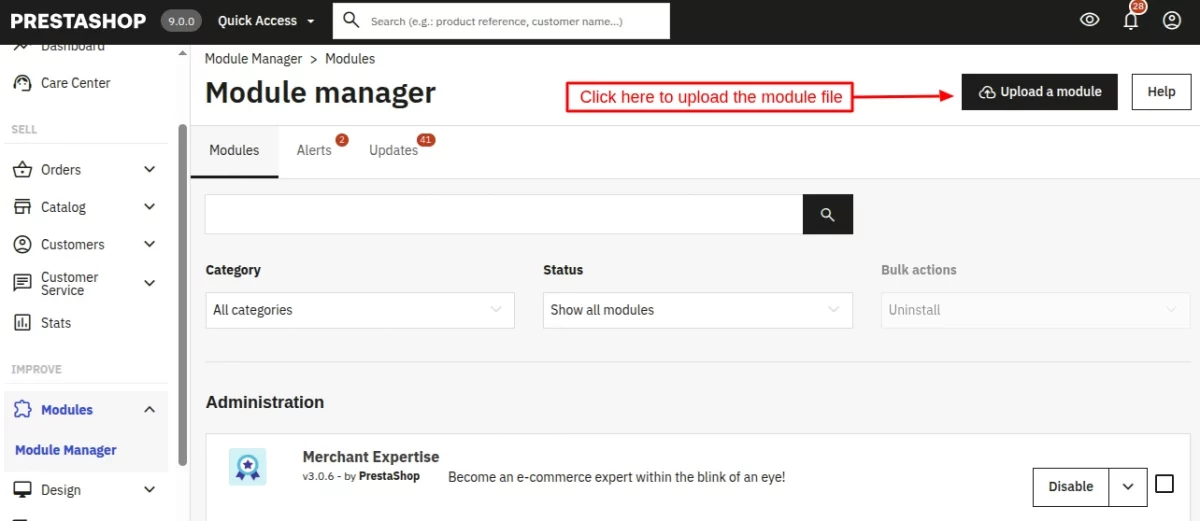
- Firstly, go to the module manager in the back office and click on ‘upload a module’.
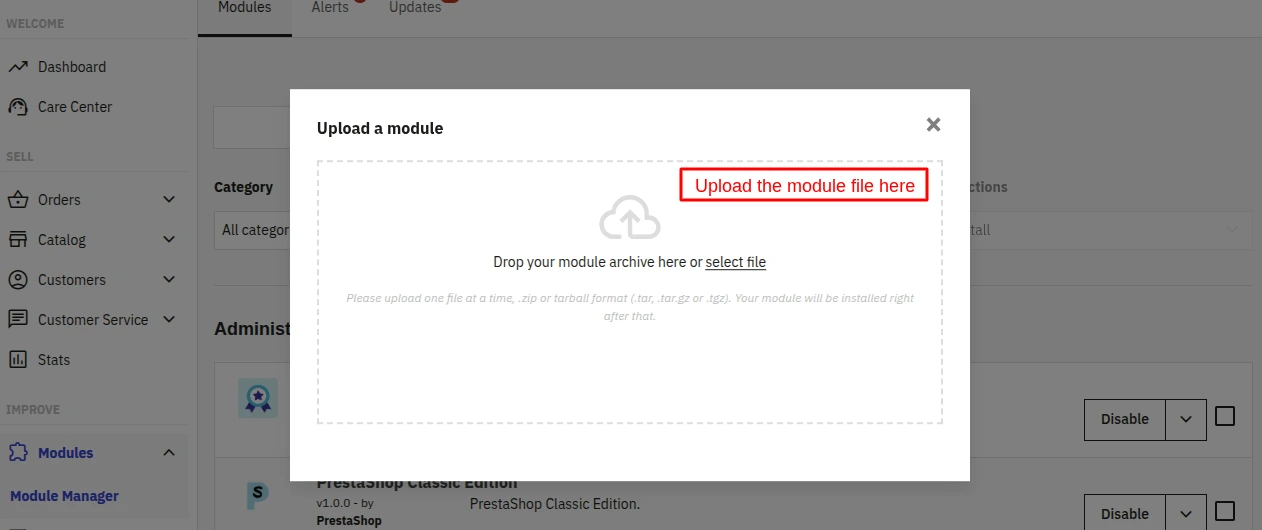
- After that, drag and drop the module file or select the file from the system.
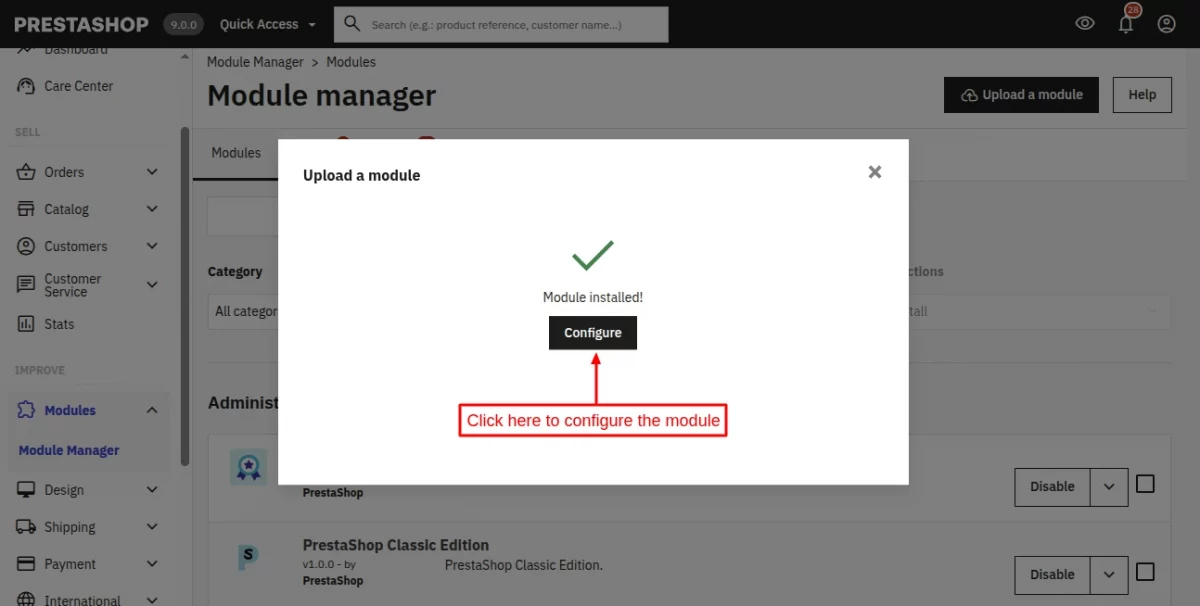
- In this way, the module installation will be successful.
PrestaShop Import Export Module Configuration
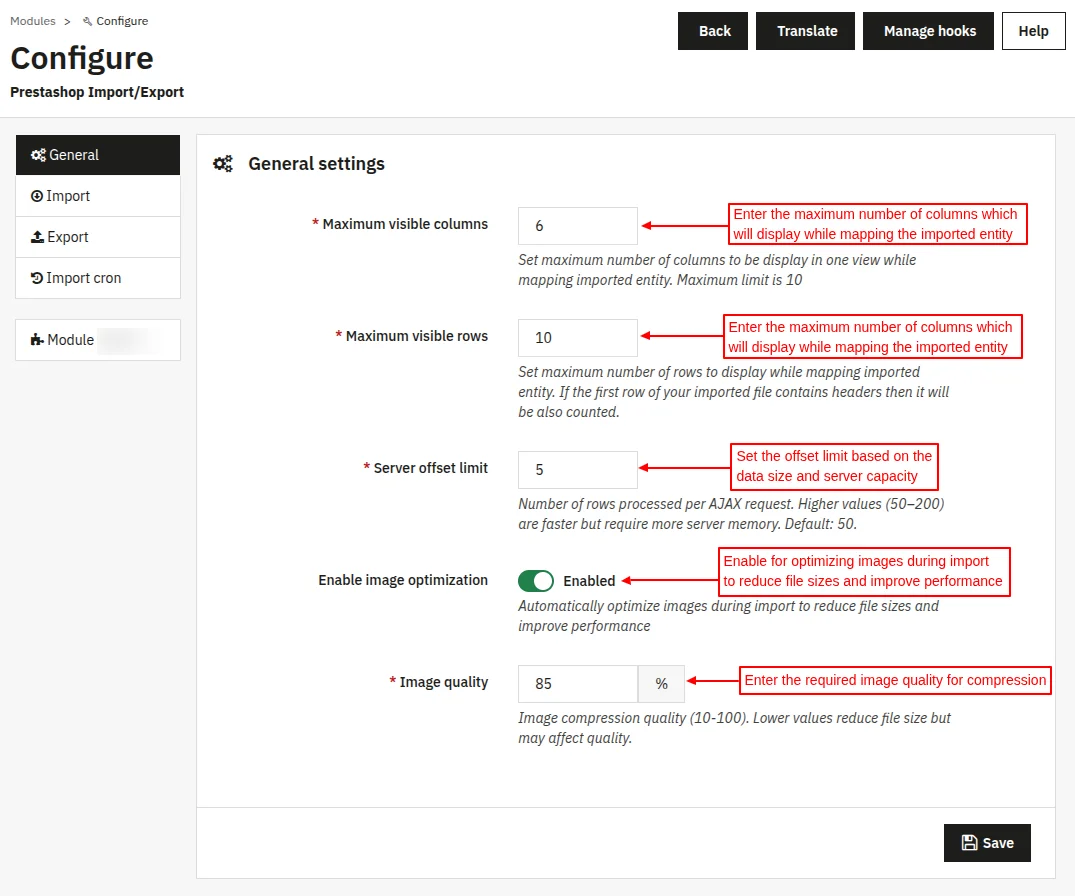
Configure the module using the “General” tab. Under General Settings, the admin can set:
- Maximum visible columns
- Maximum visible rows
- Server offset limit
- Enable image optimization
- Image quality
Import Process
The Import tab guides you through a three-step wizard: Import settings, Mapping, and Import execution. It supports 16 entity types and 8 file-source methods.
Step 1 — Import settings
Choose the entity you want to import, select an import method, and provide the required file or connection details.
Import entity:
Select one of Products, Combinations, specific prices, Categories, Customers, Addresses, Brands/Manufacturers, Suppliers, Alias, Stores, Discounts, Carriers, Groups, Attributes, Features, or Orders.
Notes:
- Discounts must be imported in ascending order of discount ID.
- If Products is selected in the Import entity, then in the category column, the first category will be treated as the default category.
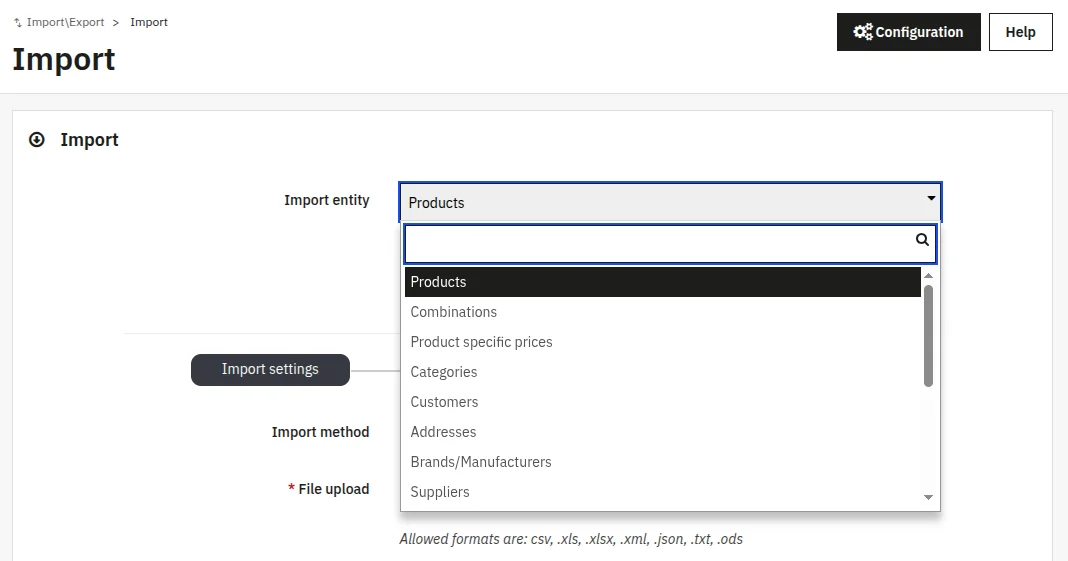
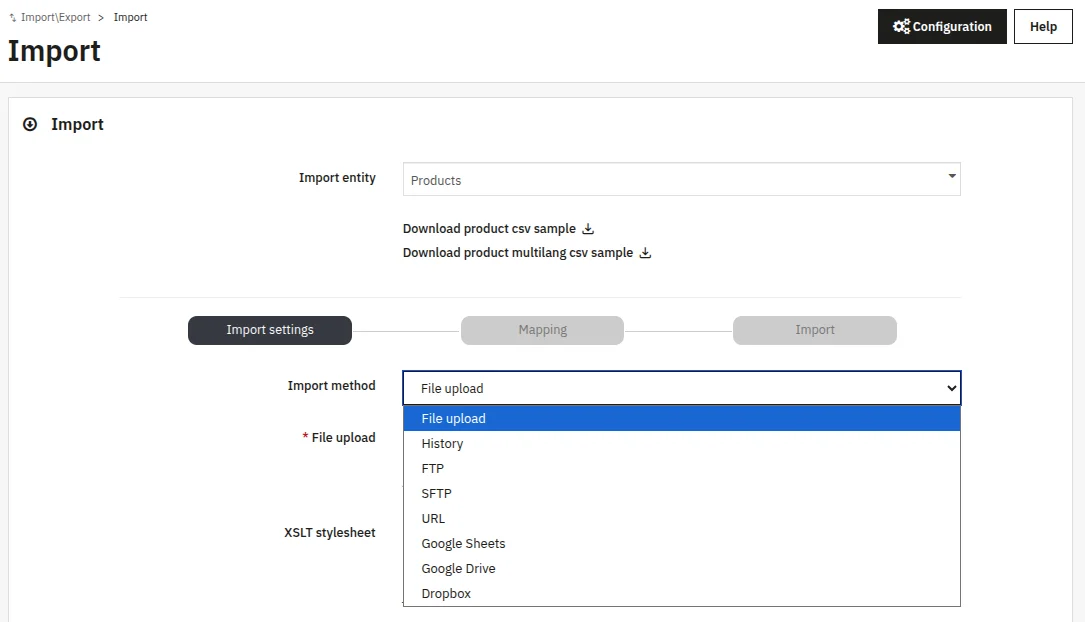
Import method: Choose to import the entities using File upload, History, FTP, SFTP, URL, Google Sheets, Google Drive, or Dropbox import methods.
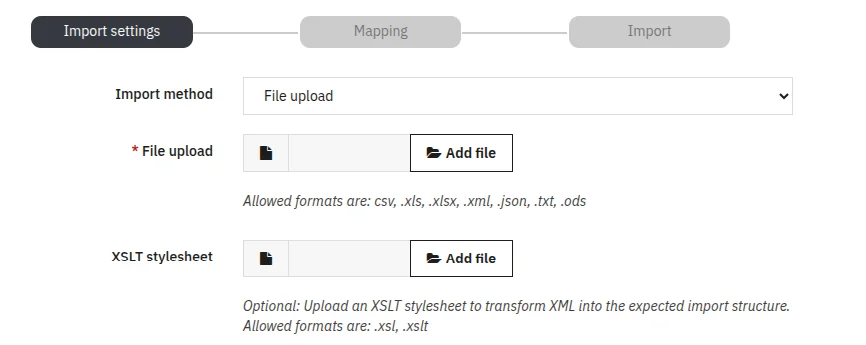
- File upload:
Upload files from your computer. The supported file formats are:
.CSV,
.XLS,
.XLSX,
.XML,
.JSON,
.TXT,
.ODS
If your XML file comes from an external system and doesn’t match the required format, you can upload an XSLT stylesheet to transform it automatically during import.
Note: The XSLT stylesheets are optional and apply only to XML imports.
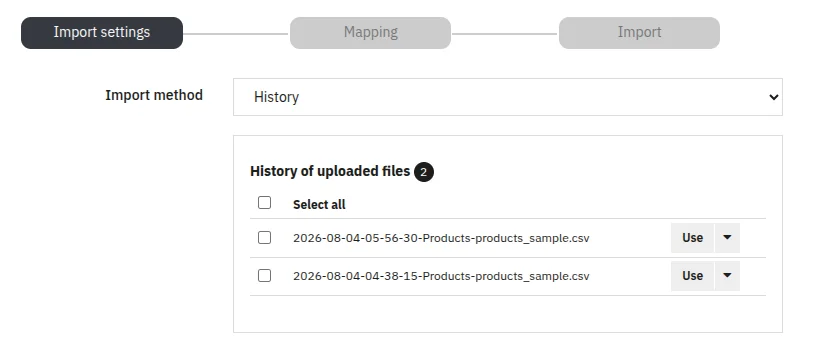
- History:
Choose history to display the list of available files (including the ones you previously uploaded using the browser), then click the “Use” button for the file you wish to import.
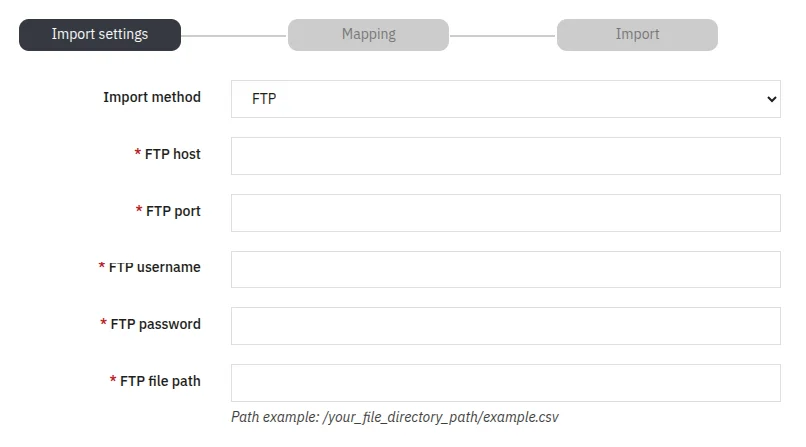
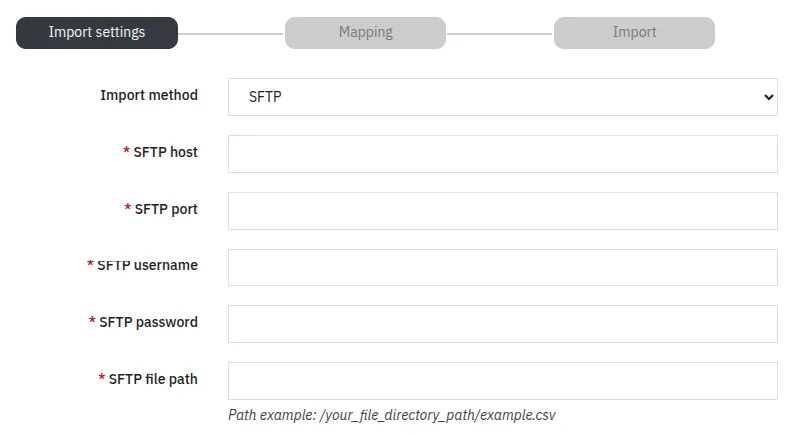
- FTP/SFTP:
Enter host, port, username, password, and remote file path. The module fetches the file directly from your server.
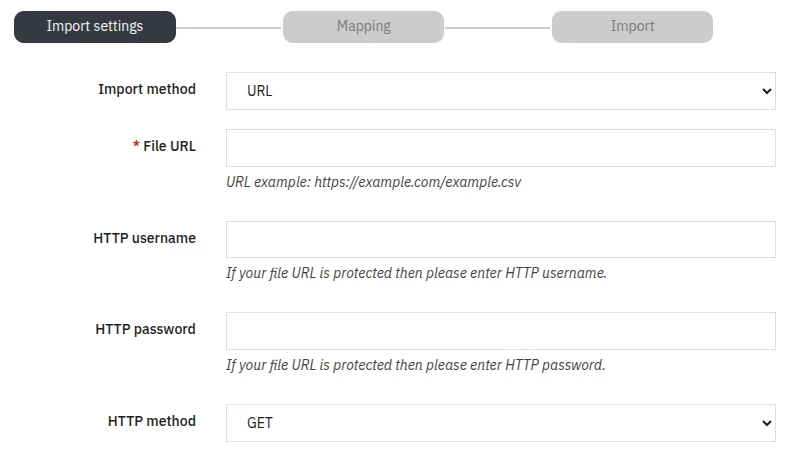
- URL:
Enter a publicly reachable file URL. For protected URLs, provide HTTP username and password and choose GET or POST.
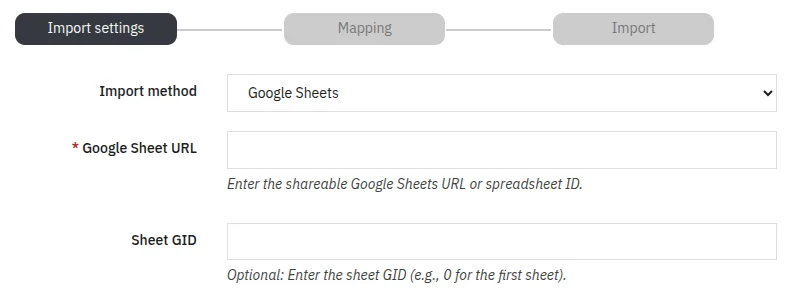
- Google Sheets:
Paste the shareable Google Sheets URL or spreadsheet ID. Optional Sheet GID targets a specific tab.
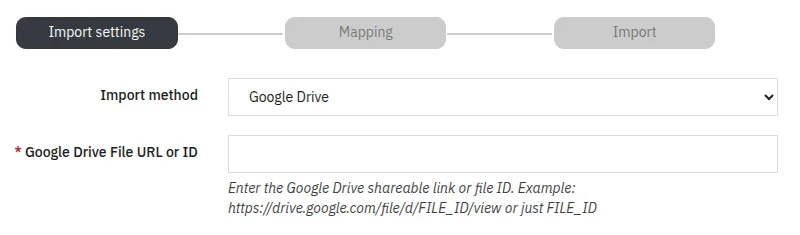
- Google Drive:
Paste the shareable Google Drive link or file ID.
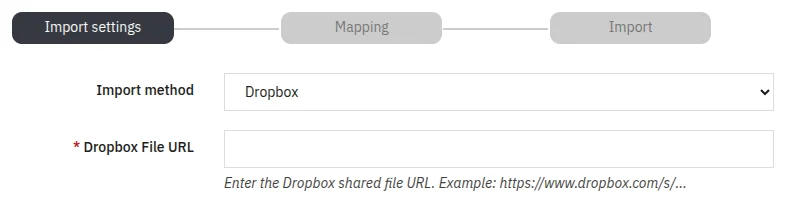
- Dropbox:
Paste the shared Dropbox file URL.
Import options
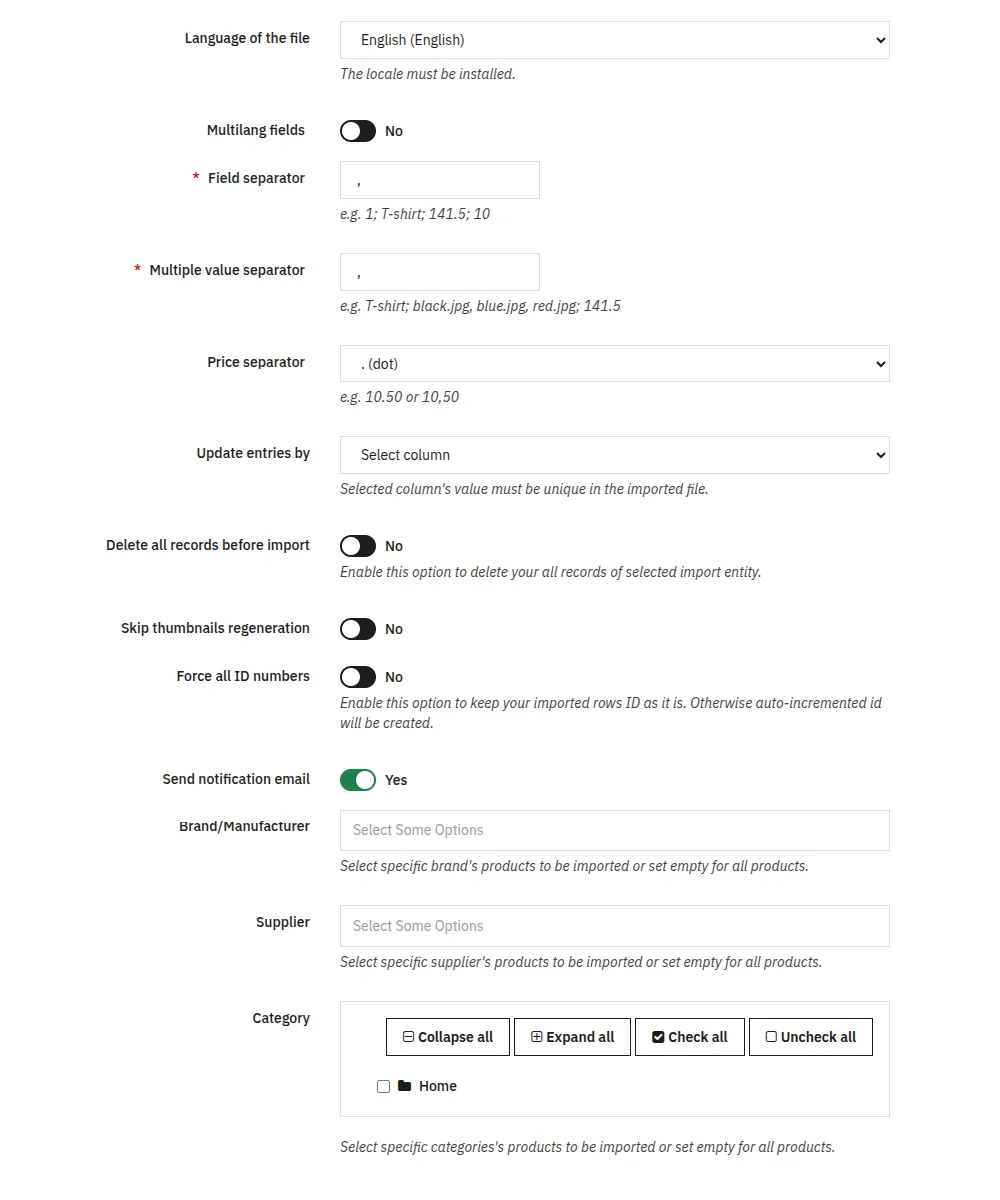
These settings appear below the method fields and control how the module processes the data.
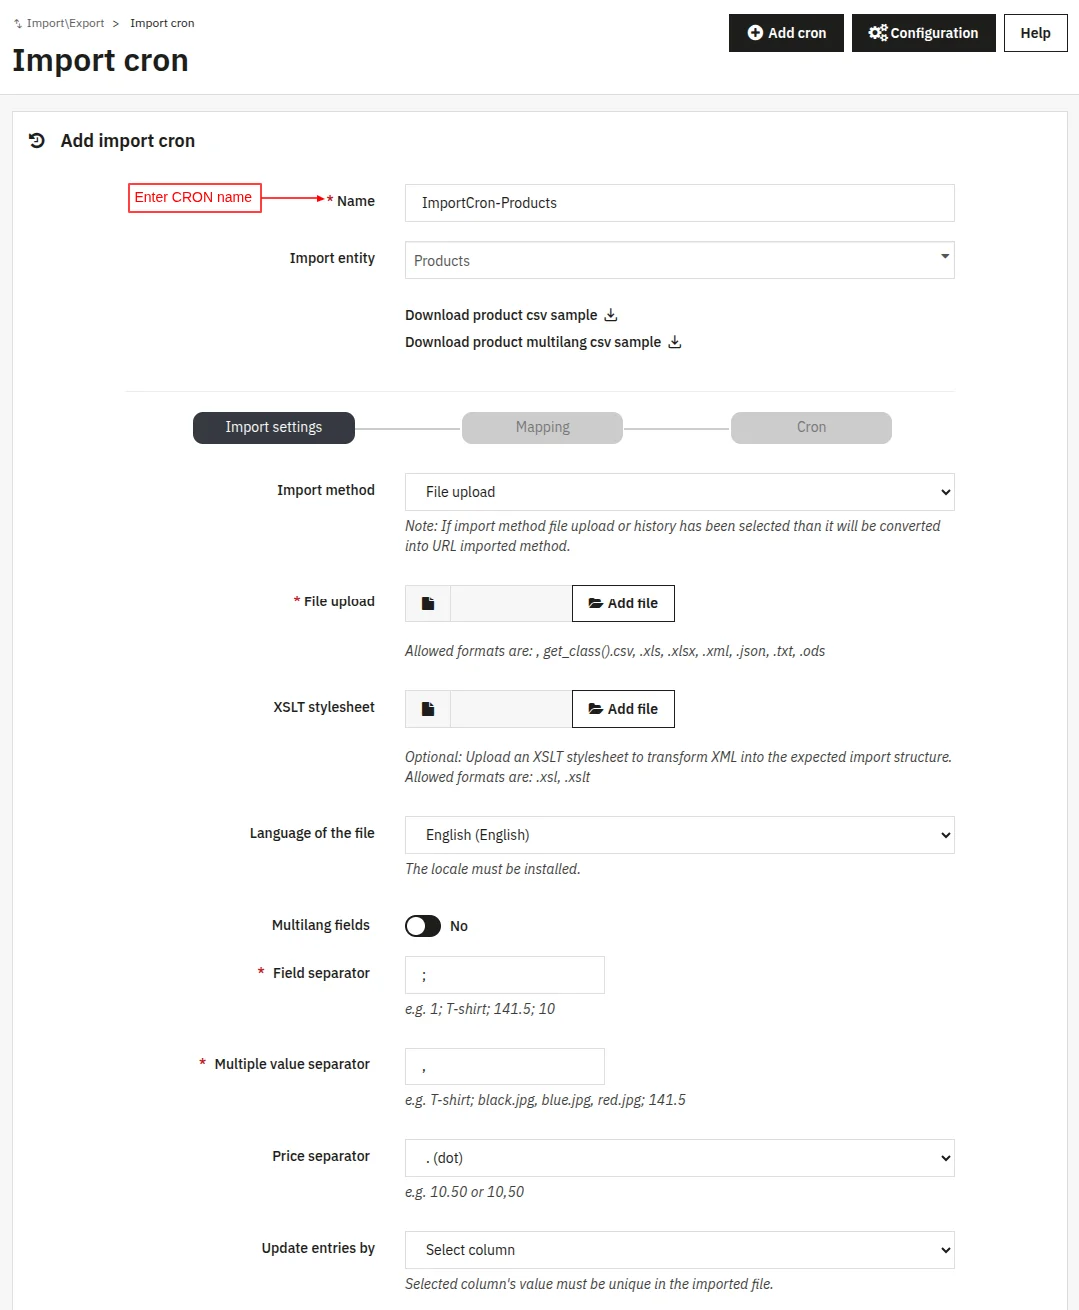
- Language of the file: The language the file is written in. You will need to also have the appropriate language pack installed.
- Multilang fields: Enable to import multi-language values for name, summary, and description (Applicable only in case of product entity).
- Field separator: Select the character separating columns in text-based files.
- Multiple value separator: Enter the character separating multiple values in a single field.
- Price separator: Choose dot (.) or comma (,) for decimal prices.
- Update entries by: Choose how existing records are matched — ID, Reference, EAN, UPC, ISBN, Supplier reference, or MPN. The selected column must contain unique values.
- Delete all records before import: When enabled, removes every record of the selected entity before inserting new ones.
- Skip thumbnails regeneration: When enabled, PrestaShop does not regenerate product thumbnails after image import, which speeds up processing.
- Force all ID numbers: Preserve the ID values from your import file instead of letting PrestaShop auto-increment them.
- Send notification email: Activate this option to receive an email when the import is complete.
- Brand/Manufacturer: Filter product imports to selected brands only.
- Supplier: Filter product imports to selected suppliers only.
- Category: Filter product imports to selected categories only.
Notes:
- The Delete all records option will delete all records from the database.
Whereas in the import combination case, it will delete only those product combinations which are mentioned in the import file. - The brand/manufacturer, supplier, and category fields appear only while importing the Products. The rest of the entities have the same configuration form.
Step 2 — Mapping
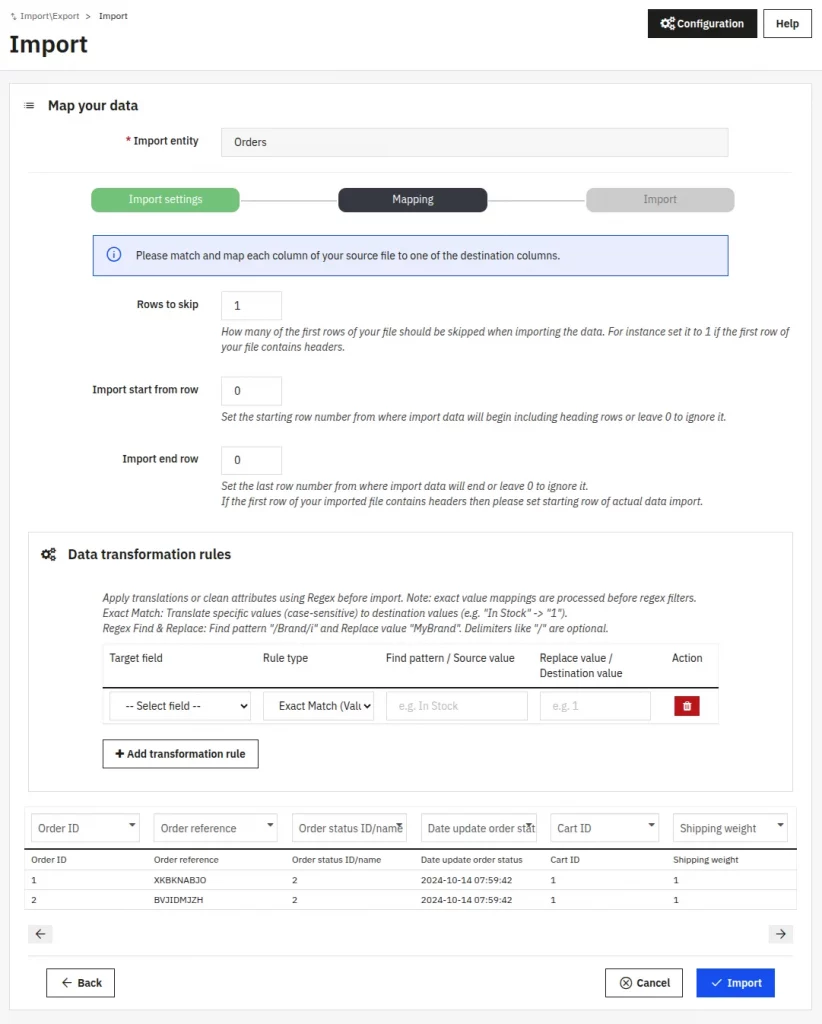
After submitting Step 1, the module loads a preview of your file and shows a mapping grid. Each column header from your file is matched to a PrestaShop field.
Matches are attempted automatically by header name; unmatched columns fall back to sequential field assignment.
- Review the auto-mapped columns and correct any mismatches.
- Use Rows to Skip to ignore header or metadata rows at the top of the file.
- Set Import start from row and Import end row to process a subset of the file.
- Add regex-based transformation rules to clean or reformat values during import.
- Add value mapping rules to replace source values with destination values for specific fields.
- Click Import to begin processing. The module processes rows in AJAX batches sized by your Server offset limit.
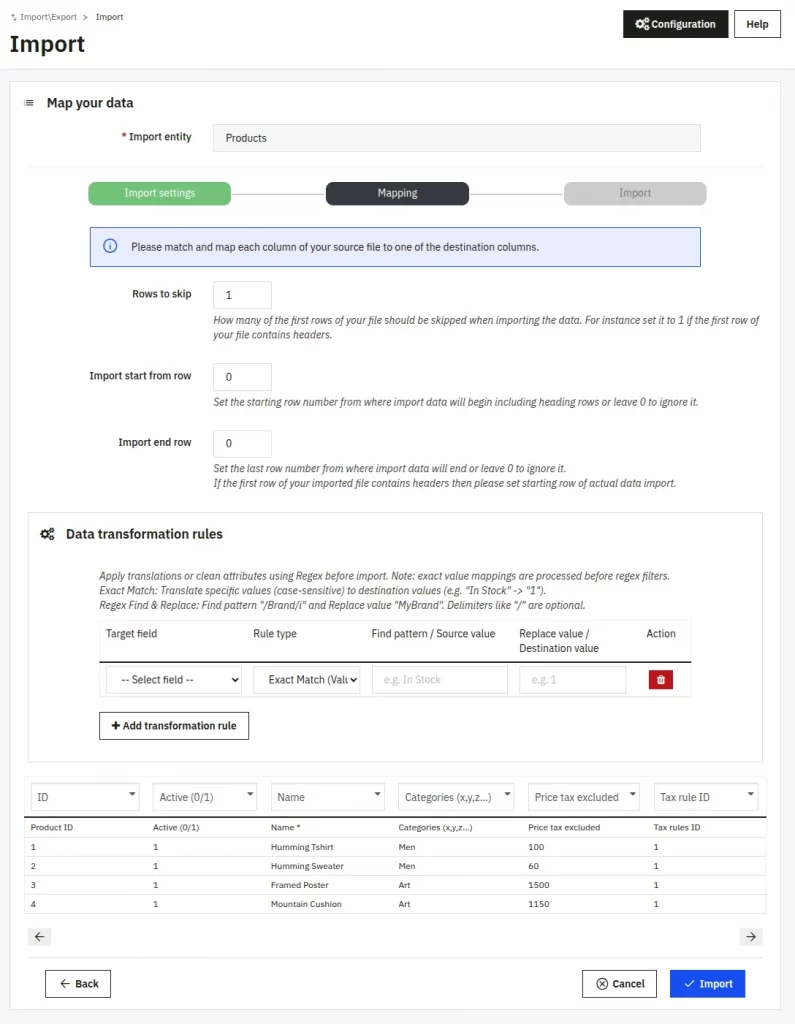
Note: When we set the start row or end row or both, then we can not skip the starting row. To skip starting rows, please set the starting row accordingly.
Step 3 — Import execution
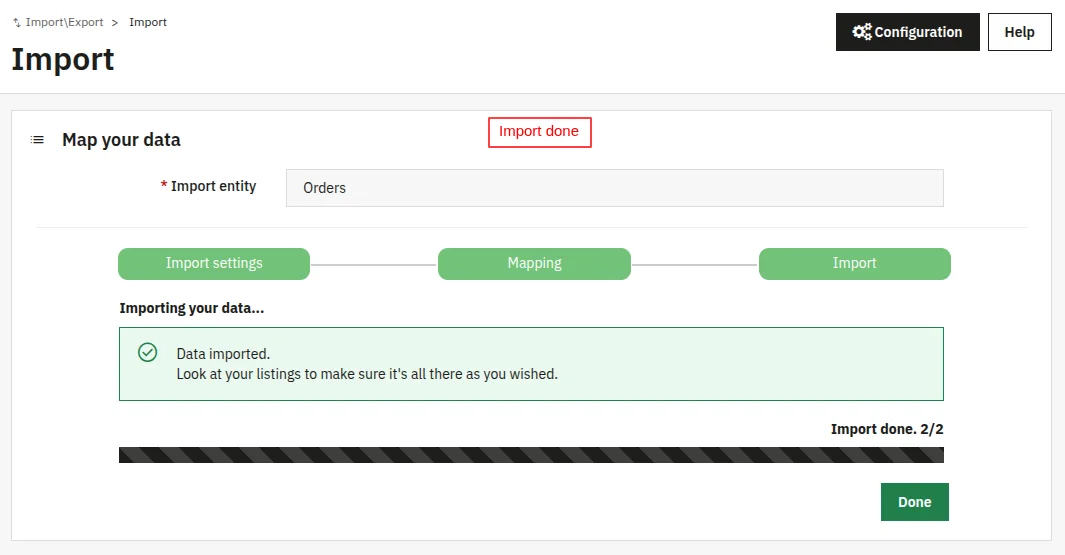
The module validates each row, skips invalid rows, and collects errors in an on-screen report. A success summary shows how many records were created or updated.
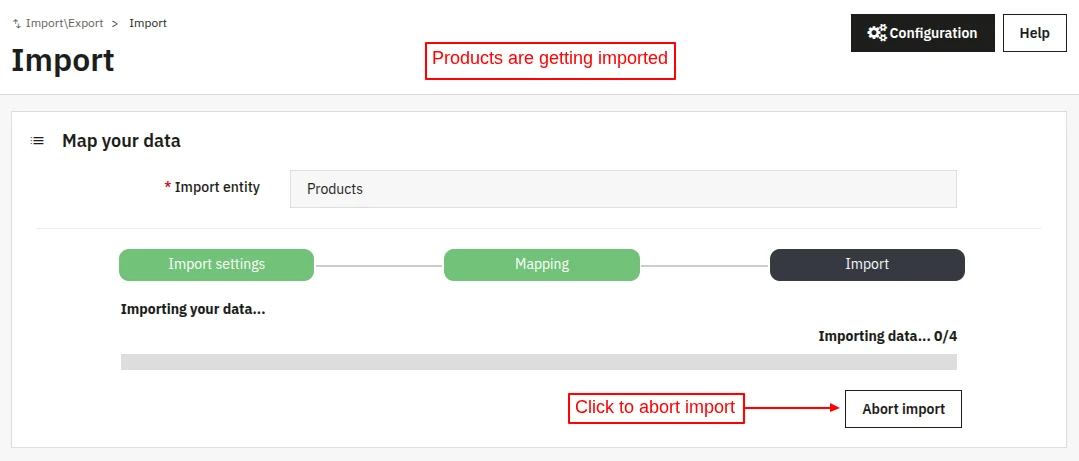
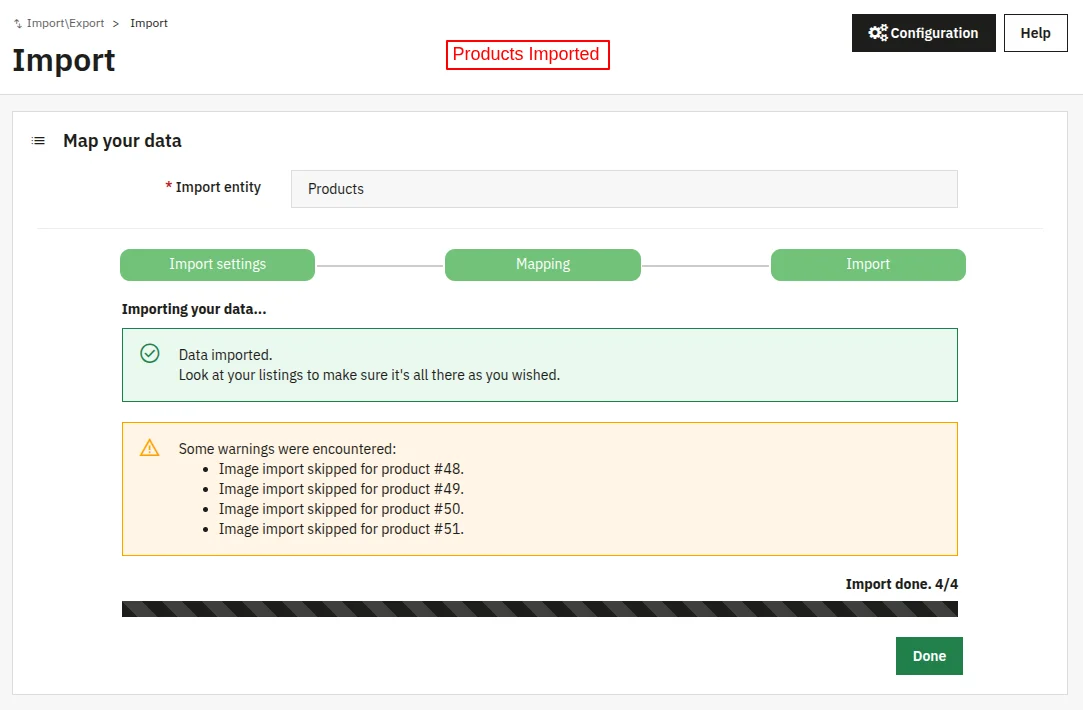
The products are imported and added to the catalog.
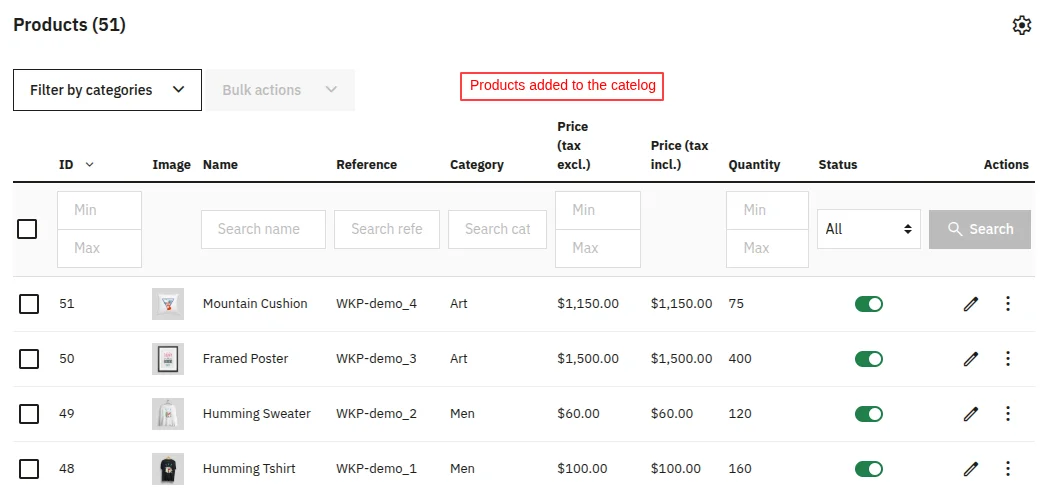
Likewise, you can import combinations, categories, customers, addresses, brands/manufacturers, suppliers, aliases, stores, discounts, carriers, groups, features, attributes, and specific prices.
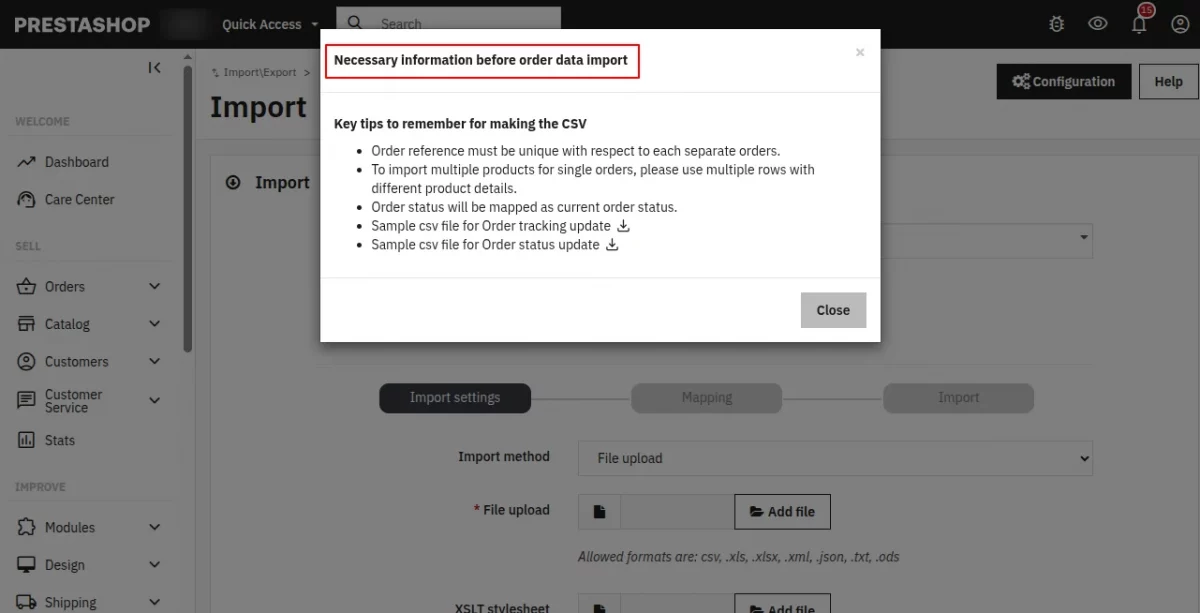
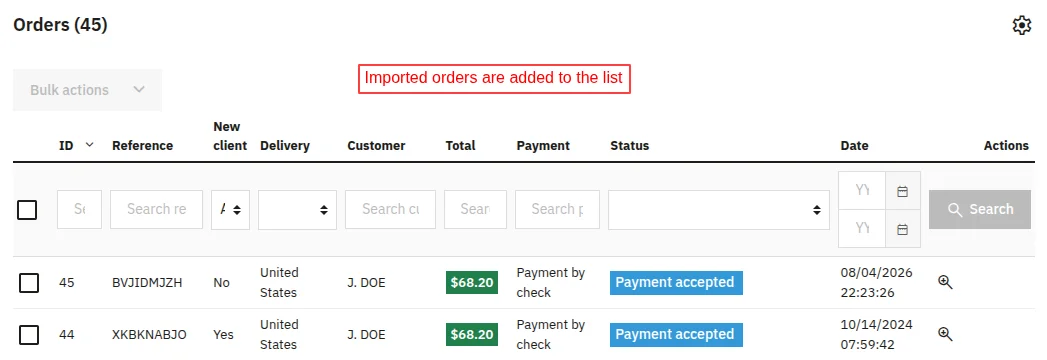
Import Orders
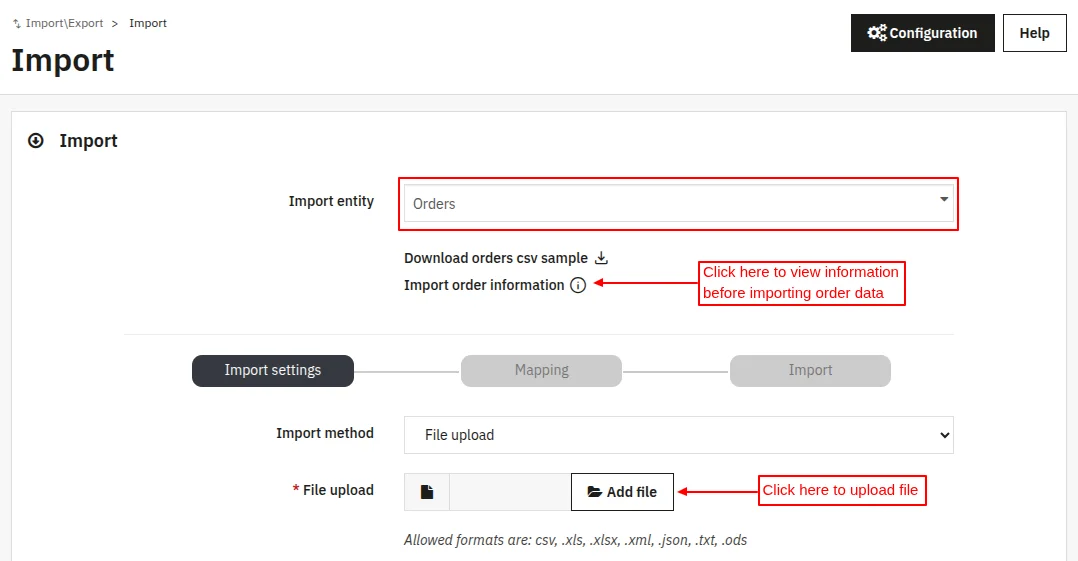
Click on the information to view the points to be considered before preparing the CSV file.
Export Process
The Export tab allows you to export PrestaShop data into a structured file. Choose the entity, pick the columns, set the output format, and download.
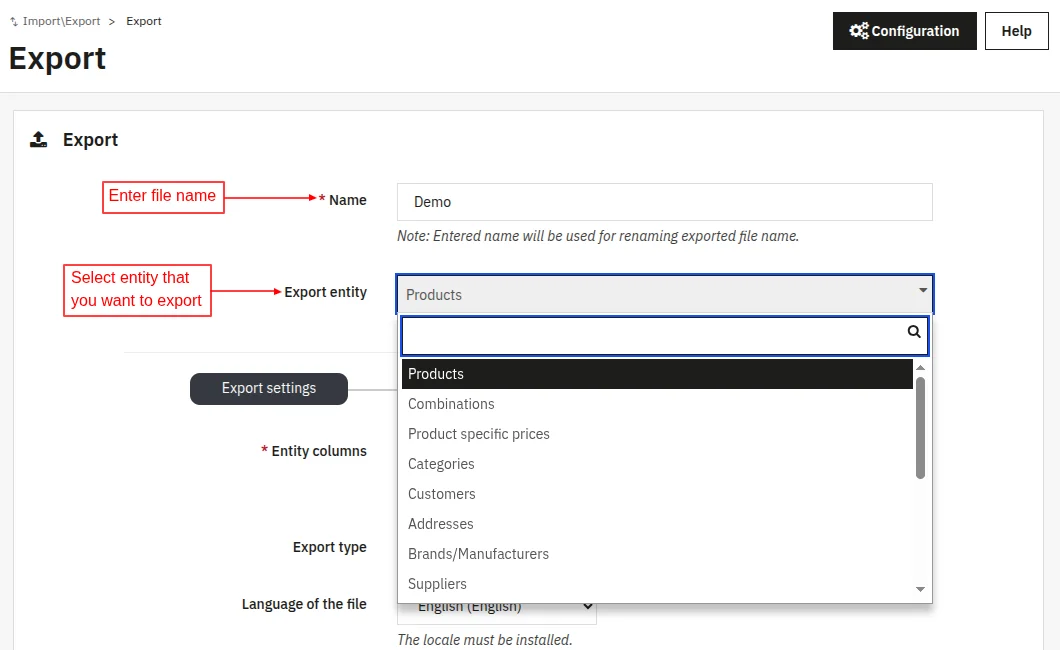
- Name: Enter a label for the export file.
- Export entity: Select the data that you want to export from the 16 entity types.
- Entity columns: Tick the fields you want in the exported file.
- Export type: Choose CSV, XLS, XLSX, or XML.
- Multilang fields: Enable to export multi-language values for name, summary, and description.
- Field separator: Select the character that should be used for separating columns in the file.
- Multiple value separator: Enter the character that should be used for separating multiple values.
- Price separator: Choose dot (.) or comma (,) for decimal prices.
- Price range: Filter entities by a minimum and maximum price.
- Date range: Filter and export entities based on from and to dates.
- Sort entries by: Choose ID, Reference, EAN, UPC, ISBN, Supplier reference, or MPN to sort the exported file.
- Send notification email: Receive a confirmation email with the exported file attached.
- Data Transformation rules: Clean up your exported data automatically before downloading — use find-and-replace rules or swap specific values for other values.
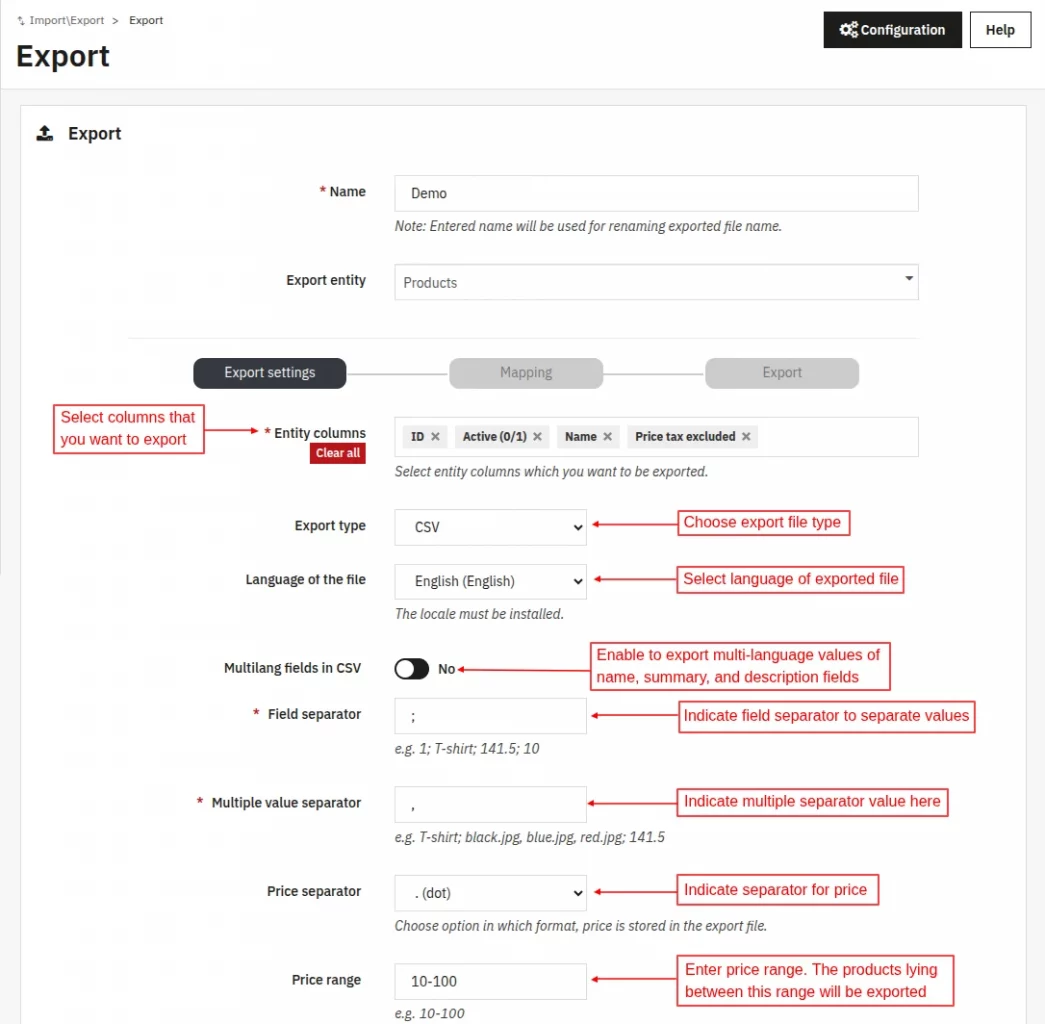
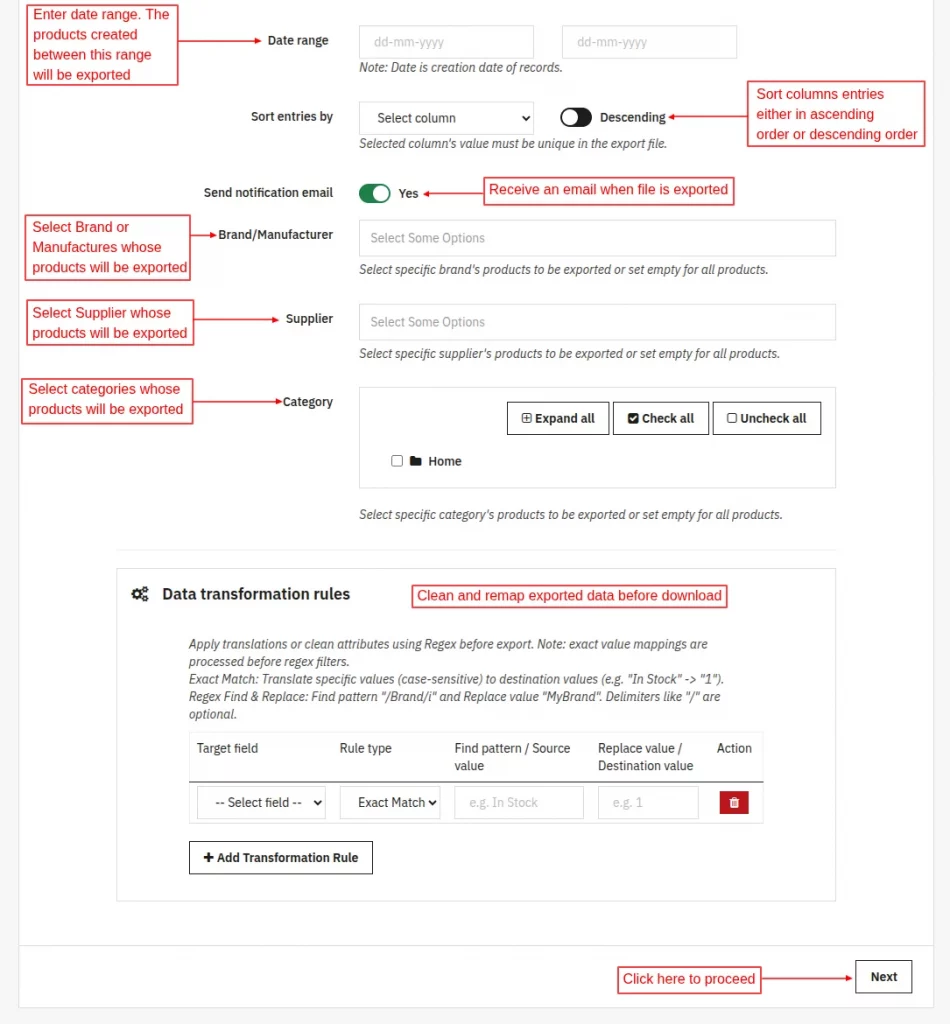
After this, click Next to proceed further. The module generates the file and provides a download link. Large exports are processed in the background and emailed if notification is enabled.
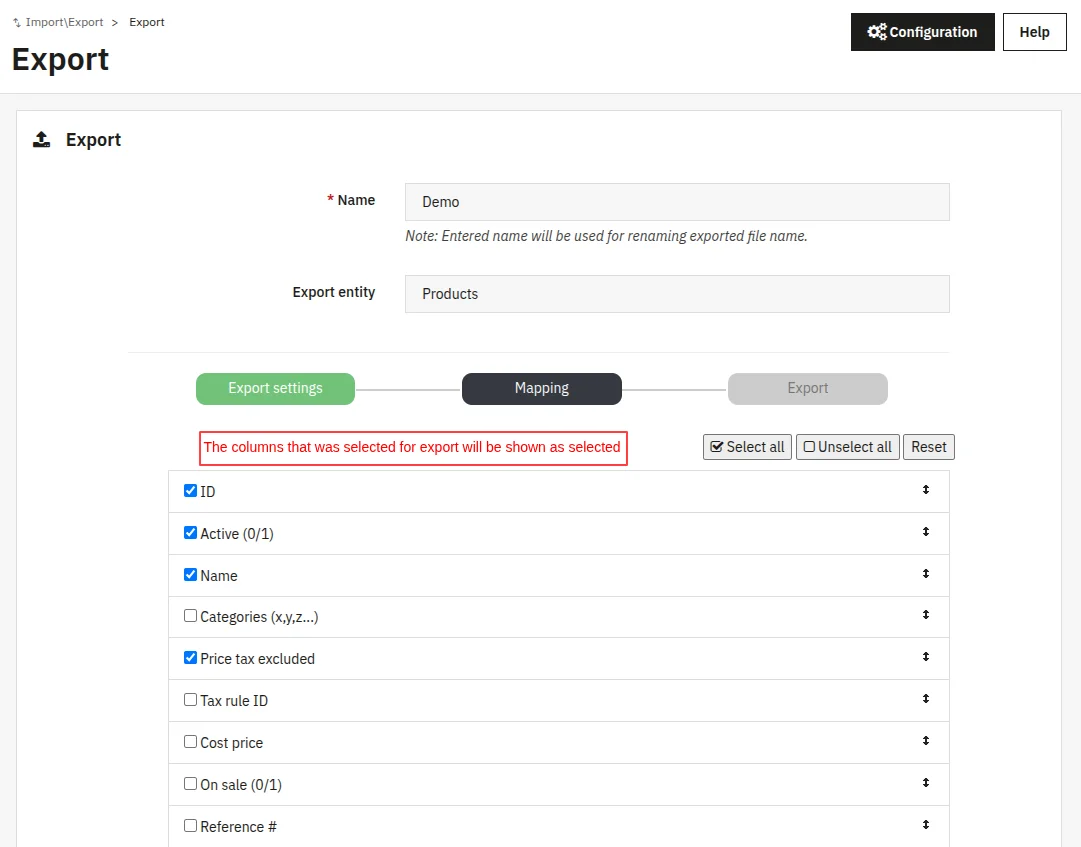
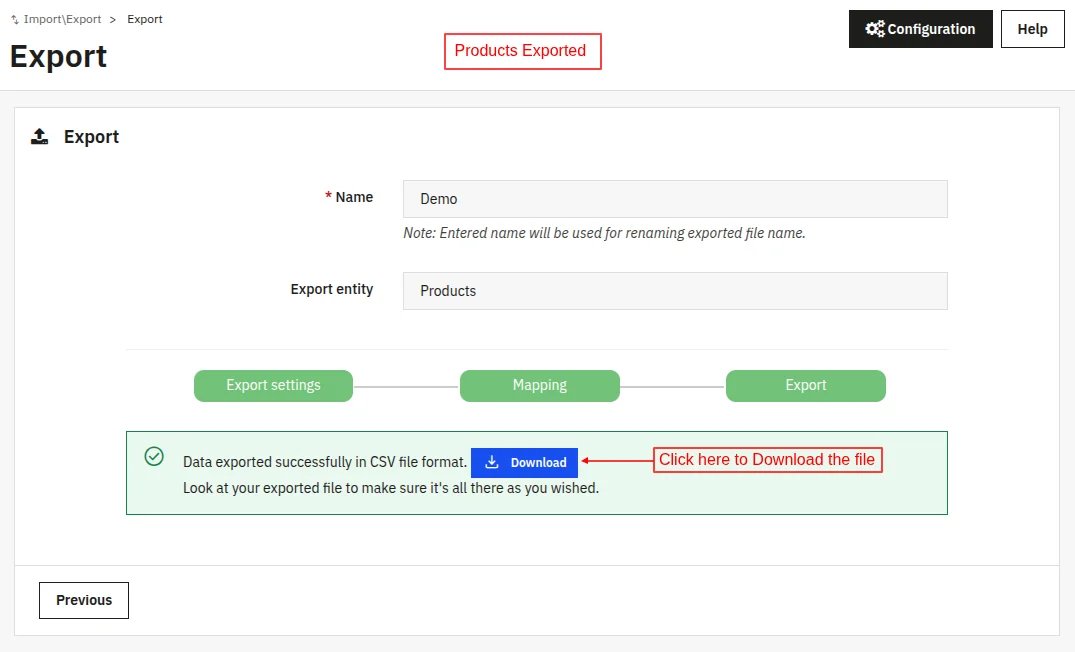
Here is a glimpse of the exported file.

Likewise, you can export products, combinations, categories, customers, addresses, brands/manufacturers, suppliers, aliases, stores, discounts, etc.
Import Cron
The Import cron tab stores scheduled import jobs. Each job remembers the entity, import method, file source, mapping, etc. so the same cron job can automatically run at scheduled intervals.
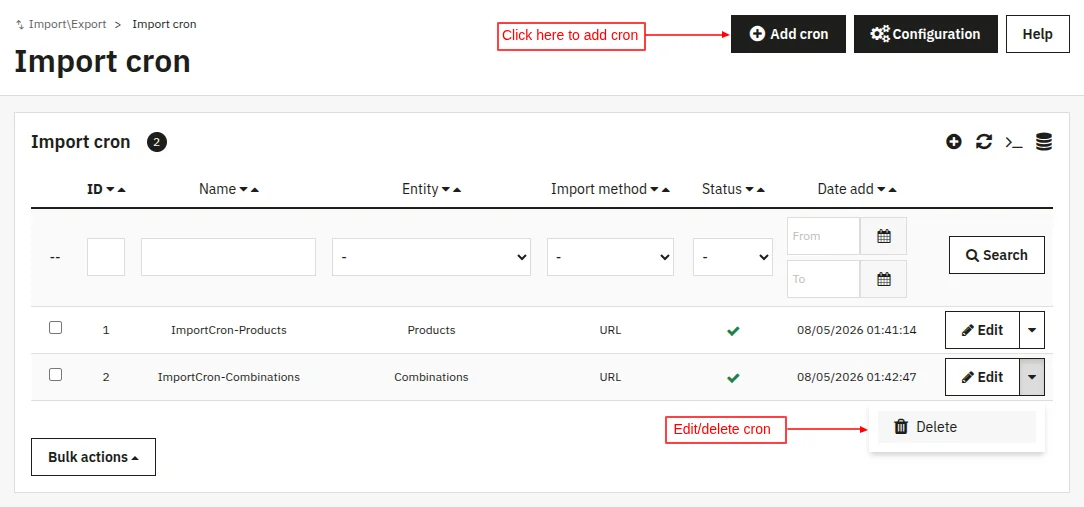
Add CRON
Click the Add Cron button to create a new scheduled import. The Add New Cron page is similar to the Import tab, but it includes some additional fields that are specific to cron scheduling.
- Cron notification email: Enter an email address that receives a status message when the cron job finishes.
- Cron max records: Limit the number of rows processed per cron request. Leave empty to process all records.
- Status: Activate or deactivate the cron job without deleting it.
- Automatically deactivate cron job: When enabled, the job turns itself off after its first successful run. Useful for one-time scheduled migrations.
- Shop context: Cron jobs respect PrestaShop multi-store context. Jobs are scoped to a specific shop or shop group.
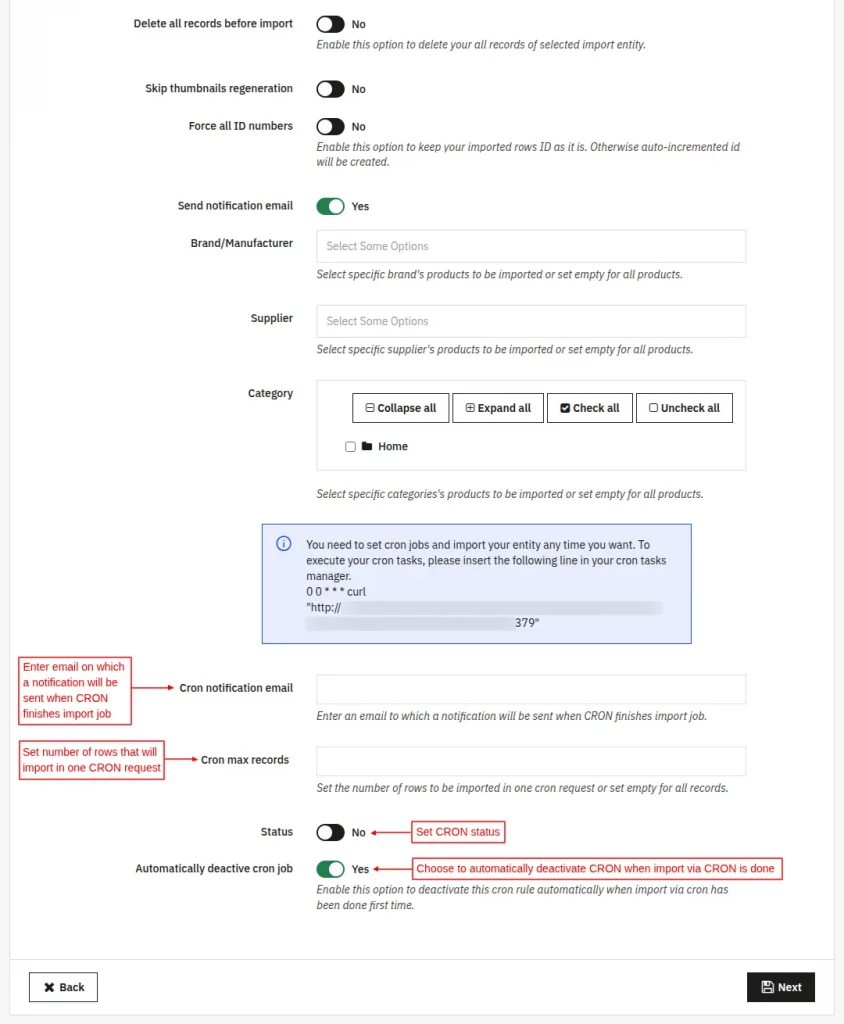
Note: To execute your cron tasks, please insert the following line in your cron task manager. Replace the string “www.sitename.com” with your website link.
0 0 * * * curl “https://www.your-site.com/module/wkimportexport/wkcronimport?token=YOUR_SECURE_TOKEN”
After completing this step, click Next to proceed to the mapping step.
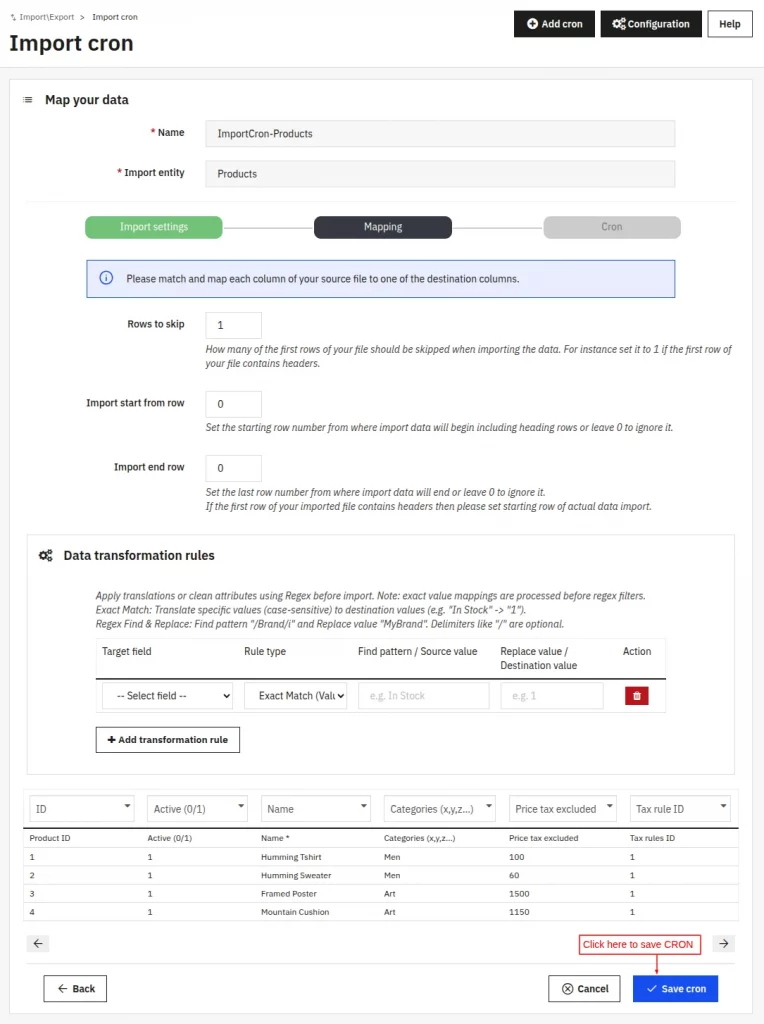
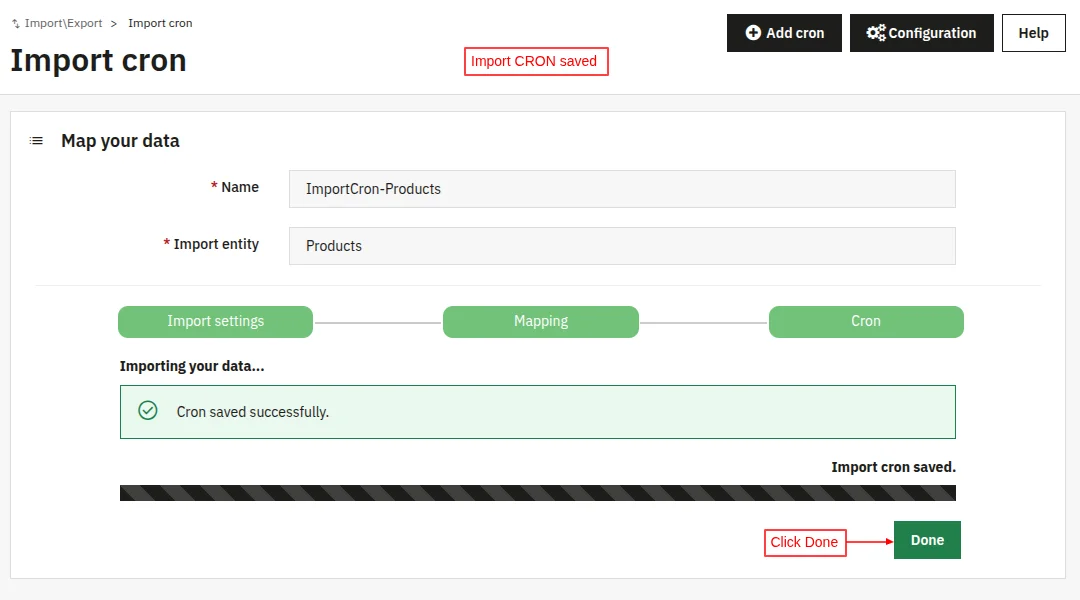
Once all the entity fields have been mapped, click the Save button to save the import cron successfully.
This was all about the PrestaShop Import Export Module. I hope this document will help you in checking the functionality of the module in a better way.
Also, do let us know about your views in the comments.
Support
For any kind of technical assistance or query, please raise a ticket or send us an email at [email protected]
Also, please explore our PrestaShop development services and vast range of quality PrestaShop addons.
Current Product Version - 2.0.0
Supported Framework Version - 9.x.x, 8.x.x, 1.7.x.x

Be the first to comment.