Opencart Services and Packages extension allows the store owner to create holiday tour packages. The package comprises of camp & adventure activities, meals, vehicles, and places. The extension offers dynamic packaging that enables customers to customize and build their tour packages by selecting various options.
After selecting the tour packages, the customers can pick the travel booking dates from the calendar and proceed towards the checkout.
Note: – Opencart Services and Packages is an add-on of the Opencart Hotel Booking System, you need to first install the Opencart Hotel Booking System extension.
Features
- Manage camp and adventure activities in Tour Packages.
- Manage meal types, vehicles, and places in the tour package.
- The customers can use the filter option to find the tour packages.
- Enter tour packages information – name, description, duration (in nights), no. of people.
- Mention package base price and the activities (add-ons) prices.
- Provide short information for activities, meals, and places.
- Set prices for each activity, meal, vehicle, and place.
- Set pricing according to per person or for everyone.
- Default include the activities, meals, places.
- Customers can customize the tour packages by selecting activities, meals, places.
- Module source code is open for customization.
- Supports multiple languages translations.
Installation
Upload Folders
First, extract the downloaded zip file. After that, open the correct Opencart Version Folder. According to Opencart Version installed in your system. Then, upload admin and catalog folders to the Opencart root directory.

Upload XML
Now log in to admin backend and navigate to Extensions>Extension Installer. Click the Upload button and browse the XML file, this file is in the ocmod folder. Please select the correct ocmod folder. According to your Opencart version installed in your system.

Click Continue after uploading the XML file.
Refresh Modifications
After uploading the XML file, please navigate through Extensions>Modifications. Now, click Refresh button as visible in the screenshot.
Edit User Groups
After that, go to System>Users>Usergroups. And then, edit ‘Administrator’. Click Select All for both Access Permission and Modify Permission and Save it.

Install Module
Now, navigate to Extensions>Modules. Find Services and Packages from the list. Click the Install button as visible in the screenshot below.
Language Translation
The module supports multiple languages, please click here to read about Opencart language installation and translation.
Module Configuration
After the module installation, the admin needs to enable the module. Navigate to Extensions>Modules, and find Services and Packages from the module list. Then, click the Edit button.
The following page will open, set the Status option as Enabled to use the module. Else select Disabled, if you do not want to use this module.
The new menu options will appear after the installation. From the following screenshot, you can see that the Services and Packages option appears in the main menu of the Opencart backend.
- Camp Activities
- Adventure Activities
- Meal Types
- Vehicles
- Places
- Packages
- All Booking Package

Manage Camp Activities
To manage camping activities go to Services and Packages>Camp Activities. The following page will open, from here the admin can add & delete camp activities.
Activity Name – Enter the name of the camp activity.
Image – The admin can upload a picture for the camp activity.
Sort Order – Set the order sequence of the camp activity.
Add – Click the Add button for adding a new camp activity.
Delete – Click the Delete button for deleting an existing camp activity.
Click Save to apply your changes.

Manage Adventure Activities
To manage adventure activities go to Services and Packages>Adventure Activities. The following page will open, from here the admin can add & delete adventure activities.
Activity Name – Enter the name of the adventure activity.
Image – The admin can upload a picture for the adventure activity.
Sort Order – Set the order sequence of the adventure activity.
Add – Click the Add button for adding a new adventure activity.
Delete – Click the Delete button for deleting an existing adventure activity.
Click Save to apply your changes.

Manage Meal Types
For managing the meal type options, go to Services and Packages>Meal Type. The following page will open, from here the admin can add & delete the meal types.
Meal Type Name – Enter the name of the meal type.
Image – The admin can upload a picture for the meal type.
Sort Order – Set the order sequence of the meal type.
Add – Click the Add button for adding a new meal type.
Delete – Click the Delete button for deleting an existing meal type.
Click Save to apply your changes.

Manage Vehicles
For managing the vehicles, go to Services and Packages>Vehicles. The following page will open, from here the admin can add & delete the vehicles.
Vehicle Name – Enter the name of the vehicles.
Image – The admin can upload a picture for the vehicles.
Sort Order – Set the order sequence of the vehicles.
Add – Click the Add button for adding a new vehicle.
Delete – Click the Delete button for deleting an existing vehicle.
Click Save to apply your changes.

Manage Places
For managing the places, go to Services and Packages>Places. The following page will open, from here the admin can add & delete the places.
Place Name – Enter the name of the places.
Image – The admin can upload a picture for the places.
Sort Order – Set the order sequence of the places.
Add – Click the Add button for adding a new place.
Delete – Click the Delete button for deleting an existing place.
Click Save to apply your changes.

Manage Packages
After creating the camp & adventure activities, places, meal types, and vehicles, the admin can now create packages. Navigate to Services and Packages>Packages, the following page will open. This is a Package List page showing all the tour packages.
The admin will see the package name, image, category, price, and status.
Add – To create a new package click the Add button.
Delete – To remove an existing package from the list, select the package, and click Delete.
Edit – To update or make any changes to an existing package, click Edit button.
Filter – To find any package from the list use filter option.

Manage All Booking Package
After creating the camp & adventure activities, places, meal types, vehicles, and packages, the admin can manage all booking packages. Navigate to Services and Packages>All Booking Packages, admin can manage all booking details of the package.

Add Package
After clicking the Add Package button, the following page will appear. The admin needs to provide the package information as follows:
General
Package Name – Enter the name of the package.
Package Description – The admin can provide a short description of the package.

Data
Package Status – Select Enabled to use show this package to the customers. Else select Disabled to hide the package from the customers.
Package for Nights – Mention the duration of the package in nights. Eg. If 6 is entered here, the package will be of 6 Nights and 7 Days.
Package Category – Select the category for the package.
Base Price – Set the price of the package.
Number of People – Enter the number of people allowed in a package.

Camp Activity
Short Information – Enter some information about each camp activity.
Price – Enter the price of each camp activity. This field can be left empty.
Price For – If For All is selected, all the people in the package can do this activity. If Per Person is selected, each person will have to pay for the activity.
Status – To include a camp activity in the package, set this option as Enabled. Else select Disabled, if you do not want to include a camp activity.
Default Includes – Select Yes for preselecting the activity. The customers will not have the option to deselect the activity. Select No for allowing customers to select and customize the package.

Adventure Activity
Short Information – Enter some description of each adventure activity.
Price – Enter the price of each adventure activity.
Price For – If For All is selected, all the people in the package can do this activity by paying the amount. If Per Person is selected, each person will have to pay for the activity.
Status – To include an adventure activity in the package, set this option as Enabled. Else select Disabled, if you do not want to include an adventure activity.
Default Includes – Select Yes for preselecting the activity. The customers will not have the option to deselect the activity. Select No for allowing customers to select and customize the package.

Meal
Short Information – Enter some description about each meal type.
Price – Enter the price of each meal.
Price For – If For All is selected, all the people in the package can have the meal by paying the amount. If Per Person is selected, each person will have to pay for the meal.
Status – To include a meal in the package, set this option as Enabled. Else select Disabled, if you do not want to include a meal.
Default Includes – Select Yes for preselecting the meal. The customers will not have the option to deselect the meal type. Select No for allowing customers to select and customize the package.

Places
Short Information – Enter some description about each place.
Price – Enter the cost of each place.
Price For – If For All is selected, all the people in the package can visit the place by paying the amount. If Per Person is selected, each person will have to pay for the place.
Status – To include a place in the package, set this option as Enabled. Else select Disabled, if you do not want to include a place.
Default Includes – Select Yes for preselecting the place. The customers will not have the option to deselect the place. Select No for allowing customers to select and customize the package.

Add Activity
The admin can add activities in a place. After clicking the Add Activity, the following pop-up window will appear. To include an activity, enter its price and select enabled. On the front-end, the customer can select the activities and add it to the package.
Note: – If an activity’s price field is left empty, it won’t be visible on the frontend.
To offer meals & vehicles for the place, enter the price and select enabled.

Images
The admin can upload various images for the package. Click Add button for adding images and then, click Upload. Set the sort order of each package image. An existing package image can be deleted by clicking the Delete button.

Customer Front-End View
The customers go to the tour package page for viewing all the tour packages available in the store. On this page, the customers can use the filter options for finding a package according to camp activity, adventure activity, meal, places, or tour package categories.

Package Page
On the package page, the customers will be seeing all the details about the package. They can view the package name, price, duration, no. of persons allowed. The customers can also view the description, customer reviews & ratings of the package.
Offered Activities – These are the activities which are covered in the package, the customers can expand and view the tabs to view the information. The customers can customize and add various add-ons in the package.
Book Now – After selecting the dates from the calendar, the customer can click Book Now button to add the package to the cart and proceed towards the checkout process.
Latest Packages – The customers can also view other latest packages of the store on this page. They can view the package name, price, duration, image, and description.

Camp Activity
The customers can view the camp activities covered in the package. They can view the activity name, image, information, price (if any). If a camp activity is not included in the package, the customers can include it in the package by clicking Add to Package button.

Adventure Activity
The customers can view the adventure activities covered in the package. They can view the activity name, image, information, price (if any). If an activity is not included in the package, the customers can click Add to Package button.

Meal
The customers can view the meal options covered in the package. They can view the meal name, image, information, price (if any). If a meal option is not included in the package, the customers can click Add to Package button.

Places
Here the customers can view the places which are covered in the tour package. They can view the place name, image, information, and activity price. The customers can select and add activities or (rental) vehicles in a package. If the price field is empty for any place, that means the place in already included in the base package price.

Booking Calendar
At the bottom of the page, the customers can select the travel dates from the calendar and click Book Now. The tour package will be added to the cart, then the customer can progress towards the checkout process for placing the order.

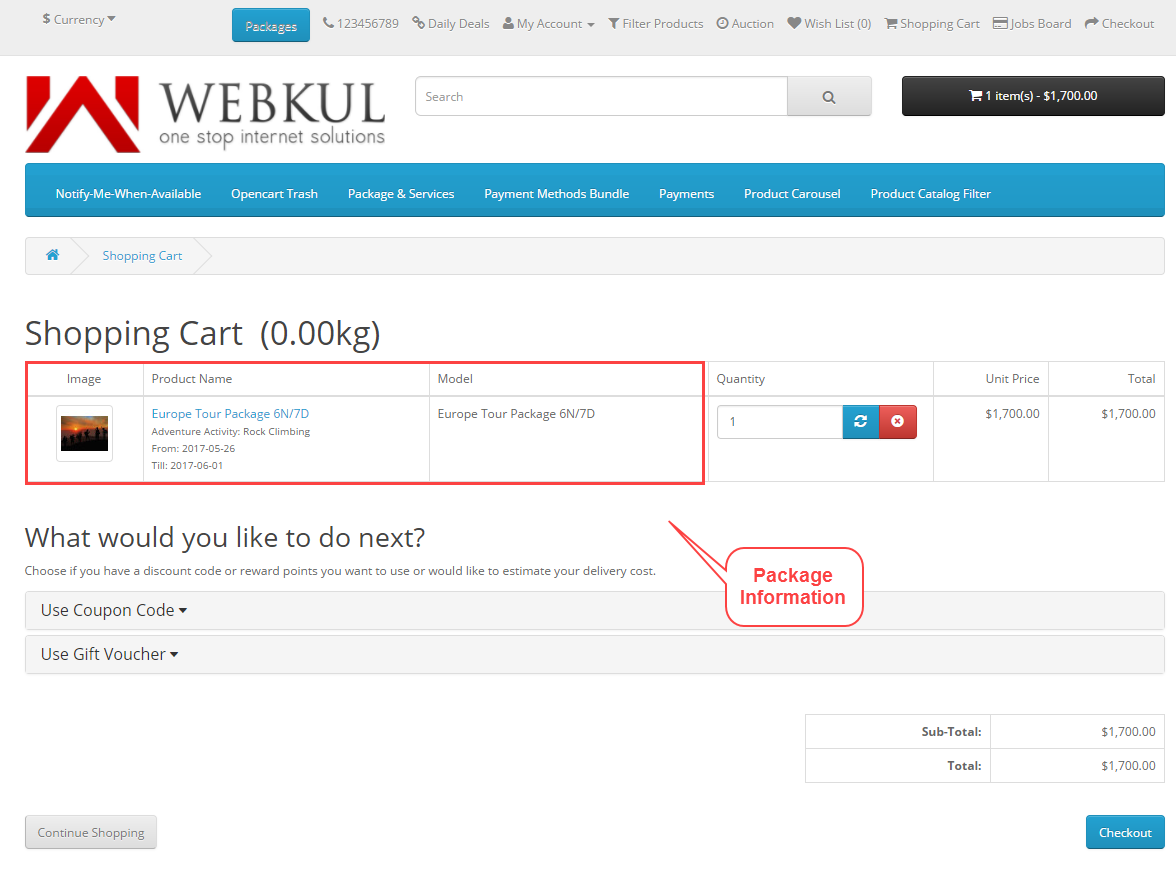
Shopping Cart
After clicking the Book Now button, the tour package will be added to the shopping cart. The customer can view the information about the tour package – name, price, image, booking dates, quantity.
Admin Order Management
The store owner or the admin can navigate to Sales>Order and view the order details. Select the order and click the View button, go to the Products tab, and the following page will appear. The admin can view the tour package information which was ordered by the customer with the booking dates.
Click the Print Invoice button to create an invoice for the order.

Thank you for viewing this blog. If you have any queries or need more information, please contact https://webkul.uvdesk.com/.
Current Product Version - 3.1.0.2
Supported Framework Version - 3.x.x.x

Be the first to comment.