NOTE: This module defines the configuration of Odoo Website PayLater. To understand the setup and configuration of Pay Later payment acquirer, refer to User Guide for Odoo Payment Acquirer PayLater.
INTRODUCTION
Buy without worry with Odoo Website PayLater!
Pay Later payment solutions are a proven way to reach new consumers and increase the company’s conversion rates.
Odoo Website PayLater allows you to offer Buy Now and Pay later options to your customer on your Odoo website to expand your customer base.
The Odoo app facilitates customers to buy the products without disturbing their current budget.
Further, the module solves all issues in one go. This Odoo app does not need a credit card or a long payment method. Instead, it follows a shortened checkout process.
Moreover, allocate credit limits to the selected customers and allow them to shop on your website by making payments with the Website Pay Later Option.
Also, customers can clear the dues according to the structure defined in the Odoo.
NOTE: Odoo Website PayLater works in conjunction with the following module:
Odoo Payment Acquirer PayLater
First, you must install these modules in your system for the Odoo Website PayLater to work correctly.
FEATURES
- The Pay Later option eliminates the need for customers’ card details.
- Assign the Pay Later option for all customers or specific customers manually.
- Eligible customers are automatically assigned the credit limit and notified via mail.
- All ‘Pay Later’ transactions are recorded in the Odoo backend.
- Customers can check their pay-later orders from their Website Account.
- Set Cron to send reminder emails to the customers.
- Send payment reminder emails to customers before and after the bill date.
- Define rules, tags, and credit limits from the Odoo backend.
- Assign credit limit to specific or global customers (only registered users).
INSTALLATION
- Once you purchase the App from Webkul store, you will receive the link to download the zip file of the module.
- Extract the file on your system after the download finishes. You will be able to see a folder named- ‘website_pay_later.’
- Copy and paste this folder inside your Odoo Add-Ons path.
- Now, open the Odoo App and click on the Settings menu. Here, click on Activate the Developer Mode.
- Then, open the Apps menu and click on ‘Update Modules List.’
- In the search bar, remove all the filters and search ‘website_pay_later.’
- You will be able to see the module in the search result. Click on ‘Install’ to install it.
WORKFLOW
Moving to the configuration of Odoo Website PayLater.
CONFIGURATION
1. Go to ‘Invoicing> Pay Later> Pay Later’ in the Odoo backend once installed.

2. Now, configure the Pay Later credit limit for customer(s). Enter the name and credit limit.
2.1. Select the Specific Customer or Global option in the ‘Apply for’ option to apply the limit to the set one. You can also set specific or all products to apply the Pay Later option.
If you select ‘Specific Products,’ you must specify the product.
NOTE: You can create Multiple Pay Later in the backend, but only one can be activated simultaneously.

2.2. Further, from the ‘Billing Details’ tab, you can set the credit limit, Billing cycle, Billing notification, and add the ate fee for different payment dues.
3. Configure the Rules for PayLater from the ‘Invoicing> Pay Later> Pay Later Rules’ menu. Select the registration date (from and to) and condition for sale.

4. After that, create the desired pay later tags from the ‘Invoicing> Pay Later> Pay Later Tags> Create’ menu according to your need.

5. From the ‘Invoicing> Pay Later> Pay Later Transactions’ menu, you can view every debit and credit transaction of customers.

6. Also, the module allows you to freeze accounts for global customers. Go to ‘Invoicing> Pay Later> Settings’ and choose the desired option.

CUSTOMER ACCOUNT & ODOO WEBSITE FRONTEND
7. On the Odoo website, you can view the ‘Pay Later Enabled’ on the product page (for the global or specified products).

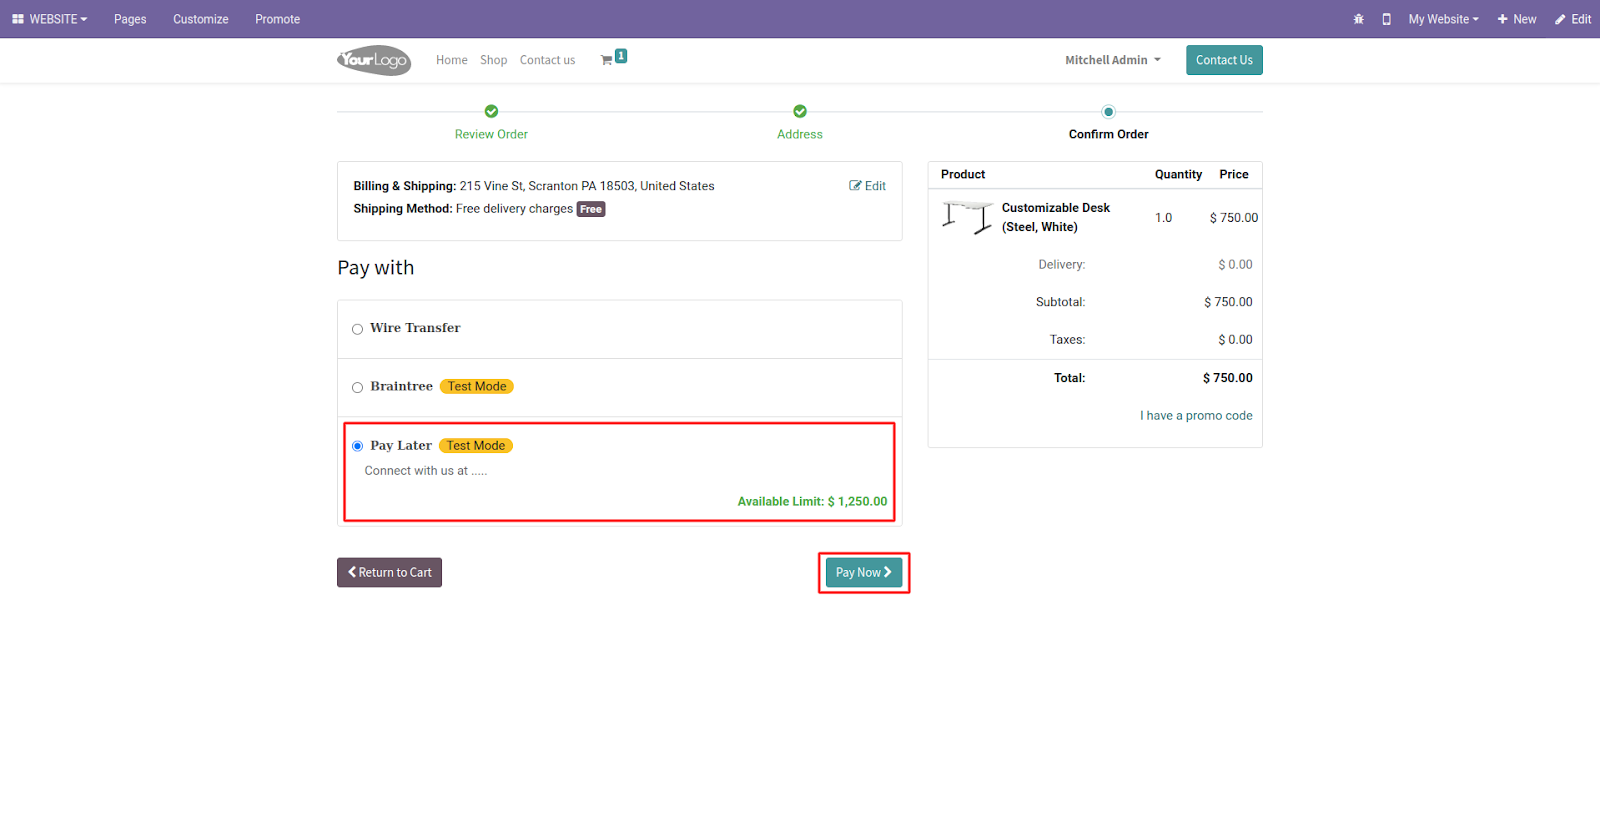
8. Add a product to the cart and move to the confirm order page. Here, view the Pay Later option with the available credit limit. Select the Pay later option and click ‘Pay Now.’
9. Customers can check their pay later transaction and status under the ‘My Account> Pay Later’ section. Also, they can clear the bill by clicking the ‘Pay Now’ button.


OTHER ODOO PAYMENT MODULES
- Odoo Website PayTabs Payment Acquirer
- Website Payu Latam Payment Acquirer
- Odoo Website Stripe Payment Acquirer
- Odoo Website Braintree Payment Acquirer
- Website WorldPay Payment Acquirer
- Odoo Website Paymill Payment Acquirer
NEED HELP?
Hope you find the guide helpful! Please feel free to share your feedback in the comments below.
If you still have any issues/queries regarding the module, please raise a ticket at https://webkul.uvdesk.com/en/customer/create-ticket/.
Also, please explore our Odoo development services & an extensive range of quality Odoo Apps.
For any doubt, contact us at [email protected].
Thanks for paying attention!!
Current Product Version - 1.0.0
Supported Framework Version - Odoo V19, V18, V17

Be the first to comment.