Note: The User Guide describes the workflow of Odoo Marketplace Membership only. To know how the base module: Odoo Multi-Vendor Marketplace works, kindly refer to the User Guide of Odoo Multi-Vendor Marketplace.
Introduction
Integrate Memebership Plans on Marketplace with Odoo Marketplace Memebership!
Odoo Marketplace Membership plans let marketplace admins create and offer structured membership plans to vendors. Additionally, sellers can browse available plans and choose one that fits their budget and business needs.
Moreover, the module handles the full membership lifecycle, from free trials and active plans to grace periods and expiry. As a result, admins can track and manage every stage automatically with minimal effort.
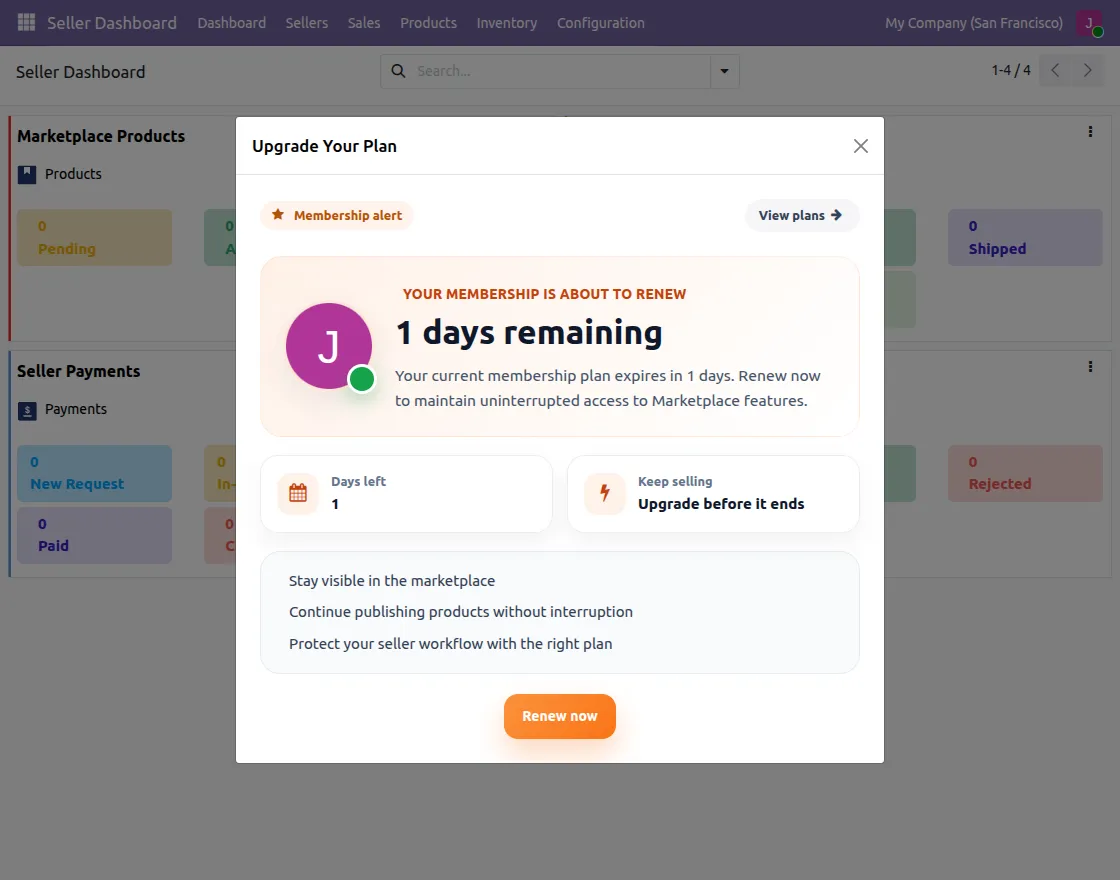
Admins can set up renewal email alerts and on-screen pop-up reminders to keep sellers informed before their plan expires. This ensures sellers always have time to renew without losing their listings.
The module also supports prorated upgrades, pricelist-based pricing, downgrade controls, and one-click membership cancellation, giving admins full control over how vendors access the marketplace.
Features
- Admins can create and manage multiple membership plans with custom price, duration, and product limits.
- Each plan supports terms and conditions, a plan description, highlight color, and a tagline.
- Plans can be published or hidden from the frontend until the admin is ready to go live.
- Pricelist-based pricing rules can be added per plan for region or currency-based pricing.
- Admins can enable a free trial period for newly registered sellers with a configurable number of days.
- A trial notification pop-up can be set to appear when seller’s trial days fall below a set threshold.
- A Grace period after membership expiry can be enabled, giving sellers extra days to renew their plan.
- When membership expires with no grace period active, all seller products are auto-unpublished.
- Sellers can upgrade their plan anytime and pay only the prorated price difference for remaining days.
- Admin can allow or block sellers from downgrading to a lower membership plan from settings.
- A visual membership timeline tracks trial, active, and grace stages for every seller.
- Renewal email alerts can be configured to notify sellers a set number of days before expiry.
- Admins can cancel any seller’s membership at any time directly from the backend.
- All membership settings are managed from one central configuration panel inside Odoo settings.
Get Vouchers for your customers with Odoo Marketplace Vouchers, which helps in promoting business sales and getting better customer interaction.
Looking to implement ERP in your system? Check out Odoo Implementation! It’s your go-to solution for seamless integration and enhanced efficiency.
Installation
- Once you purchase the App from Webkul store, you will receive a link to download module’s zip file.
- Extract the file on your system after download finishes. As a result, you will be able to see a folder named- ‘marketplace_membership’.
- Copy and paste this folder inside your Odoo Add-Ons path.
- Now, open Odoo App and click on the Settings menu. Here, click on Activate Developer Mode.
- Then, open Apps menu and click on ‘Update Modules List.’
- In the search bar, remove all the filters and search ‘marketplace_membership’.
- You will be able to see module in the search results. Click on ‘Activate’ to install it.
Before moving further, explore our Odoo development services & an extensive range of quality Odoo Apps.
Workflow
Admin Workflow:
1. Access Settings and Configure Trial & Grace Period
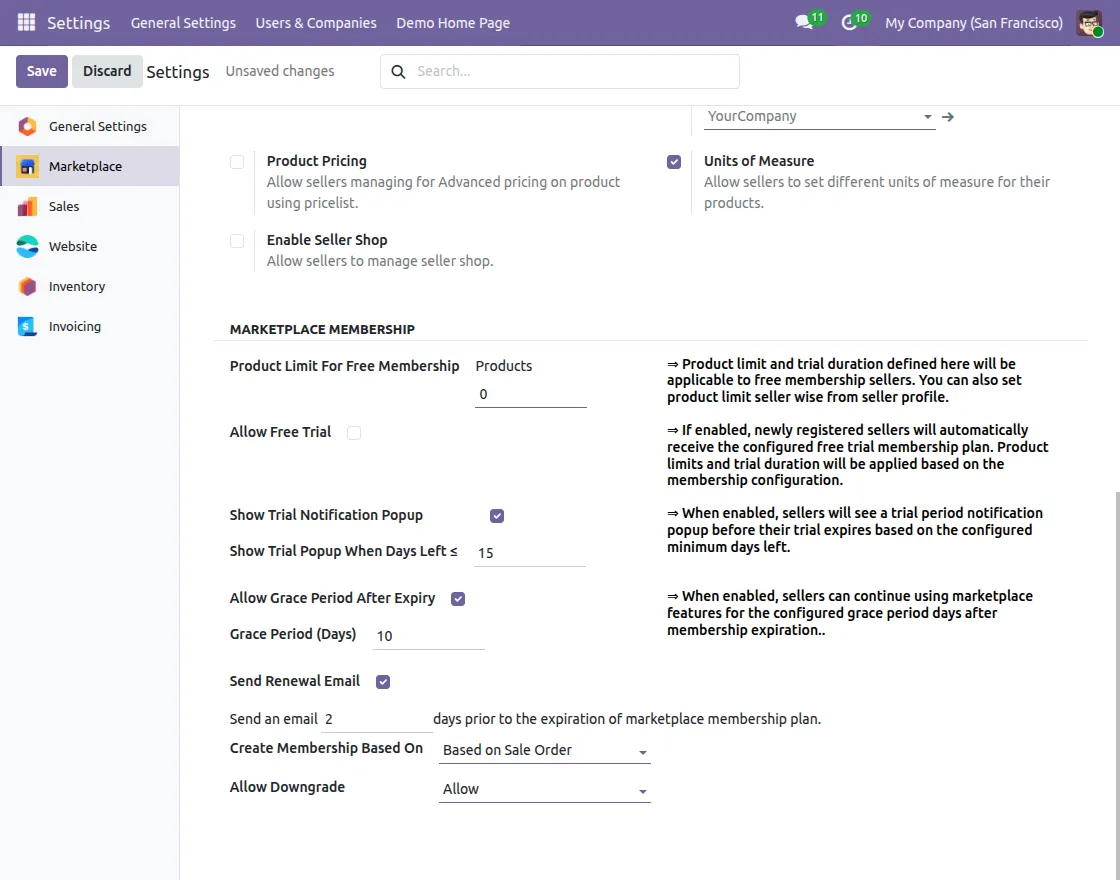
After installing Odoo Marketplace Membership, navigate to Settings >> Marketplace >> Other Settings. There, you will find the Marketplace Membership configuration section under the Product Terms tab.
Next, enable Allow Free Trial and set the number of trial days and notification pop-up threshold. Then, enable Allow Grace Period After Expiry and define the number of grace days.
2. Set Up Renewal Alerts and Downgrade Rules
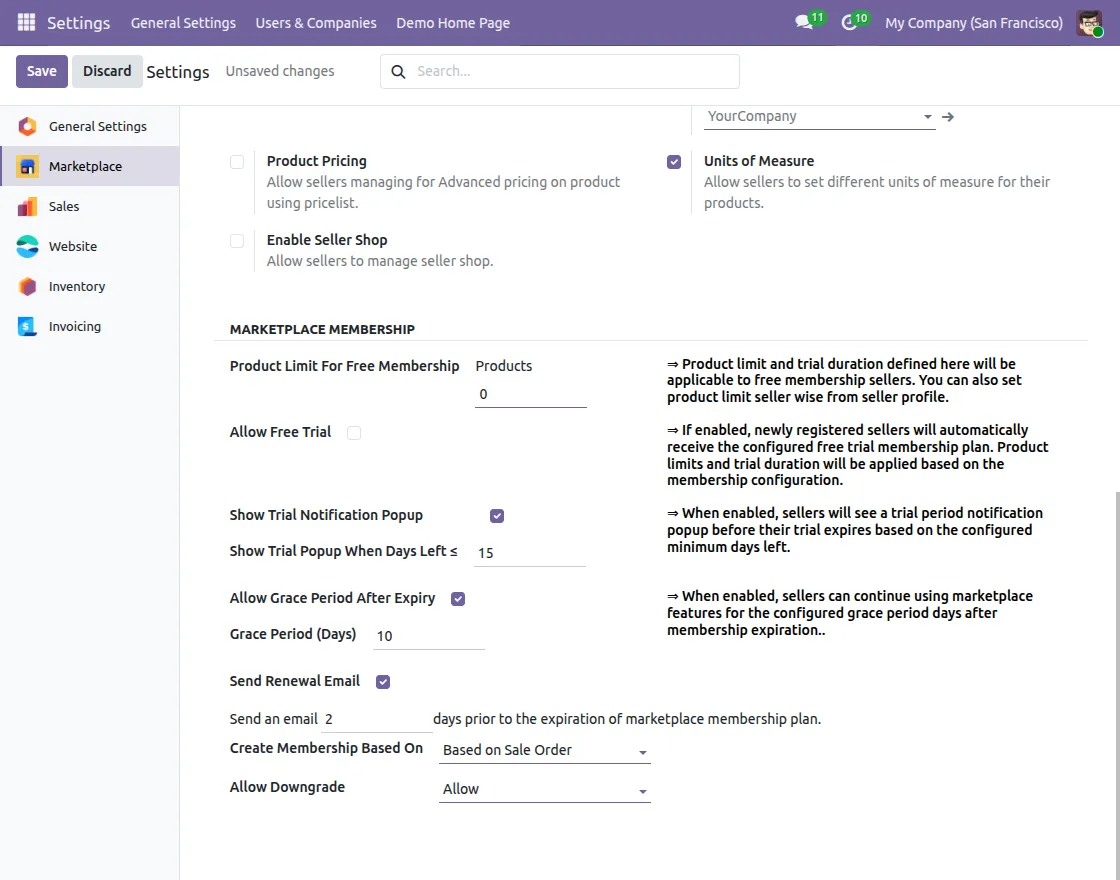
Once you save the trial and grace period settings, next, turn on Send Renewal Email and define how many days before expiry the system should send the alert.
Finally, use the Allow Downgrade option to control whether sellers can switch to a lower plan.
3. Create Membership Plans
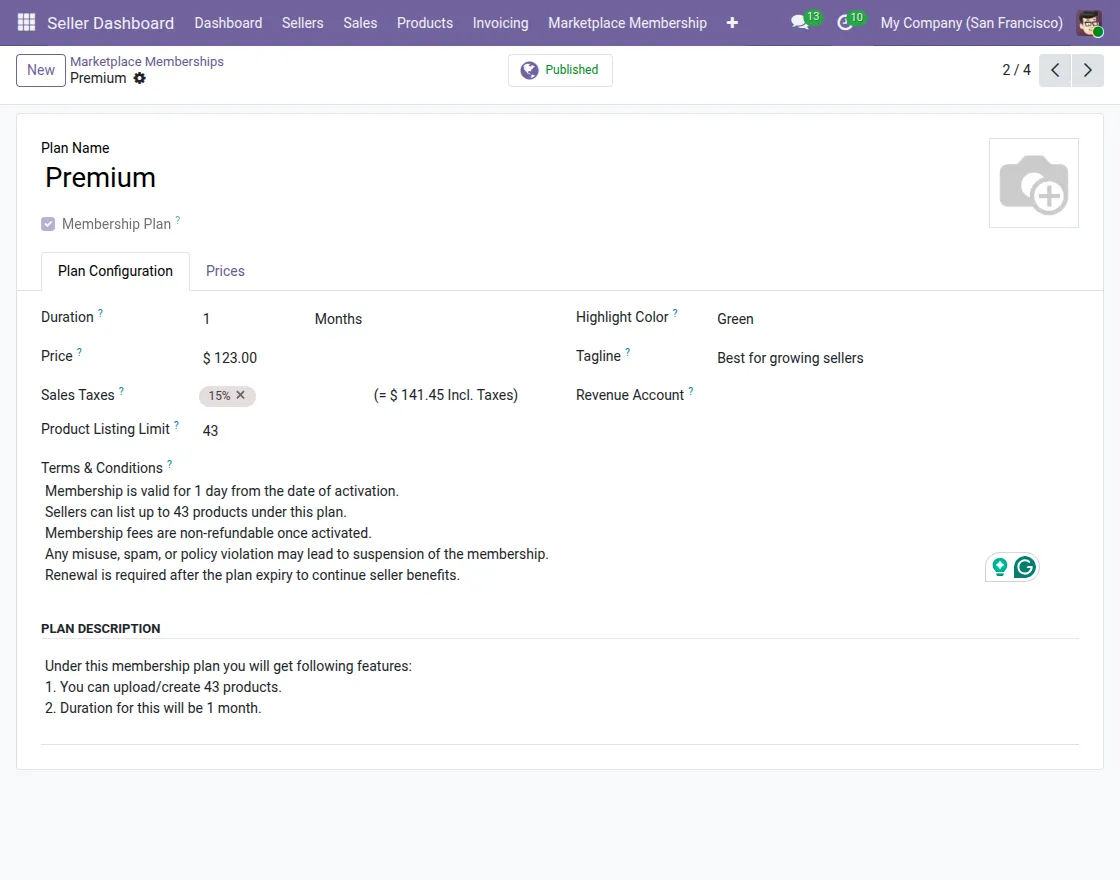
Next, navigate to Marketplace Membership >> Membership Plans and click New to create a plan.
After that, enter the plan name, price, duration, product listing limit, highlight color, tagline, and terms and conditions. Finally, save the plan after adding all the required details.
Once the plan is ready, click Published to make it visible to sellers on the frontend. Plans that are not published remain hidden until the admin activates them.
4. View Created Membership Plans
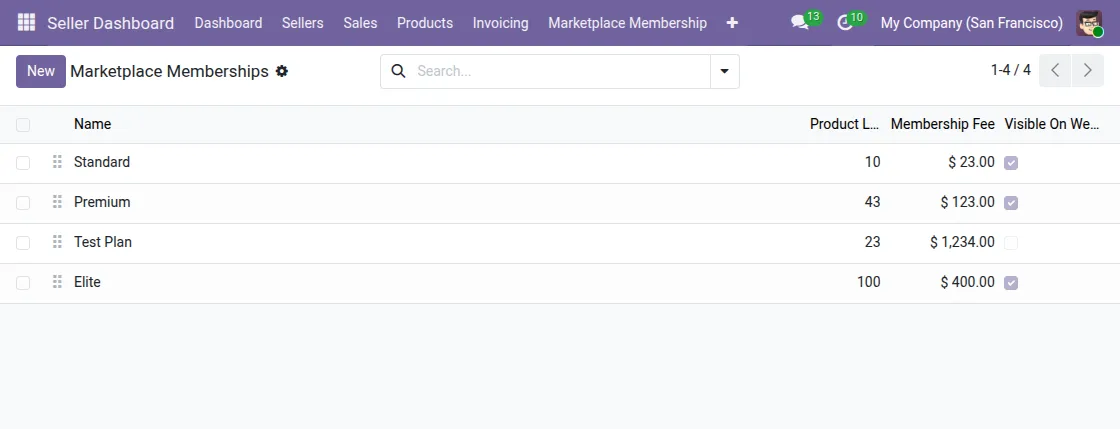
Once you create and publish the plans, navigate to Marketplace Membership >> Membership Plans to view the full list.
Next, you can see each plan’s name, product limit, membership fee, and visibility status in one place. Additionally, plans marked as visible will appear on the frontend, allowing sellers to browse and purchase them.
5. View Seller Memberships
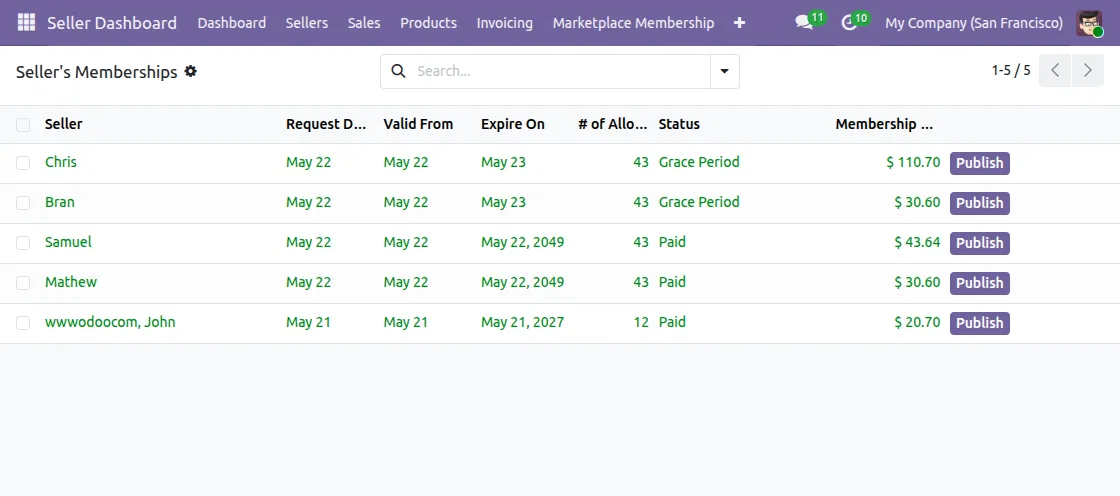
Finally, navigate to Marketplace Membership >> Seller Memberships to view all active memberships. Here, you can track each seller’s status, expiry date, allowed products, and membership fee in one place.
6. Publish Seller Products
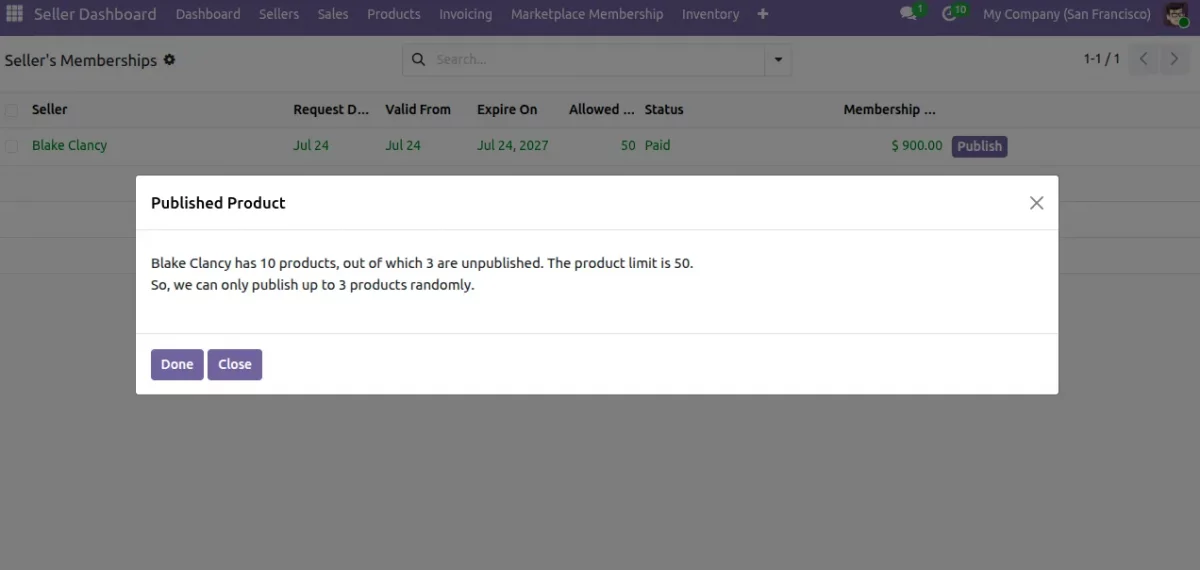
Once you review the membership, click Publish next to the seller. Next, a pop-up shows the total products, unpublished count, and product limit. Then, the system randomly publishes eligible products up to the allowed limit.
Seller Workflow:
1. Browse Membership Plans
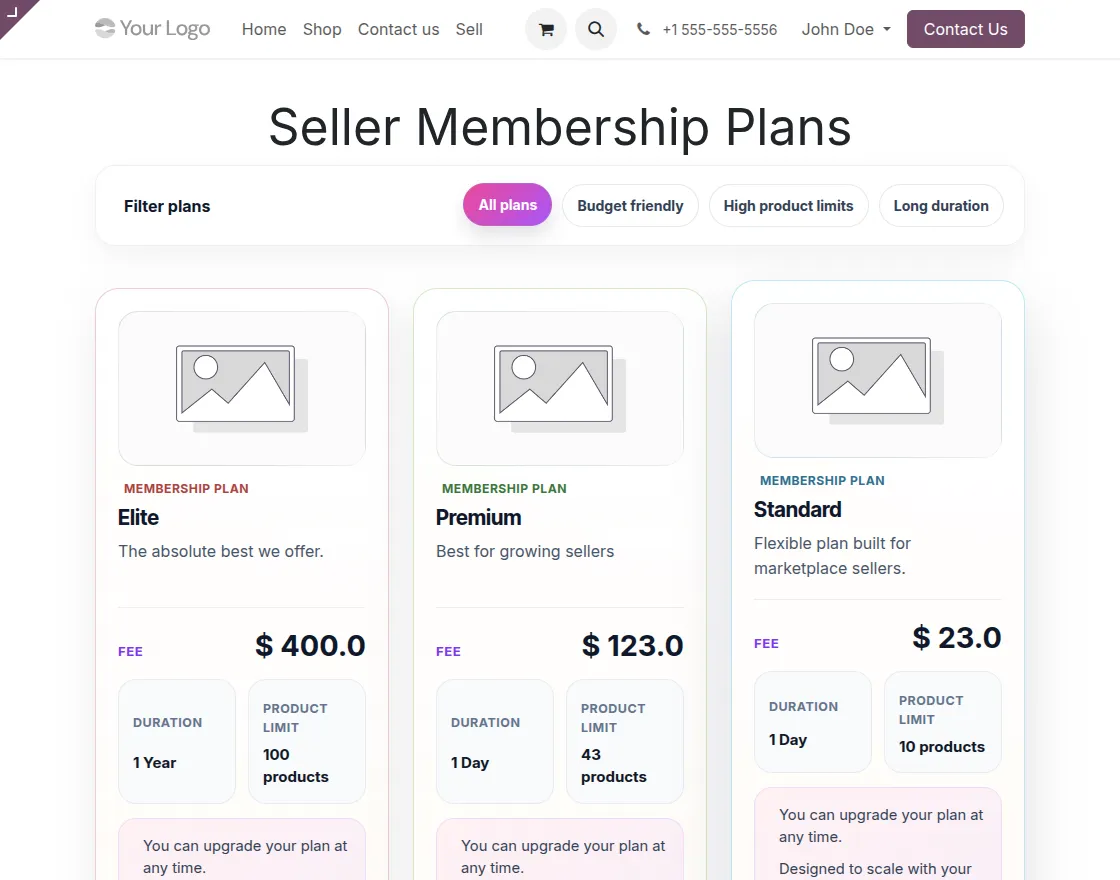
To get started, sellers can log in to their account and open the Membership Plans page. On this page, they can view all available plans, including the fee, duration, product limit, and plan features.
After reviewing the available options, sellers can choose a suitable plan and follow the guided checkout flow to complete the payment. Once the payment is complete, the system activates the membership plan when the admin confirms the sales order or the customer pays the invoice, based on the admin’s settings.
2. Track Membership Status
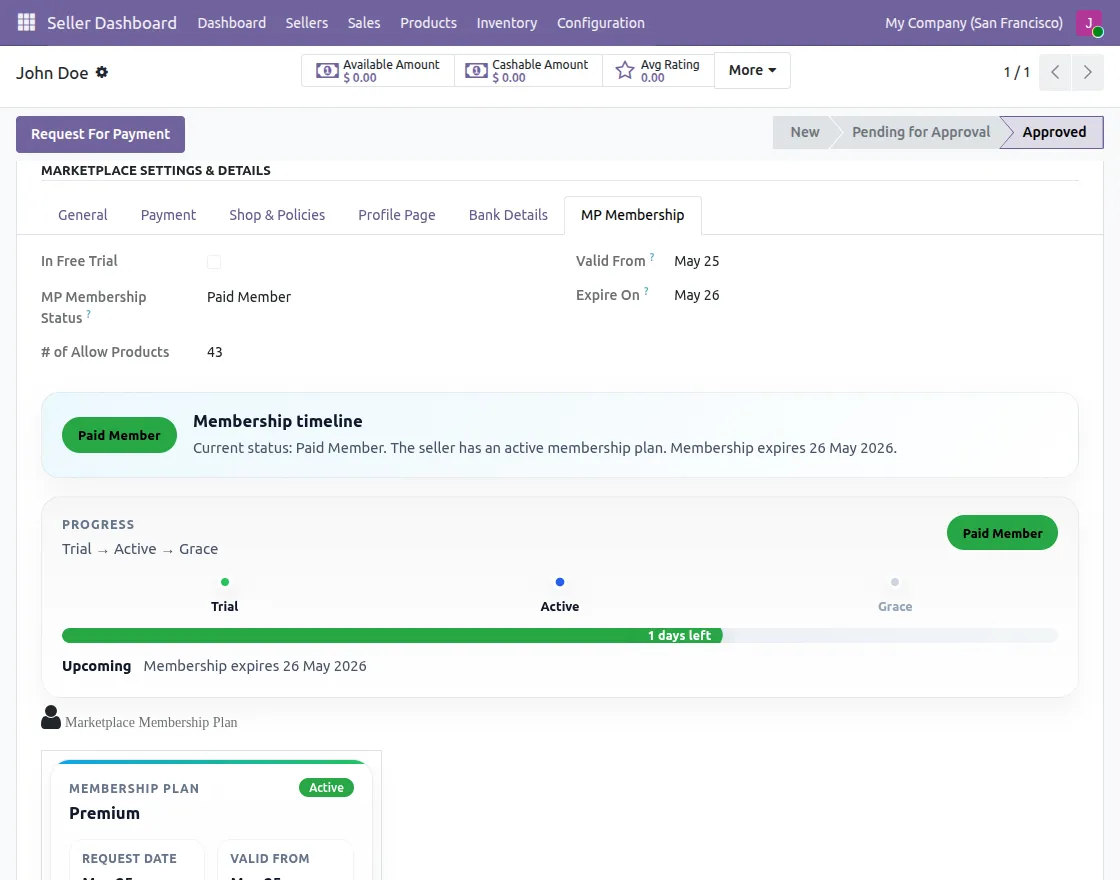
After activation, sellers can track their membership by going to My Profile >> Marketplace Settings & Details >> MP Membership tab.
Additionally, they can view the membership timeline, which shows the trial, active, and grace stages along with the progress bar and expiry date.
3. Renew Before Expiry
As the plan nears expiry, sellers receive an email alert and an on-screen pop-up reminder. They should renew their plan before the grace period ends to avoid the marketplace automatically unpublishing their products.
NEED HELP?
Hope you find the guide helpful! Please feel free to share your feedback in the comments below.
If you still have any issues/queries regarding the same, please raise a ticket at the UV Desk.
I hope this helps. In case of any further queries, contact us at our support mail.
Thanks for paying attention!!

Be the first to comment.