Introduction
Odoo Multi-Vendor Marketplace helps businesses create and manage a multi-seller online marketplace with full control.
Admins can manage sellers, products, commissions, and orders from a single backend.
The module supports both internal sellers and portal sellers based on configuration settings. Portal sellers manage products, inventory, orders, and payments directly from the website dashboard.
Internal sellers operate with backend access, allowing them to manage products, orders, and other marketplace activities with greater control.
As a Marketplace Owner (Admin), you have complete authority to approve/disapprove products, orders, sellers, etc, as well as manage sellers’ payments, seller shops, and much more.
Check the video mentioned below for a brief introduction to the module:
Features
- Transform your Odoo Website into an Online store for multiple vendors
- Odoo Multi-Vendor Marketplace allows to add terms and conditions on the seller registration form.
- Admin can also sell his/her products on the Marketplace with the help Odoo Multi-Vendor Marketplace module.
- Sellers can now be registered as internal users or portal users based on marketplace configuration in Odoo Multi Vendor Marketplace.
- Customers can quickly search for products using the barcode scanning feature.
- Only sellers approved by admin can upload their products on the Online Store
- Admin can set manual or auto-approval of seller products and their quantities.
- Analytics Dashboard allows Admins and Sellers to track sales, revenue, and order trends and top-performing sellers.
- Sellers can also check their best-selling products on the Analytics Dashboard.
- Portal Seller support allows sellers to manage products, orders, inventory, and payments directly from the website dashboard.
- Portal sellers can manage product variants using the Variant Expression Builder directly from the portal dashboard.
- Portal sellers can update existing products and re-upload the ZIP file directly from the portal dashboard.
- Only approved products by admin are displayed on the store
- Assign individual warehouses and locations for all sellers for Effective inventory management.
- Odoo Multi-Vendor Marketplace allows showing/hiding seller information on the website such as sales count, Product count, Return Policy, Joining date, shipping policy, etc.
- Odoo Multi-Vendor Marketplace module allows customers to reach out to the seller through the ‘Email to Seller’ button.
- Each seller has a separate shop and profile page in the marketplace.
- Sellers can set up a unique profile page and provide a shop description, shop name, tagline, etc on the website.
- The seller can provide the shop’s terms and conditions using WYSIWYG.
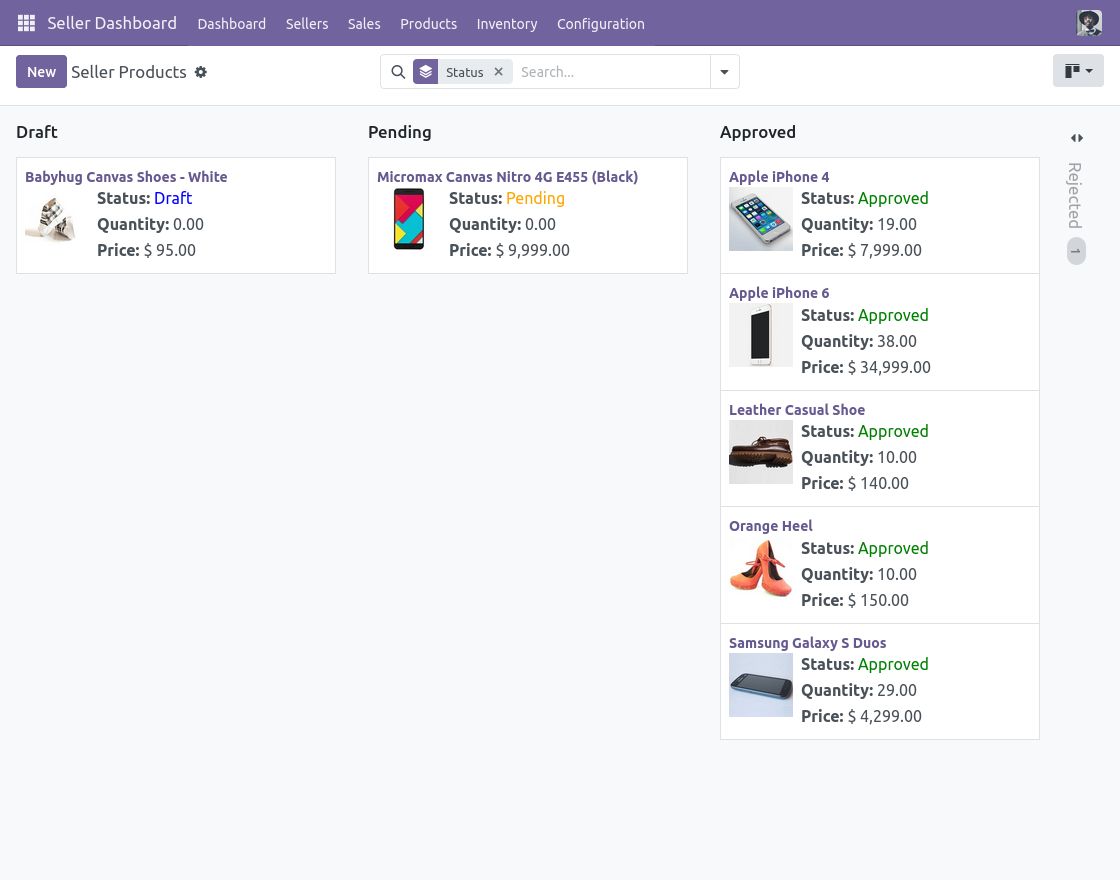
- View total sales and easily manage all orders on your shop( sales order analysis ) with the help of the Odoo Multi-Vendor Marketplace module.
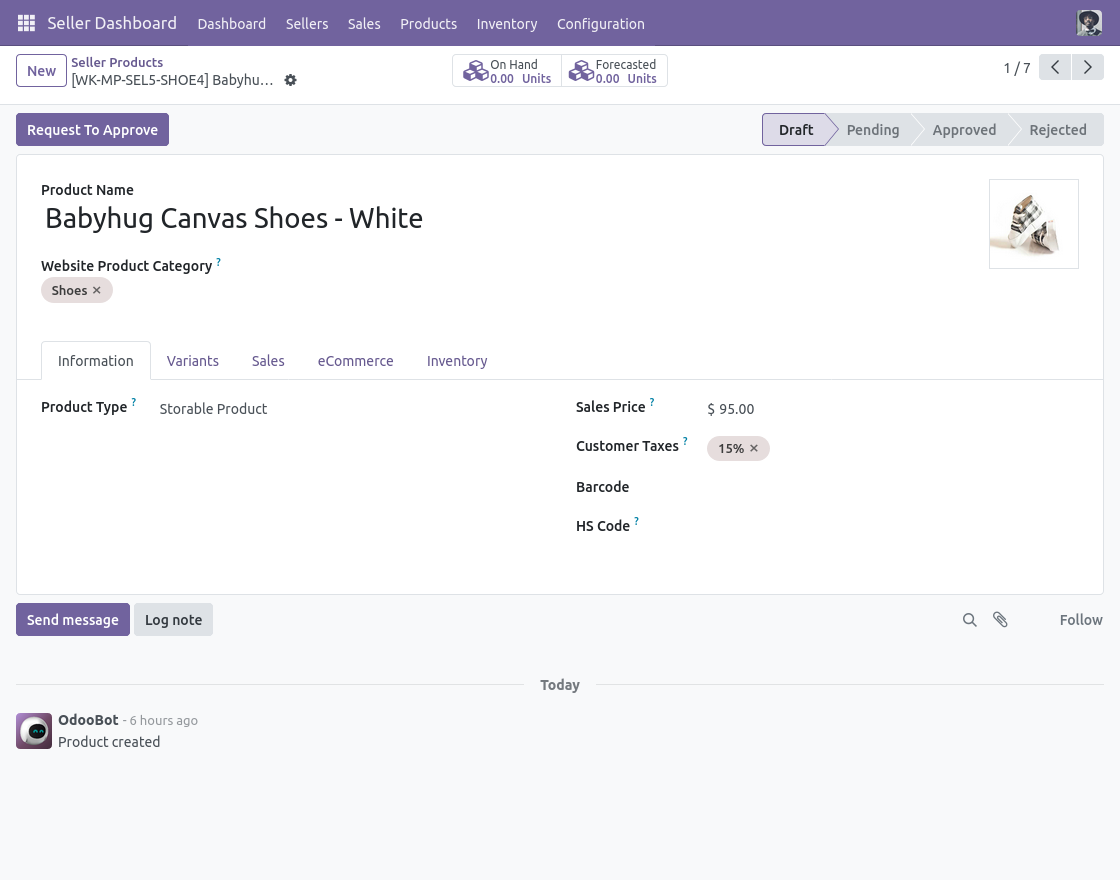
Installation
- Once you purchase the App from the Webkul store, you will receive the link to download the zip file of the module.
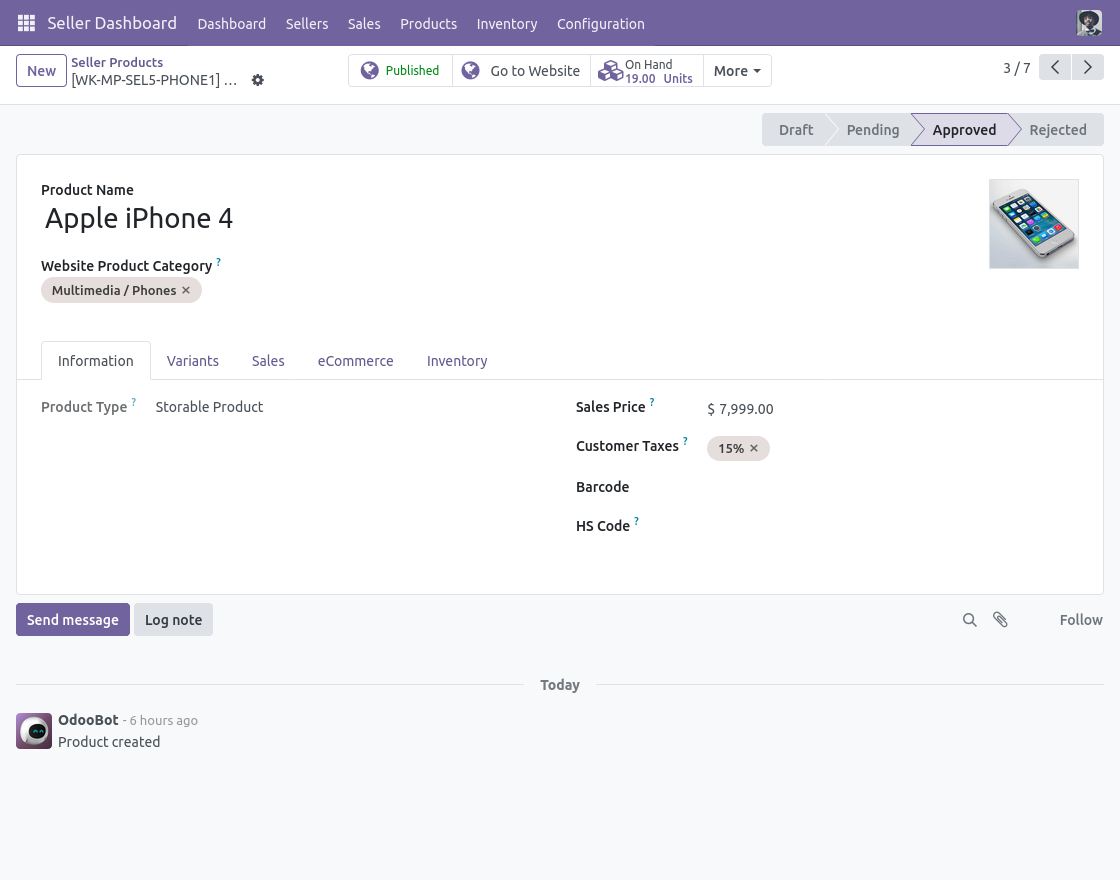
- Extract the file on your system after the download finishes. As a result, you will be able to see a folder named ‘odoo_marketplace’
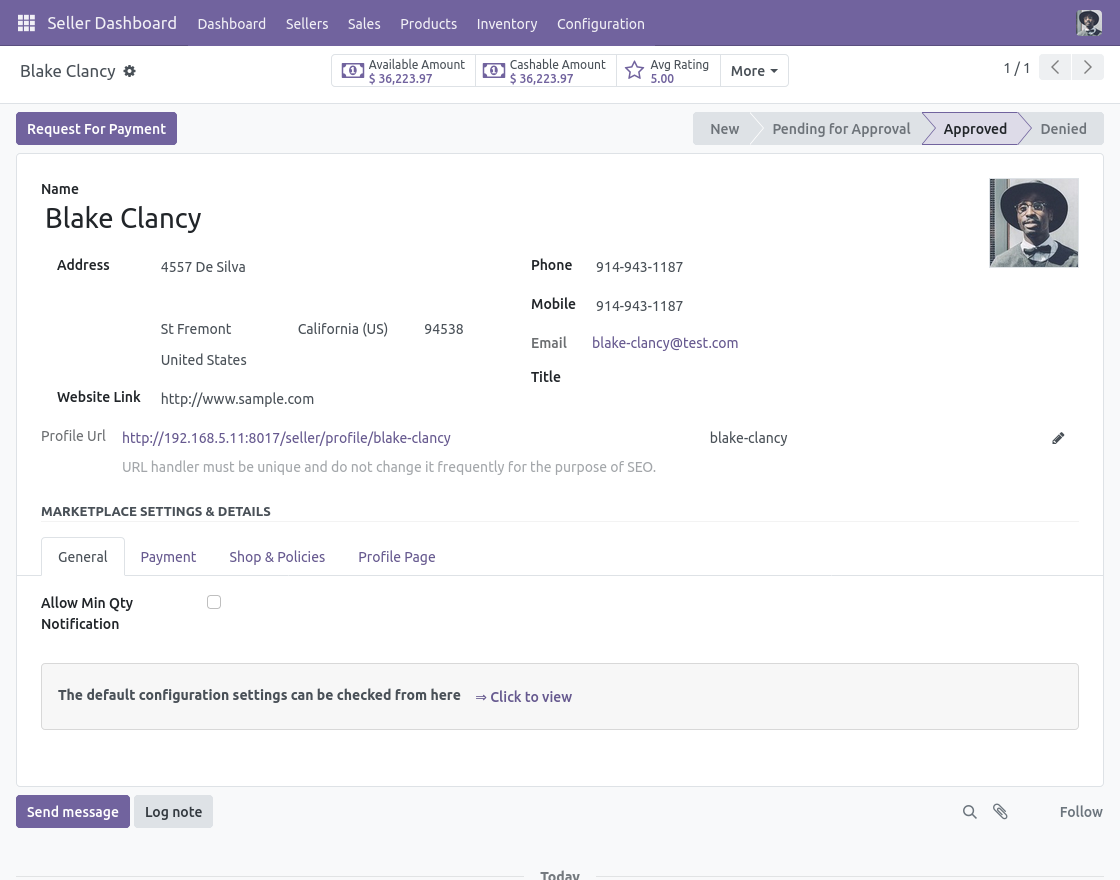
- Copy and paste this folder inside your Odoo Add-Ons path.
- Now, open the Odoo App and click on the Settings menu. Here, click on Activate Developer Mode.
- Then, open the Apps menu and click on ‘Update Modules List.’
- In the search bar, remove all the filters and search ‘odoo_marketplace’
- You will be able to see the module in the search results. Click on ‘Activate’ to install it.
Workflow
Configuration
- After installing Odoo Multi Vendor Marketplace, Login to your Odoo Database with Admin Credentials and go to the Seller Dashboard Module
- Click on the ‘Configuration’ Tab>> Settings
- You can set the “Auto Approval Settings“; like automatically approve the seller’s requests, product approval, and quantity approval. Moreover, you can set the internal category for all marketplace products.
- Set the Seller Creation Type. Choose whether marketplace sellers will be created as Internal Users or Portal Users.
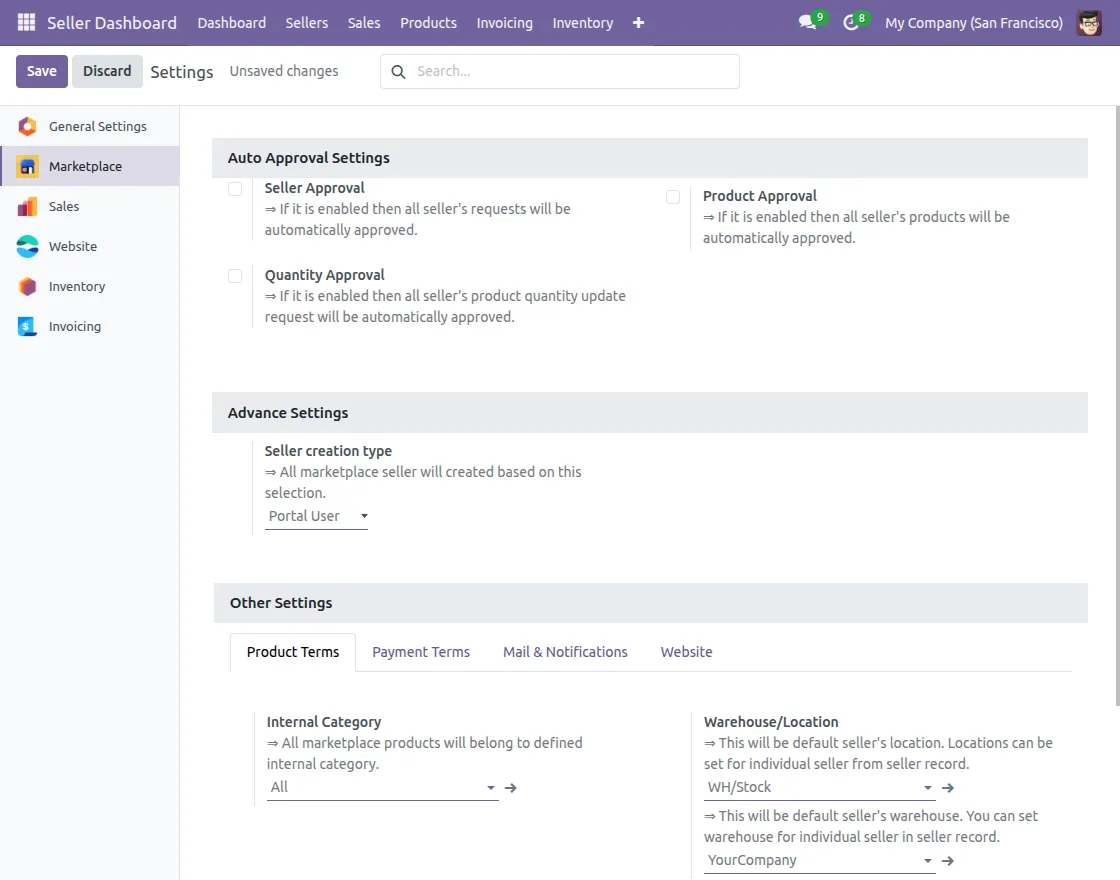
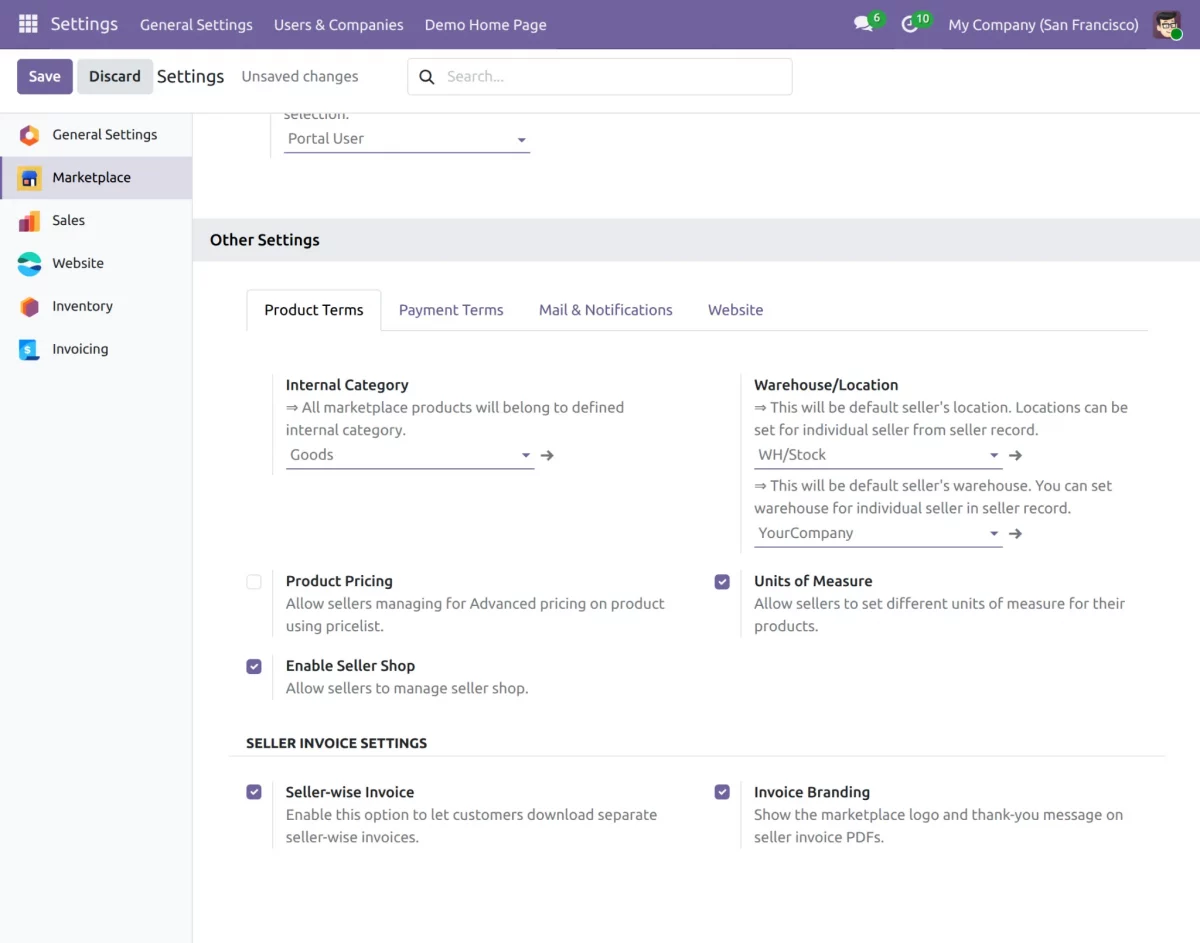
5. Scroll down to the Seller Invoice Settings section under the Product terms tab. Enable Seller-wise Invoice to let customers download separate invoices for each seller.
Enable Invoice Branding to show the marketplace logo and thank-you message on seller invoice PDFs.
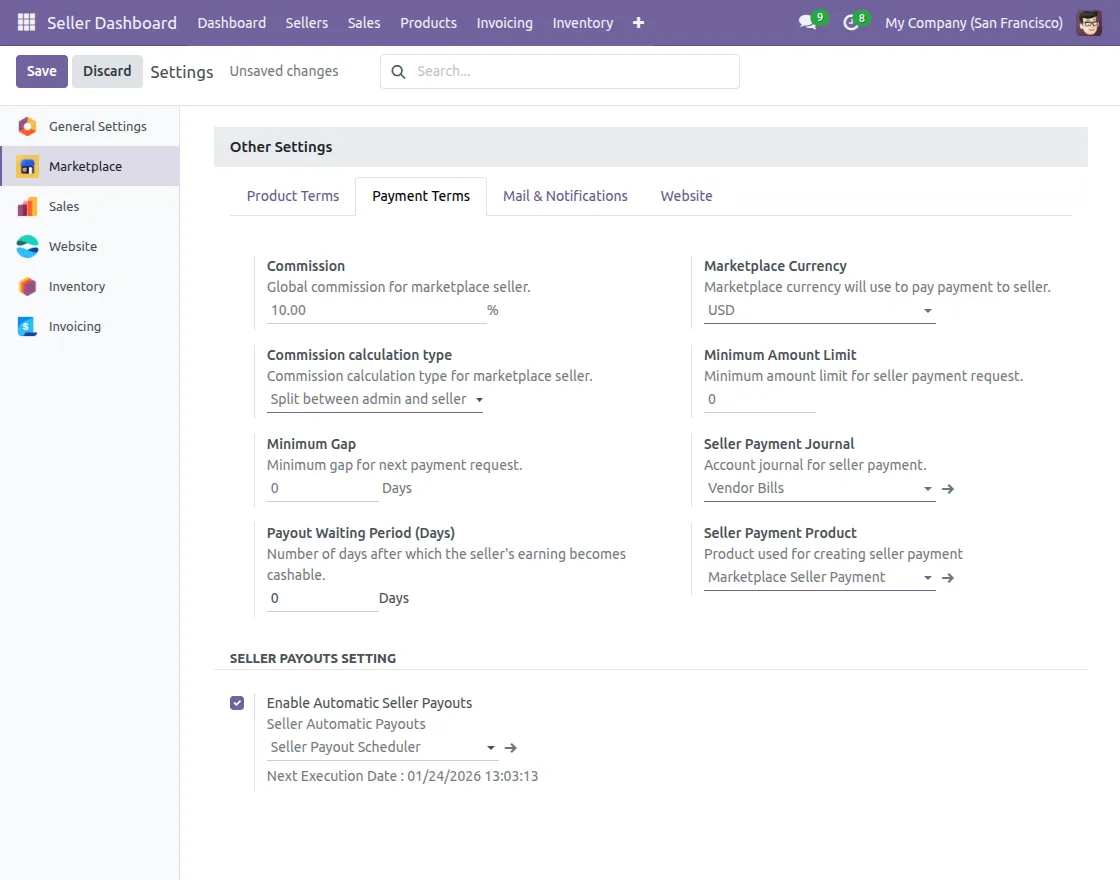
6. After that, click on the ‘Payment Terms‘ Tab under Other Settings; set the global payment terms for all of your marketplace sellers.
However, the payment terms set for each seller profile uniquely can override these settings.
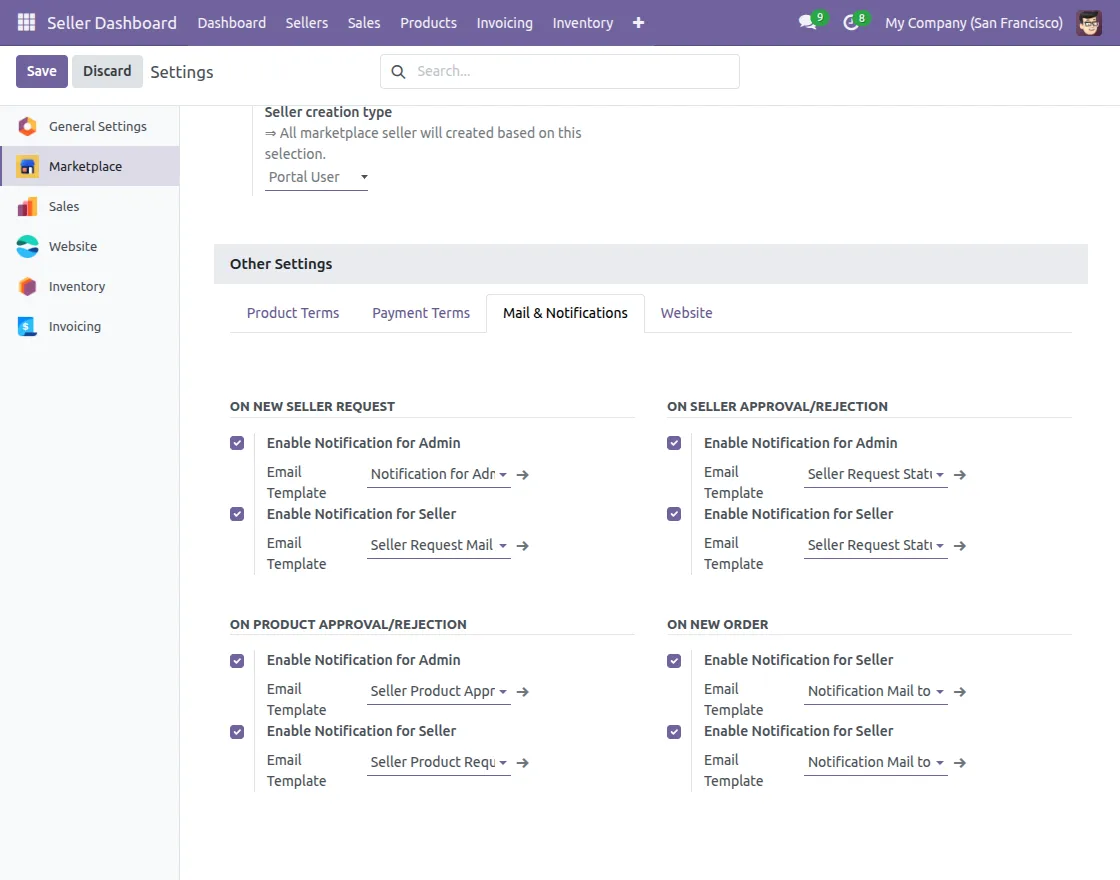
7. After that, click on the ‘Mail & Notifications‘ Tab under Other Settings; Enable/Disable mail notifications for admins and sellers for different Marketplace Events.
The events like seller’s requests, product approval, new order, and quantity approval.
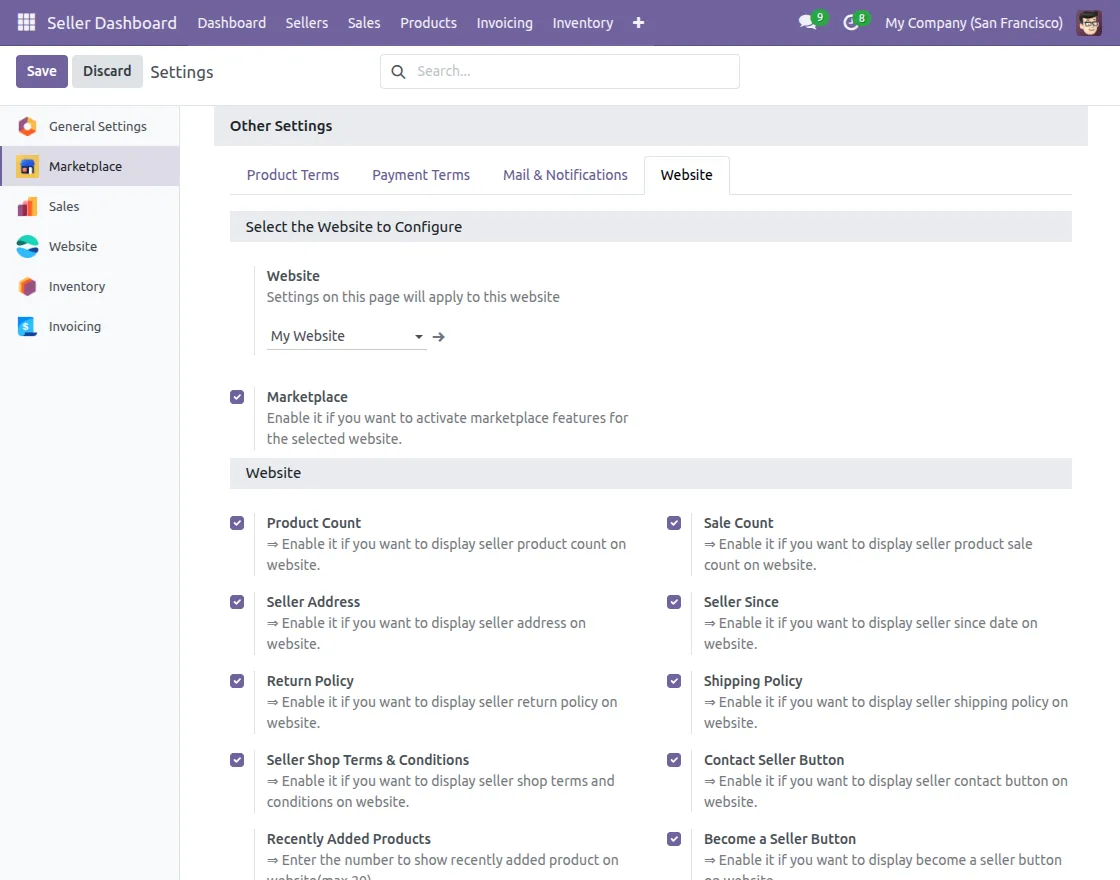
8. Click on the Website tab under Other Settings to manage website view settings, such as showing or hiding reviews, review counts, the marketplace landing page, and recently added products.
Admin View
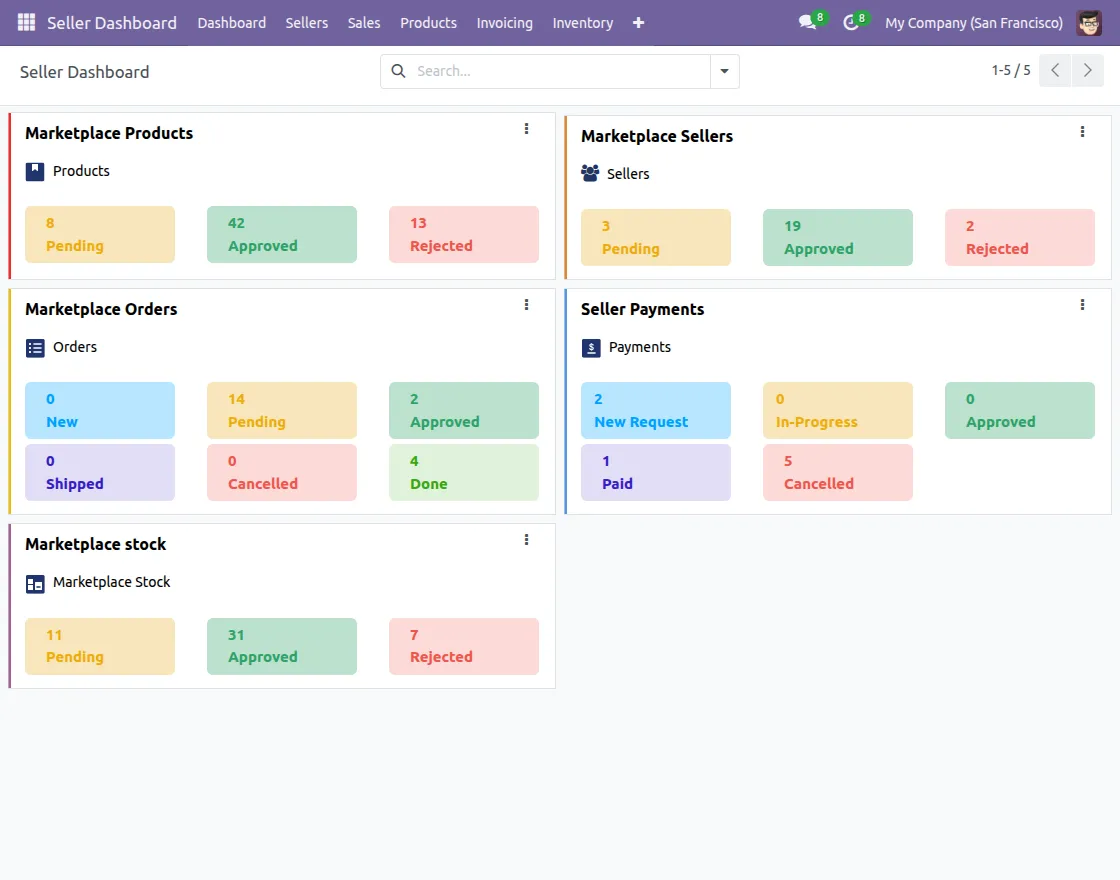
9. Now click on the Dashboard tab for a quick peek at all the approvals.
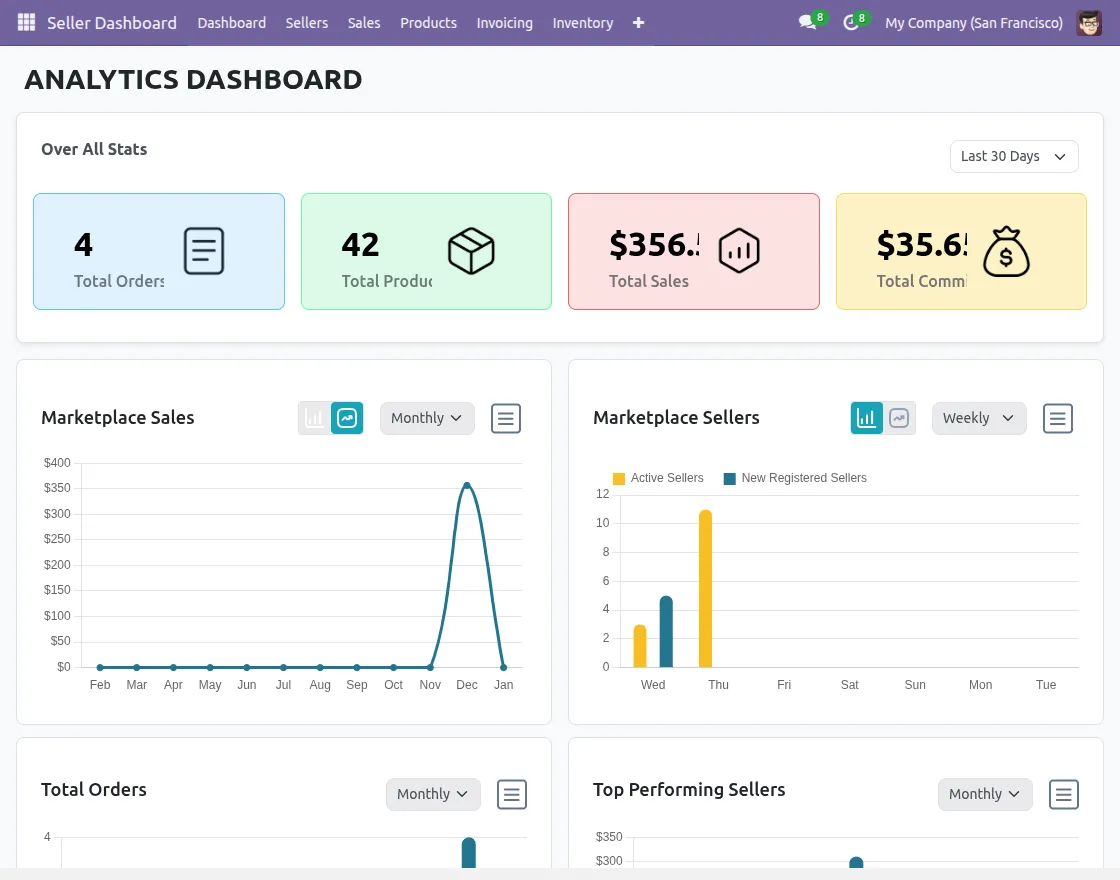
10. After this, click on the Analytics Dashboard to review overall sales metrics, orders, product counts, and commissions for a selected time range, along with visual charts.
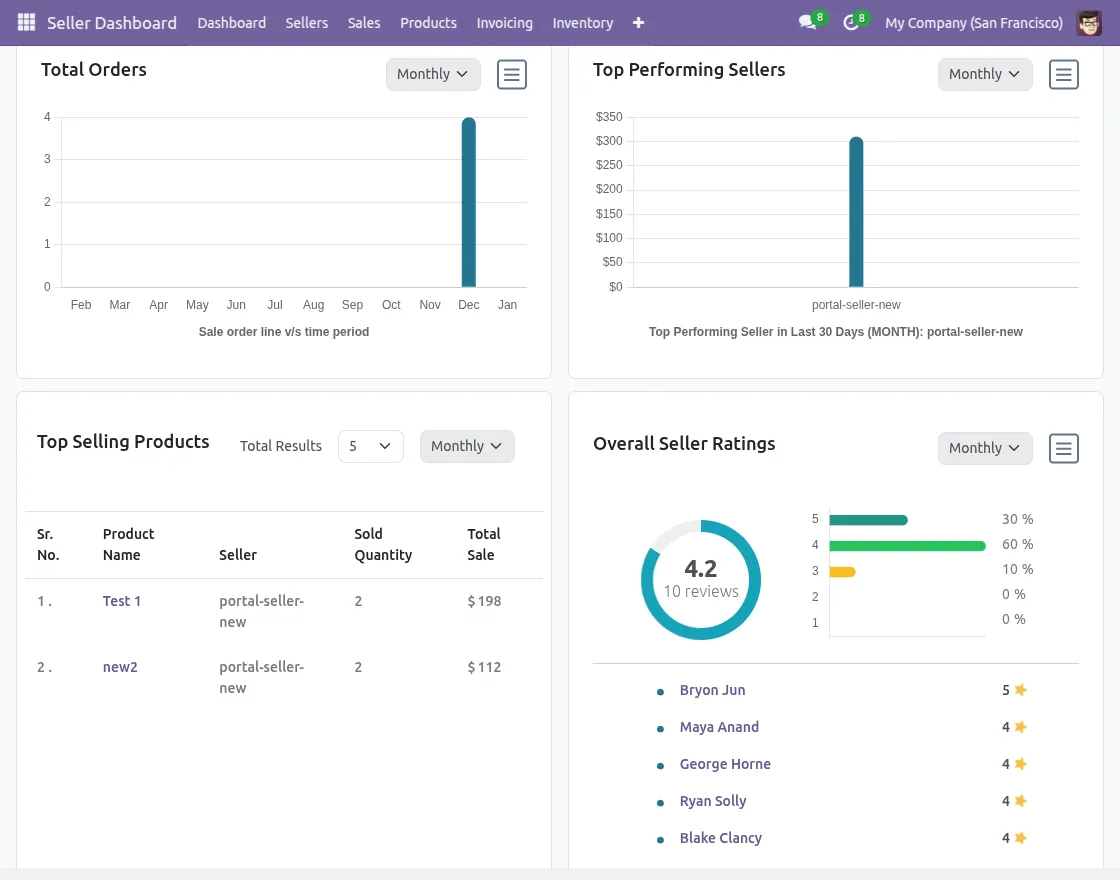
11. Scrolling down, you can see a quick snapshot of total orders, top-performing sellers, best-selling products, and overall seller ratings by applying different filters according to your choice.
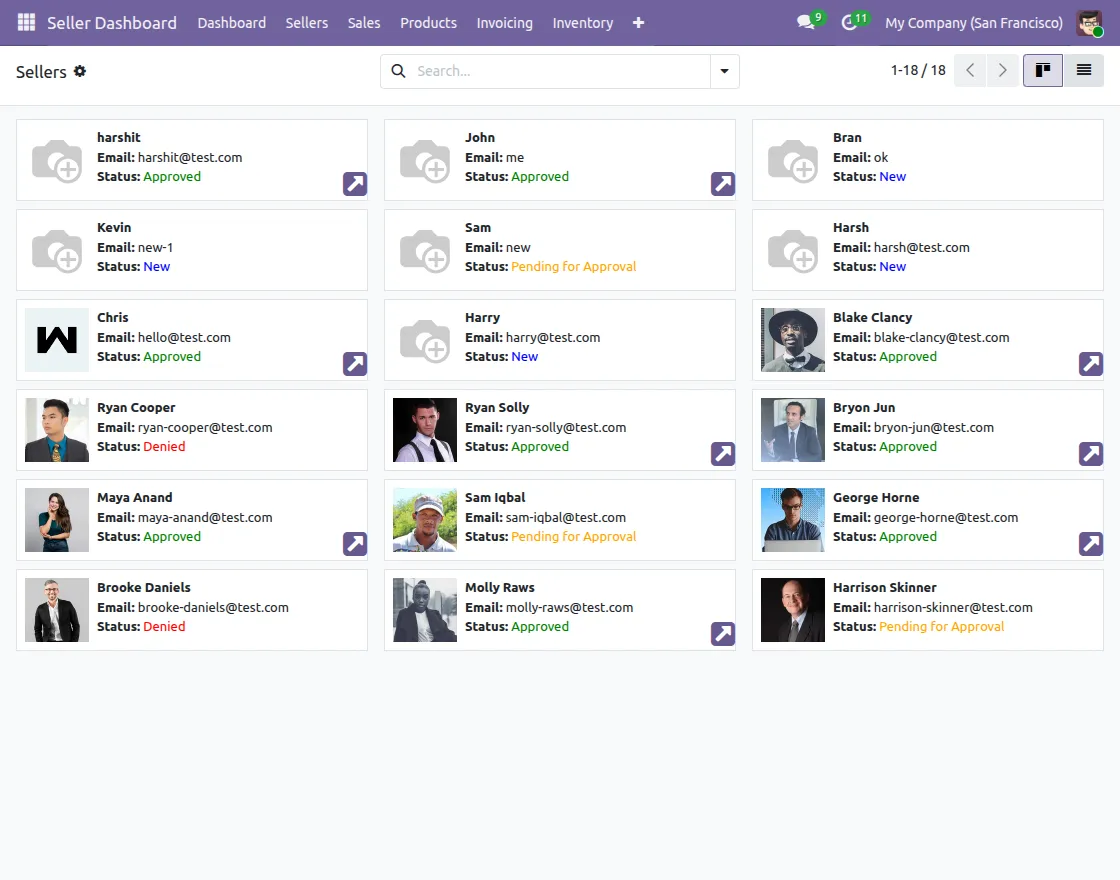
12. Go to the Sellers; from here you can view and manage the marketplace sellers
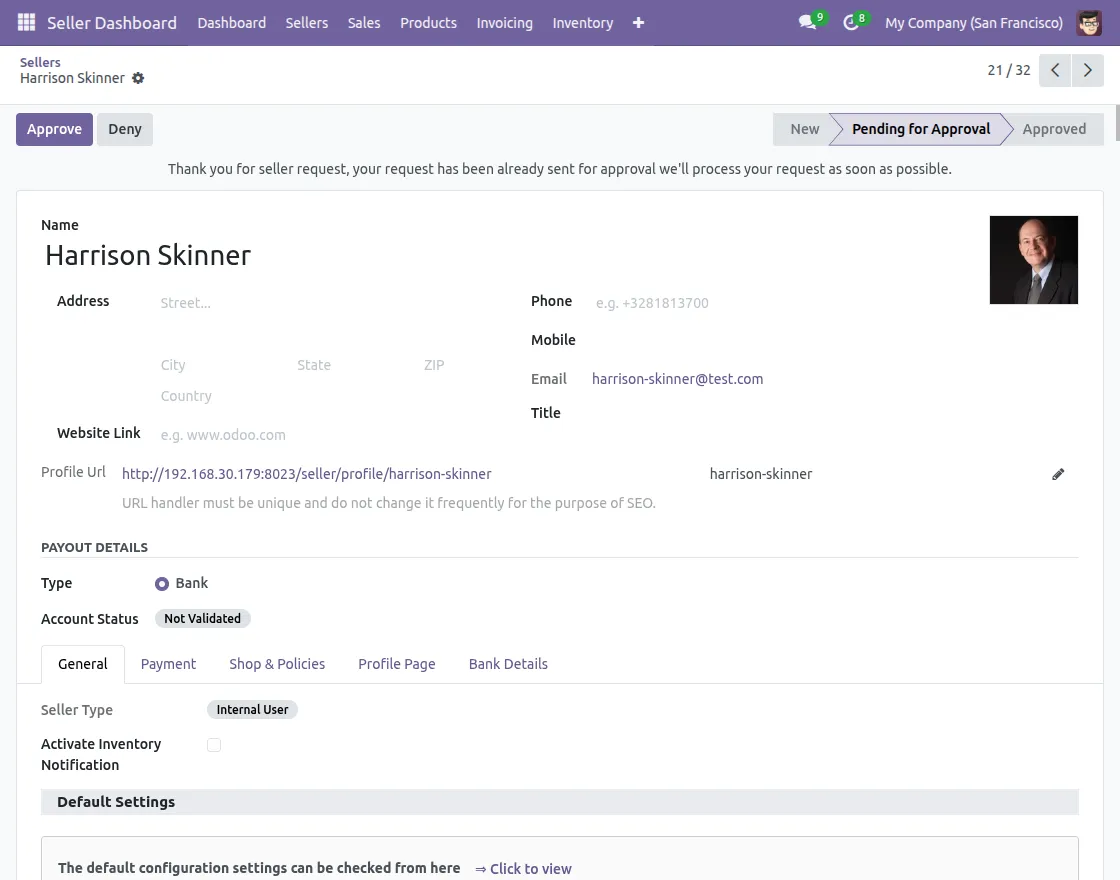
13. Open any pending Seller request; approve or deny the request and after that edit seller settings as per your requirements.
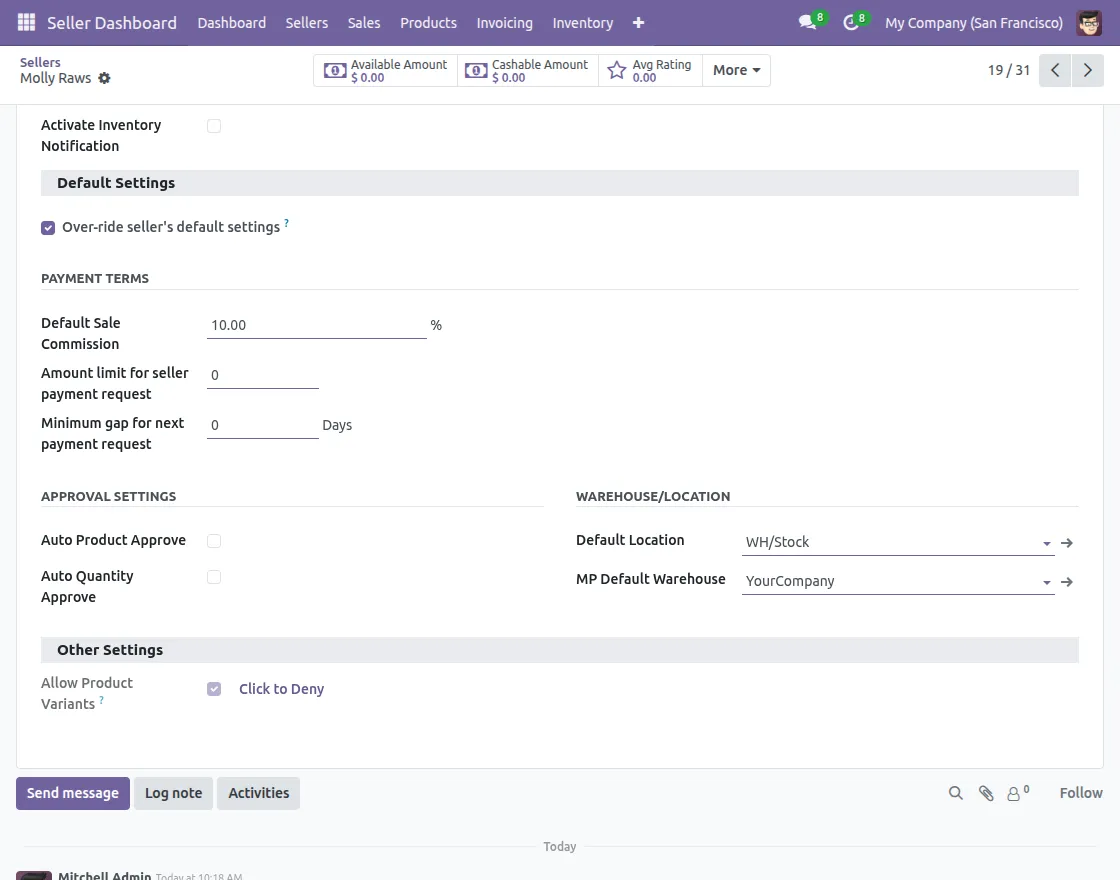
14. Enable the checkbox to Over-ride seller’s default settings and after that set the terms as per your requirements.
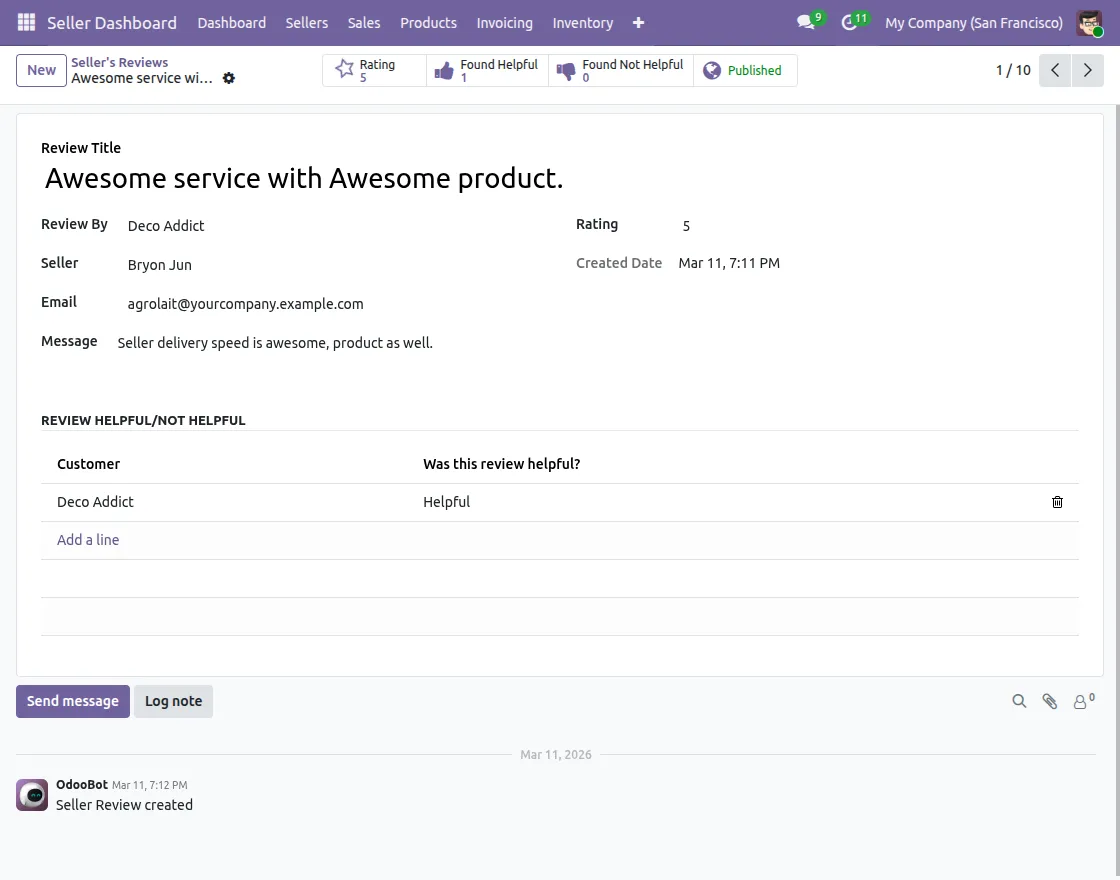
15. After that, go to the Seller Reviews under Sellers Tab to manage seller reviews and recommendations from customers.
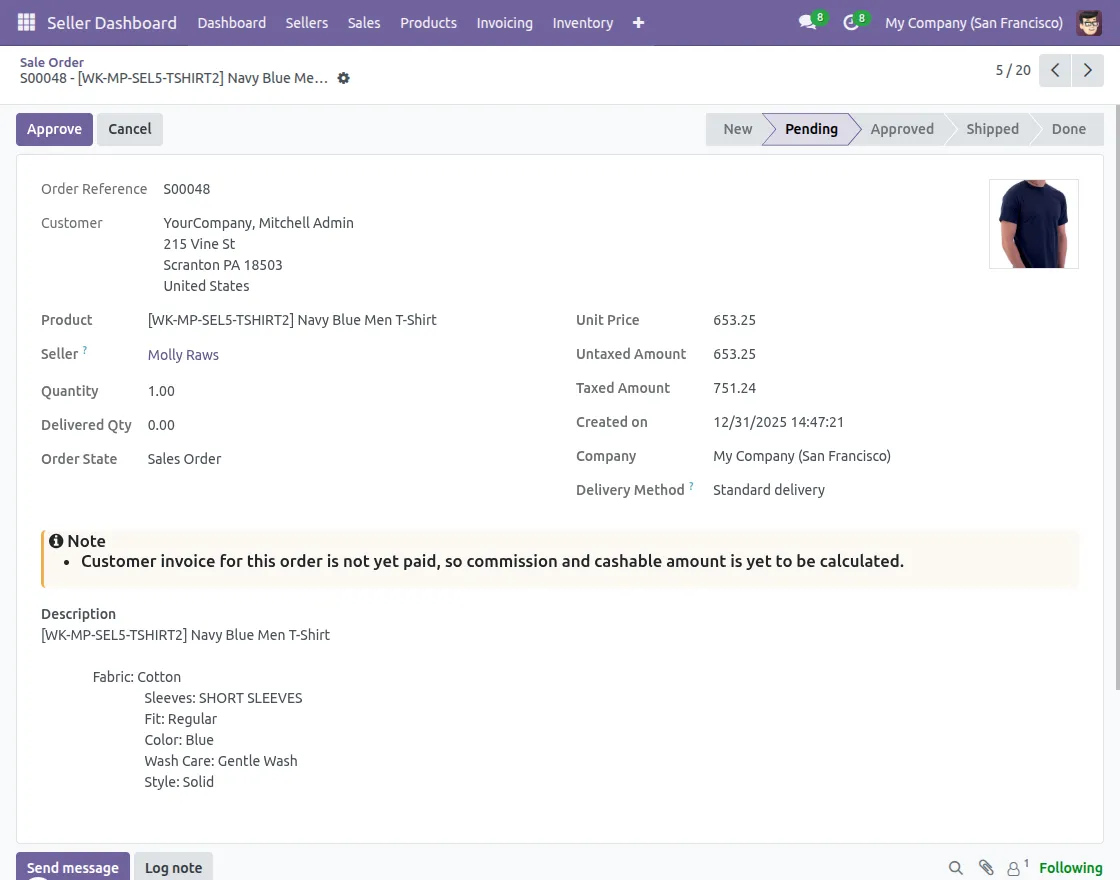
16. Under the Sales Tab, Go to the “Orders” to manage the orders; moreover, you can manage sellers payment history from the Sales Tab only. Click on the “Approve” button to approve the order.
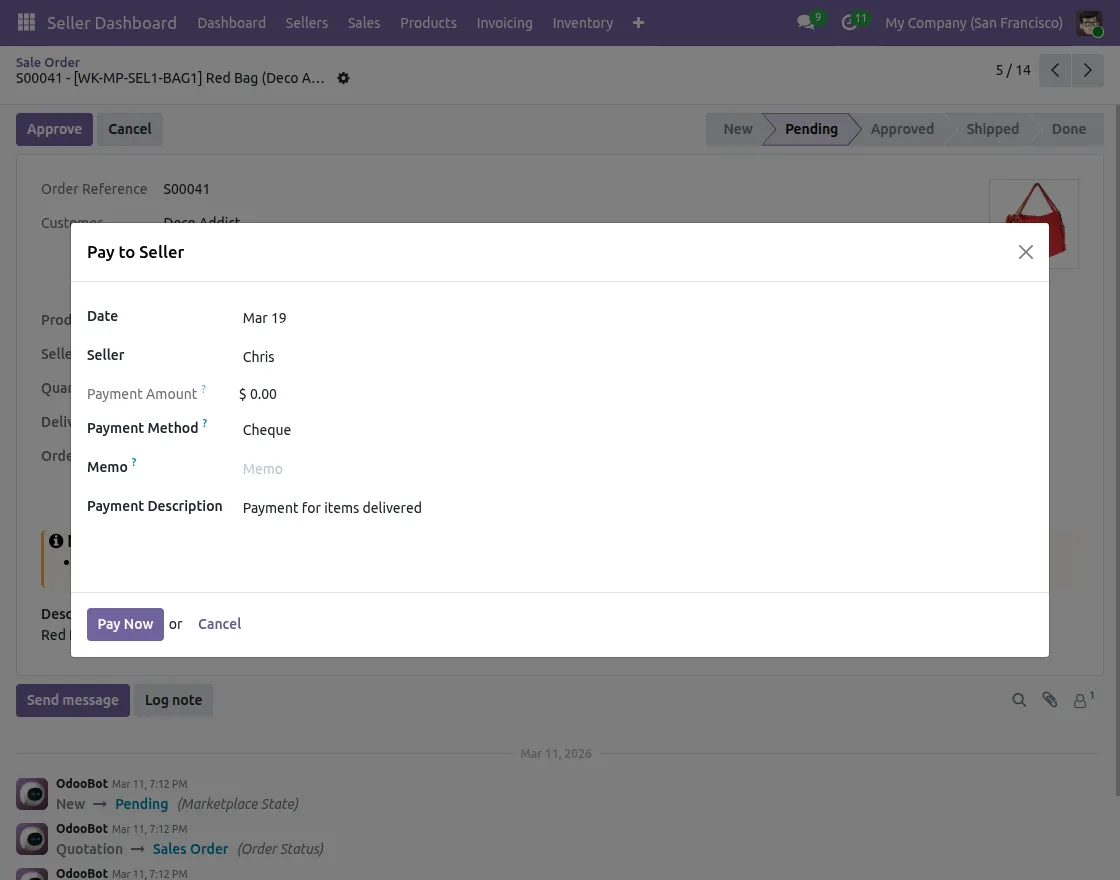
17. Click on the Pay to Seller menu to make the payment, and after that fill in the required details to pay the sellers
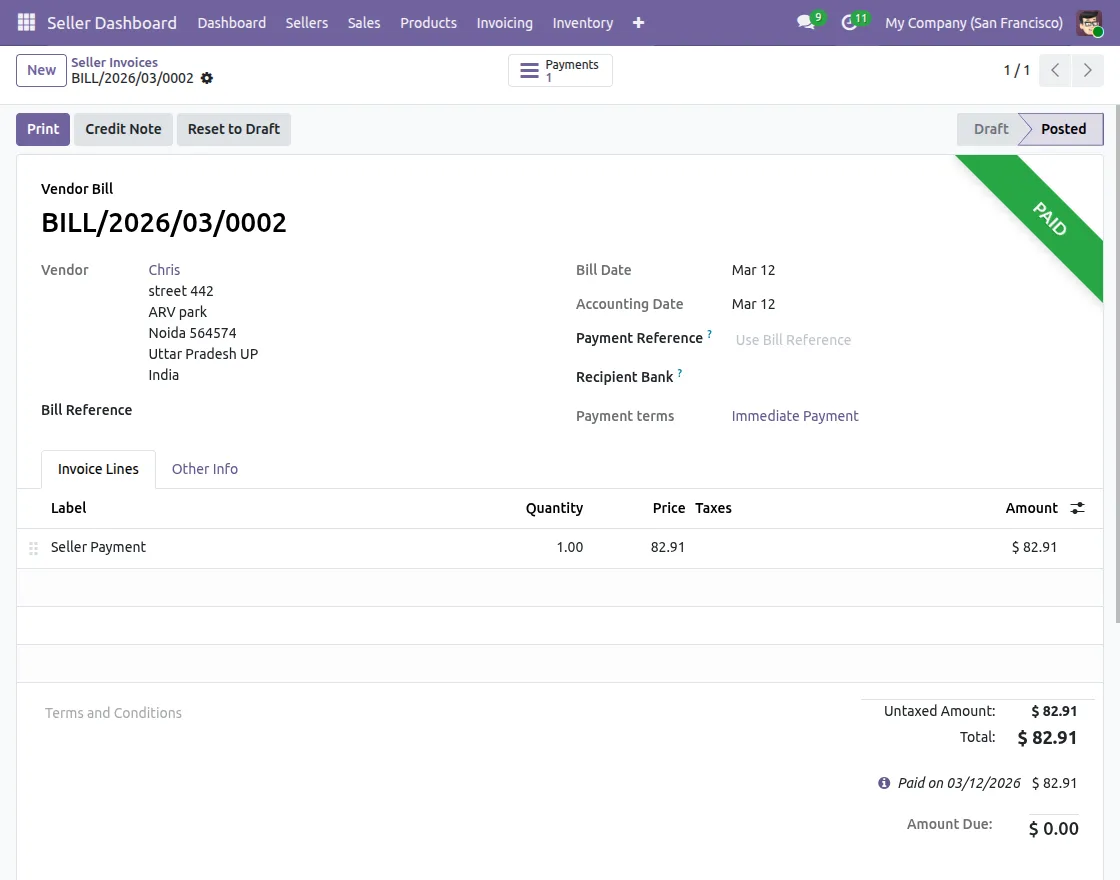
18. Go to the Seller Bills to manage seller payments; In addition, click on the “Ask For Credit Note” button if needed
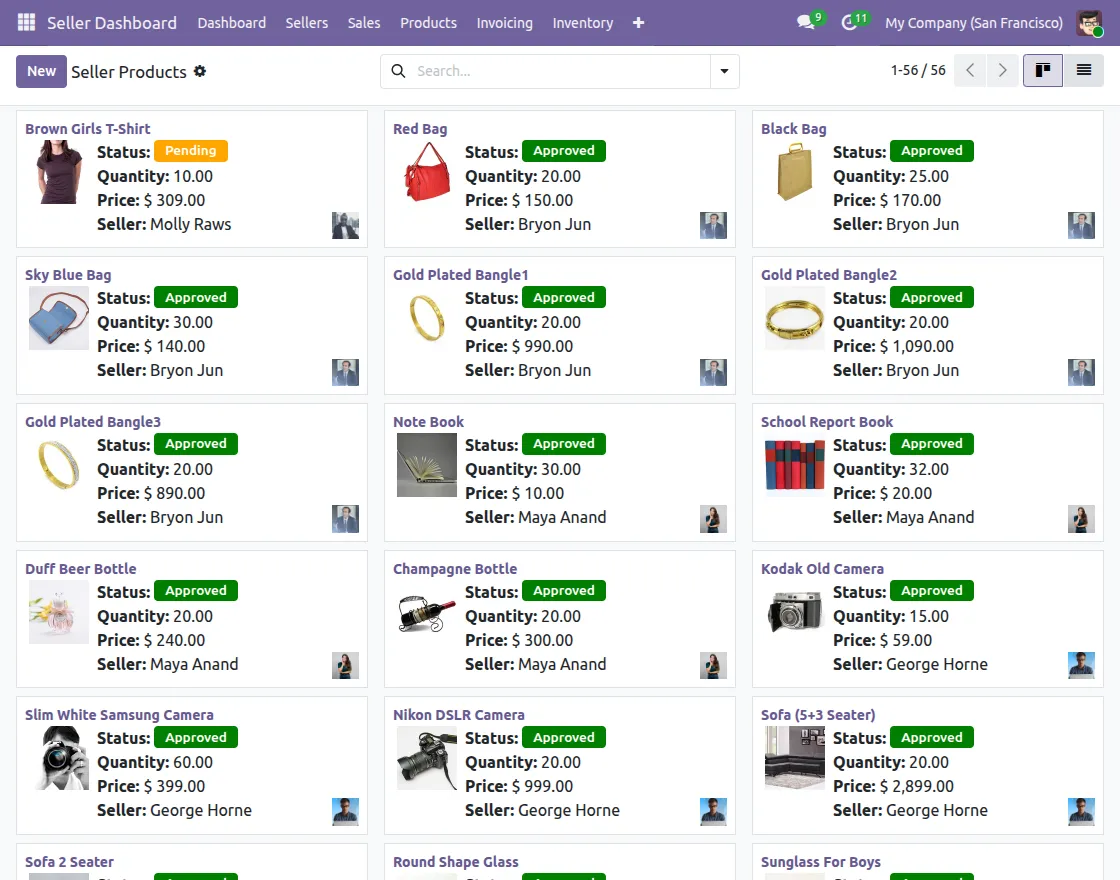
19. Go to the Product tab; after that, you can create a new product and approve/disapprove the product request.
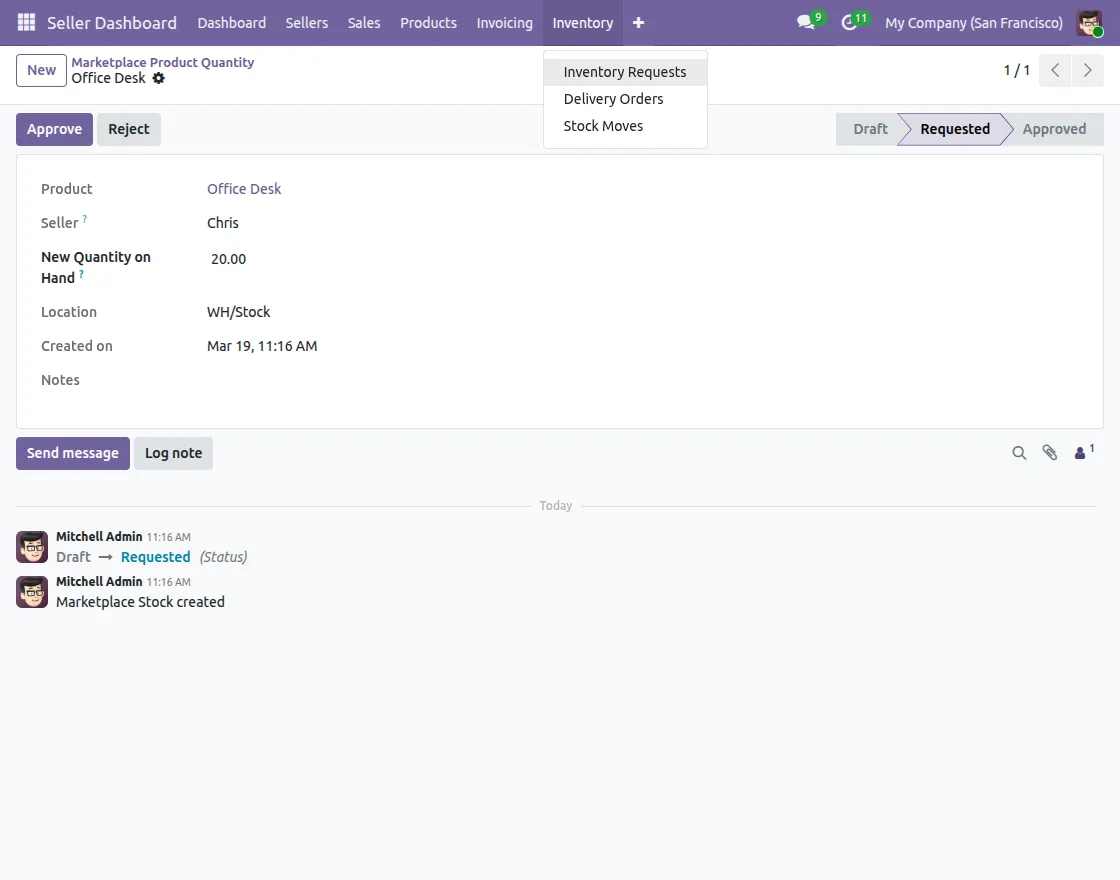
20. Go to Inventory; As a result, you can manage sellers’ inventory request and view delivery orders for the marketplace.
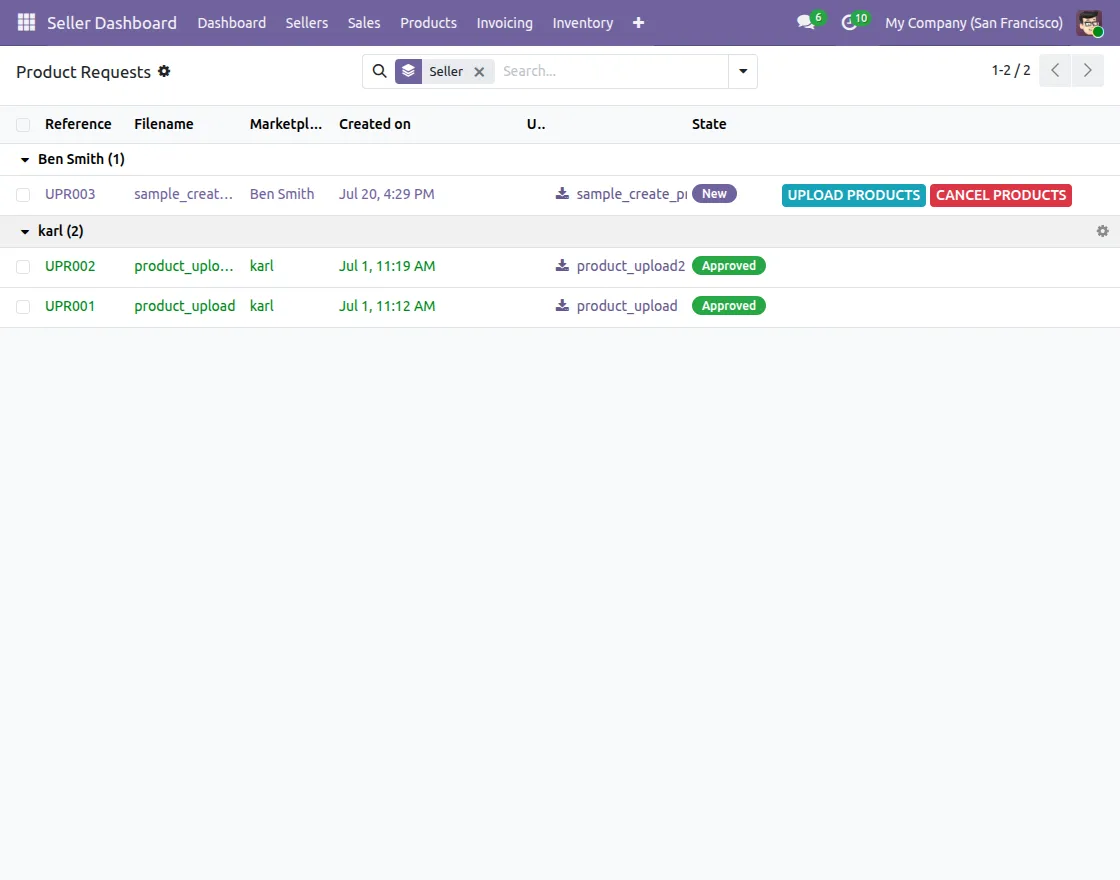
21. Go to Upload Requests → Product Requests to view product upload requests submitted by sellers. Then, click Upload Products to approve the request or Cancel Products to reject it.
Subsequently, only approved products are then added to the marketplace. (For Portal Sellers)
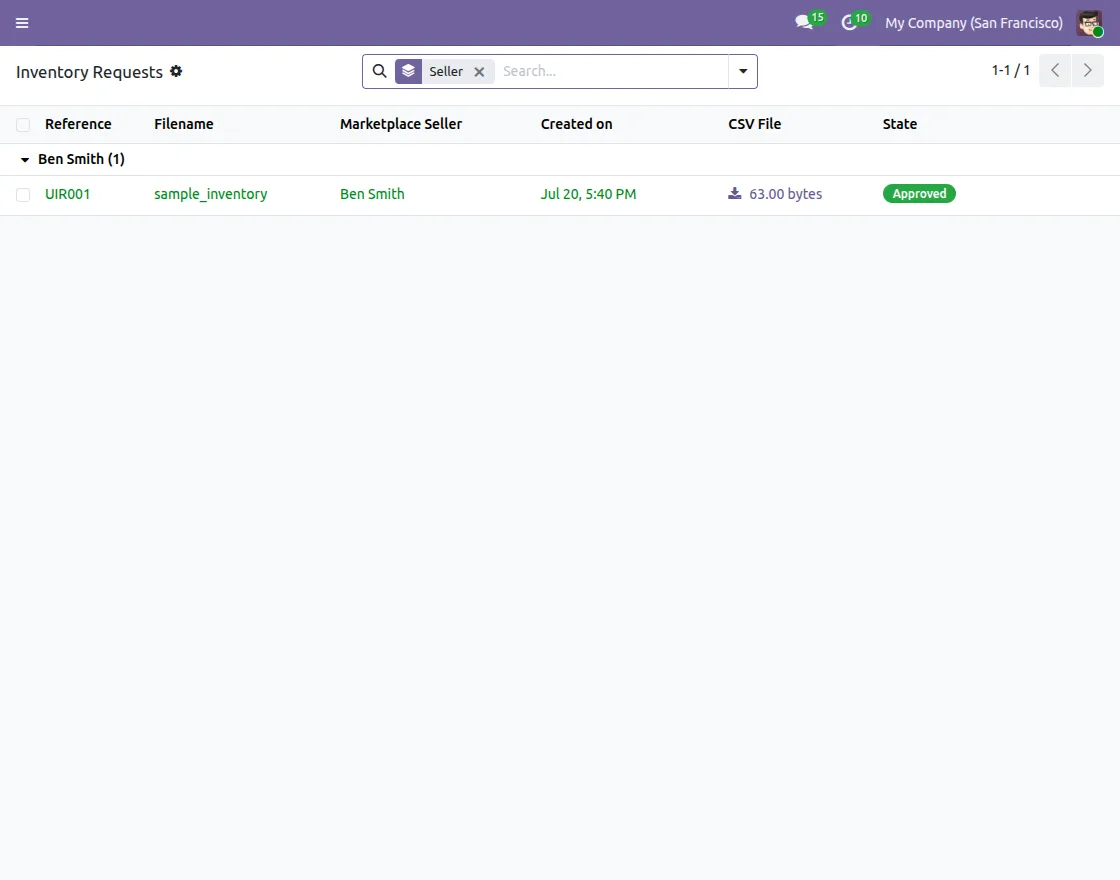
21. Go to Upload Requests → Inventory Requests to review inventory update requests from sellers.
Then, Click Upload Inventory to approve the update or alternatively Cancel Inventory to reject it. Thereafter, inventory updates are applied to seller stock. (For Portal User)
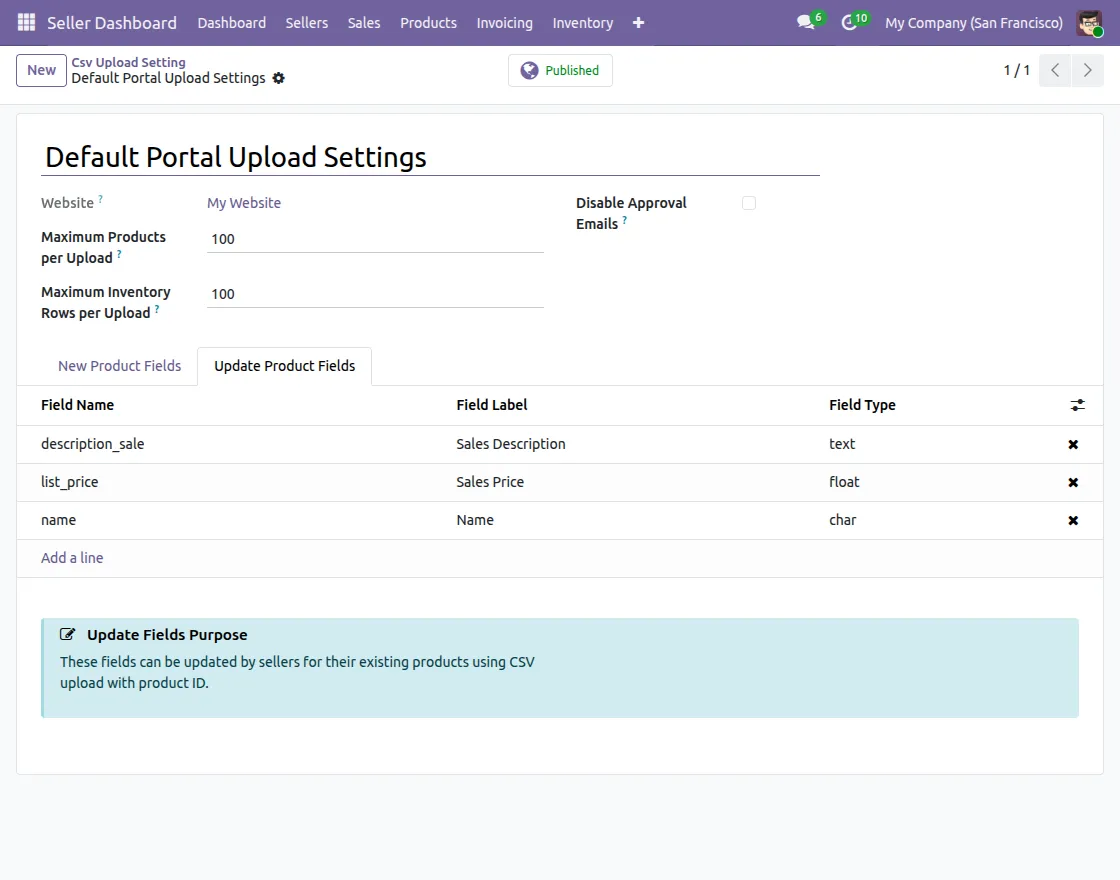
22. Go to Upload Requests → CSV Upload Settings to manage the fields included in the CSV files for product uploads.
Under the New Product Fields tab, you can manage the fields that will be included when sellers upload new products via CSV.
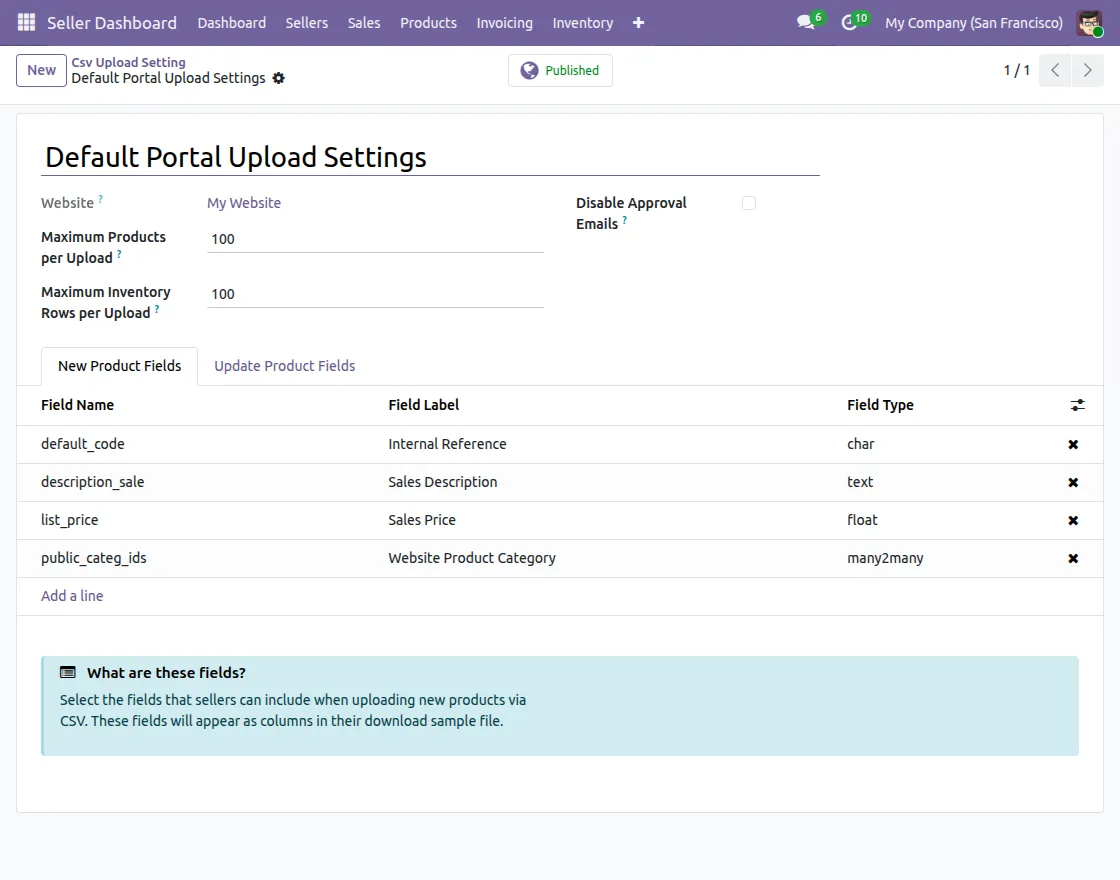
23. You can also manage the fields for updating existing products by clicking on the Update Product Fields tab and adding or removing fields as needed.
Seller View (Internal User)
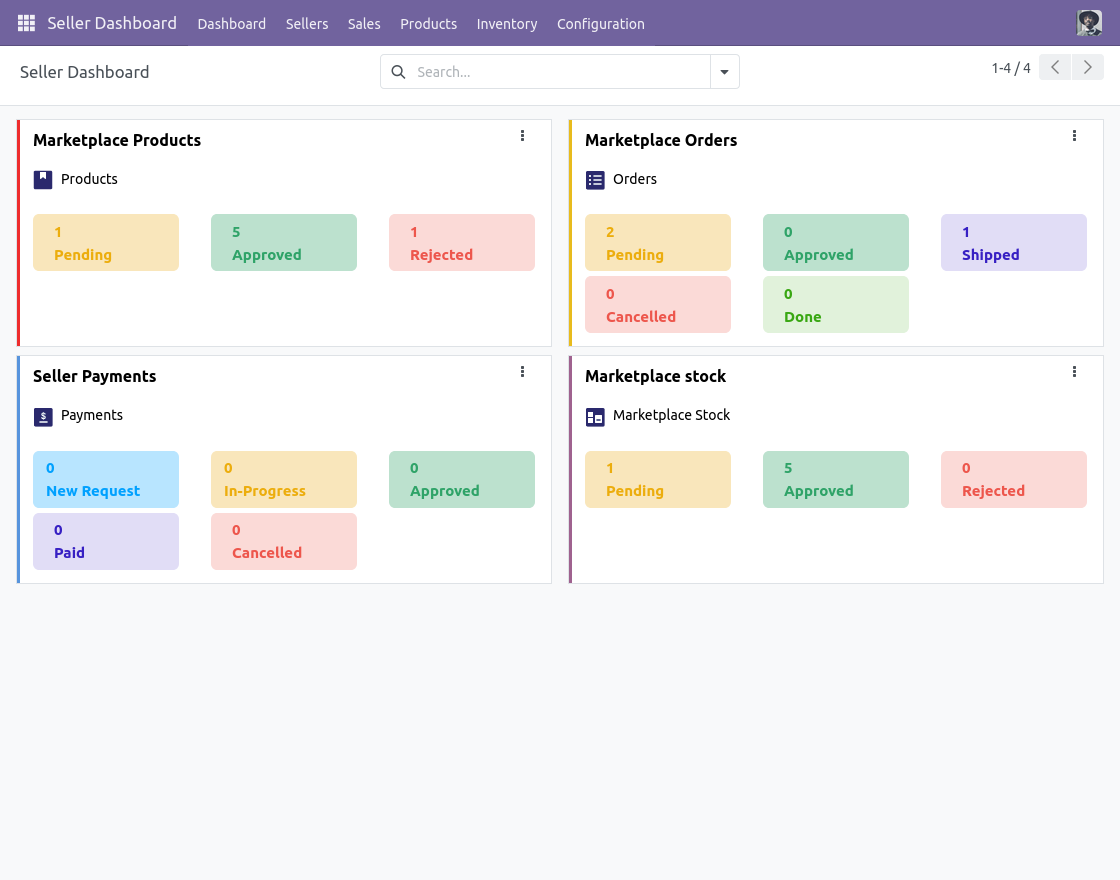
24. Log in as a seller and go to the seller dashboard. Sellers can check Marketplace products, orders, and payments.
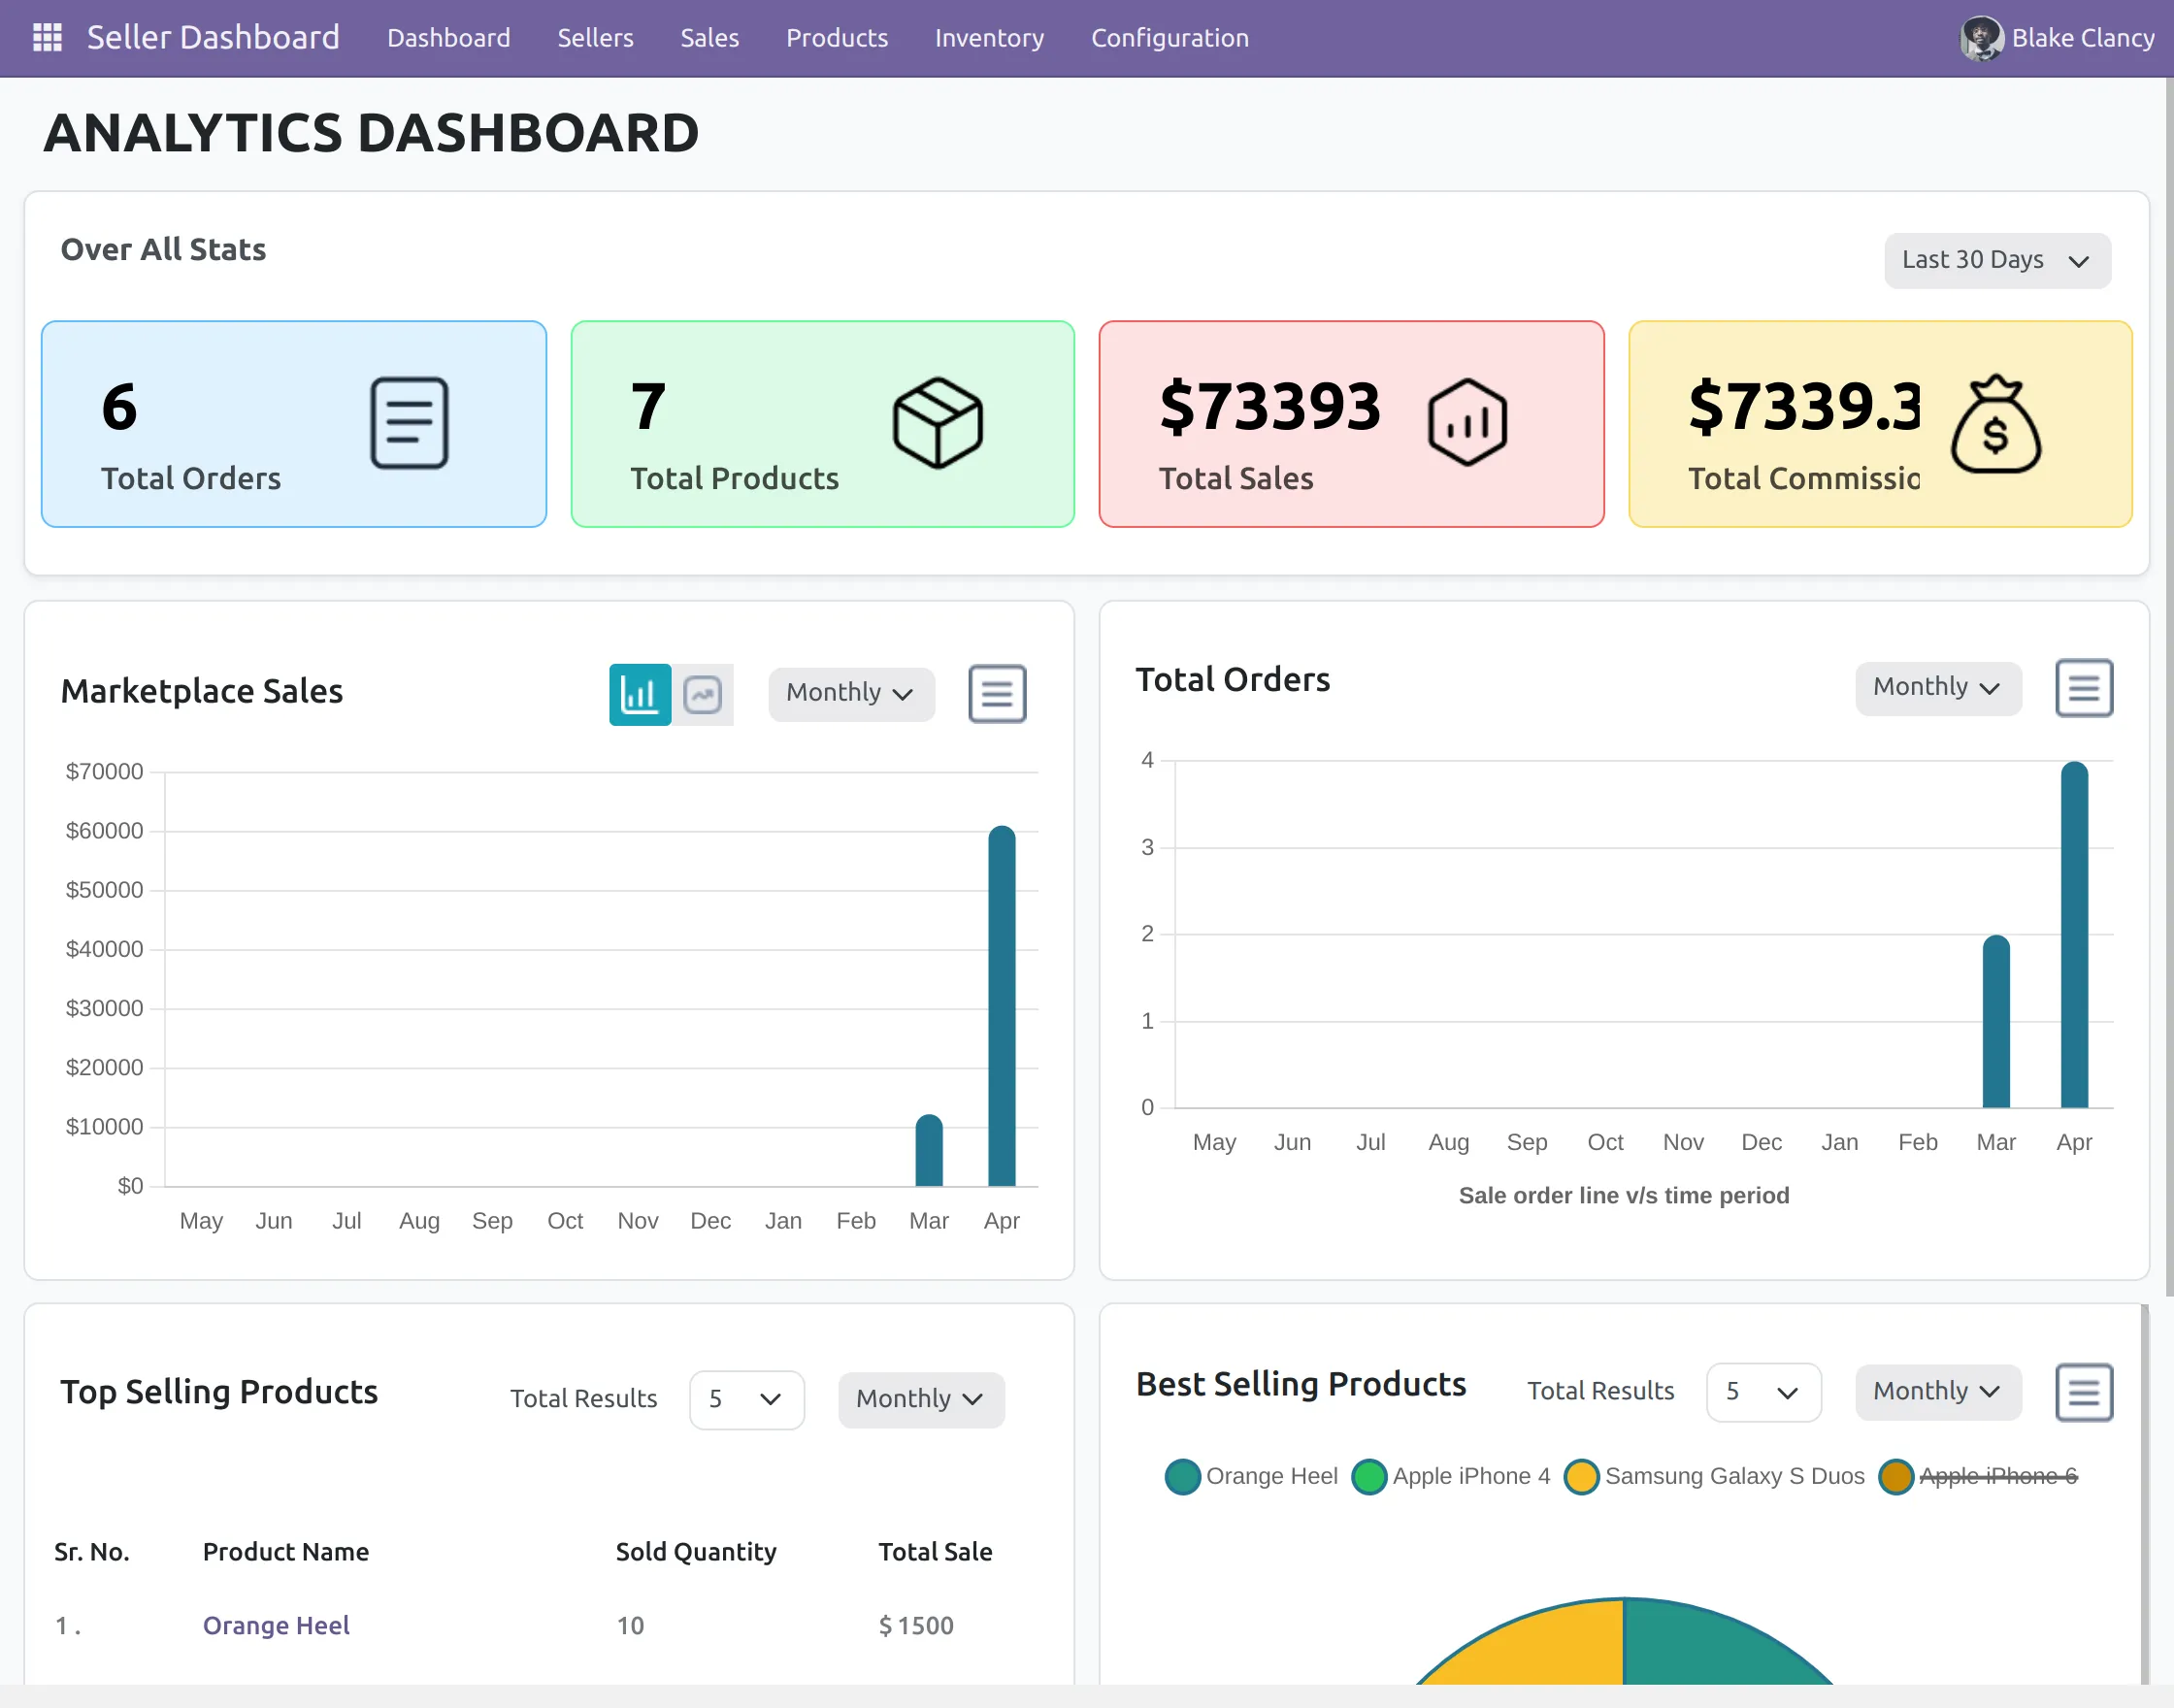
25. Now, Sellers can go to the Analytics Dashboard under the dashboard section, showing total sales, orders, and earnings with a graph and quick access to order details.
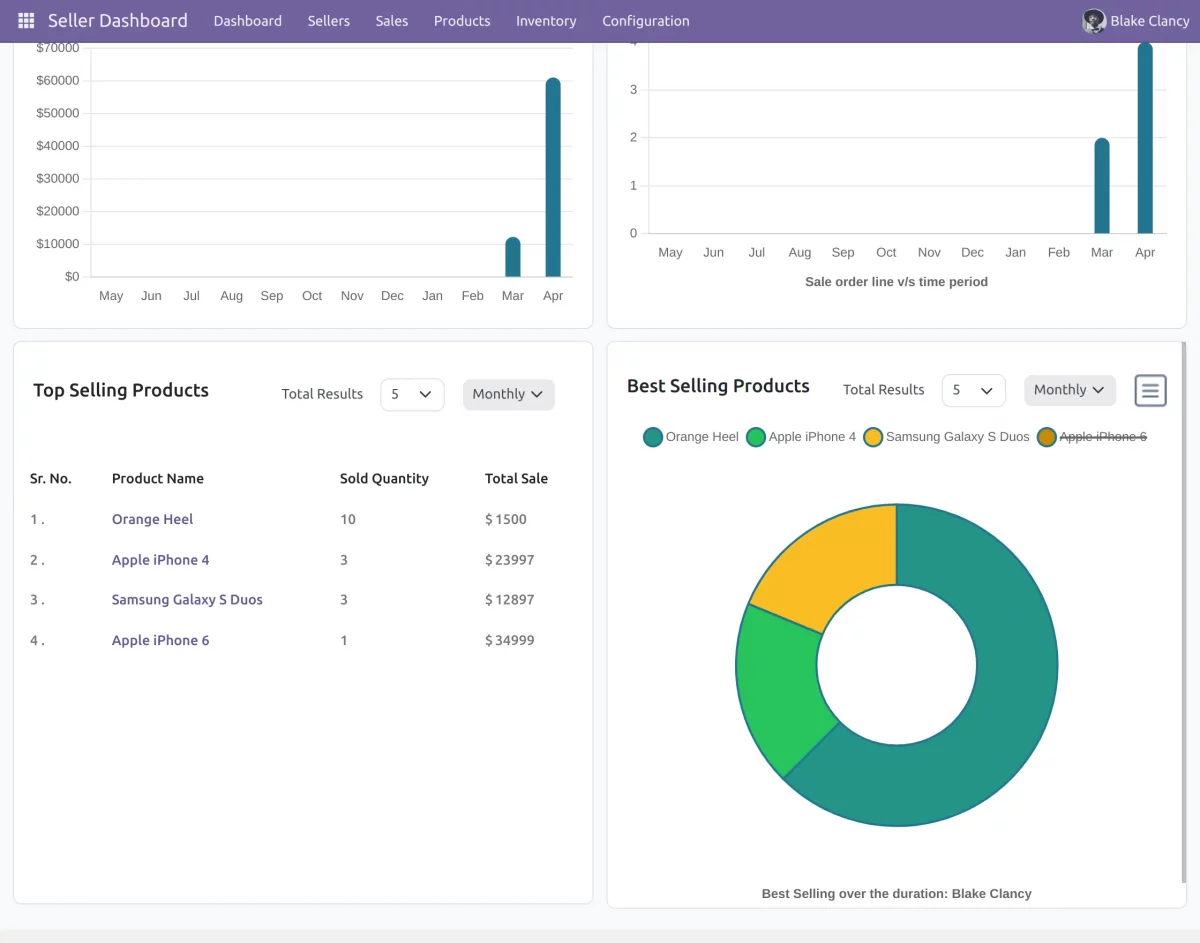
26. Scrolling down, sellers can see their top-selling and best-selling products. It has a graphical representation that helps sellers track product popularity and revenue trends efficiently.
27. Seller can create a product and publish it on the website.
28. Enter the details such as product name, website product category, product type, sales price and other details.
29. After entering the details, click on save and ask for approval from the admin
In Addition, Please note: If the admin has enabled auto-approval settings, then the product will get approved without asking for approval from the admin.
30. As soon as the admin approves, the Status will change to Approved and therefore seller can publish their products on the website.
31. Go to “My Profile” under Sellers Tab to manage payment settings, shop policies, and profile page, and click on the “Request For Payment” tab to directly notify the admin for the payment.
32. Seller can also check his default configuration settings by clicking on the “Click to view” option.
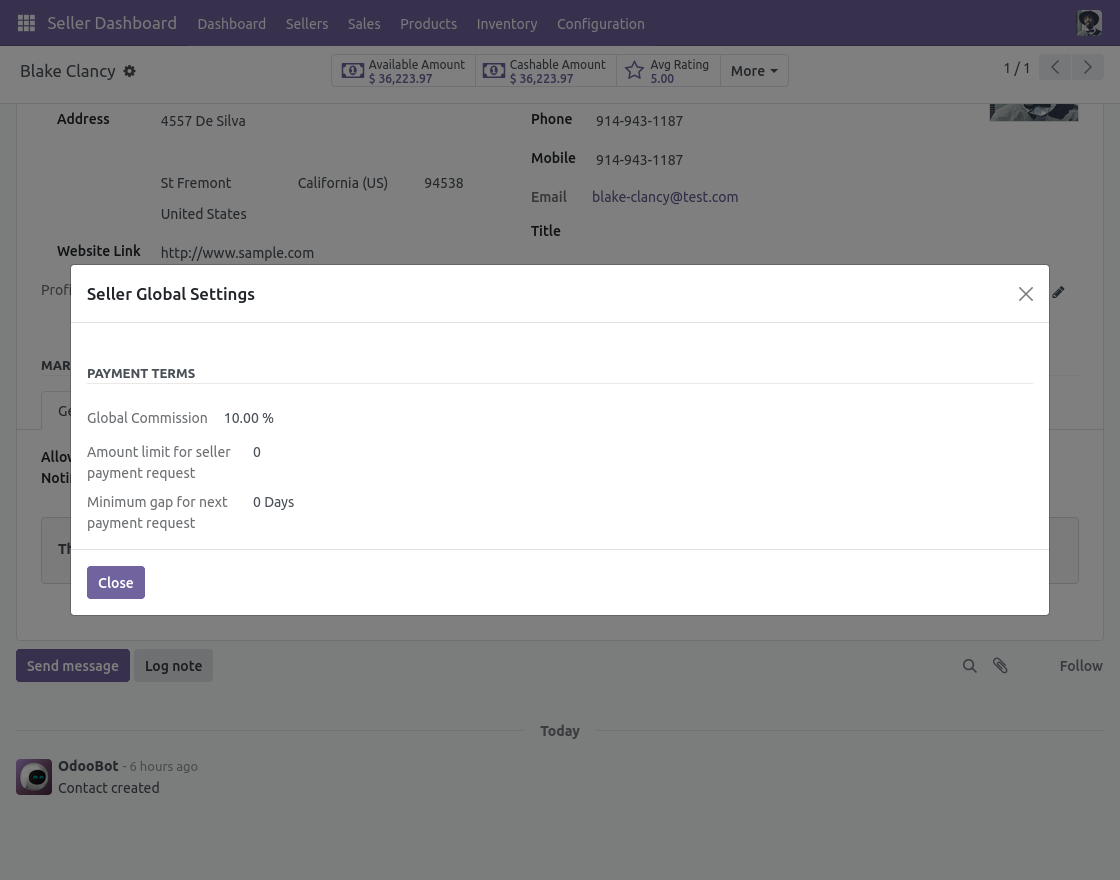
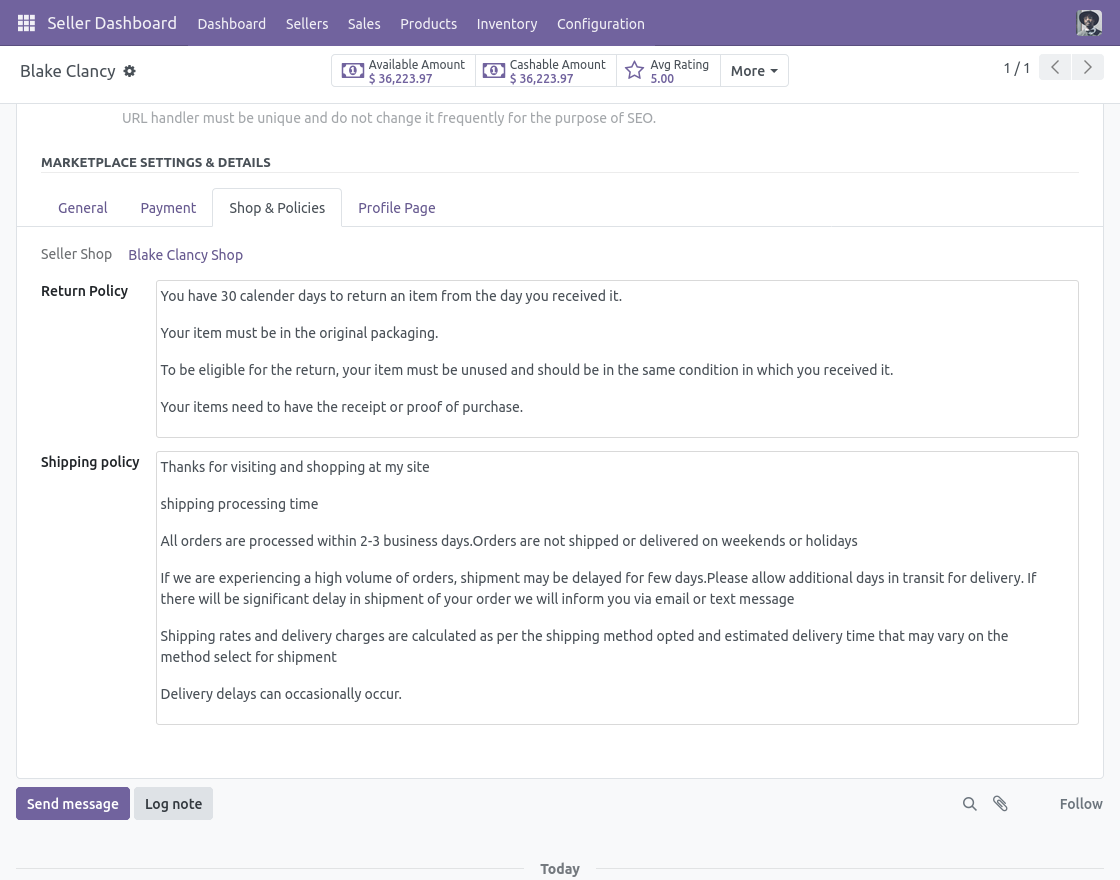
33. Seller can also manage his payments, shop policies, and profile page.
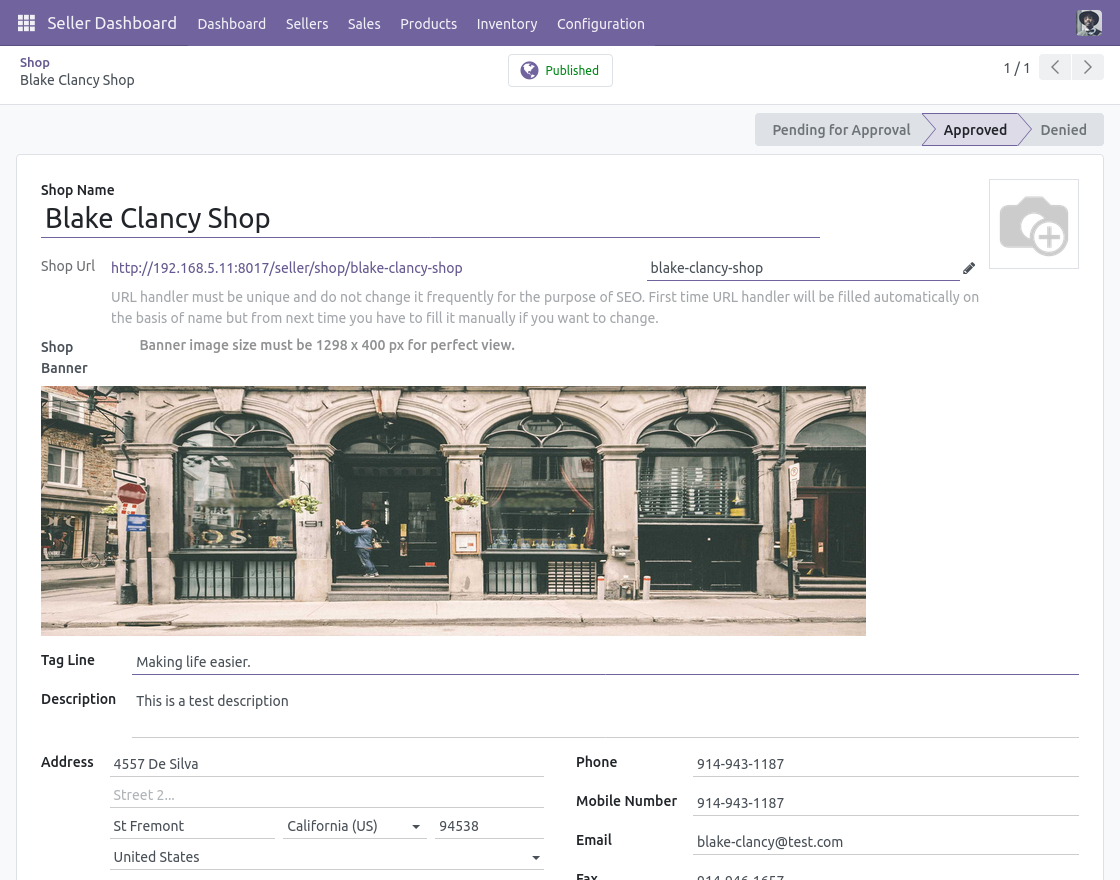
34. After that, under the same Seller tab, the Seller can also visit the shop and edit the shop URL, shop banner, tagline, address, and terms & conditions.
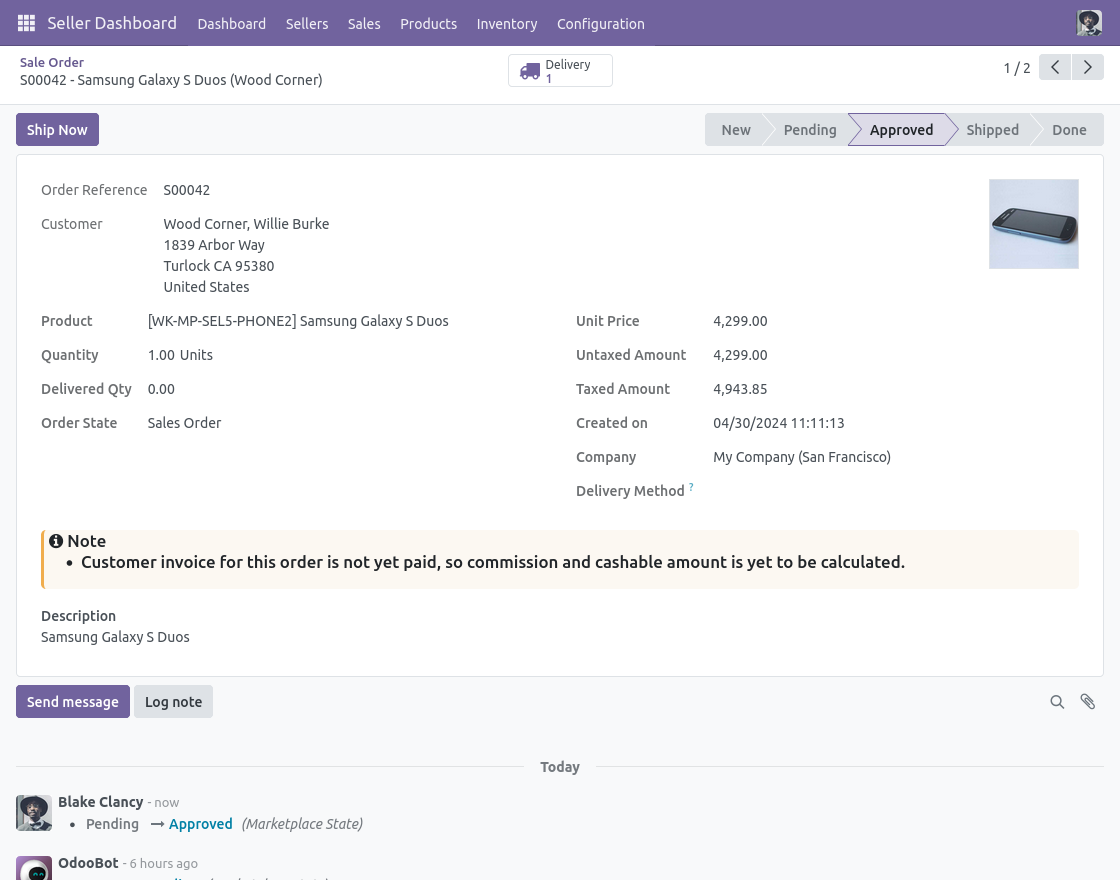
35. Navigate to the “Sales” tab to manage orders and payments. Under Orders, sellers can check their pending orders and ship them.
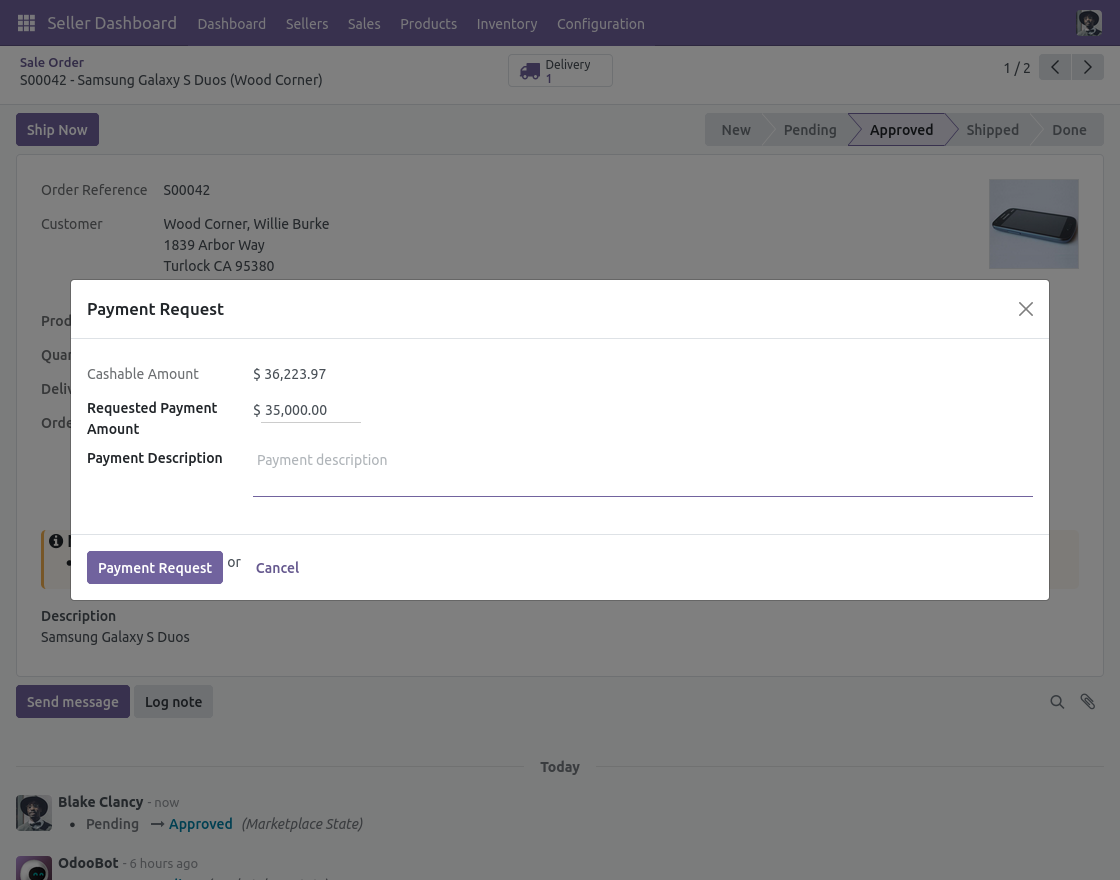
36. Under the same Sales tab, Click on the “Request for payment” for payment from the admin.
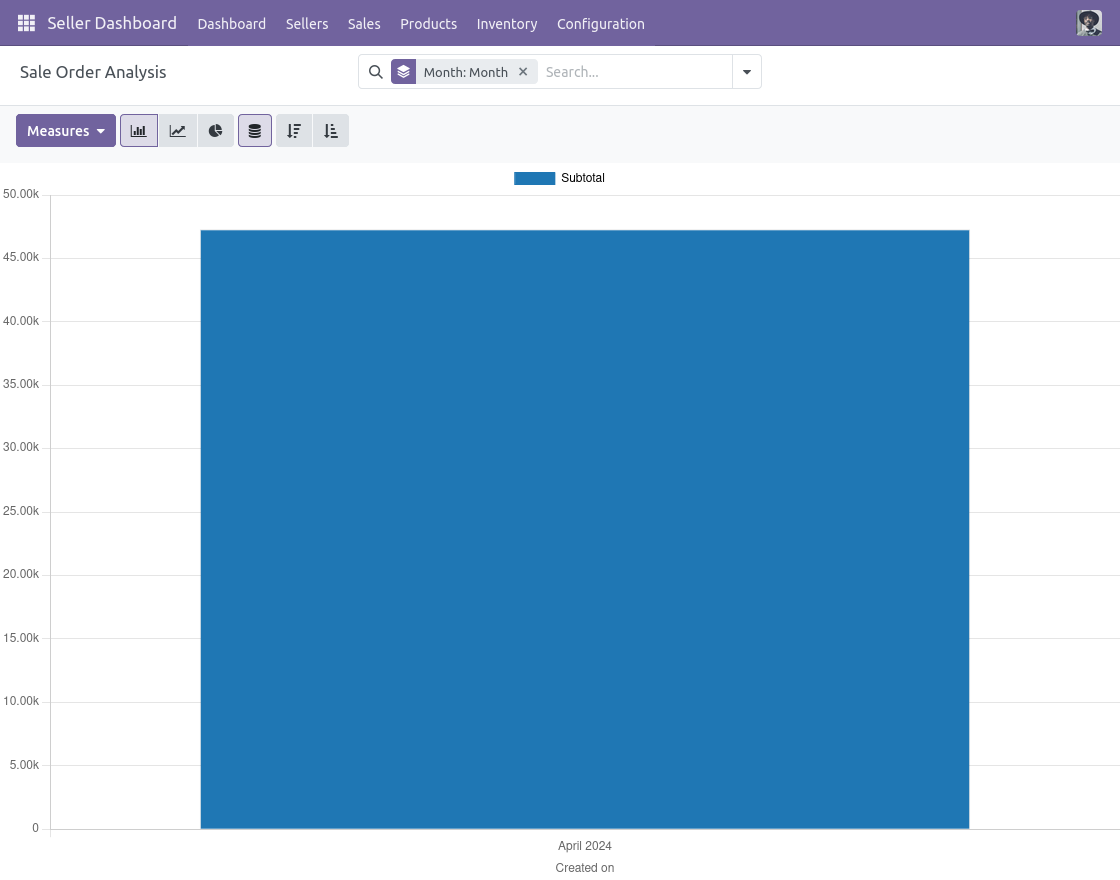
37. Moreover,Seller can check his ongoing payments and order analysis under the same Sales tab.
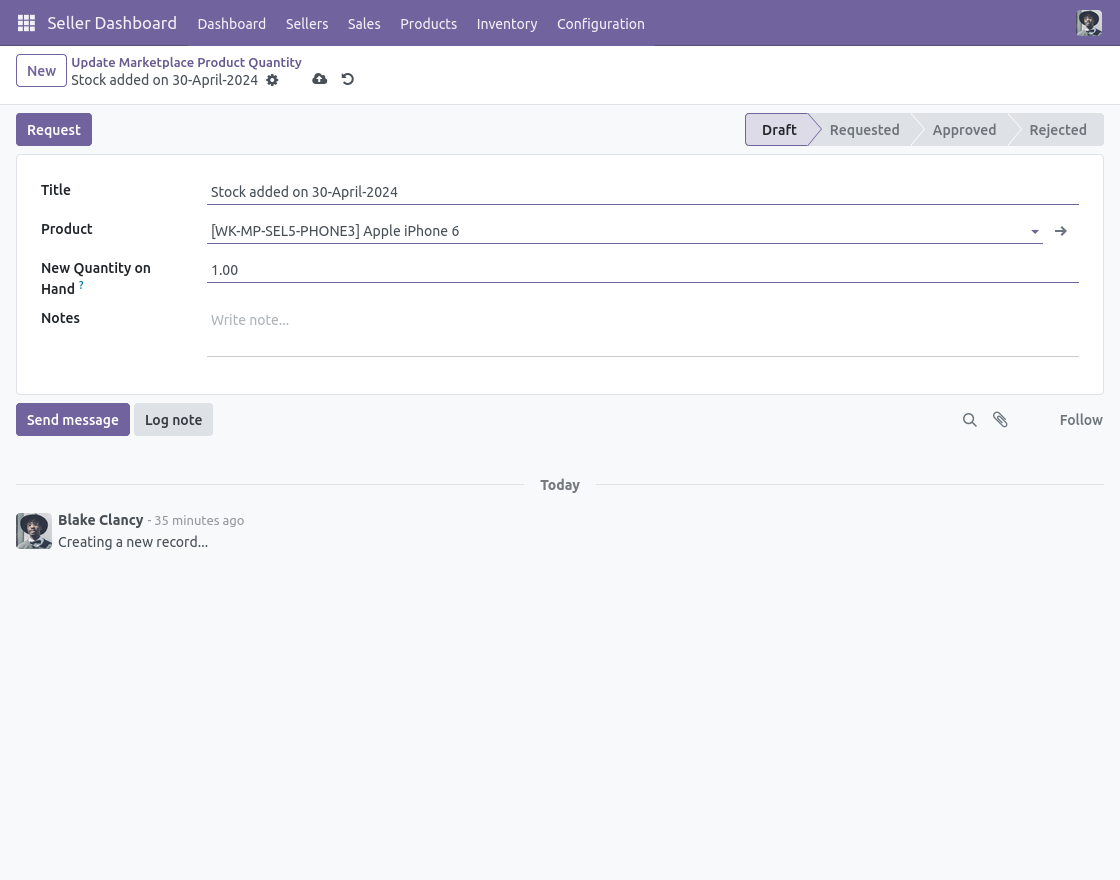
38. Navigate to the “Inventory” tab, Seller can request admin to update the inventory.
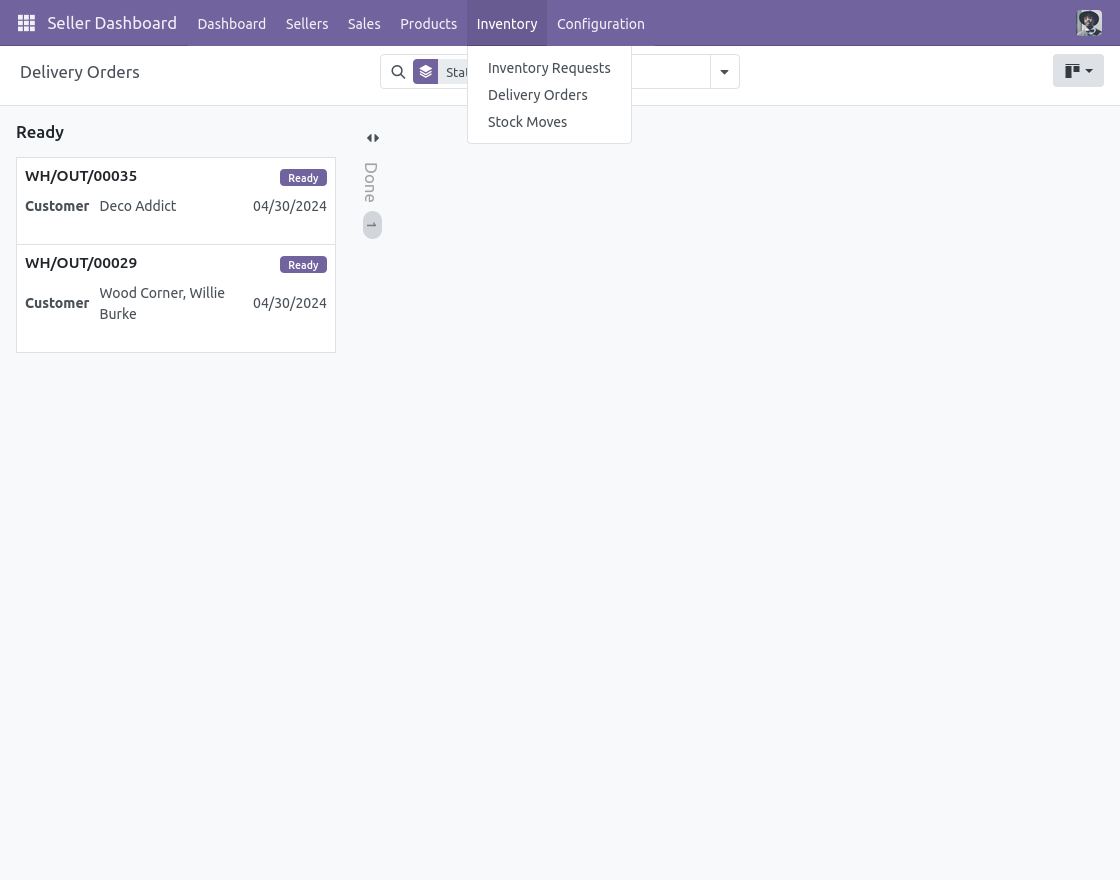
39. Lastly, the Seller can also check for Delivery orders and stock moves.
Seller View (Portal user)
40. Login as a seller, then Go to the website, click on Profile → Marketplace, and open the Seller Dashboard.
From here, sellers can then access profile, products, orders, payments, inventory requests, and bulk upload options in one place.
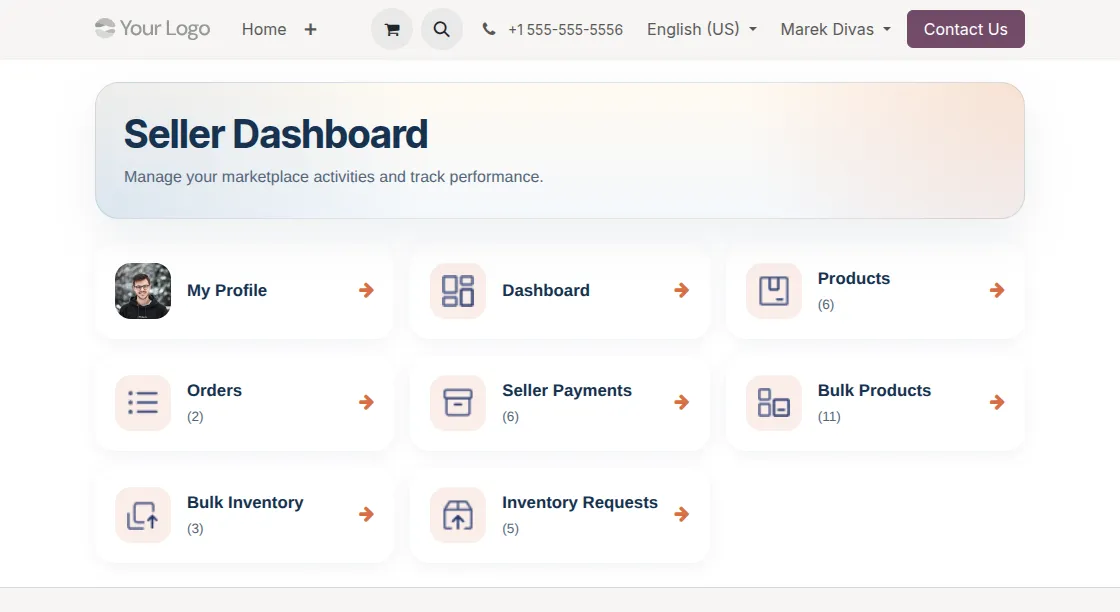
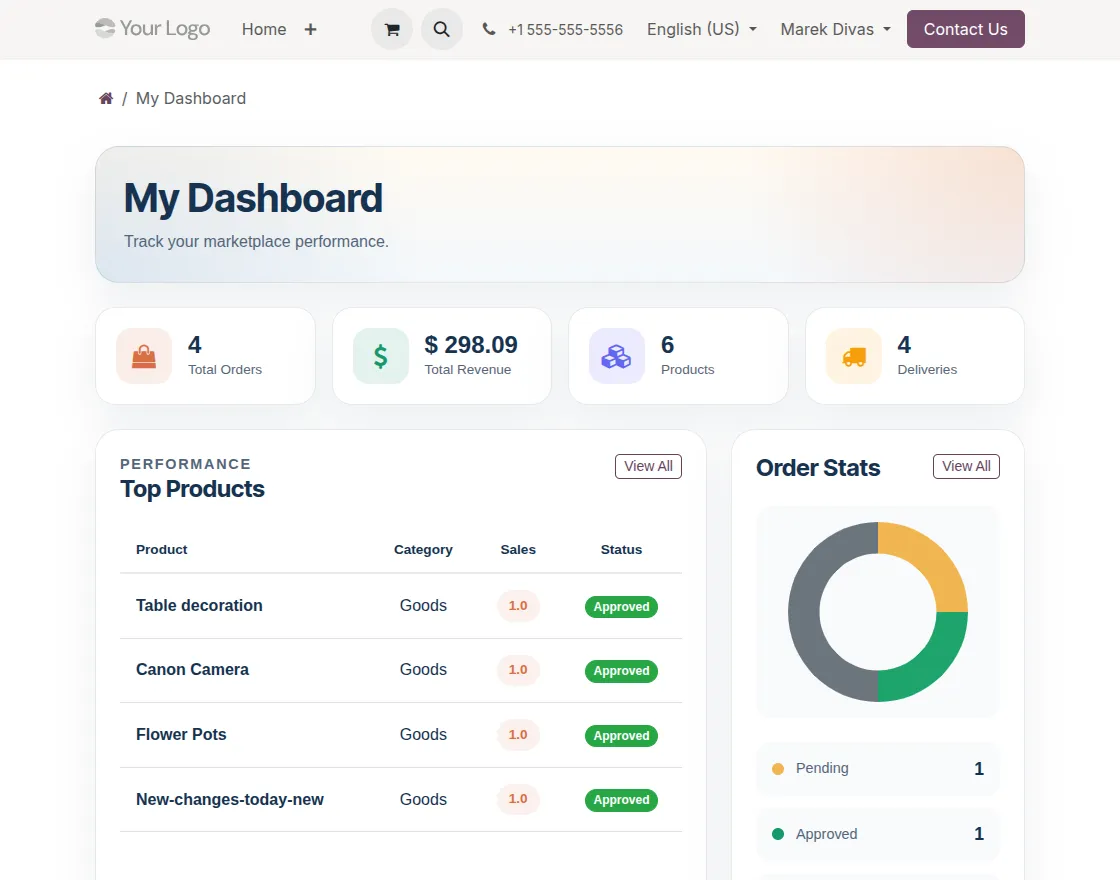
41. Go to the Dashboard under Seller Dashboard to view total sales, orders, and earnings.
Then sellers can analyze performance through graphs and scroll down to see top-selling products, sale orders, and revenue trends.
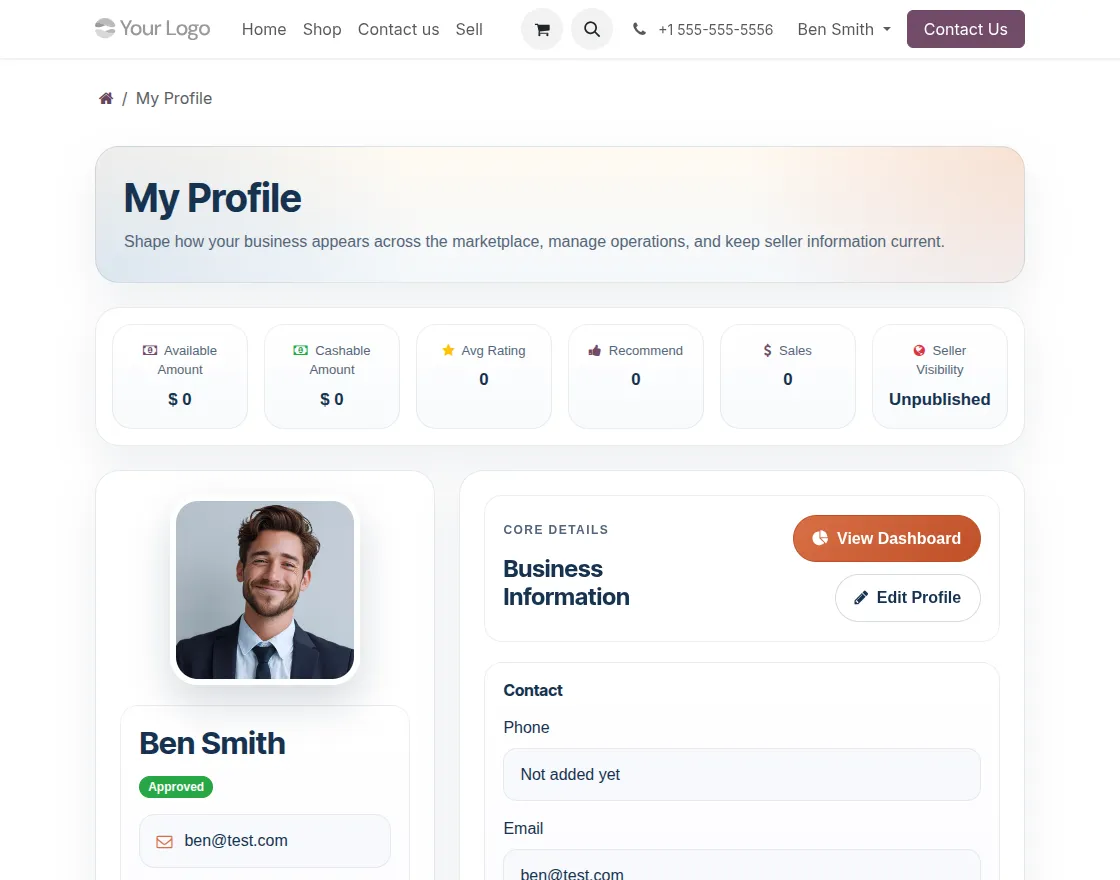
42. Go to Portal Seller Dashboard → My Profile to view complete profile information.
Sellers can check public profile link, ratings, published status, and marketplace commission details, and click Edit to update profile information when needed.
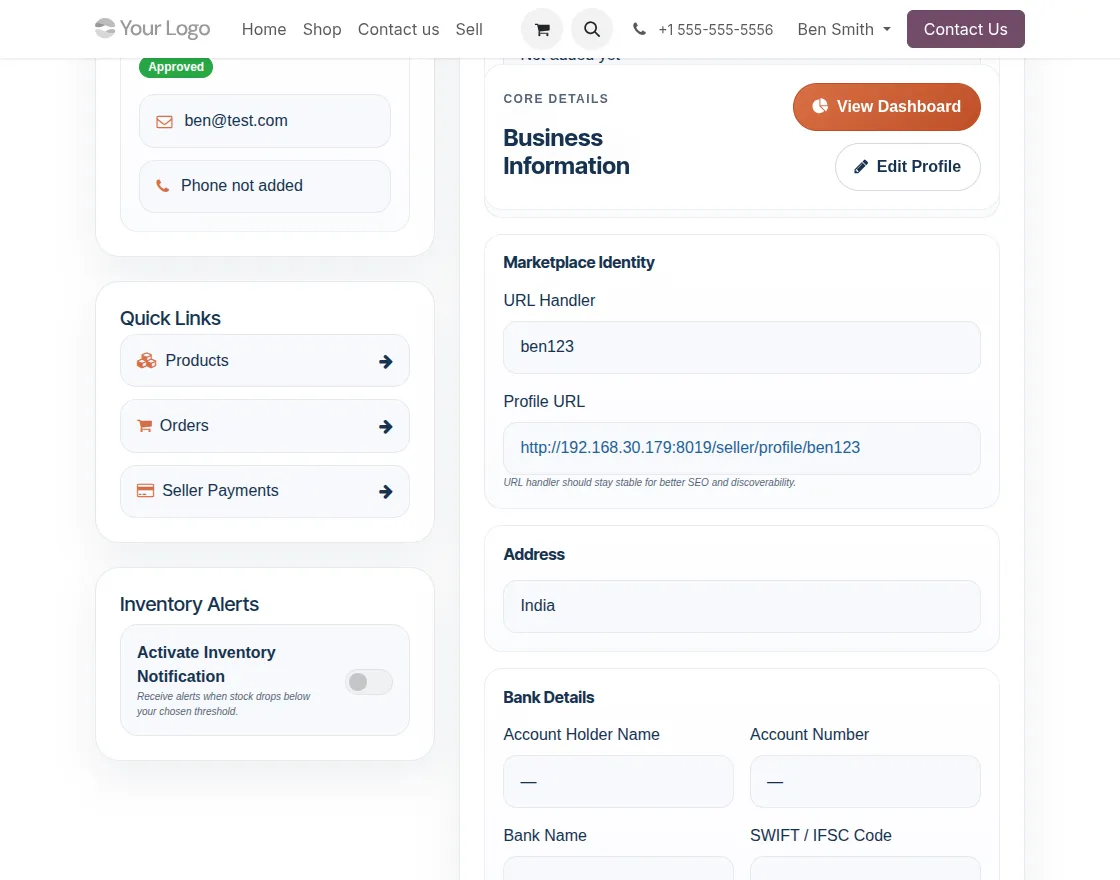
43. Scroll down on the My Profile page to view and update bank details including account holder name, account number, bank name, and SWIFT or IFSC code.
Sellers can also view their Marketplace Commission details, including global commission, amount limit, total amount, paid amount, cashable amount, and gap in next payment request.
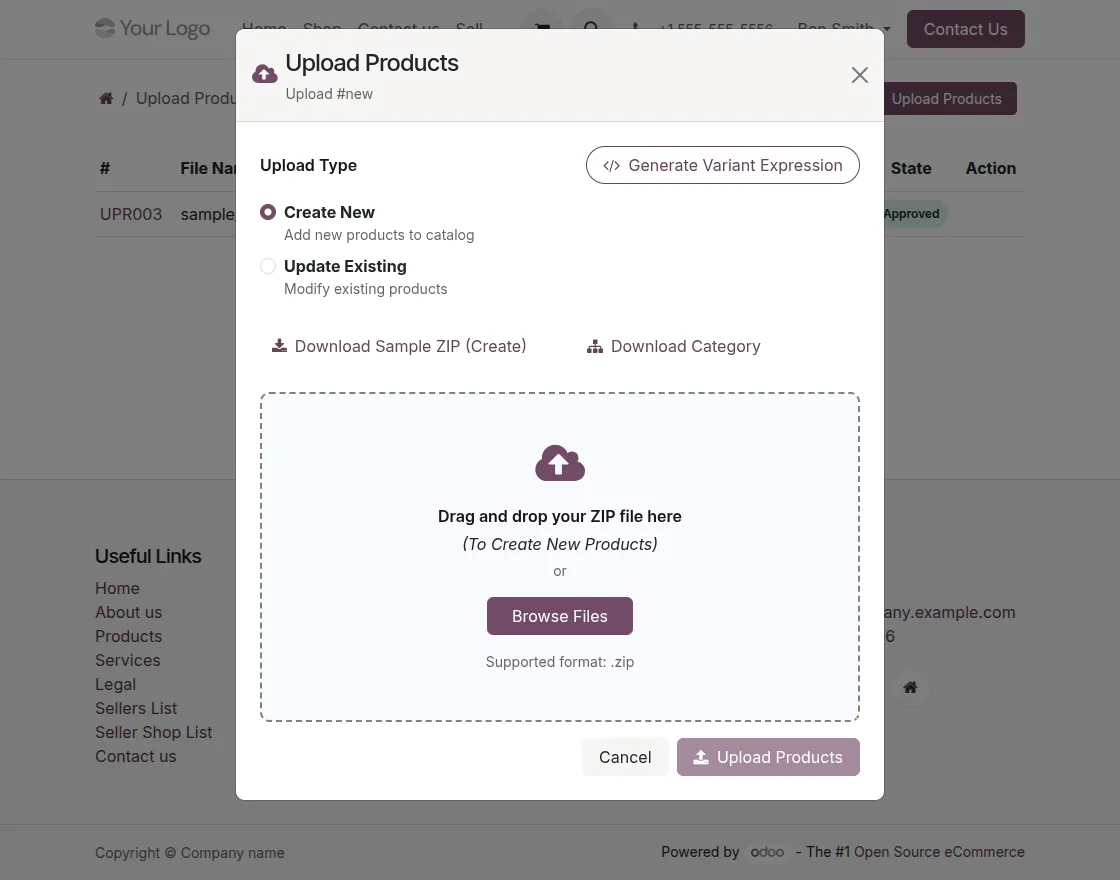
44. Go to Portal Seller Dashboard → Upload Bulk Products to upload a ZIP file and add multiple products at once.
Then, click Upload Products and select Create New to add new products by uploading a ZIP file.
To update existing products, select Update Existing instead and upload the updated ZIP file. Then, the request is sent to the admin for review and approval.
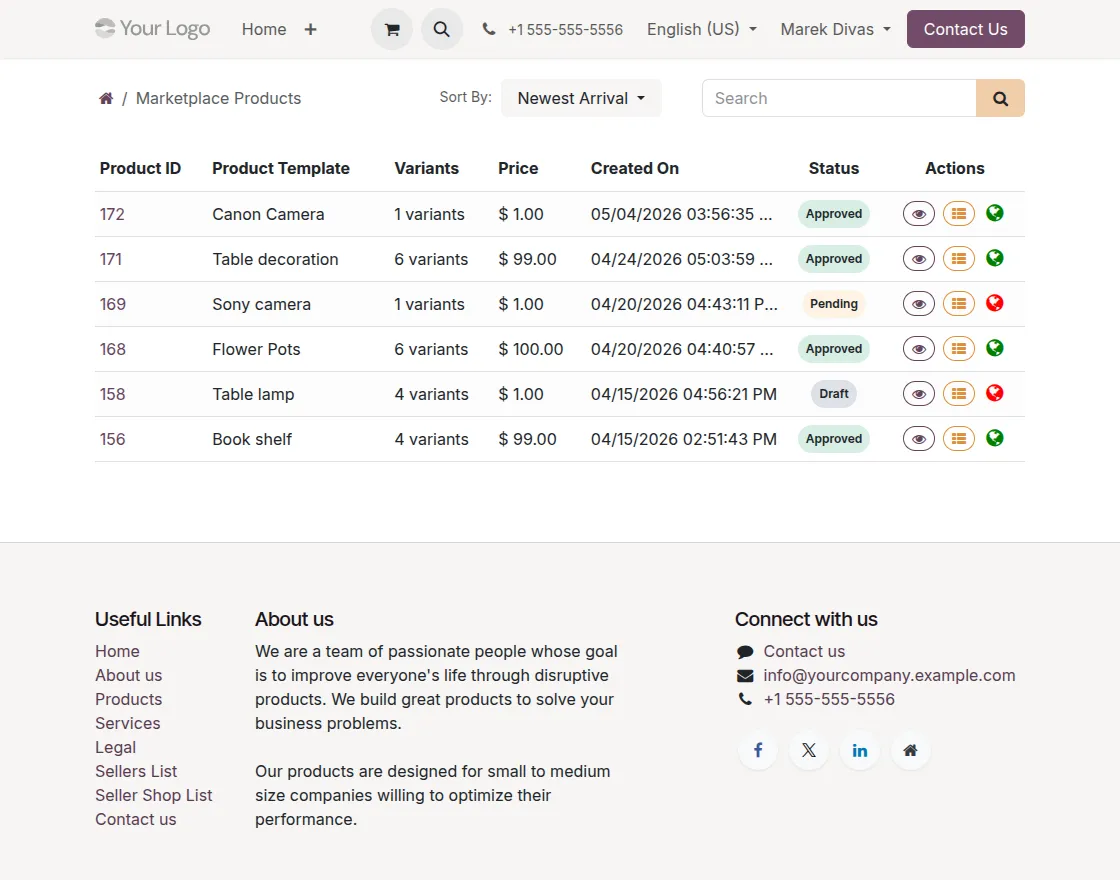
45. Go to Portal Seller Dashboard → Products to view the complete list of seller products. This section displays the product name, quantity, price, status, and last updated details.
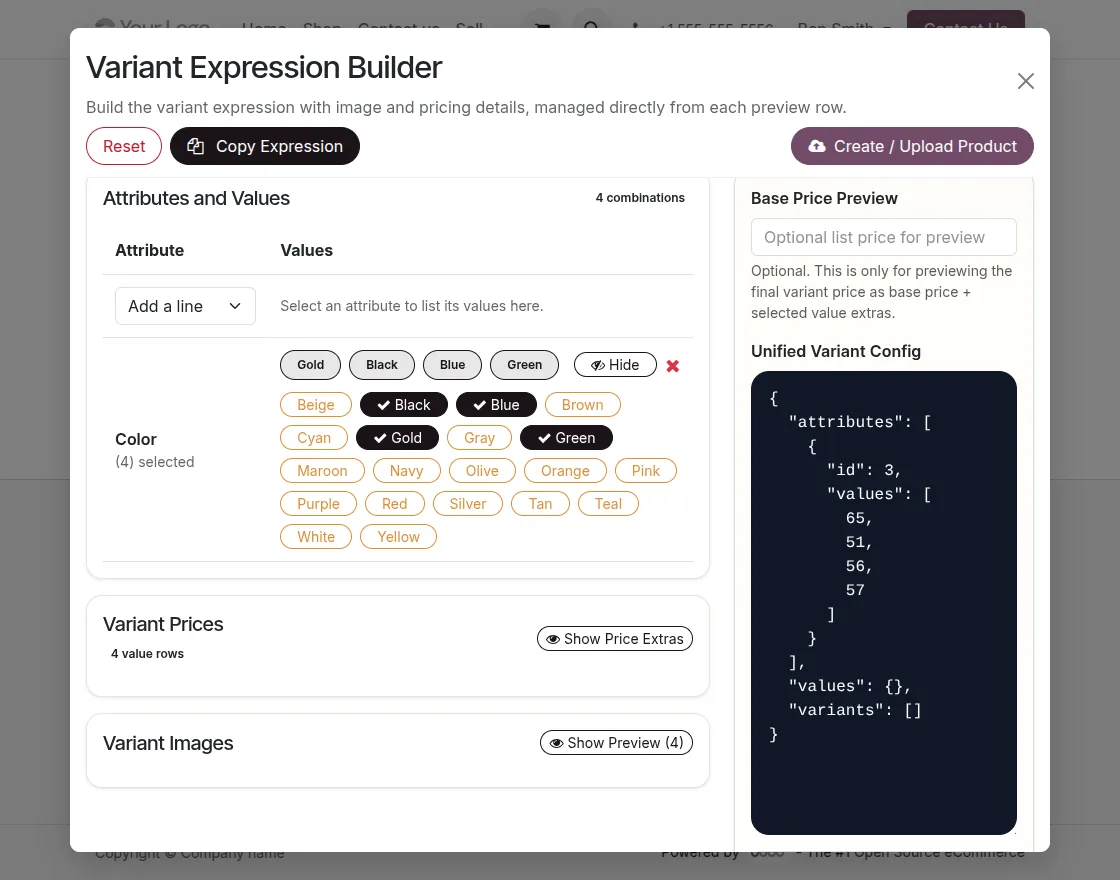
46. Go to Portal Seller Dashboard → Upload Bulk Products → Click on Upload Products, then click on Generate Variant Expression Builder to create product variants.
After that, select attributes and values to generate variant combinations. Set price extras and images for specific combinations.
Click Copy Expression, then paste the copied JSON into the variant_config column of the product CSV.
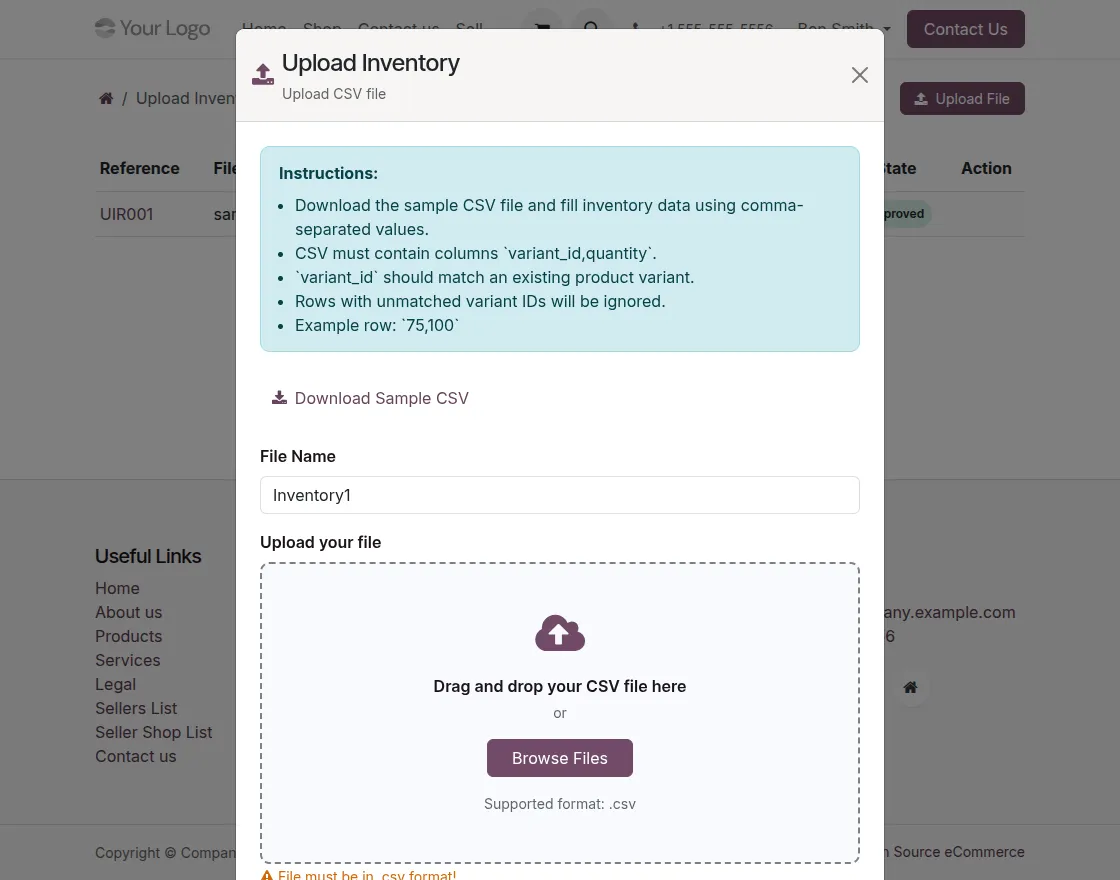
47. Go to Portal Seller Dashboard → Upload Bulk Inventory to update inventory in bulk. Download the sample CSV file, fill in the variant_id and quantity columns, and upload the CSV file.
Then, the request is sent to the admin for approval, and approved updates are applied to product stock.
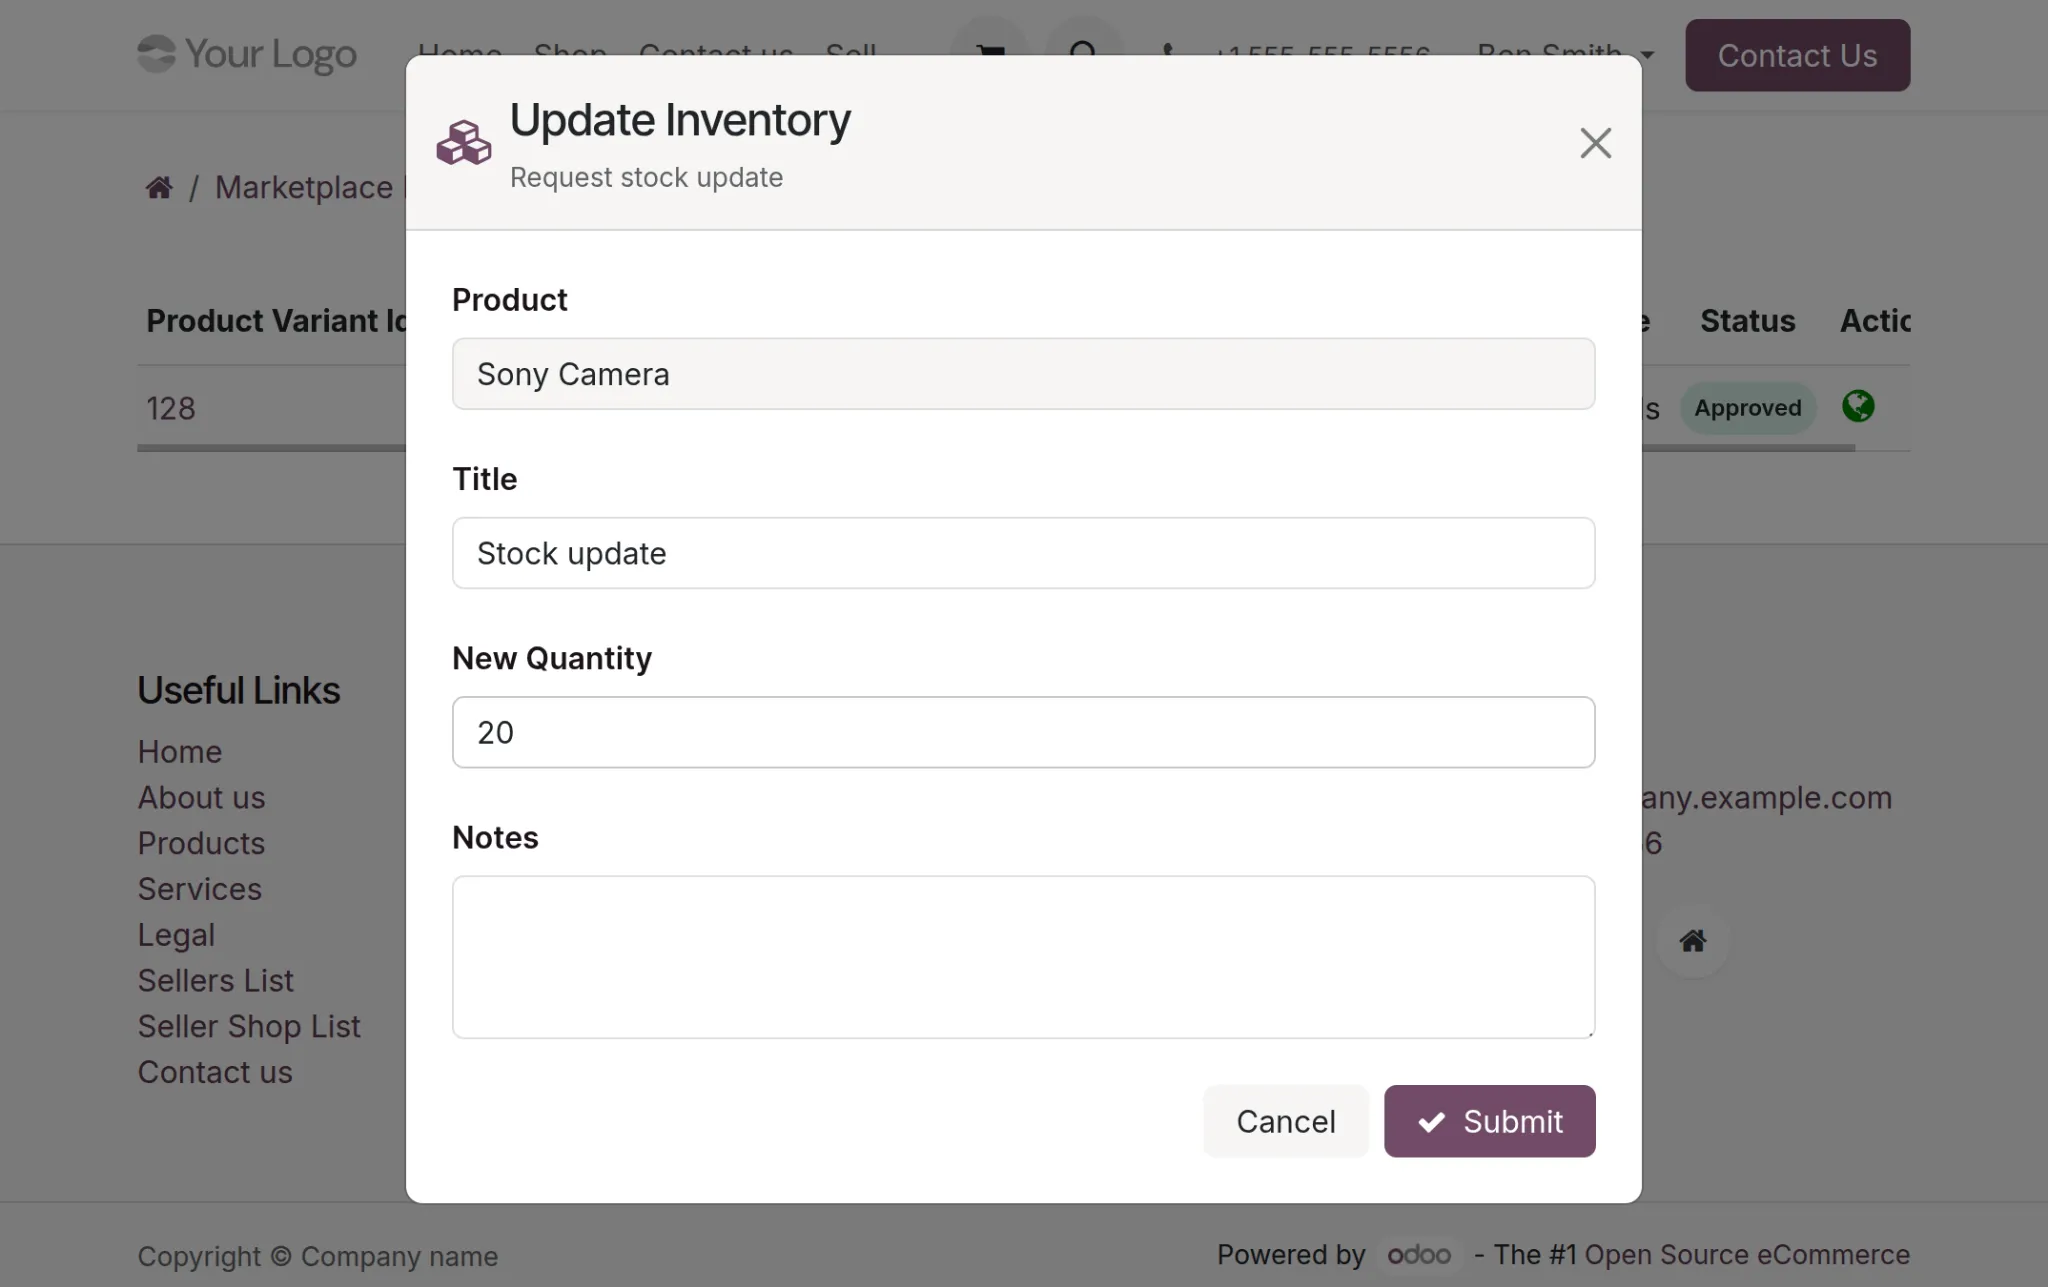
48. To update inventory for a single product, then, go to Products → click on the particular product → click on Variants to view all product variants.
Click the Inventory Update icon under the Actions column to create an inventory update request for that variant.
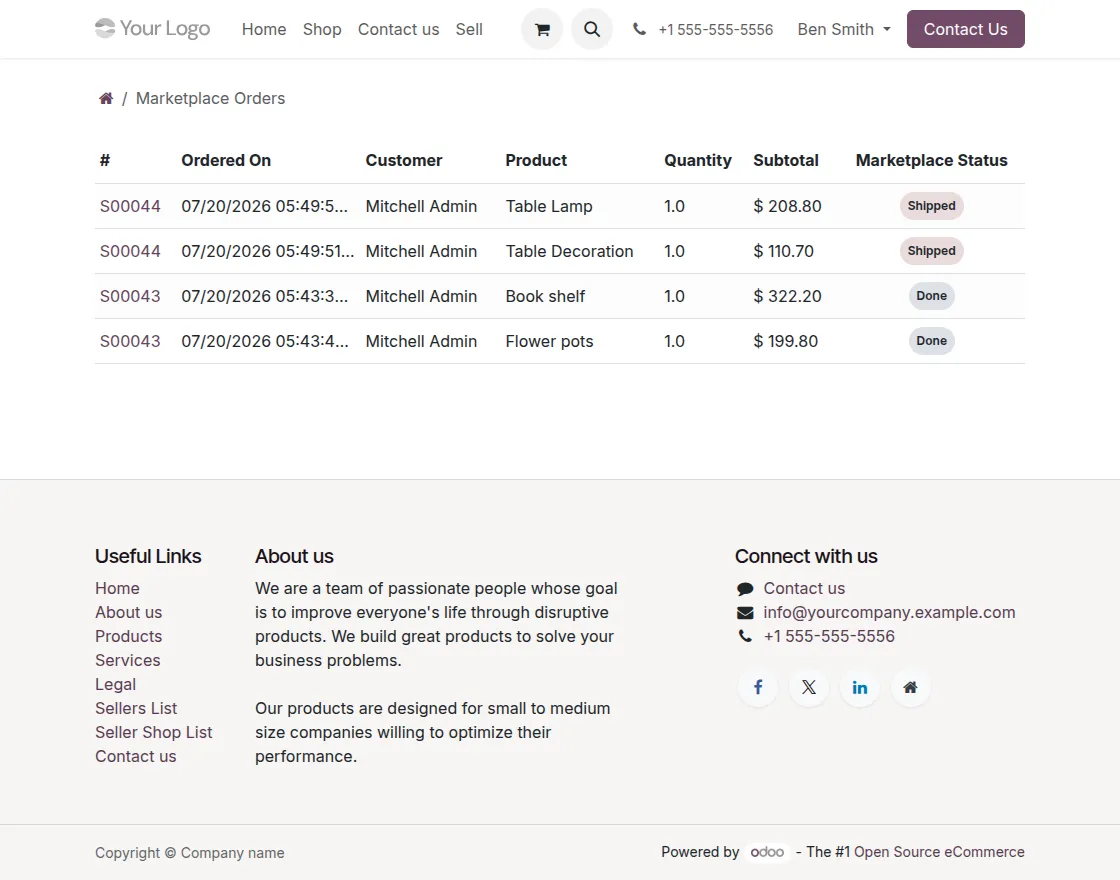
49. Go to Portal Seller Dashboard → Orders to view all orders for seller products.
Each order displays key details such as order reference, customer name, quantity, subtotal, and status, helping sellers track fulfillment progress easily.
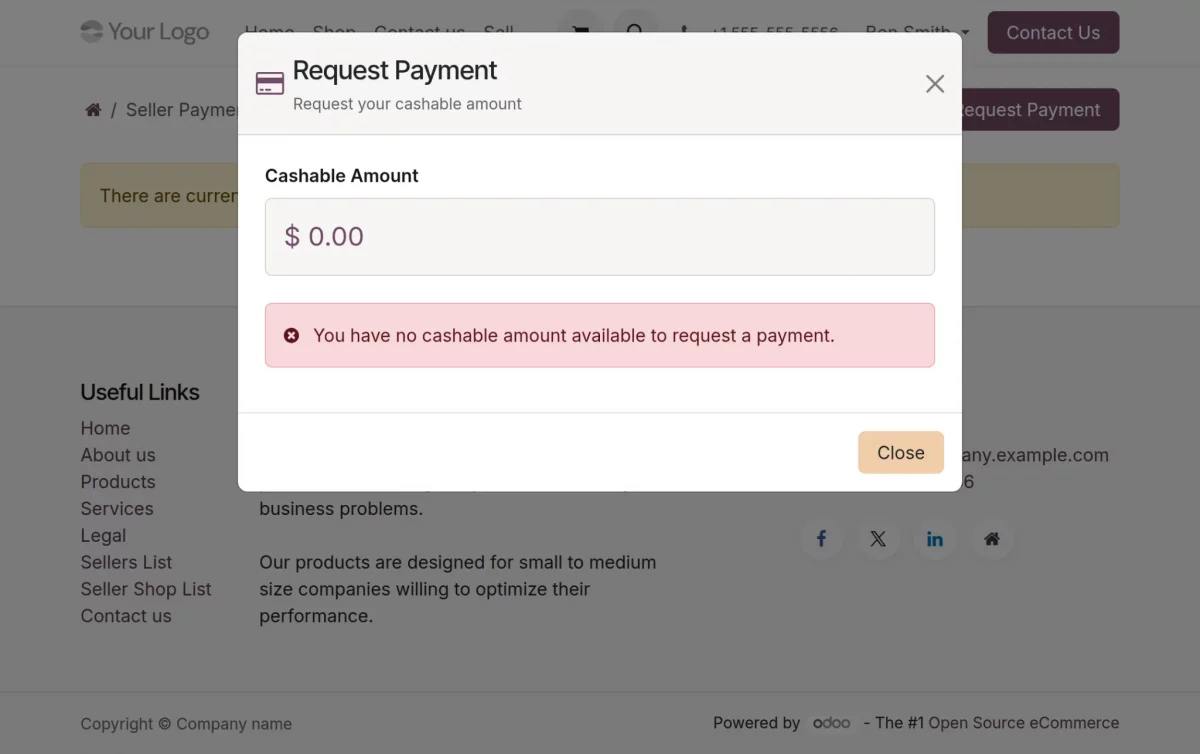
50. Go to Portal Seller Dashboard → Seller Payments to view payment history and previous requests.
Click Request Payment, select the credit payment, add a description if required, and submit the request to the admin for processing.
Website View
51. Firstly, Login as a customer in the marketplace; here, you can see the seller’s name on the product page.
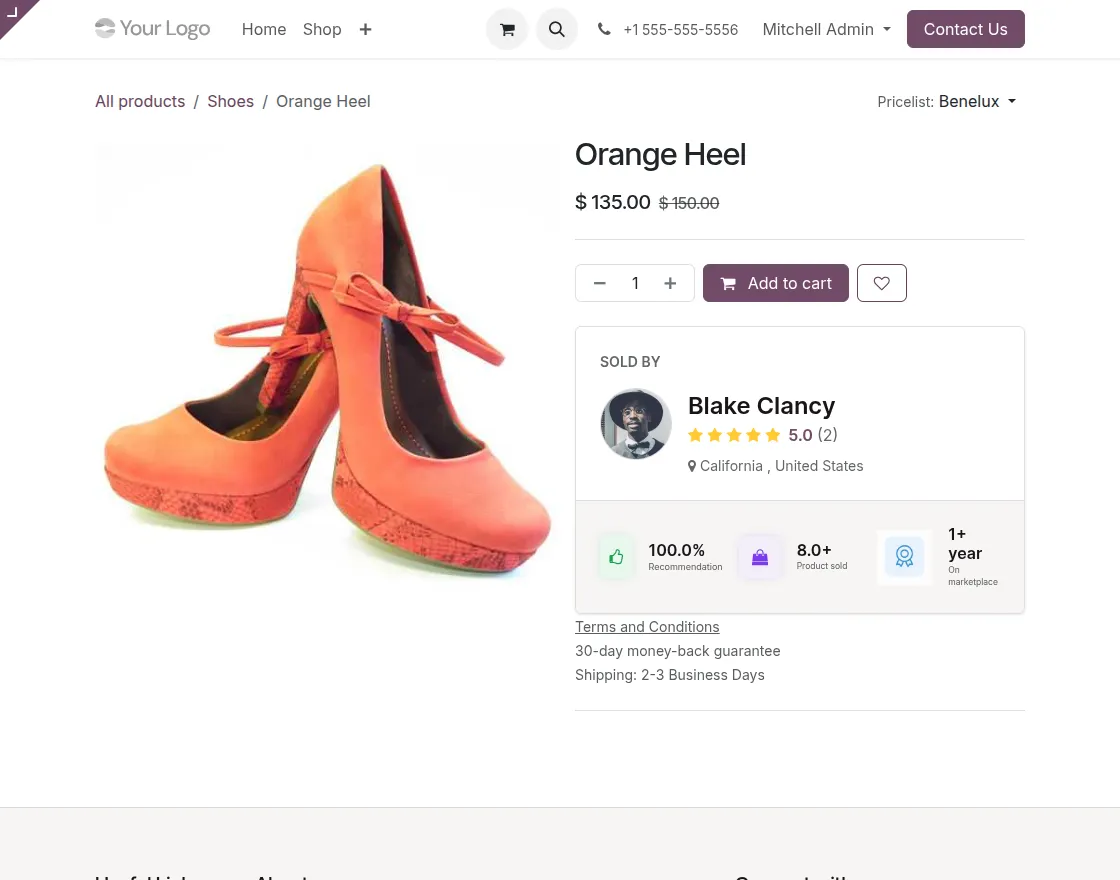
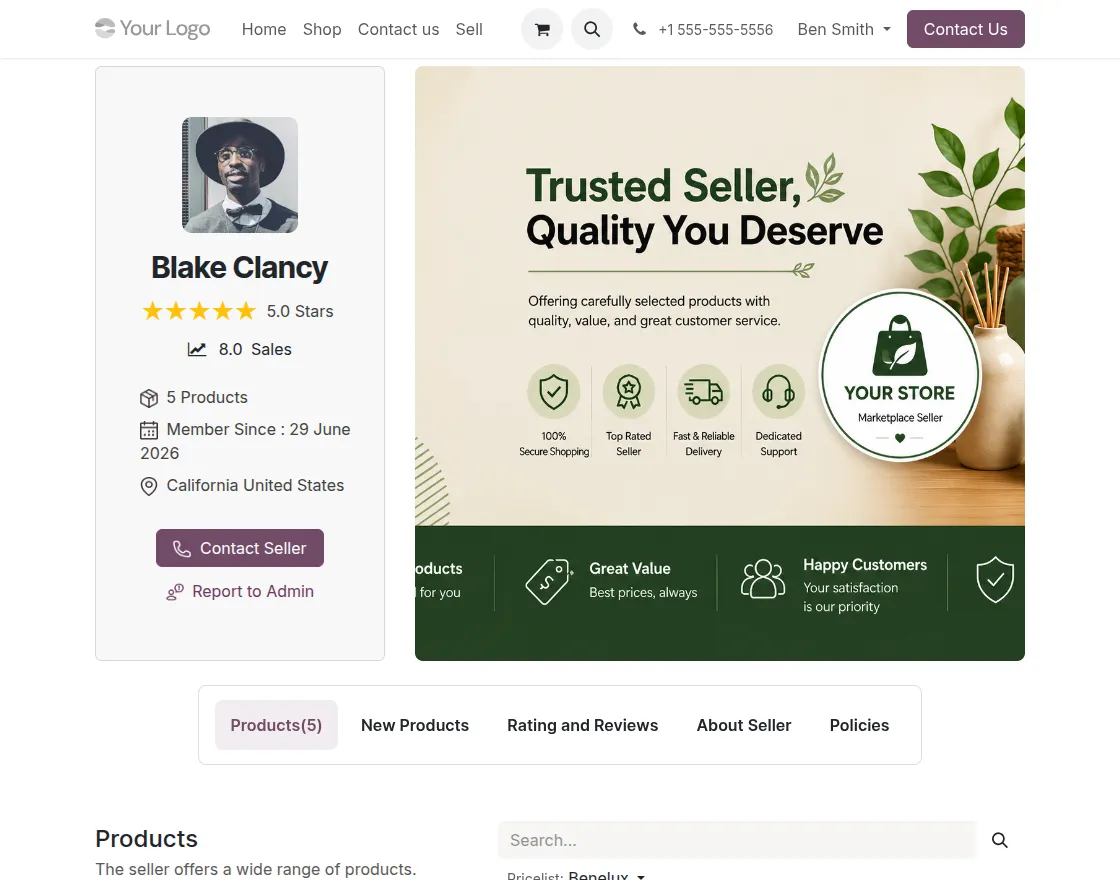
51. After that, click on the Seller’s name to view his/her details.
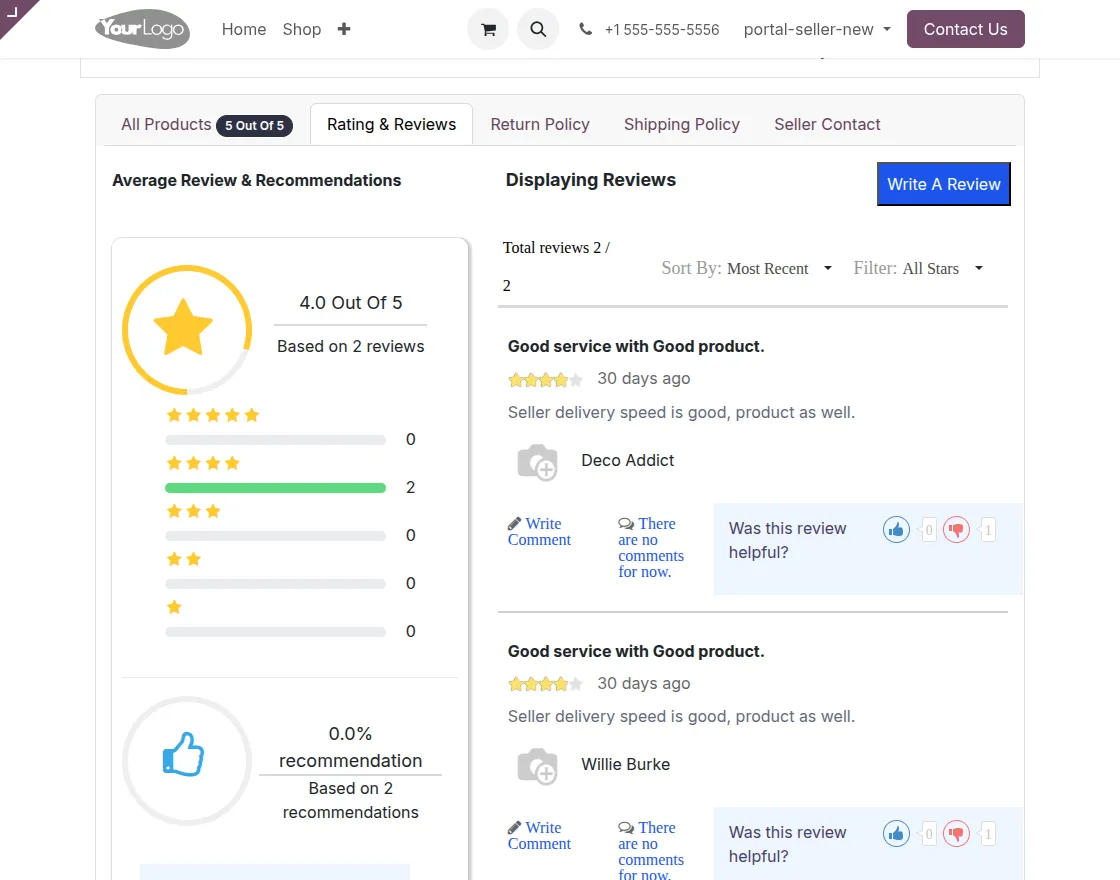
52. Lastly, Click on the “Rating & Reviews” tab to write a review for the seller and see others’ reviews.
Need Help?
Hope you find the guide helpful! Please feel free to share your feedback in the comments below.
If you still have any issues/queries regarding the same, please raise a ticket at the UV Desk.
I hope this helps. In case of any further queries, contact us at our support mail.
Thanks for paying attention!!
Current Product Version - 1.4.6
Supported Framework Version - Odoo 17, 18, 19


I am interested in purchasing your Odoo Multi Vendor Marketplace module. However, I’m having trouble with the Live Preview. When I access the demo link, I cannot find the login credentials to test the features, and the storefront appears to be empty.
Could you please provide the login details or a guided link so I can experience the workflow from both the Admin and Seller perspectives? This will greatly help me in my purchasing decision.
Thank you!