Introduction
Magento 2 Multi Vendor Page Builder extension allows vendors to manage and update their profile page using the front-end view and a drag-and-drop method.
This module allows vendors to change the profile page in the page builder by dragging and dropping items.
Vendors may view all of the changes from the customer’s perspective and save all of the changes in the page builder by clicking the save button.
Note: This is an add-on of Webkul’s Magento 2 Multi Vendor extension, so you need to install Marketplace modules first.
Check a brief overview of the plugin –
Features
- The layout of the Profile Page can be changed.
- Update the content of the Profile Page on a separate page.
- Change the order of the blocks by dragging and dropping them.
- View all of the changes in real-time from the perspective of a customer.
- Option to reset the seller profile layout to default.
- The extension is compatible with the Hyva Theme.
Install Extension from Webkul Store
The installation is quite simple just like the standard Magento 2 extensions.
#1 Download Module
To begin, log in to Webkul Store, navigate to My Account>My Purchased Products, validate, and then download and extract the contents of this zip folder onto your system.
#2 Upload Folder
After extracting the module zip, go to src>app and put the app folder into the Magento 2 root directory on the server, as shown below:

#3 Run Commands
You must perform the following commands in the Magento 2 root directory after uploading the module folder:
php bin/magento setup:upgrade
php bin/magento setup:di:compile
php bin/magento setup:static-content:deploy
php bin/magento indexer:reindex
php bin/magento cache:flush
Install Extension from Magento Marketplace
Please follow the steps below or go to this link if you purchased this extension through the Magento Marketplace.
#1 Get Access Keys
To obtain access keys, go to My Profile in Magento Marketplace and select Access Keys from the My Products section.

After that, go to Magento 2 and copy both the Public Key and Private Key Access Keys. These access keys will be required for authentication in the following steps.

If you haven’t already done so, you’ll need to create access keys click Create A New Access Key, enter any name and click OK.

#2 Update composer.json File
To find out the component name and version number, go to My Profile>My Purchases in your Magento Marketplace account, then find this extension to see the details.
Please notice that the graphic below is only an example; each extension will have its own component name and version.

After that, go to your Magento project directory and make the following changes to your composer.json file.
composer require <component-name>:<version>
To install version 5.0.0 of this extension, for example, perform the following command:
composer require webkul/module-marketplace-pagebuilder:5.0.0
#3 Enter Access Keys
Now you must enter the Access Keys that you received in the first step #1 Obtaining Access Keys. Wait for Composer to finish updating your project’s dependencies, then double-check for issues.
#4 Run Command
Run the following commands to complete the installation :
php bin/magento setup:upgrade
php bin/magento setup:di:compile
php bin/magento setup:static-content:deploy
php bin/magento indexer:reindex
php bin/magento cache:flush
Multi-Lingual Setup
For Multilingual support, please navigate through Store > Configuration->General > Locale Options and select your desired language from the locale option.
php bin/magento indexer:reindex
Language Translation
Navigate through the module language to translate it src/app/code/Webkul/MarketplacePageBuilder/i18n and make changes to the en US.csv file
After that, rename the CSV to “en SA.csv” and translate all right-side material in Arabic after the comma. Save the CSV after you’ve finished editing it.
Then upload it to the path src/app/code/Webkul/MarketplacePageBuilder/i18n Magento 2 is installed on the server here.
The Arabic language is used to translate the module. It works with both RTL and LTR languages.

The user can edit the CSV like the image below.

Admin Configuration
On successfully installing the module, the admin has to log in first.
The admin can set the configurations for the Magento 2 Marketplace Page Builder Extension by navigating through Stores > Configuration > Marketplace Page Builder.
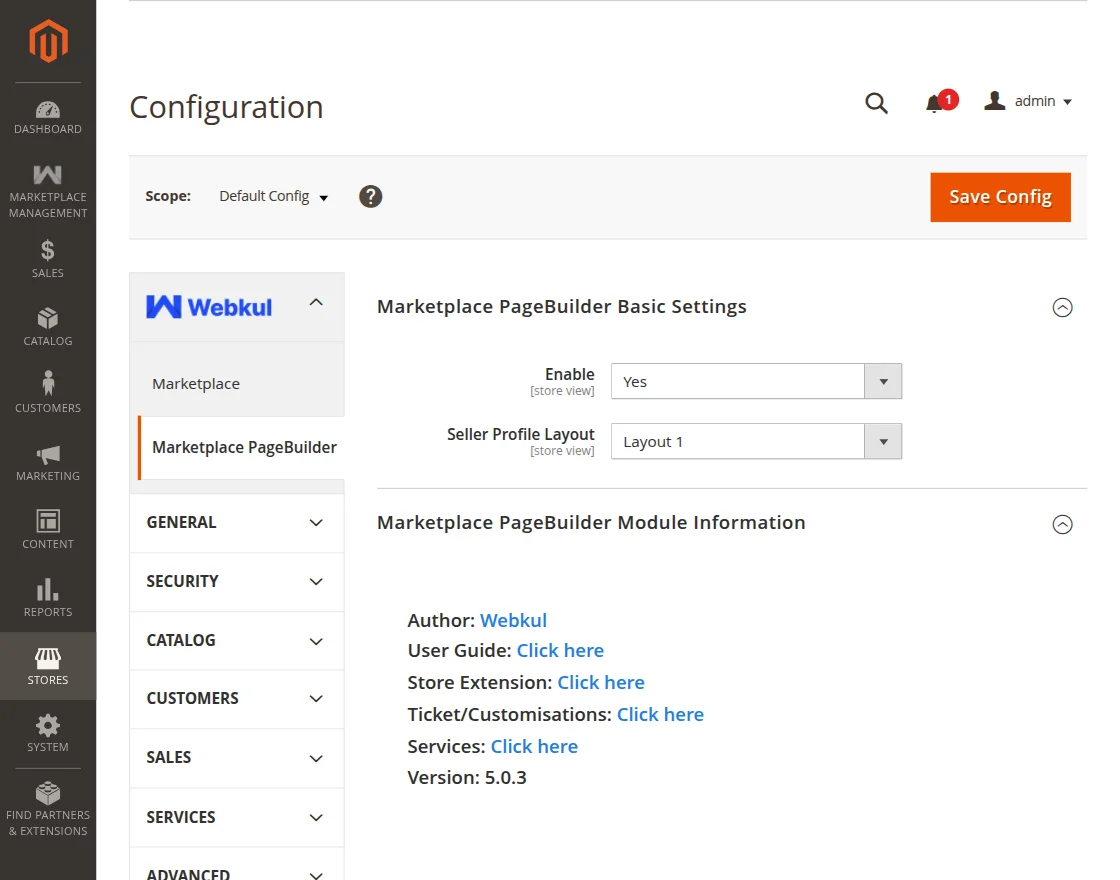
Here, the admin has two settings –
Enable – The admin can set this field as ‘Yes’ or ‘No’ to enable or disable the extension.
Seller Profile Layout – The admin can choose the layout that can be used by the seller to reset the seller profile layout to default.
Note: Only Layout 1 is available that is being fetched from the Magento 2 Multi Vendor module.
Seller End Workflow
Page Builder is a set of tools that allows you to build and maintain your website without entering a single line of code.
To Edit the seller Profile, the seller needs to login into their account.
Here the seller can click on Edit Profile in Page Builder as per the below image.
When the seller clicks on Edit profile in Page Builder. The seller can change the layout of the Profile Page.
The seller can Drag for changing the order of the blocks and then can click on Save as per the below image:

The page looks like this as per the below image after clicking on Edit profile in Page Builder.

By Drag seller can drag anywhere where he/she wants to put as per the below image:

The seller can drag the About us as per the below image:

A seller can edit the description of the About Us section by clicking on Edit as per the below image:

Clicking on the top left-hand side, by using the Drop method,
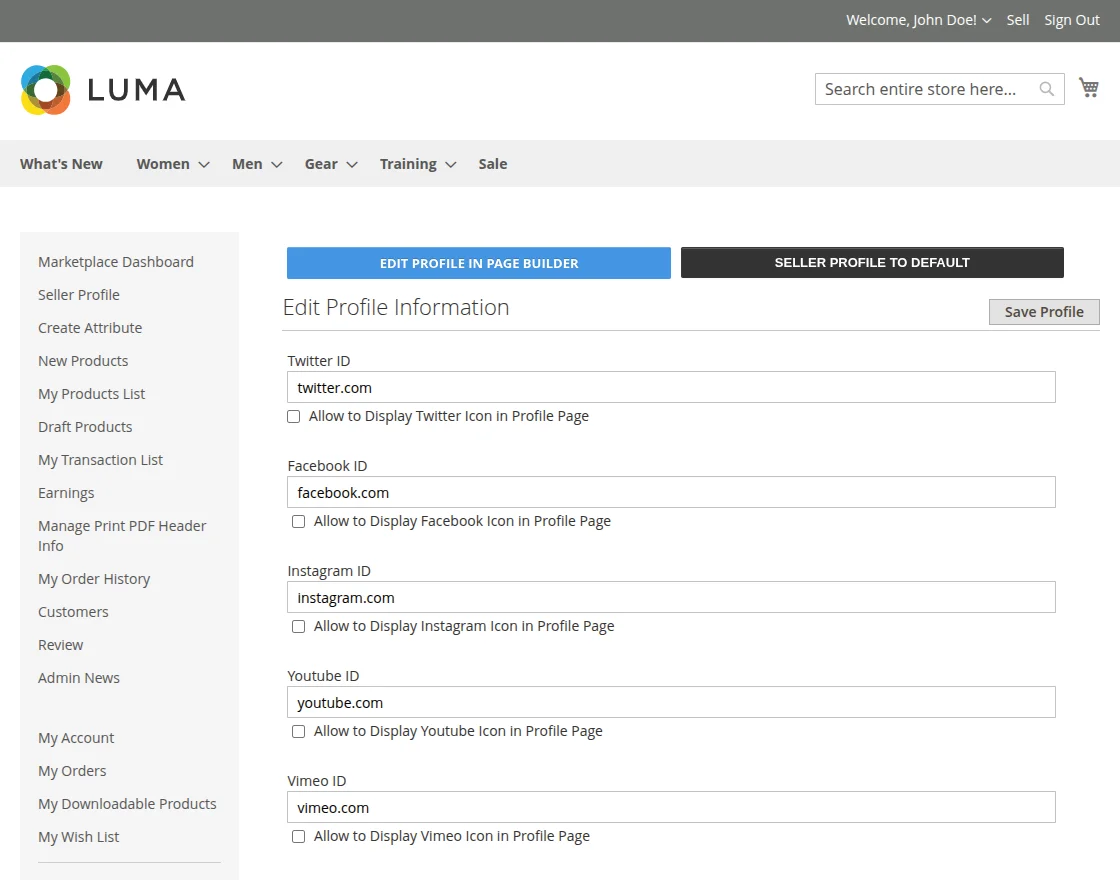
From here you can enter Twitter ID, Facebook ID, Instagram ID, Youtube ID, Vimeo ID, Pinterest ID, and Contact Number.

Also, the seller has a button available for Seller Profile To Default.
Tapping this button will reset any changes made under the Edit Profile In Page Builder section and will rearrange the sections according to layout 1.

In conclusion, that’s all for the Magento 2 (Adobe Commerce) Marketplace Page Builder Extension.
For any question/query, please raise a ticket at our Help desk system. We are more than happy to assist you with your queries.
You can also get back to us via mail at [email protected]. Explore the Adobe Commerce Cloud development services by Webkul.
You may also browse other Magento 2 marketplace addons. Also our quality Magento 2 extensions.
Current Product Version - 5.0.3
Supported Framework Version - Magento 2.0.x, 2.1.x, 2.2.x,2.3.x, 2.4.x

Be the first to comment.