Laravel eCommerce Marketplace Table Rate Shipping module allows the seller to set custom superset rates and shipping rates from their dashboard. The seller can upload the shipping information using the CSV files. That will include product weight, zip codes range, price, alphanumeric zip codes, Shipping type.
The admin can easily create supersets methods. The seller and the admin both can set the superset rate that includes price range, shipping cost, shipping method name, seller name, select superset type as – free or fixed.
This module is helpful for order confirmation, tracking number from seller and print invoice. Marketplace Table Rate Shipping module helps the seller to manage the shipping in an easy way.
Note** Laravel eCommerce Marketplace Table Rate Shipping is an add-on of Laravel Multi-Vendor Marketplace. To use this module first, you must have to install Laravel Multi-Vendor Marketplace.
Features of Laravel eCommerce Marketplace Table Rate Shipping
- Sellers/admin can add shipping rates using CSV file for table rates.
- Admin can also add shipping rates for Admin Products.
- Seller and admin both can create shipping Rates.
- Supersets are created by Admin and they are used by both Admin and Sellers.
- The admin and sellers, both can create super set rates.
- Shipping Rates will be calculated based on ZIP and the weight of the product.
- Shipping cost will be calculated as per the seller or vendor.
- The seller can confirm the order and can set the tracking ID for the order.
- Shipping rates details can be seen in the each seller profile.
- Option to export shipping CSV file from the back-end.
- If a product is not meeting shipping rates of super set rates, Default Flat Rate and Free shipping will appear.
- Ability to download Invoice.
- Marketplace Table Rate Shipping supports alphanumeric zip codes.
- Sample for shipping rates can be downloaded from the Admin and Seller end.
Installation Of Marketplace Table Rate Shipping
Step 1: Extract Package
Unzip the extension package and merge the packages folder into your project root.
Step 2: Register Service Provider
Go to: bootstrap/providers.php file and add the following line under ‘providers’
use Webkul\MarketplaceTableRateShipping\Providers\MarketplaceTableRateShippingServiceProvider;

return
[
 MarketplaceTableRateShippingServiceProvider::class,
 ]
Go to composer.json file then add the following line under ‘psr-4‘
"Webkul\\MarketplaceTableRateShipping\\":"packages/Webkul/MarketplaceTableRateShipping/src"
Next, run these commands below to complete the setup in the bagisto root directory.
composer dump-autoload
php artisan mp-table-rate-shipping:install
php artisan optimize:clear
Marketplace Table Rate Shipping – Admin Management
After the successful installation of the module, you will see the Marketplace Table Rate Shipping under Configure>>Sales>>Shipping Methods.
From the drop-down admin can find the option Marketplace Table Rate Shipping
Admin adds Configuration :
- Title: Here admin defines the title for the shipping method.
- Description: Enter the description.
- Type: Here admin selects the shipping type from the dropdown on unit basics or per order basis.
- Status: Update the module status to enable/disable.
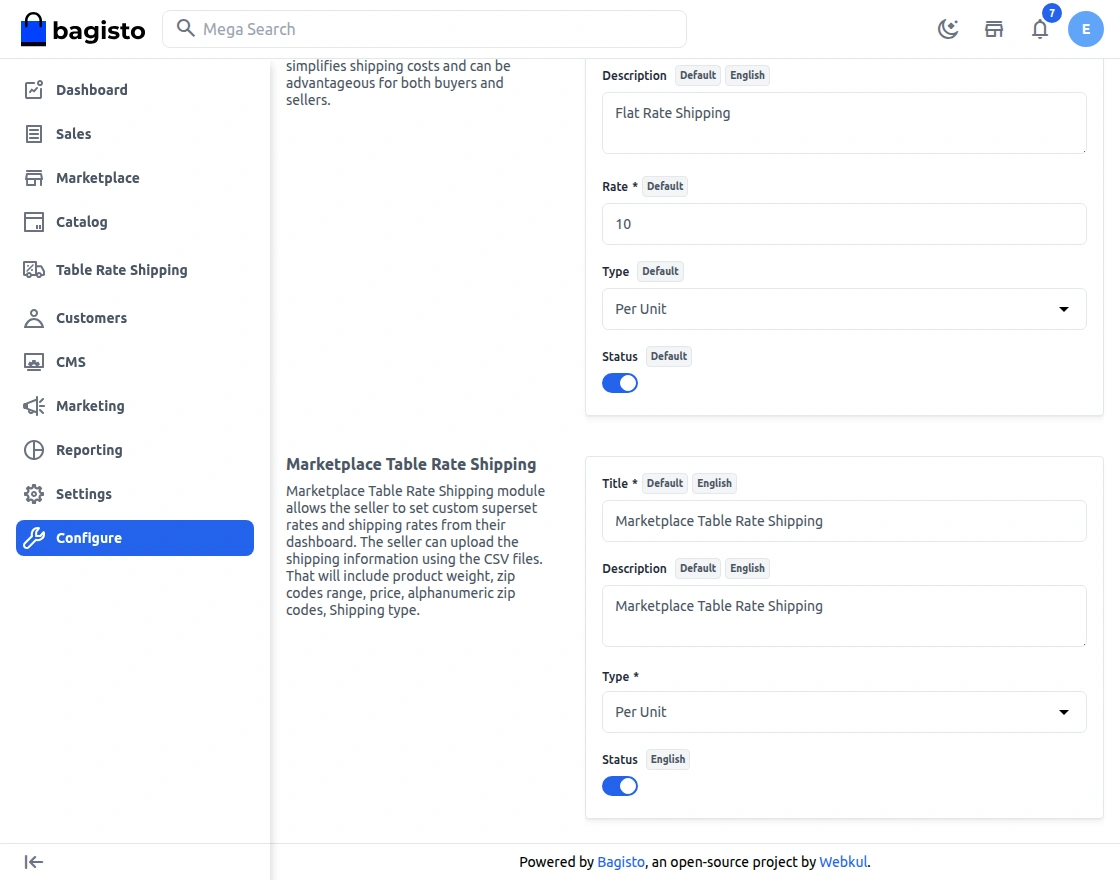
Now, the admin can manage the Table Rate shipping for marketplace sellers by navigating to Table Rate Shipping as shown in the below image.

Supersets
Under the table rate shipping, firstly the admin will add the supersets.

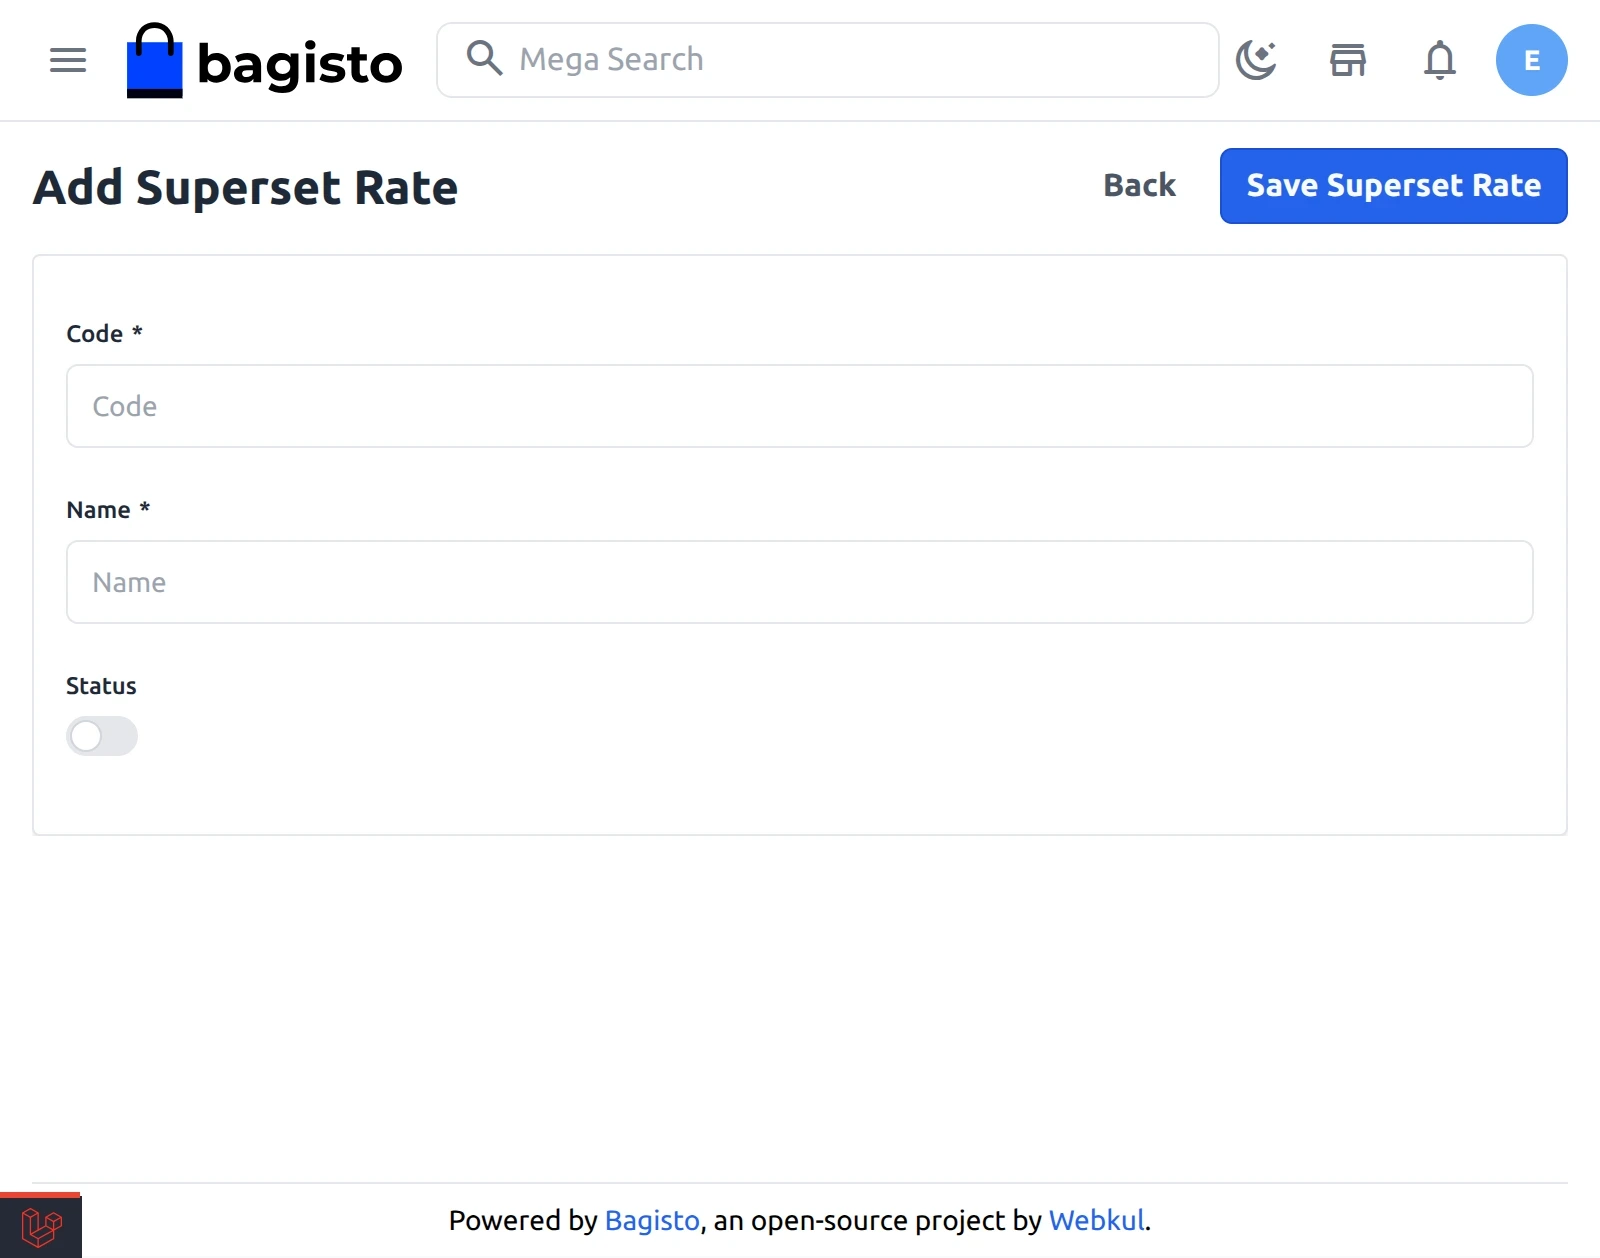
After clicking on the Add Superset button the following page will appear.
Here, the admin will set the general settings:
- Code: Here the admin will set the code of superset.
- Name: Enter the name of the superset.
- Status: Enable to active superset.
Lastly, the admin will save the superset by hitting the save superset button.

As shown in the below image the admin will find all the Supersets list here, by selecting the superset admin can easily update or delete it from the drop-down.

Superset Rate:
After successfully adding the Superset now the admin will Add the Superset Rates under the Superset Rates section.

After clicking the Add Superset Rate Button, the following page will appear.
Here the admin needs to fill in the superset rate details as follows:
- Price From – Set the minimum price of the cart to use this shipping set.
- Price To – Set the maximum price of the cart for this shipping set.
- Shipping Type – Select the Fixed option to enter the shipping price, else select the Free option to allow free shipping.
- Seller Name – Either select the seller name or the admin.
Once admin can set the superset rate they will have to add the shipping rate so they move forward to the shipping rate section under the next tab.
Shipping Rate:
As an admin, you can see all the shipping rates already set up, and you can easily add new rates by clicking the “Add Shipping Rate” option.

Bulk Import/Export: You have the option to upload multiple shipping rates at once using a CSV file. This works for both general marketplace rates and specific rates for sellers. To get started, download the sample CSV template by clicking the “Import” button.

After clicking on the Import the below pop-up will be shown. here admin can add and download a sample CSV template.

Updating Data In Sample Format
Under the below CSV the admin can easily set the shipping rate. Every field is mandatory to fill. Above grid of shipping rates will be visible as a table matrix of the CSV.

- ID: A unique identifier for each shipping rate.
- Superset_code: A code associated with the shipping service category.
- Seller_ID: The ID of the seller within the Marketplace.
- Country: The destination country for the shipping rate.
- Zip_from: Starting zip code or range.
- Zip_to: Ending zip code in a range.
- Region: Geographical region or area.
- Weight_from: Minimum weight for the shipping rate.
- Weight_to: Maximum weight for the shipping rate.
- Price: The cost of the shipping service.
- is_zip_range: Indicates if the zip code is a range (Yes/No).
- zip_code: Specific zip code (if applicable).
- Note: Country Code must be as per the official ISO-2 (alpha-2) two-letter country codes.
If the seller_id is set = empty, the admin can use this CSV file for uploading their own Table Rate Shipping. Else, if they want to upload the Table Rate Shipping CSV for any of the marketplace sellers then they will input the seller’s Id in the seller_id column in the downloaded CSV file.
Note- Shipping rates are Priority as compared to the superset rates.
Export Data: Admin can export the data that show in table by clicking on export button.
Marketplace Table Rate Shipping – Seller Management
The seller can easily find the option of Shipping Rate and Superset Rates under the Navigation bar as shown in the below image.
“Only admin can create the Superset and admin/ seller both can use the same superset which can be created by admin”.
Superset Rate
By hitting over the Superset Rates the new page will appear as shown in the below image.
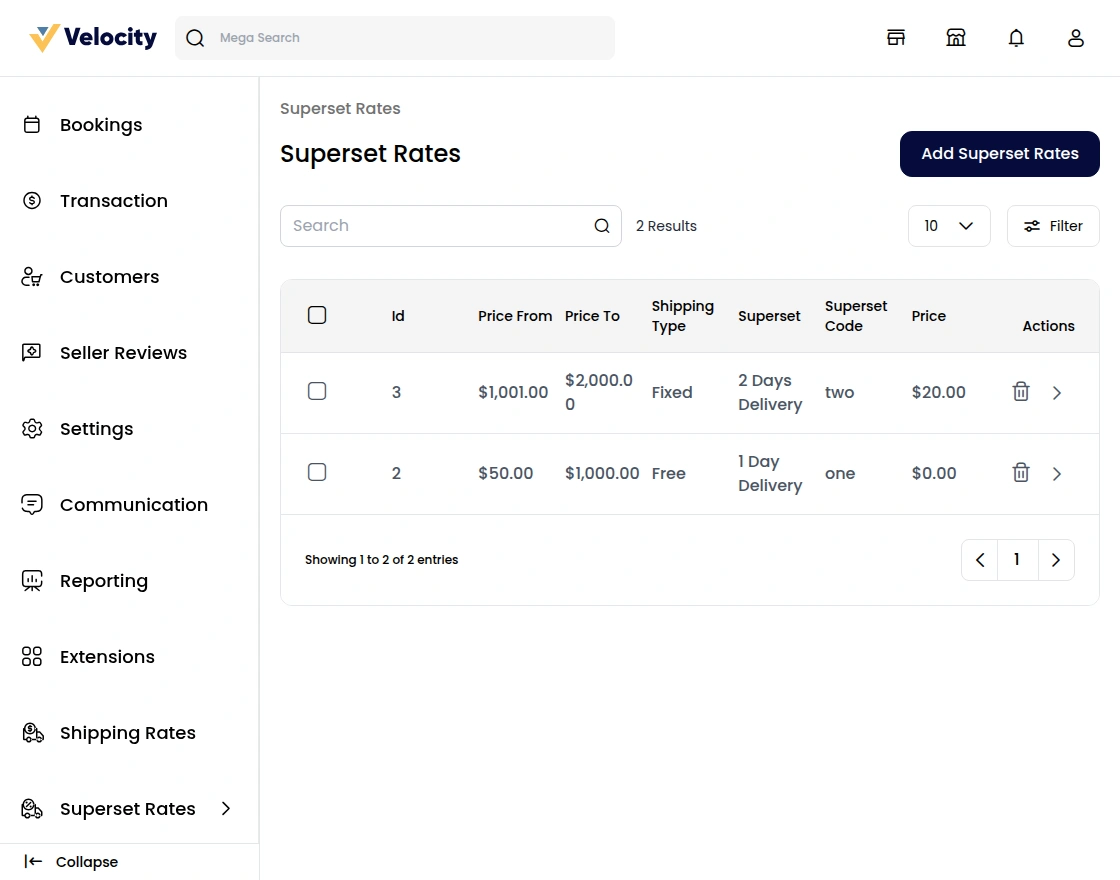
Here the seller can easily add the Superset Rate for their marketplace products.
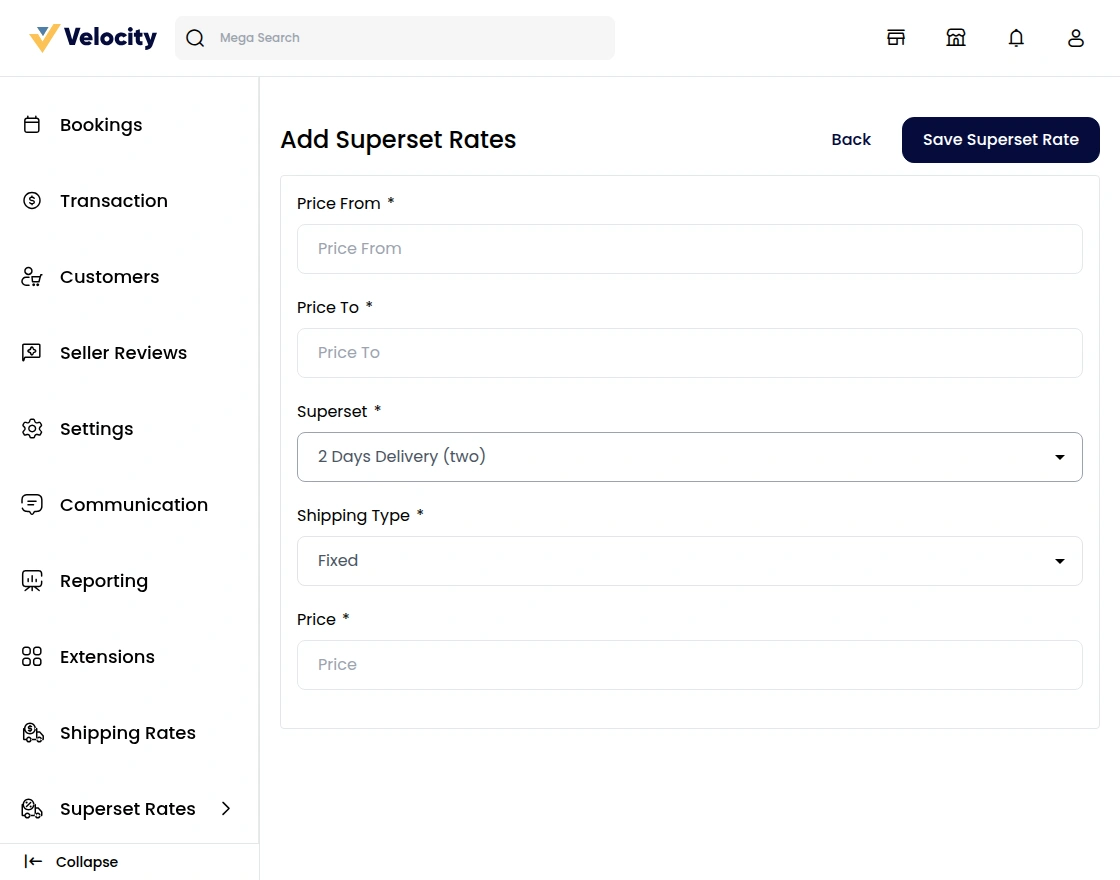
After hitting the Add Superset Rate the sellers can create their own shipping methods. A new window will appear, enter all the required shipping details then click Save Superset Rate button.
Please Note**
If multiple shipping options are available to the customer, priority will be given to the Superset Shipping Rates and then the Superset Rates. If no Shipping conditions are matched then free shipping or flat rates will appear.
Price From – Set the minimum price of the cart to use this shipping set.
Price To – Set the maximum price of the cart for this shipping set.
Superset Method – Enter the shipping method name for this set.
Shipping Type – Select Fixed option to enter the shipping price, else select Free option to disable shipping price.
Price – Set the shipping method price for this set.
Instance for Super Set Rates
Case 1 -> If Seller1 and Seller Both Products lie in Super Set Rates.
Seller 1 Product – Price Range Satisfied
Seller 2Product – Price Range Satisfied
Case 2 -> If Seller 1 lies in Superset Rates and Seller 2 does not.
Seller 1 Product – Price Range Satisfied
Seller 2 Product – Price Range Not Satisfied.
Result – Seller 1 Superset rates will appear.
Case 3 -> If Seller 2 lies in Superset Rates and Seller 1 does not.
Seller 1 Product – Price Range Not Satisfied
Seller 2 Product – Price Range Satisfied.
Result – Seller 2 Superset rates will appear.
Case 4 -> If both Seller’s Does not lie in Super Set Rates.
Seller 1 Product – Price Range Not Satisfied.
Seller 2 Product – Price Range Not Satisfied.
Result – Default Free Shipping and Flat Rate Shipping will appear.
Vendor Shipping Rates
By clicking on Shipping Rates the new page will appear as shown in the below image.
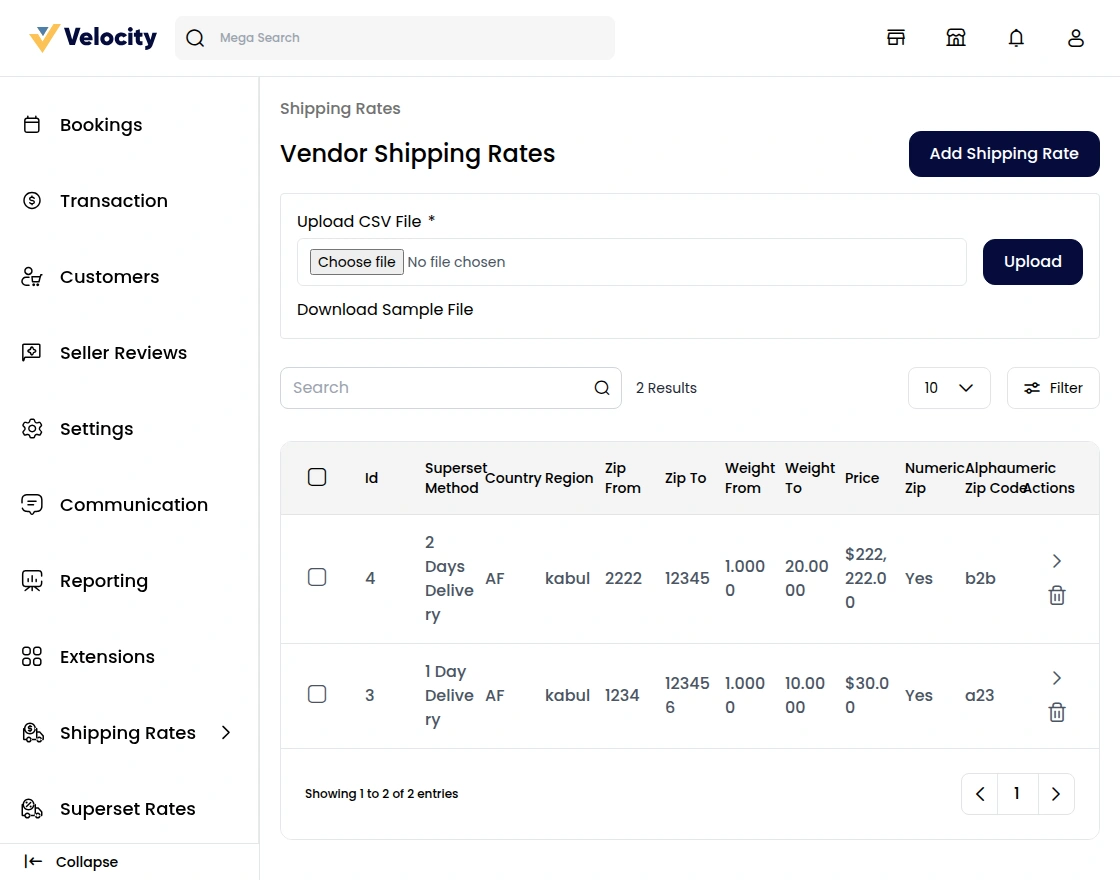
Here the seller can easily download or upload the CSV or can add the shipping rate for their products.

CSV Format
The CSV format for Laravel eCommerce Table Rate Shipping is provided in the below image. All the fields in the CSV file are mandatory to fill.

- Country: The destination country for the shipping rate.
- Region: Geographical region or area.
- Zip_from: Starting zip code or range.
- Zip_to: Ending zip code in a range.
- Price: The cost of the shipping service.
- Weight_from: Minimum weight for the shipping rate.
- Weight_to: Maximum weight for the shipping rate.
- Superset_code: A code associated with the shipping service category.
Note: Country Code must be as per the official ISO-2 (alpha-2) two-letter country codes.
IS Zip Range (Numeric Zip Code) – Select “Yes” if want to enter the numeric zip code else select “No” to enter the alphanumeric zip code.
Zip Code(Alphanumeric Zip Code) – Enter the alphanumeric zip code if the “Numeric Zip Code” option is set to “No”. Else enter the numeric zip code if the “Numeric Zip Code” option is set to “Yes”.
Add Shipping Rate
The seller can also add the shipping rate by clicking on the add shipping rate button, the next page will appear as shown in the below image.
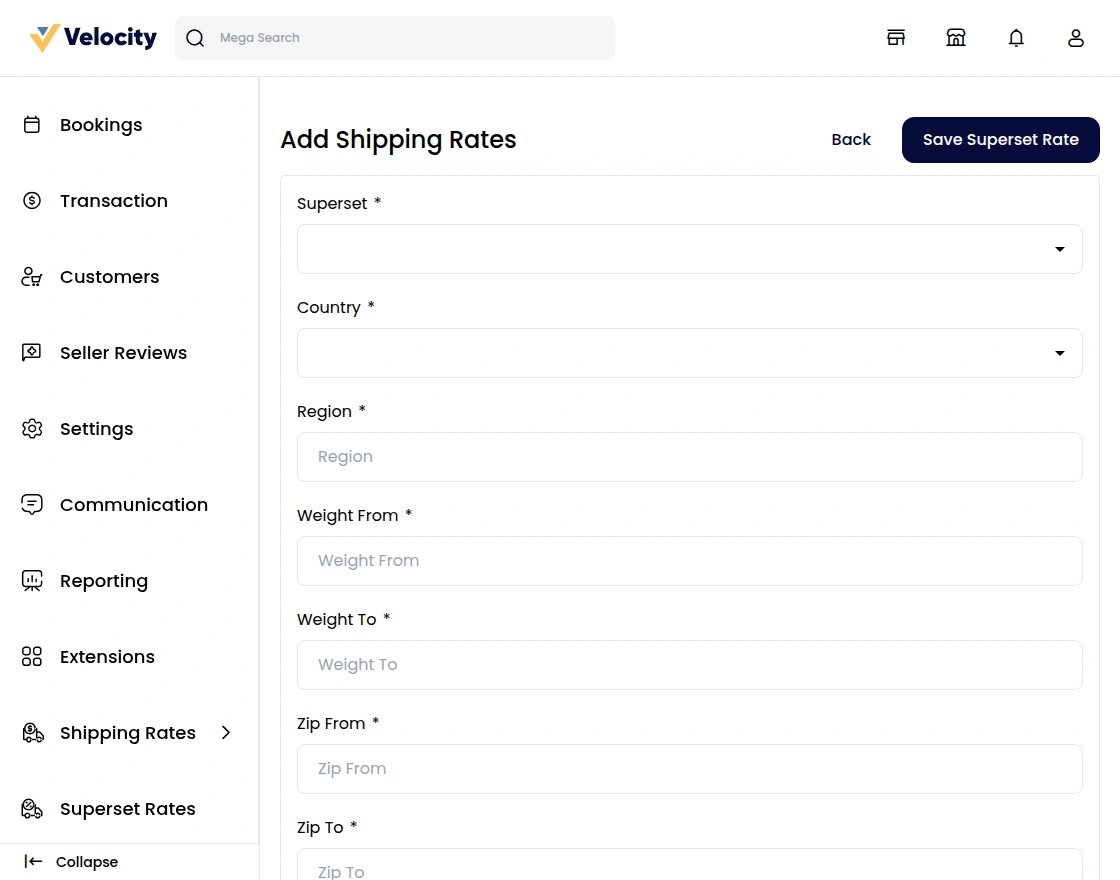
Superset Methods – Select the superset method.
Please Note: – The sellers can only use the suggested shipping method name created by the admin.
Country – Select the country from the list.
Region Code – Enter the region code of the available region.
Weight From – Set the minimum weight value to allow this shipping method.
Weight To – Set the maximum weight value for this shipping method.
Zip From – Enter the first zip code.
Zip To – Enter the last zip code.
Price – Set the cost of this shipping method.
Numeric Zip Code – Select “Yes” if want to enter the numeric zip code else select “No” to enter the alphanumeric zip code.
Alphanumeric zip code – Enter the alphanumeric zip code if “Numeric Zip Code” option is set to “No”. Else enter the numeric zip code if “Numeric Zip Code” option is set to “Yes”.
Example – You can select Numeric Zip as “Yes” if the shipping that you are providing is for a zip code range but if there is any place like Canada that supports alphanumeric zip codes (H3Z 2Y7) in this situation you can select Numeric Zip as “No” and then enter the alphanumeric zip code of the place for which you want to display the shipping.
Note: If there is only one seller product in the shopping cart, then if the conditions set by the seller like the product weight, zip code, and country match then all the Table Rate Shipping methods display at the time of checkout.
“Also if no table rate shipping condition is verified – Default Flat and Free shipping will appear”.
For Instance
For Instance Superset Shipping Rates
Note – It should be clear that for fetching shipping rates both weight and zip should be satisfied. In case any of the condition does not match Shipping rates will not appear.
Case 1 -> If Seller1 and Seller Both Products lie in Super Shipping Rates.
Seller 1 Product – Weight and Zip Range Satisfied
Seller 2 Product – Weight and Zip Range Satisfied
Result – Both The Super Set rates will be added and displayed.
Case 2 -> If Seller 1 Shipping rates lie and Seller 2 Shipping Rates do not.
Seller 1 Product – Weight and Zip Range Satisfied
Seller 2 Product – Weight and Zip Range Not Satisfied
Result – Seller 1 Shipping Rates will appear.
Case 3 -> If Seller 2 Shipping rates lie and Seller 1 Shipping Rates do not.
Seller 1 Product – Weight and Zip Range Not Satisfied
Seller 2 Product – Weight and Zip Range Satisfied
Result – Seller 2 Shipping Rates will appear.
Case 4 -> If Seller1 and Seller Both Products does not lie Super Shipping Rates.
Seller 1 Product – Weight and Zip Range Not Satisfied
Seller 2 Product – Weight and Zip Range Not Satisfied
Result – By Default Free Shipping and Flat Rate shipping will appear.
Marketplace Table Rate Shipping – Customer Order
As shown in the below image the customer will add the two products to the cart from the different seller’s.

After clicking the “Proceed To Checkout” button the customer will bring to the below page where they will see the customer will mention all required information as shown in the below image

Here, the customer will select the table rate shipping method then next will select the payment method to proceed further.

Important Note**
Note: Laravel eCommerce Marketplace Table Rate Shipping module, the shipping rate will be calculates according to the seller’s product weight and the customer’s delivery address.
Finally the customer will complete the order by clicking the Place Order button and it will show a thank you screen as below image:

Once the order has been successfully place, the customer can easily check the details of their orders under their account with the total shipping charges as shown below.

Marketplace Table Rate Shipping – Seller Order Management
If the admin sets the “Seller Can Create Invoice” option as Yes and also “Seller Can Create Shipment” option as “Yes” then the seller can manage the orders from front end.
Once the order is placed by the customer then the seller can easily check that order in their “Order List. as pending status as shown in the below image.

After clicking on the arrow Icon the seller can easily check the order information along with the shipping address, shipping method and payment method as shown in the below image.
After that, the seller will click on the Invoice Button to generate the invoice.

Here the seller creates the invoice for the customer’s order and will assign the quantity then they will click on the Create button to generate the invoice.

Once the invoice is generated successfully, now the seller will generate the shipment for the order by clicking on the Ship button.
Here the seller will provide the Carrier Title, Tracking ID and select the Product Ordered Source then the seller will click on the Create Shipment button to complete the order.

That’s all for the Laravel eCommerce Marketplace Table Rate Shipping
If you still have any concerns, feel free to raise a ticket at https://bagisto.uvdesk.com/en/
Current Product Version - v2.4.6
Supported Framework Version - Bagisto v2.4.6

Be the first to comment.