CS-Cart Headless theme provides the CS-Cart store with a headless architecture and improves its overall performance and efficiency.
It is built using a Headless eCommerce approach, using Next.js (which is based on React) for the front end. Also, It links up with CS-Cart via REST APIs.
CS-Cart Headless Development allows to separate the front end and back end of the CS-Cart eCommerce platform. So, They are independent and can be changed without impacting each other.
Note: This theme is compatible with default CS-Cart and is well integrated with CS-Cart Multi Vendor as well.
Features
- ISR, or incremental site regeneration, is utilized for product pages.
- SSG, which stands for static site generation, is applied to CMS and other static content.
- The theme incorporates Tailwind and PostCSS for styling.
- The website’s performance gets enhanced.
- WebCore vitals gets improved.
- CS-Cart version updates require minimal maintenance.
- Overall website performance receives a boost.
- Next.js enhances your website’s SEO capabilities.
- Third-party integrations are simplified through APIs.
- The combination of these technologies provides a more efficient web experience.
- The headless architecture uses REST API.
Installation
Prerequisites
- Node >= 16.0.0
- NPM >= 8.1.0 OR YARN >= 1.22.0
Manual Installation
1) Unzip the respective extension zip and then move NextJs folder into directory where you want to install it.
2) Setup the env
- Duplicate .env.template rename duplicate to .env.
- Update the values mentioned in .env file.
NO_SECRET: Set to NO_SECRET for development mode.
MODE: Set to PRODUCTION for production environment.
NEXTAUTH_SECRET: Your NextAuth.js secret for signing session tokens.
API_VERSION: The version of the API you wish to use.
NEXTAUTH_URL: The base auth URL for your NextAuth.js application.
BASE_URL: The base URL for your application.
CSCART_ENDPOINT: Endpoint_URL for CS-Cart API.
CSCART_COMPANYID: Company_ID for CS-Cart operations.
CSCLIENT_TOKEN: Authorization token for CS-Cart client API.
IMAGE_DOMAINS: Allowed image domains (e.g., flagcdn.com,other_domains).
FAVICON_ICON: Path to the fallback favicon icon (e.g., /favicon/apple-icon-144x144.png).
3) Run Following Command via terminal:
npm install OR yarn install
npm run build OR yarn build
npm run start OR yarn start
4) It will be served on 3000 port to your server for eg: localhost:3000.
Using Vercel
1) Unzip the respective extension zip and then upload NextJs folder to your Github private repository.
2) Go to Vercel (create account/login).
3) Select Add New Project.
4) Select your Repository under Import Git Repository.
5) Add Project Name.
6) Then select the Environment Variables and add the ENV variables mentioned in .env.template.
For Apache
Header set Access-Control-Allow-Origin:
- https://your-website.com/
Header set Access-Control-Allow-Headers:
- Accept, Content-Type
For Nginx
Header set Access-Control-Allow-Origin:
- https://your-website.com/
Header set Access-Control-Allow-Headers:
- Accept, Content-Type
Note: To allow all origins you can just pass _ for eg: Header set Access-Control-Allow-Origin “_” OR add_header
CS-Cart Headless Theme – Admin Configuration
Admin will go to the Dashboard and then navigate to Headless dropdown menu. From here, they can access the Headless settings. It is displayed as per below image,
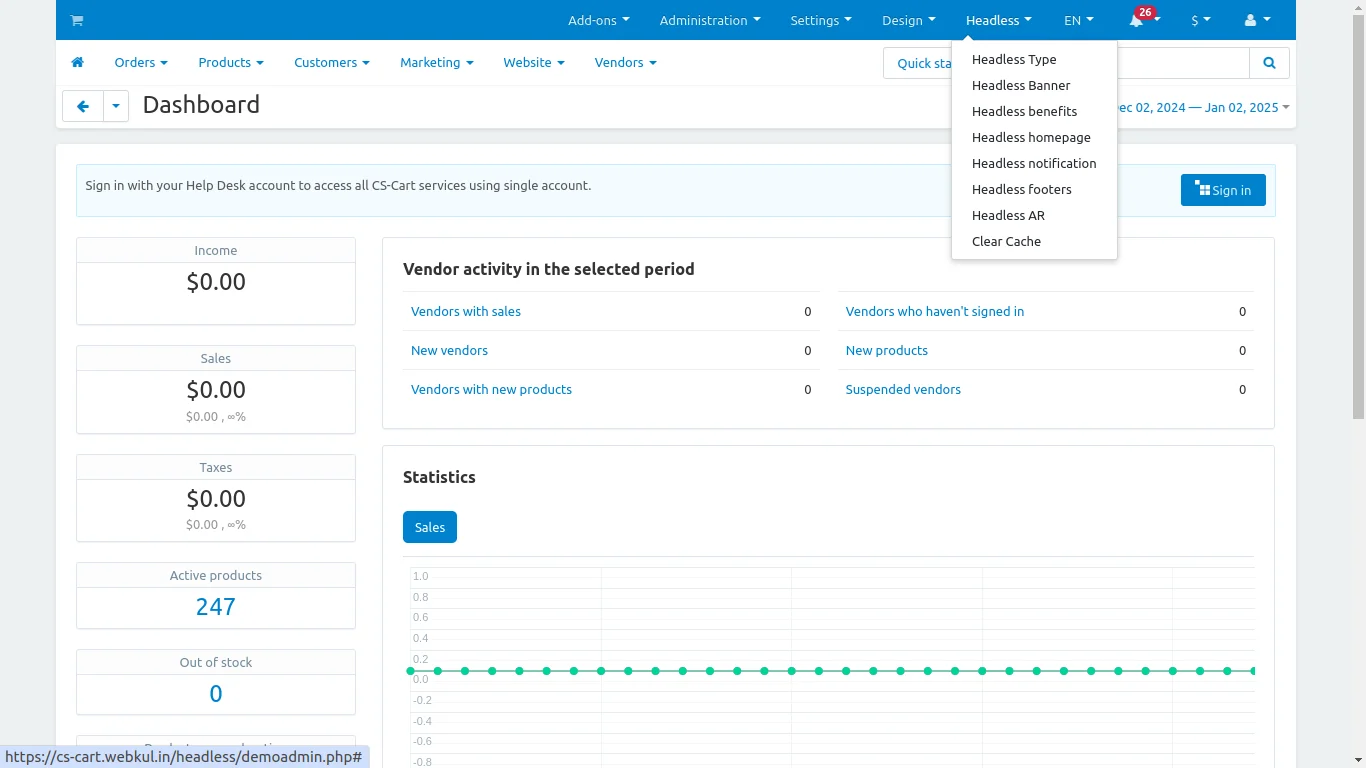
Lets check below the types of configurations available for the admin,
Headless Banner Type
Under this section, admin can set the Banners as per their requirement. Now, the full list of created Banner types will be listed on this page.

They get the option for various banner types such as which can be added by admin,
- Banner
- Carousel
- Corner Offers
- Recently Viewed Products
Headless Banner
In this type, admin can add banners with images and set their names as well. Here, the banners which they create under this section will be listed as below,

Headless Benefits
The Headless benefits section allows the admin to create and list benefits on the storefront as per choice.
They can add images to it with Local, Server or URL and also set the status as Active or Disabled whenever required.

Headless Homepage
The Headless homepage section is used by admin to add various blocks on the homepage. Here, they can add Featured Products or Explore Products through it and display them over the storefront.

Headless Notifications
The admin can set notifications based on Product, Category and Other types from the headless notification section. Also, its configuration is displayed as below,

Headless Footers
Footer of the storefront is editable for the admin. Here, they can add various footers. Also, they can set the Title, Position and Choose Page or Category.
T
Headless AR
Products can be displayed in Augmented Reality on the storefront using the CS-Cart Headless theme. Here, Admin can add products and add their respective files in .glb and .usdz format.

Clear Cache
The Clear Cache button allows the admin to clear the cache in this headless theme.

Now, let’s take a look at the Headless theme storefront below,
Seller End Workflow
CS-Cart Headless theme is compatible with CS-Cart Multi Vendor. Therefore, sellers can also register on the platform and start selling.
To register as a Seller, a user will navigate to Home>All Sellers and then tap on Become a Seller button. So, It is displayed as per the image below,

Once the user taps on the Become a Seller button, then, a registration page pops up in which they have to enter the following details,
- Company: Enter the company name
- Email: Enter the Email Address

Fill the details and then tap on Submit button to register as a seller.
Storefront
An effectively structured home page with a navigation menu, categorized sections, featured products, a dedicated area for special offers, and a banner featuring a call-to-action button.

Search Option
Visitors can swiftly and effortlessly locate products by utilizing the search feature located on the right side of the menu.

Category Page
Showcase a chosen range of products in a specific category. Use layered navigation to help visitors easily find and filter the items they are interested in.

Catalog Listing
Customers can sort products by utilizing the different filter options located in the top right corner. They can arrange the products based on any of the choices displayed in the screenshots below.

Product Page
Make your product pages stand out by including engaging descriptions, showcasing related items, and allowing customer reviews.

Also, Customers can check the Related Products as well from the below section,

Cart Page
A shopping cart icon located at the top right corner of the website. It lets customers view and check their cart whenever they want.
Additionally, it includes a Checkout button that redirects the customers to the checkout page.

Checkout Page
Users can easily access a streamlined and effective checkout page. Further, it includes options for shipping address, shipping method, billing address, payment, and order review.

Login Page
Now, from this page Customers can Login through their Email and Password from the Login Page.

Support
So, that is all for the CS-Cart Headless Theme. Also, If you require any further assistance, Please don’t hesitate to reach out to us through [email protected] or raise a ticket.
Current Product Version - 1.0.0
Supported Framework Version - CS-Cart 4.18

Be the first to comment.