Introduction
Running e-commerce also requires vivid control of every associated process i.e. from product management and delivery of products to the procurement of stock.
Prestashop is the perfect software to run an online shop.
On the other hand, you can manage your purchase and delivery operations efficiently in ERPnext by integrating your Prestashop with ERPnext using Prestashop ERPnext Connector.
Import orders from Prestashop to ERPnext, import/export product and product categories from PrestaShop to ERPnext, and vice-versa.
Manage accounting and inventory to keep a track of the entire process from order placement to delivery and invoicing.
Real-time stock update on Prestashop for changes made at ERPnext’s end.
Features
- Real-time sync of order statuses like paid, cancel, and delivered from Prestashop to ERPnext end.
- Bi-directional sync of products, their attributes, and attribute values between ERPnext and Prestashop.
- Bi-directional sync of products, their categories between ERPnext and Prestashop.
- Update Products and categories From Erpnext to Prestashop.
- Payment method, taxes, and delivery method synchronization from Prestashop to ERPnext.
- You can manually export orders and products from Prestashop to ERPnext.
- Synchronize payment methods, taxes, manage multi-currencies and orders From Prestashop to ERPnext.
- Synchronize customers and their addresses From Prestashop to ERPnext.
Installation
1) Prestashop ERPnext Connector is a package of two modules, one for Prestashop and another for ERPnext.
2) Now, extract the file you received. You will get two folders: Inside the Prestashop folder, there is a base module.
ERPnext End Installation :
- After purchasing the app from the Webkul store, you will receive a link to download the module ZIP file.
- Extract the downloaded ZIP file, and you will see a folder named ‘prestashop_erpnext_connector’.
- Set up the module in your Git repository.
- If the app is hosted on GitHub, fetch it using the command:
bench get-app --branch main https://github.com/your_account/prestashop_erpnext_connector.git
- (Replace “main” with your branch name and replace the “HTTPs URL” with your HTTPS clone URL.)
- Install the app on your site using the command:
bench --site <your-site_name> install-app prestashop_erpnext_connector
- Finally, run the “bench migrate” command to complete the installation.
Prestashop End Installation :
a.) To install the module on Prestashop, go to “Module Manager” in the ‘Modules’ menu
b.) Click on the ‘Upload a module’ icon in the top right corner.
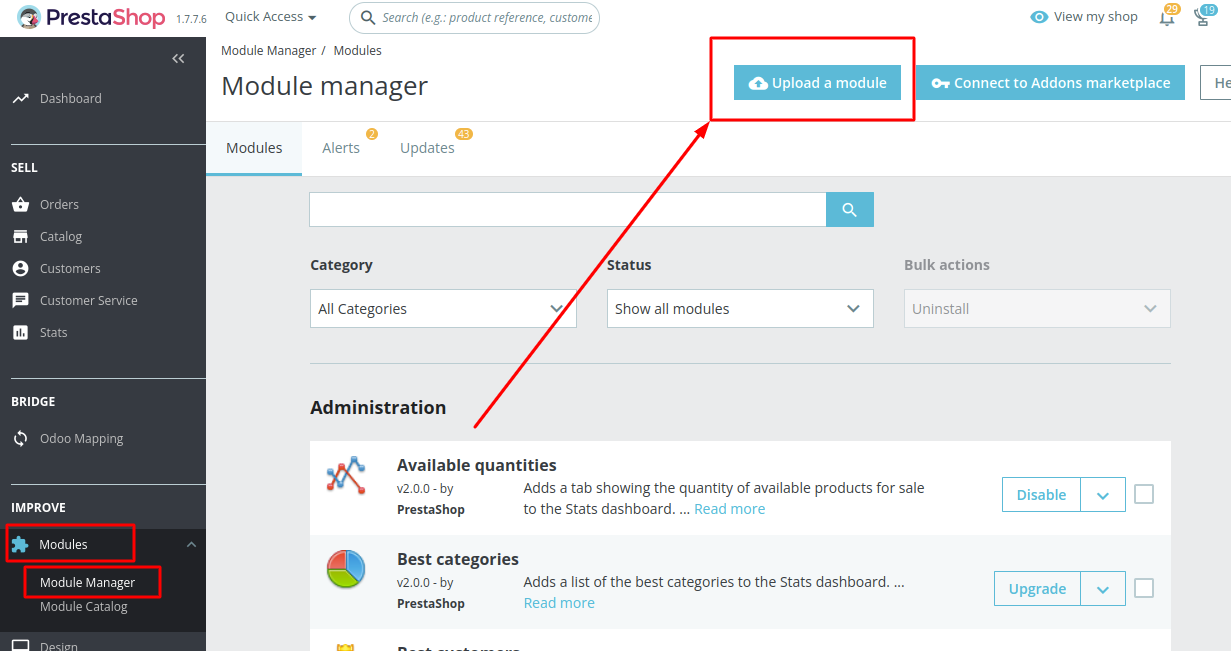
c.) Upload the ‘prestashop’ module that needs to be installed at the PrestaShop end.
d.) Once uploaded, then it will be installed automatically.
Configuration :
Note to remember:
1) Firstly, you need to configure at ERPnext end followed by configuration in Prestashop end.
2) Please remember that while testing the Prestashop Connection, ERPnext connection should be active.
You can also edit the synchronization configuration in Prestashop ERPnext Connector as per your business requirements.
You can follow the steps mentioned below to generate the API name and password
To configure the module go to the ‘ERPnext Mapping’ menu and click on ‘ERPnext Configuration’. Fill in the required fields and click on the Save button to save settings.

Points To Take Into Consideration
If you are managing your complete data at ERPnext end only then follow below-mentioned steps:
- Synchronize all attributes from ERPnext to Prestashop
- After that, sync all categories’ from ERPnext to Prestashop and Vice Versa
- Now, you can synchronize all products from ERPnext to Prestashop. (If there is any product in Prestashop End with Same SKU as ERPnext then also there will be no duplicity.)
If you are managing your data at Prestashop end only then follow below-mentioned steps:
- Synchronize all Categories from Prestashop to ERPnext
- Now, sync all products from Prestashop to ERPnext (If there is any product in ERPnext End with Same SKU as Prestashop then also there will be no duplicity. But in the case of Multi Variant Product, the module will also check the combination(attributes) of the products of both ends. If both combinations are same then it will map the same product.)
- All the related customers, products, currency, delivery methods, payment methods and taxes will be automatically synced with the synchronization of the respective orders.
- To make the process faster, you need to synchronize order-related data before order synchronization
- In case, there are same payment methods, delivery methods and taxes at both ends then you need to map them manually before order synchronization. In case, it is not followed then ERPnext throws an error.
Whenmanaging your data at both ends then follow below-mentioned steps:
- Firstly, you can synchronize all the attribute from Prestashop to ERPnext; after that, you can synchronize all attributes from ERPnext to Prestashop.
- You can synchronize all the categories from Prestashop to ERPnext as well as vice versa
- You can synchronize all products from ERPnext to Prestashop; it will map the products with the same SKU at both ends along with the synchronization. Hence, it will not create duplicity if products have the same SKU.
- Combination of Variants should be the same at both ends for the synchronization of same configurable products to avoid duplicity
- You can manually map taxes, payment methods, shipping methods and currency from Prestashop, if presented at both ends.
In case there are any changes in existing shipping as well as billing address which are already mapped then it will not be updated at ERPnext end.
Workflow :
Category Synchronization: To synchronize Categories from ERPnext to Prestashop, click on ‘Synchronize Categories’ Button
Select the action to export or update the data. After that click on the ‘Synchronize Now’ button; here, you can see the message of category synchronization.
In the Prestashop End, Click on ‘Product’s Category’ Menu which is available under ‘ERPnext Mapping’ tab. Here, click on ‘Synchronize’ button to export categories from Prestashop to ERPnext.
Product Synchronization: In the Prestashop End, Click on ‘All Products/Combinations’ Menu which is available under ‘ERPnext Mapping’ tab. Here, click on ‘Synchronize’ button to export products from Prestashop to ERPnext.

Customer Synchronization: In the Prestashop End, Click on ‘Customer’ Menu which is available under ‘ERPnext Mapping’ tab. Here, click on ‘Synchronize’ button to export Customer from Prestashop to ERPnext.

Delivery Method Synchronization: In the Prestashop End, Click on ‘Carrier’ Menu which is available under ‘ERPnext Mapping’ tab. Here, click on ‘Synchronize’ button to export Delivery Method from Prestashop to ERPnext.

Payment Method Synchronization: In the Prestashop End, Click on ‘Payment Method’ Menu which is available under ‘ERPnext Mapping’ tab. Here, click on ‘Synchronize’ button to export Payment Method from Prestashop to ERPnext.

Tax Rates Synchronization: In the Prestashop End, Click on ‘Taxes’ Menu which is available under ‘ERPnext Mapping’ tab. Here, click on ‘Synchronize’ button to export taxes from Prestashop to ERPnext.

Manual Synchronization: In Prestashop End, Click on ‘Manual Product Export to ERPnext Menu available under ‘ERPnext Mapping’ tab.
Here, select the products which you want to synchronize from Prestashop to ERPnext.
Then, click on the Bulk Action button; after that, select Exported to ERPnext option to export product from Prestashop to ERPnext.

Order Synchronization: In the Prestashop End, Click on ‘Orders’ Menu which is available under ‘Sell’ tab. Here, select the orders which you want to synchronize from Prestashop to ERPnext.
Then, click on the Bulk Action button; after that, select Synchronize to ERPnext option to export orders from Prestashop to ERPnext.

Real-Time Synchronization: There is real-time synchronization from Prestashop to ERPnext for order and order status.
You can also notice Real-Time Synchronization From ERPnext to Prestashop for product stock and order status.
Manual Mapping
Product Mapping in Prestashop ERPnext Connector: At Prestashop end, click on the ERPnext Mapping tab to reach ‘All Products/Combinations’ menu.
Here, click on ‘Manual Mapping’ Button. Now, select Prestashop as well as Products/Combinations and save the item.

Note: Currently, you can manually map simple products only because multi variants have their own combinations. Hence, manual mapping for multi variants can cause mis-match.
Tax Rates Mapping in Prestashop ERPnext Connector: At Prestashop end, click on the ERPnext Mapping tab to reach ‘Taxes’ menu. Here, click on ‘Manual Mapping’ Button. Now, select the Prestashop as well as Taxes and save the item.

Delivery Methods Mapping: At Prestashop end, click on the ERPnext Mapping tab to reach ‘Carriers’ menu. Here, click on ‘Manual Mapping’ Button. Now, select the Prestashop as well as Delivery Methods and save the item.
Payment Method Mapping: At Prestashop end, click on the ERPnext Mapping tab to reach ‘Payment Methods’ menu. Here, click on ‘Manual Mapping’ Button.
Now, select the Prestashop as well as Payment Methods and save the item.

Odoo Bridge For Prestashop User Guides
Need help
Hope you find the guide helpful! Please feel free to share your feedback in the comments below.
If you still have any issues/queries regarding the Prestashop ERPnext Connector module then please raise a ticket at https://webkul.uvdesk.com/en/customer/create-ticket/
For any doubt contact us at [email protected].
Thanks for paying attention!!
🙂 😊

Be the first to comment.