Payment gateways are very essential for an eCommerce website. Thus to serve the customers from the Caribbean, we are here with the Prestashop WiPay Payment Gateway module.
WiPay is an online Caribbean payment processing company that serves the Caribbean. The eCommerce websites from the Caribbean can use this payment mode to accept payment from their customers.
After installing the module, you can allow your customers to pay via credit card. The payment method provides peer to peer transfer & click to pay invoices for the Caribbean eCommerce websites.
Features of the Prestashop WiPay Payment Gateway module
- A new payment method becomes available for the customers.
- Choose to use the module either in test mode or live mode.
- 3-D secure payment gateway.
- Customers can use their credit card to make the payment via WiPay.
- Select the country code for the country in which your account is registered.
- Either collect payment gateway charges from your customers or pay yourself.
- Also, choose to split the payment gateway charges in half with customers.
- View all the WiPay transactions in a separate tab at the admin’s end.
- The name of the payment gateway used to pay for the order is also available on the admin order details page.
Currencies supported by Prestashop WiPay Payment Gateway module
The WiPay Payment supports only the following currency. The customers using these currencies can only pay for the order using the WiPay Payment gateway.
- TTD (Trinidad & Tobago Dollar)
- USD (United States Dollar)
- JMD (Jamaican Dollar)
How to install the Prestashop WiPay Payment Gateway module
- Firstly, go to the module manager in back office and click on ‘upload a module’.
- After that, drag and drop the module file or select the file from the system.
- In this way, the module installation will be successful.


How to generate the API keys
In order to get the API keys, you will need a verified WiPay business account. Sign up here to create a WiPay business account.
After verification, you can create the API keys for WiPay.
Firstly navigate to your WiPay account dashboard. After that, go to the “Developer” section of your profile by clicking on your account’s profile picture at the top-right corner of the screen.
In case, if you do not see the “developer” option, then make sure that you have a verified business account.
After clicking on the “developer” option, you will land on the new page. Here, you will need to enter your website URL to get your API keys.
Now, click the “submit” button after adding the URL. On submitting the website URL, API keys will appear on your screen.
How to configure the module
After getting the API keys, you can now proceed to configure the module. In the configuration settings, there are various options. Let’s discuss them all one by one.
- Payment Mode: Select whether you want to use this module in test or live mode.
- WiPay Account ID: Enter the account ID of your WiPay business account.
- API Key: Enter the API key that you generated on the WiPay website.
- Country Code: Select the country code for the country in which your account is registered.
- Fee Structure: Select the entity who will bear the payment gateway charges.
The module allows you to select the following options under fee structure. Let’s understand their significance one by one.
- Customer Pay: This means that your customer will pay the payment gateway charges.
- Merchant Absorb: On selecting this option, merchant(admin) will pay the payment gateway charges.
- Split: In this case, admin will pay the half & customer will also pay the half of the payment gateway charges.

So, this was all about the process to configure the module.
How a customer will pay using WiPay Payment Gateway
After configuring the module successfully, customers will get the option to pay using WiPay Payment.


Now, as you can see a new option i.e., Pay by WiPay Payment Gateway is now available to the customers.


On the WiPay payment page, a customer needs to enter the credit card details in order to proceed. You might notice that the amount is different from the checkout page.
This is because of the payment gateway charges. Currently, as per the configuration settings, a customer will bear the extra payment gateway charges.
So, the amount on the WiPay Payment page is different from what the customer saw on the checkout page.
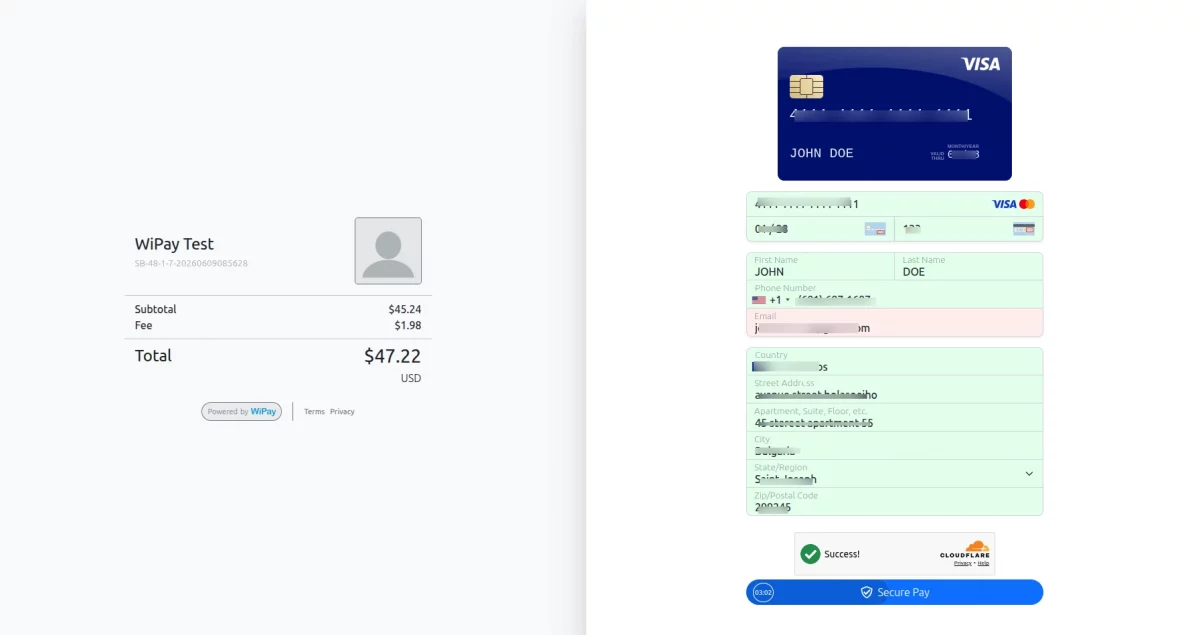
After the payment is successful, the order will confirm.

Transaction details at the admin end
After the installation of the module, a new tab named “WiPay Transactions” adds to the admin dashboard.

Under the “WiPay Transactions” tab, the list of all the WiPay transactions is available. On clicking the “view” button available against each entry, you will land on the admin order details page.

The name of the payment gateway used to pay for the order is also available on the admin order details page.

So, this was all about Prestashop WiPay Payment Gateway Module. I hope this document will help you in checking the functionality of the module in a better way.
Also, do let us know about your views in the comments.
In case, if you are also looking for a payment module that supports recurring payments. Then, do check out the blog.
Support
For any kind of technical assistance or query, please raise a ticket at http://webkul.uvdesk.com or send us a mail at [email protected]
Also, please explore our PrestaShop development services & vast range of featureful PrestaShop Addons.
Current Product Version - 4.1.1
Supported Framework Version - 9.x.x, 8.x.x, 1.7.x.x

Be the first to comment.