WooCommerce WhatsApp Order Notifications plugin allows store managers to communicate order updates to customers via WhatsApp. It automatically sends notifications after a purchase is made.
Additionally, the admin can manually send updates from the order editing page.
This plugin integrates seamlessly with WooCommerce, ensuring that order details are well-organized and easy to understand.
It enhances customer communication by providing fast updates. Its user-friendly design makes managing notifications a breeze.
If you’re looking for a way to add a custom prefix or suffix to your orders, check out the Custom Order Prefix for WordPress WooCommerce.
Note – This plugin is compatible with WooCommerce’s latest High-Performance Order Storage (HPOS) and Cart and Checkout block.
Explore our WooCommerce Product Import – XML CSV URLs plugin that enables the admin to easily import products from XML & CSV URLs or through FTP/SFTP details.
Features
- When customers place an order, they get automatic alerts via WhatsApp.
- The store admin has the option to send updates manually from the order editing section.
- A message is also sent through WhatsApp whenever there is a change in the order status.
- It integrates seamlessly with WooCommerce to provide order information.
- Enhances customer engagement by delivering quick updates through WhatsApp.
- Features an easy-to-use interface for handling and sending notifications.
- The admin can opt to send order updates to their own WhatsApp number as well.
Installation of WooCommerce WhatsApp Order Notifications
The user will get a zip file that he has to upload in the “Add New” menu option in the WordPress admin panel.
For this, log in to WordPress Admin Panel, then under the Dashboard, hover your mouse over the “Plugins” menu option, which brings out a Sub-Men,u then select the “Add New” option.
After this, you will see an option on the top of your page that is “Upload Plugin”, now click the option to upload the zip file.

By clicking on the “Upload Plugin” option, below that, you will see a button “Choose File” Click on the button to browse for the zip file as per the snapshot below.

After browsing the file, click the “Install Now” button to install the plugin as per the snapshot.

Now when the plugin is installed correctly, you will see the success message & an option to activate the plugin.
Henceforth now, click on “Activate Plugin” to activate the installed plugin.

After the plugin is installed successfully, it is visible under the Installed Plugins section as per the image below.

Module Translation
To learn how to translate the module, you can click here.
Activate and Update Plugin
Check how to activate your WooCommerce plugin through the purchase code and get updates on Webkul Modules directly on the Plugins page.
Sign Up – Twilio Account
To initiate your Twilio account. Now, enter your name and email address. Then set your password and click on the start your free trial button.

Therefore, as a result, a verification email is sent to your registered email ID.

Now, verify your email by clicking on the Confirm your Email link enclosed within the mail.

Further, you need to enter your Phone number and click on the Send verification Code button.

Now, enter the verification code received on the number provided by you, and then click on the submit button.

A pop-up will appear on your screen Click on the Confirm button to activate your sandbox account as shown below.

Log in – Twilio Account
Moreover, if you already have a Twilio account, first enter your email ID to log in, and then click the Continue button to proceed.

WhatsApp Configuration
To send and receive messages from the Sandbox to the Application, the store admin needs to go to the following web page.
Note – To receive OTP on your WhatsApp, you need to send join “Content visible in the Twilio Account” from your WhatsApp number to the Twilio number (+14155238886).
- Send a message to the Twilio number with the verification code to join.

You will receive a confirmation text on your device as shown below.

- Send a One-Way Message.
- Two-Way Messaging.

Now, as we can check, Twilio has received the message

Now, click on the Next Step button

Message service Credentials
Firstly, the admin needs to log in to the Twilio account.
The admin will navigate to Messaging -> Services in the Twilio side panel.

In the Services dashboard, the admin will click on Create Messaging Services.

Then, the admin will enter the name for the friendly messaging services.
After this, the admin will click on Create Messaging Services

In the next step, the admin will add Senders to Service by clicking on Add Senders.

Then, the admin will select the sender type as a phone number and click on Continue.

Next, the admin will select the phone number and confirm it.

Now, senders have been added and the admin assigns the sender to their service by clicking on add sender.

Next, the admin will move to the next step.

After configuring step 3, the admin will move toward the Next step: Add Compliance info.

Now, the admin will click on the Complete Messaging Service Setup.
Then, a popup notification of a successful update will appear.

Finally, the admin can see the Service ID and use it in the WooCommerce WhatsApp Order Notification.

Order Detail Content ID Credentials
In the Twilio dashboard, the admin will navigate to Messaging -> Content Template Builder at the Twilio side panel.
Now, the admin will click on Create New.

Then, the admin will add the template name and the template language.
Next, select the content type. Then, click on Create.

Then, add the content in the Content body section and write ” {{1}} “, where the Order Detail is visible .
Example:Hello {{1}}, thank you for your order #{{2}}!
{{3}}.We’ll notify you when your items are shipped. If you have any questions, feel free to contact us.
Thank you for shopping with us!😊

Then, the admin will add sample text and click on save with samples.

Then, submit it for WhatsApp review.
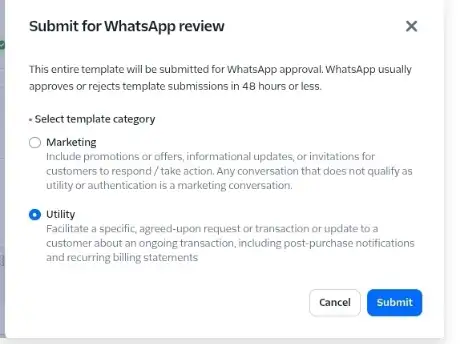
A pop will show the Successful message and the ORder Detail Content SID will be created.

Live Environment – Module Configuration
Step 1 – Log in to Twilio
Go to Twilio and log in using your Twilio credentials.
After logging in, open your Twilio account dashboard.
The dashboard displays information such as:
- Account SID
- Account Role
- Current Account Status
- Trial/Upgrade option
For production usage, the Twilio account must be upgraded from the trial account.
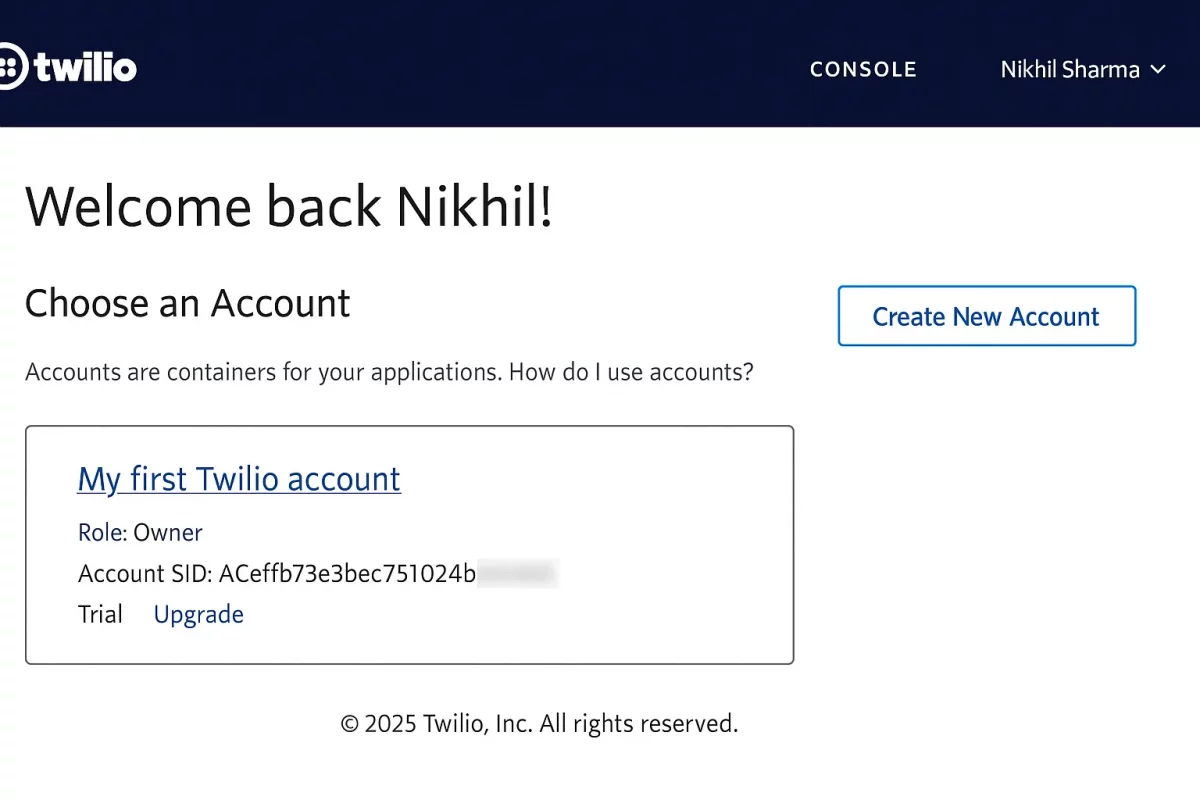
Step 2 – Upgrade the Twilio Account
Click Upgrade from the Twilio account dashboard to begin the production account setup.
Twilio will ask you to select your country as part of the account upgrade and verification process.
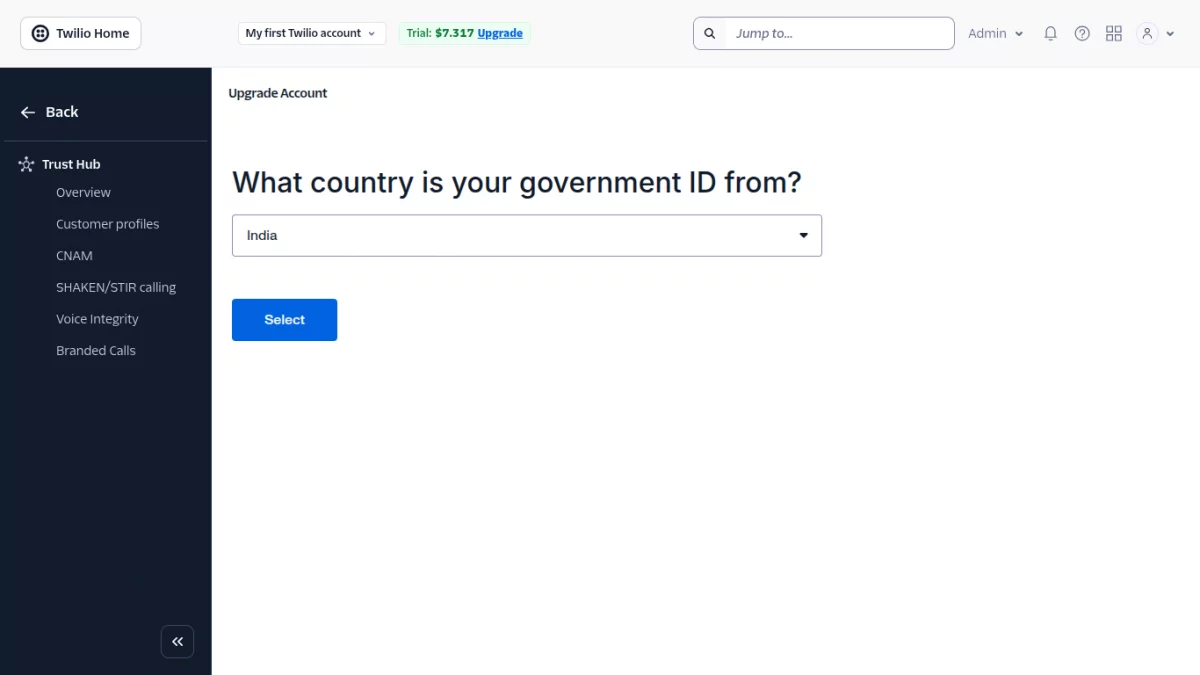
Select the appropriate country and continue with the verification process.
Step 3 – Complete Identity Verification
After selecting the country, Twilio may require identity verification.
Select an accepted government-issued identification document, such as:
- Driver License
- National ID
- PAN Card
- Passport
- Voter ID
Upload the required document and submit it for verification.
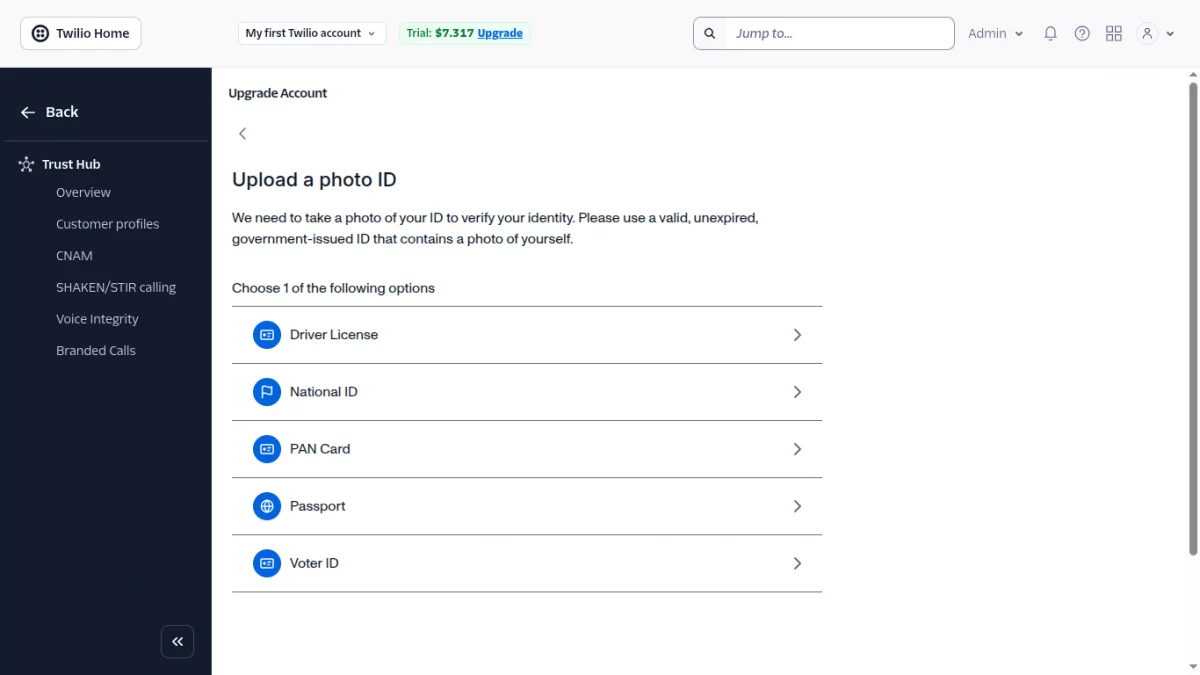
Once the required documents are submitted, wait for Twilio to complete the verification process.
Step 5 – Configure WhatsApp Sender
After WhatsApp Business access is approved, navigate to:
Messaging → Senders → WhatsApp Senders
Add the business WhatsApp phone number and complete the required verification.
After successful verification, the WhatsApp number can be used for sending messages through the live environment.
Step 6 – Create a Messaging Service
Navigate to:
Messaging → Services
Create a new Messaging Service for the WhatsApp notifications. Add the verified WhatsApp sender to the Messaging Service.
Complete the Messaging Service setup.
After the service is created successfully, Twilio provides a Messaging Service SID.
Keep this SID available because it is required when configuring the WooCommerce WhatsApp Order Notification plugin.
After you activate your WhatsApp number, create a Messaging Service by going to Messaging → Services.
This service will generate the Messaging Service SID required for your WooCommerce plugin.
Note: Currently, Twilio WhatsApp does not support message delivery to U.S. phone numbers due to WhatsApp (Meta) and carrier restrictions.
As a result, WhatsApp messages sent via Twilio may fail for U.S. numbers even in a live environment. Please consider this limitation when planning WhatsApp communication
Configuration of WhatsApp Order Notification Plugin
After completing the Twilio Live/Production setup, log in to the WordPress Admin Panel and navigate to:
Webkul WC Addons → WhatsApp Order Notification → Settings
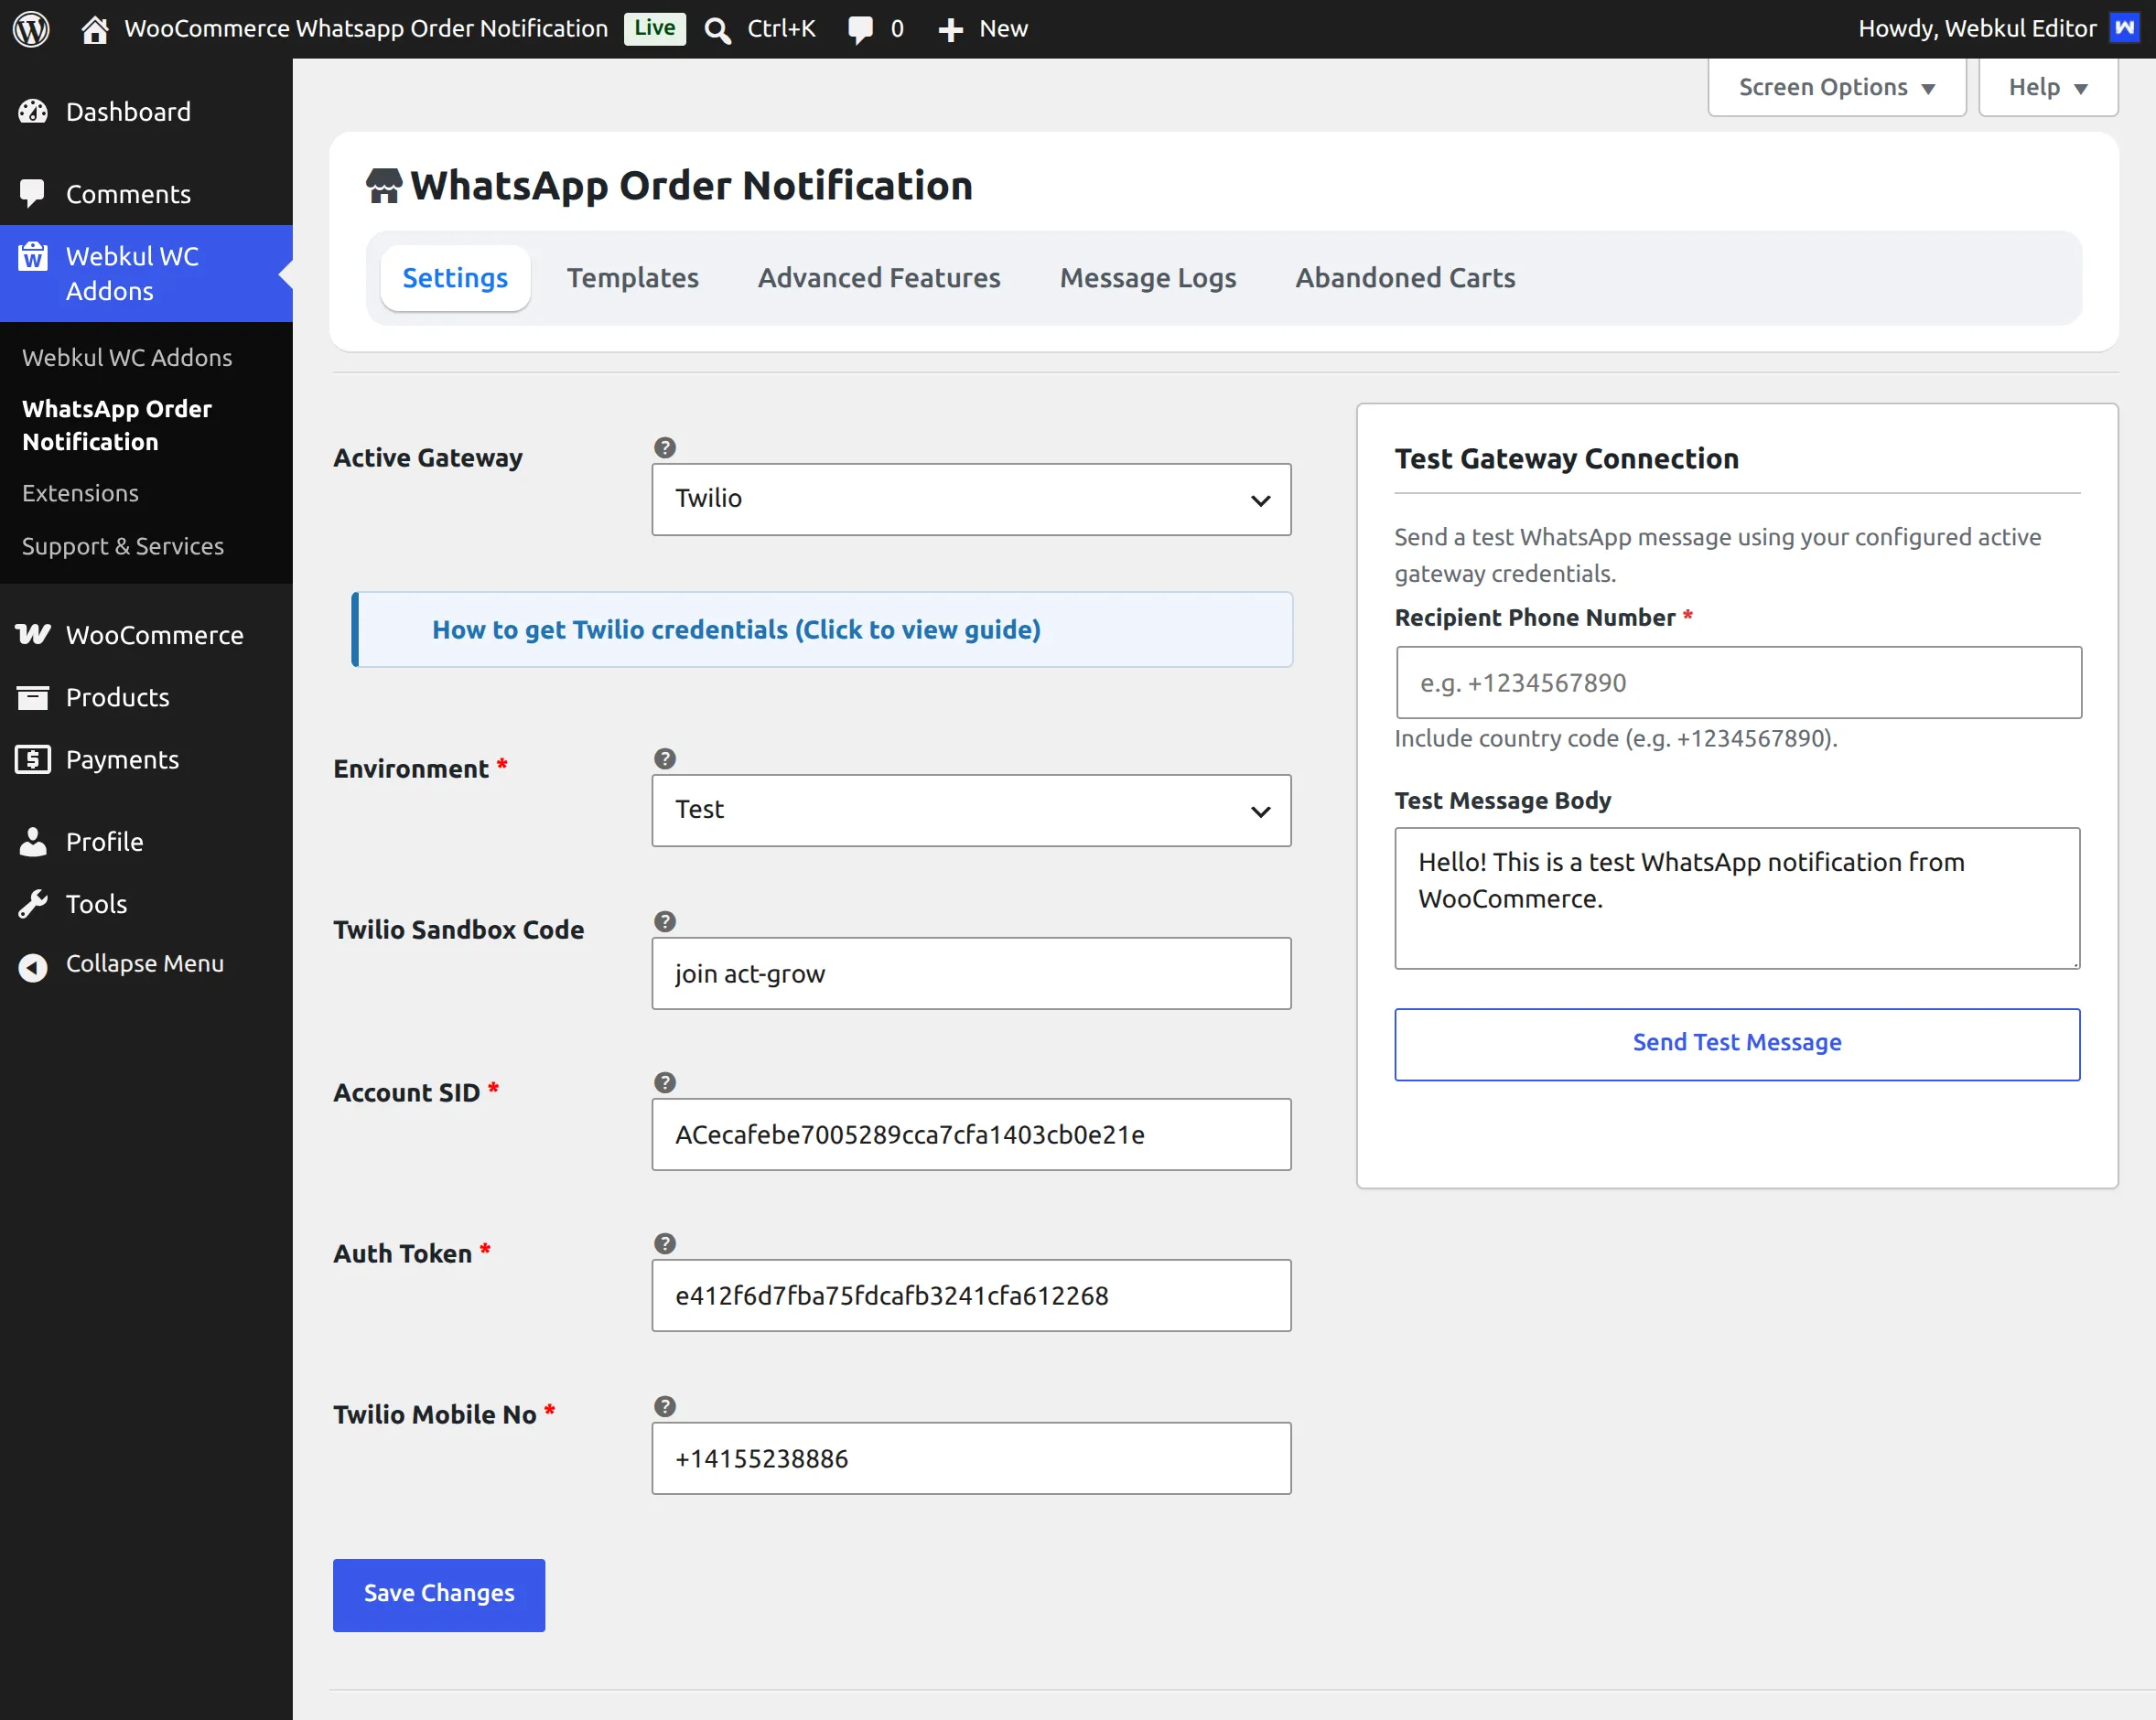
The plugin supports multiple WhatsApp gateways. Under Active Gateway, select the gateway that you want to use.
The currently available gateways are:
- Twilio
- Meta Cloud API
Twilio Configuration
When Twilio is selected as the Active Gateway, configure the following fields:
Environment – Select the required environment, such as Test or Live.
Twilio Sandbox Code – Enter the Twilio Sandbox code when using the Test environment.
Account SID – Enter the Twilio Account SID.
Auth Token – Enter the Twilio Auth Token.
Twilio Mobile No. – Enter the Twilio WhatsApp/Sandbox number configured for the selected environment.
Meta Cloud API Configuration
The plugin also supports Meta Cloud API as a WhatsApp gateway.
Select Meta Cloud API from the Active Gateway dropdown.
Configure the following:
- Access Token – Enter the Meta Cloud API access token.
- Phone Number ID – Enter the WhatsApp Business phone number ID.
- WhatsApp Business Account ID – Enter the WhatsApp Business Account ID.
- App ID – Enter the Meta application ID.
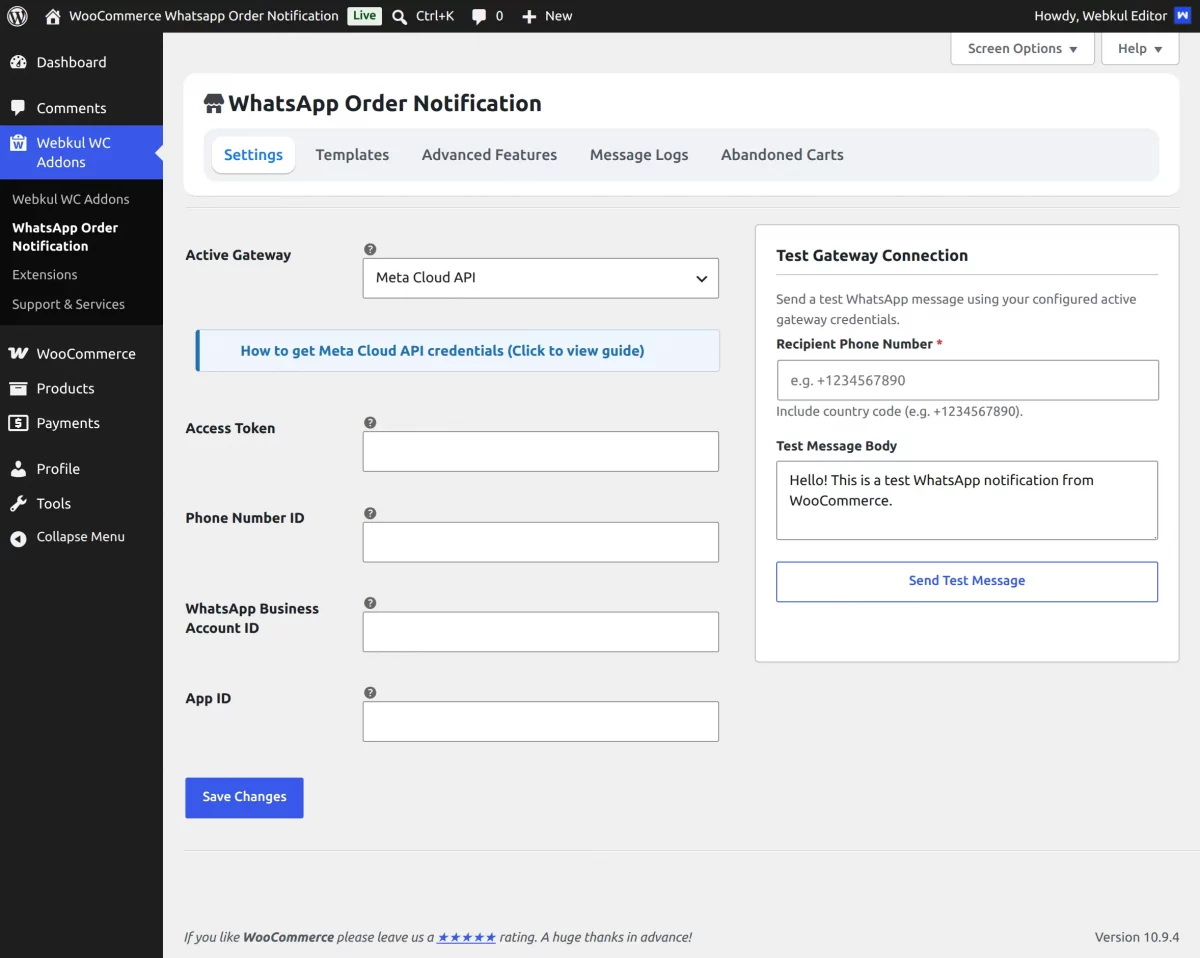
After entering the credentials, click Save Changes.
Test Gateway Connection
The plugin provides a built-in Test Gateway Connection option to verify the configured WhatsApp gateway before sending actual order notifications.
The admin can enter:
- Recipient Phone Number – Enter the recipient’s WhatsApp number with the country code.
- Test Message Body – Enter the message that should be sent for testing.
Click Send Test Message to test the active gateway.
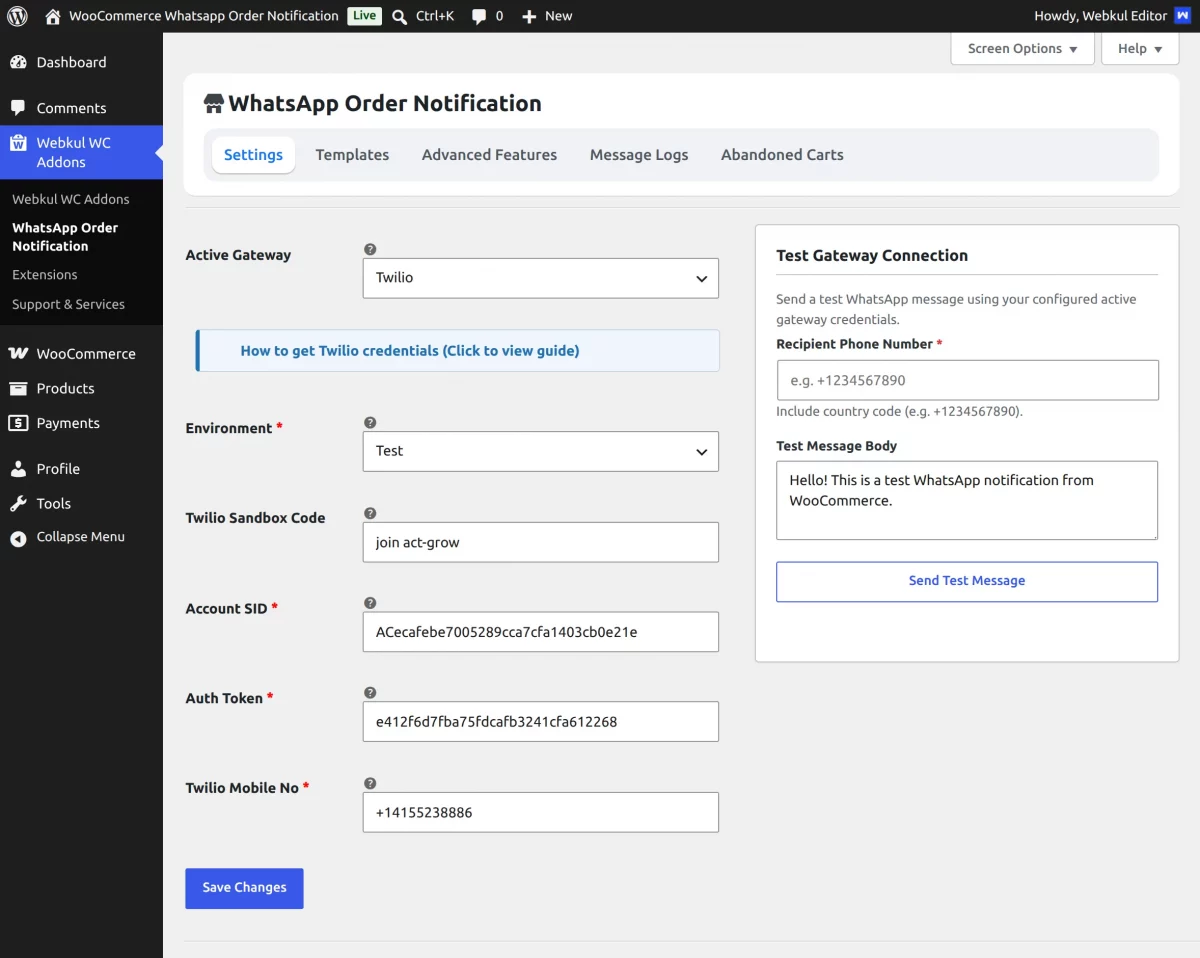
A successful test confirms that the configured gateway credentials can be used to send WhatsApp messages.
Templates
After configuring the WhatsApp gateway, navigate to:
Webkul WC Addons → WhatsApp Order Notification → Templates
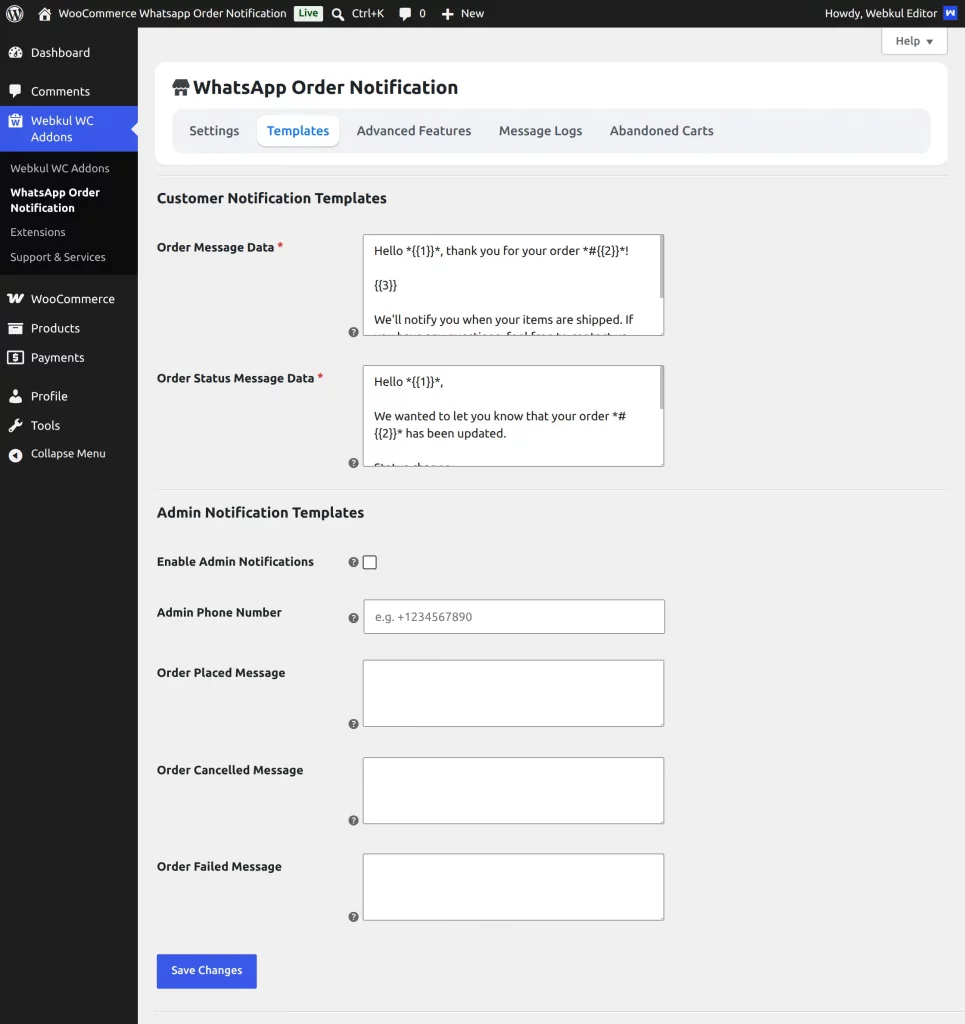
The Templates section allows the admin to configure customer and admin WhatsApp notifications.
Customer Notification Templates
Order Message Data
Configure the message that will be sent when a new order is placed.
The message can contain dynamic order information using the supported placeholders.
Order Status Message Data
Configure the message that will be sent when the status of an order changes.
Admin Notification Templates
The plugin also allows the admin to receive WhatsApp notifications for important order events.
Enable:
Enable Admin Notifications
Then configure:
- Admin Phone Number – Enter the WhatsApp number where admin notifications should be received.
- Order Placed Message – Message sent when a new order is placed.
- Order Cancelled Message – Message sent when an order is cancelled.
- Order Failed Message – Message sent when an order fails.
After configuring the templates, click Save Changes.
Advanced Features
The latest version provides an Advanced Features tab containing additional WhatsApp automation and customer communication features.
Navigate to:
Webkul WC Addons → WhatsApp Order Notification → Advanced Features
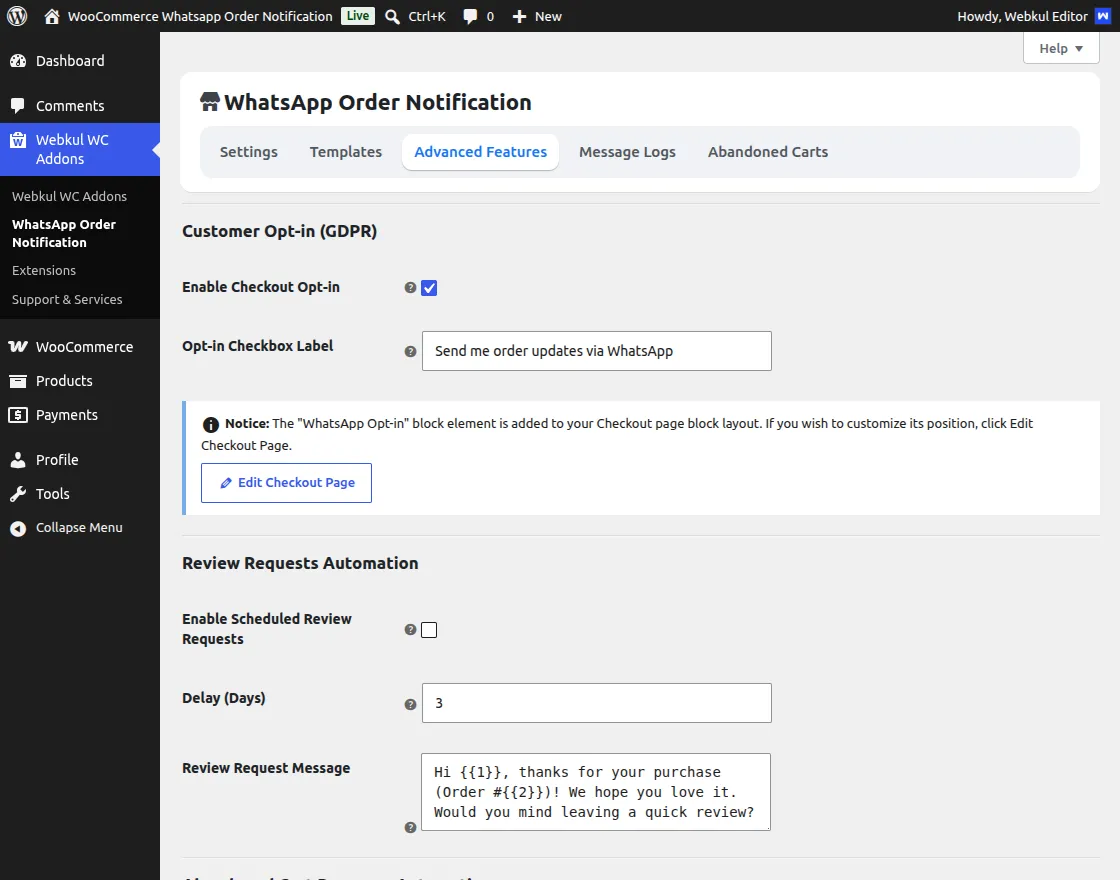
Customer Opt-in (GDPR)
The admin can enable a WhatsApp opt-in checkbox on the checkout page.
Enable:
Enable Checkout Opt-in
Then configure:
Opt-in Checkbox Label
For example:
Send me order updates via WhatsApp
The plugin also provides an Edit Checkout Page option to manage the position of the WhatsApp Opt-in block on the checkout page.
Review Requests Automation
The plugin can automatically send WhatsApp review requests after a customer’s purchase.
Enable:
Enable Scheduled Review Requests
Then configure:
- Delay (Days) – Number of days to wait before sending the review request.
- Review Request Message – WhatsApp message that will be sent to the customer.
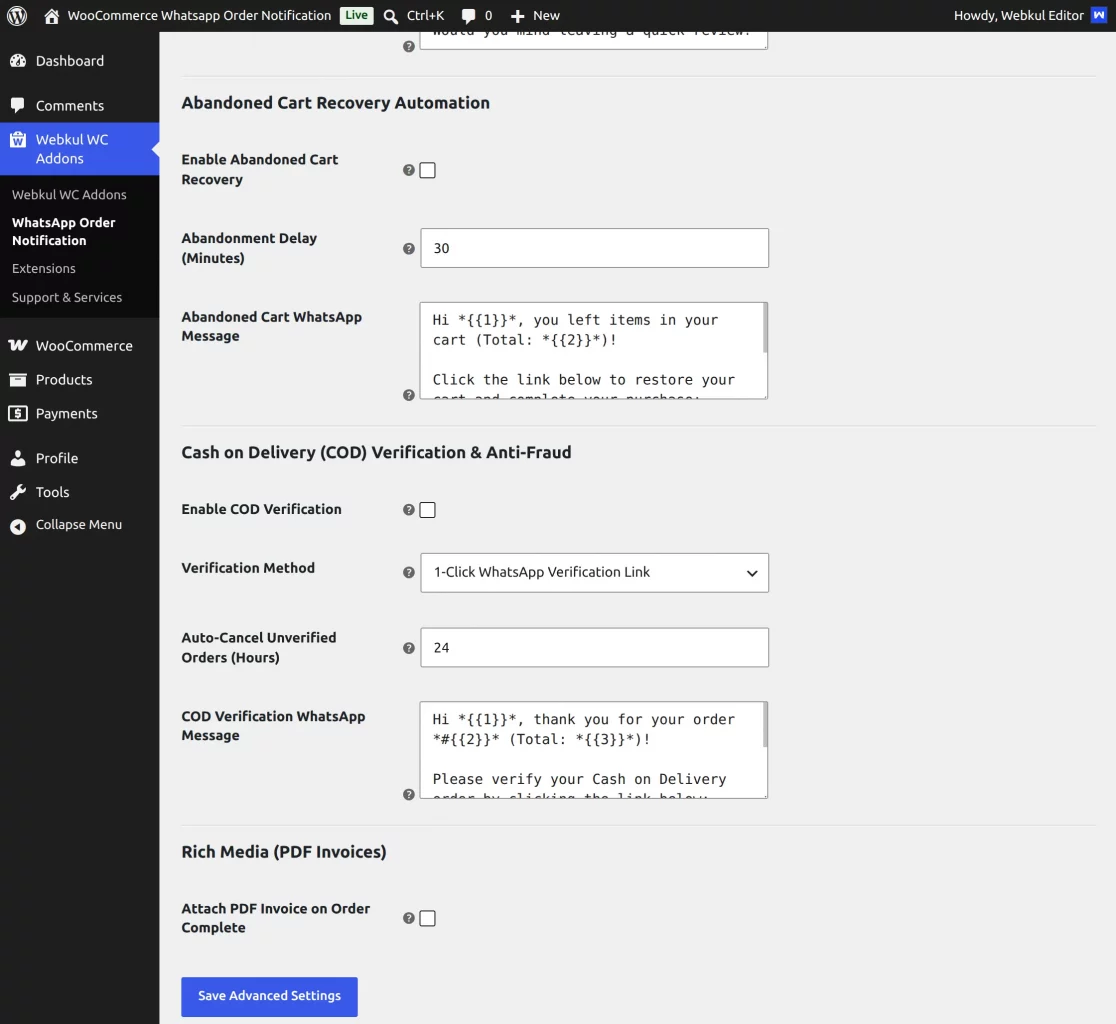
Abandoned Cart Recovery
The plugin provides automated WhatsApp reminders for abandoned carts.
Enable:
Enable Abandoned Cart Recovery
Configure:
- Abandonment Delay (Minutes) – Time to wait before considering the cart abandoned.
- Abandoned Cart WhatsApp Message – Message sent to the customer to remind them about the items left in their cart.
Once enabled, captured abandoned carts can be monitored from:
WhatsApp Order Notification → Abandoned Carts
The Abandoned Carts page displays:
- ID
- Customer Name
- Phone Number
- Cart Total
- Status
- Captured At
- Actions
Cash on Delivery (COD) Verification & Anti-Fraud
The plugin provides WhatsApp-based verification for COD orders.
Enable:
Enable COD Verification
Then select the required:
Verification Method
The current interface provides:
1-Click WhatsApp Verification Link
Configure:
- Auto-Cancel Unverified Orders (Hours) – Define how long an unverified COD order can remain pending before automatic cancellation.
- COD Verification WhatsApp Message – Message sent to the customer containing the verification request.
This feature helps the store verify COD orders before processing them and reduces potentially fraudulent or unwanted COD orders.
Rich Media – PDF Invoices
The plugin also supports attaching a PDF invoice to the WhatsApp notification after order completion.
Enable:
Attach PDF Invoice on Order Complete
When enabled, the generated PDF invoice can be included with the applicable WhatsApp communication.
After configuring the Settings section, the Admin configures the WhatsApp message templates For this they tap on the Templates button.
Message Logs
The plugin provides a dedicated Message Logs section to track outgoing WhatsApp notifications.
Navigate to:
Webkul WC Addons → WhatsApp Order Notification → Message Logs
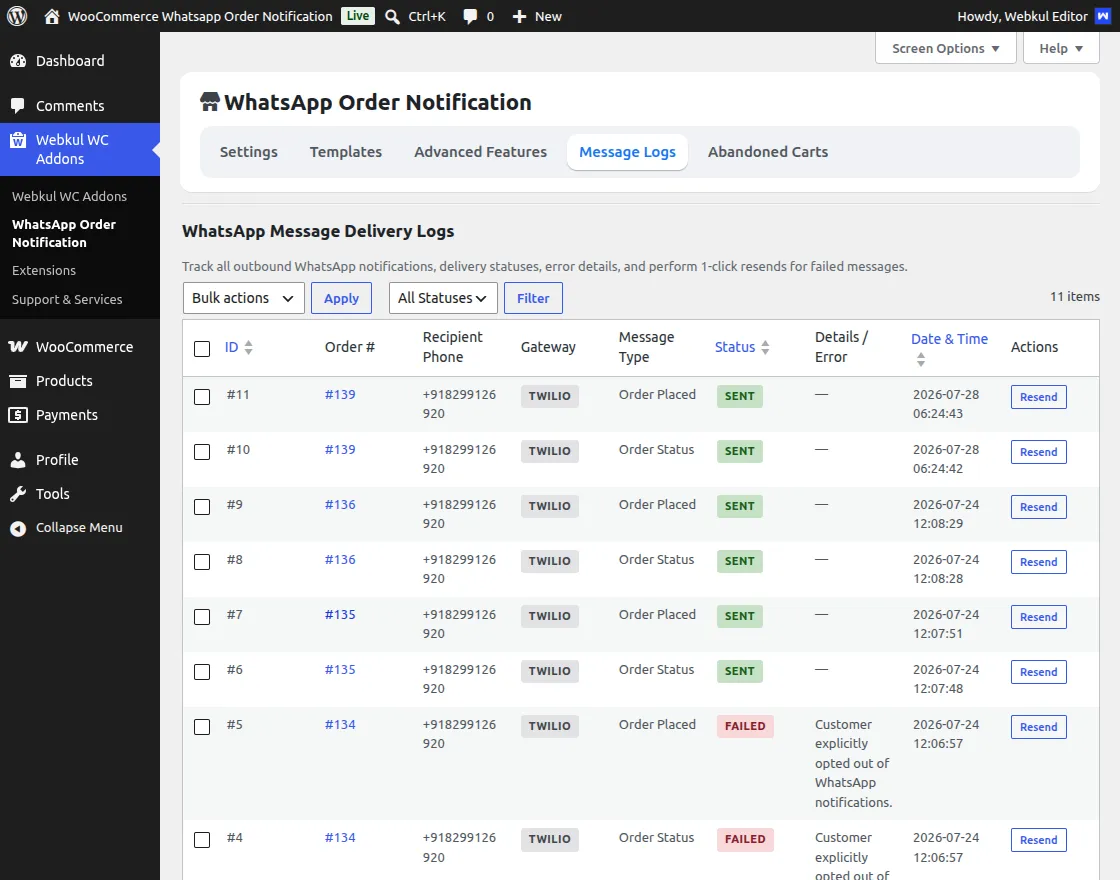
The logs provide information such as:
- ID
- Order #
- Recipient Phone
- Gateway
- Message Type
- Status
- Details / Error
- Date & Time
- Actions
The Gateway column identifies whether the notification was sent through the configured gateway, such as Twilio.
The Status column indicates whether the message was successfully sent or failed.
For failed messages, the Details / Error column displays the available failure reason.
So, that is it for the configuration part of the plugin. Let’s check below how the user receives Order-based messages on their numbers.
WhatsApp Notification Flow:
1. Order Placement Notification
When a customer successfully places an order, the plugin processes the configured WhatsApp notification.
If customer WhatsApp notifications are enabled and the required configuration is available, the customer receives the configured Order Message.
If Admin Notifications are enabled, the configured admin WhatsApp number also receives the applicable order notification.
2. Order Status Update Notification
When the admin updates the order status, the plugin sends the configured Order Status Message to the customer.
If admin notifications are enabled, the applicable admin notification is also sent according to the configured settings.
This keeps customers and administrators informed about the latest order progress.
3. Manual WhatsApp Notification
The admin can manually send a WhatsApp notification for an order.
Navigate to:
WooCommerce → Orders
Open the required order.
Under Order Actions, select:
Send WhatsApp Notification

The admin can use this option to manually notify the customer about the order.
Customer End WhatsApp Order Messages
Whenever a customer purchases a new product or admin updates an existing order, the system sends a WhatsApp notification using the specified template.
Order Message Data and Order Status Message


Support
So that is it for the WooCommerce WhatsApp Order Notifications plugin. If you need further assistance, please email us at [email protected] .
Current Product Version - 1.1.0
Supported Framework Version - WordPress - 7.0.2, WooCommerce - 11.0.0

Be the first to comment.