The most crucial part of running an online store is integrating a smooth and efficient payment gateway which eases the process of making payments,
And which manages the admin’s commission in a marketplace efficiently.
This module is one such extension which facilitates the admin of the store to integrate the DIBS Payment Method for an easier split of the order’s payment amongst the admin and the sellers.
Admin and the seller receive the commission directly in the DIBS Account.
The DIBS payment gateway offers its customers an effective solution for payment which adds to and makes the payment process hassle-free and for the customers.
Note:
- Marketplace DIBS Payment for WooCommerce is an add-on of WordPress WooCommerce Multi-Vendor Marketplace Plugin.
- To use this plugin, the user must first install WordPress WooCommerce Multi-Vendor Marketplace Plugin.
- This module only integrates the DIBS D2 Account.
Watch the below video tutorial to understand the extension workflow:
Features of WooCommerce Marketplace DIBS Payment
- The DIBS payment method facilitates payment split between admin and seller when products of both are added in the order.
- Commission charges go directly to admin DIBS account.
- Very secure payment integration.
- Checked and utilized both Test and Live server modes on the payment gateway.
- Supports almost all kind of cards including Visa, MasterCard, American Express, Maestro and VisaElectron.
- Well integrated with WordPress WooCommerce Marketplace.
Installation of WooCommerce Marketplace DIBS Payment
The user will get a zip file which needs to be uploaded in the “Add New” menu option in the WordPress admin panel.
For this login to WordPress Admin Panel and in the Dashboard hover your mouse over the “Plugins” menu option select the “Add New” option.

After this, the user will see an option on the top of the page that is “Upload Plugin”, click the option to upload the zip file.
On clicking the “Upload Plugin” option, the user will see a “Choose File” button. Click on the button to browse for the zip file as per the image below.

After browsing the file, click on the “Install Now” button so as to install the plugin as per the snapshot.
Once the user installs the plugin, a message “Plugin installed successfully” displays and an “Activate Plugin” is visible to activate the plugin.
The user needs to click on the “Activate Plugin” button to activate the plugin.

Module Translation
Integrating of WooCommerce Marketplace DIBS Payment
Initially, the user needs Merchant ID and the MD5 keys which are retrieved by following the steps given below.
Step 1:
- The user needs to login to the DIBS Payment website by hitting the given link.
- Thereafter, the user needs to tap on the “Get A Test Account” as shown in the image below, so as to retrieve the credentials.

Step 2:
- Thereafter, the user needs to choose “Create a D2 test Account” in order to create a test account as shown in the image below.

Step 3:
- On clicking Create a D2 test Account button, it navigates the user to a page where the user needs to add the basic details such as Name, Email Id, Address, etc.

Step 4:
- On submitting the details, the user will receive an email including the credentials- Username and Password as shown in the image below.

Step 5:
- The mail includes a link against Administration-
- The user needs to hit the link for the login purpose.
- On adding the credentials the user can simply tap on the Login button as shown.

Step 6:
- As the user clicks on the Login button, it redirects the user to the DIBS dashboard as shown in the image below.
- The user needs to navigate through Integration > MD5 Keys where the user will find the keys.

Configuration of WooCommerce Marketplace DIBS Payment
The admin can add configurations for Marketplace DIBS Payment for WooCommerce in the admin dashboard by navigating through WooCommerce > Settings > Payments as shown in the image below.
The admin shall find the list of payment methods where the DIBS option is also present along with the other payment methods as shown.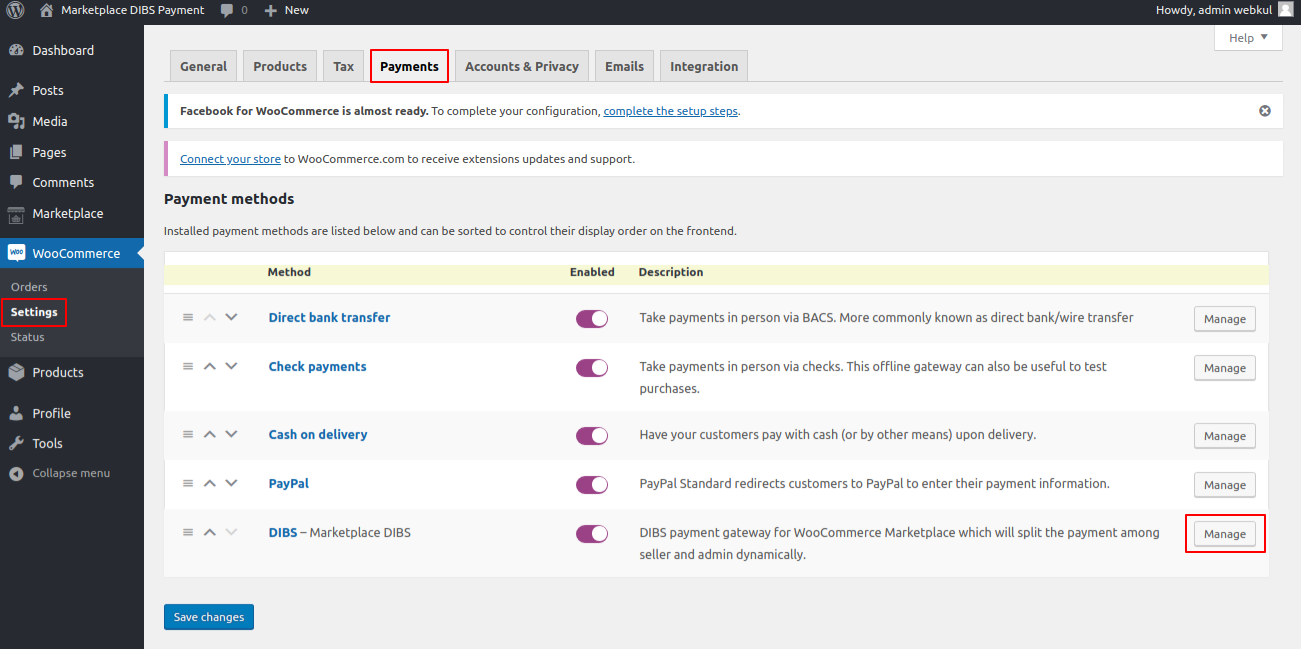
In order to set or edit the configurations of the DIBS payment gateway, the admin needs to click on the Manage button, present against the DIBS option as shown in the above image.

The admin can configure the fields for the DIBS as follows:
Enable/ Disable: The admin sets the status of the module as Enable or Disable.
Title: The admin allocates a title to the DIBS payment.
Description: The admin sets a description of the DIBS Payment Method.
Merchant ID: The admin fills in the Merchant ID retrieved from the DIBS website.
MD5 K1: The admin fills in the MD5 K1 retrieved from the DIBS website.
MD5 K2: The admin fills in the MD5 K2 retrieved from the DIBS website.
Language: A default language may be chosen from the dropdown list.
Test Mode: The admin may Enable the Test Mode for DIBS while using the test account on the DBIS.
Seller End Workflow
The sellers need to log in to the seller panel in order to configure the settings for the DIBS Payment Method.
The seller can simply navigate through Dashboard > Seller Profile > DIBS Payment Gateway as shown.
The seller will have to fill in the Merchant ID and the Keys for the DIBS Payment Gateway can be added as shown in the image below.
Note: If the sellers do not add their credentials, then the amount is added in the admin’s account.

The seller needs to configure the following DIBS Payment Gateway fields:
Merchant ID: The seller fills in the Merchant ID received from the DIBS website.
MD5 K1: The seller fills in the MD5 K1 retrieved from the DIBS website.
MD5 K2: The seller fills in the MD5 K2 retrieved from the DIBS website.
Frontend Workflow
In the checkout page, the Marketplace DIBS payment option will be visible to the customers as shown in the image below.
The customer needs to add the card details and the CVC number and proceed to place the order.

Once the customer places the order, the order details shall display as shown in the image below.

The details of the purchased order shall be visible by navigating through Payments > Summary > Captured in the DIBS dashboard as shown in the image below.
Be it the seller’s amount or the admin’s amount, it shall be visible as shown in the image.

In order to view the complete Order Details, the Trans. or the Transaction ID must be clicked. A new page shall open up displaying the details of the respective order as shown in the image.
That’s all for the Marketplace DIBS Payment for WooCommerce. If you still have any issues, feel free to add a ticket and let us know your views on our Webkul Support System.
Current Product Version - 1.0.0
Supported Framework Version - 3.0.x, 3.1.x, 3.2.x, 3.3.x, 3.4.x, 3.5.x, 3.6.x

Be the first to comment.