Introduction
In this guide of the WooCommerce Group Buy extension, we will explain how any merchants can start Pinduoduo like group deal website. Pinduoduo is a very popular social commerce marketplace.
At Pinduoduo deals are created by sellers but initiated by the customers where the customers have the privilege of creating a group or joining an existing group to access the deals.
With the help of the WooCommerce Group Buy extension, the admin can give the privilege to their customers to buy the product at a discounted price by creating a group or by joining an existing group.
The customer must be logged in to the store to buy the product by creating the group. They can also join the existing groups or create a new one.
The customer can also share the group through Facebook, Twitter, LinkedIn, or Send By Email.
The admin can add the product in the group buy from the back-end which will display under the Group Buy category at the front-end and can decide the group size for that particular product.
The admin can also enable the wallet extension from the back-end so that the customer can use the wallet to pay for the purchase. They can also refund the amount into the customer’s wallet.
Note – This plugin is compatible with WooCommerce’s latest High-Performance Order Storage (HPOS) and Cart and Checkout block.
If you are looking for another extension which can enhance your eCommerce store then you can check our WooCommerce extensions.
Watch the below video tutorial to understand the plugin workflow:
Features
- The admin can add a Group Buy option on the products.
- The module supports simple and variable products.
- The customer can purchase the Group Buy products in a group.
- The customer can share the group via Facebook, Twitter, LinkedIn or via Email.
- The size of the group is decided by the admin.
- The admin can describe the working of Group Buy products on the product page.
- Add existing products into the Group Buy category.
- The admin can provide the discount on Group Buy products.
- The customers can utilize the discount of the product by creating a group with the desired group size.
- The admin can decide the start date and the end date for the Group Buy products.
- The admin can decide the total number of groups that a single customer can create.
- The groups can be managed by back-office by the admin.
- The admin can perform various actions on the group such as Qualified, Disqualified or Refunded.
- The admin can see the total number of the members that are present in the group.
- Admin can see the group notes.
- The admin can enable the wallet setting for the customer.
- The customer can pay for the purchase using the wallet.
- The customers can add the amount in their Wallet.
- They can see their wallet transaction under My Account.
- The minimum wallet credit amount can be decided by the admin.
- The admin can decide the maximum wallet debit fixed or percentage amount.
- The verification OTP can access by the customer via email.
- The admin can see all the wallet transactions of the customers.
- Compatible with WPML (The WordPress Multilingual Plugin).
Installation
The user will get a zip file which he has to upload in the “Add New” menu option in the WordPress admin panel.
For this, login to WordPress Admin Panel and then Under the Dashboard, hover your mouse over the “Plugins” menu option which brings out a Sub-Menu and then select the “Add New” option.

After this, you will see an option on the top of your page that is “Upload Plugin”, Now clicks the option to upload the zip file.

By clicking on the “Upload Plugin” option, below that you will see a button “Choose File” click on the button to browse for the zip file as per the snapshot below.

After browsing the file, click the “Install Now” button to install the plugin as per the snapshot.

Now when the plugin is installed correctly, then you will see the success message and an option to activate the plugin. Henceforth now, click on “Activate Plugin” to activate the installed plugin.
Thus, this installation completes.
Activate and Update Plugin
Check how to activate your WooCommerce plugin through the purchase code and get updates on Webkul modules directly on the plugins page.
Webkul Addons
Here the admin will get Webkul add-ons and for configuration, the needs to click “Setting”.

How to Translate the plugin using the WPML
WooCommerce group buy is compatible with WPML (The WordPress Multilingual Plugin). A detailed guide is also available to know Woocommerce Group buy the plugin.
Steps to create account on Twilio
Note- The admin will have to run the command to install Twilio via the composer. Folder path example – cd /home/installation/folder1/wp-content/plugins/woocommerce-booking-and-reservation
- The user can hit the link- www.twilio.com to sign up with the Twilio SMS provider.


On clicking the link, the user will be redirected to the Sign-Up page. The user will have to enter details such as Name, Email, Password etc.
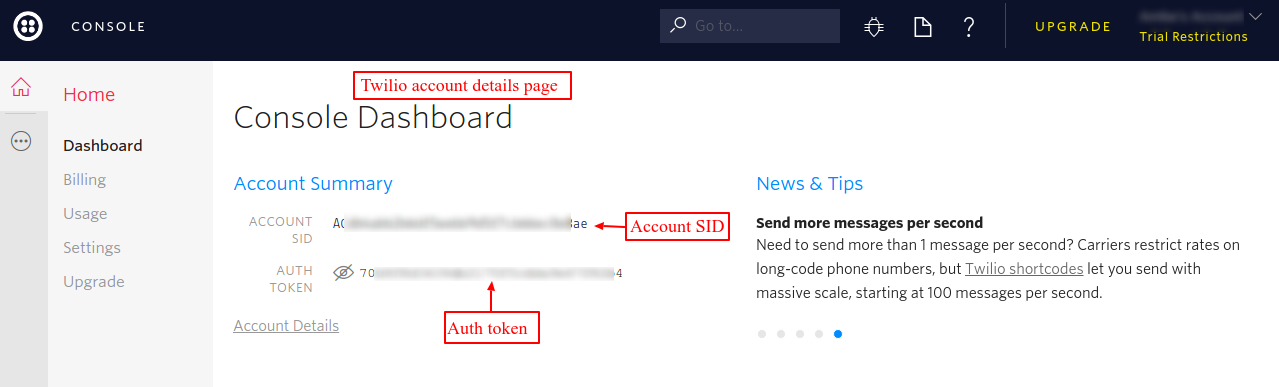
Once the user submits the sign-up details and completes the sign-up process, the admin can check Twilio credentials under Console Dashboard as shown in the image below.

On receiving the credentials, the admin can complete the module configuration with the Twilio SMS provider.
Plugin Activation
Check how to activate your WooCommerce plugin through the purchase code.
Plugin Update
Check how to get updates of webkul modules directly on the Plugins page.
Admin End Workflow- Group Buy
The admin can easily manage the module from the back-end. Moreover, after the successful installation of the module, the admin has to navigate through Group Buy > Configuration as per below image:
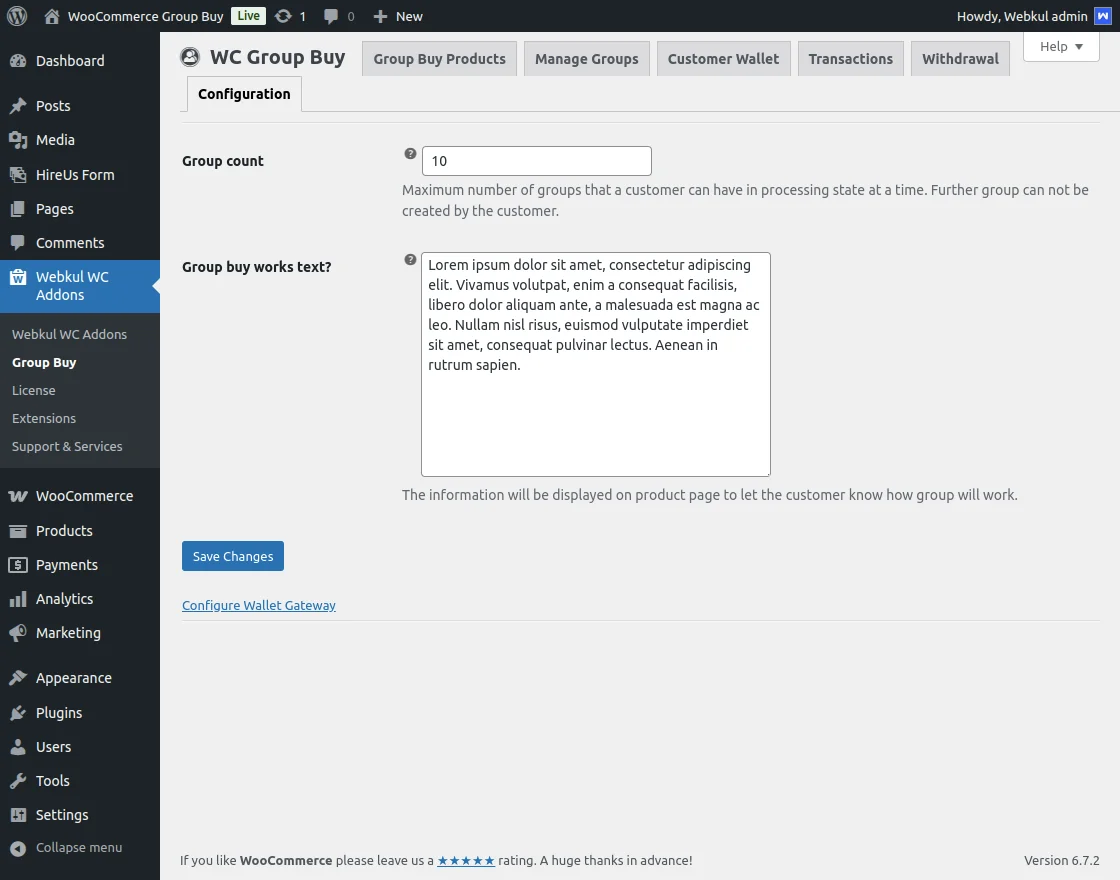
Group Count- From here, the admin can decide the maximum number of the group which each customer can create.
Group Buy works text– Here the admin can describe how the Group Buy works. For a better understanding.
Thus, the configuration part completes.
How To Add Group Buy Products
To enable the Group Buy Option in the products, the admin needs to navigate towards Group Buy > Products as per below image:
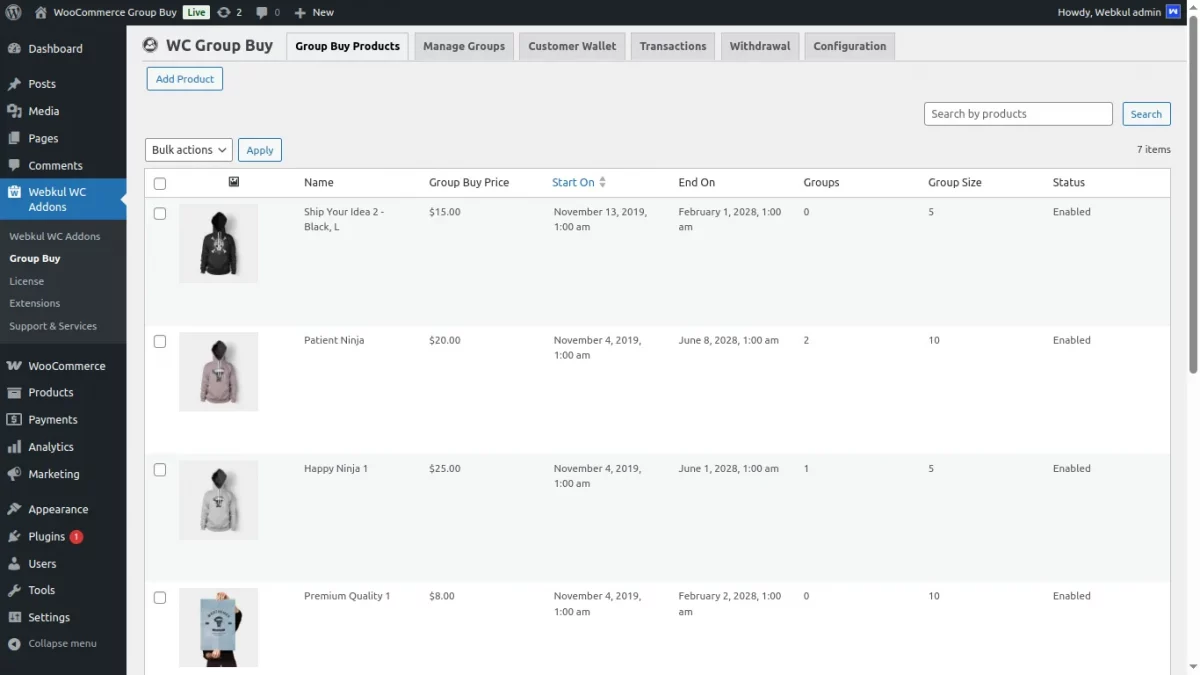
Here, the complete listing of products with the Group Buy Option can be seen by the admin.
Also, the admin can add new products to the Group Buy category by clicking on the Add Product button.
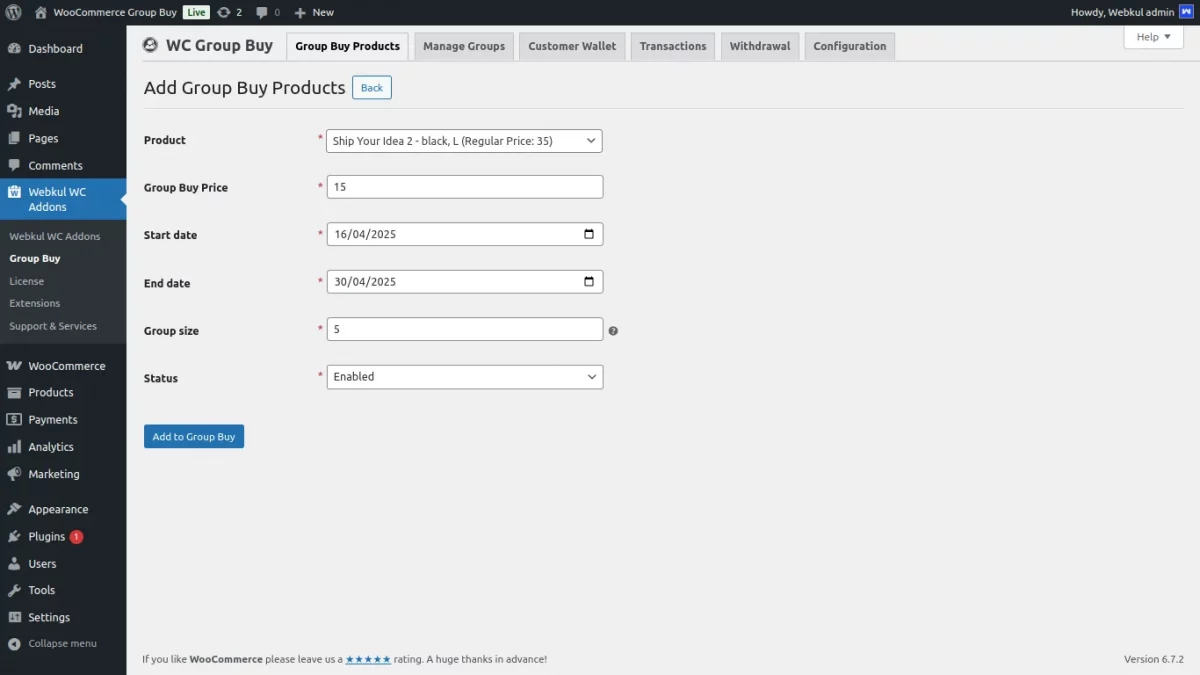
For adding the product:
Product- From here the admin needs to select the product which they want to add for the Group Buy.
Group Buy Price- The admin can set the discounted price of the Group Buy Product from here.
Start date- The admin has to select the start from which Group Buy gets activated for the particular product.
End Date- Also, the admin has to select the end date on which the Group Buy feature will end for the particular product.
Group size– From here, the admin can decide the count of the member in the group for qualifying for Group Buy.
Status– Moreover, the status of the Group Buy product can enable or disable by the admin.
After setting all the above fields, the admin has to click on the Add to Group Buy button to save the product.
Manage Groups
For managing the groups the admin has to navigate through Group Buy > Groups as per the below image:
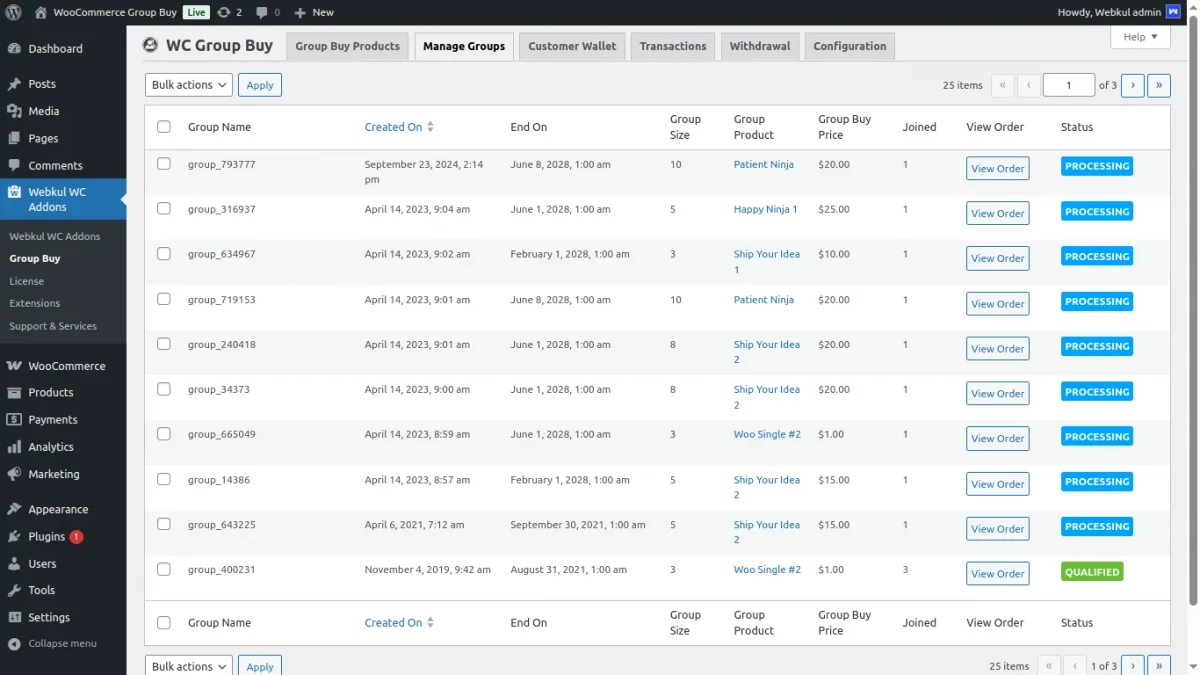
Here, the admin can see the existing groups’ information such as Group Name, Group creation date, End date, Group Size, How many members have joined the group till now and the status of the Group.
From here, the admin can also perform the bulk delete operation on the existing groups.
Also, the admin can click on the edit button of the group to edit the existing group.
For reference, you can check the below snapshot:

- Here the admin can edit the name of the group.
- The admin can view the group details as per the above image.
- The admin can see members of the group under Group Members.
- The Groups Notes is created every time an action is performed on the group such as group creation, New member joined the group, Group status changed.
- The admin can perform the various actions on the group such as Processing, Qualified, Disqualified, Refunded.
Group Actions:
- Processing– When the group has been created by the customer but the group size has not reached its required limit, during that duration the admin can set the status of the group as Processing.
- Qualified– When the group has completed its member during the time duration, then the admin will change the status of the group as Qualified and process the orders of that product at the discounted price.
- Disqualified– When the group has not completed its required size with the provided time frame by the admin, then the admin can Disqualify that group.
- Refunded– When the group is disqualified, then the admin can refund the amount of the customers, and then can change the status of the group as Refunded.
Once, the group is disqualified, then automatically the Refund button will enable in the group detail section in the backend as per below image:

After the admin clicks on the Refund button, a pop-up will appear on the screen as below:

Once, the admin will click on the Refund Button, it will redirect them to the default Woocomerce order page for the Refund procedure.
Configuration- Wallet
The admin has to navigate towards WooCommerce > Settings > Payments > Wallet as per the below image from configuring the wallet system for the customer.
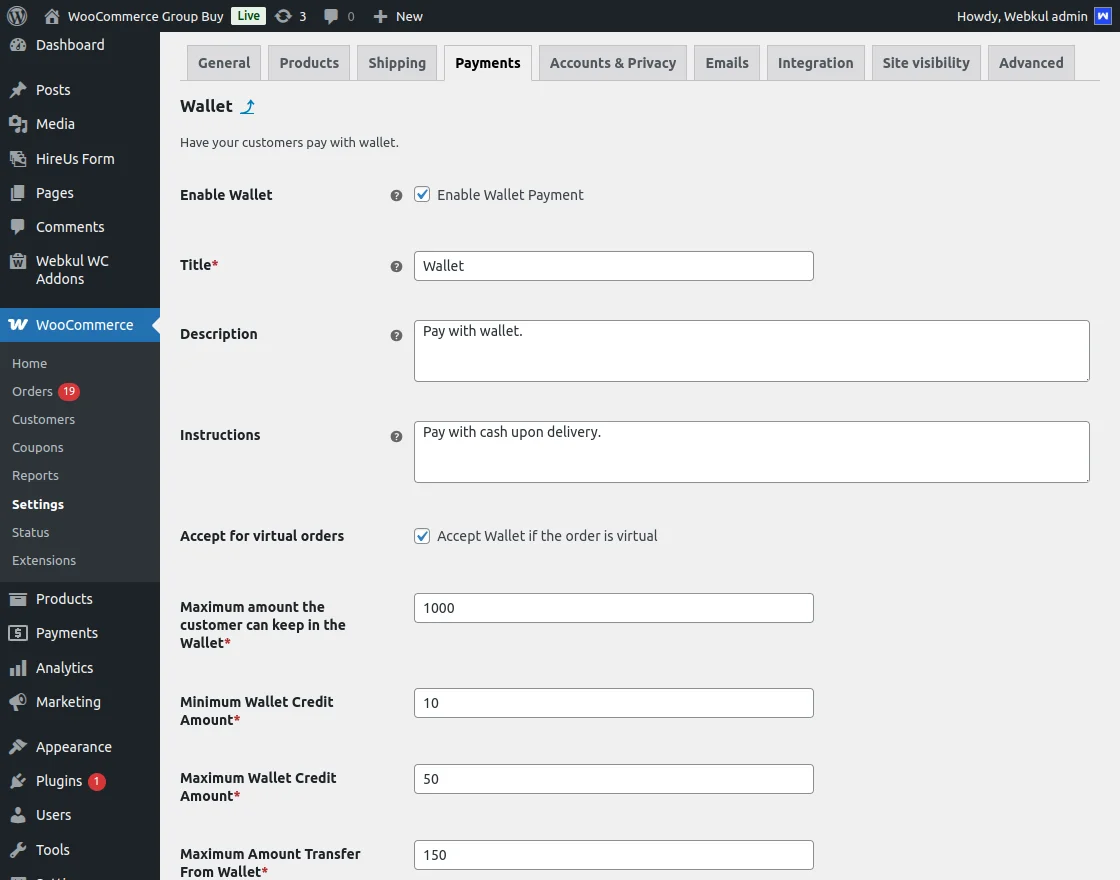
Here the admin needs to enter the various details such as:
Enable Wallet- The admin can check this box to enable the wallet system for the customers.
Title- The admin can enter the title of the wallet extension which the customer will see at the time of the checkout.
Description- The description of the wallet can be entered by the admin.
Instruction- The admin can also describe the instruction of the wallet. i.e how to use.
Accept for Virtual Orders- If the admin checks this box, then the customer can pay for the virtual products through the wallet else not.
Maximum Amount the Customer can Keep in the Wallet: Here the admin can define the maximum amount the customer can keep in the wallet.
Minimum Wallet Credit Amount- Here the admin can decide the minimum amount required to recharge their wallet by customers.
Maximum Wallet Credit Amount: Here the admin can define the maximum wallet credit amount.
Amount Transfer From Wallet (Maximum) : Here the admin can define the maximum amount that can be transferred from the wallet.
Maximum Wallet Debit Type- The admin can decide the type of wallet debit amount as fixed or percentage which the customer can debit at a single time.
Wallet Debit Amount (Maximum) – Here the admin will enter the amount that the customer can use from the wallet during checkout.
Additional Configuration
Apply Discount: Here the admin can allow to apply a discount or not while customers recharging their wallets.
One Time Password Verification- If the admin wants the customer to verify the wallet transactions, then they make this option.
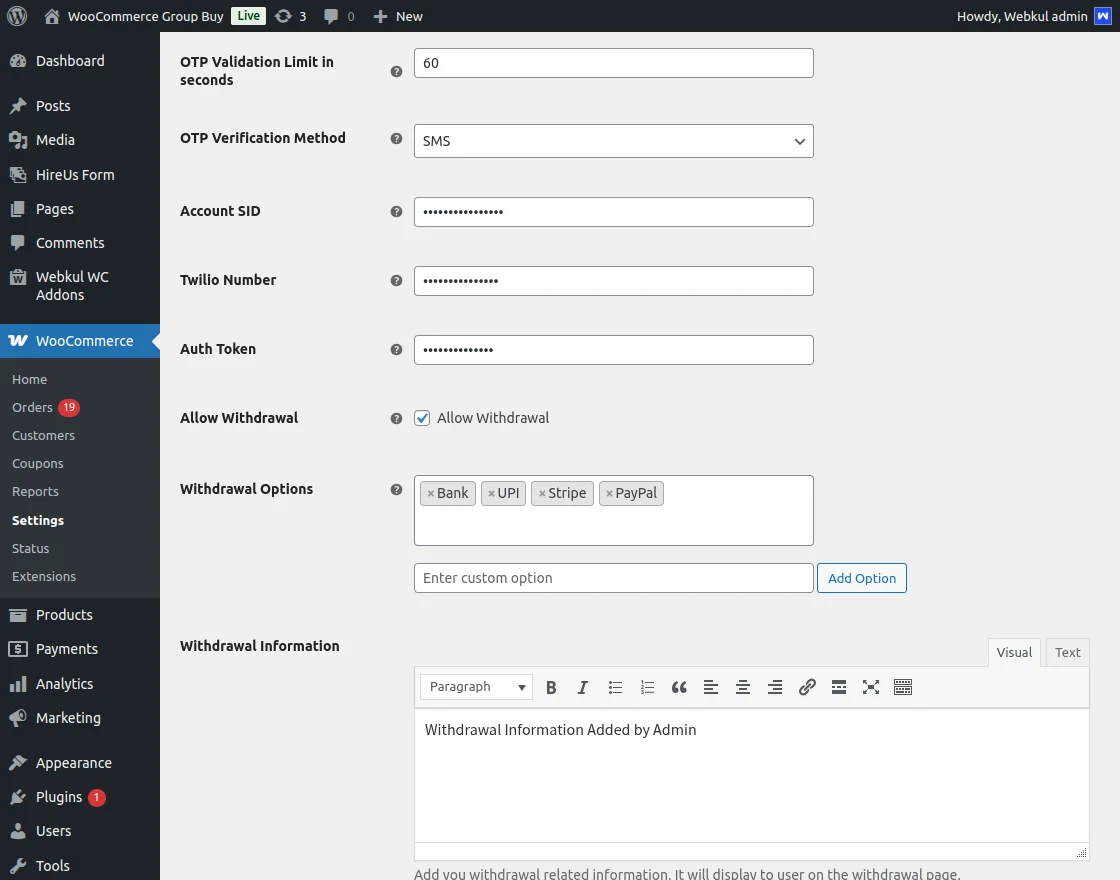
OTP validation Limit in Seconds: Here the admin can specify the time limits of OTP validation in seconds.
OTP verification Method– Here the admin will choose the OTP verification method via Email or SMS.
If the admin chooses SMS for OTP verification then they need to provide Twilio API credentials i.e Account SID, Twilio Number and Auth Token.
Allow Withdrawal – If admin enables this option then customer can withdraw their wallet amount.
Withdrawal Options – Admin selects the option for which they want to allow withdrawal.
Withdrawal Information – Admin can add withdrawal information in this text box.
After setting the wallet configuration the admin can save it by clicking on the Save Changes button.
Wallet View- Admin View
The admin can view the wallet of the customers by navigating through Group Buy > Wallet as per below image:
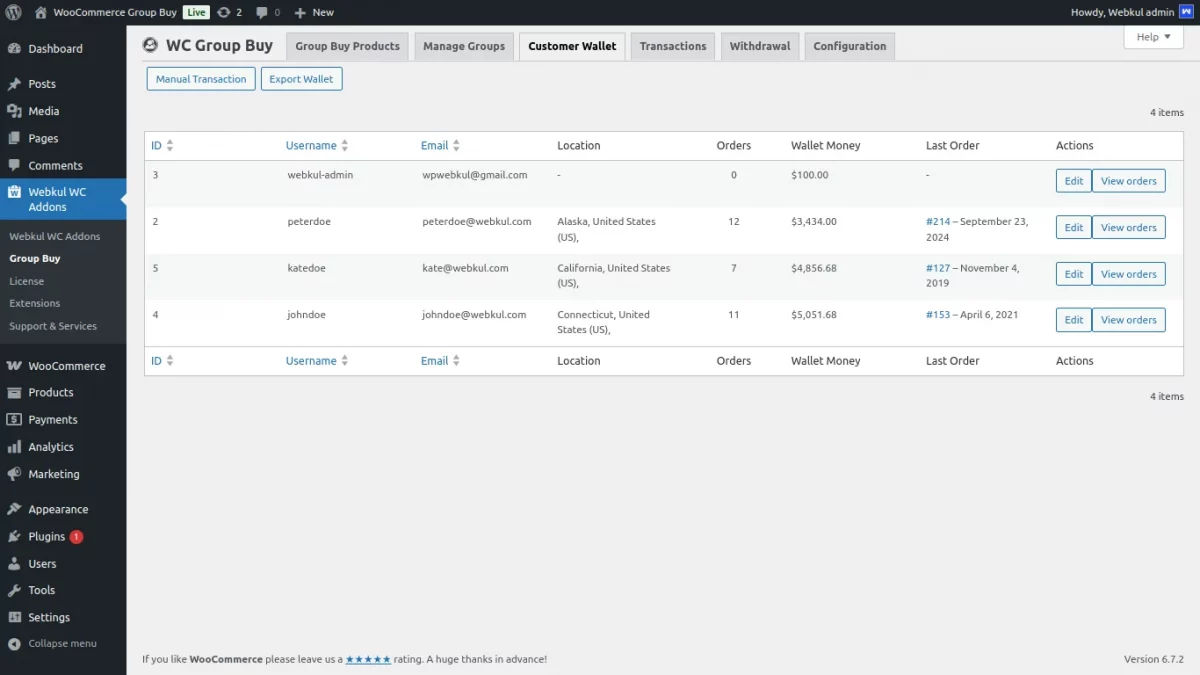
The admin can view the details of the customers such as their username, Email, Location, Number of Orders, Wallet Money, Last placed order Id, and its date.
Manually the admin can debit or credit the wallet amount in the customer wallet.
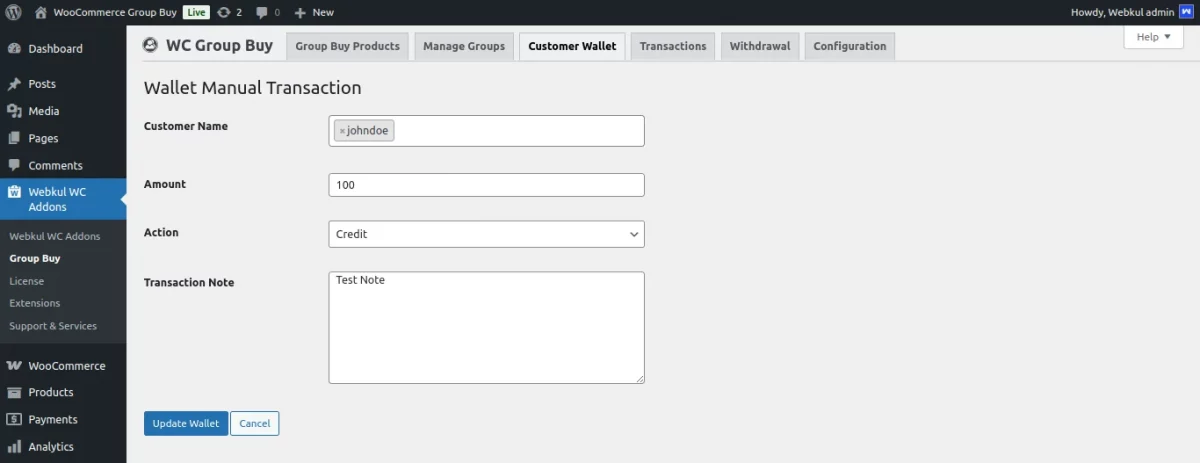
Check below to know the details which are required for the manual wallet transaction:
Customer Name- Here the admin can select the customer for the manual wallet transaction.
Amount- The admin can enter the amount of the manual transaction.
Action- Form here the admin can perform the action on the manual transaction on to the wallet as Credit or Debit.
Transaction Note- Here the admin can leave a note for the transaction.
Thus, in this way, the money is added to the customer’s wallet or debited from the wallet.
Wallet Transaction- Admin End
Also, the admin can view the list of the wallet transactions as per the below image:
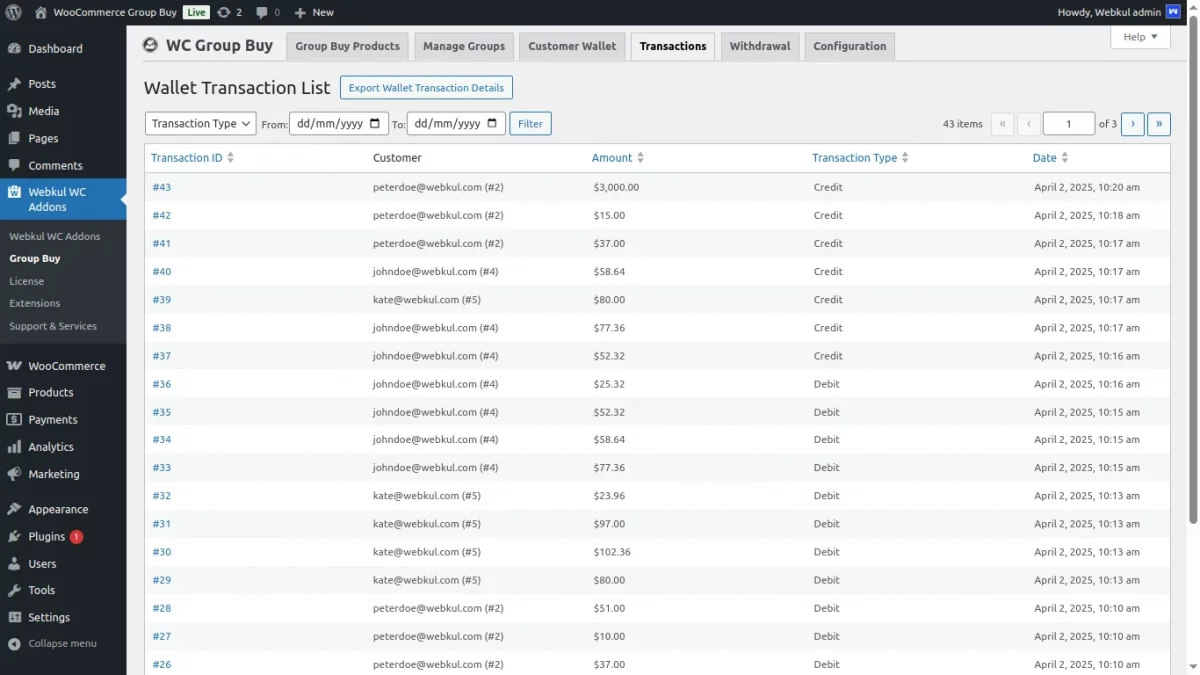
The admin can see the Transaction ID, Customer mail, Transaction type, Date, etc. under the transaction list.
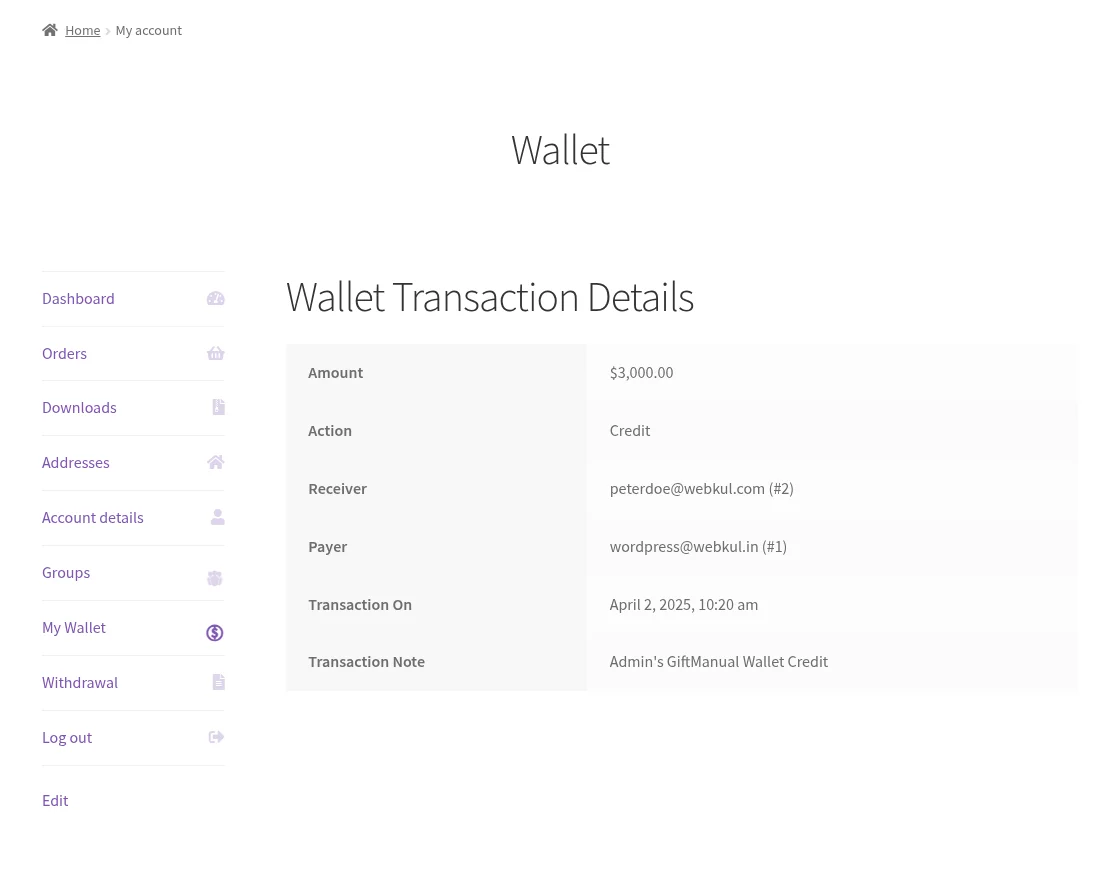
Also, the customer can see the wallet transaction as per below image:
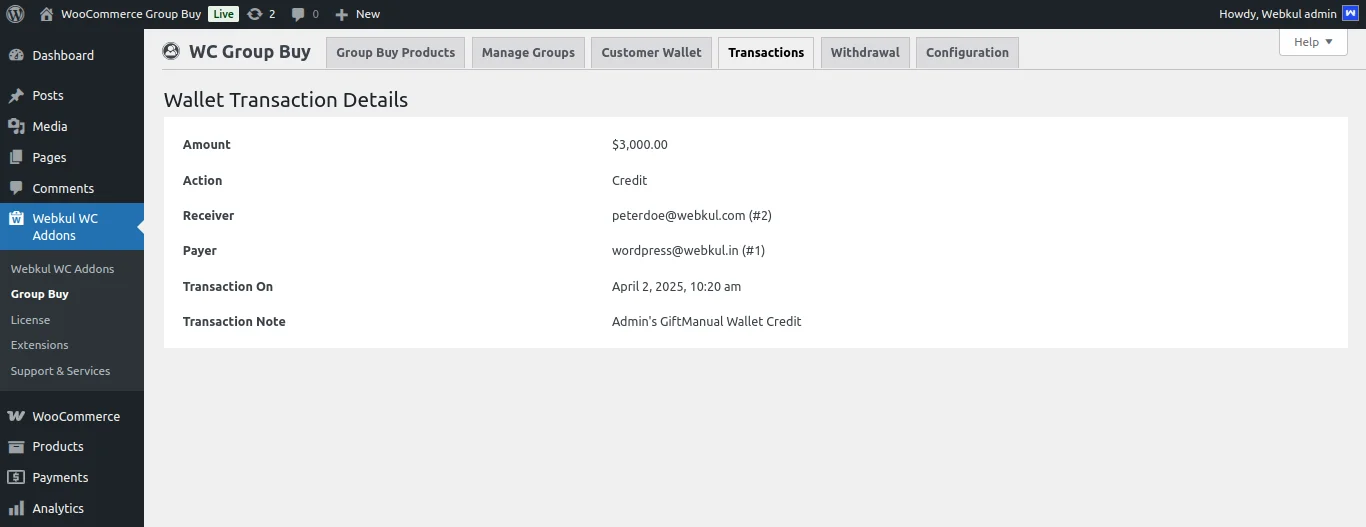
Here, the details of the transaction contain:
The Amount, Order ID, Action (Debit, Credit, Redunded), Receiver, Payer, Transaction On, Transaction Note is displayed.
Withdrawal
From this section, admin can view the Withdrawal Request List. These are the requests which have been generated by customers.
Admin can filter the requests based on Withdrawal Method, User and Status. It is visible as per below image,
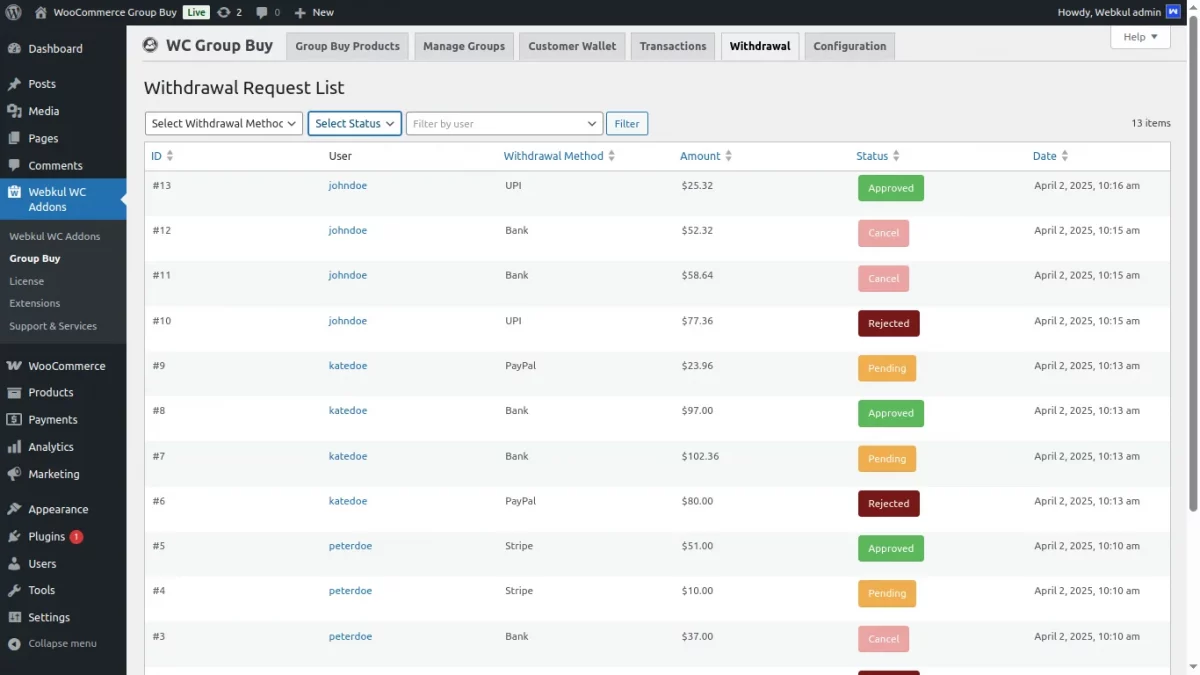
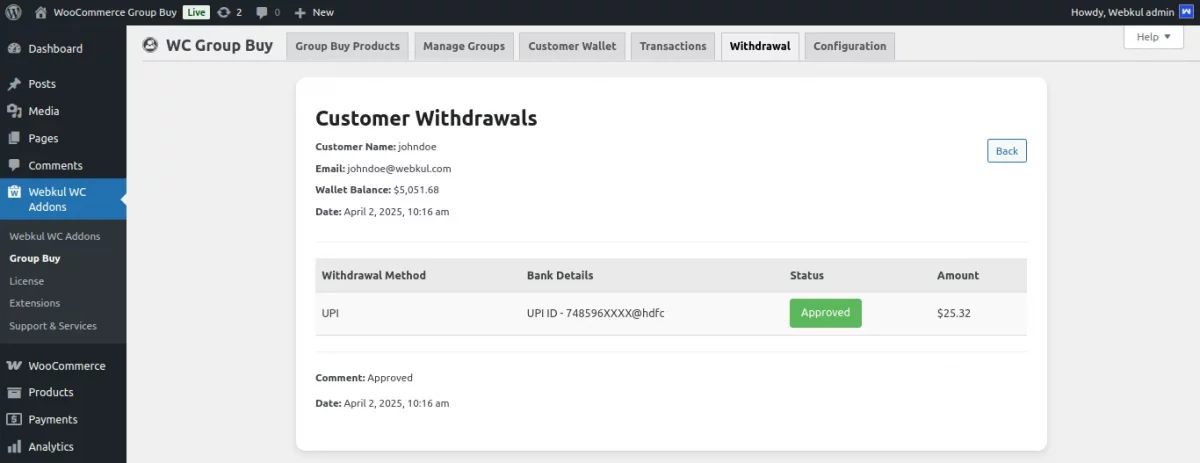
To view a particular withdrawal, admin taps on the View Withdrawal button to check particular Customer Withdrawals.
Customer View- Group Buy
The customer can see all the Group Buy type of products under the Group Buy menu as per below image:

Firstly, the new customer is essential to log in/Register to buy the group product.
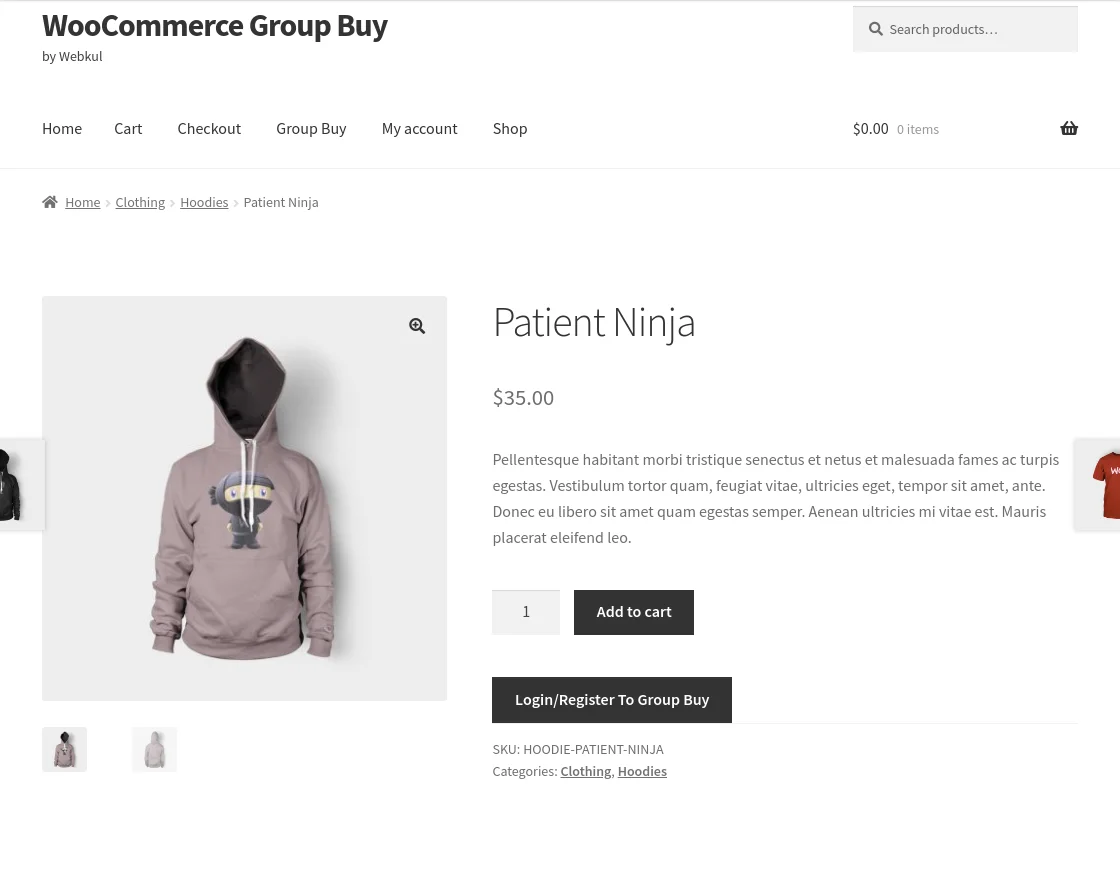
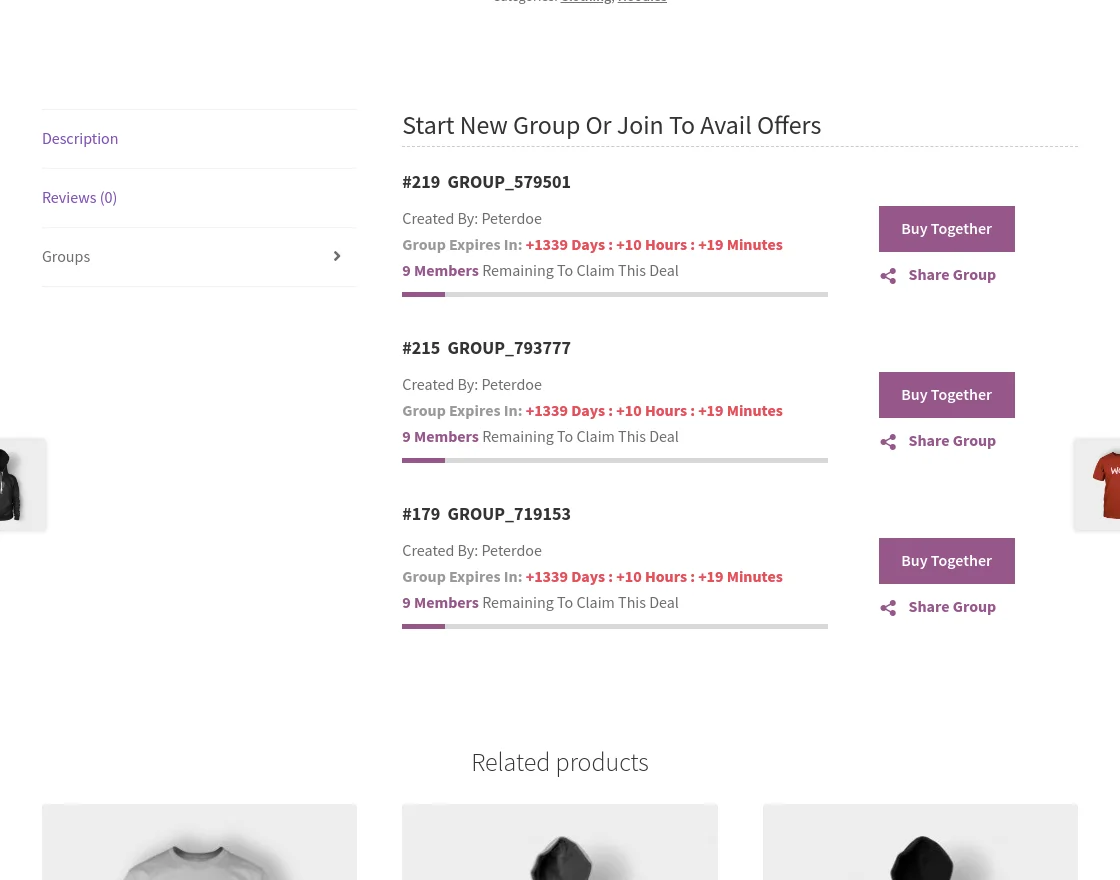
The customer can select the product as per their choice and see the Create Group option or can Join the Existing Group to purchase the product.
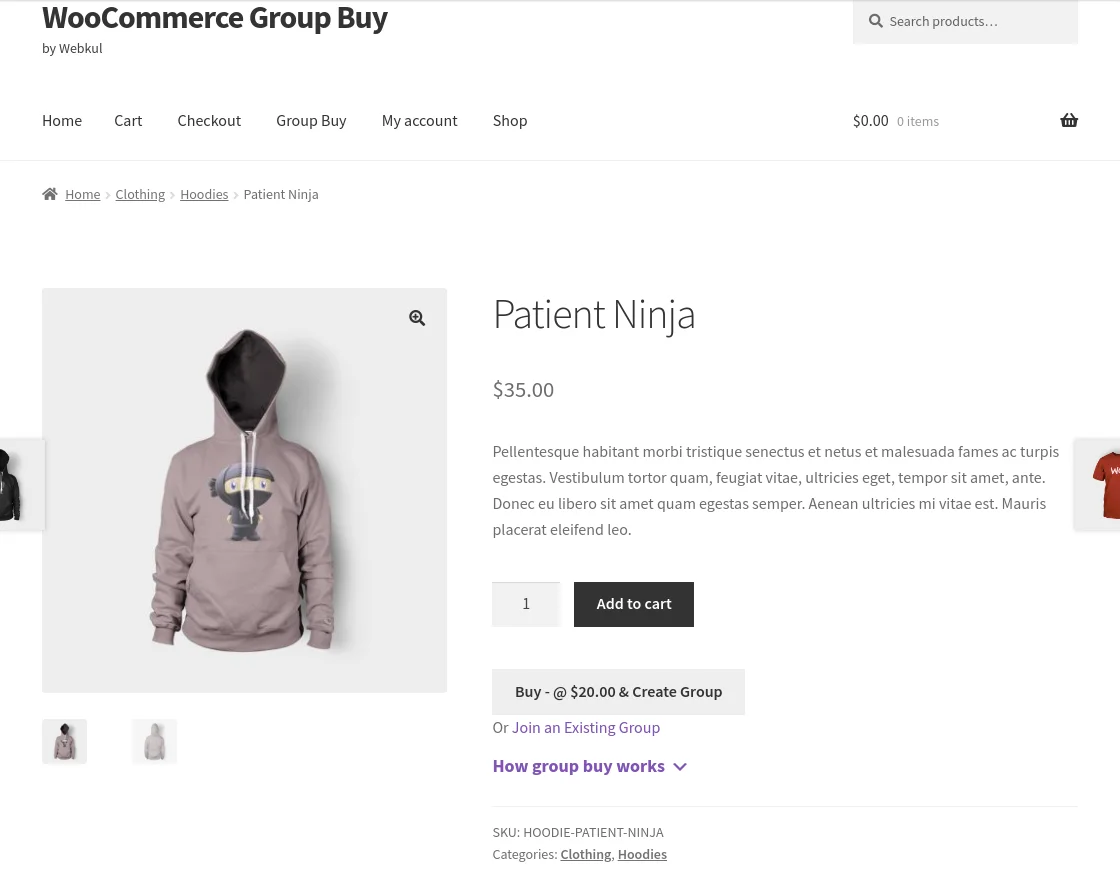
If the customers want to create a new group to purchase the product, then they need to click on the Create Group button.
Once the customer has clicked on the Create Group button, the product is added to the cart and they can proceed for the checkout of the product and also a group is created for that product after that.
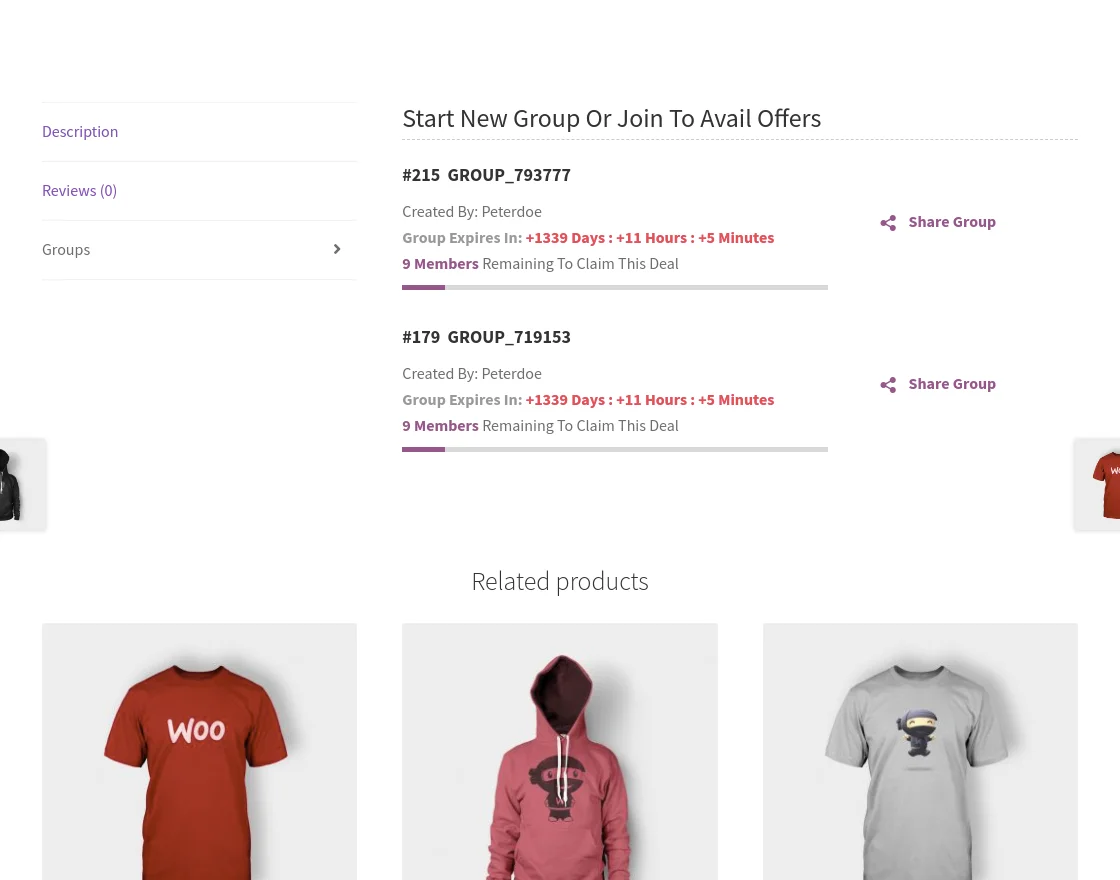
Also, the customer can join the existing group to purchase the product at a discounted price. After clicking on the Join Existing Group, they can see all the created groups of that particular product.
From here, the customer can click on the Buy Together button to join that group and proceed for the checkout.
Also, they can see the number of join members on the group, group expiry time, the group creator name.
Moreover, the customer can also share the group by clicking on the Share Now button.
Note: Once a product from having Group Buy option is added to the cart, then a customer cannot add a new product to the cart. A customer has to order a standalone product.
The Customers Created Groups And Joined Groups
The customer can see the groups under the My Account > Groups as per below image:
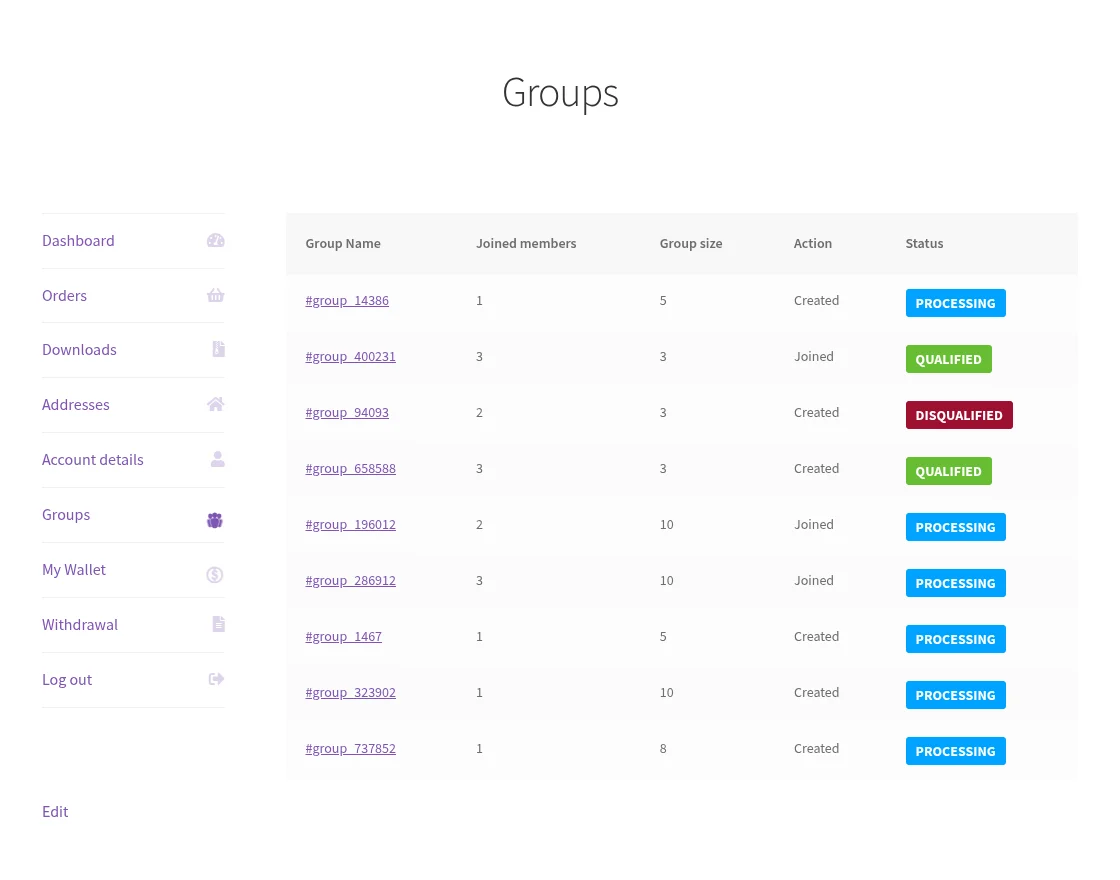
Here the customer will see all the groups created and joined by them and the status of the same.
The customer can select any group to see its details. For the reference, you can check the below snapshot:
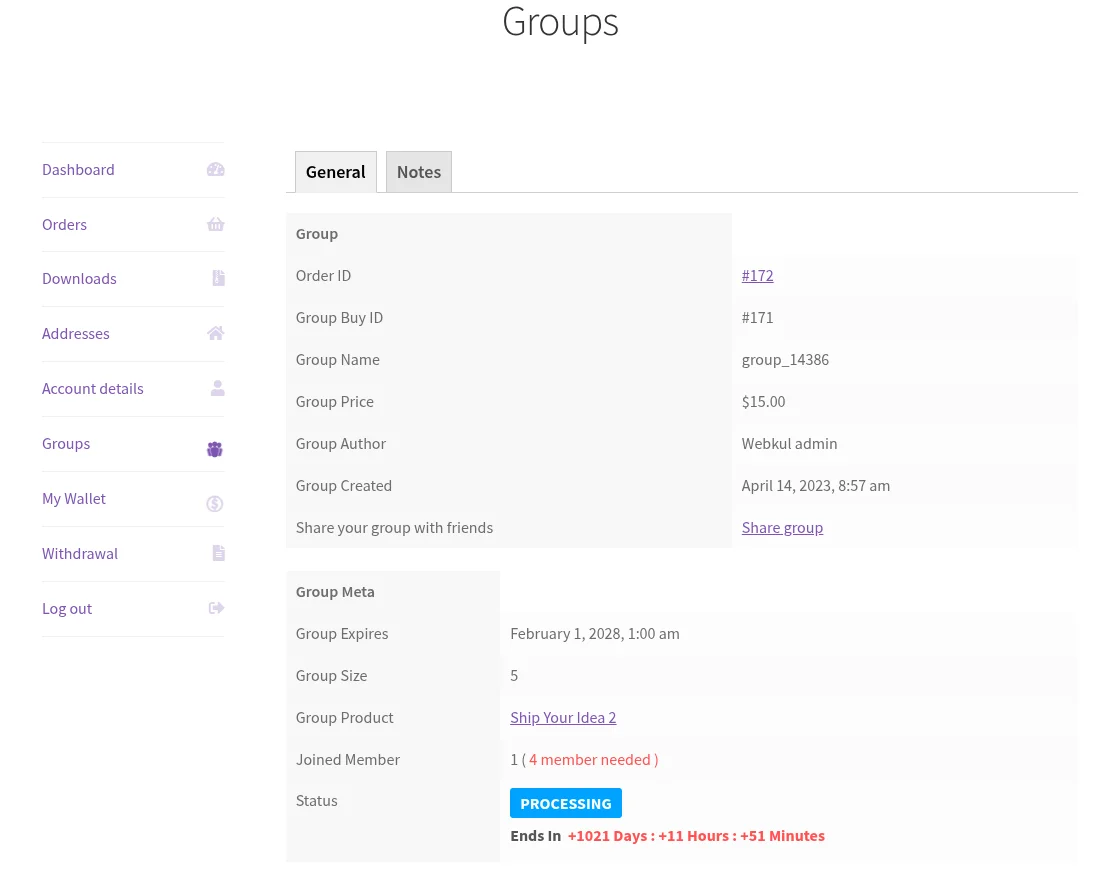
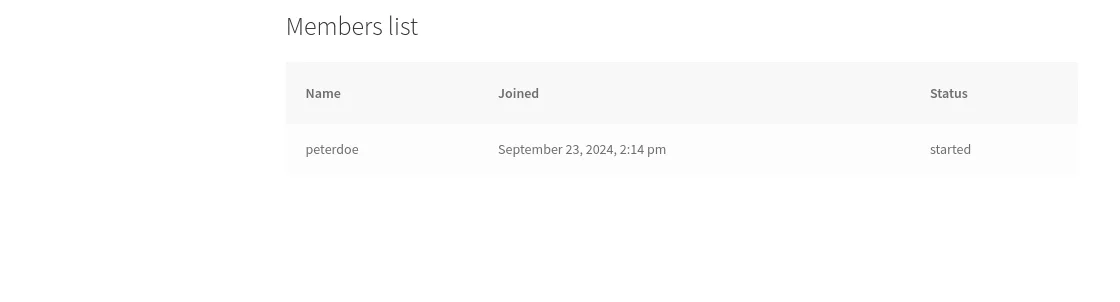
In the General section, the admin can see all the details of the group such as Group Expiry date, Group Size, Joined Member number, Member List, etc.
Also, from here the customer can Share the group through Facebook, Twitter, LinkedIn, or Send By Email.
In the Notes section, the customer will be able the see all the notes related to the group as per the below snapshot:

Customer view- Wallet
Once the admin has enabled the wallet extension for the customer, the customer can see the Wallet option under the payment methods as per the below image:
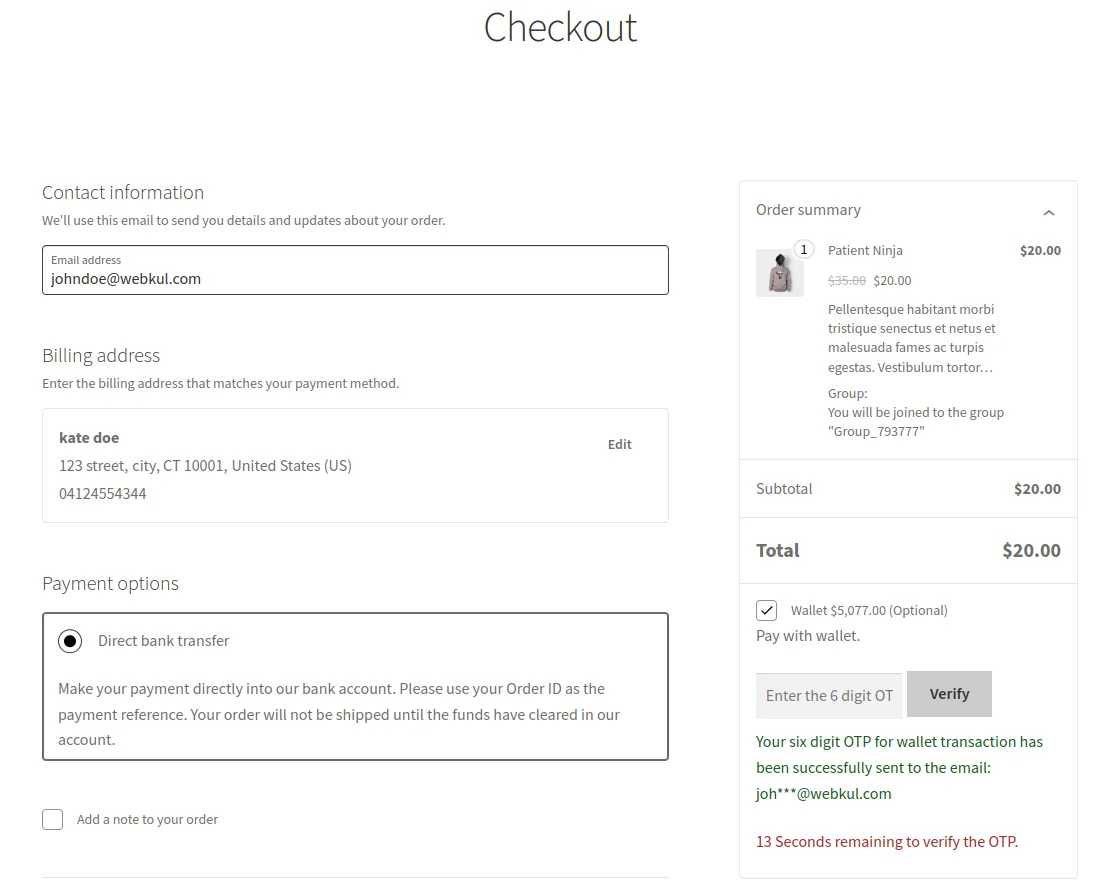
Next, the customers will received the OTP on their Email as per the below image,
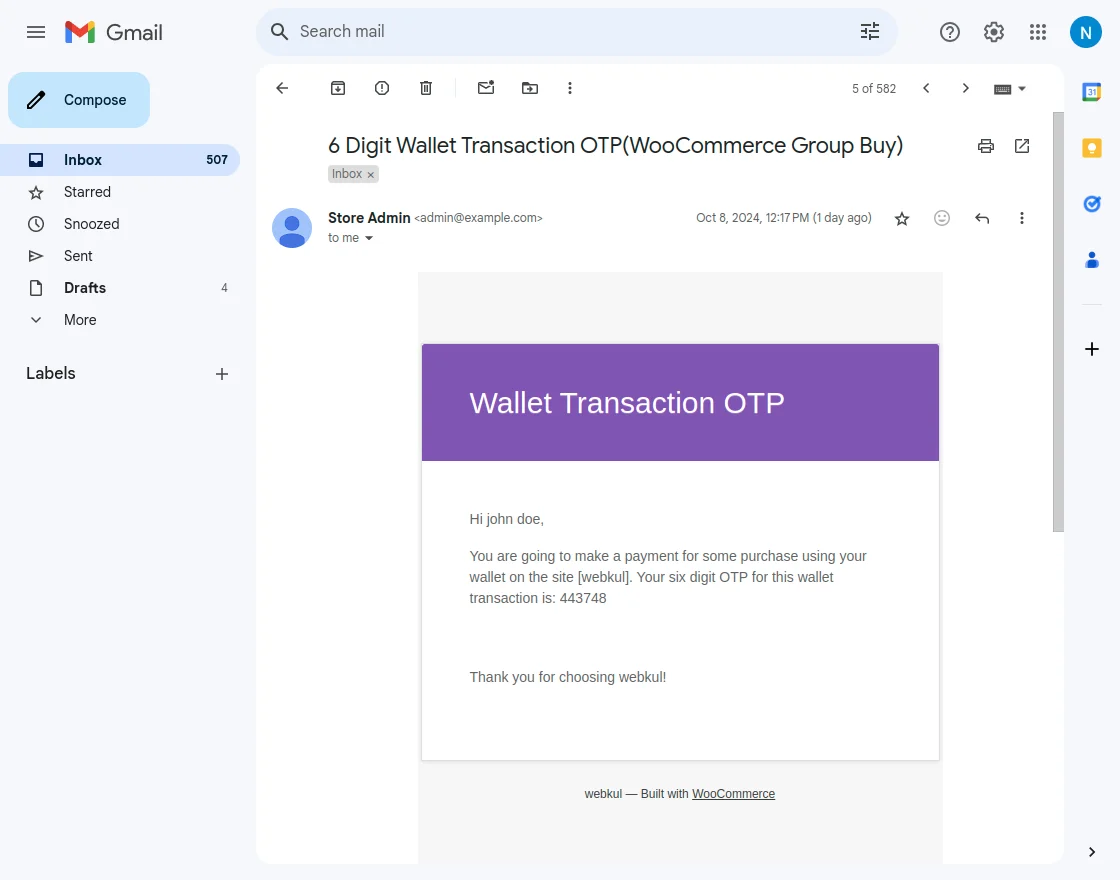
Similarly, the customers will receive the OTP on SMS if selected by admin in configurations.
Thus, in this way, they can pay for the purchase through their wallets.
How the customer can see the Wallet Transaction List?
The customer has to navigate towards, My Account > My Wallet to see all the wallet transactions.
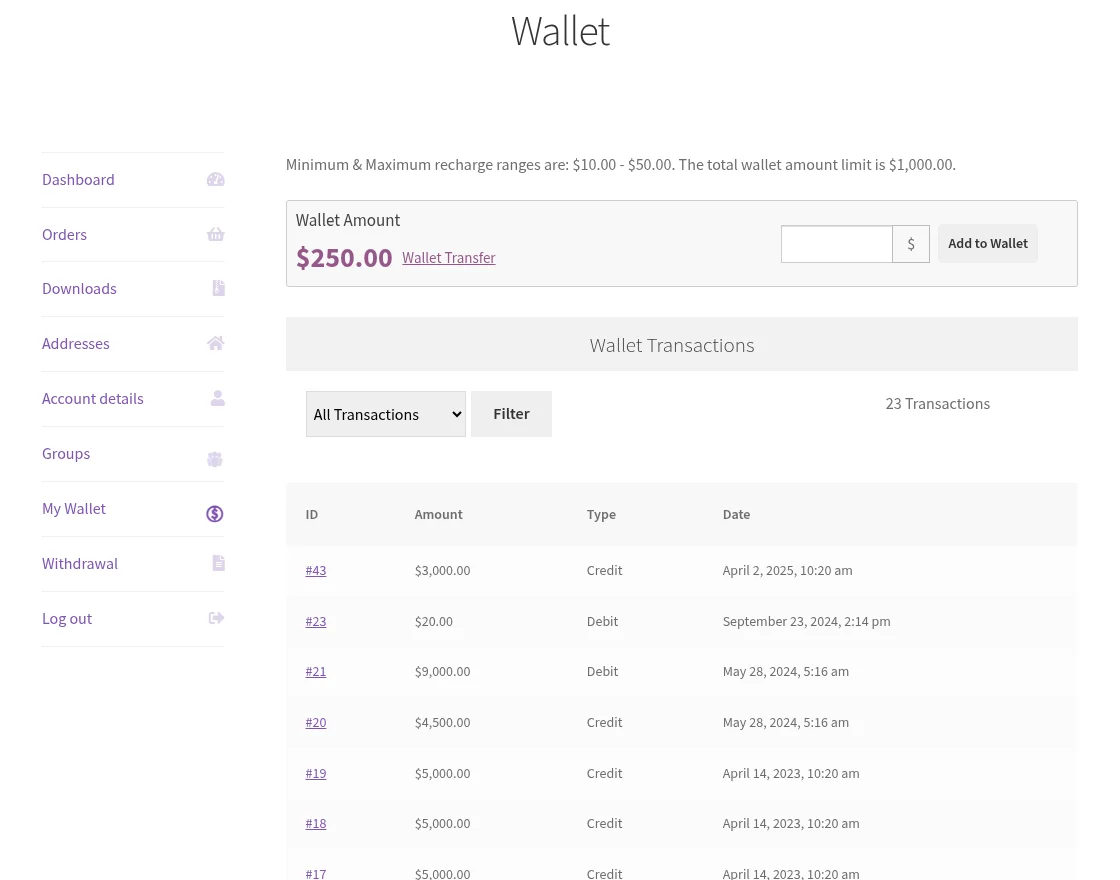
They can click on any transaction to see the details of the transaction and the transaction is shown as per the below image:
Also, the customer can add the money into the wallet by clicking on the Add to Wallet button but before that, they need to enter the amount which they want to add.
Then, it will redirect them to the cart page as per the below image:
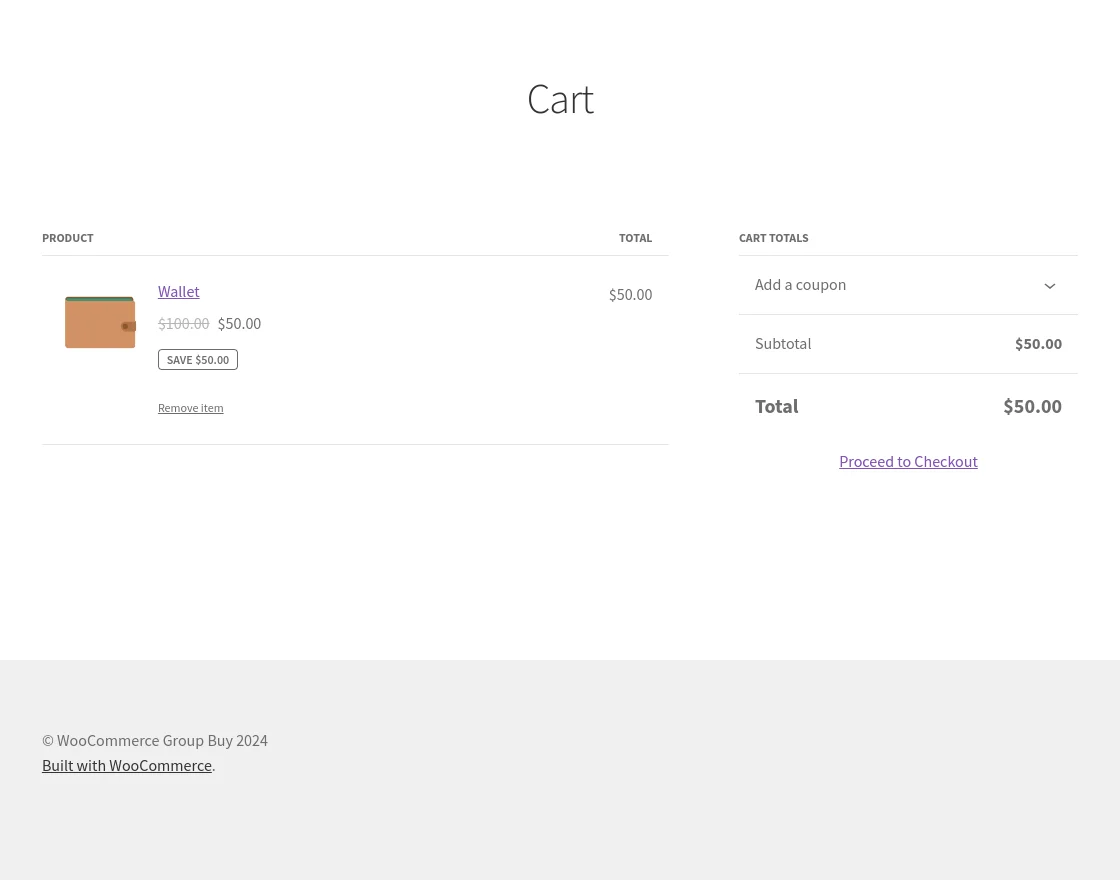
Hence, in this way, the customer can add money to the wallet.
Wallet Transfer
Here the customer can easily transfer their wallet amount to each other.
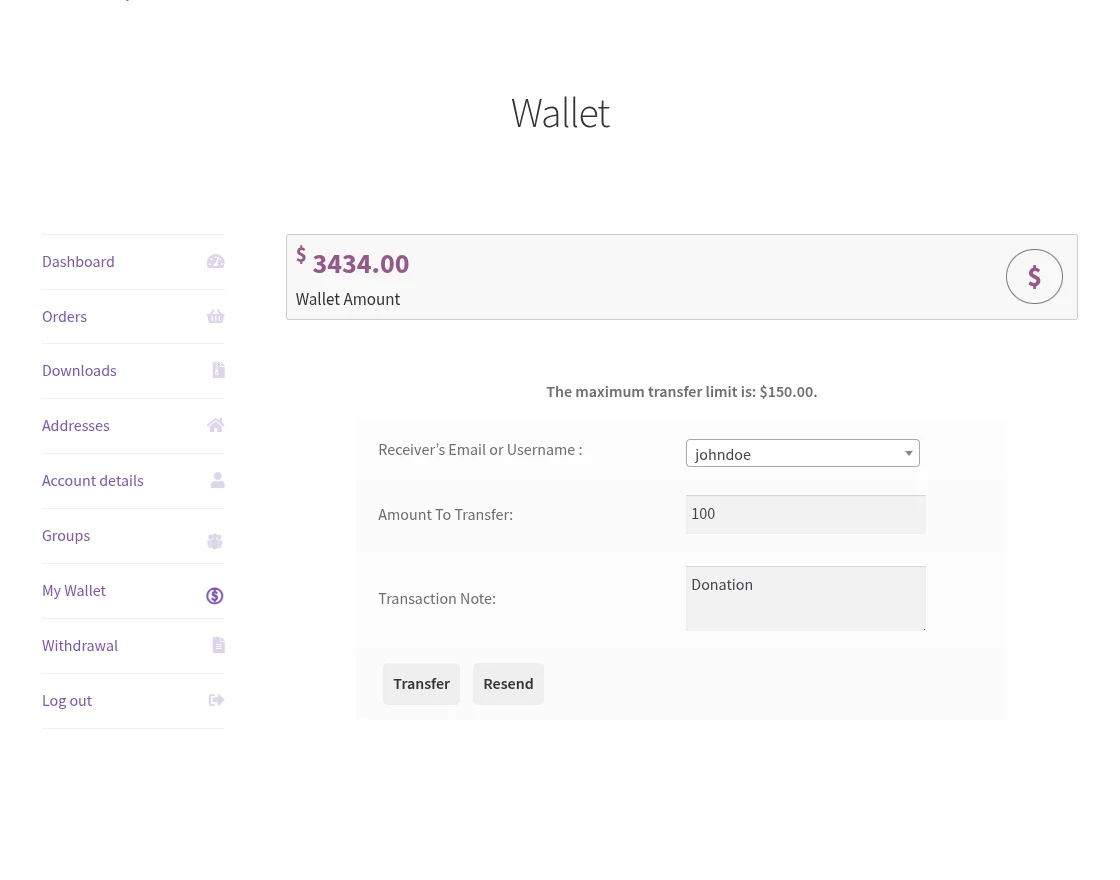
Customers can transfer amount from one wallet to another. They’ll have to fill the below details,
Receiver’s Email or Username
Amount to Transfer
Transaction Note
Customer Wallet Withdrawal
Customers can raise Withdrawal Requests from the dedicated withdrawal button. Once they tap on it, they are redirected to the below page,
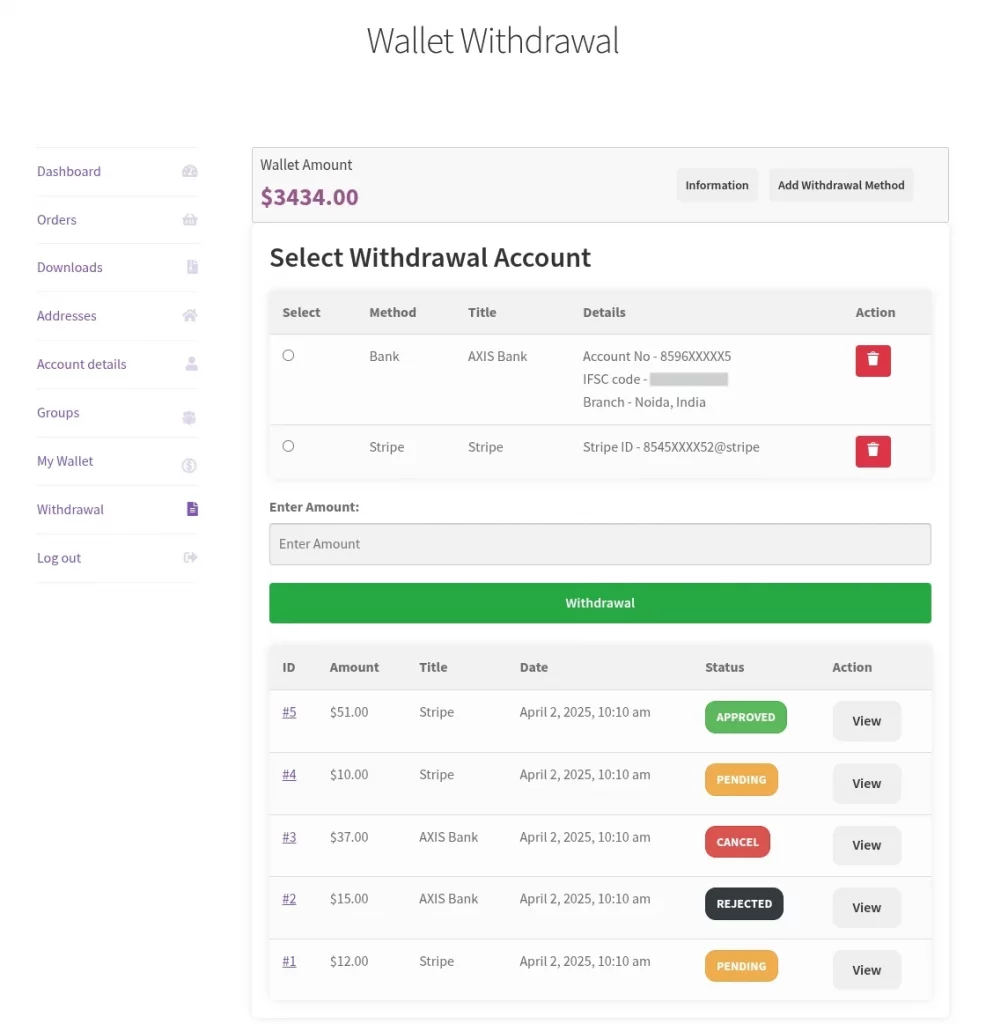
Here, customers select their preferred withdrawal account, enter the Withdrawal amount and then tap on the Withdrawal button to create a withdrawal request.
Customers can also add new Withdrawal methods by tapping on Add Withdrawal Method button.
Support
Thus, that’s all for the WooCommerce Group Buy extension. Still, have any issues feel free to add a ticket. Also, let us know your views to make the module better. ツ
Current Product Version - 1.5.0
Supported Framework Version - WooCommerce: 9.8.1; WordPress: 6.8.0

i.e. only allow shop staff to create group buy group.
Thanks!