The WooCommerce Connector is a Pimcore bundle that syncs your product catalog between Pimcore and a WooCommerce store, in both directions, entirely from inside Pimcore Studio. No custom scripts, no manual CSV exports — connect a store once, map your fields, and run export or import jobs whenever you need to, with live progress and a full history of everything that ran.
This guide walks through every feature of the connector, screen by screen.
Connecting a WooCommerce Store (Accounts)
Everything starts with an Account — a saved connection to one WooCommerce store, holding its URL and REST API credentials. The connector supports multiple accounts, so you can connect as many WooCommerce stores as you like from a single Pimcore install (a staging store, a production store, a store per brand or region — whatever your setup needs), each with its own credentials, import folder, and batch size.
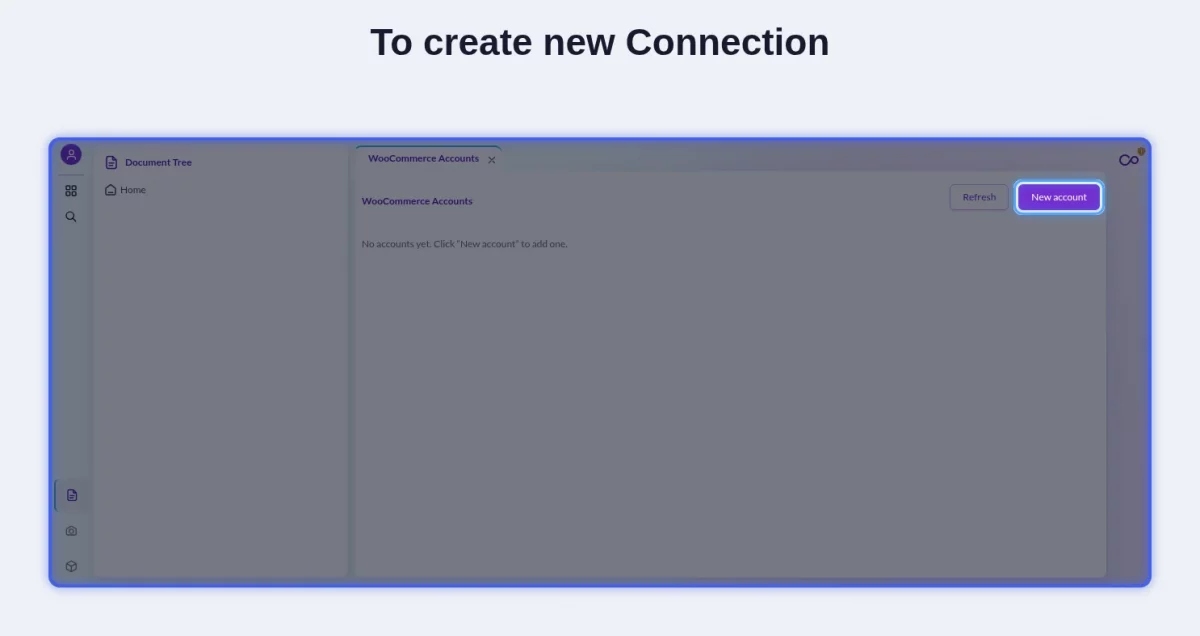
When you first open WooCommerce Connector → Accounts, the list is empty — click New account to add your first store.
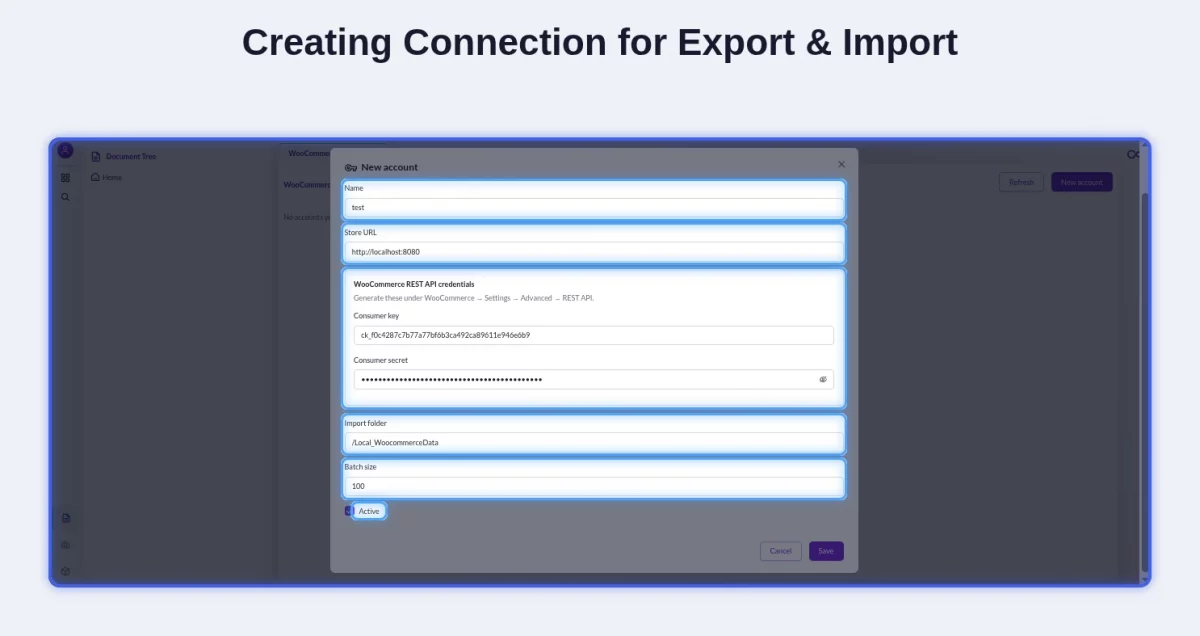
The account form asks for:
- Name — a friendly label for this connection.
- Store URL — your WooCommerce site’s base URL.
- WooCommerce REST API credentials — the Consumer key and Consumer secret, generated in WooCommerce under Settings → Advanced → REST API.
- Import folder — the Pimcore asset/object folder this account’s imports land in.
- Batch size — how many records are sent per API request during a sync.
- Active — a toggle to enable/disable the connection without deleting it.
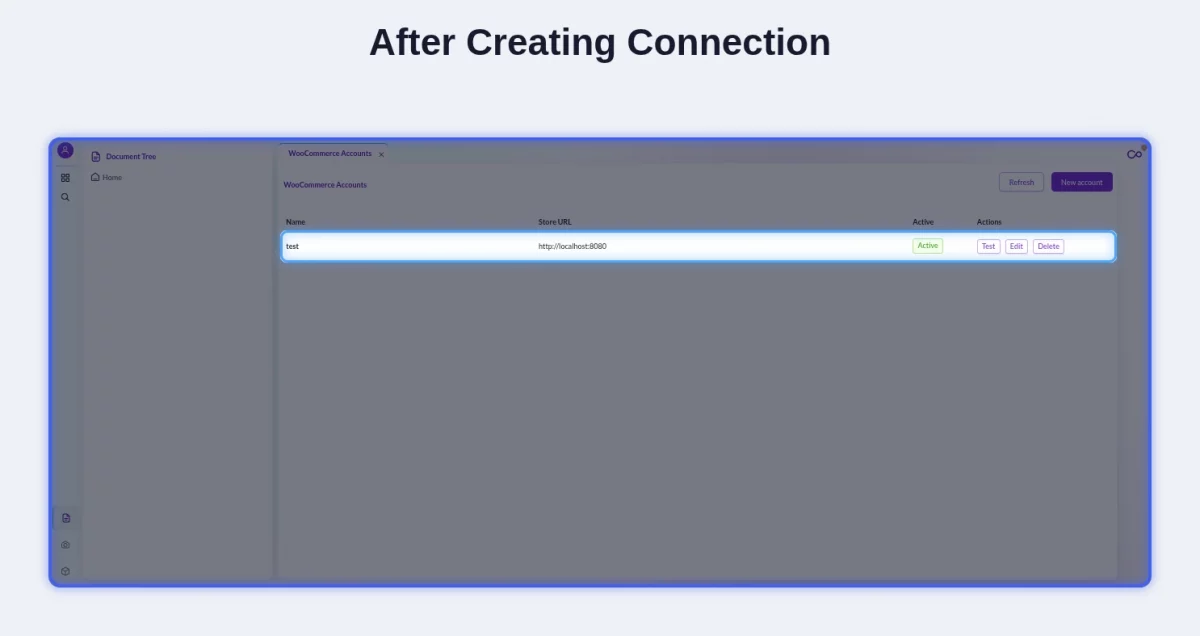
Once saved, the account shows up in the list with quick actions:
- Test — pings the store live with the saved credentials to confirm the connection actually works, right from the list, before you run a single job.
- Edit — update the URL, credentials, folder or batch size at any time.
- Delete — remove the connection entirely.
2. Finding Your Way Around (The Connector Menu)
Everything the connector does lives under its own entry in Pimcore’s main menu, so it never gets mixed up with the rest of your Pimcore setup:
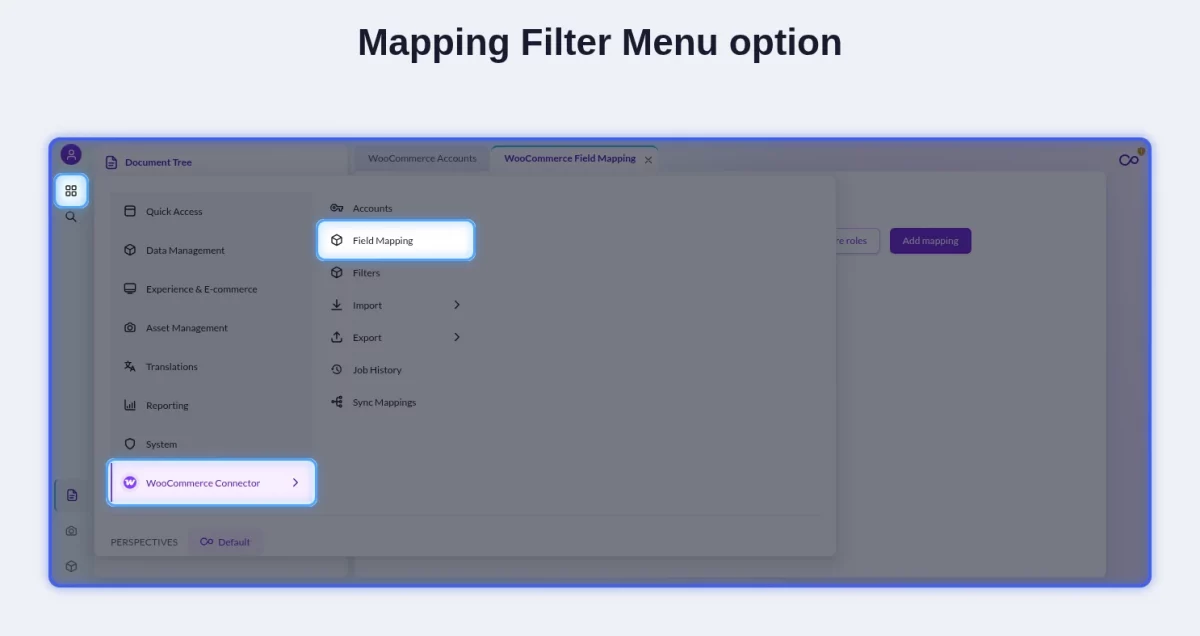
From here you can reach:
- Accounts — the connections screen covered above.
- Field Mapping — decide which Pimcore field feeds which WooCommerce field.
- Filters — decide which records get included in a sync at all.
- Import — one submenu entry per importable entity.
- Export — one submenu entry per exportable entity.
- Job History — every export/import job you’ve ever run, in one place.
- Sync Mappings — the cross-system link between a Pimcore object and its WooCommerce counterpart.
3. Telling the Connector Which Pimcore Class Is Which
Nothing about this connector is hardcoded to a specific class name. Before mapping fields, you tell it which of your Pimcore classes plays the role of a WooCommerce Product, Category, and Brand — click Configure roles on the Field Mapping screen:
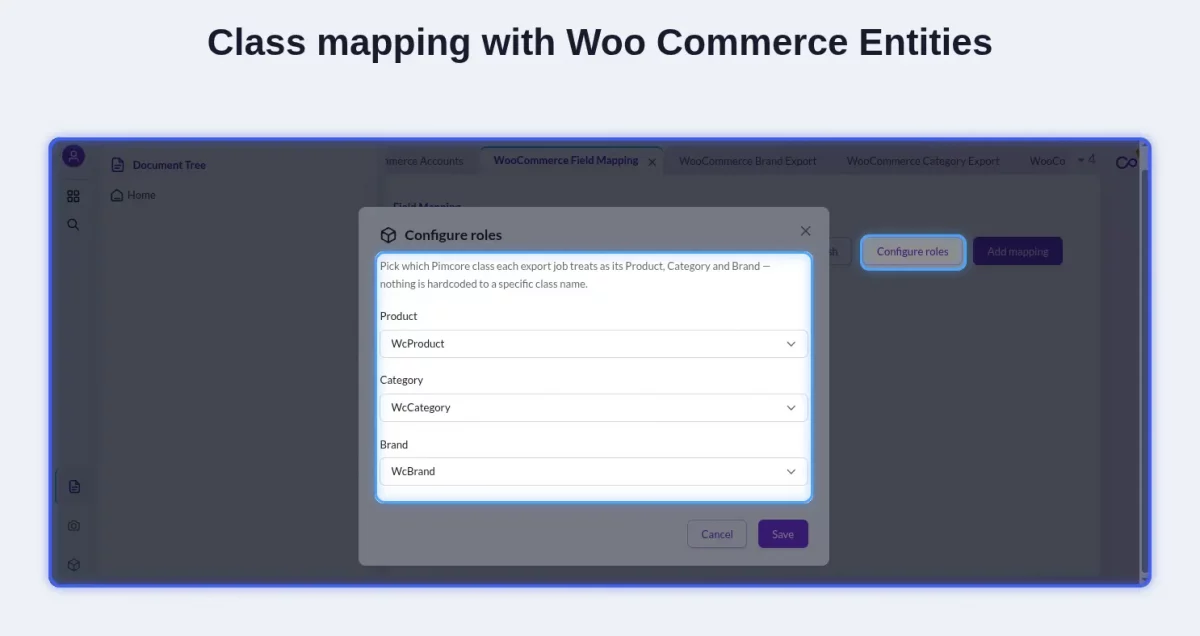
Whatever class you already use for products, categories or brands in your Pimcore data model — the connector adapts to it, instead of forcing you into its own schema.
4. Field Mapping — Connecting Individual Fields
For each account and each entity role (Product / Category / Brand), the Field Mapping screen lets you wire a Pimcore field to a WooCommerce field one at a time. Click Add mapping:
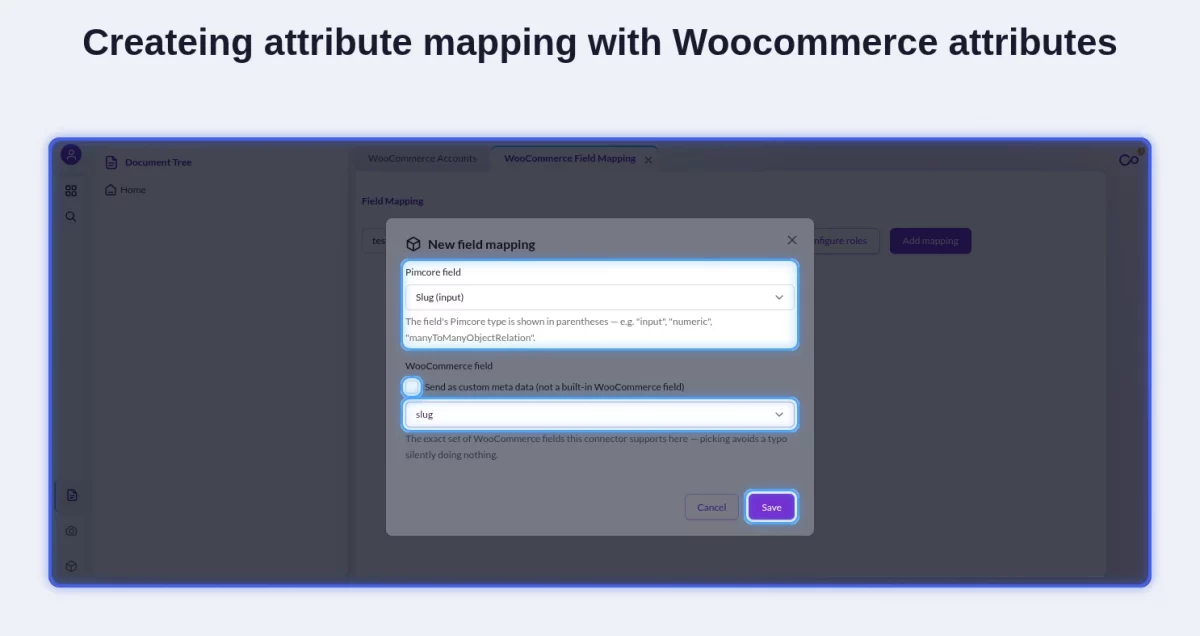
- The Pimcore field dropdown is populated straight from your class definition — including its Pimcore data type (`input`, `numeric`, `image`, `manyToManyObjectRelation`, and so on) — so there’s no guessing what a field actually is.
- The WooCommerce field dropdown offers exactly the fields this connector understands for that entity, which prevents silent typos that would otherwise map to nothing.
- Send as custom meta data — for anything WooCommerce doesn’t have a native field for. Instead of losing the value, it gets written as WooCommerce product/term meta, so custom Pimcore data (brand info, SEO fields, dimensions, or anything modeled through Pimcore’s Classification Store) still makes the trip across.
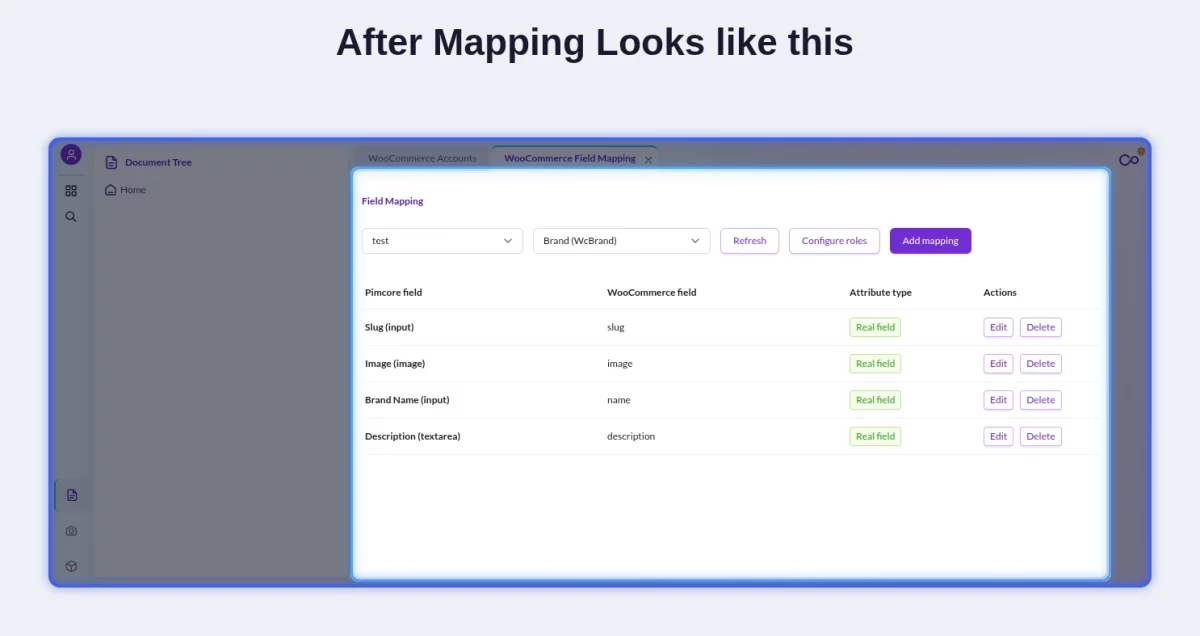
Once you’ve mapped everything for an entity, the list gives you the full picture — every Pimcore field, its WooCommerce counterpart, whether it’s a real field or custom meta, and quick Edit/Delete actions:
5. Filters — Syncing Only What You Want
Not every record needs to leave — or enter — your catalog. The Filters screen lets you define per-account, per-direction (export or import) rules that include or exclude records from a sync, so you can, for example, keep draft products out of an export, or skip importing certain WooCommerce categories entirely.
6. Exporting From Pimcore to WooCommerce
The Export submenu gives you one screen per entity type — Category, Brand, Attribute, Product, and Variation Export. Each screen works the same way: pick the account, hit Run.
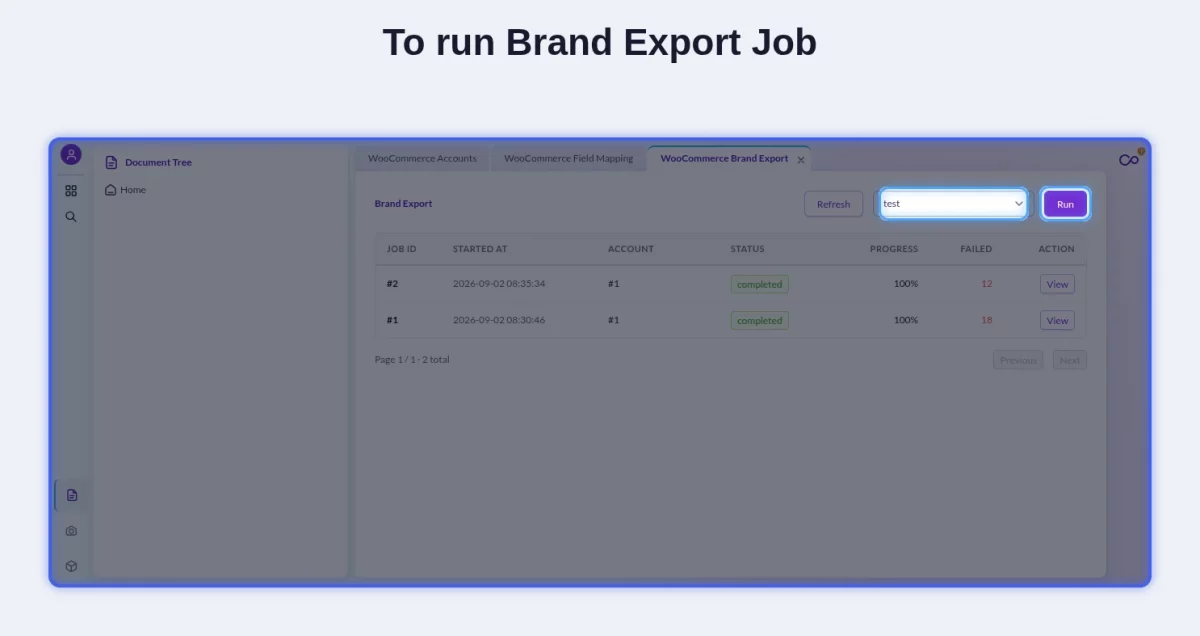
Run order matters for a first full sync: Categories → Brands → Attributes before Products (since a product references its category/brand/attributes), and Products before Variations.
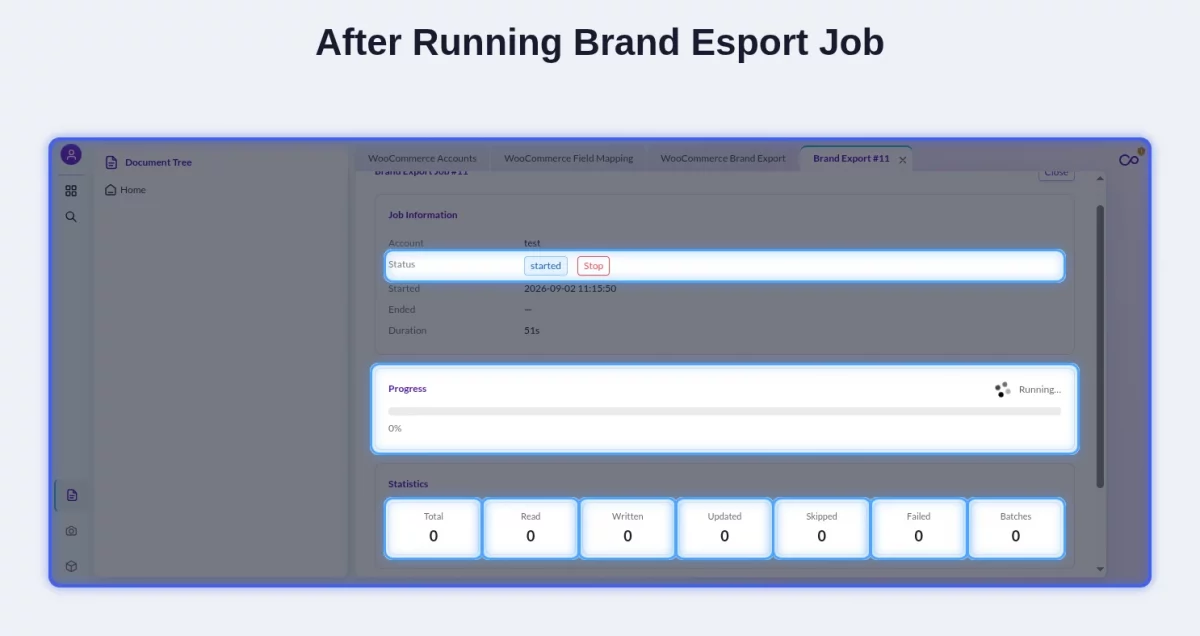
Every job runs asynchronously in the background, so Studio stays completely responsive — start a job, keep working, and come back to check on it. Open a job and you get live status:
- Status, with a Stop button to cancel a run that’s still in progress.
- Started / Ended / Duration.
- A live Progress bar with percentage.
- Live Statistics: Total, Read, Written, Updated, Skipped, Failed, and Batches — updating as the job works.
7. Importing From WooCommerce Into Pimcore
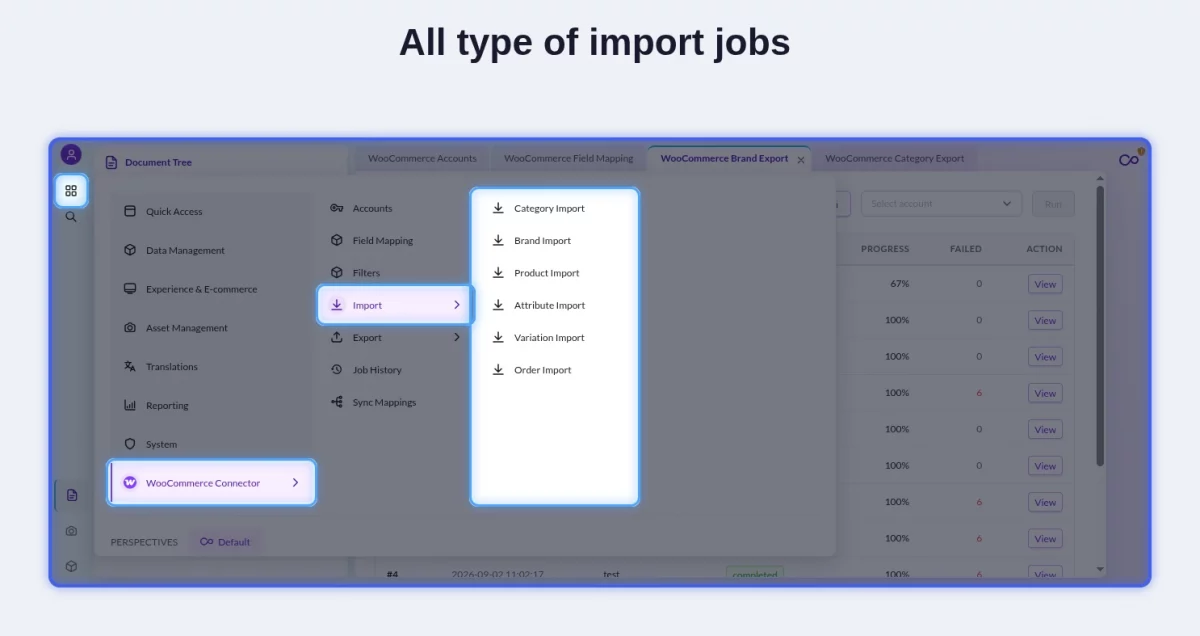
Sync works the other way too. The Import submenu covers every entity the connector can pull in: Category, Brand, Product, Attribute, Variation, and Order Import.
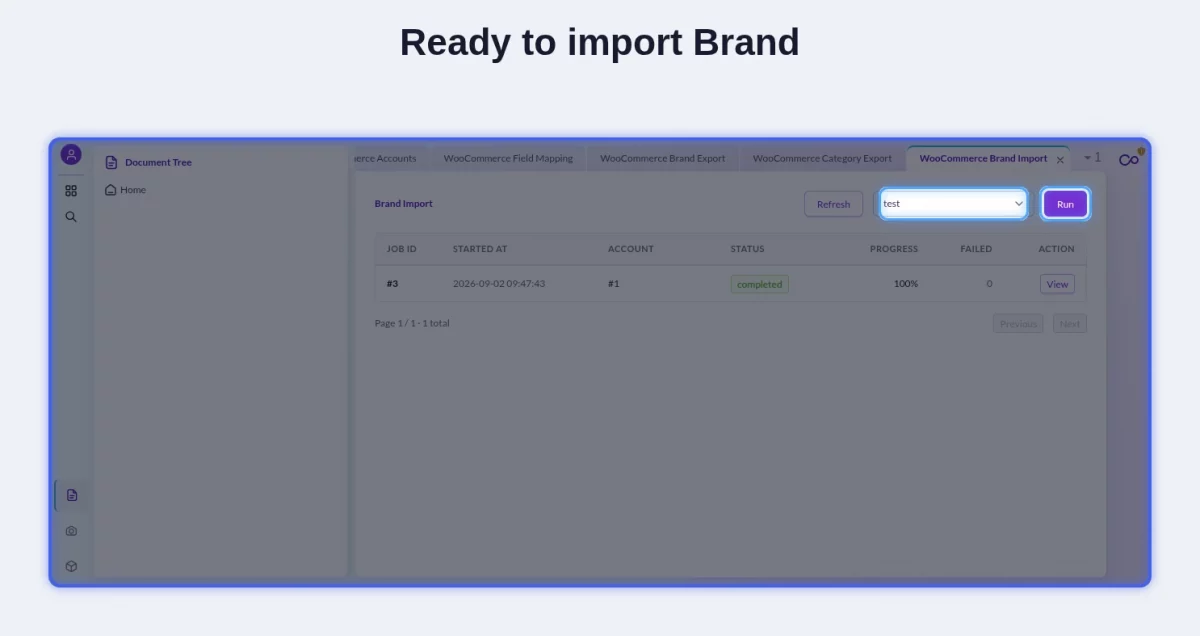
Each import screen mirrors the export screens exactly — pick the account, Run, and watch the job history build up right there:
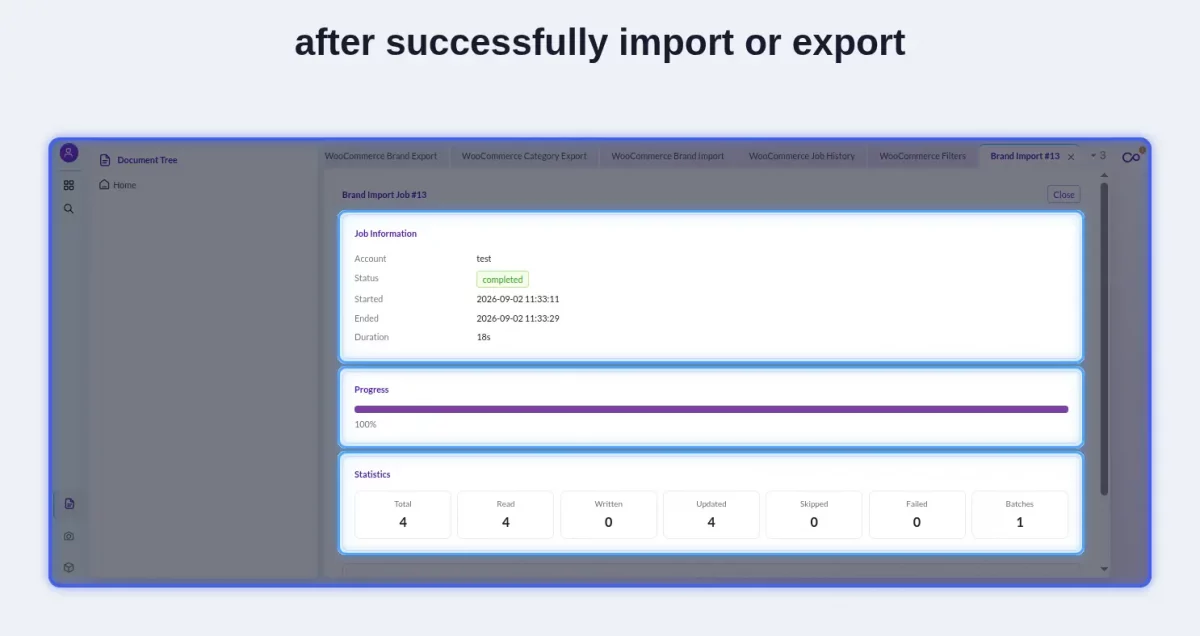
And the same live job detail view — progress, statistics, and all — shows you exactly what happened once it’s done:
8. Job History — Everything, In One Place
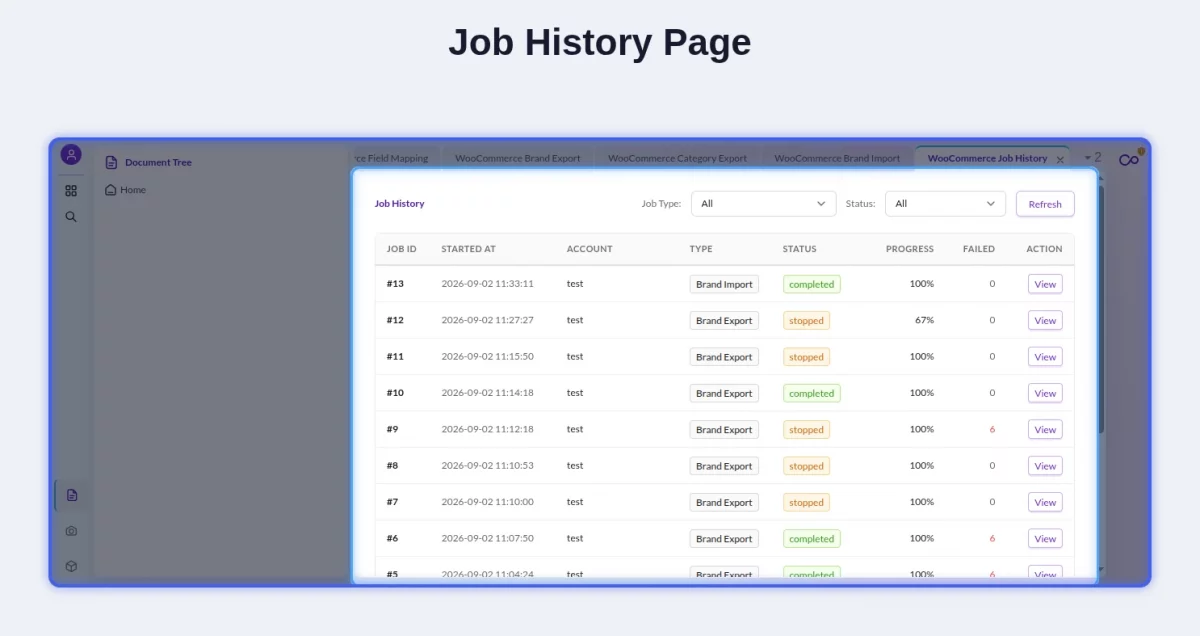
Rather than hunting through individual export/import screens, the Job History page lists every job the connector has ever run — export or import, any entity type, any account — with filters for Job Type and Status, live progress, failure counts, and a View action into the full detail of any job:
10. Seeing the Result — Live in WooCommerce
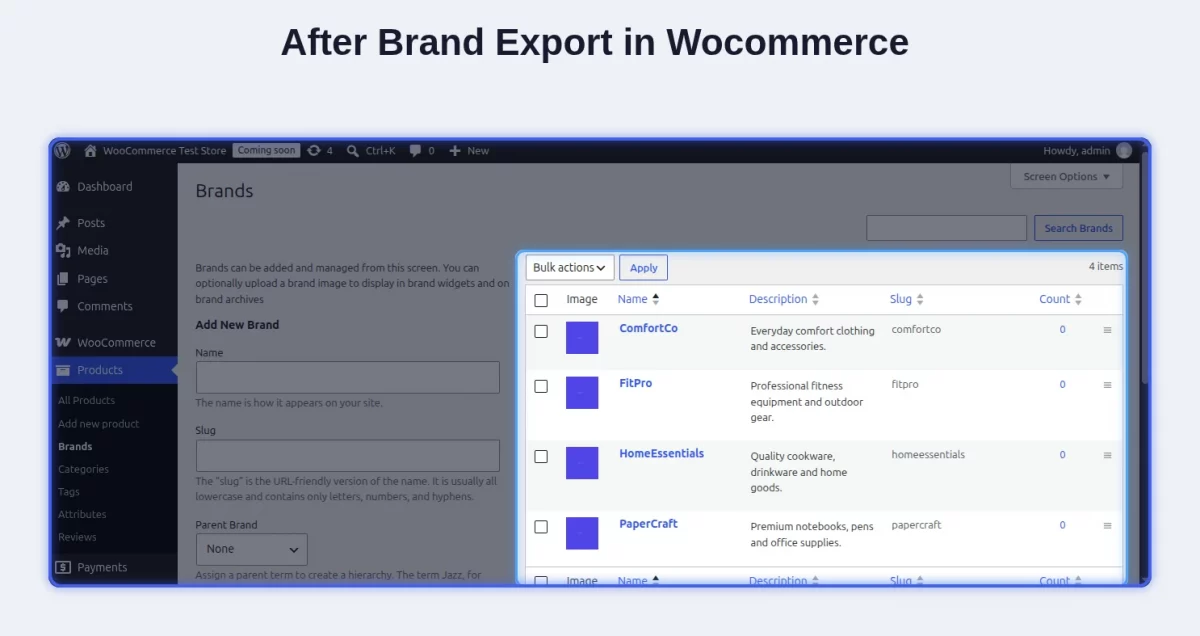
And here’s the payoff: after running a Brand Export, the brands created in Pimcore show up in WooCommerce’s own admin — names, descriptions, slugs, and images, exactly as configured in your field mapping:
11. Feature Summary
Multi-account / Multi-store
- Connect any number of WooCommerce stores.
- Configure each store independently.
REST API Authentication
- Connect using WooCommerce Consumer Key and Consumer Secret.
Live Test Connection
- Verify WooCommerce credentials before running synchronization jobs.
Configurable Class Roles
- Map Product, Category, and Brand to your own Pimcore classes.
- No hardcoded class dependencies.
Field Mapping
- Map Pimcore fields to WooCommerce fields.
- Configure mappings per account and entity.
Custom Meta Data Mapping
- Map data that does not have a native WooCommerce field.
- Supports Classification Store attributes, including:
- Brand information
- Product specifications
- SEO data
- Dimensions
- Custom attributes
Filters
- Configure include and exclude rules.
- Set filters independently for each account and synchronization direction.
Export Support
- Category
- Brand
- Attribute
- Product
- Variation
Import Support
- Category
- Brand
- Product
- Attribute
- Variation
- Order
Async Job Engine
- Synchronization jobs run in the background.
- Pimcore Studio remains responsive during processing.
Live Progress & Stop Control
- View real-time job progress and statistics.
- Cancel running jobs when required.
Unified Job History
- Track every synchronization job in one place.
- Filter jobs by type and status.
Sync Mappings
- Maintain persistent cross-system ID mappings.
- Re-sync existing records without creating duplicates.
Per-account Batch Size & Import Folder
- Configure batch sizes for each WooCommerce account.
- Organize imported assets using separate folders for each store.

Be the first to comment.