PrestaShop Canva Connect links your Canva account directly to your PrestaShop shop, so you can edit product images, category banners, brand logos and supplier pictures.
The module adds an “Edit in Canva” action to the relevant back-office grids and provides a full media library for importing and reusing designs.
It is designed for store owners and marketing teams who already use Canva to create promotional and catalogue imagery.
Instead of switching between tools, you open Canva from inside PrestaShop, make your changes, and return to find the new image already applied.
The module also supports bulk updates through a background job queue, which is useful when refreshing many items at once.
Features of PrestaShop Canva Connect
- Sends the current product, category, brand or supplier image to Canva and writes the edited design back automatically.
- Adds an “Edit in Canva” row action to Product, Category, Brand and Supplier grids in the back office.
- Adds a bulk “Apply a Canva design” action to the same grids for updating many items at once.
- Connects to Canva using OAuth 2.0 with PKCE; stores access and refresh tokens in encrypted form.
- Verifies every design returning from Canva using Canva’s Connect signing keys before it touches your catalogue.
- Lets you browse your Canva designs inside PrestaShop with search and pagination, then import any design into the media library.
- Provides a searchable, filterable media library for all imported designs with options to attach them to catalogue items or copy HTML snippets.
- Automatically backs up the old image when replacing a category, brand or supplier image, so you can restore it later.
- Processes bulk assignments through a durable job queue with automatic retry and back-off.
- Shows queue statistics (waiting, running, done, failed) and offers Run now, Retry failed and Clear finished controls.
- Generates a tokenised cron URL so the queue can run on a schedule without manual log-ins.
How to Install PrestaShop Canva Connect
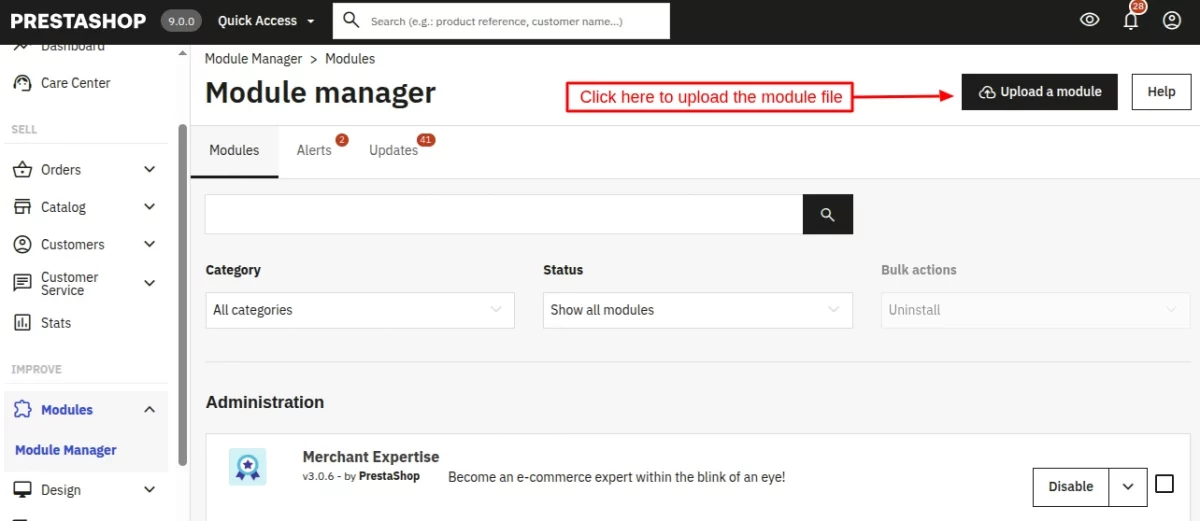
- Firstly, go to the module manager in the back office and click on ‘upload a module’.
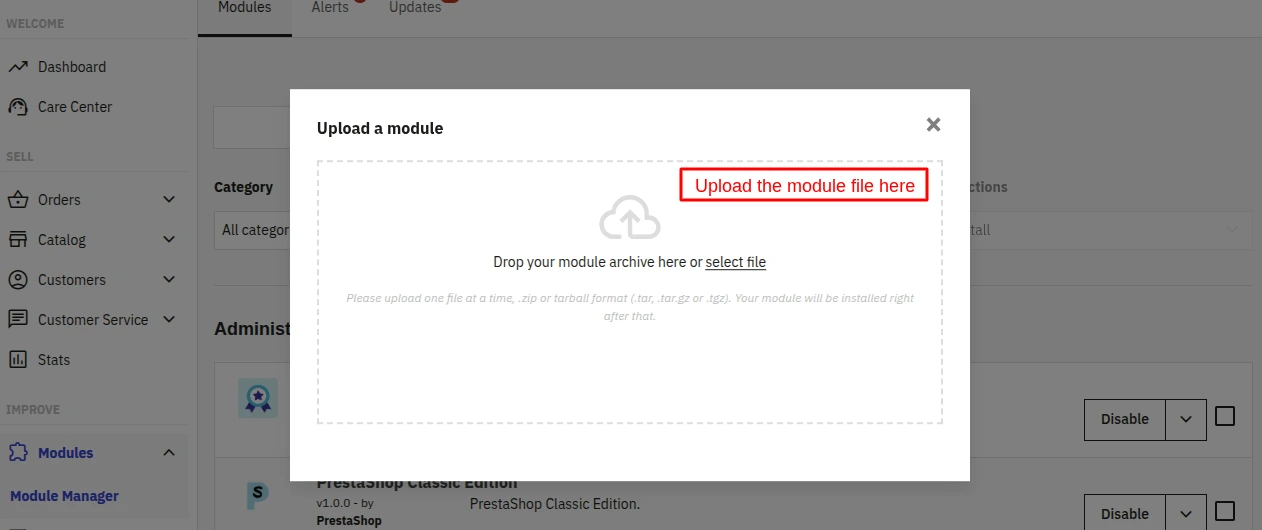
- After that, drag and drop the module file or select the file from the system.
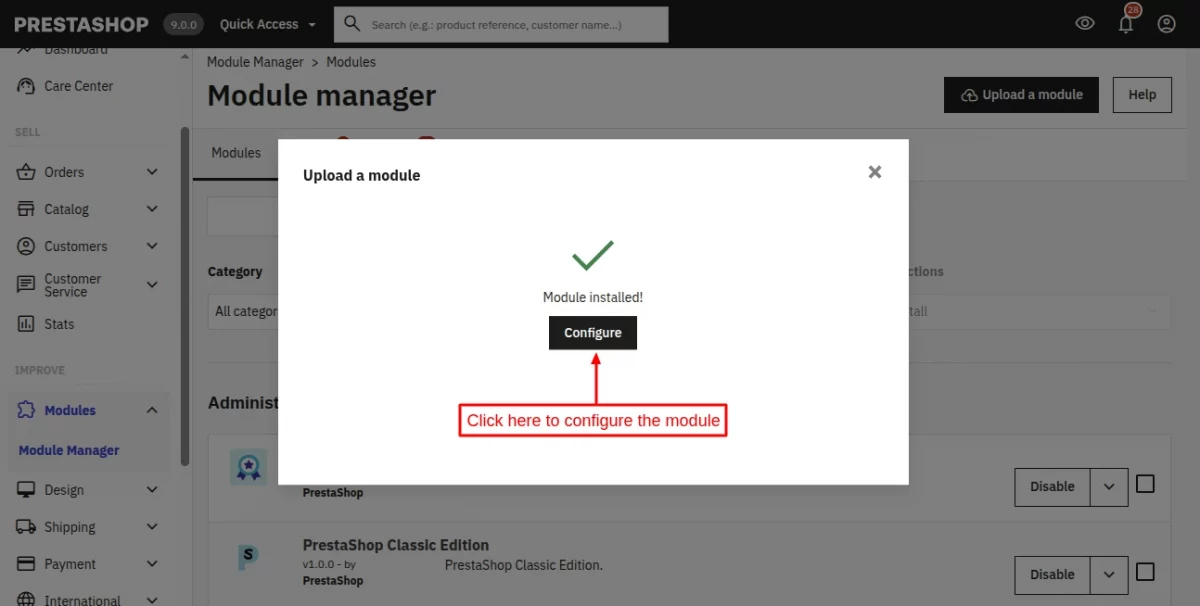
- In this way, the module installation will be successful.
Setup Progress and Connection
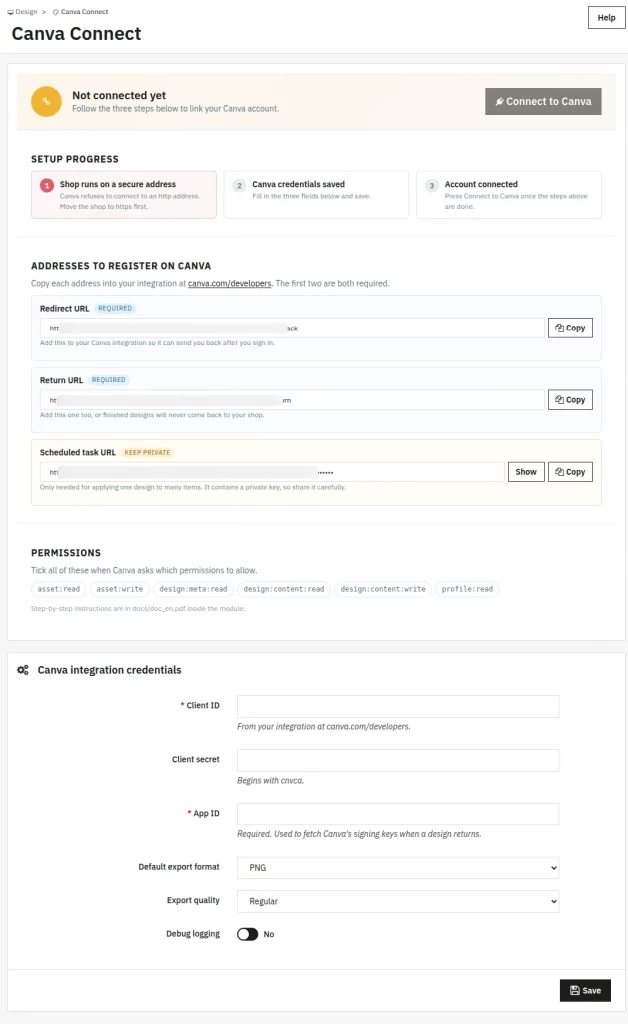
Below is the credentials form, the settings page shows a three-step checklist:
- Shop runs on a secure address — Canva requires HTTPS. If your shop is not on HTTPS, the Connect button is disabled and a warning explains why.
- Canva credentials saved — appears once Client ID, Client Secret and App ID are all present.
- Account connected — appears once you have successfully authorised the module with your Canva account.
Connecting your Canva Account
Step 1:
Go to Design > Canva Connect > Settings.
Step 2:
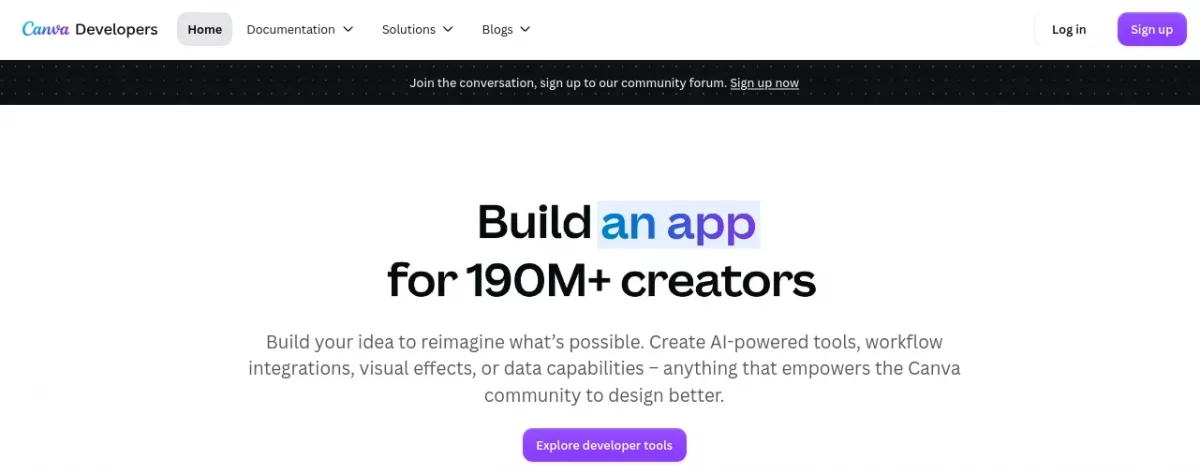
In a new browser tab, go to https://www.canva.com/developers/ and sign in with your Canva account.
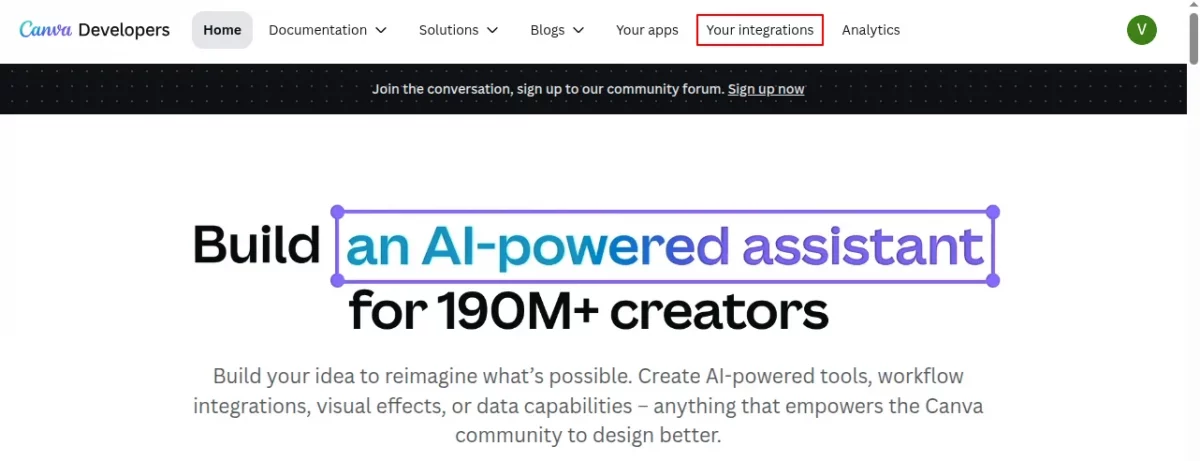
Now, go to ‘Your integrations’ section and click on ‘Create an integration’ button.
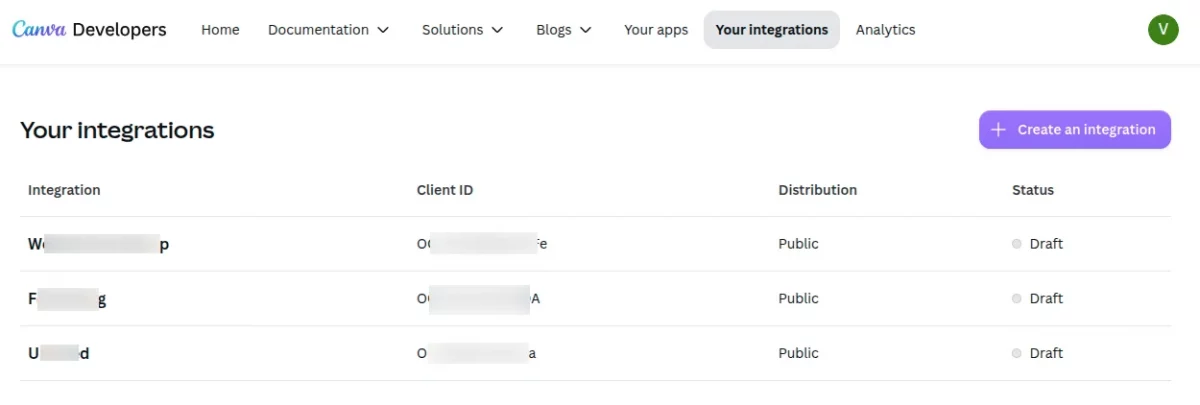
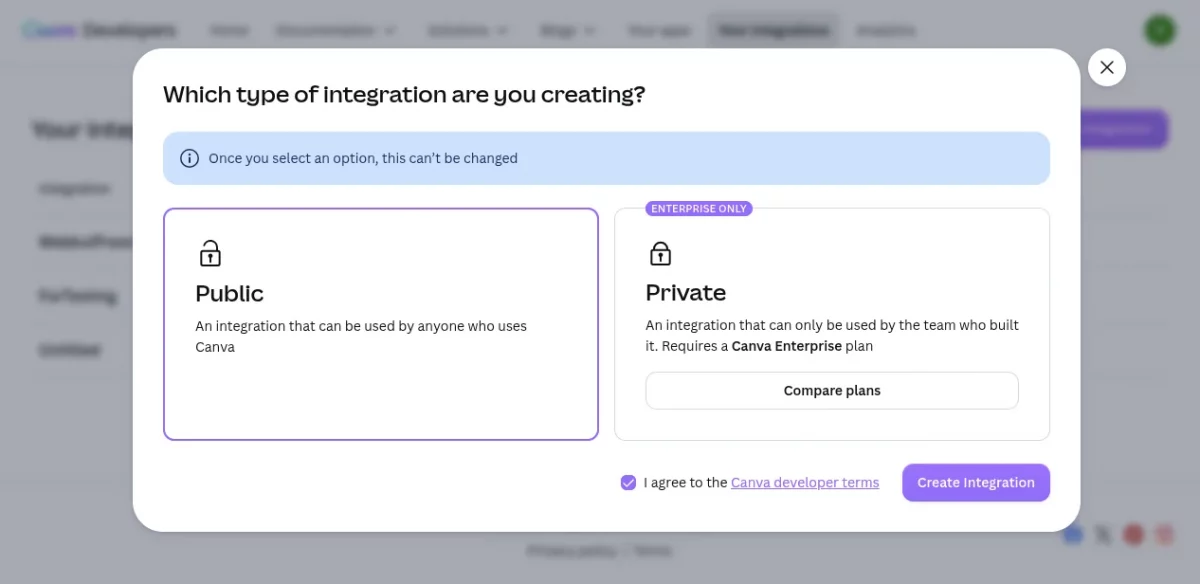
On clicking ‘Create an integration’ button, a popup appears on the page asking for the type of integration you need to create.
Select public, agree to Canva terms, and click on ‘Create Integration’ button.
Specify the integration name and you will find Client ID and Client secret under Credentials.
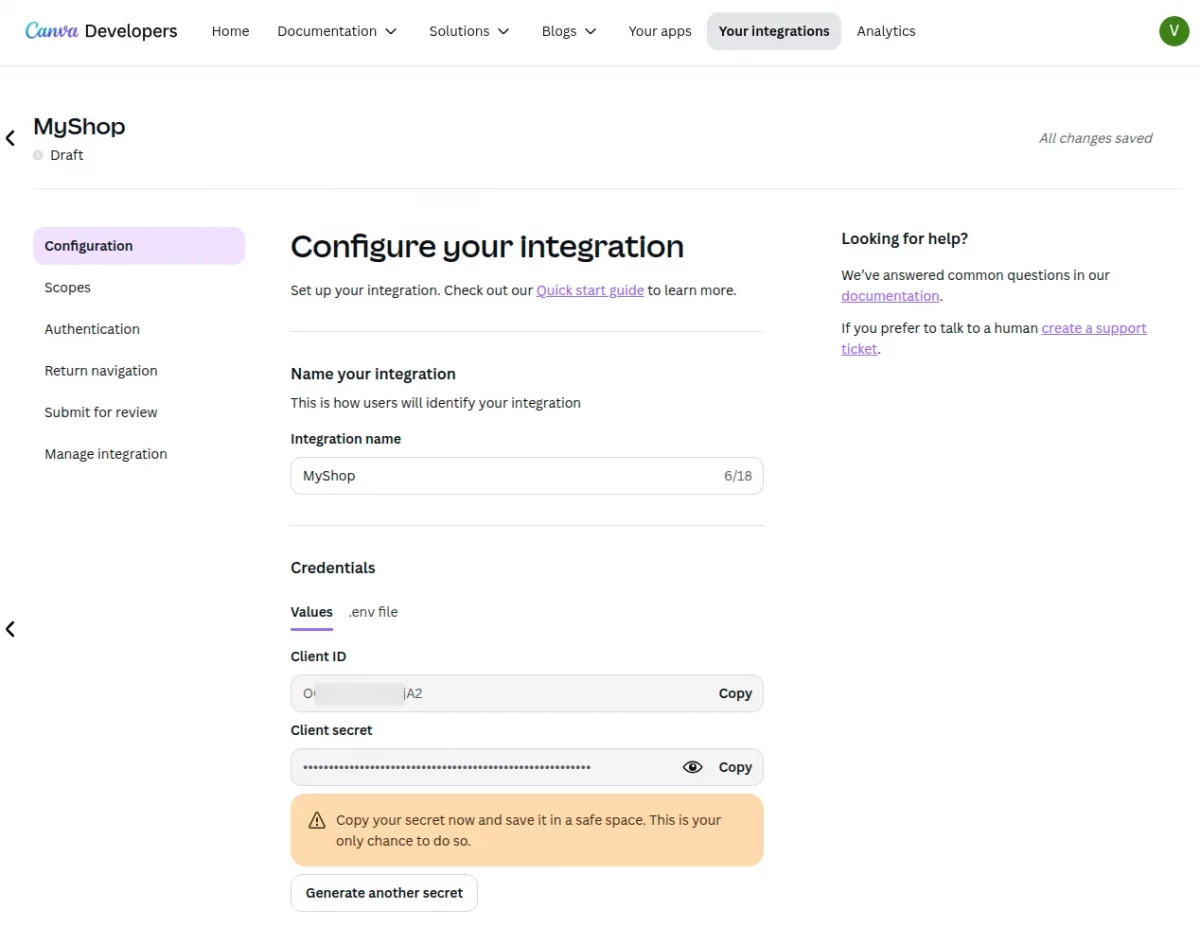
Step 3: Allow two web addresses
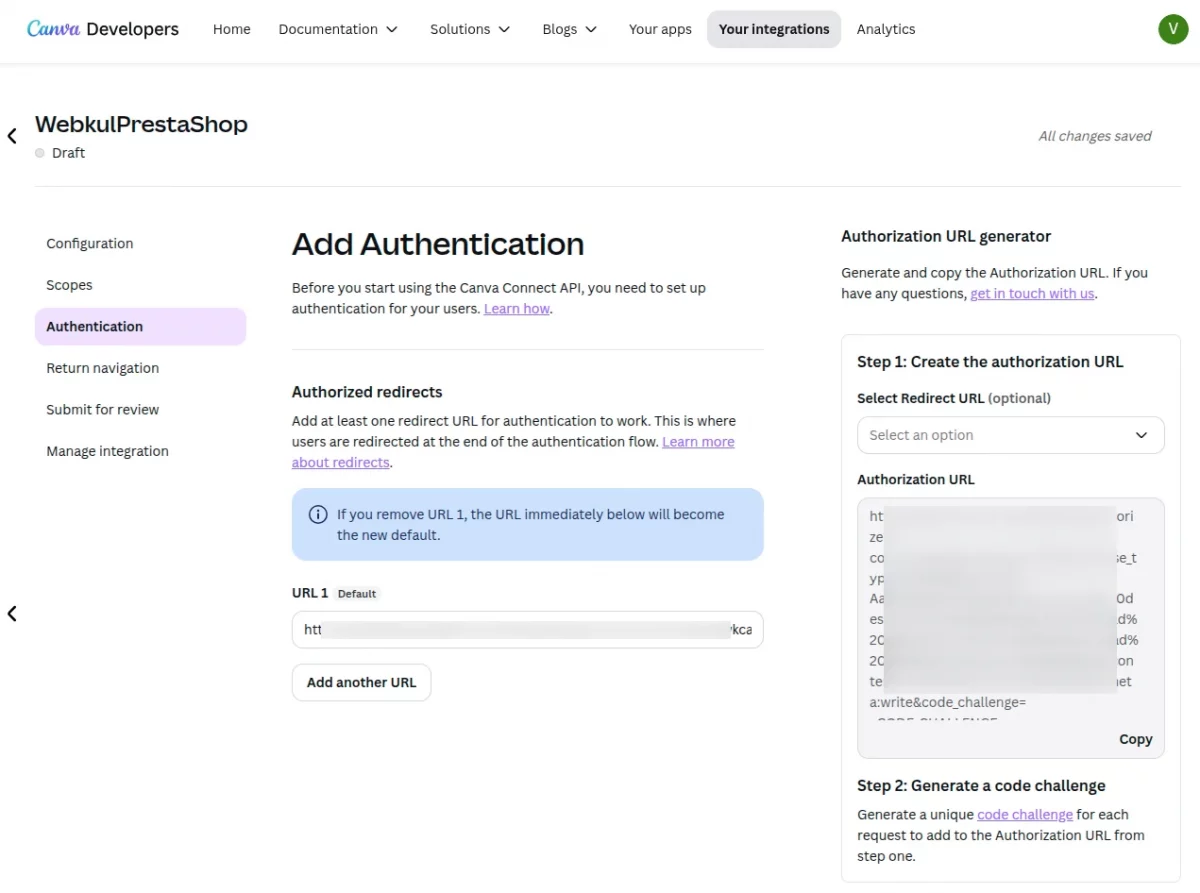
Enter the redirect URL given under addresses on Canva Connect page in URL 1 field under the Authentication tab in Canva. This URL is required so you can send pictures to Canva.
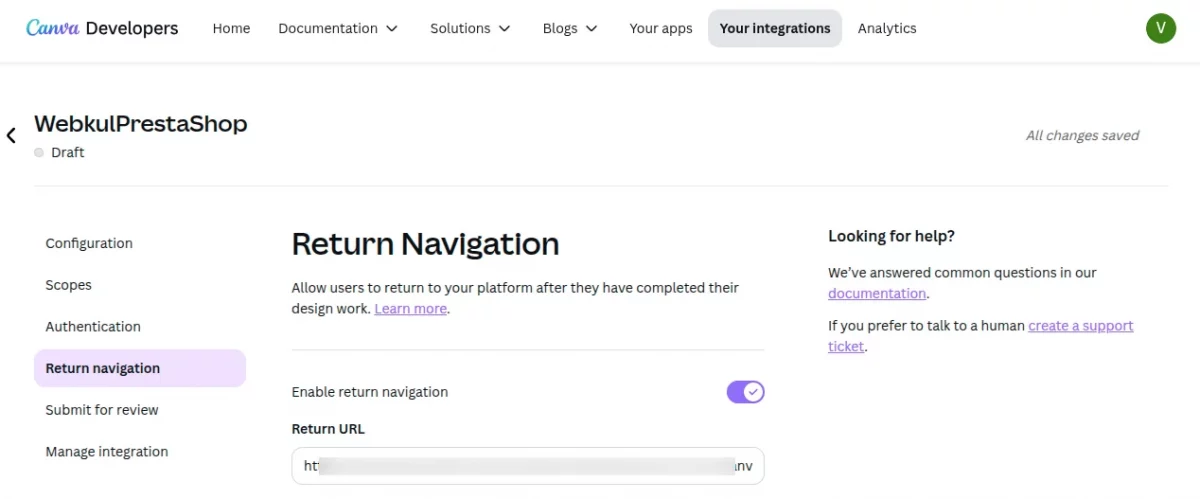
Now, enter the return URL given under addresses on Canva Connect page in Return URL field under Return Navigation tab on Canva.
This URL is required so that the finished design come back to PrestaShop.
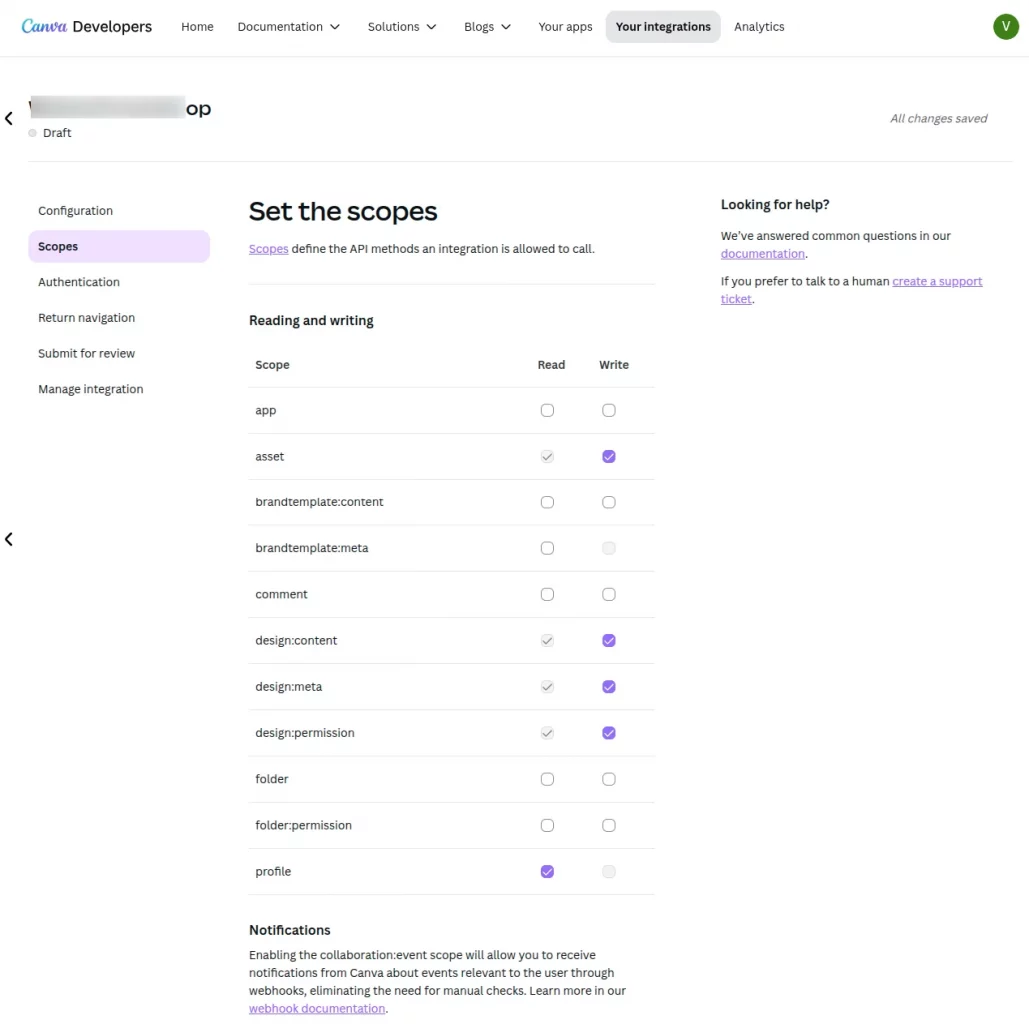
Step 4: Tick the permissions
Canva asks which things your shop is allowed to do. You can tick the required ones under Scopes.
Step 6: Create App
For creating an app, go to “Your apps” tab and click on ‘create an app’ button.
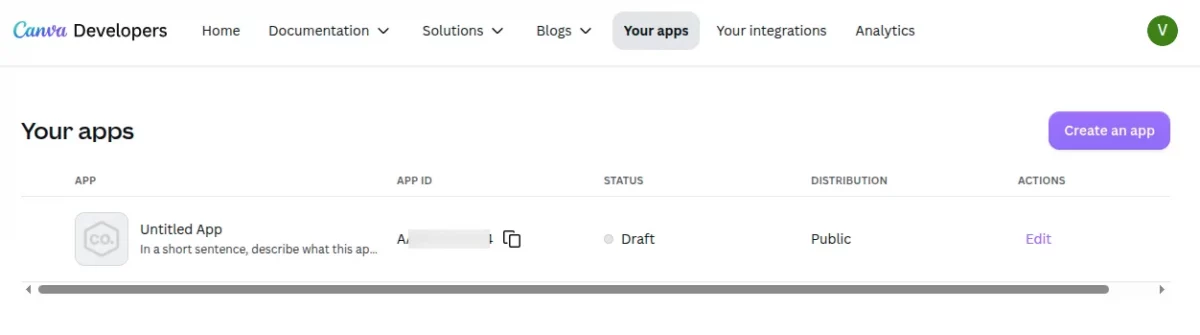
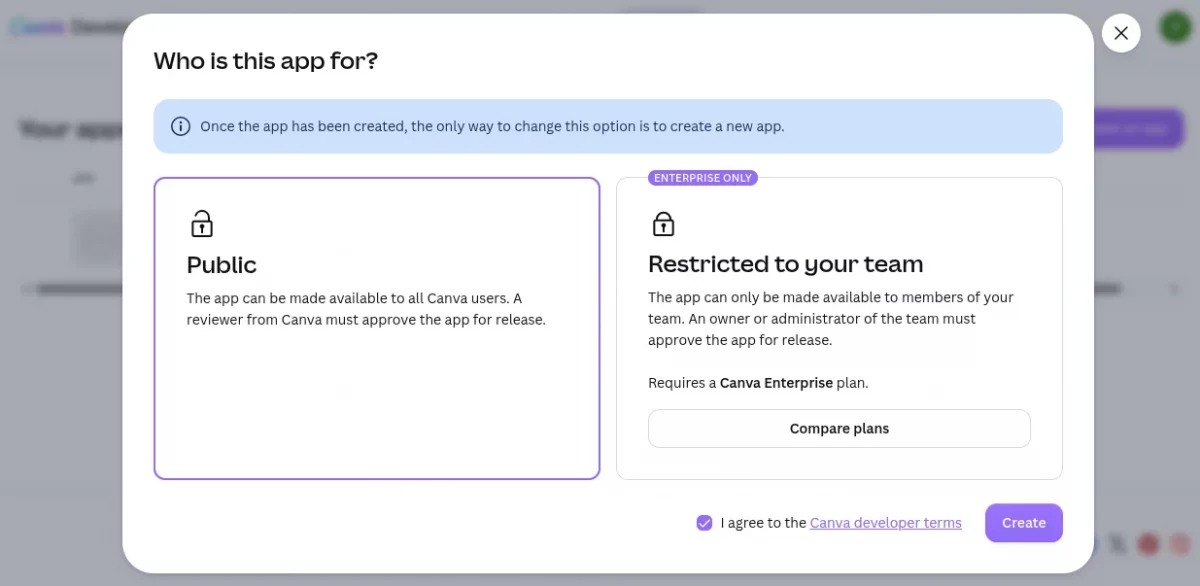
On clicking the ‘create an app’ button, a popup appears on the page, where you need to select public, tick terms checkbox, and click on create button.
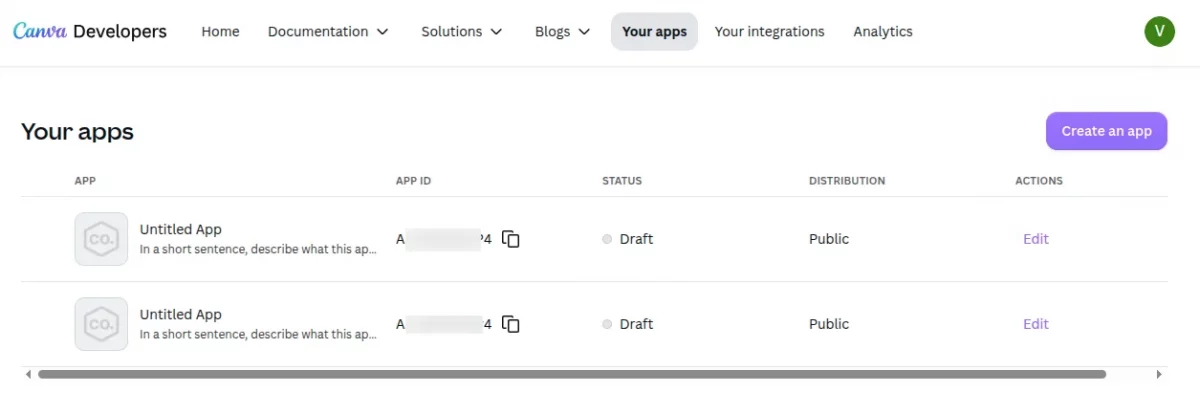
Step 5: Copy Client ID, Client Secret, and App ID into your shop.
After entering the credentials, click on save button.
Step 6: Connect
Click on “Connect to Canva” button.
Canva opens and asks whether you allow your shop to access your Canva account. Click on ‘Allow’ button.
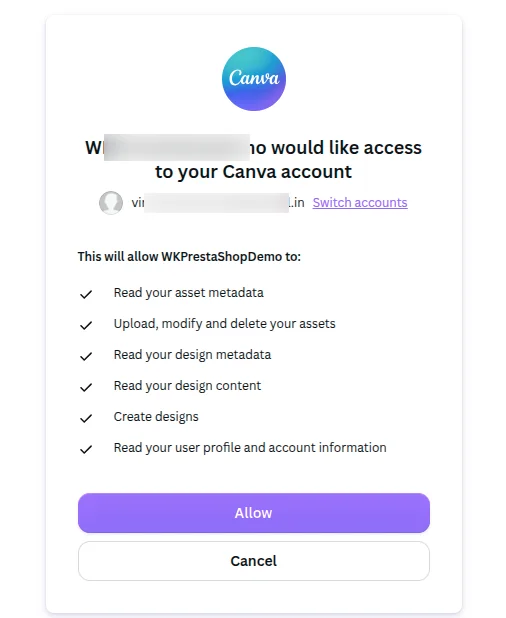
On clicking the ‘Allow’ button, You will be redirected to your shop, and the page now says Connected to Canva. together with the list of permissions you granted.
PrestaShop Canva Connect Configuration
Navigate to Design > Canva Connect > Settings. The settings page is split into three areas: credentials, connection status, and registered URLs.
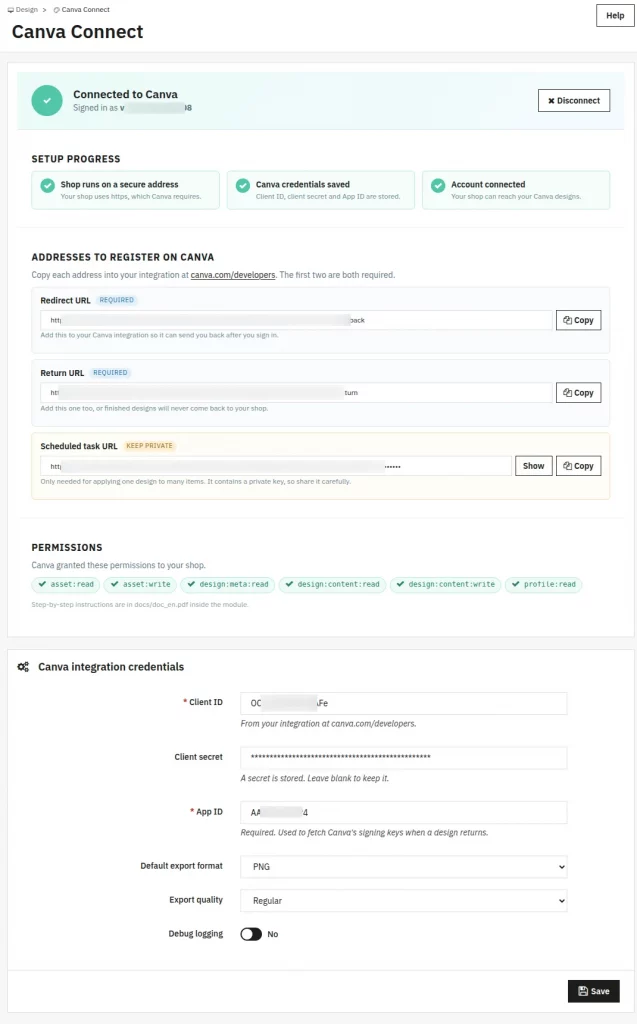
Canva Integration Credentials
- Client ID (Required): Paste the Client ID from your integration at canva.com/developers.
- Client Secret (Required): Paste the Client Secret from the same integration. The field masks your secret after saving, so leave it blank to keep the existing value.
- App ID (Required): Enter your Canva App ID. This is needed to fetch Canva’s signing keys when a design returns from the editor, so the module can verify it is genuine.
- Default Export Format: Choose the file type for designs sent back from Canva. Options are PNG, JPG or PDF. PNG is selected by default and works for most use cases.
- Export Quality: Choose Regular or Pro. Pro produces higher-resolution exports but requires a Canva Pro plan.
- Debug Logging: Turn this on only when troubleshooting. It records detailed request and response logs that help identify connection or import problems.
Editing Pictures in Canva
After the successful installation of the module, an option “Edit in Canva” gets available in product, categories, brands, and suppliers grids. Using this option, the admin can edit the image in Canva.
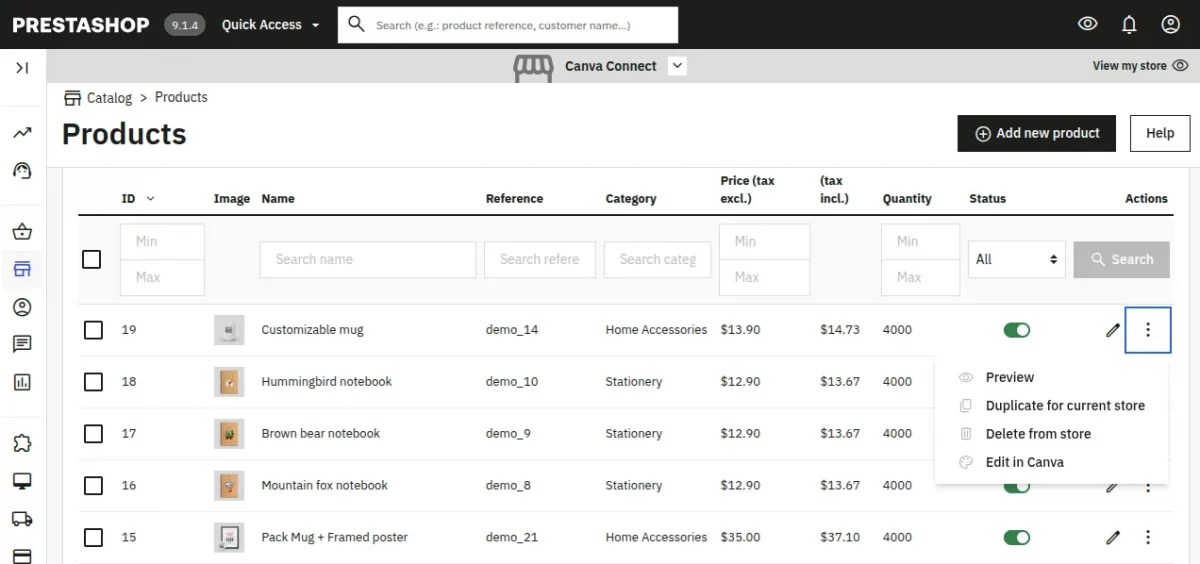
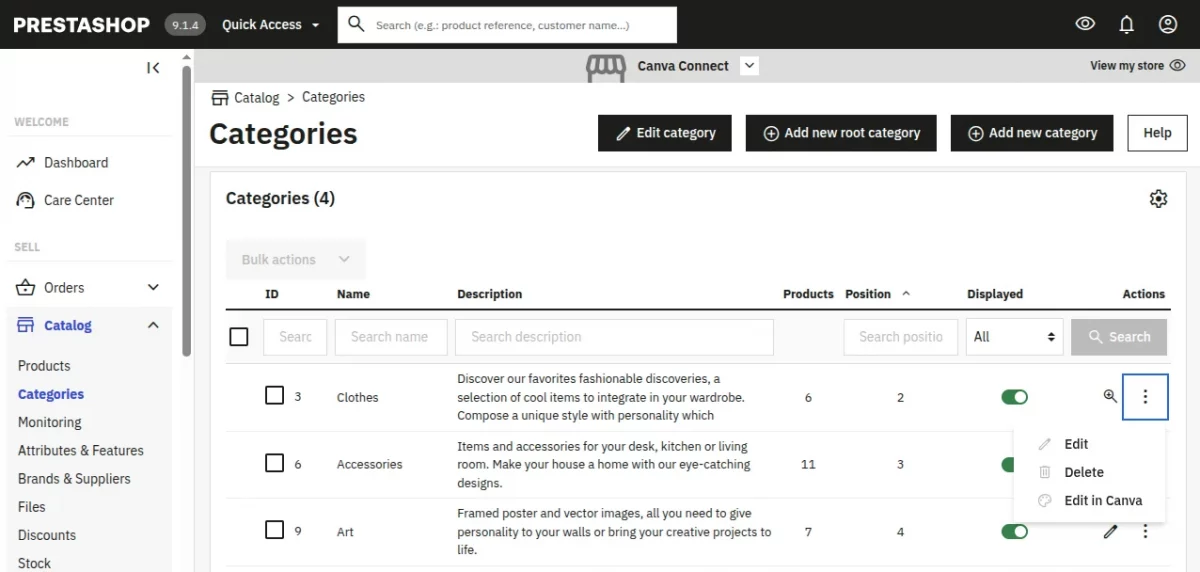
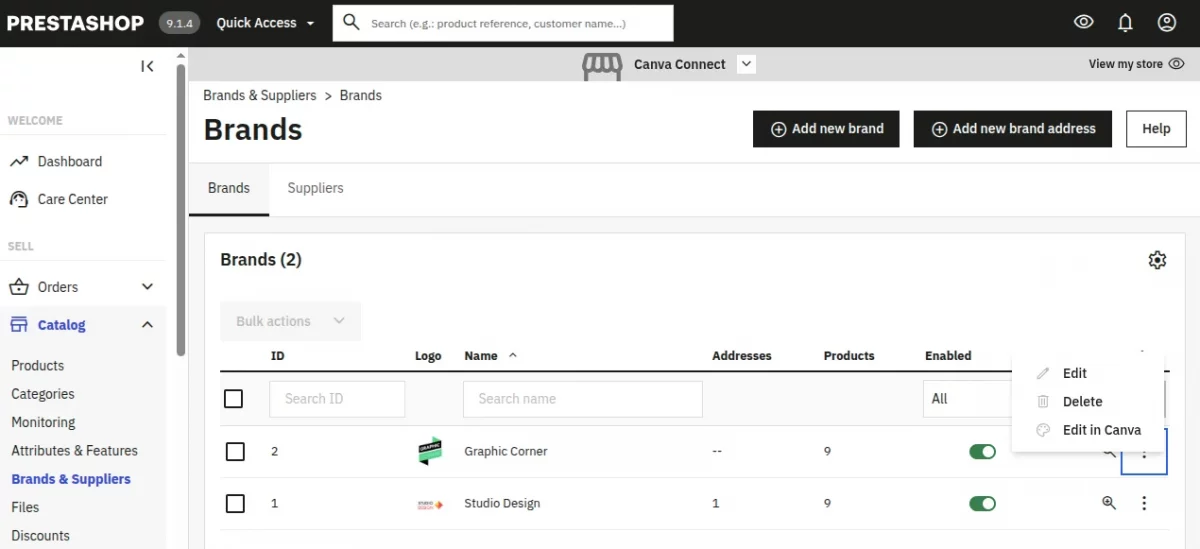
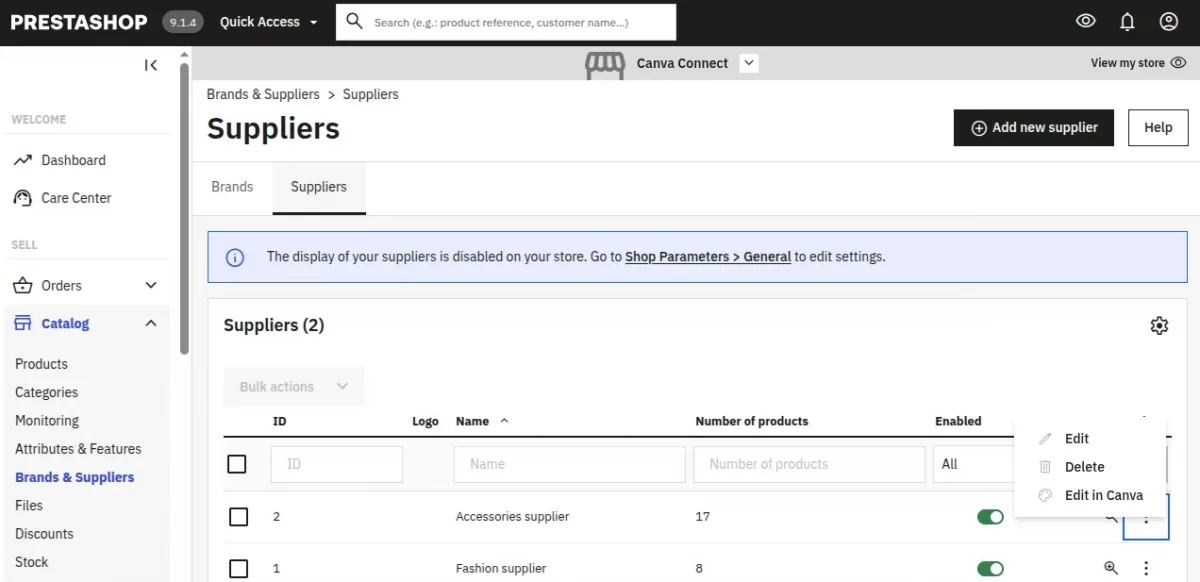
On clicking the ‘Edit in Canva’ option, the admin is redirected to Canva where they can edit the image.
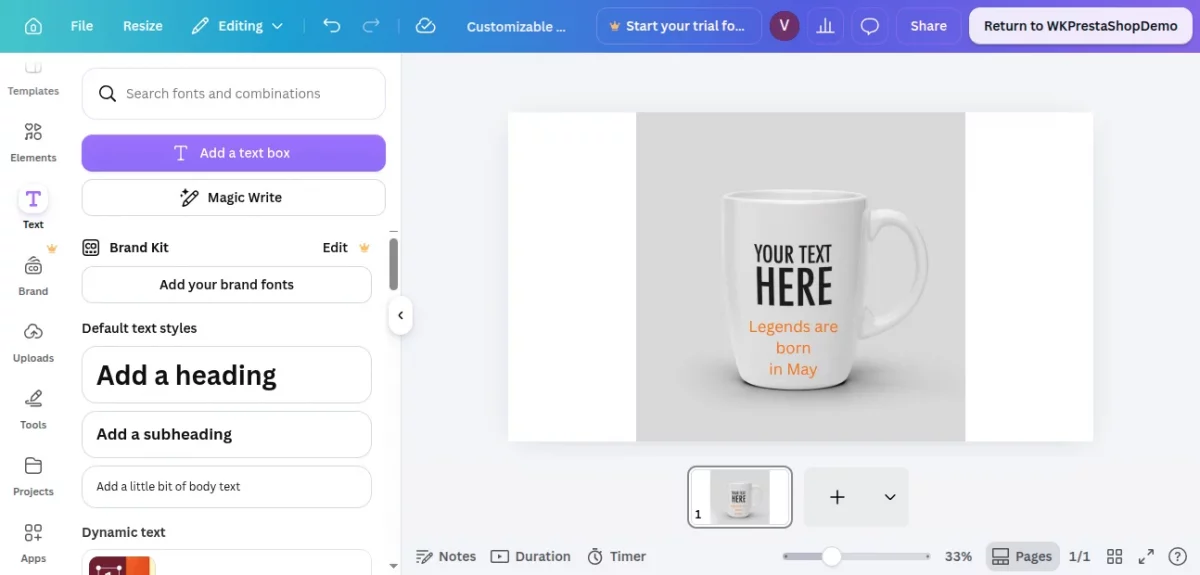
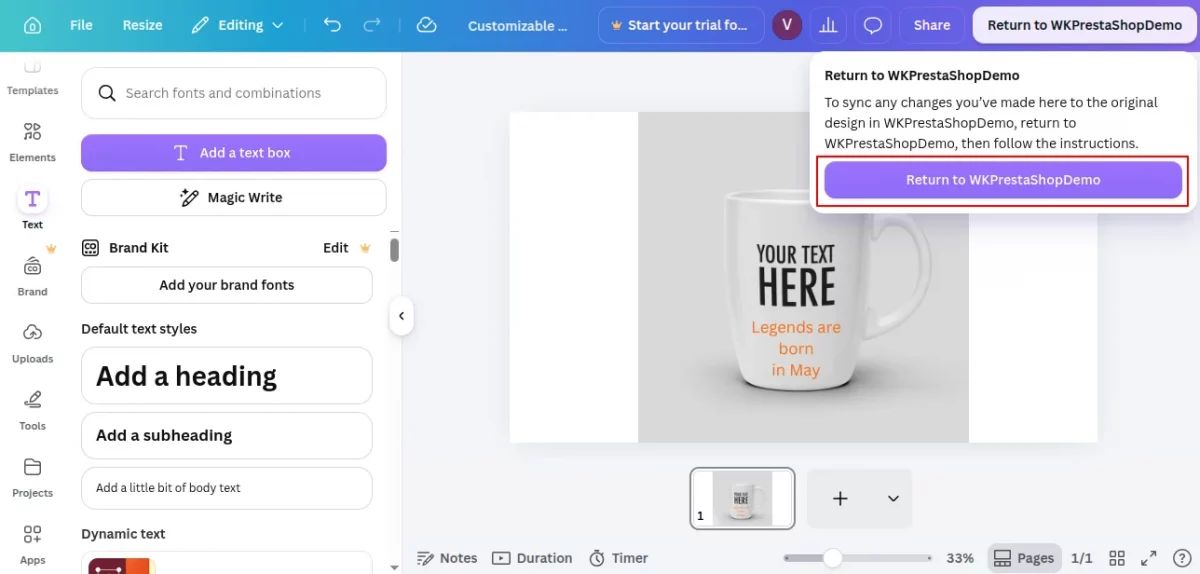
Once done editing, click on the return button. On clicking the return button, a popup appears on the page as shown in the below screenshot.
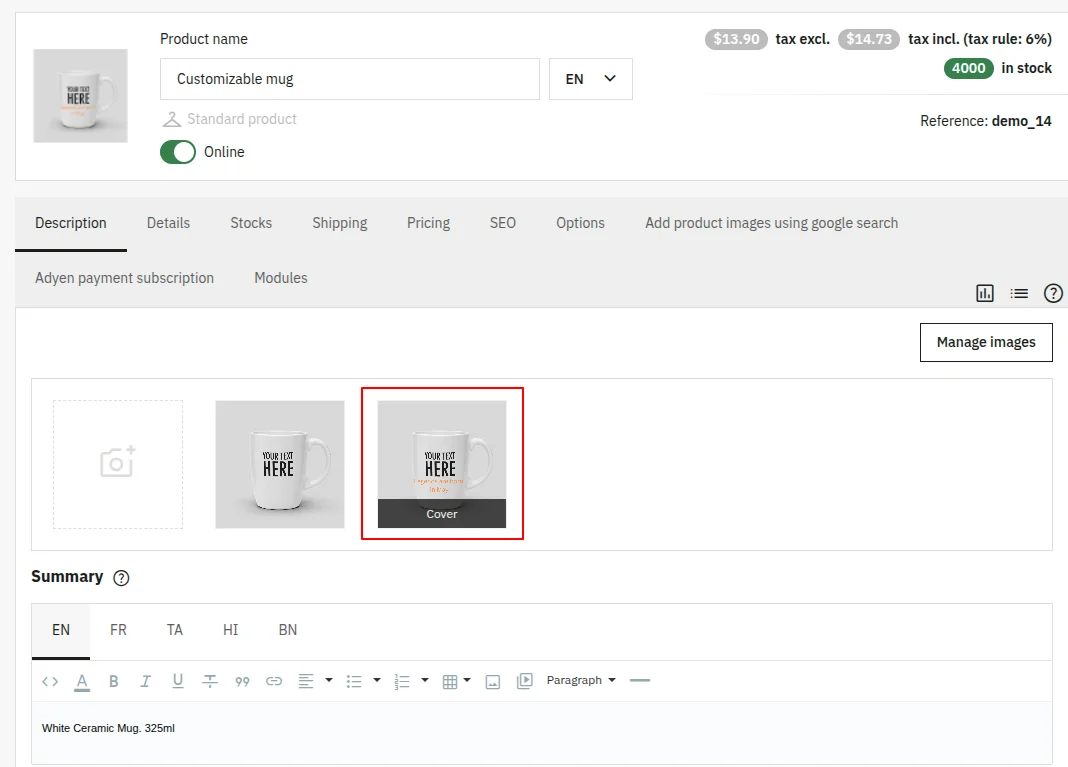
On clicking the return button, the admin will be redirect to PrestaShop. In edit product page, the admin can view the new image has been applied to the product.
Storefront View
When a merchant edits an image in Canva and returns to PrestaShop, the new image is saved to the server immediately.
On the next page load, the updated image appears in the product page without any further action needed.
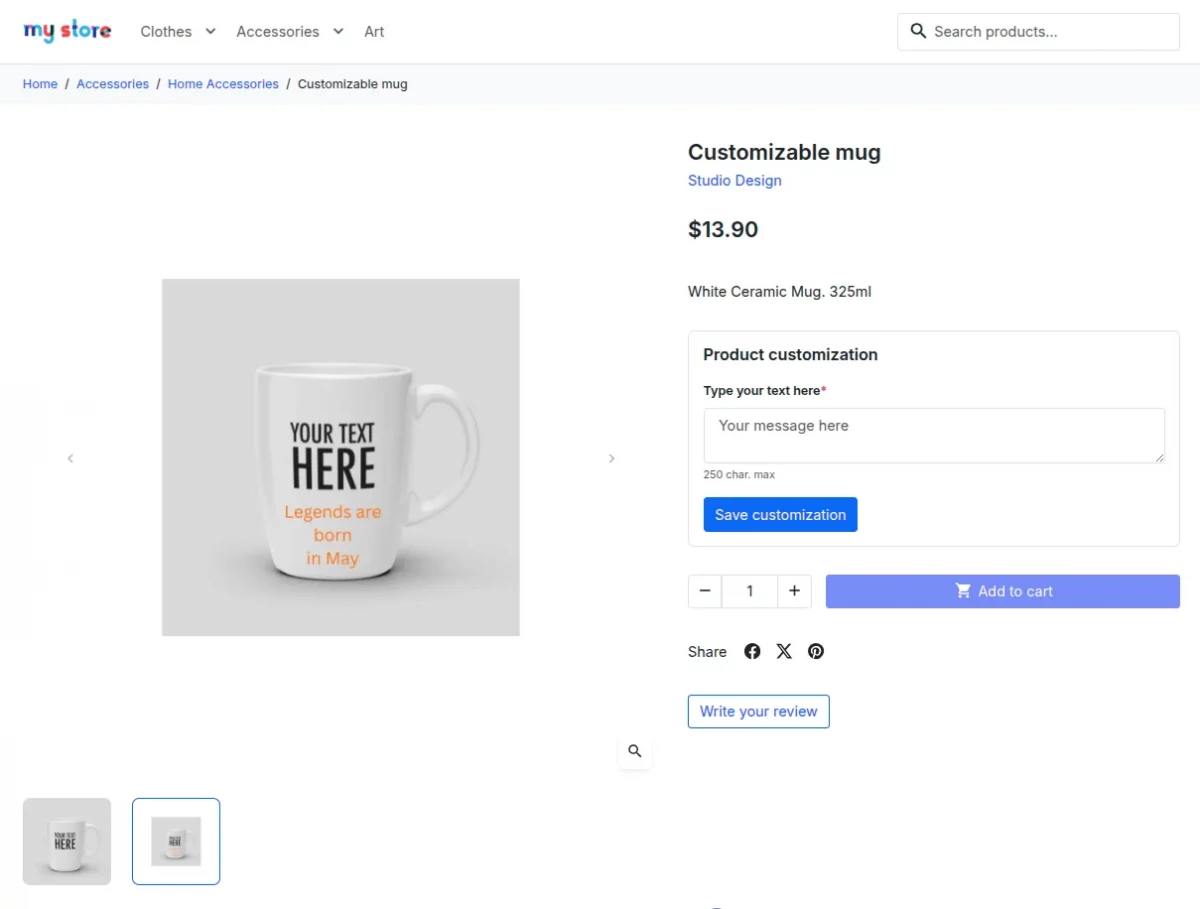
Canva Designs
This page shows the designs already in your Canva account — everything you have ever made there. Use it when you want to bring an existing design into your shop, rather than editing a shop picture.
You can search for a design by typing part of design’s name in search bar.
Also, each design has an Import button. Clicking it copies that design into your shop’s library.
You will see Importing… and then Imported into your library. It stays on this page, so you can import several one after another.
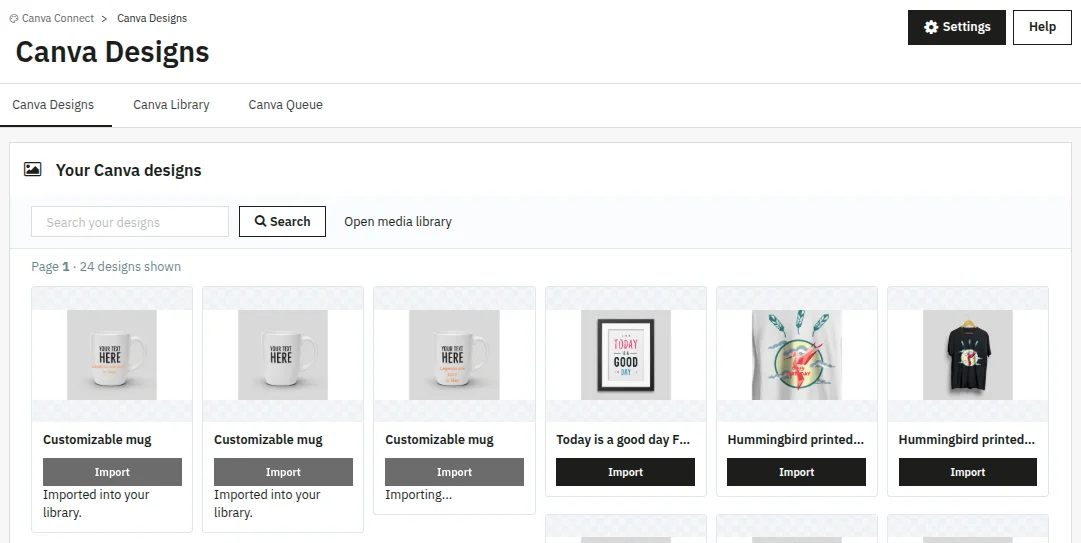
Canva Library
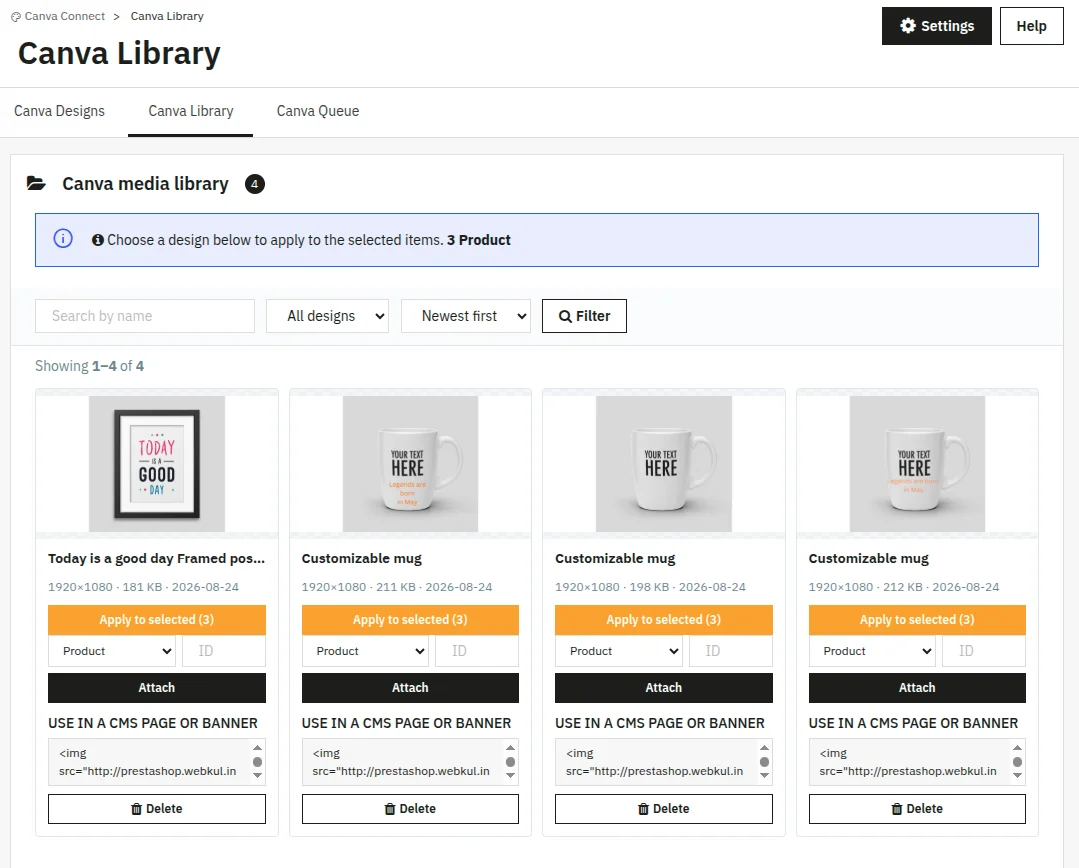
The Canva Library is where all imported designs live. From here you can search by name, filter by source (Imported or Backup), sort by newest, oldest, name or file size, and page through results.
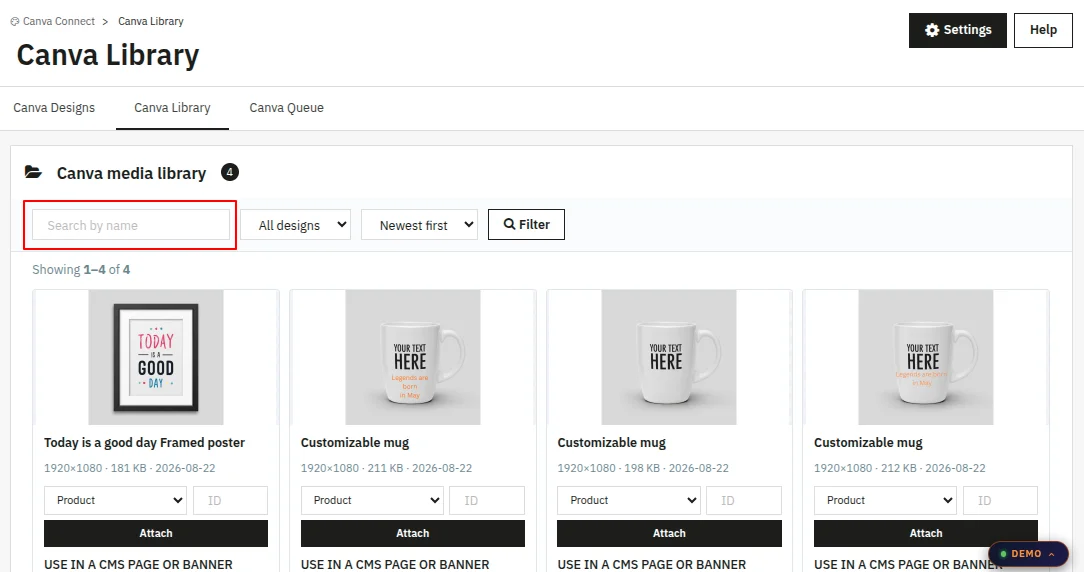
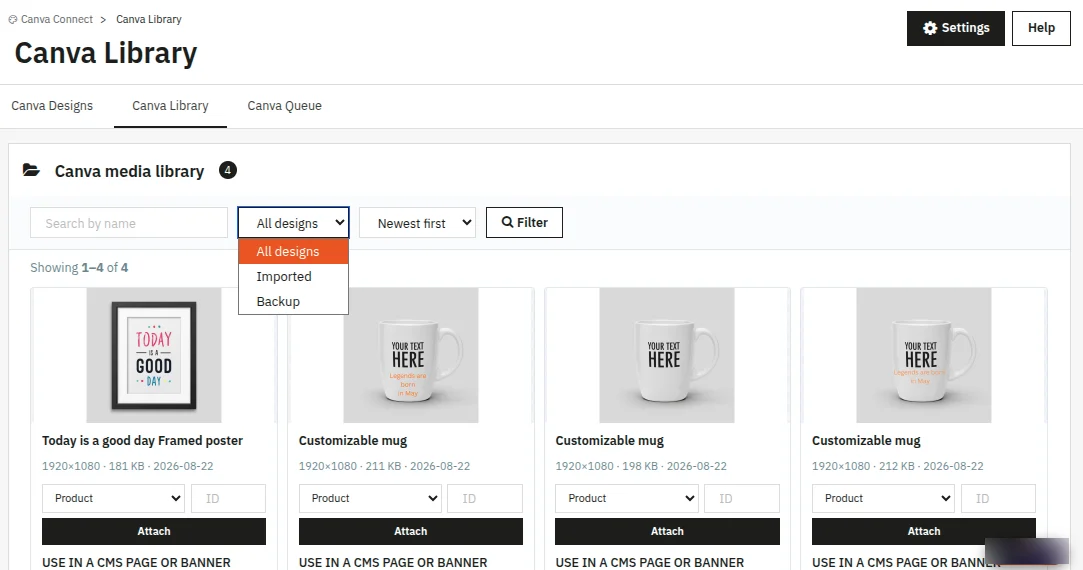
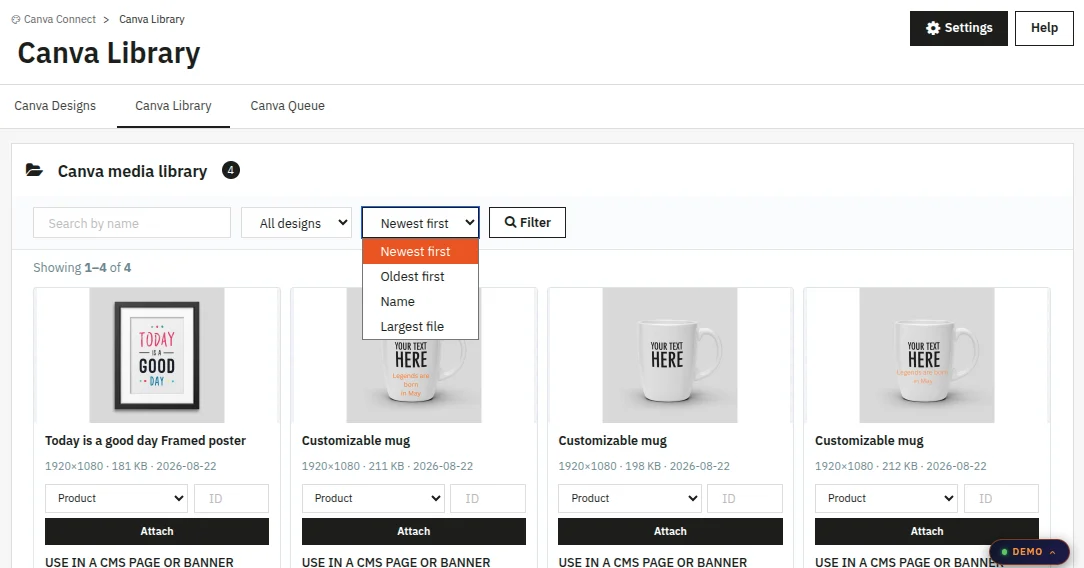
Under each design there is a dropdown and a number box.
- Choose what you are attaching to: Product, Category, Brand or Supplier.
- Type that item’s ID number.
- Click Attach.
Delete Images
Removes the design from your library and deletes the file.
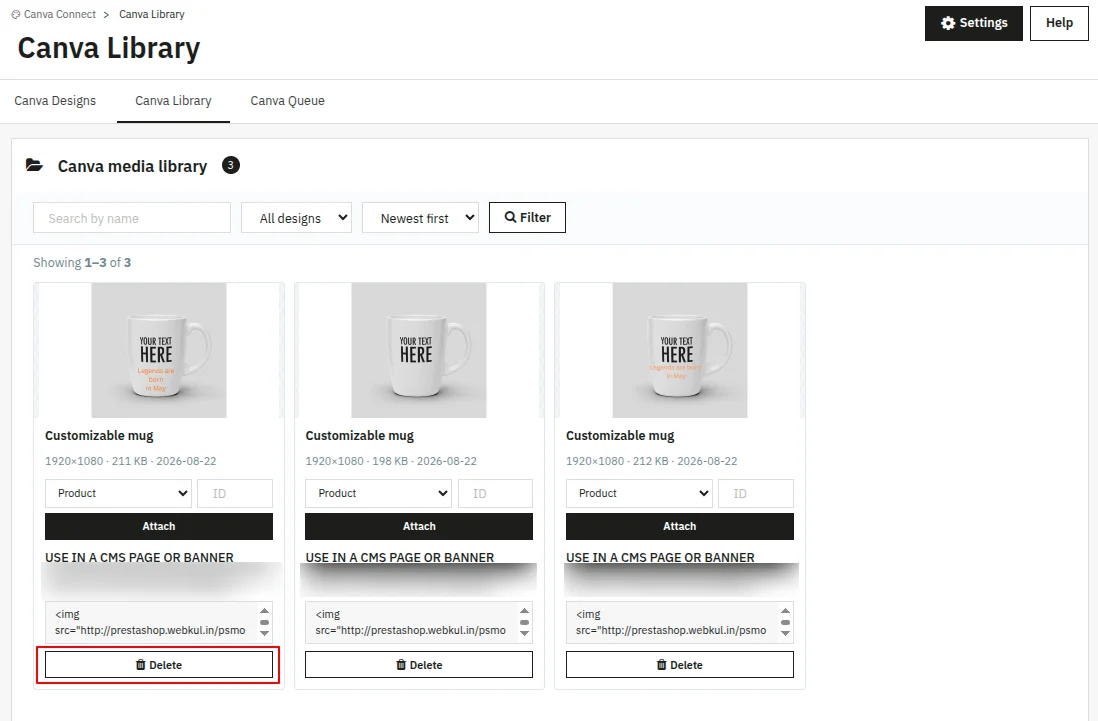
It does not touch pictures already applied to your shop. If you attached a design to a product last week and delete it from the library today, the product keeps its picture.
The library is a storage shelf, not the pictures themselves.
You are asked to confirm before anything is deleted.
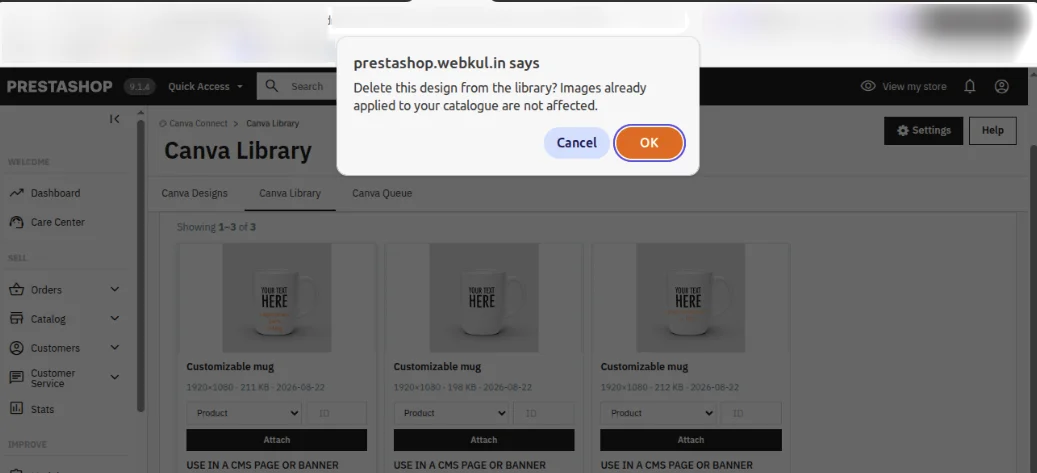
Bulk Apply a Design to Selected Items
Use this when the same picture should go onto lots of items — a seasonal banner across a whole category, or one badge on fifty products.
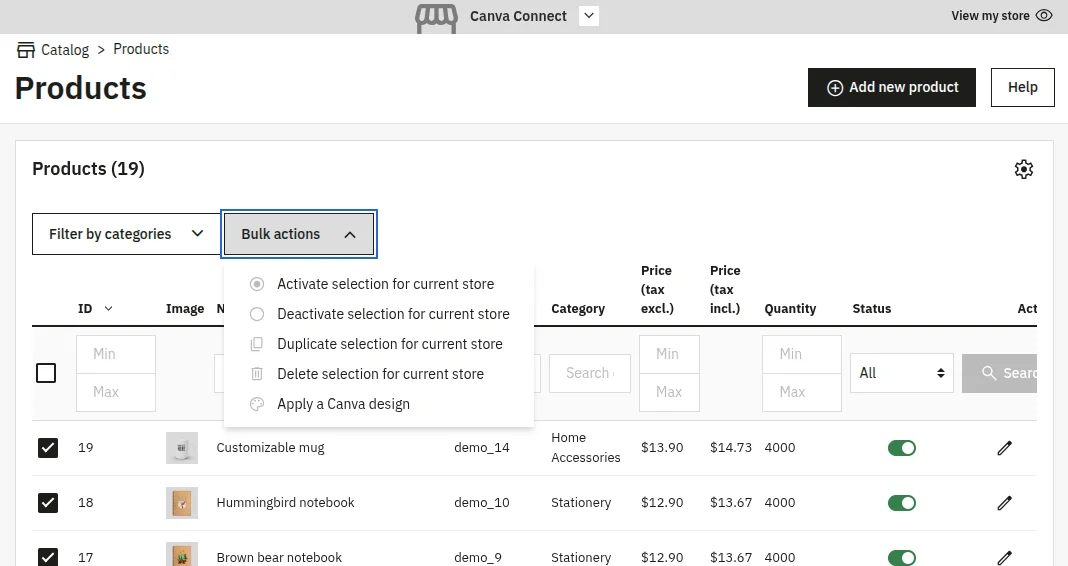
- Open Products, Categories, Brands or Suppliers.
- Tick the boxes next to every row you want.
- Open the bulk actions menu at the bottom and choose Apply a Canva design.
- You are taken to the library. Pick the design you want and click Apply to selected.
- You will see a message like 5 jobs queued.
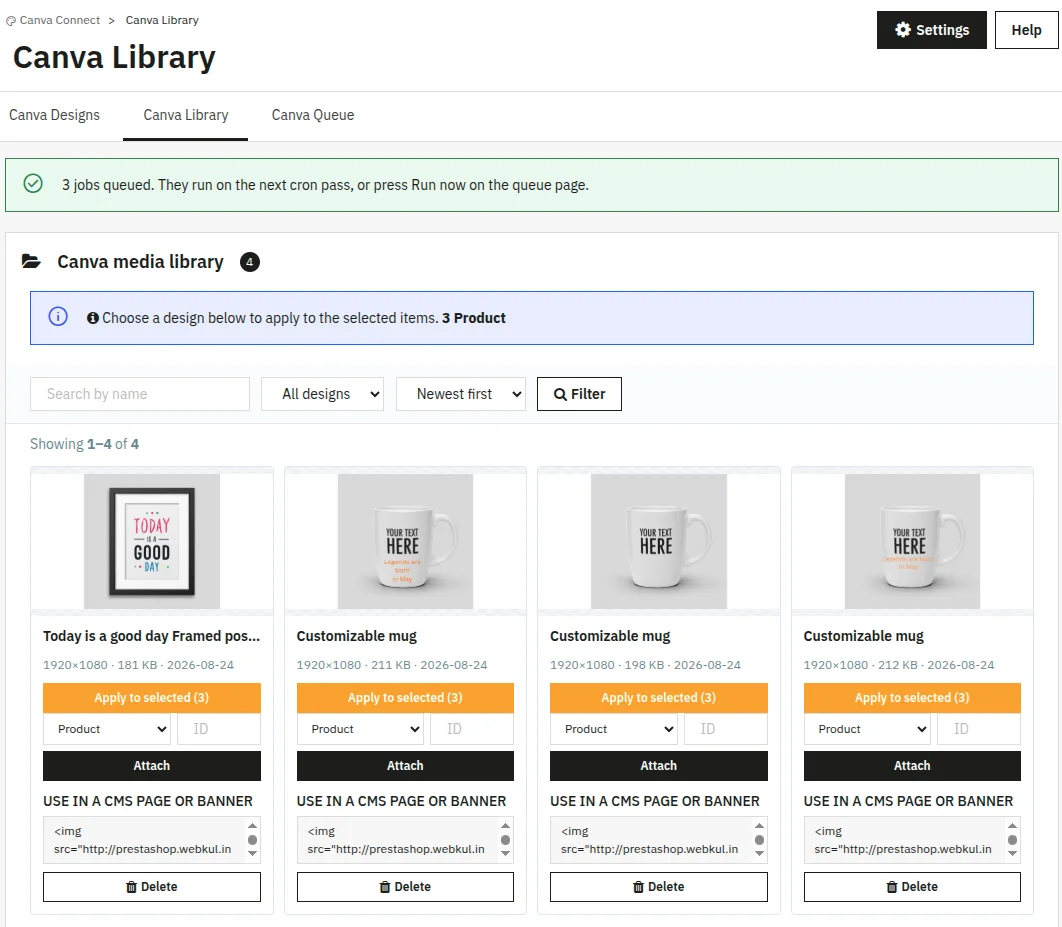
The word queued means the work is lined up to happen in the background rather than immediately. You can close the page. Your shop keeps working through the list on its own.
To watch progress or to make it start straight away, go to the Canva Queue page.
Canva Queue
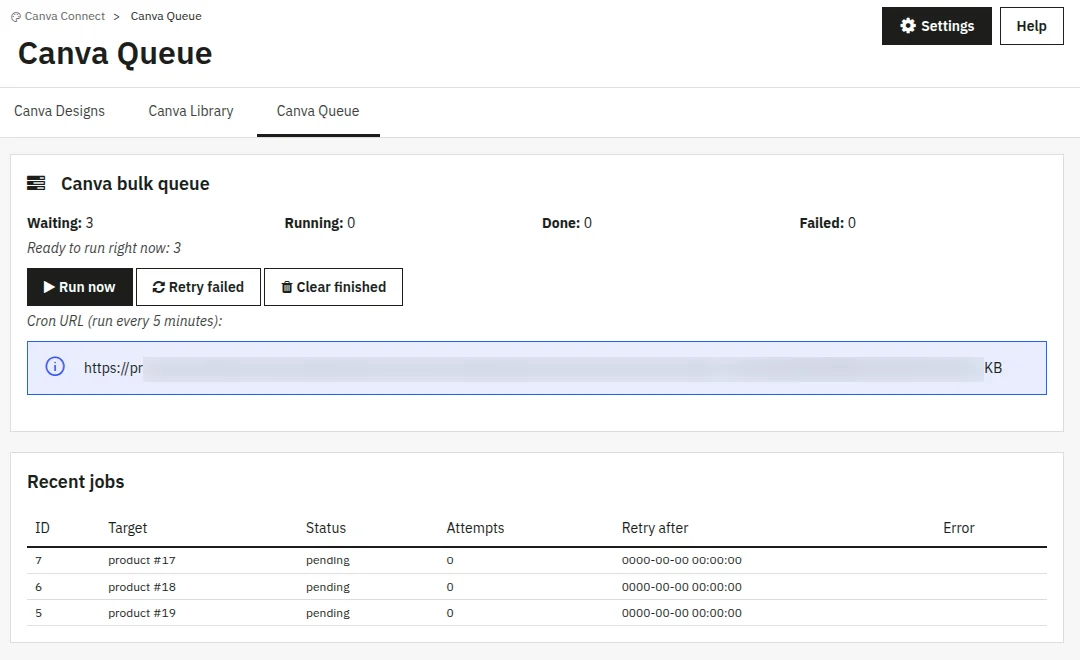
The Canva Queue page shows the status of all bulk-apply jobs.
The top section displays four counters: Waiting, Running, Done and Failed. Below that, a row shows how many jobs are ready to run right now.
The three buttons
Run now — starts working through the list immediately, instead of waiting for the scheduled task.
It works for about 20 seconds and then stops, so on a long list you may need to press it a few times. Use this if you have no scheduled task set up.
Retry failed — puts everything that failed back into the waiting list to be attempted again. Useful after fixing the cause — for example, reconnecting your Canva account.
Clear finished — removes completed jobs from the recent list to keep the table short.
Cron URL
The Scheduled Task URL is a protected endpoint that processes queued jobs. Set up a server cron or scheduled task to call this URL every five minutes.
The URL contains a private token, so do not share it publicly.
Recent Jobs Table
The table lists up to 50 recent jobs with their ID, target type and ID, status, attempt count, next retry time and any error message.
This gives you full visibility into what the queue is doing and where it might be stuck.
Support
For any kind of technical assistance or query, please raise a ticket or send us a mail at [email protected]
Also, please explore our Prestashop development services and vast range of quality Prestashop addons.
Current Product Version - 1.0.0
Supported Framework Version - 9.x.x, 8.x.x, 1.7.x.x

Be the first to comment.