Basically, this module provides communication between Shopify and OpenERP, Means you can synchronize data from Shopify to OpenERP.
Features
- Sync Product
- Sync Collections
- Sync Customer
- Real-time sync of orders
- Real-time update of order’s state like order payment/Order Fulfillment.
Note: We provide free installation service with this module.
Configuration
1. OpenERP Configuration
- Click on “Configuration”, you will see a similar screen to this.

- You need to fill all OpenERP admin details.
- Choose default OpenERP category (would be used during product synchronization).
- Check taxes included(Should be enabled, if taxes included in price option is enabled in your Shopify).
- Click on “Save” button you will get successfully connected message in “Connection Status”.
2. Product synchronization
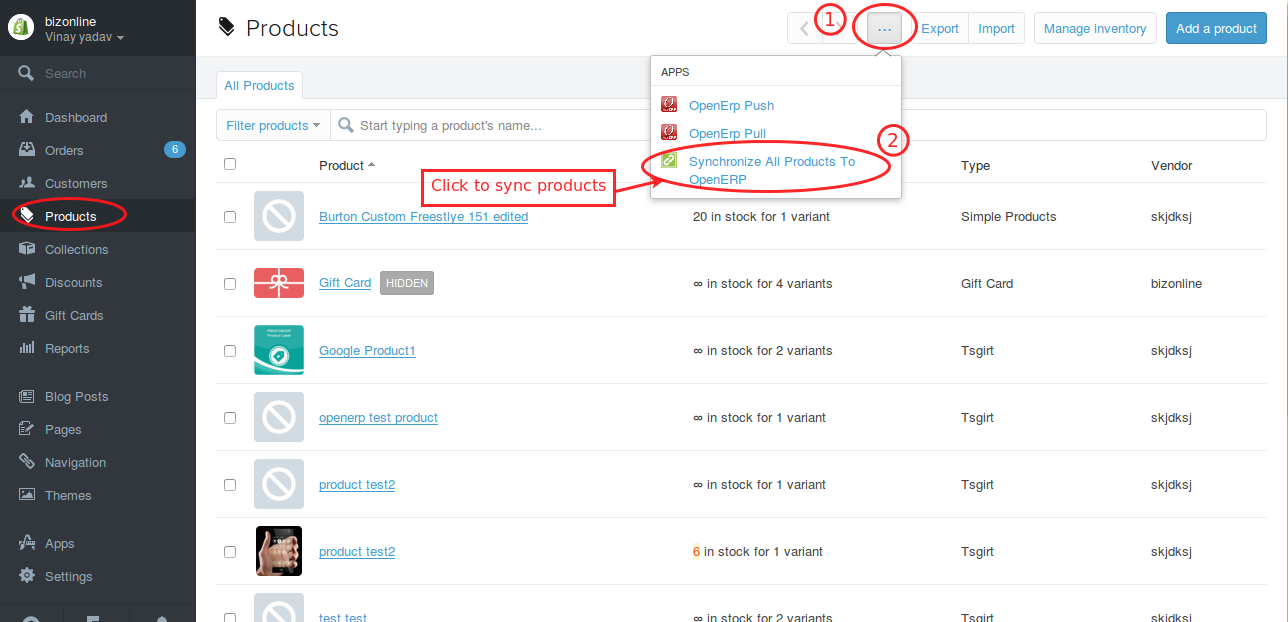
Step 1. Go to Shopify admin panel.
- Let’s start with product mapping, click on products menu.
- you will get Shopify product page with all Shopify products, then click on “Synchronize All Products To OpenERP” to sync products on OpenERP.
- You will see screen similar to this.
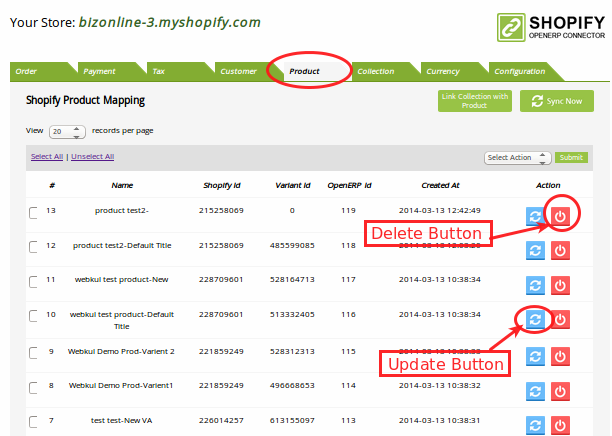
- “Sync Now” button will sync all Shopify product on OpenERP, go to the OpenERP you will see similar products on Products Mapping.

- “Link Collection With Product” button will link all Shopify product’s collection on OpenERP categories. If you have chosen the default category during configuration that will be set as default OpenERP category for all products and other collections will be added as extra categories in `Shopify collections` tab.

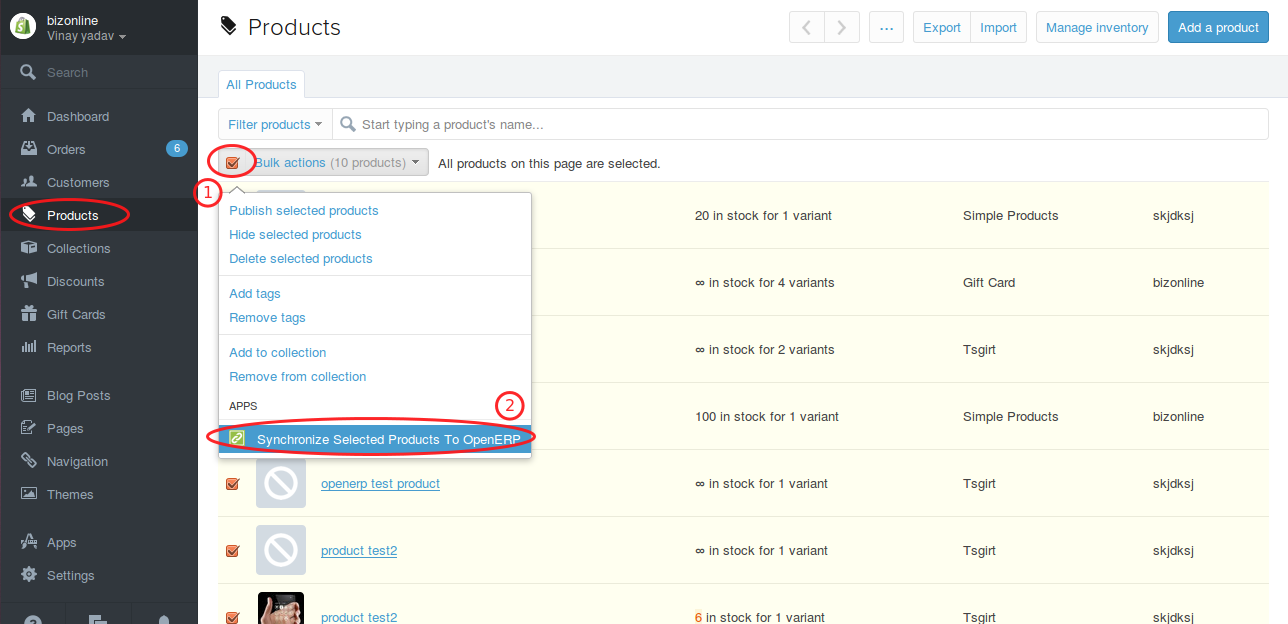
- Bulk Action, select products to sync then click on “Synchronize Selected Products To OpenERP”.
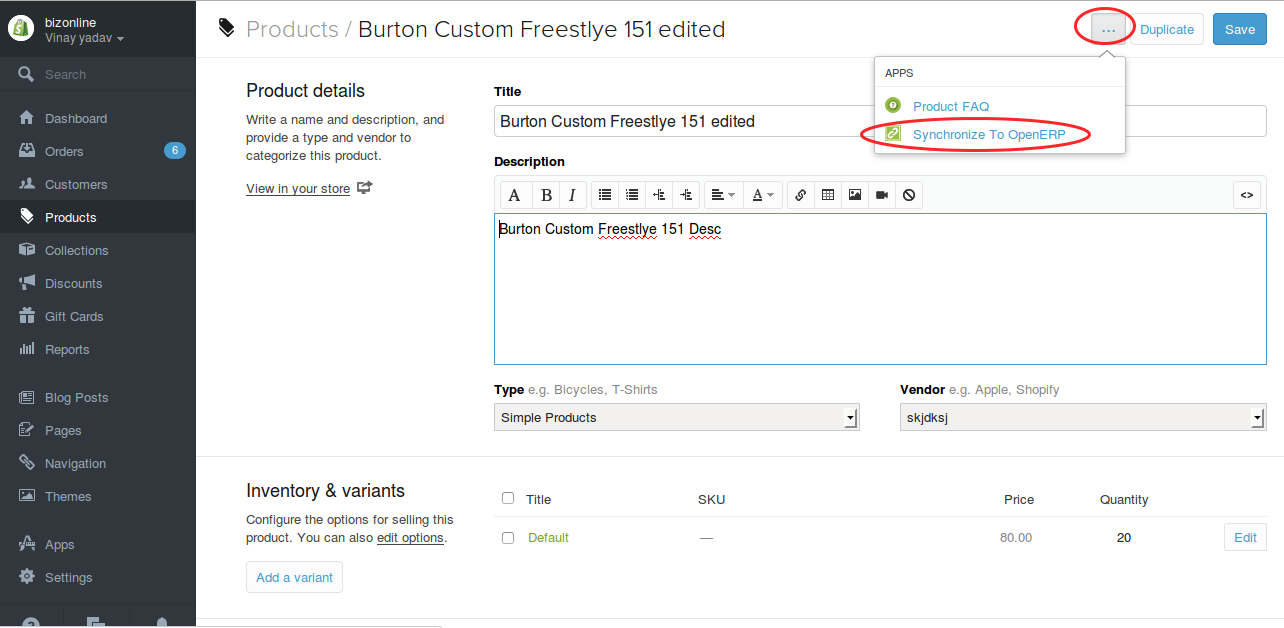
- Detail Action, if you wants to sync single product click on “Synchronize To OpenERP”.
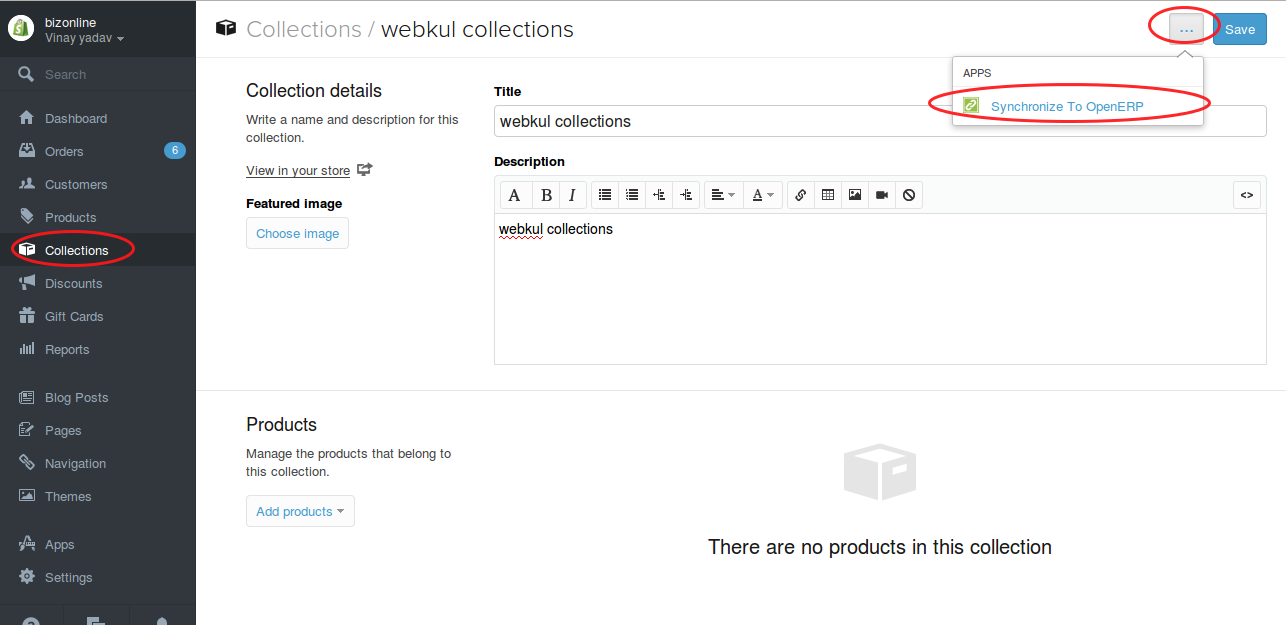
3. Collection/Category synchronization
- Click on “Collection”, you will see a similar screen to this.

- “Sync Now” button will sync all Shopify collection on OpenERP categories, go to the OpenERP you will see similar Categories on Category Mapping.

- Bulk Action, to sync all collection then click on “Synchronize Selected Collections To OpenERP”.
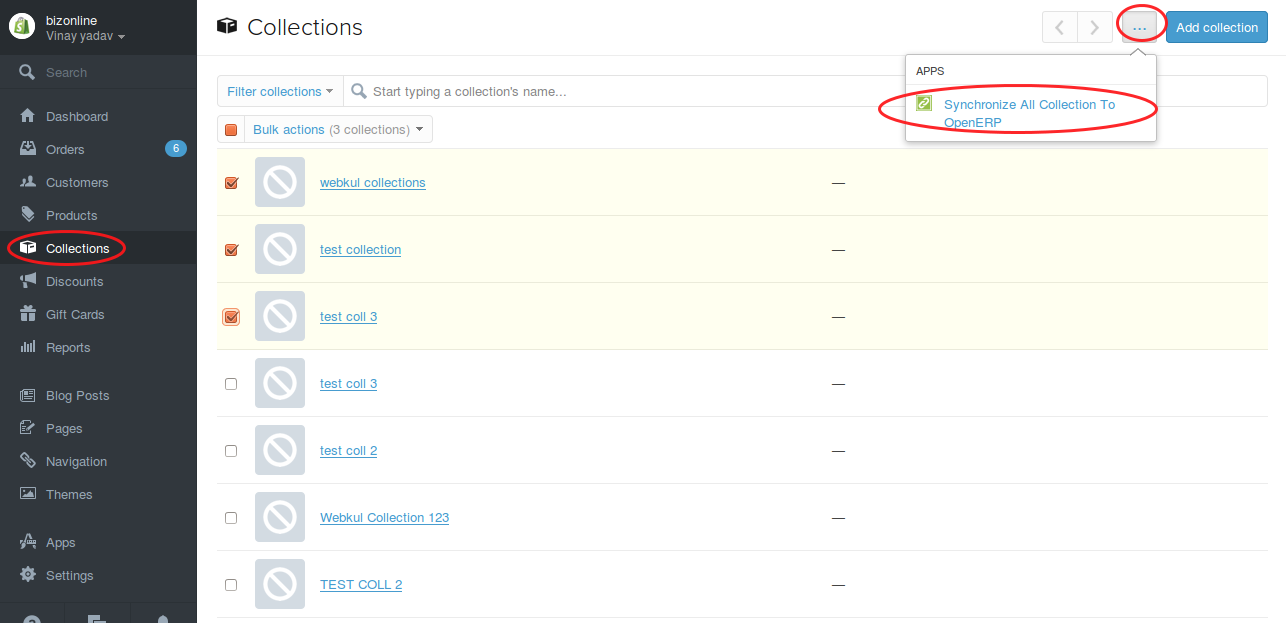
- “Detail Action”, if you want to sync single collection click on “Synchronize To OpenERP”.
Note: Before doing order synchronization: we will strongly suggest you do “payment method mapping” and “tax mapping”.
4. Customer Synchronization
- Click on “Customer”, you will see a similar screen to this.
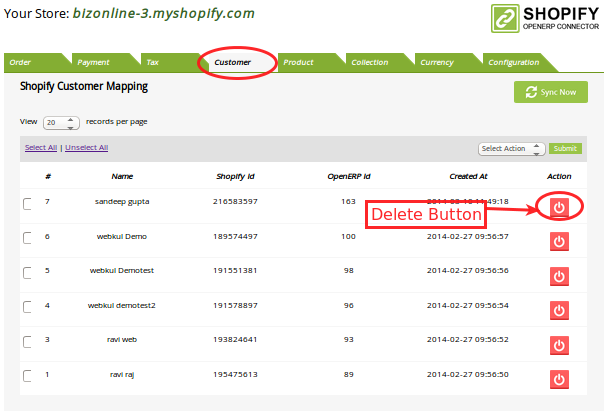
- “Sync Now” button will sync all Shopify customer on OpenERP, go to the OpenERP, you will see similar Customer on Customer Mapping.

5. Tax Synchronization
- Click on “Tax”, you will see a similar screen to this.

- “Sync Now” button will sync all Shopify taxes on OpenERP.
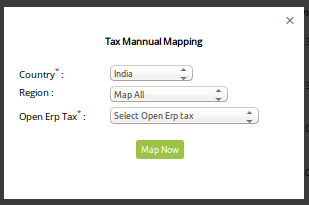
- “Manual Mapping” Button, for manual tax mapping, select country.
- The region will appear according to the country, select any region or “Map All”, if “Map All ” will set the selected OpenERP tax to all region.
- and select Open Erp Tax.
6. Payment Synchronization
- Click on “Payment”, you will see a similar screen to this.

- “Manual Mapping” Button, for manual payment mapping, select Payment Type, Payment Method, and Open Erp Payment Method.

7. Currency Synchronization
- Click on “currency”, you will see a similar screen to this.

- “Manual Mapping” Button, for manual currency mapping, select Currency, and OpenERP Currency.

8. Sales Order Synchronization
- Click on “order”, you will see a similar screen to this.
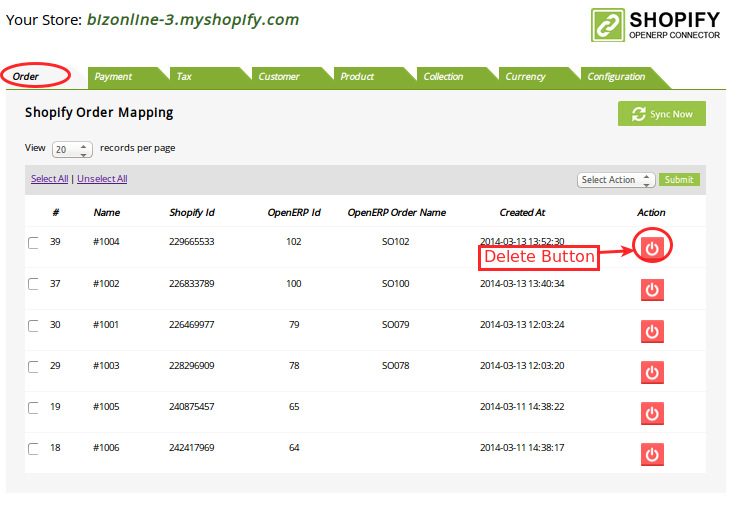
- “Sync Now” button will sync all Shopify order on OpenERP, go to the OpenERP you will see similar order on sales order mapping.

Bulk Action,
- Select order to sync then click on Synchronize Selected Order To OpenERP.
- To sync all order click on “Synchronize All Orders To OpenERP”.

9. Delete & Update Mapping Data

- “Delete” button will delete the selected item if you want to delete more items in once check those items then select delete, then click on submit button.
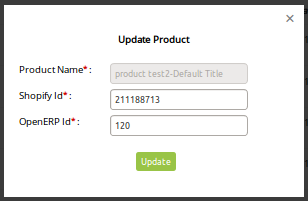
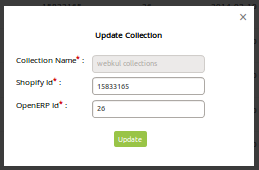
- “Update” button will update the selected item.
- product update window.
- Collection Update Window.
Support:
For demo/inquiry you can mail us: [email protected]
If you are interested in this module then you can also raise a ticket on http://webkul.com/ticket/, our Support team will guide you about this module.
Thanks for reading this blog!!!
Current Product Version - 1.0.0

We need to customize our solution for this things , you need to mail at [email protected]