We have updated the Multivendor Marketplace app for Shopify and is now available with a new feature of Seller Profile Page.
Each seller will have their respective seller profile page on the admin’s Marketplace where all the products of that seller will be displayed itself.
This User Guide will help you to understand how an admin can customize it as per his/her requirements.
All the products of that particular Seller will be displayed on each seller’s profile page.
There will be a separate section of reviews given to that seller, policies & description (if added by the seller).
Also, there will be a Feedback section from where customers will give their feedback for the seller’s products.
Now, from the Seller Profile Page Settings menu, you can customize the seller’s profile page by editing/changing the content of the page.
In addition to it, you can change the content position of the profile page, show/hide content, change the theme as well.
If you want the customers to get redirected to the seller’s profile page, you have to paste the code in product.liquid template file mentioned in the configuration page.
After pasting the code, a seller link will be displayed on the product description page. By clicking the link, you will be straightaway redirected to the seller’s profile page.
Admin can also create a menu of Seller Listing Page on his/her store by referring to below-given steps:
- Visit Shopify Store Backend
- Click “Online Store”
- Go to Navigation
- Click on Main Menu (if Created otherwise Add Menu)
- Enter Title and Link of Profile Page.
- Lastly, click on Add & Save the Menu.
This way, you can add a Seller Listing Page menu to your store’s frontend.
Features
- Option to Show/Hide the content on the profile page of Sellers.
- You can write your own CSS for further changes in the profile page
- Admin can choose the position of Seller’s Page content to be displayed on Seller’s description page.
- You can upload a banner image or a background video to display on Seller’s profile page.
- Admin can select the Theme for the Profile Page.
Admin can now edit the Theme code for Seller Profile Page. You will get the variables to edit the theme template and customize CSS of the profile page.
Custom CSS for seller dashboard option is now available in all the three plans (Basic, Executive, Pro) of the Multi-vendor Marketplace App.
Seller Profile Page Settings
Admin will follow the below steps to visit Seller Profile Page Settings section:
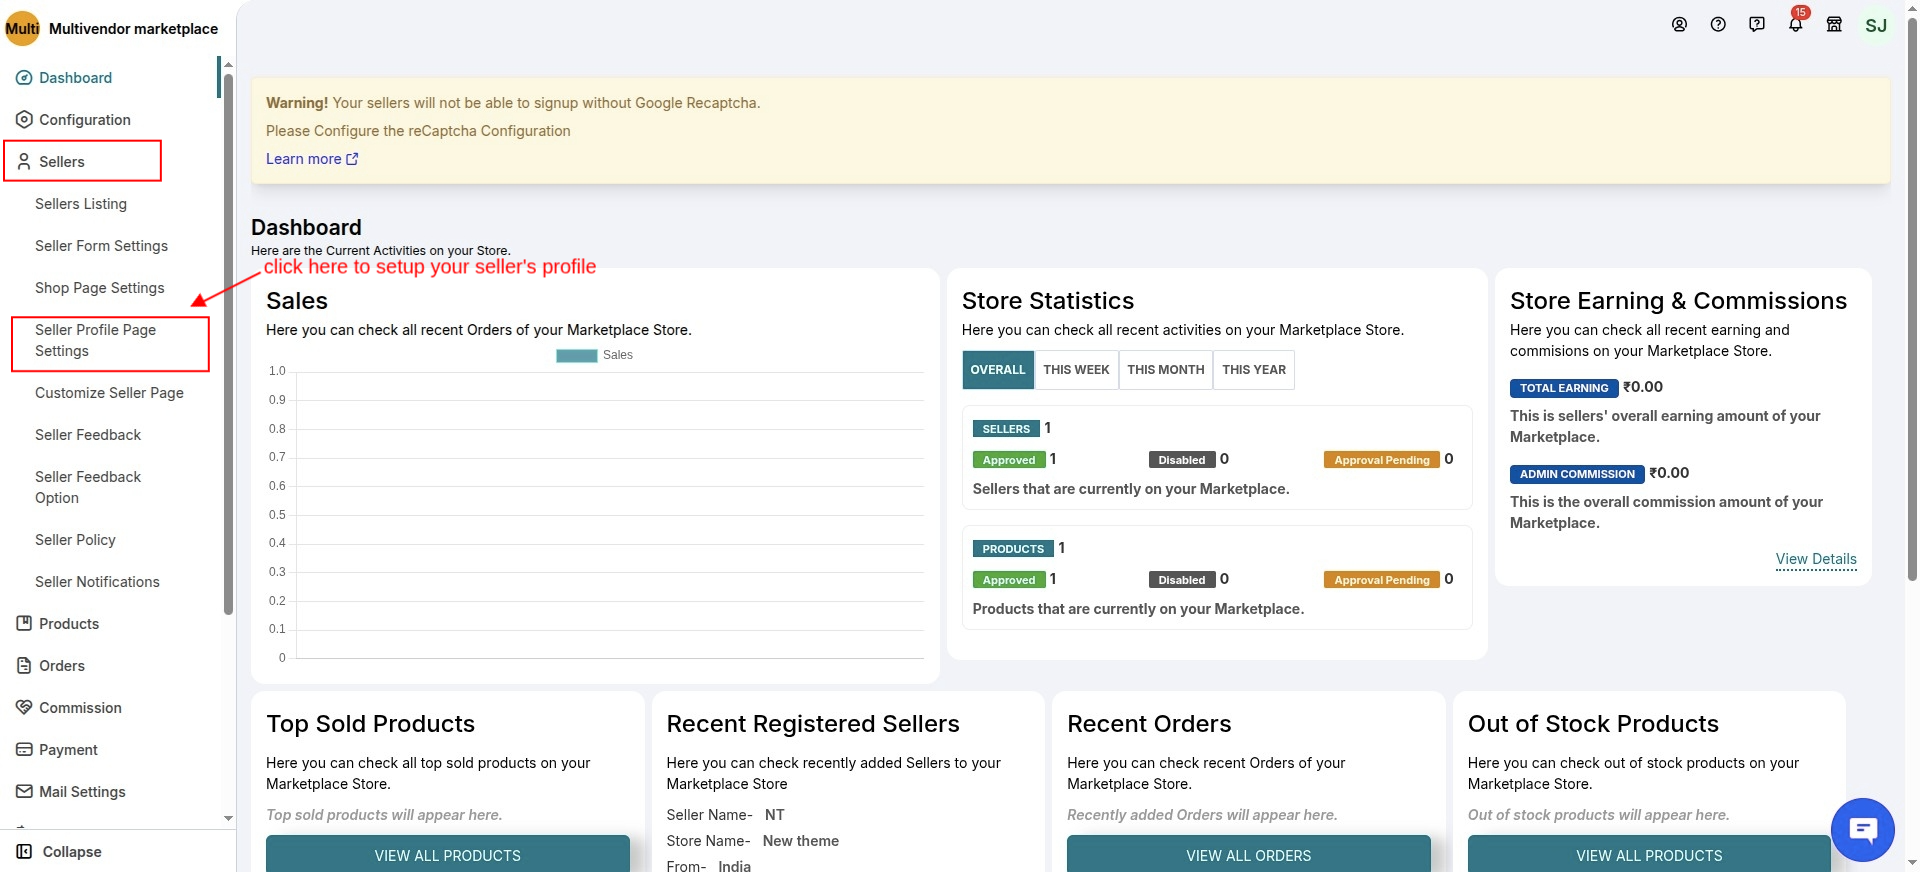
Multivendor App Admin Panel>>Go to Sellers>>Seller Profile Page Settings (from the drop-down menu).
Following are the fields admin can set up for Seller’s profile pages:
- Seller Profile Page Theme
From this section, you can select the Theme of your Seller’s profile page. You can click the radio button & choose the theme of your choice.
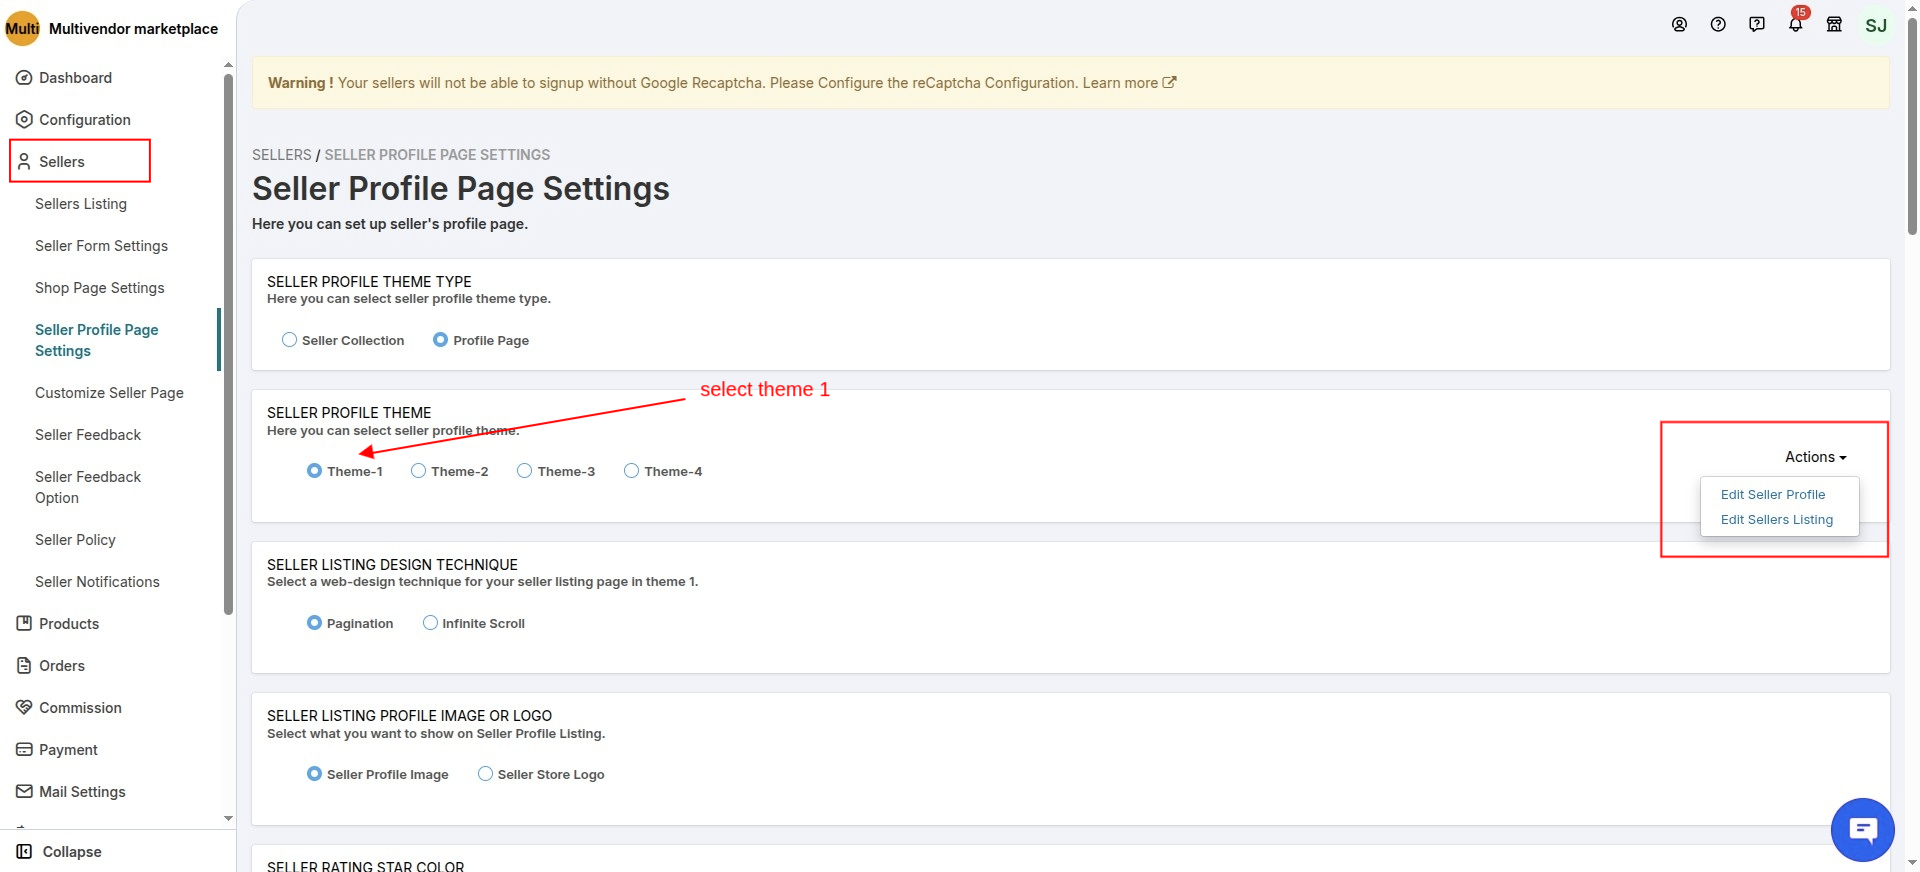
Theme 1
In Theme 1, You will get an option to edit the theme code as well. You can customize CSS and edit the theme template of the profile page as per your choice.
After clicking the Edit Theme Code button, you will get the option to edit the Theme template & edit CSS for the seller’s profile page.

As soon as you edit any code and Save it, the “Publish” button gets enabled. Now, to make the changes work for the seller page, you need to publish the edited code.
Please note that if you have saved the edited code and not published it then, the default code will work for the profile page.
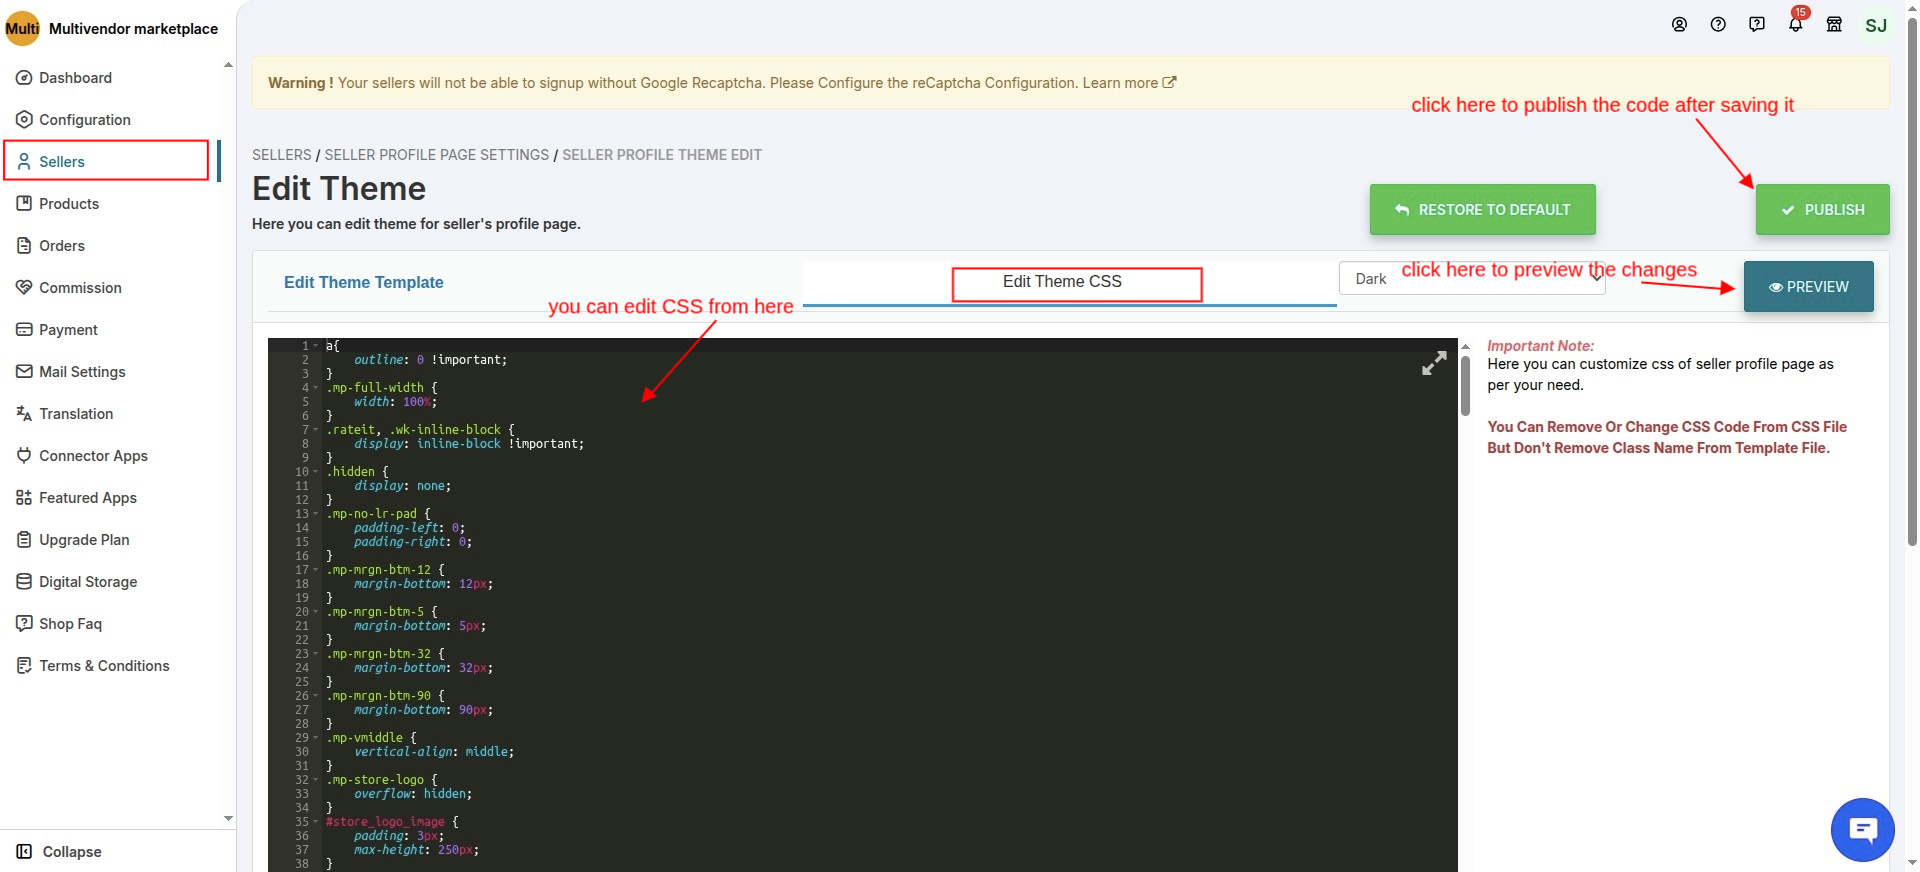
Moreover, clicking on the Preview button, you can preview the change you made for each seller’s profile.
Admin can anytime restore the default code by clicking the “Restore to Default” button.
FILTER OPTION IN THEME 1
If you want to filter any seller’s products by Category, Tag or Type on the seller profile page then, this feature is available in Theme 1.
For this, you need to enable the “Restrict Collection”, “Restrict Tag” & “Restrict Type” tab from the “Restriction Configuration” menu of the app.
Make sure that you have added product collection, tags & product types in the app.

Now, the product categories, tags or types that you have added in the app will be visible to customers while adding/editing products.
Thus, you can restrict sellers to add only those categories, tags or types to the products
and accordingly the added categories, tags or types will be visible with the products in a filter option on the seller profile page.
This filter option will be visible like this on the seller profile page:-

NOTE:- The Edit Theme Code feature is available only in Theme 1.
Moving on to the other options available in all the Themes to set profile pages of your sellers…
You will also get an option to select the color of Seller’s rating star.

Also, you can select the default “Sort by” option for the profile page. This is up to you that how you want your seller’s profiles to be listed on the page.
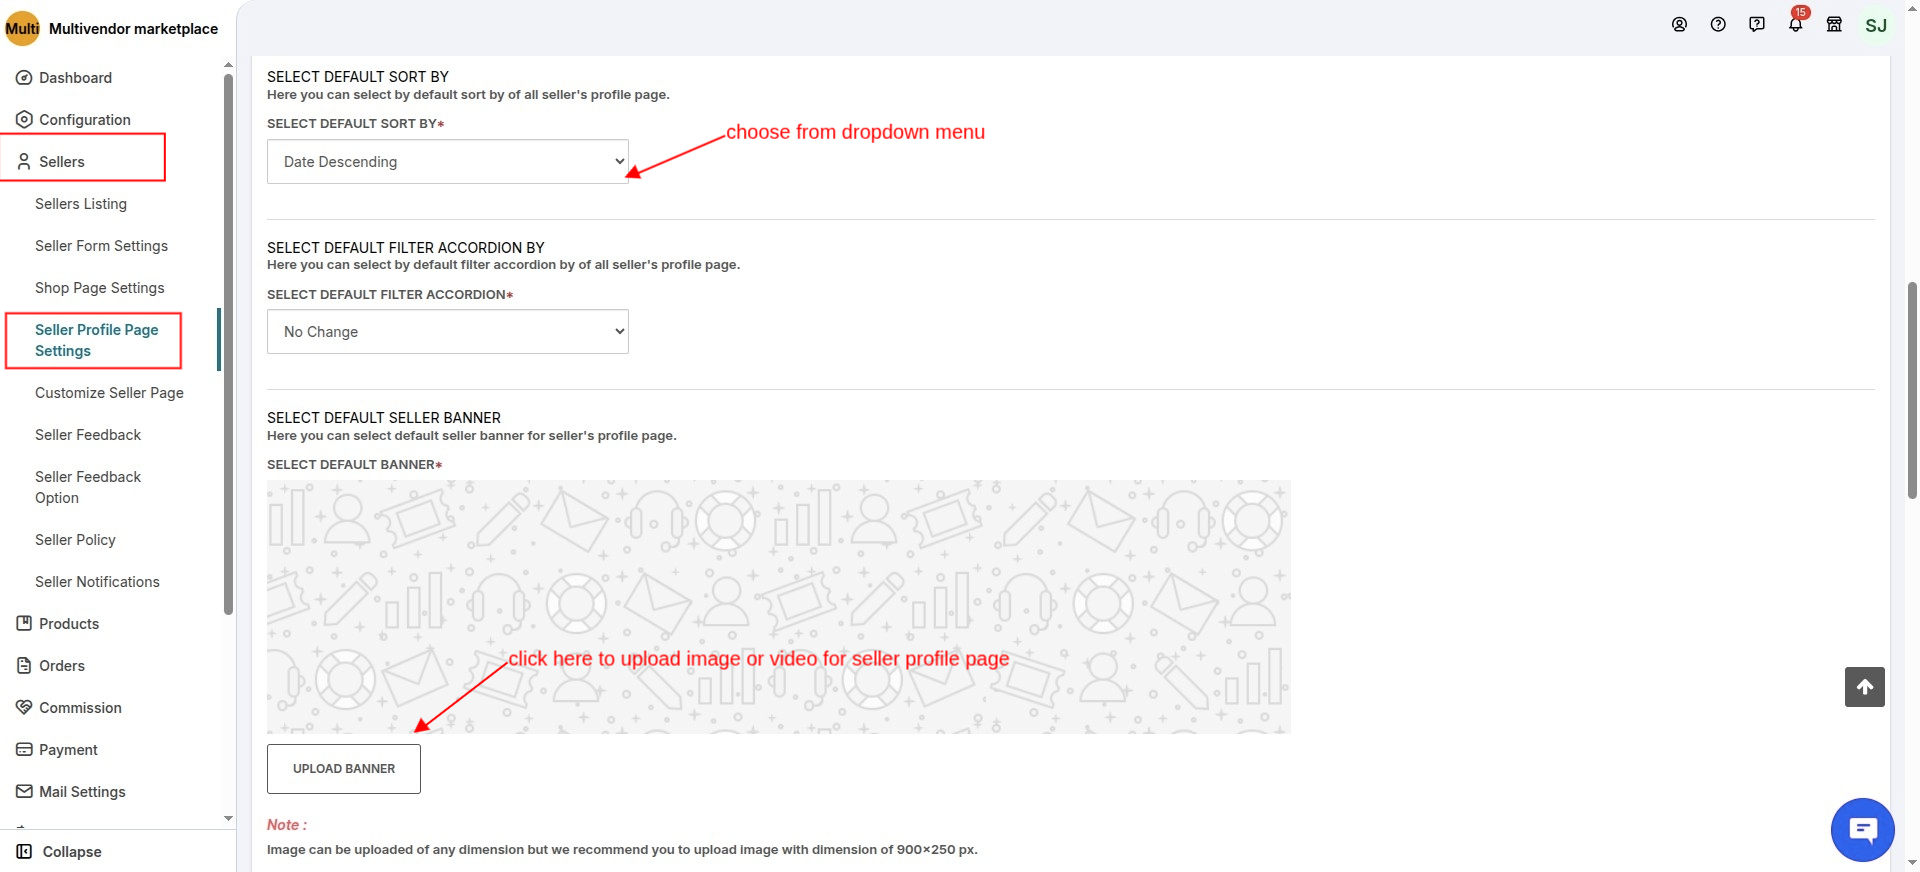
You can also upload a default banner for your seller’s profile page either as Banner Image or Background Video.

Additionally, you can Show or Hide the content of Profile Page as per your requirement.
NOTE:- The Show/Hide Seller Page Content Option is available only in Theme 1.
You can anytime re-position the Toggle Logo and Description on the profile page.
Admin can also write his/her own CSS for Profile Page.

If you select Theme 1, sellers page will look as shown in the screenshot below:

Theme 2
Similarly, you can check the features for Theme 2 as well.
Once you select Theme 2, the Profile Page will be visible like this as shown in the screenshot below:

Theme 3
Similarly, you can set your seller’s profile page using Theme 3 as well.
If you select Theme 3, seller page will look as shown in the screenshot below:

Theme 4
In Theme 4, you will get an option to edit the theme code as well. You can customize CSS and edit the theme template of the profile page as per your choice.
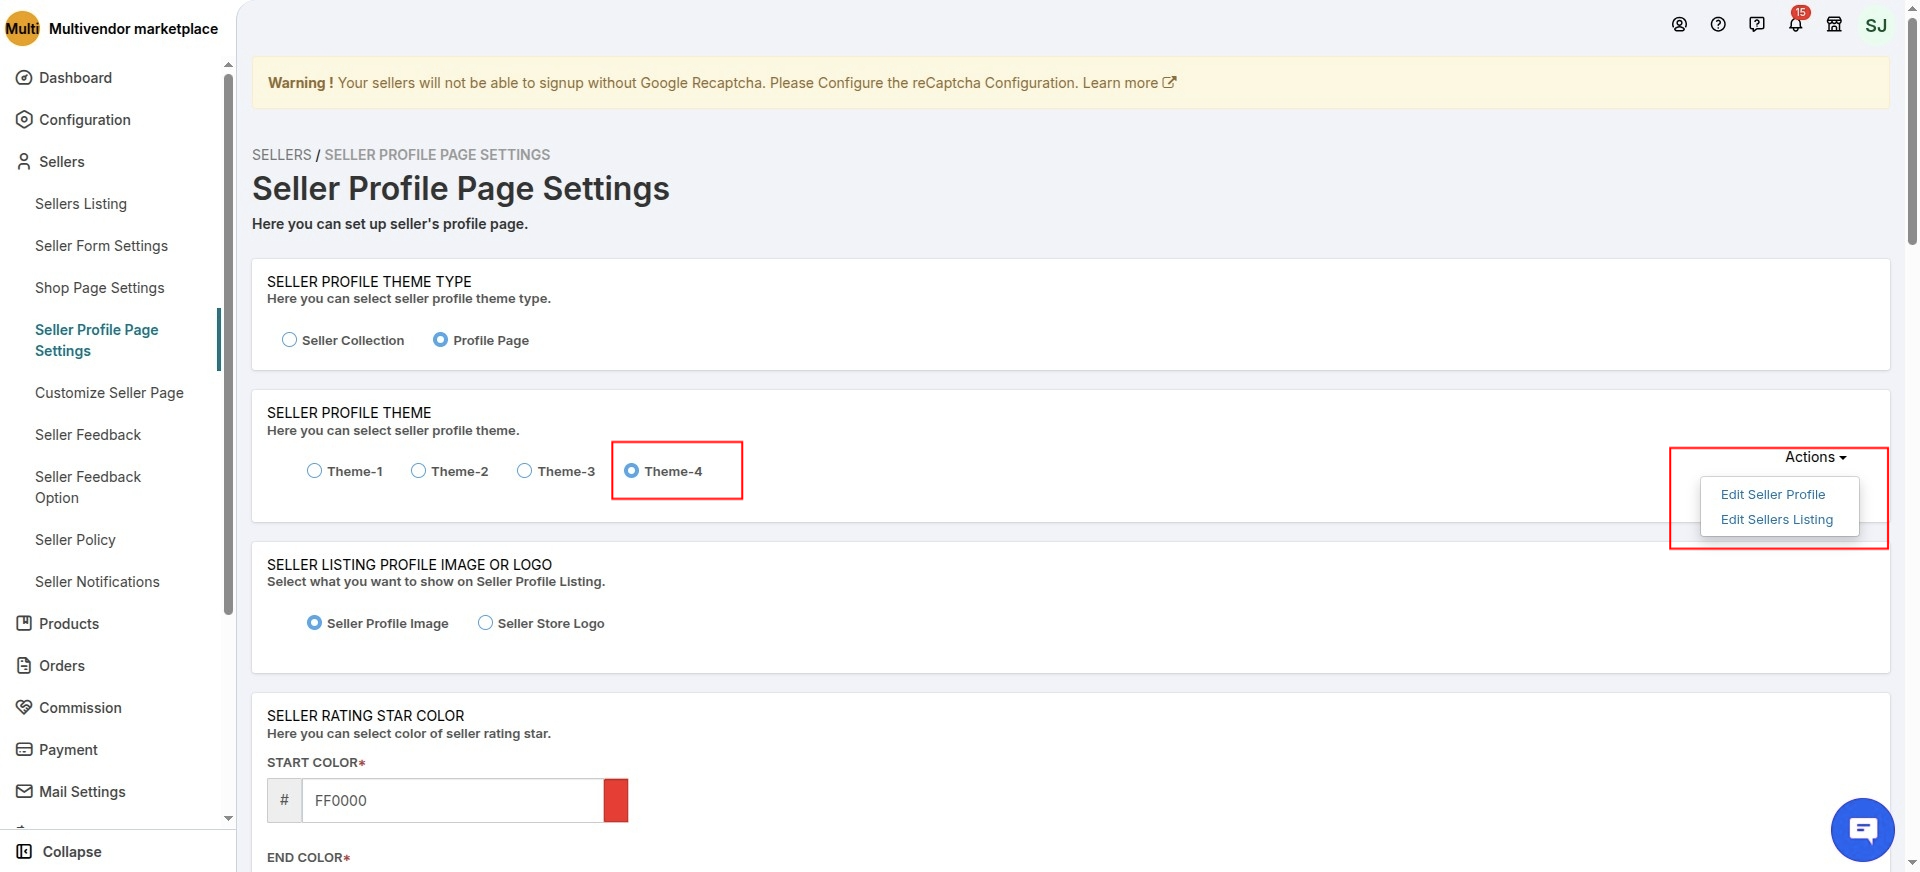
Click on the ‘Edit Seller Listing‘ option on the ‘Seller Profile Page Settings‘ page,
you will get the option to edit the Theme template & edit CSS for the seller’s listing page.
As soon as you edit any code and Save it, the “Publish” button gets enabled. Now, to make the changes work for the seller page, you need to publish the edited code.
Please note that if you have saved the edited code and not published it then, the default code will work for the profile page.
Moreover, clicking on the Preview button, you can preview the change you made for each seller’s profile.
Admin can anytime restore the default code by clicking the “Restore to Default” button.
Edit Theme Template
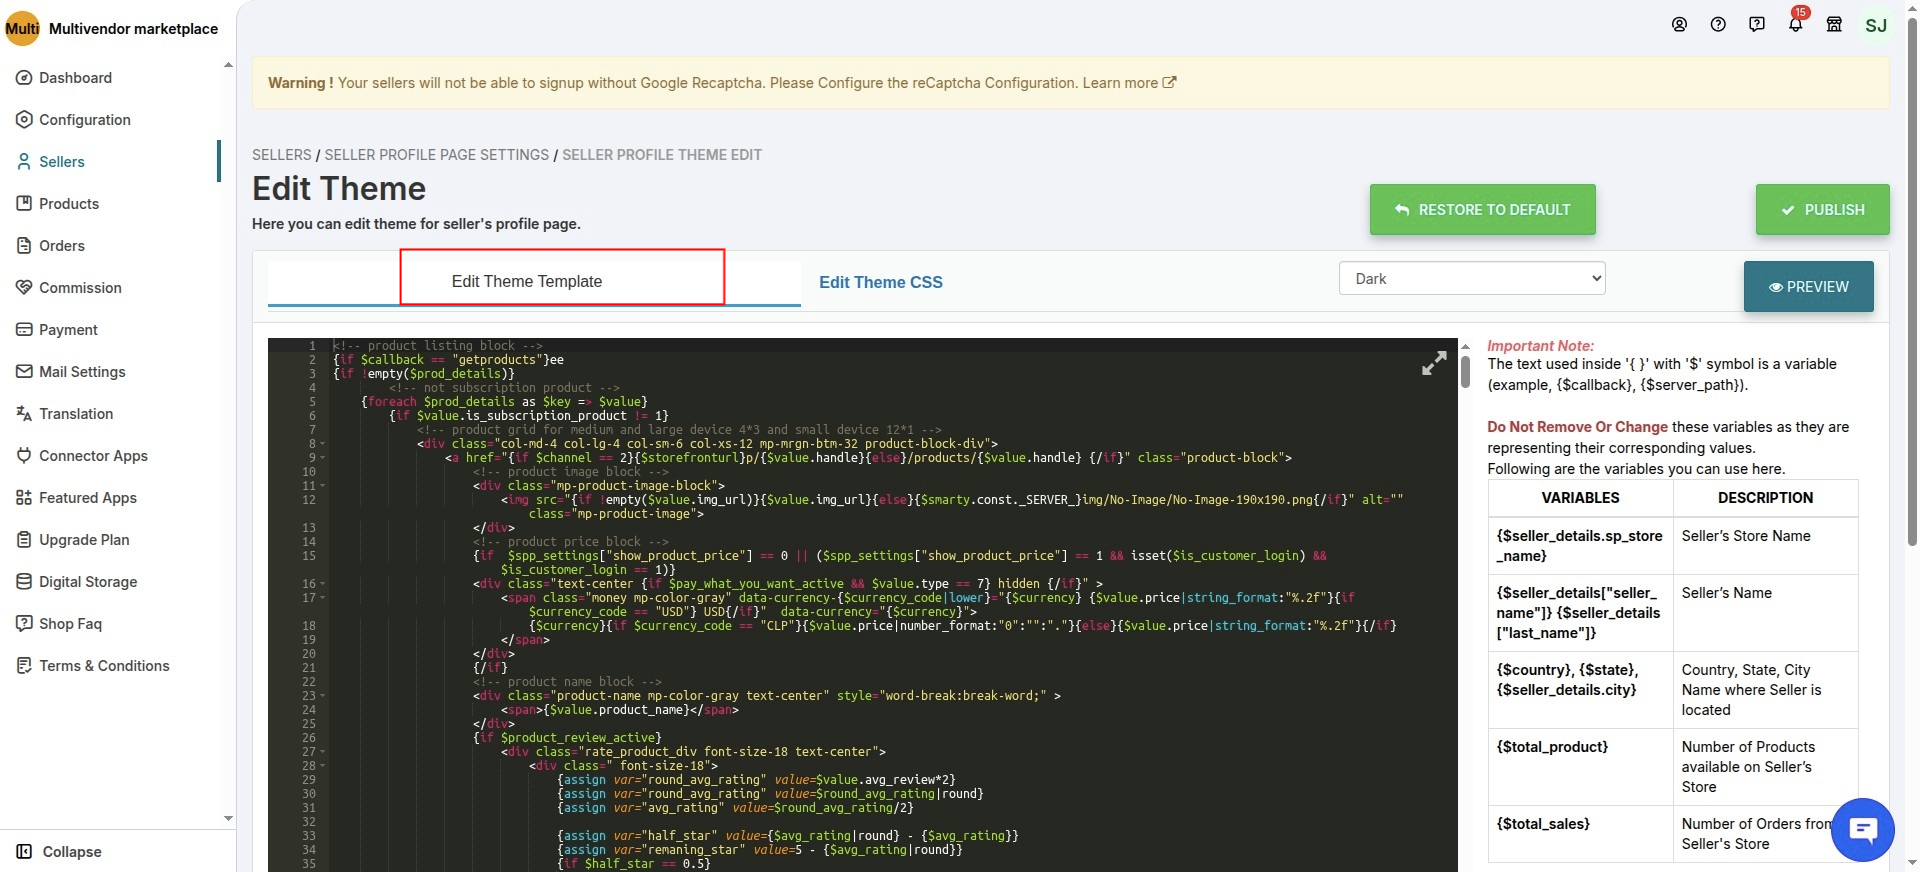
Edit Theme CSS

Seller Profile Page will be the same as that for Theme 1:

Here is a look of seller listing page for this theme:

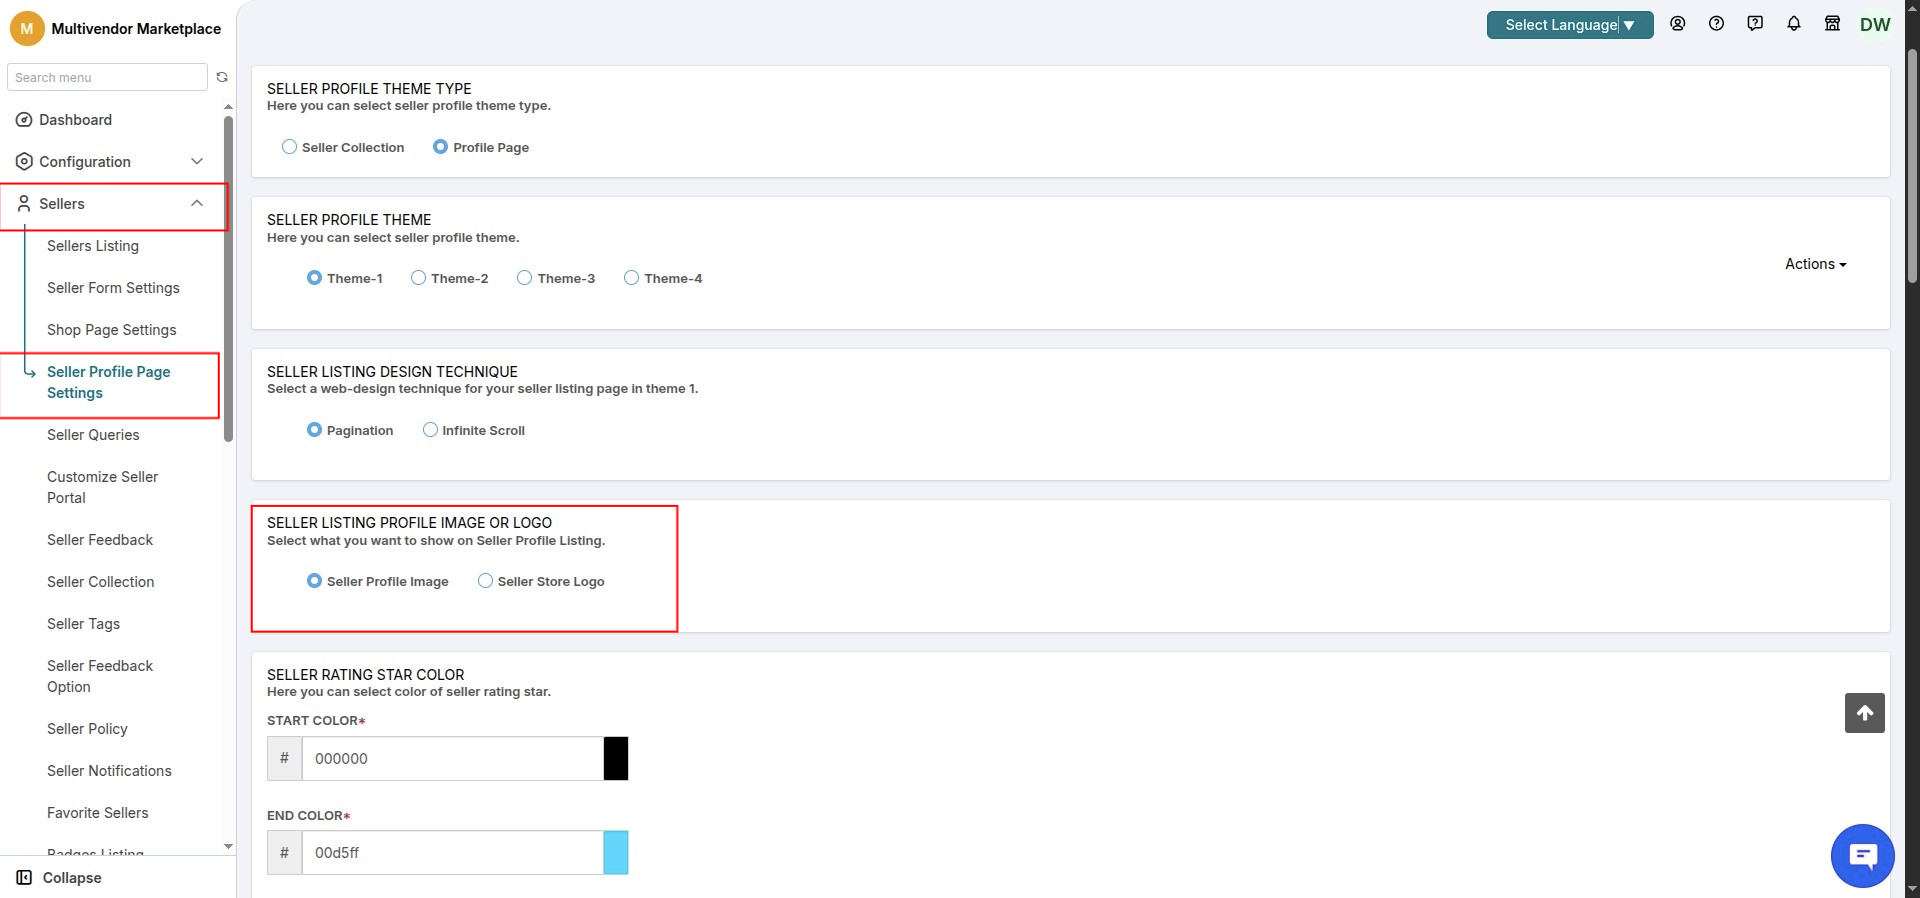
Display on seller listing page
You can choose whether you want to display seller logo or seller profile image on seller listing page from:
Multivendor App Admin Panel>>Go to Sellers>>Seller Profile Page Settings (from the drop-down menu).
How can Seller upload a banner for the seller profile page
To upload banner on the seller profile page, the seller has to visit My Account page from the Profile menu.
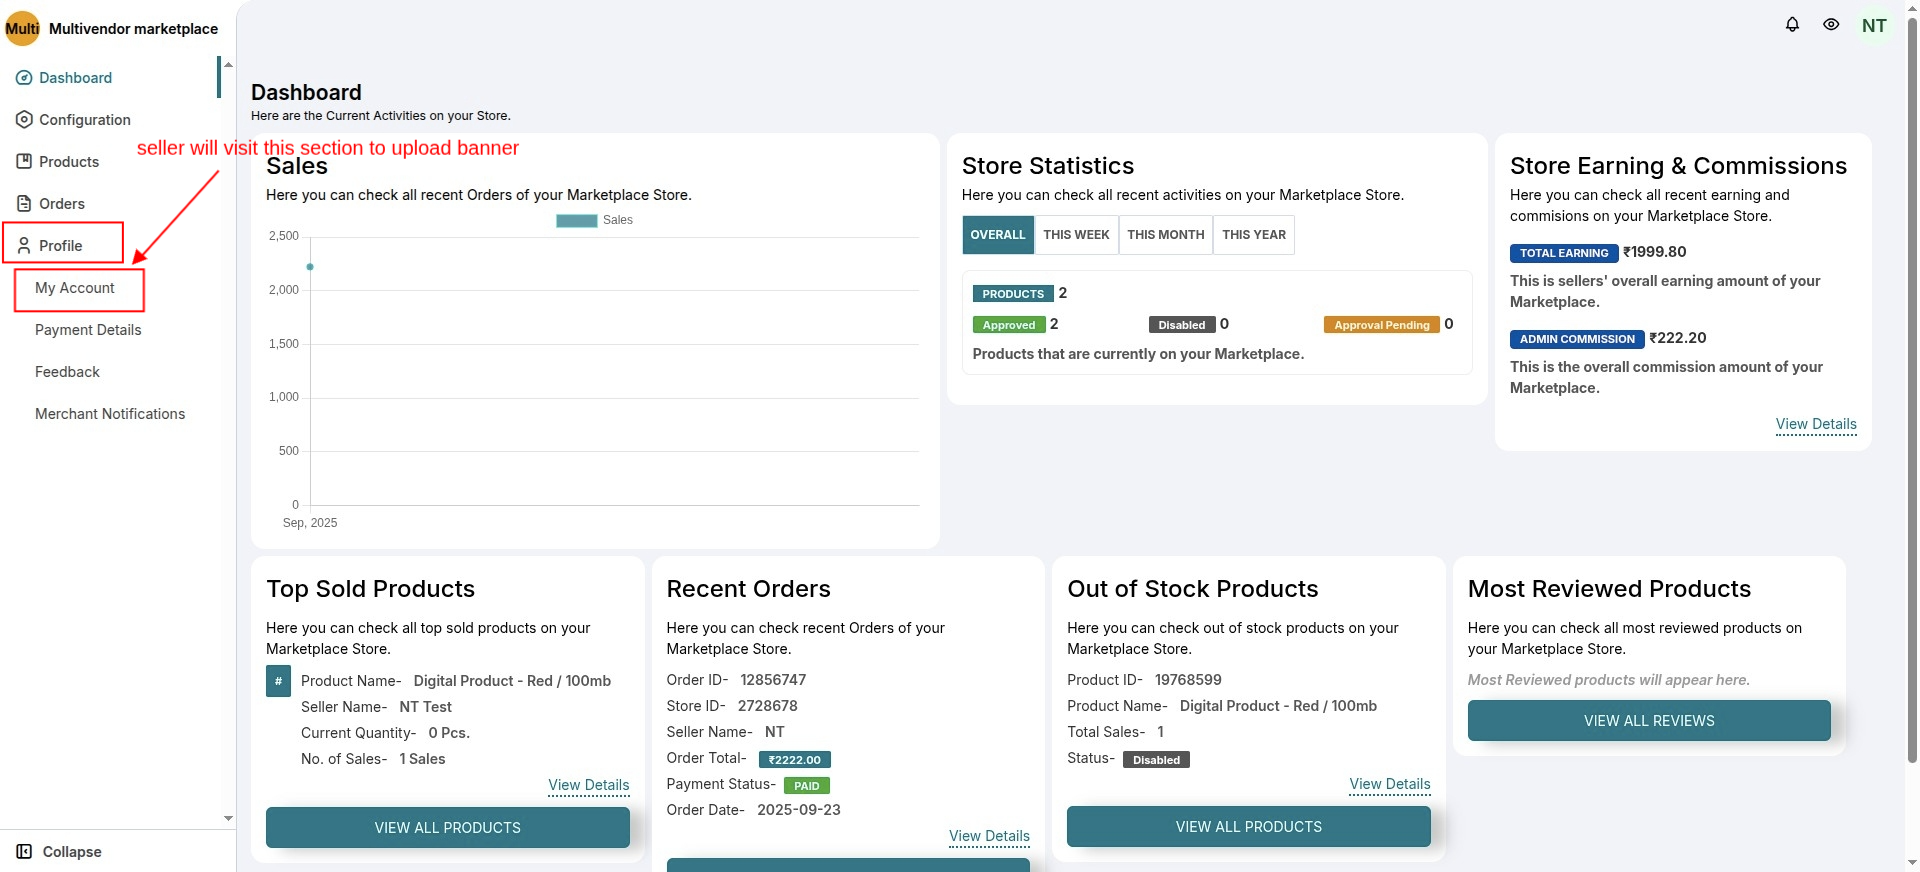
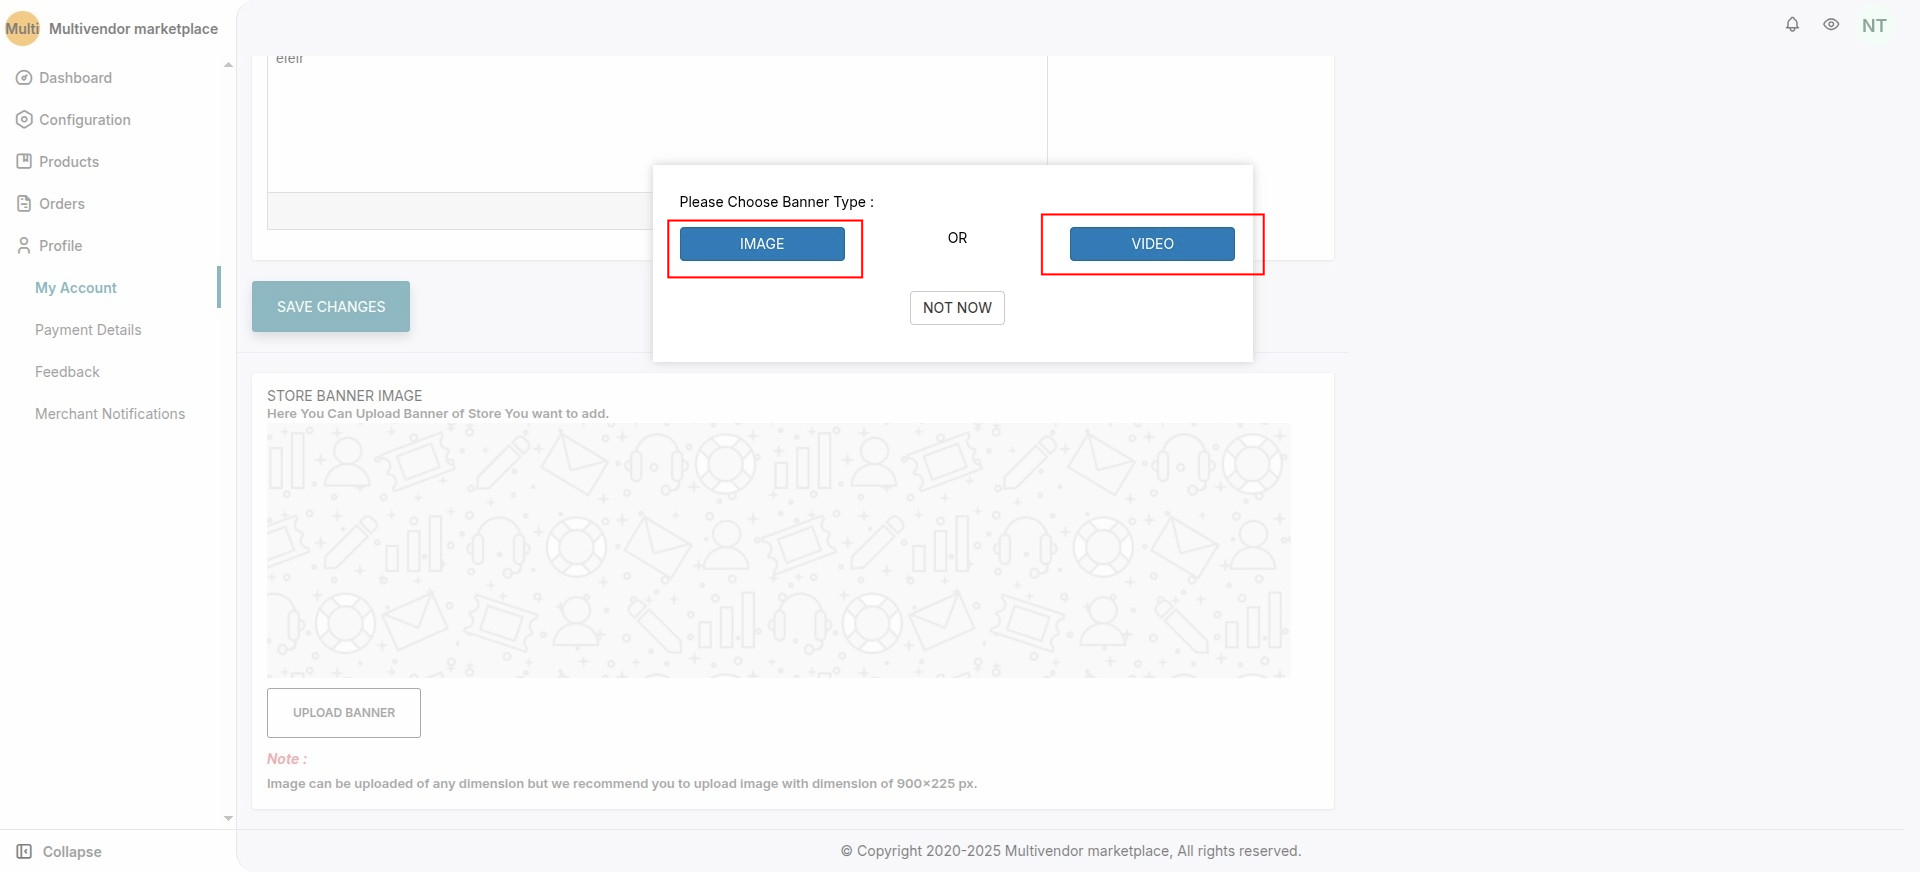
On My Account page click on ‘Upload Banner’ to upload banner on the seller profile page.

Once you click on Upload Banner, the box will open where you will get the option to upload the Image as well as video.
Sellers can also remove the banner from the “My Account” section.

How to upload the video on the seller profile page
Sellers can upload video by clicking on the video as shown in the above screenshot.
After clicking on Video a new box will open where you have to enter YouTube embedded link.
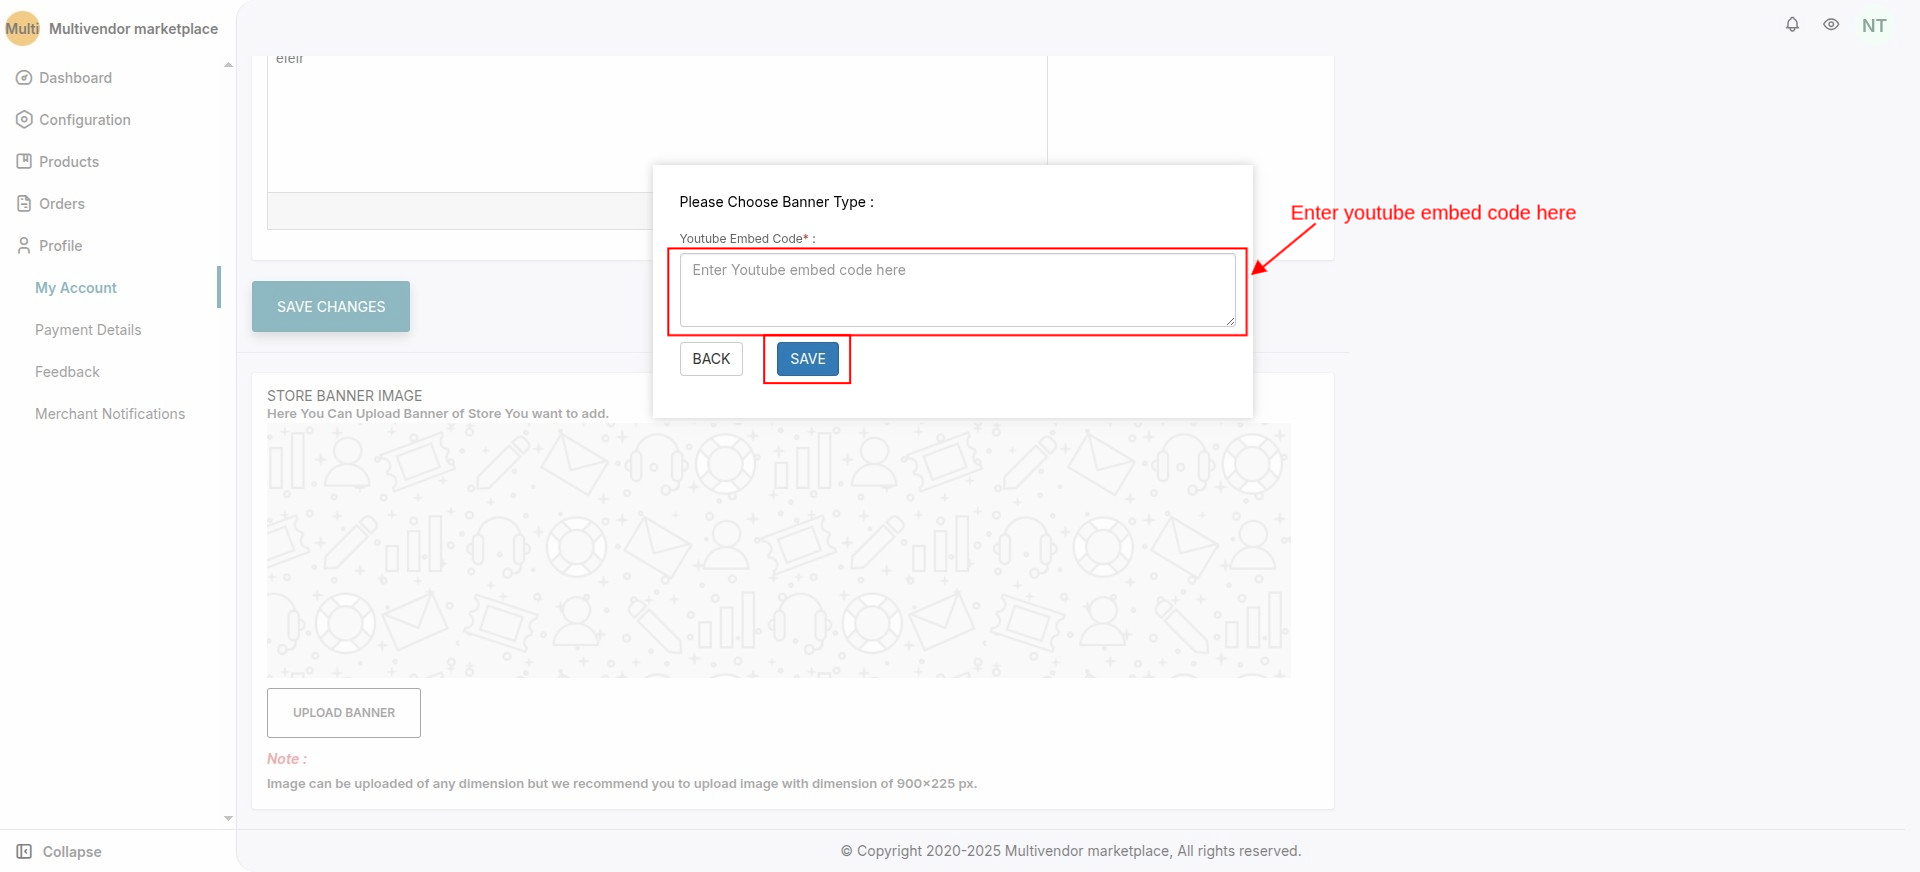
How to get Youtube Embedded code

Open the video on Youtube which you want to upload on the seller profile page.
Now click on the share button and click on the embed link.
Copy that ’embed Url’ from there and pastes it in the URL box shown above.

How to Upload Logo on the Seller profile page
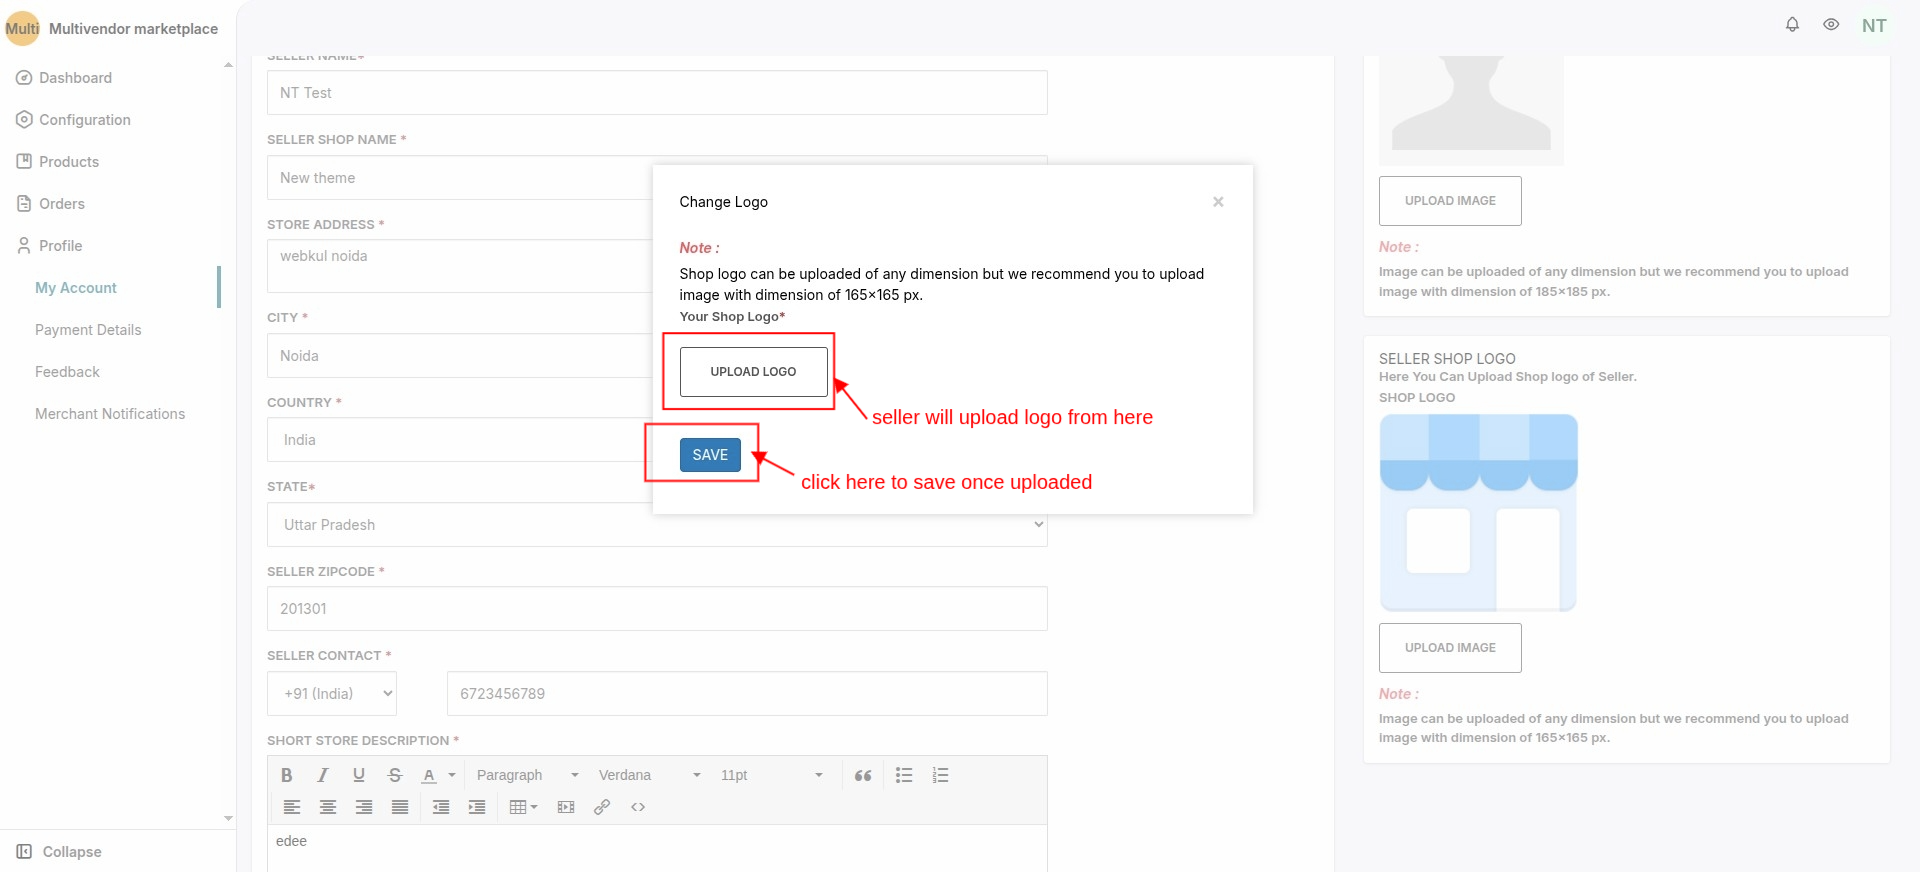
How can a Seller upload his/her Shop LOGO?
The seller can upload the Logo from the “My Account” menu of his/her profile.

Now click on upload image as shown in the screenshot below:

After clicking on ‘Upload Image’ box will open then click on upload image,
then select the image you want to upload for the logo, to display on seller profile page then click on save.
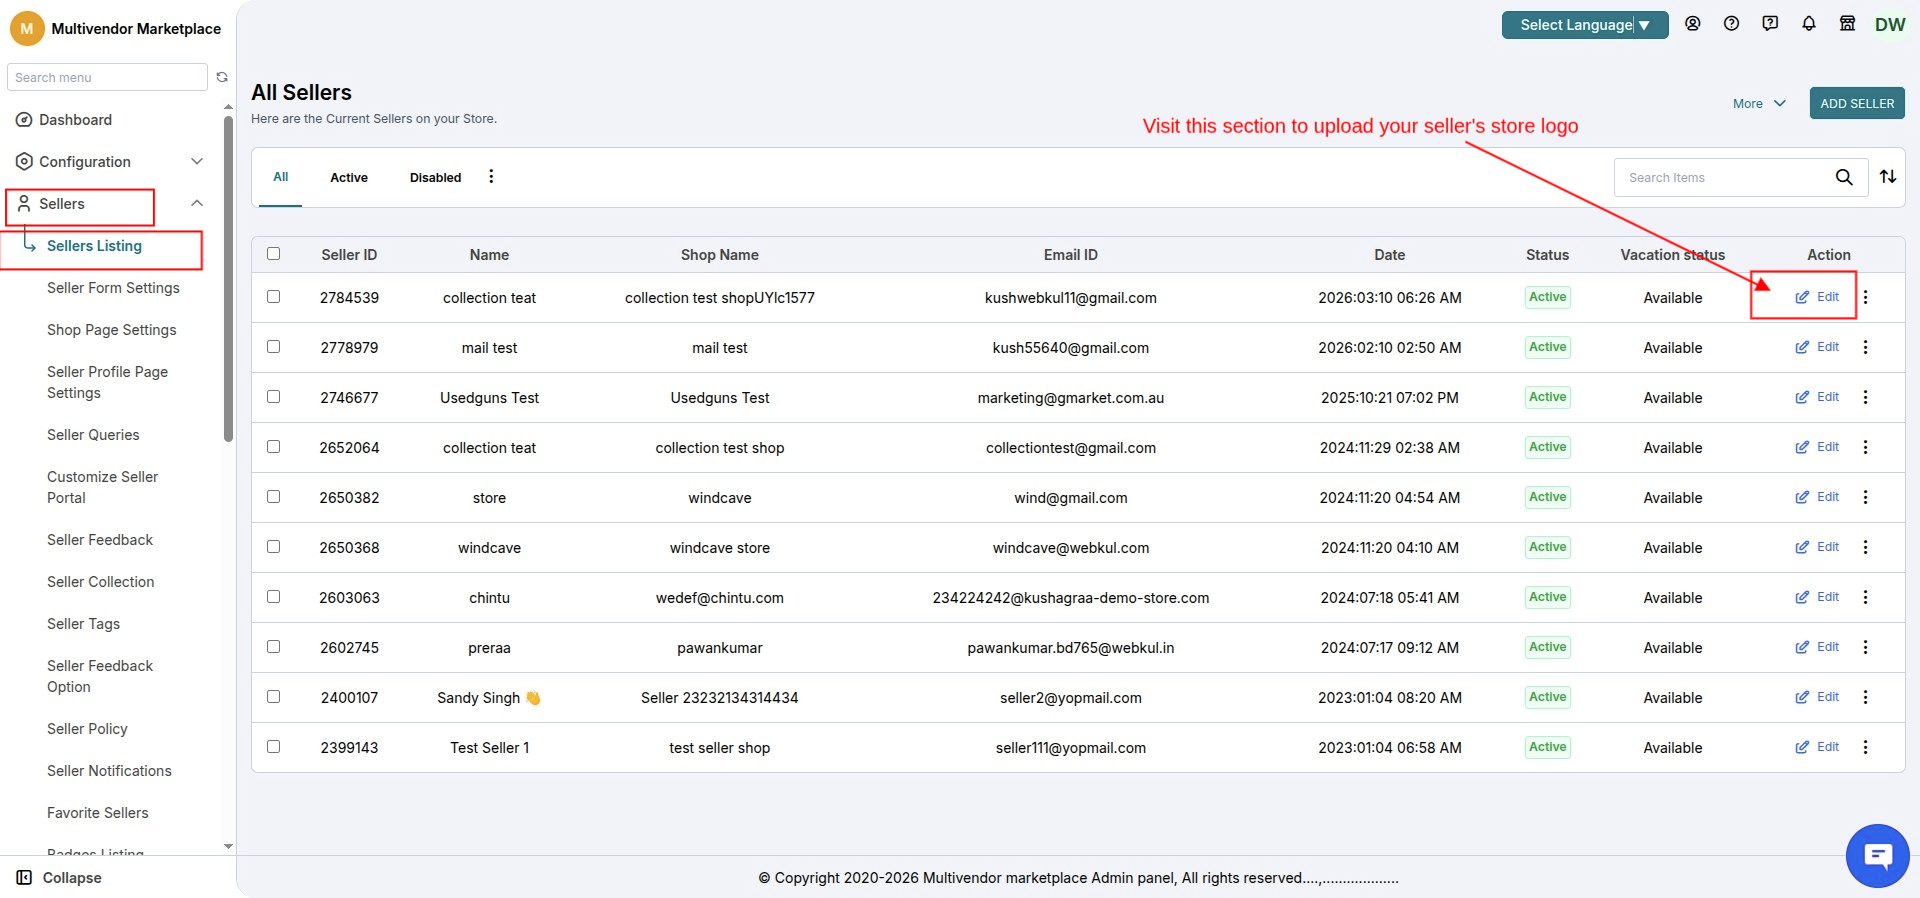
Now, admin can also upload Seller Shop Logo from his/her admin Panel of the Multivendor App.
Admin needs to follow the below procedure to Upload Logo for his/her Seller:
Multivendor admin panel>>Go to Sellers>>Click “Seller Listing” from the drop-down menu>>Select the seller to upload his store logo>>
Click on “Edit” from Action menu>>Scroll down and Upload the Logo>>Save Changes.
Admin End
Now, go to Edit Seller Section and Upload the Shop Logo of that Particular seller from admin panel.

To display Logo on the product description page, paste the below code on product.liquid template:
<div class="wk_seller_store_logo" data-productid ="{{product.id}}"></div>
To display Seller Profile Picture Link on the product description page, paste the below code on product.liquid template:
<div class="wk_seller_detail_logo" data-productid ="{{product.id}}"></div>

Follow the below process to paste the code:
- Go To Themes
- Click on Customize Theme button
- Click on Edit HTML/CSS button
- Select product.liquid file from the Templates where you want to show the link
- Paste the code
- Click on save
Edit/Change the Labels of the field
Admin can edit or change the labels as per requirement.
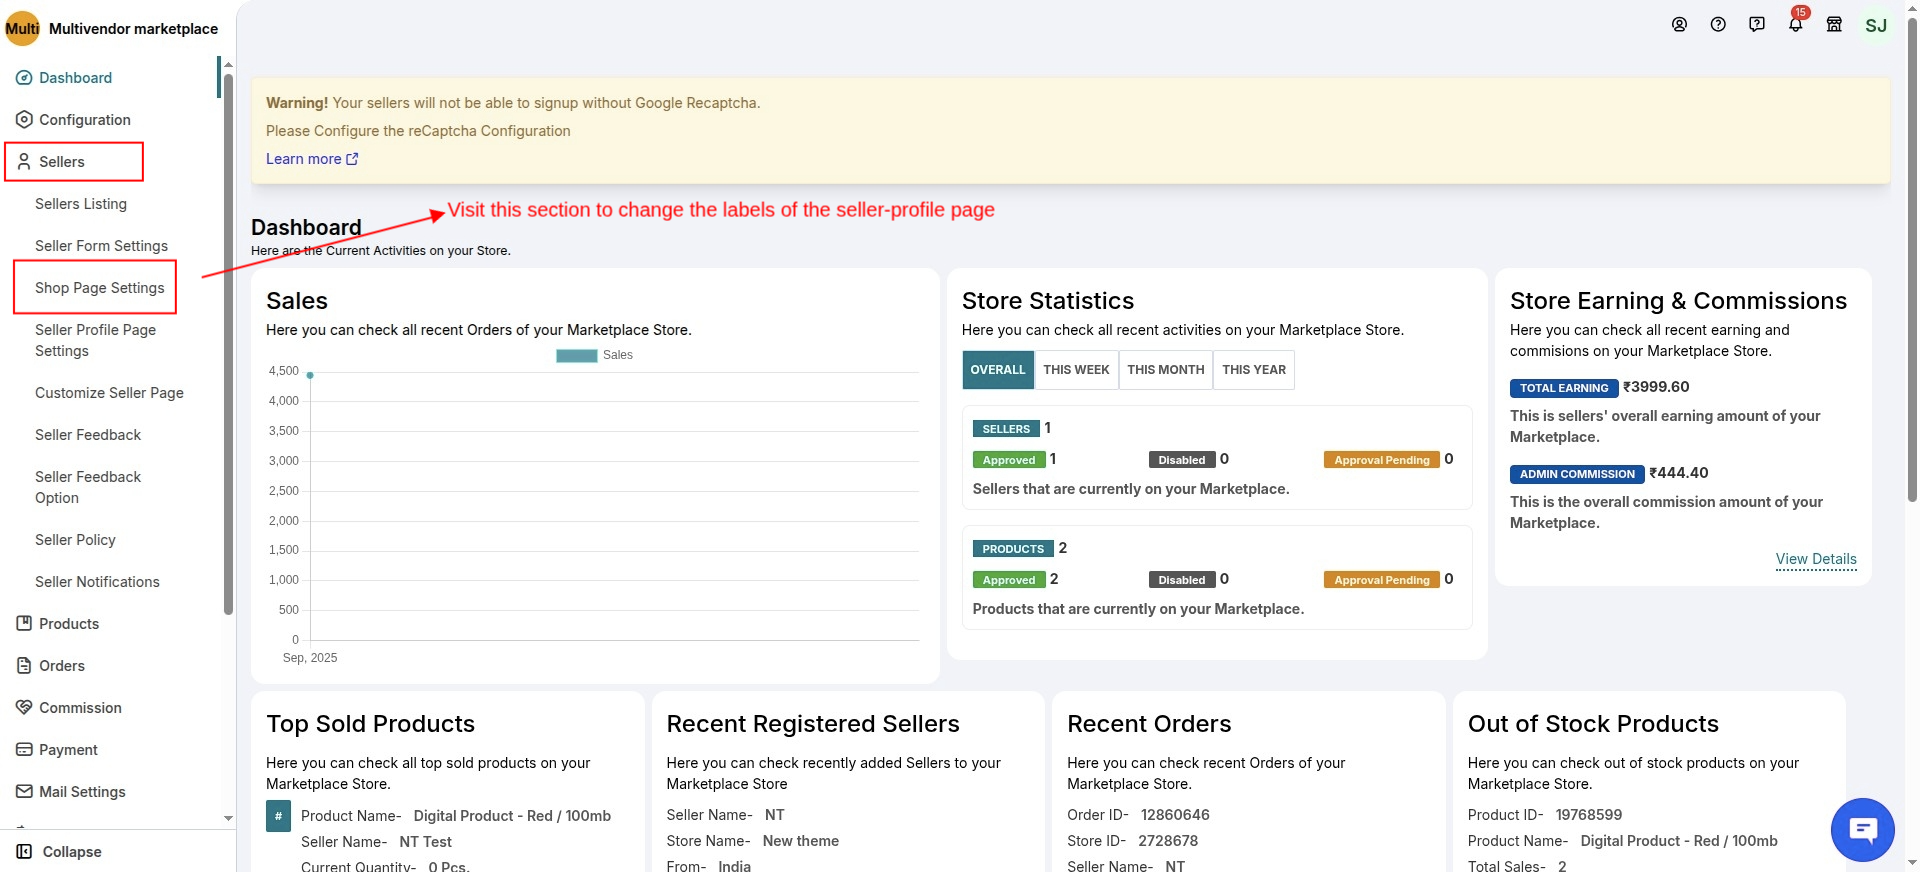
Go to Sellers “Shop Page Settings” from the main menu of the app as shown below.
You can change the labels as shown in below screenshot:

Display of seller products on the seller profile page
All the products of that particular seller will be displayed on the seller profile page itself.
The updated seller profile page with the banner and the configuration set by admin will look like this.

SELLER COLLECTION:
Now you can create seller collection pages instead of a seller profile page with all the similar seller information from the: Admin panel >> sellers >> seller profile page settings.
The seller collection page can be created in two ways i.e,
with collections OR without collection.
With collection: Select this if you want to create collections corresponding to all sellers on the Shopify side.
Without collection: Select this if you want to display the collection pages without creating the collections for all the corresponding sellers on the Shopify side.
NOTE: Please check carefully before saving the changes
whether you want to select “with collection” or “Without collection” as once the collections are created selecting “with collection”,
you will have to delete the collection manually in case you want to change the seller profile type to “without collections“.
Also if Merchant have more than 5000 sellers than we would recommend to not use with collection for Seller profile type.

Please NOTE: On updating the seller profile type, you need to regenerate the seller category page from the “Storefront configuration” section here:

Also, please note: If you have a customized seller profile page and you want to change the seller profile type,
you need to make some changes from the wk-seller-category.liquid file in your theme instead of regenerating
the page as regenerating the page will vanish the custom work and populate the default seller profile page provided by us.
If you want to change the seller profile type from “with collection” to “without collection” set the value to “0”
If you want to change the seller profile type from “without collection to with collection” set the value to “1”


Use Store Name & Description as Meta Title and Description for Seller Pages
When a seller profile is displayed as a collection page (showing all products from a particular seller),
it’s important to ensure that the meta title and meta description are optimized for search engines.
To keep it effective and consistent:
- Meta Title should reflect the seller’s store name
- Meta Description should use the seller’s store description
How to Set It in Multivendor Marketplace App:
- Open the Multivendor Marketplace app.
- Go to the “Sellers” section.
- Click on any seller profile to edit.
- Ensure that the Store Name and Store Description fields are properly filled.
- Save the changes.


These values will automatically be used as the meta title and meta description on the seller’s collection page.
CODE IMPLEMENTATION FOR SELLER COLLECTION PAGE:
You need to add these codes for the seller collection pages:
Copy following code into collection.liquid template before collection name and banner.
{% section ‘wk-seller-category’ %}
Copy following code into collection-template.liquid template and add class inside the collection banner and collection title div.
To hide the collection banner and collection title from the Seller Collection page.
“wk-collection-profile-hide”
Copy following code into collection-template.liquid template and add class inside the parent div for products and filters.
To hide the products when customer switches from one Tab to another( Seller Product , Feedback , Reviews, Policy, Description ).
“wk-seller-products”
NOTE: Now, the seller collection is now compatible with Shopify store 2.0.

In the Shopify store 2.0:
Follow the path to add seller category profile section shopify store > online store > customize > collections > add section > select,
seller category profile and click on save button.


CODE IMPLEMENTATION OF SELLER COLLECTION PAGE FOR SHOPIFY STORE 2.0.
You need to add these codes for the seller collection pages:
Copy the following code into main-collection-banner.liquid template in the parent div.
{wk-collection-profile-hide}
Copy the following code into main-collection-product-grid.liquid template in the parent div.
{wk-seller-products}
Seller collection page on the storefront:
The seller collection page will look similar to the seller profile page:

Note:
- Before proceeding further kindly make sure that the handle name should be the same on the Shopify seller collection end and multi-vendor seller end
- In case Collection is not created then you can create it by going to Multivendor Admin Panel >> Sellers >> Sellers Listing >> Click on Three dots >> Select Edit >>
- On Edit Seller Page click on “More Action” Button >> Click on Create Collection as shown below.
- In case you are not finding this button then kindly wait as it takes a little time to create a collection at the Shopify end.

Demo
Use below link and credentials to use the demo of the multivendor marketplace App for Shopify:-
https://multivendor-marketplace-5.myshopify.com/pages/seller-profile
Support
In case of any further query, feel free to raise a ticket at http://webkul.uvdesk.com/ or drop a mail at [email protected]
Thanks for reading this blog!!! 🙂

2 comments
Moreover, you can regenerate the “Seller profile Page” from the app. Refer: https://prnt.sc/uztw3q
Regards,
Team Webkul