Shopify Multivendor Marketplace App New & Upgraded Features: Yes, we are updating and introducing new features to our best featured Multivendor Marketplace app for Shopify.
Please keep following and tracking this section of ours to know about all the updates in the app.
Let’s have a look at the newly introduced and updated features of the Multivendor Marketplace app for Shopify:
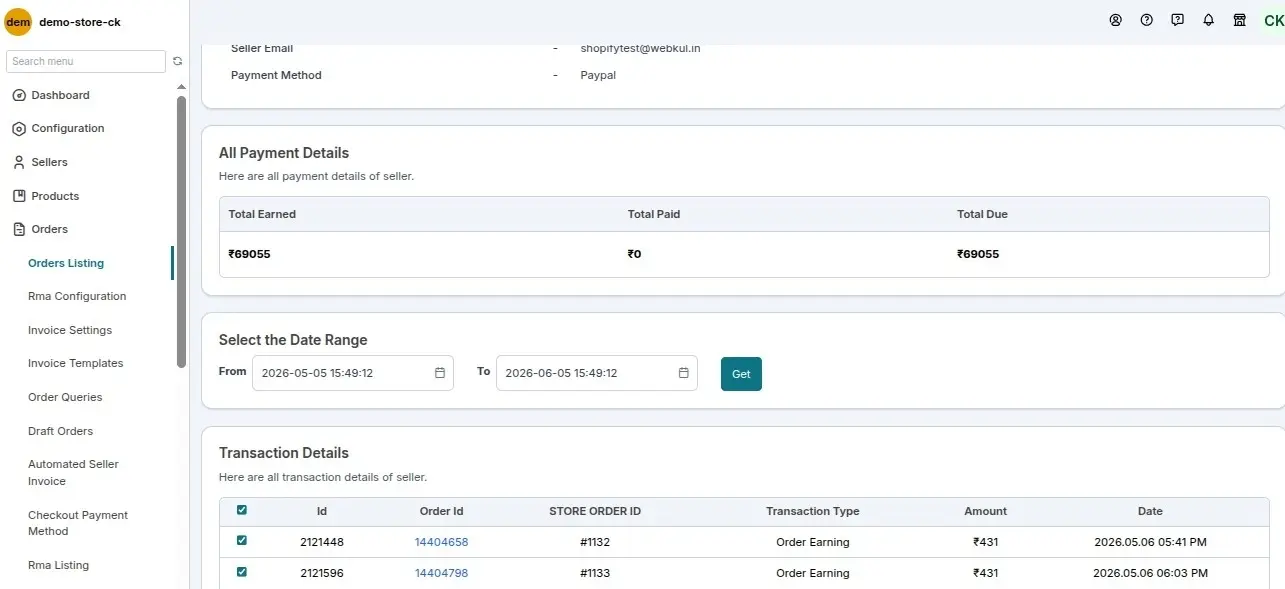
Export the order IDs
Now, the admin can easily export the order ID details by clicking on the export details. under the payment section.
Pending order
Now, we have added a “pending orders” button in the admin panel >> order >> order listing section
which shows that pending orders list in which seller payment is due and added to the seller’s due earnings as per the configuration set by admin in the admin panel.
By pending orders list, the admin can easily filter out the due payment of their sellers from the order listing.
For this, the admin just has to click “pending orders” button in order >> order listing as shown in the below image.

After the admin clicks on the pending orders button, the admin will see that order list in which seller payment is due and will click on “PAY” button to clear the seller due payment
as shown in the below image.

Note:-
The pending orders button will be shown only when the admin has selected “PAY ORDER WISE” in the “SELLER PAYMENT TYPE” dropdown from configuration >> payment configuration.
Order Prepare Status
The Order Prepare Status feature has been updated to reflect changes when an order is delivered, canceled, or refunded.
This ensures accurate order tracking and better transparency for both admins and sellers in their respective order listing pages within their dashboards.

Add CC Recipients To Order Mails
You can now allow sellers to add CC recipients to the emails sent to the customers once an order is placed. For this, visit the admin panel>>Configuration>>Order Configuration>>Enable the tab.

Now, the seller can add up to 5 CC recipients to the order placed email.

Manage Tip on Orders
Shopify has included an option for customers to add a tip at checkout. KNOW MORE Now, you can manage the tip earning in the app.
Visit the Seller Payment Configuration menu of the app and configure if you want to add the tip to the admin’s earnings or the seller’s earnings.
For this kindly navigate to Multivendor Marketplace Admin Panel >> Go to Payment >> Seller Payment Configuration >>Payment Setting >> “Manage Tip Earning”.
Refer to the screenshots below:


As per the configuration, the tip amount entered by the customer will be added to the admin/seller’s earnings in equal proportion.
For Example:- Suppose an order of $100 is placed having $80 products of Seller A and $20 products of Seller B.
A customer entered a tip of $10 at the time of order then, the $8 Tip will be added to the Seller A earning i.e. $88 [$80+$8(Tip)] goes to seller A and
the $2 will be added to the Seller B earning i.e. $22 [$20+$2(Tip)] goes to seller B.
In case of refund, you can return the tip to the customer from Shopify and update the same in the app.

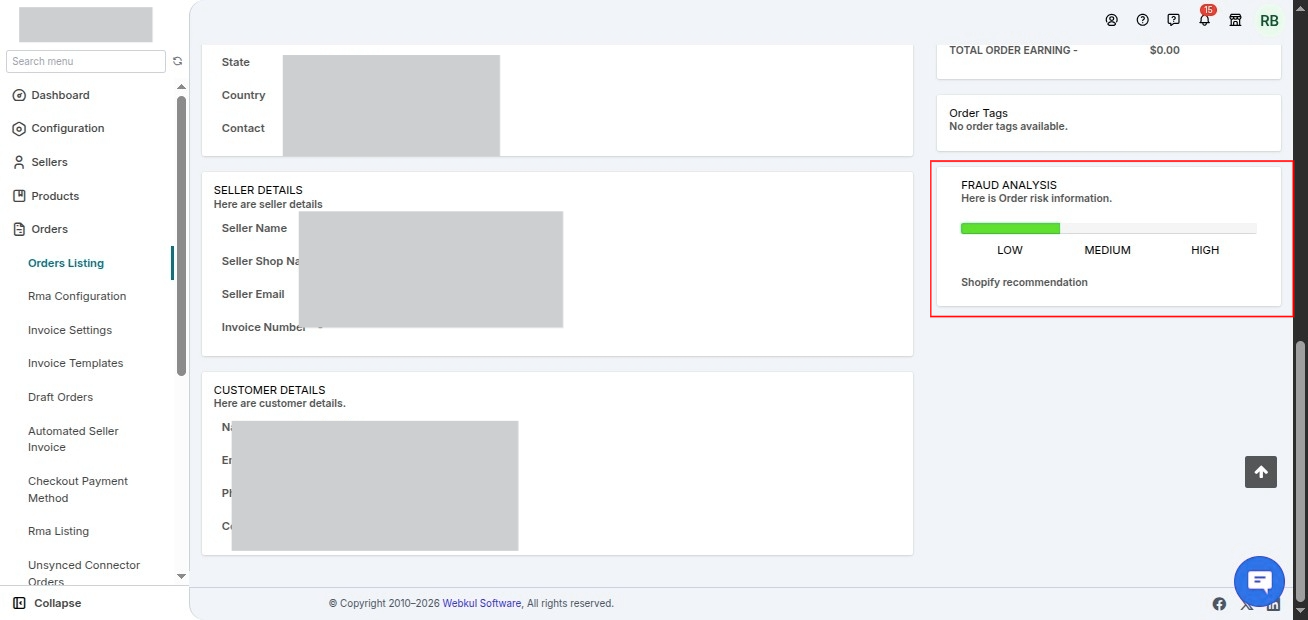
Fraud Analysis
You can now investigate an order that you think might be fraudulent.
To check this, you need to visit the Multi-vendor backend>>Go to Orders>>Order detail page and view the analysis.
Both admin and sellers can view the order analysis from their respective panels.
Check the Mail Log
You can now check the mail log info in the app. To do so, please visit the Multi-vendor admin panel>>Mail Configuration>>Mail Log.

Now, select the date range to get the mail log information in the app.

Please Note:- All the log info will be expired & get removed from the app after 30 days.
You can view any log info up to 30 days after that it will get deleted automatically. -Date & Time are in UTC format.
Also Note:- In case you are using other email service provider, you need to contact them to get the information regarding delivered emails.
Sync Inventory & Image
In the Multi-vendor Marketplace app, merchant/seller can now manually sync the Shopify product inventory & images
with that of the marketplace from the Edit product section of their respective panels.
Please Note:- To sync the product inventory and images, the products must be in approval state in the app.
ADMIN END
Go to the admin panel>>Products>>Product Listing>>Edit product>>Sync Inventory & Sync Image (More Actions).

Click the Proceed button and replace the Shopify inventory with the Multi-vendor app inventory.

Similarly, you can replace the Shopify product image with that of the marketplace.

SELLER END
Similarly, the sellers can manually sync the admin’s Shopify product inventory & image with the marketplace inventory & product images.
Go to the Seller Panel>>Products>>Product Listing>>Edit Product.

Add CC Recipients To the Email
In the app, the sellers, customers are notified via email of each action. Now, you have the option to enable the CC tab in the Mail Configuration menu to add CC recipients to the emails.
Thus, send email notifications to recipients as well.
To enable this feature, please visit the Multi-vendor Admin Panel>>Go to Mail Configuration>>Click the Edit button.

As soon as you click the Edit button, you will get the option to Enable CC Tab.

After enabling this tab, you will get the option to enter the CC recipients in the field given. Please Note:- You can add a maximum of 5 and a minimum of 1 CC recipient to a mail.

To add more than one recipient as CC, you just need to add one email ID & clicks the Enter and so on.

This way, you can add recipients to the emails.
Seller Store Address in Mail
We are excited to introduce a new enhancement to the “Customer Items Fulfillment” email in the Shopify Multivendor Marketplace app.
With this update, admins can now include detailed seller store information in the fulfillment emails sent to customers.
This new feature improves transparency and provides customers with essential seller details, making their post-purchase experience more informative.

The following seller-specific variables can now be added to the email template:
{$seller_store_address} – Seller’s Store Address
{$seller_country_name} – Seller’s Country
{$seller_state_name} – Seller’s State
{$seller_zipcode} – Seller’s Zip Code
Contact Seller Button on Product Page
You can now display the “Contact Seller” button on the product page of your store.
Thus, the customers can directly contact the seller of the product they are willing to purchase.
To do that, you just need to visit the Multi-vendor admin panel>>Configuration>>Instruction for Marketplace>>Get the code.

After adding the codes, you can view the contact button on the product description page of your store.

Clicking the Contact button, a form appears to which the customer needs to enter the details such as Name, Email ID, and Query.
Now, filling the details, the customer needs to click the Submit button. Thus, submit the query to the respective seller of that product.

This way, the customers can send their queries to the sellers of the product.
DISPLAY EXTRA INFORMATION ABOUT THE PRODUCT ON YOUR STOREFRONT
This is a newly introduced feature, in which pasting the below code in the product.liquid file
It will enable you to display extra information about the product on your store’s product description.
Therefore, to paste the below given, follow the below process:
<div class="wk_product_custom_detail clearfix" data-productid ="{{product.id}}" style="display:none; border-bottom:1px solid #ddd; border-top:1px solid #ddd; padding:5px;"></div>
- Go To Themes
- Click on Customize Theme button
- Click on Edit HTML/CSS button
- Select product.liquid file from the Templates where you want to show the link
- Paste the code
- Click on save
Moreover, Pasting this code will enable you to display the custom field you have created for the product description page on the store front end.
Display Brand Name on product page storefront
Configuration
We have added Brand Name field under product form customisation.
This field will be disabled by default. Admin needs to enable it fro products >> product form customization >> brand name


Once enabled admin can decide if he/she wants to provide this feature globally for all sellers or for some seller only.
If admin want to enable this feature for some seller then he can enable it from edit seller page

If admin wants this field as global then we have added one brand name configuration under product configuration.
Navigate from admin panel configuration >> product configuration >> DISPLAY BRAND NAME

Note: Once this feature is enabled then brand name field will be available for all seller on product page.
Normal Product Case
On product form page Brand Name field will be visible.

As a admin you can show this brand name field on product page,
we have added the code in instruction for marketplace page which needs to be added in order to show this field on front-end ( customer end )

Connector Product Case
For connector seller as well this field will be visible on product page.
We have added another page connector field mapping where seller can map the brand field with their existing field

For shopify connector seller brand name field should be mapped with “vendor” field.
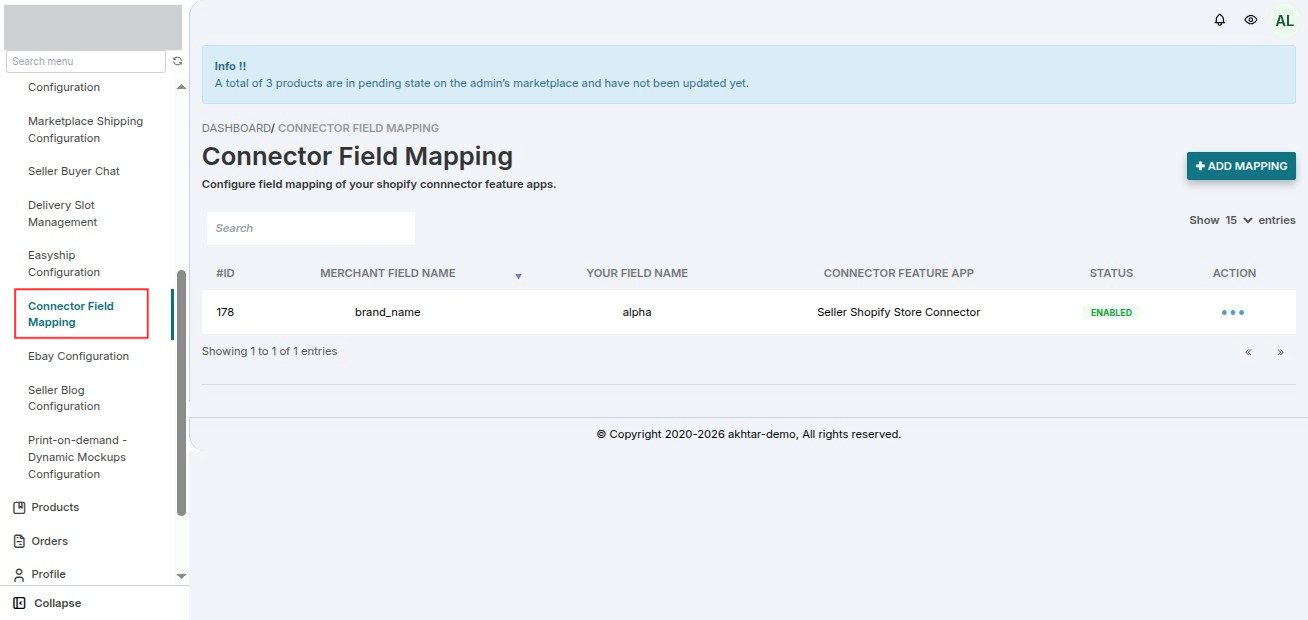
In your case products are already imported so once you enable this feature let us know we will sync the products once again for that seller so that brand name field is filled.
we have added the code in instruction for marketplace page which needs to be added in order to show this field on front-end ( customer end )
CUSTOM FIELD FOR PRODUCTS
Earlier we had custom field option only for seller sign up page, now we have introduced the option of a custom field for the product description page on the front end as well.
The admin will just choose the field whether it is for seller or product from the down while creating a custom field ..and rest everything is the same.
Go to Custom Field >>> Click on Add custom Field >>> select from dropdown – Seller or product >>> fill in rest of the form >>> click on save.

REMINDER FEATURE
Also, an extremely amazing feature of the Multivendor marketplace is “Reminder Feature” to remind the vendor for order fulfillment.

Admin can enable/disable the option of sending emails
Now, admin can enable/disable the option of sending emails and can also edit the content of the automated emails sent to the sellers
and customers from the mail configuration section.

Invoice
We have now introduced the feature of generating an invoice on our Multivendor Marketplace App.
Now in the order section, you can generate the invoice by clicking on the view button of any particular order and then clicking on the generate invoice button.
The invoice can be generated in two ways :
- Admin to Seller
- Seller to Customer
And both these types of content can be edited by visiting the invoice configuration section.

INVOICE SETTINGS
From this section the details which will be default will get filled up by admin from this section,
for example, address, VAT number, VAT, FAX, Telephone Number and much more.

Note: From the Admin panel of Multivendor Marketplace App invoice for Seller from Admin will get generated and from the Seller panel the invoice for Customer/buyer
from Seller will get generated when clicked on Generate an Invoice from the order section.
Order Note
Now, Customers while placing the order can put the order note for sellers
which will be visible to the sellers when they will click on the view button of any particular order.

LABEL TRANSLATIONS
Multivendor Marketplace Label Translations feature is here. Now you can rename the labels as per your requirement for various sections of the app.

To know more click here.
Download Invoices in bulk
Now you can download the invoices in Bulk. Just go to orders >>> select the orders you want the invoices for >>> from bulk action choose ‘Bulk Invoice’ >>> Save.

Mail Template Header & Footer Background Color
Now, the multivendor app is upgraded with a new mail template feature within the app. Through this, admin can now change the color of the header’s and footer’s background of the mail template.
Note:- This feature is applicable for all mail templates within the app.
Admin can test this change in header’s and footer’s background color through a “Test Mail” also.
Follow the procedure to change the header’s and footer’s background color of the mail template:

Admin panel of the app >> visit “Mail Configuration” menu >> click it and visit the “Mail Template Header and Footer Background Color” section >>
select the header and footer background color >> click on save button.
Commission Listing: Seller Side
Moreover, the sellers can view the list of all the Commissions charged per product from each order.
For this, go to Shopify Multivendor Marketplace Seller Panel > Orders > Commission Listing:

Attach Invoice (Seller To Customer) To The Order Fulfillment Mail
Now, you can choose if you want to send the order invoice (seller to customer) in the mail at the time of order to fulfill or not.
For this, Go to the Mail Configuration>>Select the placeholder “Customer Item Fulfillment”>>Click the “Edit” button to edit the mail template.

Clicking the edit button, the option to attach invoice enabled!

This way, you can attach “Seller to Customer” Invoice with the Order fulfillment mail to send it to customers.
Multivendor Marketplace: Digital Storage Plans
Wish to increase your Multivendor Marketplace digital storage?
Check out: Multi-Vendor Marketplace for Shopify: Digital Storage
Add Header & Footer to the Mail Templates
You will now have the option to choose if you want to add header & footer to the mail templates of the mail send to sellers and the customers or not.
You can visit the Mail Configuration menu of the app and enable/disable the settings as per the requirement.

In the mail configuration, scroll down to the bottom and configure the settings.

Allow Seller to Cancel Order Fulfillment
You can now allow sellers to cancel the order fulfillment from their respective seller panels.
For this, you need to enable the configuration from the Order Configuration menu.

Enable the settings “Allow Seller to Cancel Order Fulfillment”:-

Now, the sellers will get the option to cancel the fulfillment in their Order detail section.
Go to Order Listing>>Select a fulfilled order to cancel its fulfillment>>Click the View button(Action) menu.

On the Order Detail page, the seller will get the option to cancel fulfillment.

Clicking the “Cancel Fulfillment” button, the seller can cancel the fulfillment of an order and the same would reflect in the order detail section of the admin panel.
Note:- The sellers will not get the option to cancel the order fulfillment in case the order is fulfilled by the admin.
This feature will work in these shipping methods: FedEx, Vamaship, USPS, UPS, Marketplace Shipping, Free shipping, and Others.
Allow Seller to Accept/Reject Order
You can now choose whether you want the sellers to accept or reject the orders from their respective seller panels.
Go to Configuration>>Order Configuration>>Enable Allow Seller to Accept Order>>Save Changes.

After enabling this option, the seller will have the option to accept/reject the customer’s order.
Once an order is placed, the seller needs to visit the Order Detail section & perform the action.

Clicking the View button, the seller will have the order details, get scroll down to the bottom & in the Fulfillment Detail section, he/she can Accept or Reject the order.

CASE 1: ACCEPT ORDER
Clicking the Accept Order button, the seller can accept all the orders at a time and proceed to fulfill the order.

CASE 2: REJECT ORDER
Clicking the Reject Order button, the seller needs to give a reason for order rejection & hit the Reject Order button.

Order Rejected
This way, the seller rejects the order.

Both admin & the seller can view the order rejection details from their respective panels.
For the rejected orders, you can configure an option to cancel the order at the same time. Go to Configuration>>Order Configuration>>AUTO CANCEL ORDER ON REJECT.

In case you enable the Auto Cancel Order on Reject option:-
Then, all the items of this rejected order will get restocked and if the order is Paid & Captured, then, the order amount will be refunded.
In case you disable the Auto Cancel Order on Reject option:-
Then, you need to manually restock the items in your store and manage the refund accordingly.
Allow seller to reject “Accepted” orders before fulfillment
You can now allow the sellers to reject the orders before fulfillment from their respective seller panels.
Go to admin Panel>> Configuration>>Order Configuration>>Allow Seller to Accept Order>>Enable Allow Seller to Cancel the Accepted Order>>Save Changes

This configuration only works when ALLOW SELLER TO ACCEPT ORDER is ON
Enable this option to cancel the order if the seller accepts but doesn’t fulfill it.
To cancel when the seller rejects the order, turn on ‘AUTO CANCEL ORDER ON REJECT’; otherwise, the order will be rejected.

Managed “Delivered” order status in MVM
We’ve introduced a new enhancement in our Multi Vendor Marketplace app – Delivered status can now be managed and updated directly within the MVM app, similar to how Shopify handles order updates.
Once an order is marked as fulfilled, sellers now get the option to enter delivery details manually.
They can mark the item as “Delivered” and mention the exact delivery date using the “Enter Delivery Details” action.
This brings better sync between the Shopify order status and the MVM panel, ensuring transparency and efficiency.
Add Expected Delivery Date
You can allow sellers to add an expected delivery date for the orders.
For this, you need to visit the admin panel>>Go to Configurations>>Order Configurations.
Enable the option from here:-

Once enabled, the seller will get the option to enter the expected delivery date while accepting the order from the order detail section of the seller panel.

Once the seller accepts the order, the seller will get notified via email with the order delivery details.
You can customize the emails as per the requirements from the Mail Configuration menu in the admin panel.
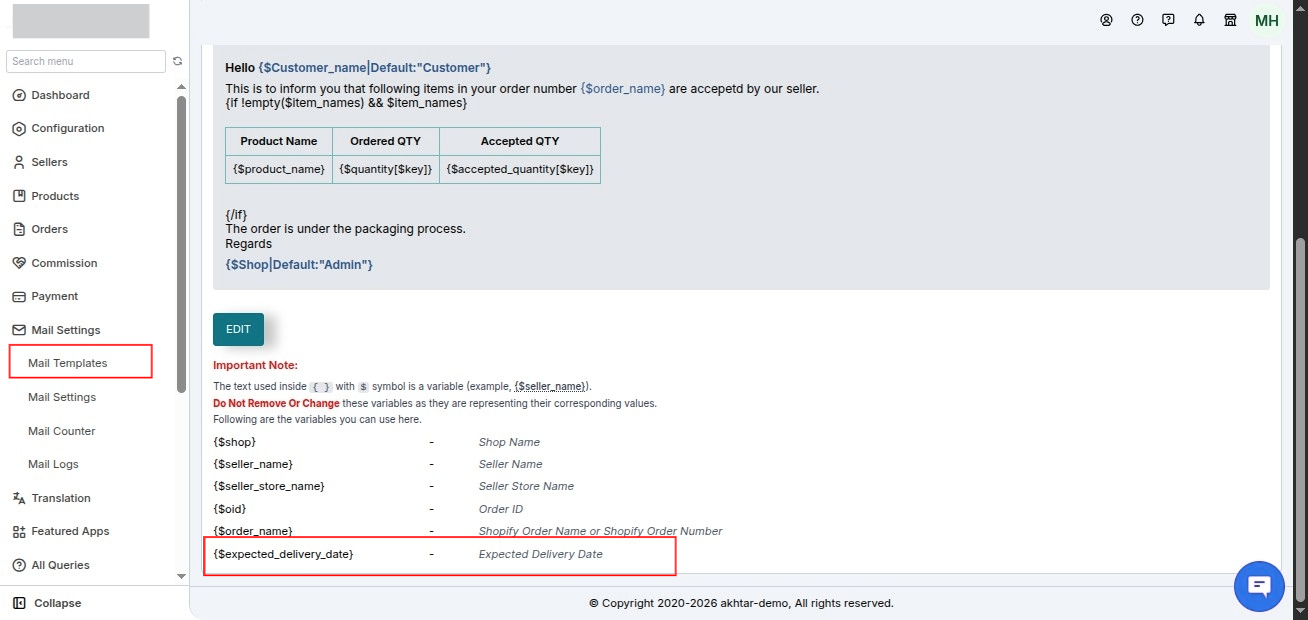
Note:- The expected delivery date variable is provided for the emails.
Wallet App Compatible with Multi-vendor for Discount via Wallet Feature
You might be using the Wallet Management app to offer a discount to your customers via Webkul wallet.
Now, if the “Manage Discount on Orders” tab is ON from the Seller payment Configuration of the Multi-vendor app then
the discount offered to customers via Webkul Wallet (through Wallet Management App) will be managed in the app.
Know how to Manage Discount on Orders
The amount paid via wallet will appear in the invoice of each order placed on your store.
Kindly navigate to Multivendor Marketplace Admin Panel >> Go to Payment >> Seller Payment Configuration >>Payment Setting >> Enable the option “Manage discount on order”.
Refer to the screenshots below:


PLEASE NOTE:-
If you have already downloaded the invoice or if you have saved the previous invoice template
then the “Pay via Wallet” option will not appear in the order invoice both on seller invoice as well as customer invoice.
If any of the above is the case, you can either reset the template on your own or send a request for the same. We will do it for you.
This is how the “Pay via Wallet” option will appear in the Order Invoice:
Merchant to Seller Invoice:-

Seller to Customer Invoice:-

Allow Seller to Create Order on Behalf of Customer
You can now allow your sellers to create orders on behalf of your customers in case the seller receives orders via call. You just need to enable the configuration in the app.
NOTE:- Please make sure that the Account Email (on Shopify End) and Business Email (in the app) is the same to use the Draft Order feature.
Login to Multi-vendor Admin Panel>>Go to Configuration>>Order Configuration>>Enable the option “Allow Sellers to create order”>>Save Changes.

Once enabled, the sellers will get the option to create order from their respective seller panels.

The seller will click the “Create Draft Order” button and proceed to create an order on customer request.

Clicking the Create Draft Order button, the seller needs to enter all the details such as:-
Customer email ID, choose whether the customer wants to place a tax-exempt order or not, choose to include products in the order.

After entering all the details, the seller will be able to create draft orders for customers.

Soon after creating a draft order, the customer will receive an email on the registered email ID to make the payment.
So, the customer will check the complete order details & total amount & pay for the order.
List all the draft orders on a separate section of the seller panel:

Clicking the View button, the seller can view the draft order details:

This way, you can allow sellers to create orders on behalf of their customers if requested via call, email,etc.
Shopify Order Fulfillment Email
If you don’t want customers to receive the order fulfillment emails from Shopify end then,
here is an option in the app. Please visit the Order Configuration menu and disable this tab.

Create Shopify Private Apps in MVM
You can now add a maximum of 5 private apps to the Multi-vendor Marketplace app.
You can create Shopify Private Apps and configure them in the app to resolve the API limit issue.
NOTE:-
From here, you can add a maximum of 5 private apps to the multi-vendor app.
Firstly, you need to provide the required permissions in the Shopify private app.
PERMISSIONS REQUIRED
- For PRODUCT:– View or manage products, variants, and collections
Access scopes: read_products, write_products - For INVENTORY:- View or manage inventory across multiple locations
Access scopes: read_inventory, write_inventory
Version Supported:- The webhook API version should be 2020-01
MARK:- Be very specific about the permissions. If it is wrong, no data will be updated as no API gets hit.
To Add a Shopify Private App into the app, you need to visit the admin panel>>Configurations>>click Shopify Private App sub-menu.


Clicking the Add Shopify Private App button, you need to configure the details such as Private App Name, API key and Secret Key.

Get the details from Shopify Manage Private App section.
HOW TO CREATE PRIVATE APP ON SHOPIFY and how to get the Admin API Details.

Also Note:- In case you want to delete the private app on Shopify, firstly you need to delete/disable the same in the app.
Otherwise, the access token will get expired and no API call gets hit from the Multi-vendor app.
Avalara Avatax
Avalara is now integrated with the Multi-vendor Marketplace app for Shopify to let merchants automate the sales tax calculation for sellers products too.
There are a few restrictions to use this feature:-
- The merchant needs to install the Avalara Avatax app in the Shopify admin.
- The Avalara Avatax is available only with the Shopify Plus plan.
To enable the feature in the app, you need to visit the Product Configuration and enable the option AVALARA AVATAX.
Now, you will have two options to add “Tax codes” in the app.
Either to a product that will be applied to all the variants of the respective product OR you can apply product type-wise tax code.
CASE 1:- Add Tax code based on Product Type.[“Restrict Product Type” Enabled]
Note:- To add the product type-wise tax code, it is mandatory to enable “Restrict Product Type” from the Restriction configuration menu.

After enabling the AVALARA AVATAX, you need to enable the “Product Type wise Tax code” option.

Now, you can enter a separate tax code for each product type and the seller will select the same while adding the product.

CASE 2: Add Tax Code directly to Products [“Restrict Product Type” Disabled]
In this case, you just need to enable the AVALARA AVATAX option in the Product Configuration menu and proceed to add tax codes.

You need to visit the Product section and click the “Add Product” button. Now, enter the product type and add tax code.
This tax code will be applied to all the variants of that product. Later, you can change the tax code by editing the variant.

This way, you can manage the automatic tax calculation for seller’s products too via Avalara AvaTax.
Export Commission
In the Multivendor Marketplace, you can now export commission details by selecting a specific date range.
For exporting commission, you need to navigate to-
Admin dashboard>>Commission>>Commission Listing>>Export Details
Choose the required fields from the options on the left and specify a date range to retrieve commission data for the selected period.
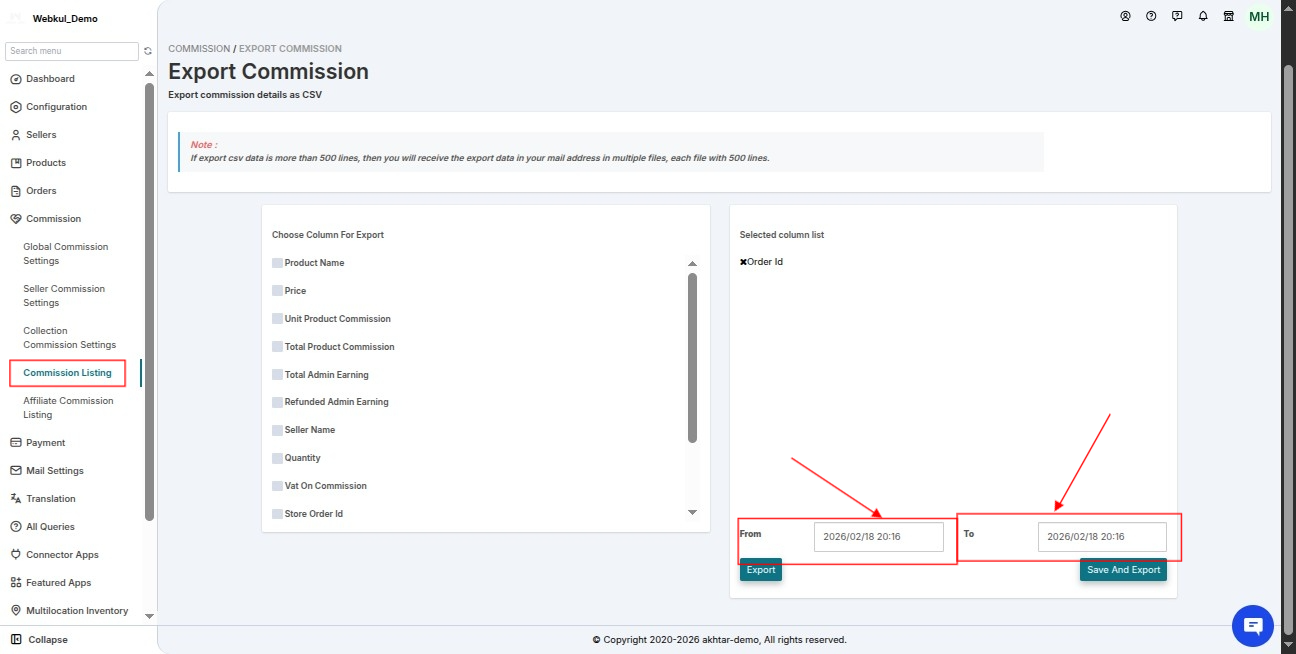
Click the “Export” button to download the commission data as a .csv file for the chosen date range.

Use the “Save & Export” option to save the selected fields (added to “Saved Lists”). Then download the commission data as a .csv file for the specified date range.
The “Saved List” feature displays all saved field configurations, allowing quick selection of a date range and easy downloading of the commission data as a .csv file.
“Total Sales” Column in Seller Export CSV
Admins can now include a Total Sales column when exporting seller details.
The total sales of a seller represent the total revenue earned from all goods they have sold within a given period.
For exporting Seller Details navigate to: Admin Dashboard>>Seller>>Seller Listing>> Export Details.

Simply check the box for Total Sales while selecting the columns, and the information will be included in your exported file.
Option to send “Digital Download Mail” on the Order Description page
In the Multivendor Marketplace, admins can send digital download emails directly to customers from the ‘Order Details’ section.
To send Digital Download Mails, Admin needs to navigate to
Orders>>Order Listing>> Hover over on 3 dots>> View>>More actions>>Send Digital Download Mail
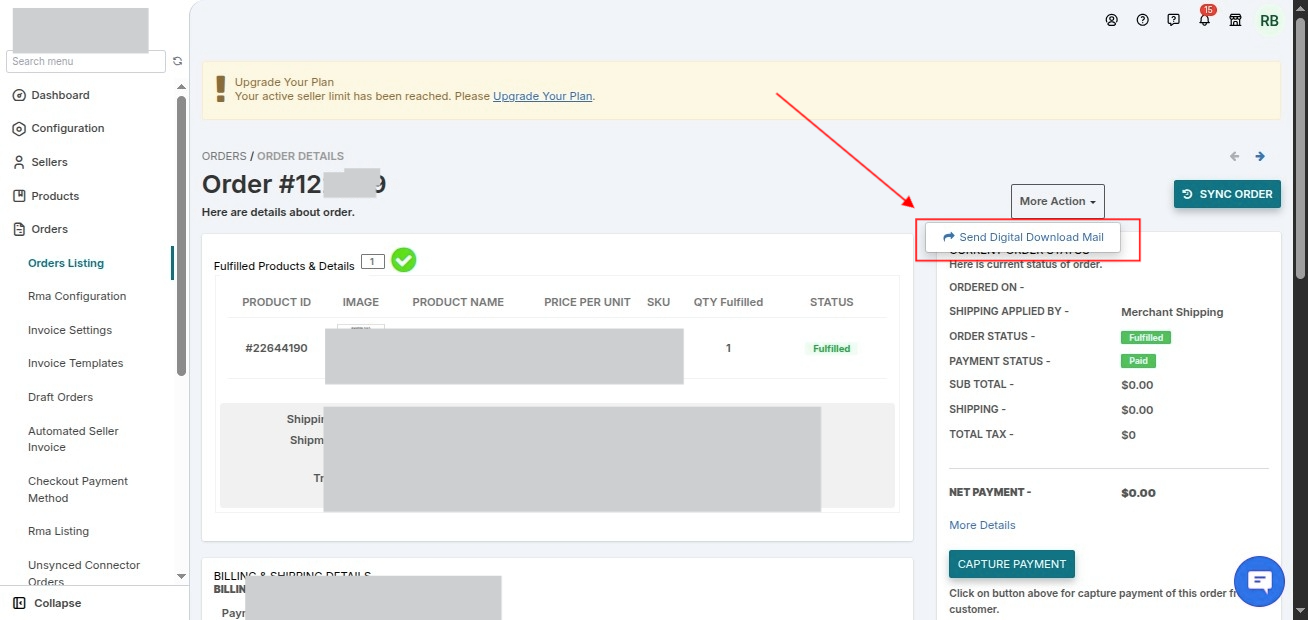
This new feature is available exclusively for digital products, ensuring a seamless delivery experience for the admin and the customer.
Note: This option will appear once the order is paid or fulfilled.
Filter Orders by Customer Name in Order Listings
If the admin wants to view a specific seller’s orders in the order listing, they can apply the ‘Search by Customer Name’ filter.
Once the filter is applied, only the orders related to the selected seller’s products will be visible.

DEMO
You can refer the below-given link to check the demo of multivendor marketplace App for Shopify:-
Keep following this blog of ours to know about all the recent updates.

4 comments
By default this feature is not there in our app , but in case you require it – the same can be customized.
And the customization will be chargeable .
Let us know .
Also you can raise a ticket at : https://webkul.uvdesk.com/en/customer/create-ticket/ for any further query .
Best Regards,
Nitika
WEBKUL
The custom field menu would be available once you have subscribed to the gold plan for the app and if the product menu is missing, then please raise a ticket at https://webkul.uvdesk.com/en/customer/create-ticket/
Sending the link for the Pricing plan of the app : https://shopify.webkul.com/multivendor/index.php?p=compare_price
Regards,
Neha