We have launched Stripe Connect payment gateway in the Multivendor Marketplace app for Shopify.
Where now after the customer pays the amount for the order, the amount will go to the respective Seller and Admin account directly as per the share configured based on commission.
Both admin & seller needs to have their respective Stripe accounts.
This feature is available at a cost of USD 10 per month over and above your monthly plan. And you can use marketplace shipping or any other shipping of your store with this feature.
NOTE: If you as Store Owner sell products, then you have to become Seller to get Payment through Stripe Connect.
Stripe Payment Method works in the case of Gift Cards.
But the admin will receive the whole payment, and it will not be auto-split between vendors and the admin.
The admin then further needs to transfer the vendor’s share separately.
– This will not work in the case of Custom Product & Gift Card Product.
POINT TO REMEMBER
If customers apply a discount code to their order, the full order amount is sent to the admin’s Stripe account.
Then Admin will be responsible for sending the seller’s earnings to his account.
NOTE:- If you are using the older version of Stripe API (before 2019-08-14), make sure to upgrade it to the latest version.
Minimum & Maximum Charge Amount
The minimum amount you can charge 0.5$ and the maximum is up to eight digits (e.g., a value of 99999999 for a USD charge of $999,999.99). Learn more.
ACTIVATION IN NEW THEME
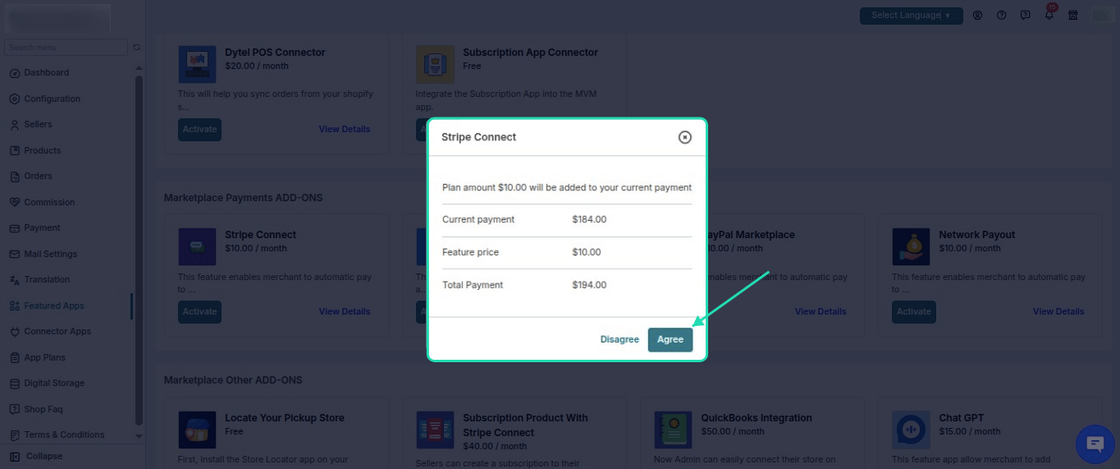
Firstly, enable the app from the Feature App section.
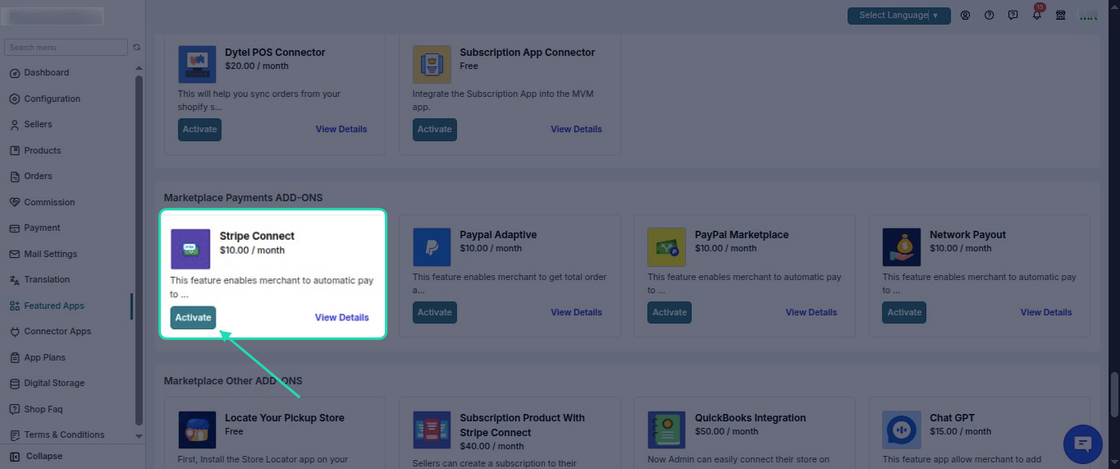
Once you click on the “Enable” button, you need to agree on additional charges which are USD 10 per month.
Now, let’s understand its workflow:-
Workflow
Configuration of the app is given in this blog: Stripe SCA Enabled: Multivendor Marketplace for Shopify
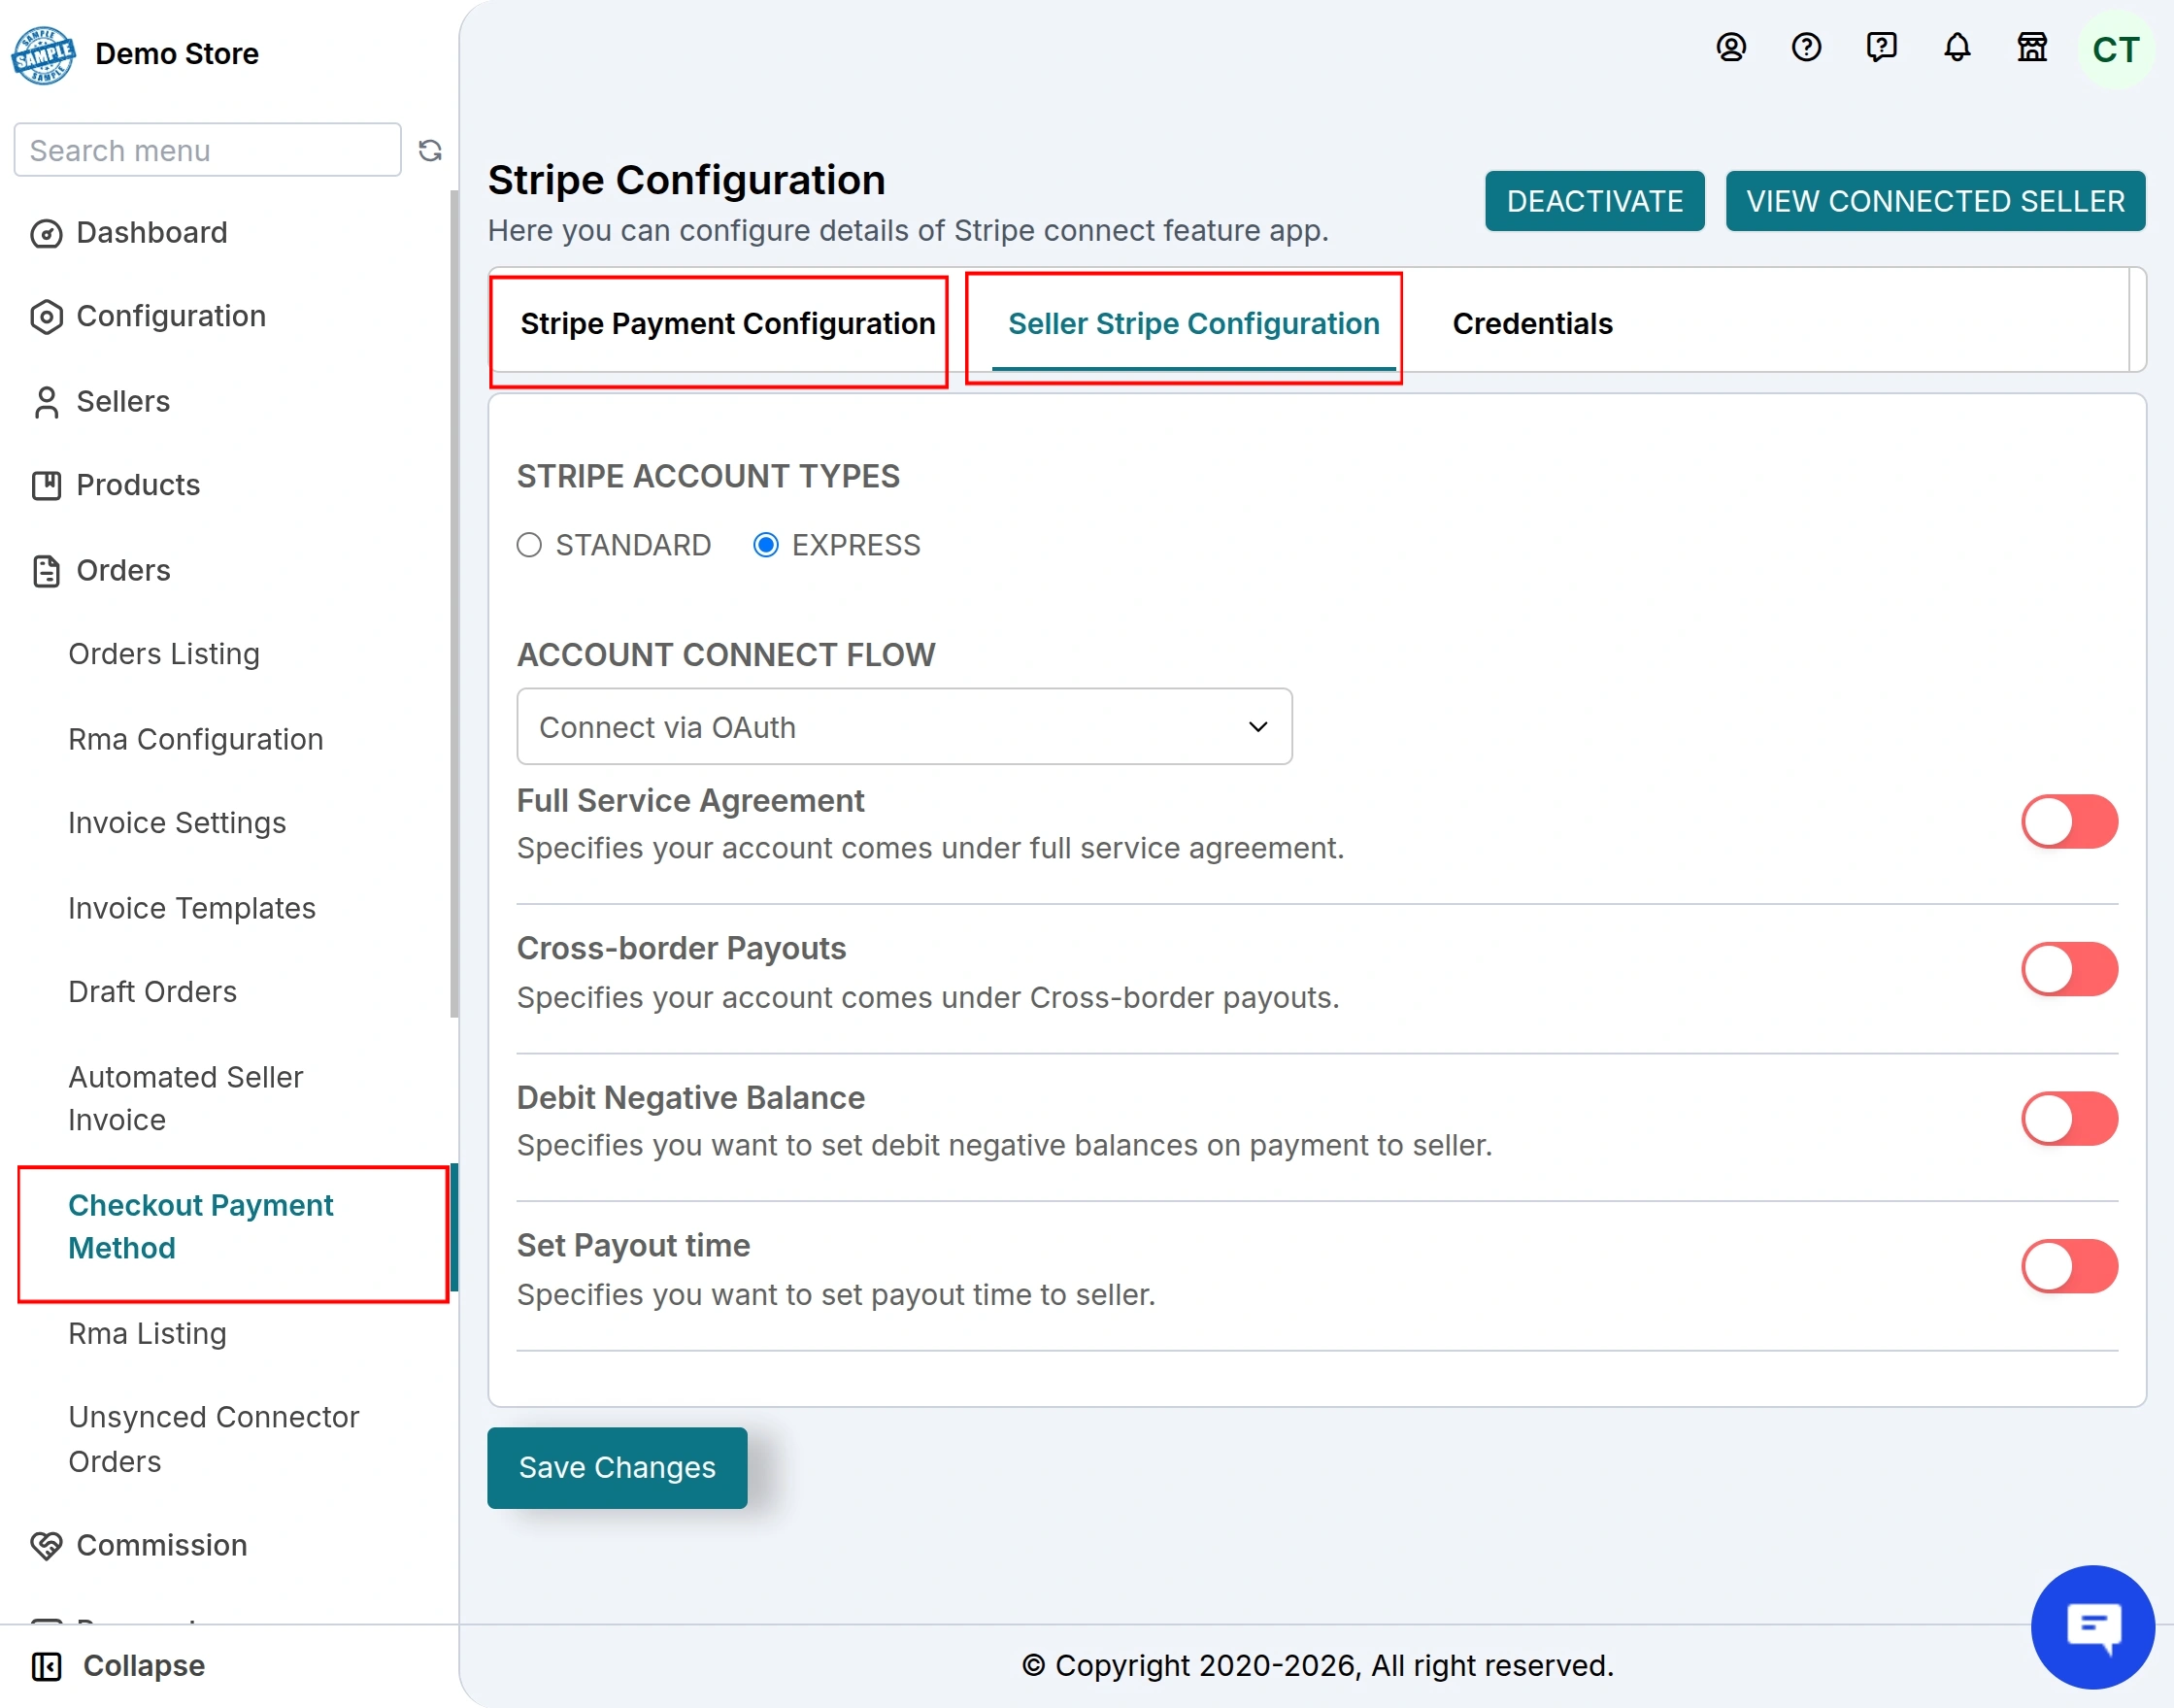
Stripe Account Types
Also, you need to choose the Stripe account type of your sellers while configuring the Stripe details in the app.
Select the account type whether Standard or Express that the seller is using with Stripe. Know more about the Stripe accounts.
Additionally, enter the details like Secret key, Publish Key and Client ID and then click on save.
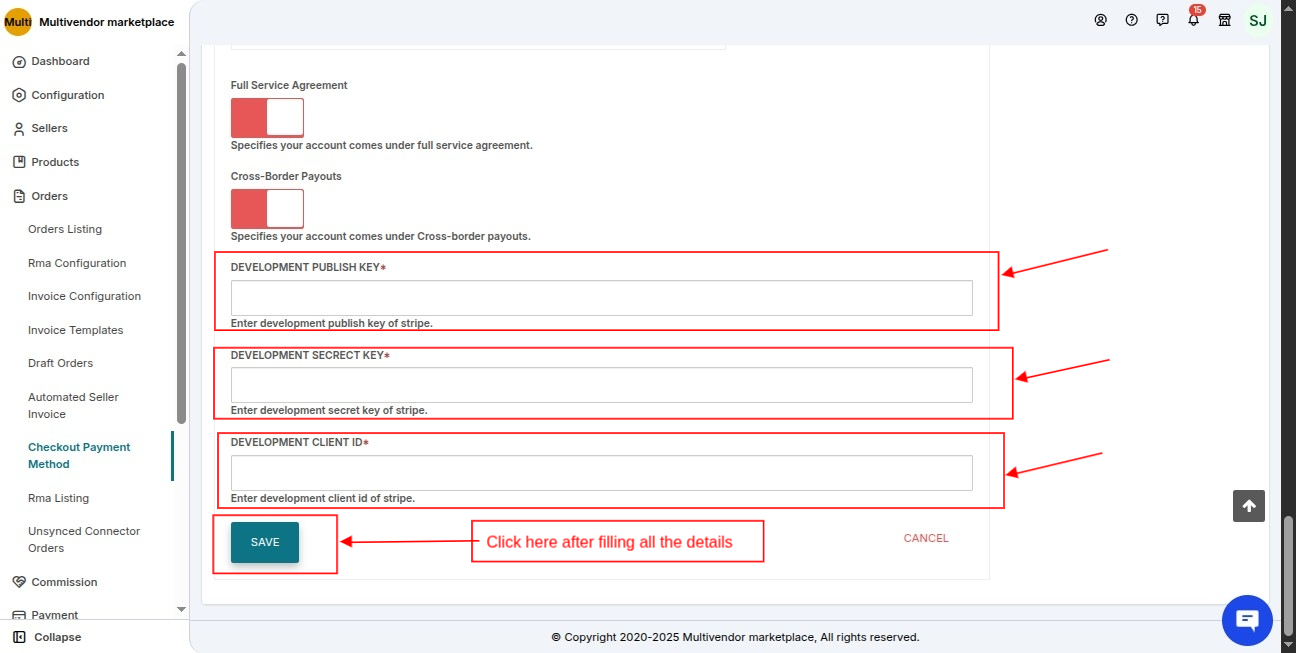
You need to log in to your Stripe Account to get the above keys.
“Secret key” and “Publish key” you will get from the “API” section of your Stripe account.

“Client ID” you will get from “settings > Connect Settings” of your Stripe account.

Copy the client ID:

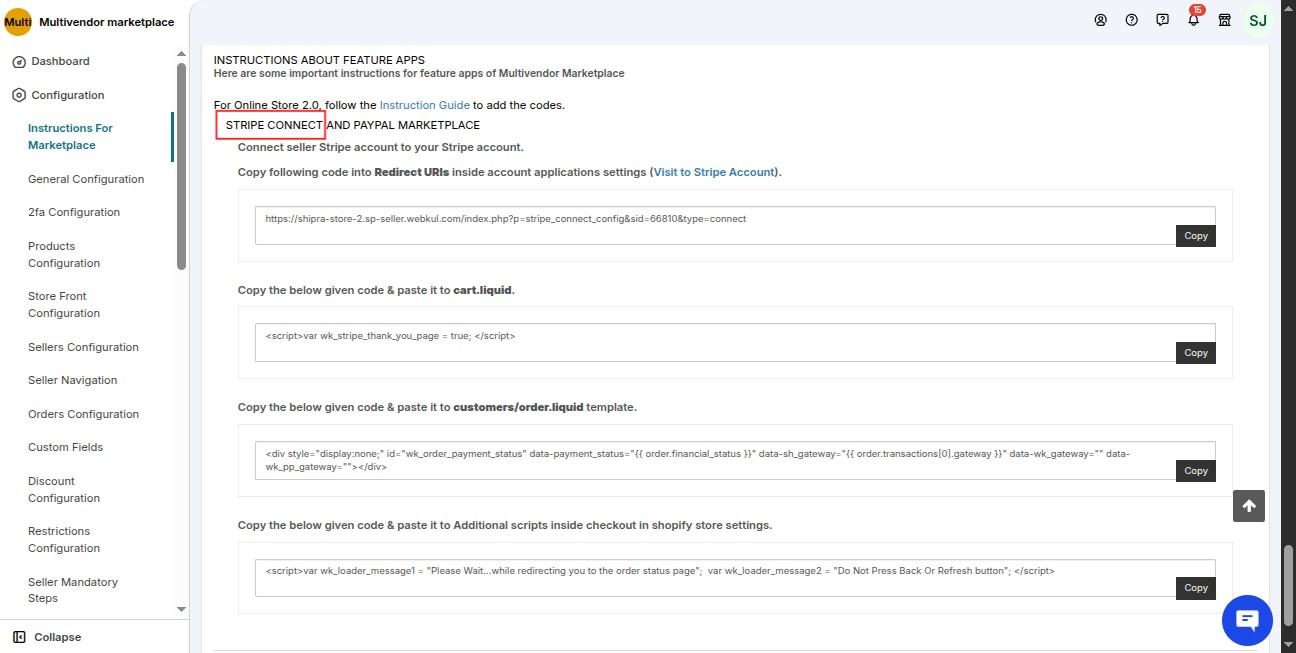
Now, to connect the seller’s Stripe account to your stripe account copy the code from the “instruction for the marketplace” section of the configuration menu in the app,
paste into the “Redirect URI” section of your Stripe account, and make this default as shown in the following screenshot:-
Admin end>> Configuration >> Instruction for marketplace >> Visit “Stripe connect” section>> Copy the given code to connect the seller’s Stripe account to your Stripe account.
Now open your “Stripe account” and paste the code in the “Redirect URI” section and make it default.


Go to Settings>> Connect Settings >> Redirects:
Enter the URL:

Set it as default:

Code Pasting
You will find the codes under Multivendor Admin Panel > Configuration > Instruction for Marketplace > Under Stripe Connect.
Connect seller Stripe account to your Stripe account by pasting these codes in the given template files.
Copy the code from the Instruction for Marketplace section into Redirect URIs inside account applications settings (Visit Stripe Account). The code will look like this:
https://{your_seller_url}/index.php?p=stripe_connect_config&sid={your_sid}&type=connect
Note: Please don’t paste the exact same code as provided above as it doesn’t have the seller URL & sid number. Visit Instruction for Marketplace section and then copy the code from there.
Copy the below-given code & paste it to the customers/order.liquid template.
<div style="display:none;" id="wk_order_payment_status" data-payment_status="{{ order.financial_status }}" data-sh_gateway="{{ order.transactions[0].gateway }}" data-wk_gateway="Stripe Payment"></div>
Admin needs to create the stripe connect payment name from Shopify store settings to add Payment Name for the checkout page. Please follow the below steps:-
Admin panel of Shopify store>Settings > Payment Providers>Visit “Manual Payments” section>click “Create Custom Payment Method” from drop down>Enter Payment Method name>Click on the “Activate” button.

Please note:- Name of your custom payment method should be the same as the name of Stripe Payment name. (Which you have entered from the “Checkout payment method” section of the multivendor app)

This way you can create the payment method which the customer will select at the checkout page once added by the admin.
Checkout extension for Stripe Payment method: Payment Option on the Thank You Page
Note: Shopify’s Additional Script has been deprecated and will be removed at any time.
To address this, we have implemented a checkout extension for Stripe.
When a customer places an order and selects Stripe as their payment method. They will be redirected to the Thank You page.
A popup will appear on the Thank You page notifying the customer that “Your payment is incomplete. Click here to complete and confirm your order”.
Once the customer clicks, they are redirected to the Stripe payment page to complete their payment.
To set the stripe New checkout method, the Admin needs to navigate to the Shopify Backend >> Setting >> Checkout >> Click on the customize button from the configuration.


On the redirected page, select the Thank You page from the dropdown menu.

Next, add the Checkout UI Extension block in the Order section, as shown in the image.

On the Thank You page, the popup to complete the payment will appear and save.

SELLER PANEL IN NEW THEME
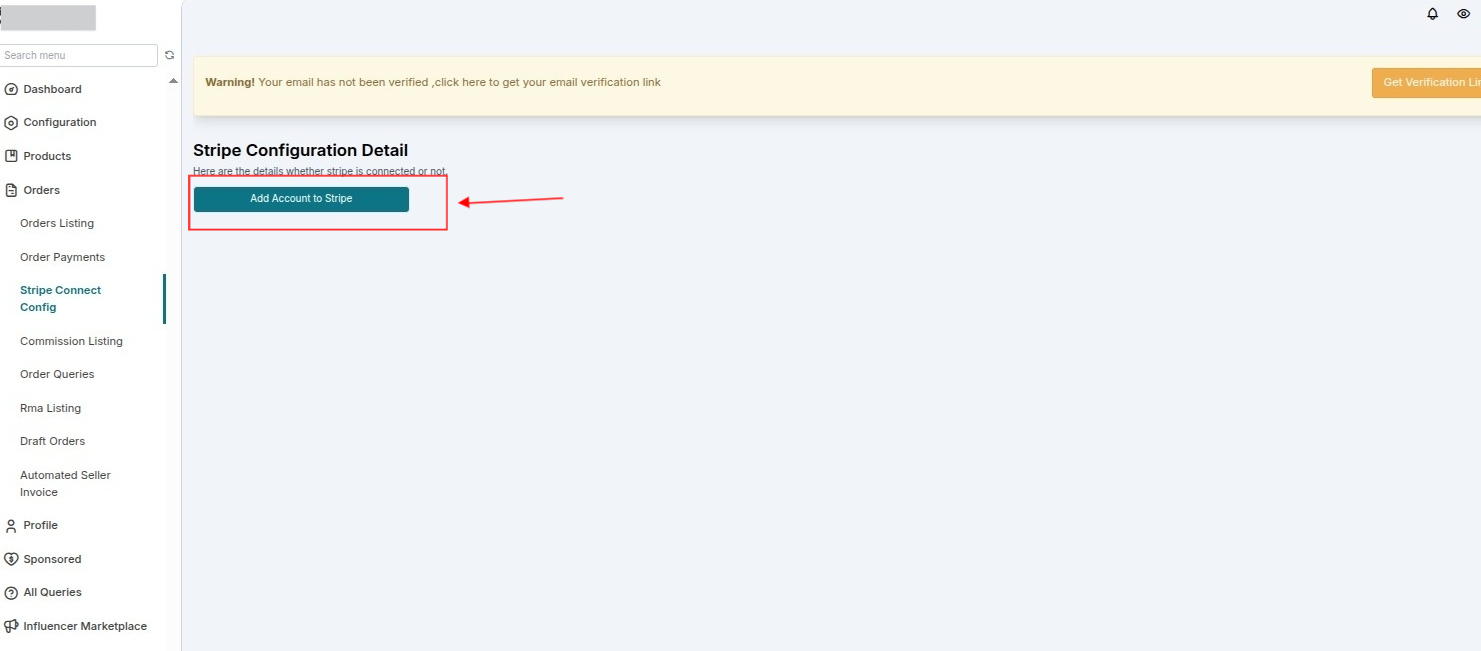
The multivendor marketplace app now displays a “Stripe Connect Configuration” menu in the orders section of the seller panel.
After visiting this section click on “Add account to stripe”

Standard:-

Express:-

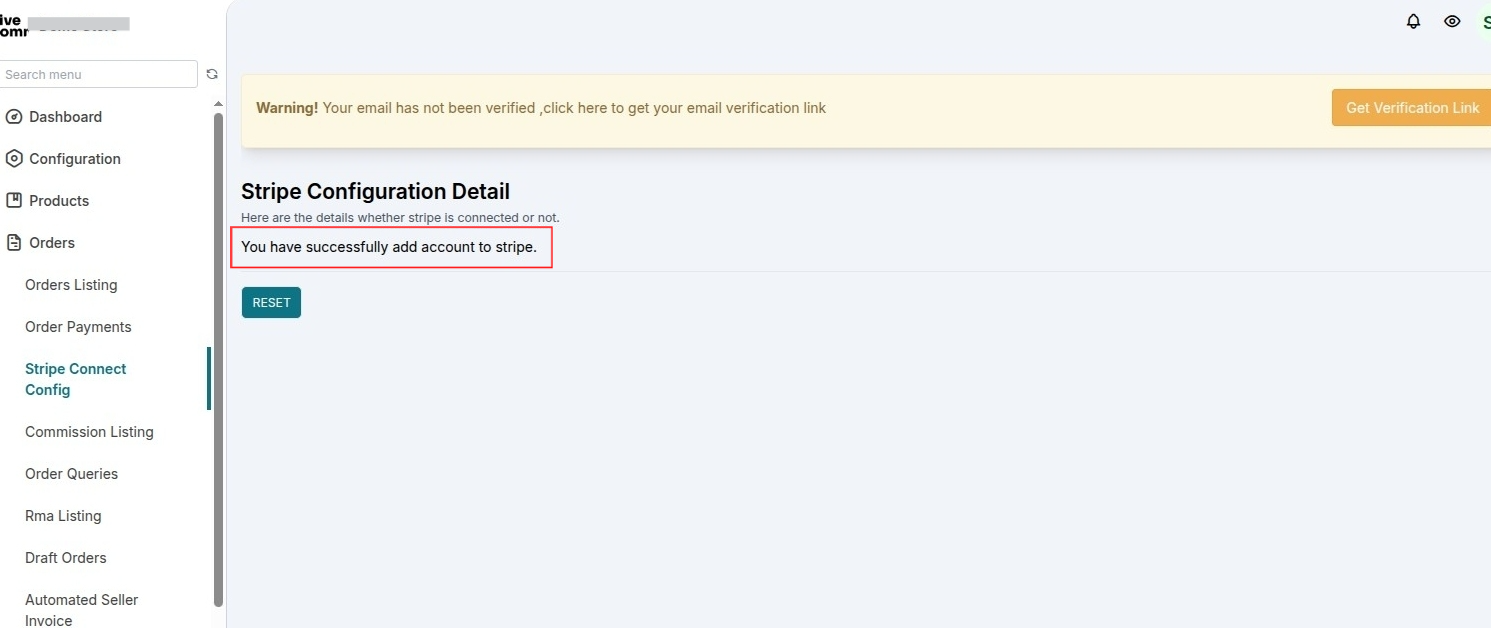
Further, the account will be successfully added.
Seller Stripe Dashboard: Express Account Type
If the seller has configured the express account, he will have the option to redirect to the stripe dashboard from here:

CUSTOMER FRONTEND
At the checkout page, a customer can choose the “Stripe Connect” payment method to pay for the order.

Stripe Payout Payment
Purpose of this feature:
This feature lets your sellers automatically receive their total earnings. Once they mark the order as delivered/fulfilled/pay after the refund date.
In the case of Stripe Payout, according to the order status (delivered/fulfilled/pay after the refund date) set by Admin,
The seller’s earnings move from the admin’s Stripe account to the seller’s Stripe account, and Stripe handles this transfer directly.
After that, based on the payout settings configured by the seller in their Stripe dashboard,
the Multivendor Marketplace App manages the transfer of funds from the seller’s Stripe account to their bank account.
Note: The stripe payout feature is not compatible with two countries that is Brazil & India.
Limitations of stripe payout
1) Balance must be available in the seller connector stripe account.
2) Enable Manual Pay on the seller’s Stripe account.
How to configure the Stripe Payout feature?
To configure this feature, the Admin needs to follow the steps written below:
- Go to Multi vendor Marketplace Admin Panel
- Hover over the Order menu & select the Checkout payment method from the drop-down menus.

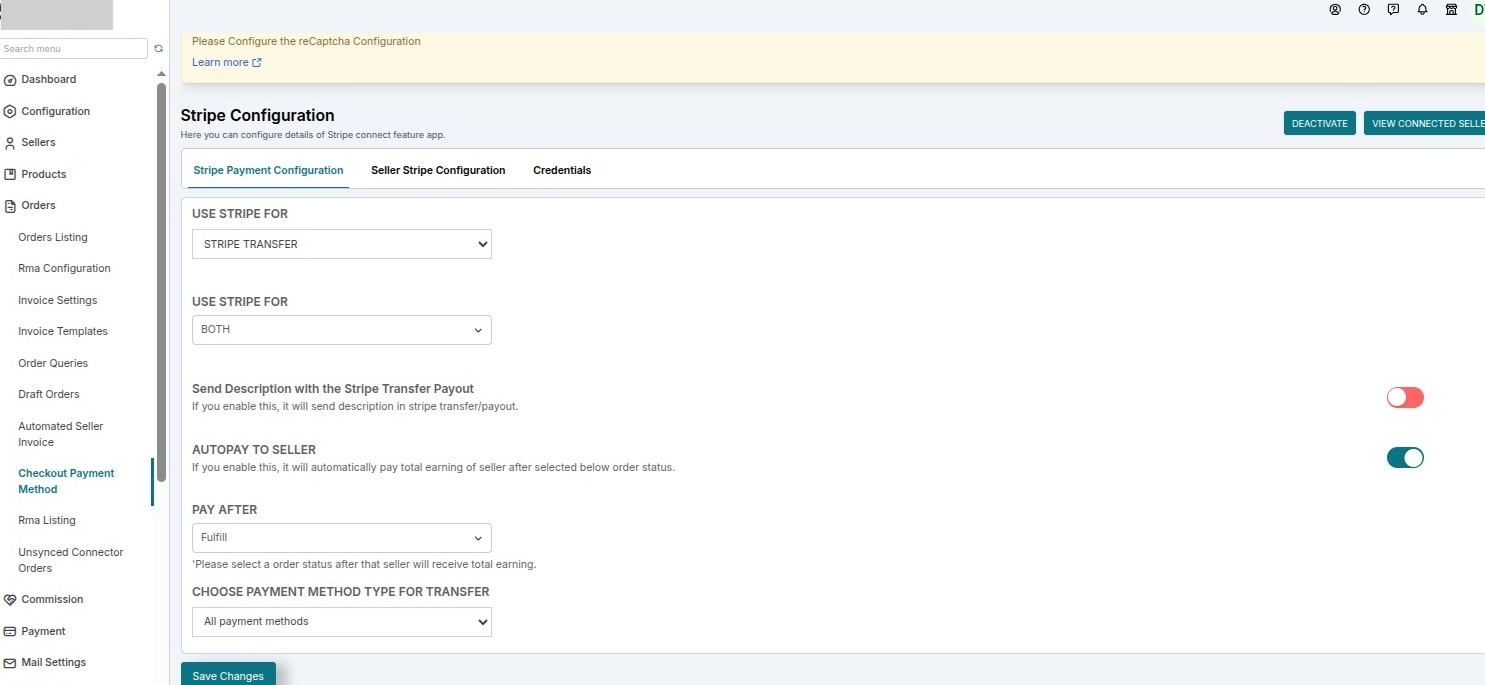
After clicking on the checkout payment method, the user will land on the checkout method page as shown in the image. The user needs to click on the add button.

Once the user clicks on the add button the stripe configuration page will open and the user needs to select the stripe payout as the use stripe for option.

After fulfilling all the relevant details, the payout configuration is there AUTOPAY TO SELLER.
Once you enable this configuration, you will get the three options to select
Fulfill:
If you select the fulfill option, the system transfers the seller’s earnings to their account as soon as the seller marks the order fulfilled.
Delivery:
The system transfers the seller’s earnings to their account once the order is marked delivered.
Pay after the return date:
To enable this, the admin first needs to enable the ENABLE CASHABLE AMOUNT FOR SELLER configuration which allows you to set particular days after which you want your Sellers to receive the payment.
These days are basically the days in which your customers can refund the purchased items.
Configure the following feature by navigating through: Multivendor Marketplace Admin Panel > Payment > Seller Payment Configuration.
Refer to the images below:


Here, the Admin needs to enter the days after which the payment will be done to his sellers for the order (order refund days) and,
select whether you want to calculate the provided span of time from the delivery date, order fulfillment date, or order creation date.
Example: If you have selected the delivery date & mentioned refund days (pay after days) as 30 then after 30 days of the delivery date, the Sellers will receive the payment.
NOTE: Refund days should be greater than -1 otherwise it will not work.
Lastly, enable the ‘Allow seller to enter refund days‘ if you want your sellers to add their individual refund days.
Once enabled, the sellers will be able to set the refund days by visiting Marketplace Seller Panel > Configuration > General Configuration > Enter the day & save:

Note: The sellers who have not entered any refund days will by default have the refund days set by the admin.
If entered then the refund days should be greater than -1 otherwise it will not work.
Only after enabling this option, the Admin will have the ‘Pay after refund date’ option in stripe Payout Configuration:

Also, the Admin won’t be able to choose the ‘pay after’ as delivery or fulfilment because now it will work as per configured in the ‘Cashable Amount for Seller’ option.
The whole auto-pay process at a glance!
Suppose, a customer placed an order and the Admin has set the stripe Payout payment condition as ‘fulfilled’,
i.e., the Seller will auto-receive the payment once he set the order status as fulfilled. Considering this scenario, let’s have a look:
The Admin can view the orders in the Order Listing page of the Admin panel:
Admin Panel > Orders > Order listing:

Similarly, the Seller can view the orders in the Order Listing page of the Seller Panel:
Seller Panel > Orders > Order Listing:

Until the order is fulfilled by the Seller, the Seller Payment will remain due at the Admin end.
Admin end > Payment > Seller Payments:

Also, the Seller will not receive any payment information in the ‘Payment Received’ page at Seller end (Seller end > Orders > Payment Received).
Once, the order is fulfilled by the Seller & the order status changes from Unfulfilled to Fulfilled at both, Admin & Seller end:
Seller end > Orders > Order Listing:

Now, as soon as the order is fulfilled by the Seller, the total due amount at the Admin end will become zero & payment earnings will be auto-paid as per the configuration.
Admin end > Payment > Seller Payments:

Stripe Transfer
Purpose of this feature:
This feature lets your sellers automatically receive their total earnings once they mark the order as delivered/fulfilled/paid after the refund date.
In the Stripe Transfer feature customers will pay the admin via the payment method available on the Shopify end.
The seller’s earnings are transferred from the Admin Stripe account to the Seller Stripe account.

Now admin can choose to create a payment (transfer to the seller) only if the payment is made through a specific payment method on Shopify.

This transfer of seller earnings from Admin to Seller Stripe account is managed by the MVM app,
then as per the settings configured by the seller on their respective stripe dashboard, the amount transferred from the Seller Stripe account to their bank account is managed by the Stripe end.
Note: The stripe Transfer feature is not compatible with one country that is India.

Description for Stripe Transfers
We have introduced a new option for Stripe transfers that allows admins to add a custom description to payouts.
Thus, when the admin selects Stripe Transfer, a new configuration called “Set Description in Stripe Transfer” will be displayed. After enabling this option, the admin can enter any custom description.
This description will then be automatically attached to all Stripe payouts processed through the Multivendor app and will be visible along with the transaction details on the Stripe dashboard.

Auto Refund on Stripe Transfer
Now, if an order is refunded after the seller’s earnings have already been transferred via Stripe, the system will automatically handle the refund.
In such cases, the seller’s transferred earnings are reversed and refunded back to the admin within Stripe.
How to configure the Stripe Transfer feature?
To configure this feature, the Admin needs to follow the steps written below:
- Go to Multi vendor Marketplace Admin Panel
- Hover over the Order menu & select the Checkout payment method from the drop-down menus.
After clicking on the checkout payment method, the user will land on the checkout method page as shown in the image. The user needs to click on the add button.
Once the user clicks on the add button the stripe configuration page will open and the user needs to select the Transfer for the field “use stripe for“.

After fulfilling all the relevant details, the payout configuration is there AUTOPAY TO SELLER.
Once you enable this configuration, you will get the three options to select
Fulfill:
Once the seller marks the order as fulfilled, the system transfers the earnings directly to the seller’s account.
Delivery:
The system transfers the seller’s earnings to their account once the order is marked as delivered.

Pay after the return date:
To enable this, the admin first needs to enable the ENABLE CASHABLE AMOUNT FOR SELLER configuration which allows you to set particular days after which you want your Sellers to receive the payment.
These days are basically the days in which your customers can refund the purchased items.
Configure
Configure the following feature by navigating through: Multivendor Marketplace Admin Panel > Payment > Seller Payment Configuration.
Refer to the images below:
Here, the Admin needs to enter the days after which the payment will be done to his sellers for the order (order refund days),
and select whether you want to calculate the provided span of time from the delivery date, order fulfillment date, or order creation date.
Example: If you have selected the delivery date & mentioned refund days (pay after days) as 30 then after 30 days of the delivery date, the Sellers will receive the payment.
Note
Refund days should be greater than -1 otherwise it will not work.
Lastly, enable the ‘Allow seller to enter refund days‘ if you want your sellers to add their individual refund days.
Once enabled, the sellers will be able to set the refund days by visiting Marketplace Seller Panel > Configuration > General Configuration > Enter the day & save:

Note: The sellers who have not entered any refund days will by default have the refund days set by the admin.
If entered then the refund days should be greater than -1 otherwise it will not work.
Only after enabling this option, the Admin will have the ‘Pay after refund date’ option in stripe Transfer Configuration:
Also, the Admin won’t be able to choose the ‘pay after’ as delivery or fulfillment because now it will work as configured in the ‘Cashable Amount for Seller’ option.
Duplicate Product Status Options
When creating a duplicate product, you now get three status options regardless of the original product’s status:
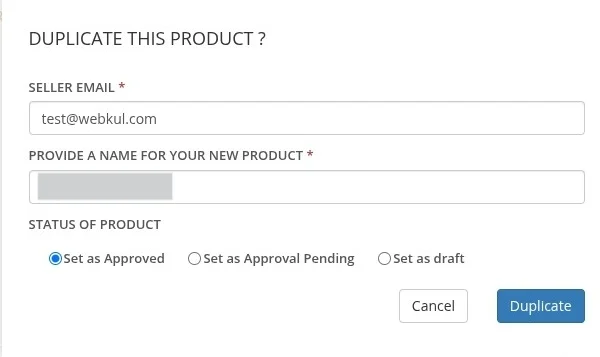
Approved → The duplicate product will be created and immediately approved.
Approval Pending → The duplicate product will be created in the approval queue.
Draft → The duplicate product will be created as a draft.
This gives better control over how duplicated products are managed right from creation.
Support
Furthermore, if you need any kind of support/Consultancy then please raise a ticket at http://webkul.uvdesk.com/ or drop an email at [email protected]
Thanks for reading this blog!!! 🙂

Thank yuo