Bagisto Tabby Payment Gateway module allows customers to integrate Tabby’s Buy Now, Pay Later (BNPL) payment solution into their Bagisto eCommerce Store. Customers can split their purchases into 4 interest-free installments.
The admin can easily connect the Bagisto store with Tabby’s payment gateway using the merchant code and API keys.
Customers can pay in 4 interest-free installments at checkout without leaving your site, with a smoother purchasing experience and higher conversion rates.
Please Note – Before buying this module, you have to check whether Tabby payment is available for your country and currencies or not. Tabby currently operates in AED (UAE Dirham) and supports GCC debit/credit cards including MADA.
Features
- The admin can Enable or Disable the extension.
- The admin can set the Custom Description and Title for the payment method.
- Customers can pay in 4 interest-free installments via Tabby’s BNPL solution.
- Provide a Secure payment method for the customer with hosted payment page.
- Admin can set sandbox keys for testing the payment gateway.
- Admin can process a full refund through the Tabby dashboard.
- Refund can also be initiated from the Bagisto admin panel.
- Automated webhook registration for sandbox and production environments.
- Asynchronous payment notification handling via IPN/webhooks.
- Promotional widgets on product pages and cart page showing installment breakdown.
- TabbyCard widget at checkout showing payment schedule.
- Supports AED currency only — ensures compliance with Tabby’s regional availability.
- Buyer risk assessment with order history sent to Tabby for real-time approvals.
Installation – Bagisto Tabby Payment Gateway
Unzip the respective extension zip and then merge “packages” and “public” folder into project root directory.
Goto bootstrap/provider.php file and add following line under ‘providers’.
use Webkul\TabbyPayment\Providers\TabbyPaymentServiceProvider;
return [
    TabbyPaymentServiceProvider::class,
]
Next, goto composer.json file and add following line under ‘psr-4’
"Webkul\\TabbyPayment\\": "packages/Webkul/TabbyPayment/src"
In the config/bagisto-vite.php file, add the following line under the ‘viters’ section:
    'tabbypayment' => [
        'hot_file'                 => 'tabbypayment-vite.hot',
        'build_directory'          => 'themes/tabbypayment/build',
        'package_assets_directory' => 'src/Resources/assets',
    ],
Run the command below to complete the setup:
composer dump-autoload
php artisan optimize:clear
php artisan migrate
php artisan vendor:publish --provider="Webkul\TabbyPayment\Providers\TabbyPaymentServiceProvider" --force
Initial Configuration – Settings
Once you successfully execute the commands, you will see the Tabby Payment by navigating through Configure → Payment Methods → Tabby Payment.
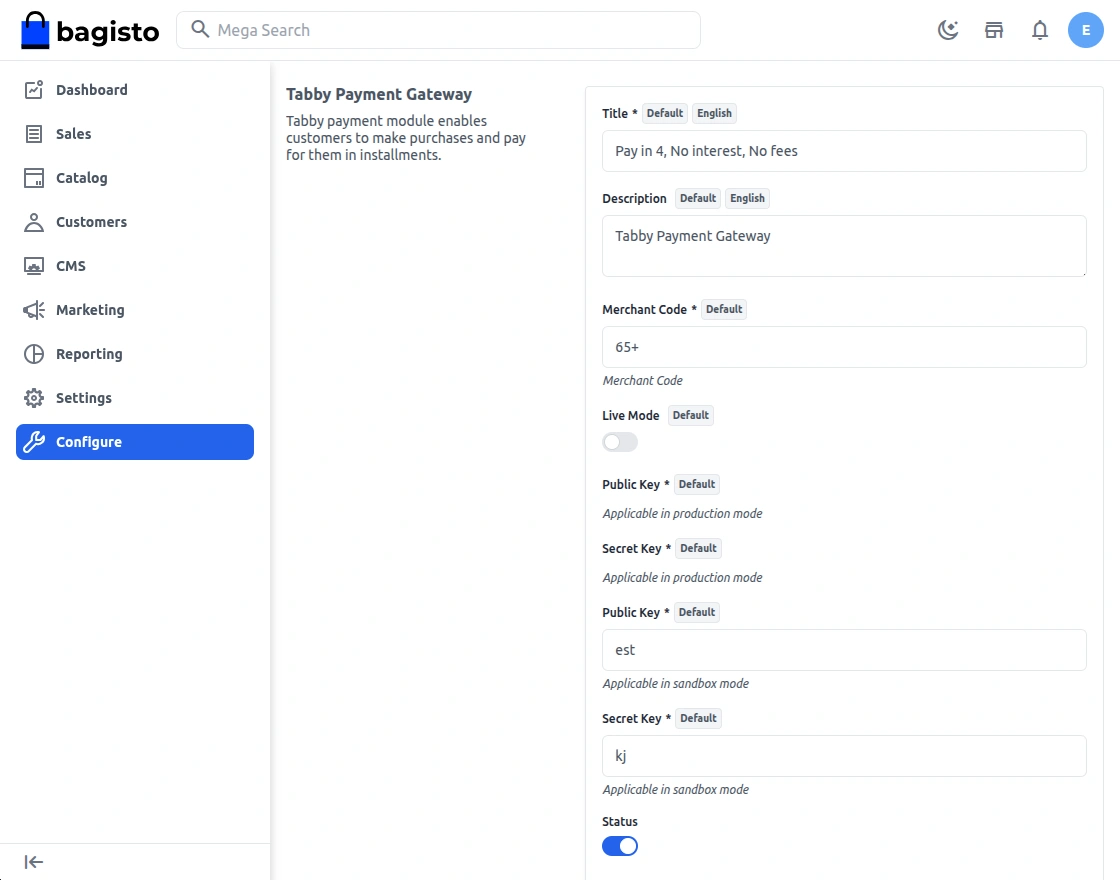
Here, the store admin will be able to configure the initial settings –
- Status:- Enable or disable this module by using the toggle button.
- Title:- Set the title which will be displayed on the front end for the payment method at checkout.
- Description:- Enter the description which they want to show on the checkout page for the Tabby payment method.
- Merchant Code:- Enter the merchant code provided by Tabby for your store account.
- Live Mode:- Toggle between Sandbox (test) and Live (production) environments.
- Live Public Key:- Enter your production public key from the Tabby Dashboard (visible when Live Mode is enabled).
- Live Secret Key:- Enter your production secret key from the Tabby Dashboard (visible when Live Mode is enabled).
- Test Public Key:- Enter your sandbox public key from the Tabby Dashboard for testing purposes.
- Test Secret Key:- Enter your sandbox secret key from the Tabby Dashboard for testing purposes.
- Sort Order:- Set the sort order so that the payment method will appear on the payment page according to the entered sort order.
After setting all configuration, click on Save button.
Storefront Workflow – Bagisto Tabby Payment Gateway
Once you have successfully added the product in your cart, tap the Continue to Checkout button.

Now, select the shipping address and tap Confirm button.

After that, select the Tabby Payment method under the payment methods section. You will see the TabbyCard widget showing the installment breakdown (pay in 4 interest-free payments).
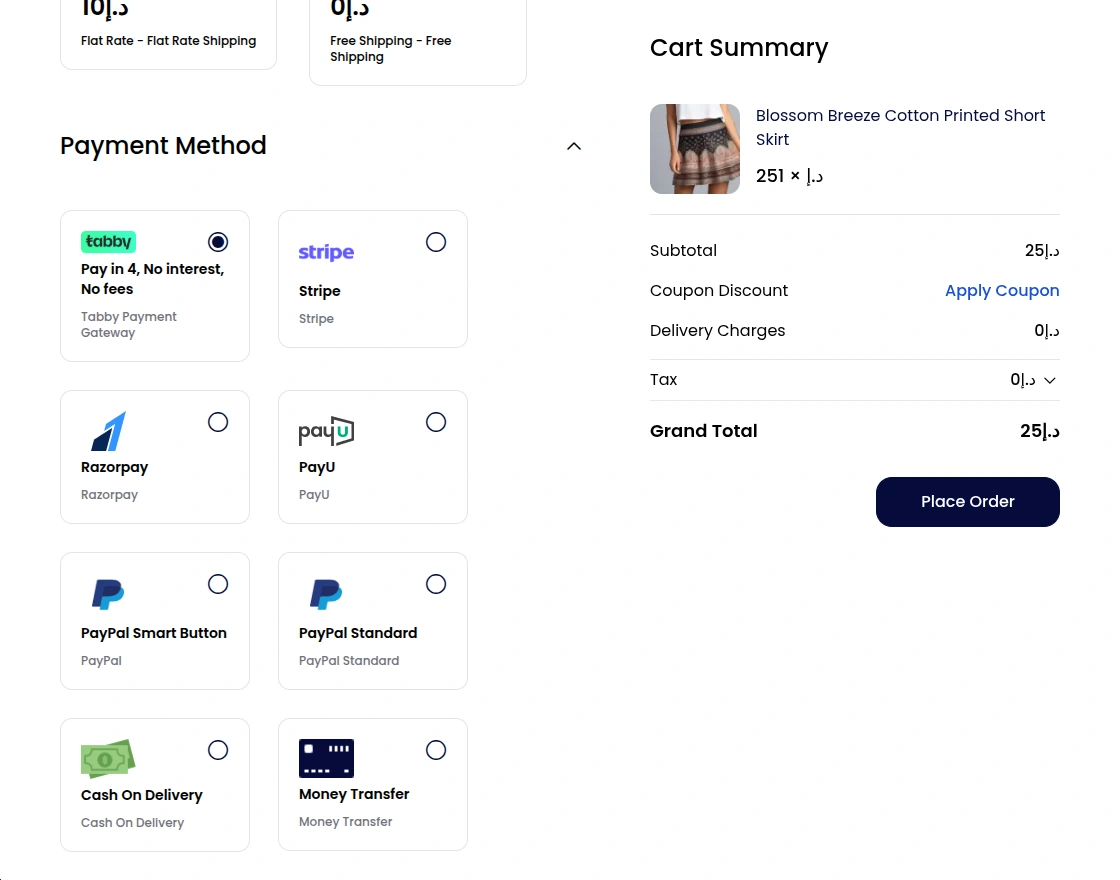
After selecting the Tabby payment method, the customer can click on the Place Order button.
Then the customer will be redirected to the Tabby hosted payment page, where they can choose their preferred installment plan and complete the payment.
After successful payment via Tabby, customers will be redirected back to your store with a success confirmation and order ID.

The customers can check order status and the selected payment gateway in their order history.

Customers can also check the selected payment method in their order invoice.
On the product page and cart page, Tabby’s promotional widget displays the “Pay in 4” messaging, showing customers how much they’d pay per installment.
Order Details – Admin Backend
The admin can view the respective orders and can see the chosen payment method for the orders.
Apart from that, the admin can see the selected payment gateway for an order by opening the same.
The admin can also view the payments for the orders done via Tabby payment gateway on the Tabby dashboard and generate refunds from there as well.
Support
That’s all for the Bagisto Tabby Payment Gateway. Still have any issue? Feel free to add a ticket and let us know your views to make the module better at bagisto.uvdesk.com
Current Product Version - v2.4.1
Supported Framework Version - v2.4.1

Be the first to comment.