Introduction
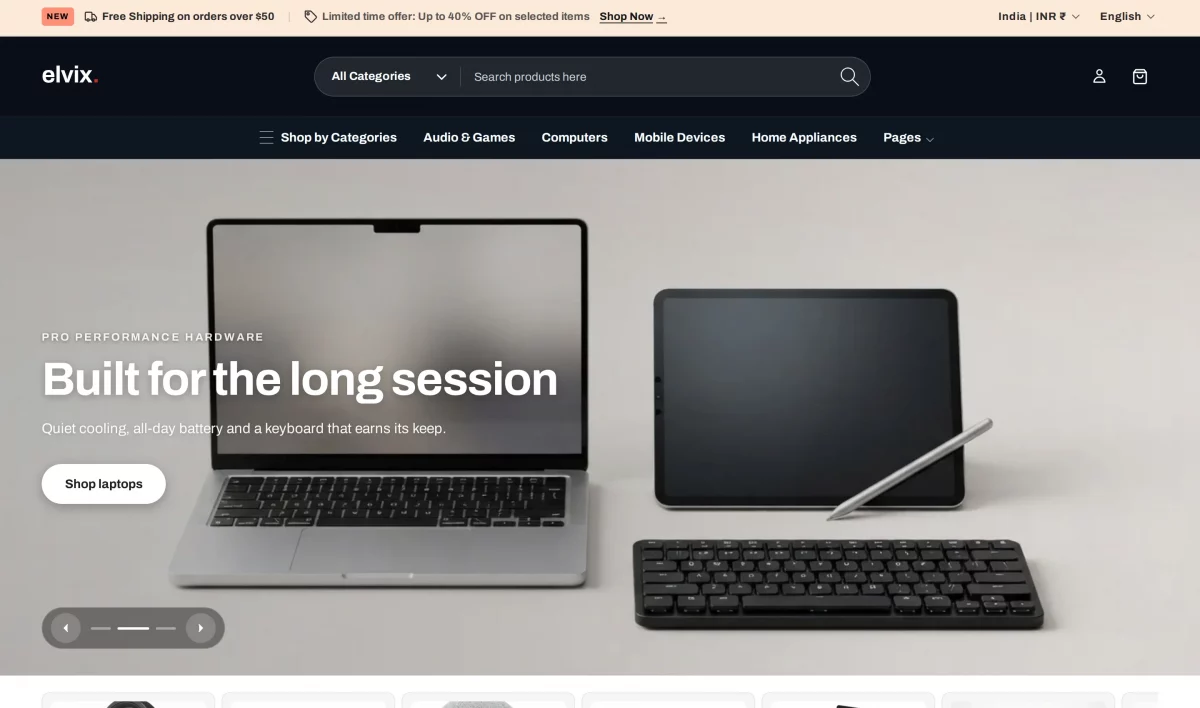
The Elvix Shopify Theme is an Online Store 2.0 storefront built for consumer electronics, audio gear, and smart hardware brands.
Shopify runs your catalog, inventory, and checkout. Elvix renders your storefront with modern, conversion-focused layouts.
This documentation guide walks you through adding the theme from the Shopify Theme Store, configuring sections, and launching your storefront.
What Makes the Elvix Theme Different
Most electronics storefront themes rely on heavy external scripts that slow down mobile shoppers. Elvix does the opposite.
It uses native CSS logical properties and 27 modular ES modules to maintain fast sub-2.2s page loads.
The theme ships with built-in Right-to-Left (RTL) Arabic support, bilingual color swatches, and technical specification matrices.
Every single layout is customizable directly from the native Shopify Theme Editor without editing code.
Prerequisites for Setup
Before setting up the theme, ensure you have the following requirements ready.
- An active Shopify store or Shopify Partner development store.
- Access to the official Shopify Theme Store.
- A modern desktop web browser such as Chrome, Safari, Firefox, or Edge.
- Shopify CLI installed on your computer (optional, for developers working locally).
Step 1: Adding the Theme from Shopify Theme Store
You can add and test the Elvix theme directly from the official Shopify Theme Store in just a few clicks.
Open the Shopify Theme Store in your browser and search for Elvix.
On the theme listing page, click Try theme to start a free trial, or click Buy theme to purchase it.
Shopify will automatically install the theme into your store’s Online Store > Themes under the Theme library.
Once added, click Customize next to Elvix to launch the Theme Editor, or click Publish to make it your live theme.
Optional: Uploading a Theme ZIP File
If you received an offline ZIP package or transfer file, you can also upload it manually.
In your Shopify Admin, go to Online Store > Themes > Theme library > Add theme > Upload zip file.
Select your elvix-theme.zip file and click Upload file.
Optional: Installing via Shopify CLI
If you prefer developing locally, deploy the theme directly from your terminal.
# Upload theme directly to your Shopify store
shopify theme push --store your-store.myshopify.com --theme "Elvix"

# Run local live development server
shopify theme dev --store your-store.myshopify.com
This command uploads your local theme files and runs a live development preview server at http://127.0.0.1:9292.
Step 2: Configuring the Header and Mega Menu
The Elvix header architecture uses dynamic Online Store 2.0 section groups.
In the Theme Editor, click on the Header section in the left sidebar.
Link your primary navigation menu under the Menu setting.
To create the 4-column mega menu, add nested sub-items under your top-level links in Online Store > Navigation.
You can also enable the sticky header, language selector, and currency selector with simple checkboxes.
Step 3: Setting Up the Bento Hero Grid
The Bento Hero section lets you highlight multiple flagship devices in a modern grid.
In the Theme Editor, click Add section on your homepage and choose Bento Hero.
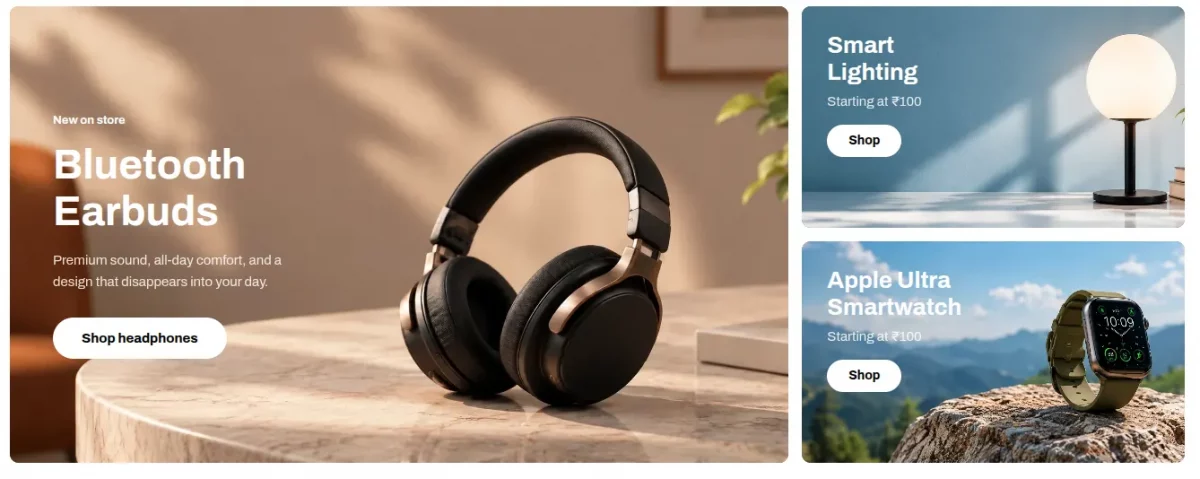
Add secondary blocks on the right for supporting hardware like earbuds, smartwatches, or gaming accessories.
All cards automatically load bundled high-resolution fallbacks if no image is uploaded.
Step 4: Setting Up the Category Scroller
The Category Scroller gives mobile and desktop shoppers an effortless way to browse hardware collections.
Click Add section on the home page and select Category Scroller.
Click Add Category to create blocks for headphones, laptops, speakers, monitors, and controllers.
Assign each block to its corresponding collection, and the theme will pull the collection image automatically.
Step 5: Customizing the Product Detail Page
The product page is optimized to display technical specs clearly and maximize conversions.
In the Theme Editor top bar dropdown, navigate to Products > Default product.
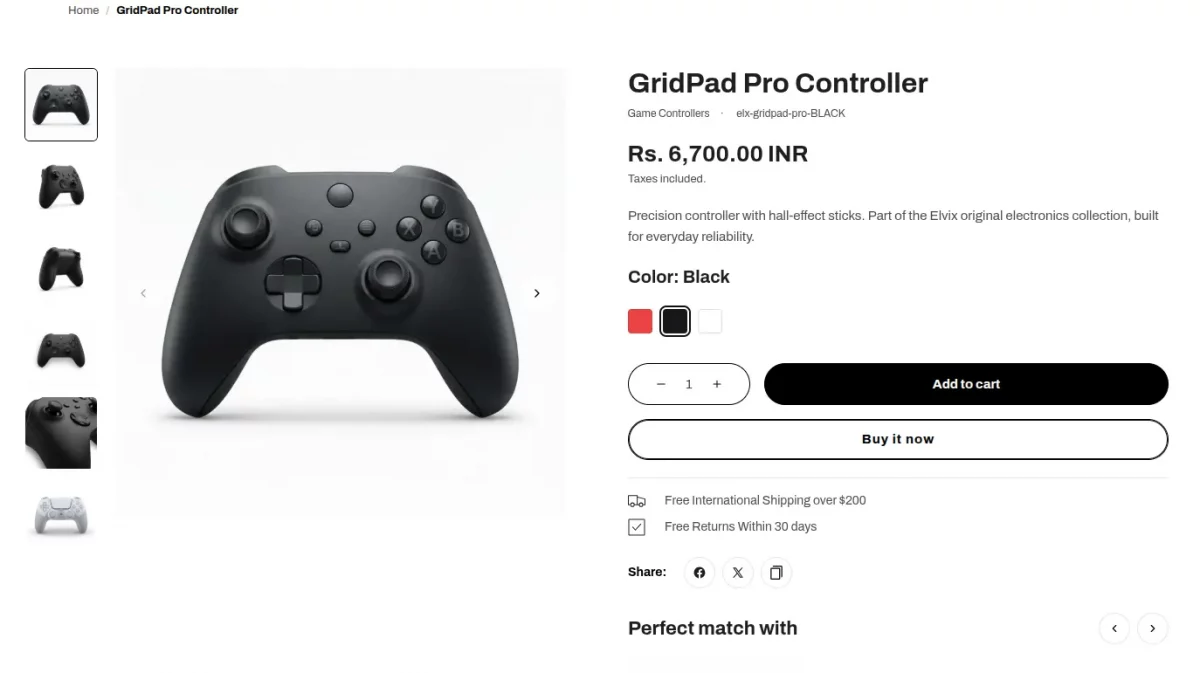
The quantity selector and Add to Cart button sit side-by-side on a single row across all mobile viewports.
The dynamic checkout button (Buy Now) sits full-width directly below them with clean outline styling.
Variant swatches update instantly via dynamic DOM events, recalculating SKU and inventory without reloading.
Step 6: Configuring Technical Specification Tabs
Electronics customers always review hardware specs before making a purchasing decision.
Add the Specification Tabs block inside your product page template.
You can create tab blocks for General Specs, Audio Performance, Battery Life, and Dimensions.
Specs can be entered in clean rich text or dynamically mapped to custom Shopify metafield definitions.
Step 7: Adding the Comparison Table
The comparison matrix allows customers to compare specs across multiple models side-by-side.
Click Add section on any page and select Comparison Table.
Add individual product blocks and define rows for driver diameter, frequency response, weight, and battery life.
Customers can click direct Add to Cart buttons directly from within the comparison table rows.
Step 8: Configuring the Homepage Video Section
The video showcase provides an engaging brand highlight on your home page.
In the Theme Editor, click Add section and choose Video.
Paste your YouTube or Vimeo link into the Video URL field, or select a Shopify-hosted video.
Upload a high-resolution 16:9 poster under Cover image.
The video player is click-to-load, meaning it downloads zero video data until the customer taps play.
Step 9: Managing Color Schemes and Typography
Elvix comes with five accessible, pre-configured color schemes.
Click the Theme settings (gear icon) in the Theme Editor and open the Colors panel.
You can adjust background tones, text colors, and the signature crimson red accent color.
In the Typography panel, choose your primary header and body fonts from the native Shopify font library.
Step 10: Activating Right-to-Left (RTL) Arabic Localization
The theme includes built-in Right-to-Left support without requiring third-party translation apps.
In your Shopify Admin, navigate to Settings > Languages.
Click Add language, select Arabic, and publish it for your target markets.
When an Arabic locale is active, the theme automatically mirrors navigation drawers, sliders, and form layouts.
Step 11: Validating and Publishing Your Store
Before launching, validate your theme files using the official Theme Check linter.
# Run Shopify Theme Check linting
shopify theme check
This checks all templates and verifies that zero liquid or syntax errors exist across your theme.
When you are satisfied with your storefront preview, click Publish in your Theme Library to take your store live.
Get the Elvix Shopify Theme
Explore the live demo store, then install the theme directly from the official Shopify Theme Store.
NEED HELP?
We hope this documentation guide helps you configure and launch your store quickly!
If you encounter any issues or have questions regarding setup, please raise a ticket on our UVdesk Support Portal.
You can also reach our engineering team directly at our support mail.
Thank you for choosing the Elvix Shopify Theme!
Current Theme Version – 1.0.0
Supported Platform – Shopify Online Store 2.0

Be the first to comment.