The PrestaShop Zoho Books Connector sends your customers, products, orders, payments, and credit slips to Zoho Books, and can bring changes made in Zoho Books back to PrestaShop.
You set it up on one Back Office page, map your taxes and payment methods, and then follow the work in the sync queue, synced records, logs, and conflicts pages.
Note: You need a Zoho Books account and a Zoho API console client of type “Server-based Application”.
The module needs PHP 8.1 or newer and a cron task that runs every 5 minutes. Zoho Books is set up per shop, so select a single shop in a multi-store setup before you change anything.
Features of PrestaShop Zoho Books Connector
- Connect one Zoho Books organization per shop with OAuth 2.0 in any Zoho data center
- Sync customers as Zoho contacts, one contact per currency, with billing and shipping addresses
- Sync products and combinations as Zoho items, matched by SKU
- Create a sales order and an invoice for each order, with taxes, shipping and discounts
- Record payments against the invoice and turn credit slips into credit notes
- Queue every change and send it from a cron task, with retries and a daily API budget
- Bring contacts, items, invoice status, payments and stock back from Zoho Books with two-way sync
- Resolve fields changed on both sides with a per-field policy and a Conflicts page
- Review the work in the Sync queue, Synced records and Logs pages
How to install PrestaShop Zoho Books Connector
- In the Back Office go to Modules › Module Manager and click Upload a module.
- Drag the module ZIP into the drop area, or select it from your computer.
- Wait for the installer to finish. The module then appears in the Module Manager list.
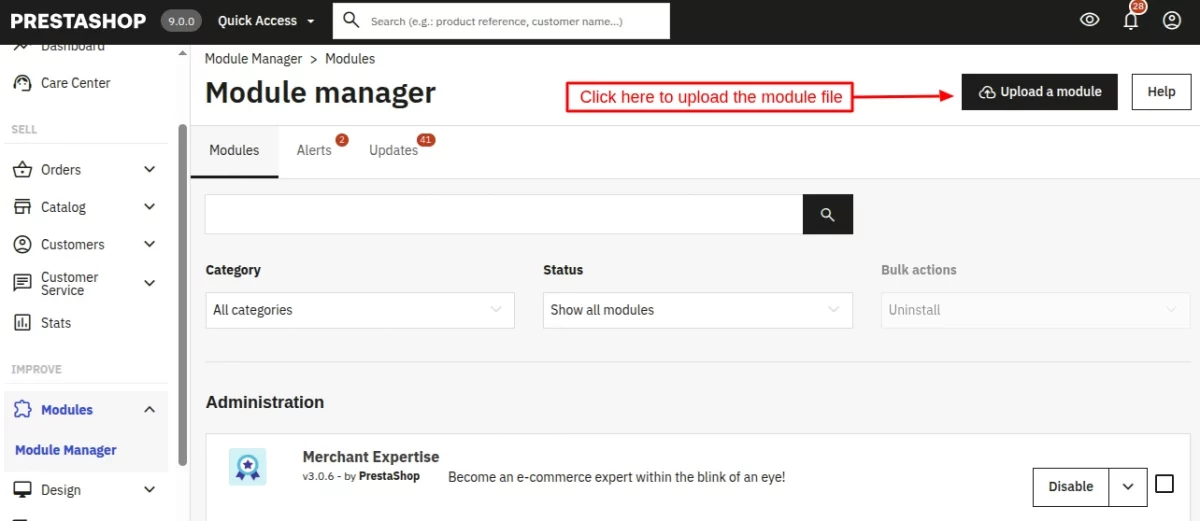
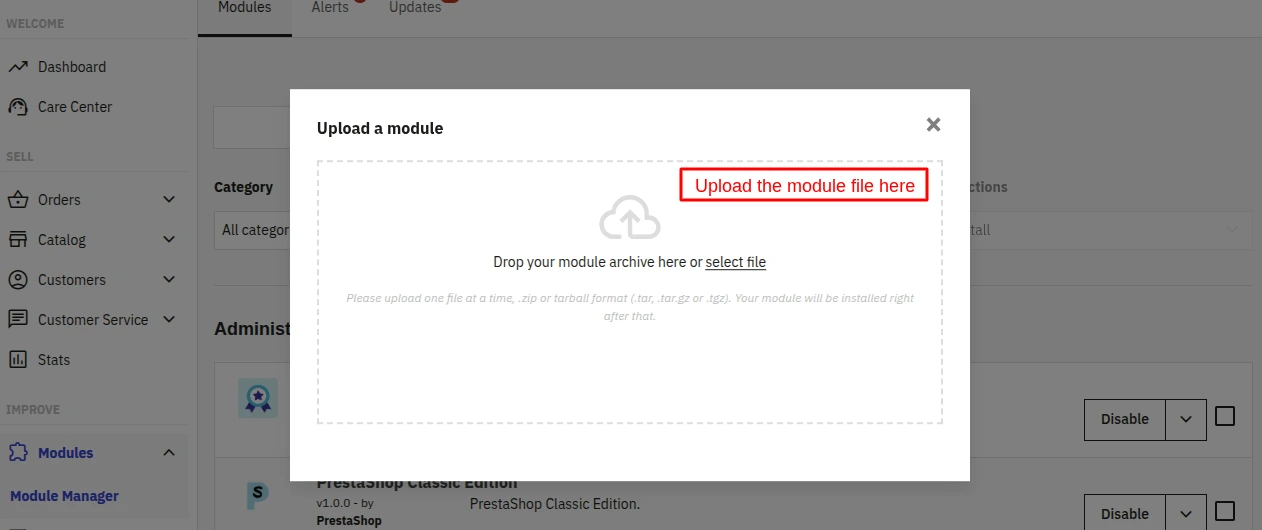
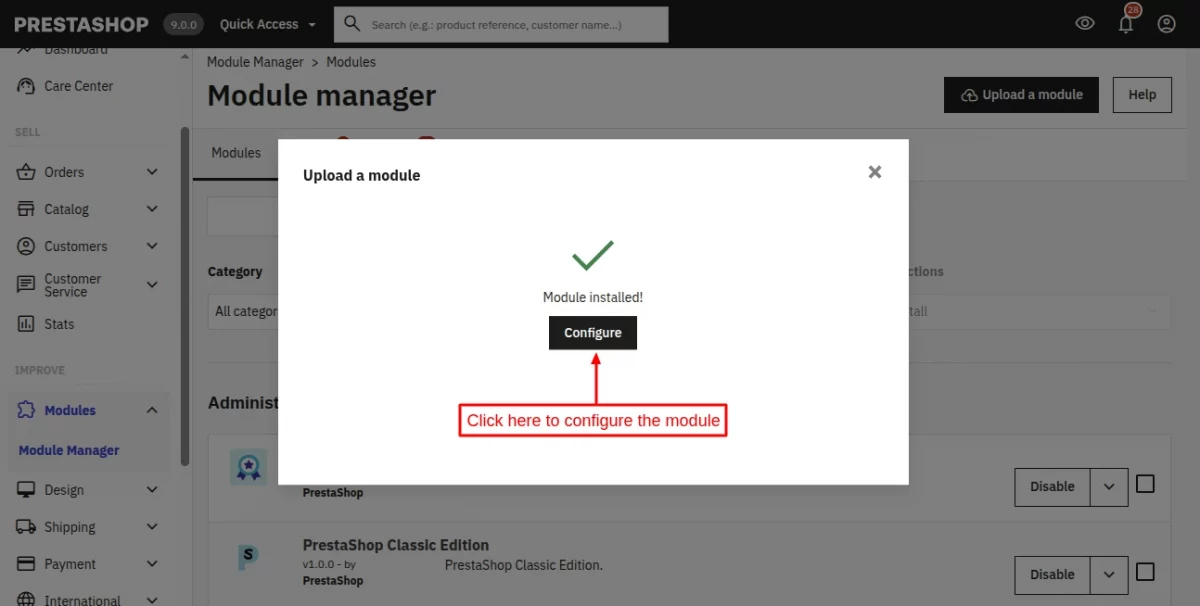
After the install, the menu Sell › Zoho Books appears with six pages: Configuration, Mappings, Sync queue, Synced records, Logs and Conflicts.
Module Configuration
Go to Sell › Zoho Books › Configuration. The page has a Connection card, a Sync settings card, a Sync status card, a Cron task card and a Real-time & two-way sync card.
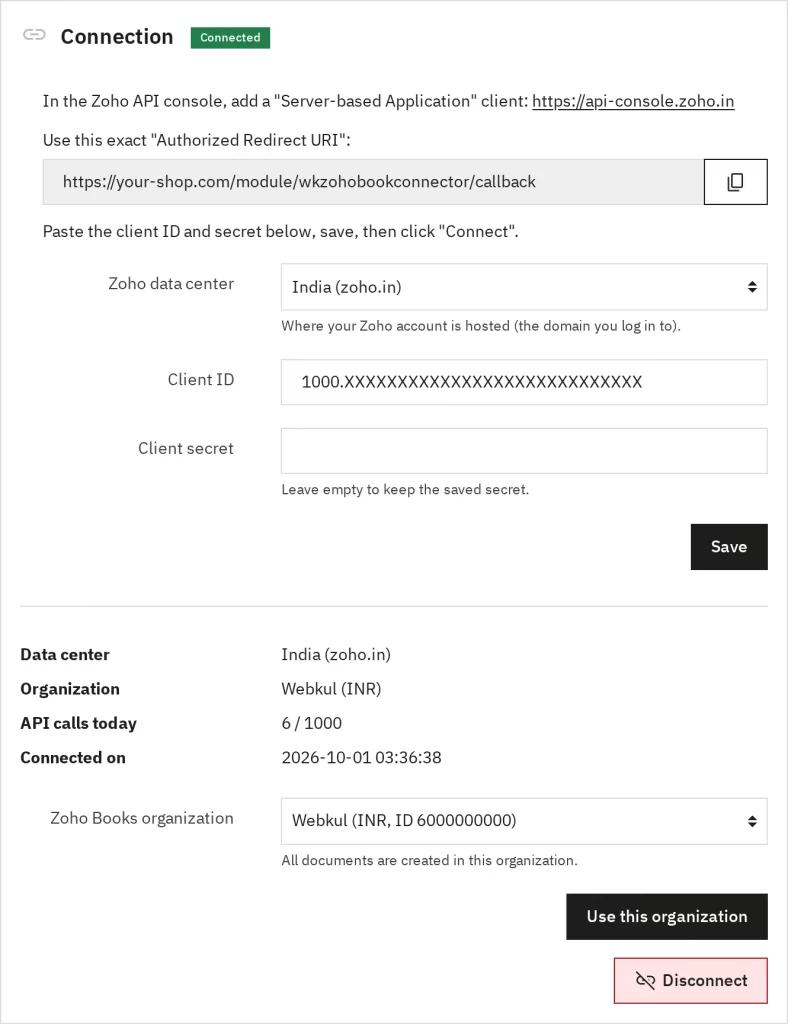
Connection
Create the API client first, as described in the Zoho Books setup section below, so you have the Client ID and secret ready.
- Choose your Zoho data center. Pick the domain you log in to, for example India (zoho.in). The default is zoho.com.
- Enter the Client ID and the Client secret, then press Save. Leave the secret empty later to keep the saved one.
- Press Connect to Zoho Books. Zoho asks you to approve the access, then returns you to this page.
- If your account has more than one organization, choose it in Zoho Books organization and press Use this organization. With a single organization the module selects it for you.
Once connected the card shows the data center, the organization, API calls today against your daily budget, and the connection date. Disconnect removes the connection.
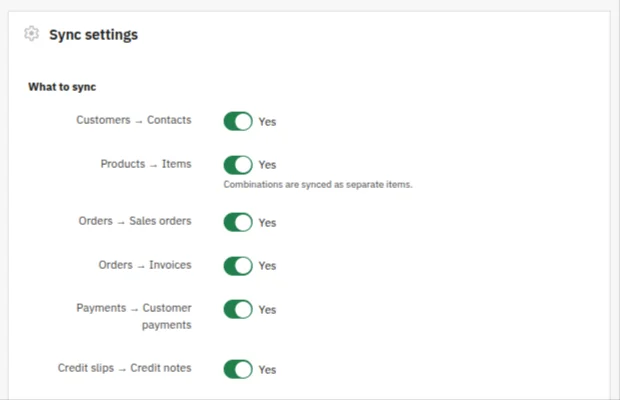
Sync settings
What to sync has one switch per data type:
Customers → Contacts, Products → Items, Orders → Sales orders, Orders → Invoices, Payments → Customer payments and Credit slips → Credit notes. All are on by default.
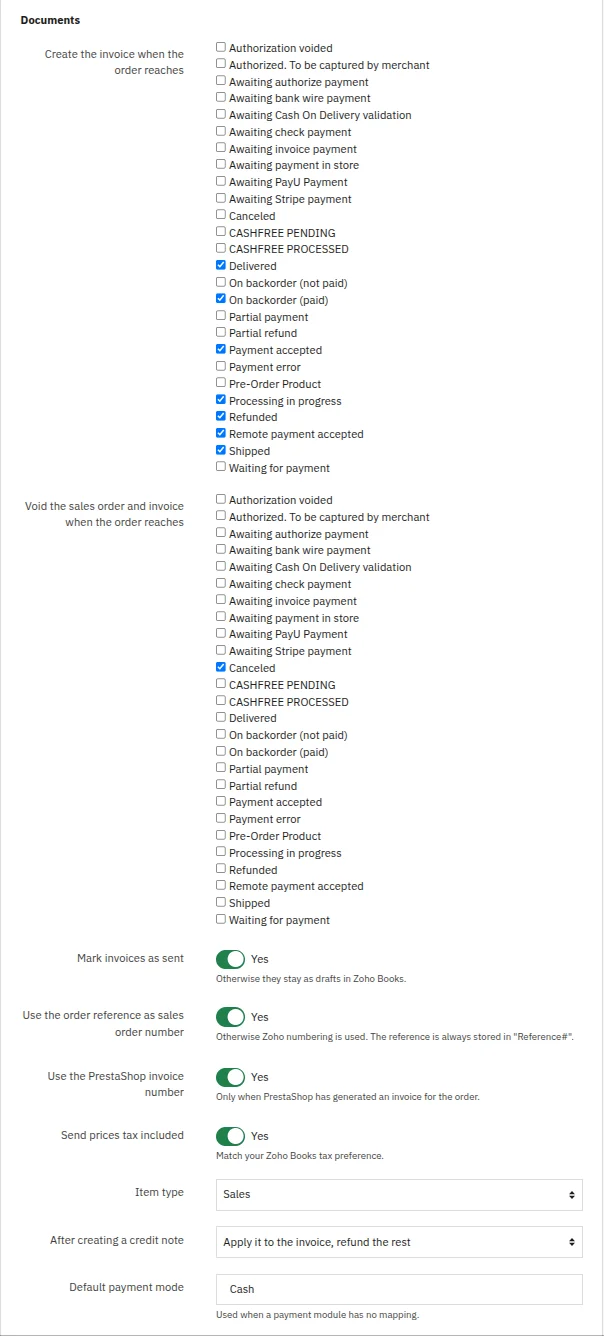
Under Documents you choose when and how documents are created:
- Create the invoice when the order reaches lists the order states that create the invoice.
- Void the sales order and invoice when the order reaches lists the states that void them, such as Canceled.
- Mark invoices as sent is on by default. When it is off, invoices stay as drafts in Zoho Books.
- Use the order reference as sales order number and Use the PrestaShop invoice number are off by default. The reference is always stored in the Zoho Reference# field.
- Send prices tax included should match your Zoho Books tax preference.
- Item type sets the type of created items. After creating a credit note chooses between applying it to the invoice or refunding it. Default payment mode is Cash and is used when a payment module has no mapping.
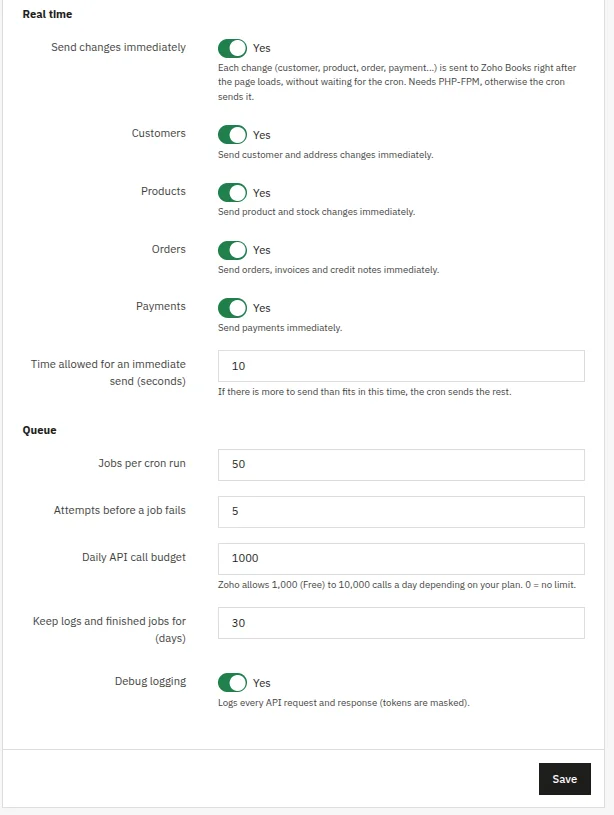
Under Real time and Queue:
- Send changes immediately sends each change right after the page loads. It needs PHP-FPM. Without it the cron task sends the changes.
- Time allowed for an immediate send (seconds) defaults to 10.
- Jobs per cron run defaults to 50 and Attempts before a job fails to 5.
- Daily API call budget defaults to 1000. Zoho allows 1,000 calls a day on the Free plan and up to 10,000 on paid plans.
- Keep logs and finished jobs for (days) defaults to 30.
- Debug logging is off by default. When on, it records every API request and response with tokens masked.
Press Save at the bottom of the card.
Cron task
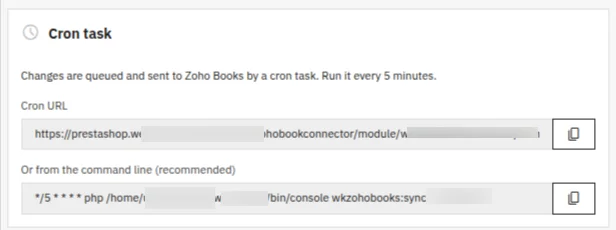
Changes are queued and sent to Zoho Books by a cron task that you run every 5 minutes. The card shows the cron URL and the command line. The command line is recommended:
/5 * php /path/to/prestashop/bin/console wkzohobooks:sync
The cron URL contains a secret token. Do not share it.
Zoho Books setup
You need the Client ID and Client secret from Zoho for the Connection card above.
- Open the Zoho API console for your data center. The link is shown at the top of the Connection card, for example
https://api-console.zoho.in. - Add a client of type Server-based Application.
- In Authorized Redirect URIs paste the exact address shown in the Connection card. If it differs by even one character, Zoho refuses the connection.
- Copy the Client ID and Client secret. You paste them into the module in the next section.
Map taxes and payment methods
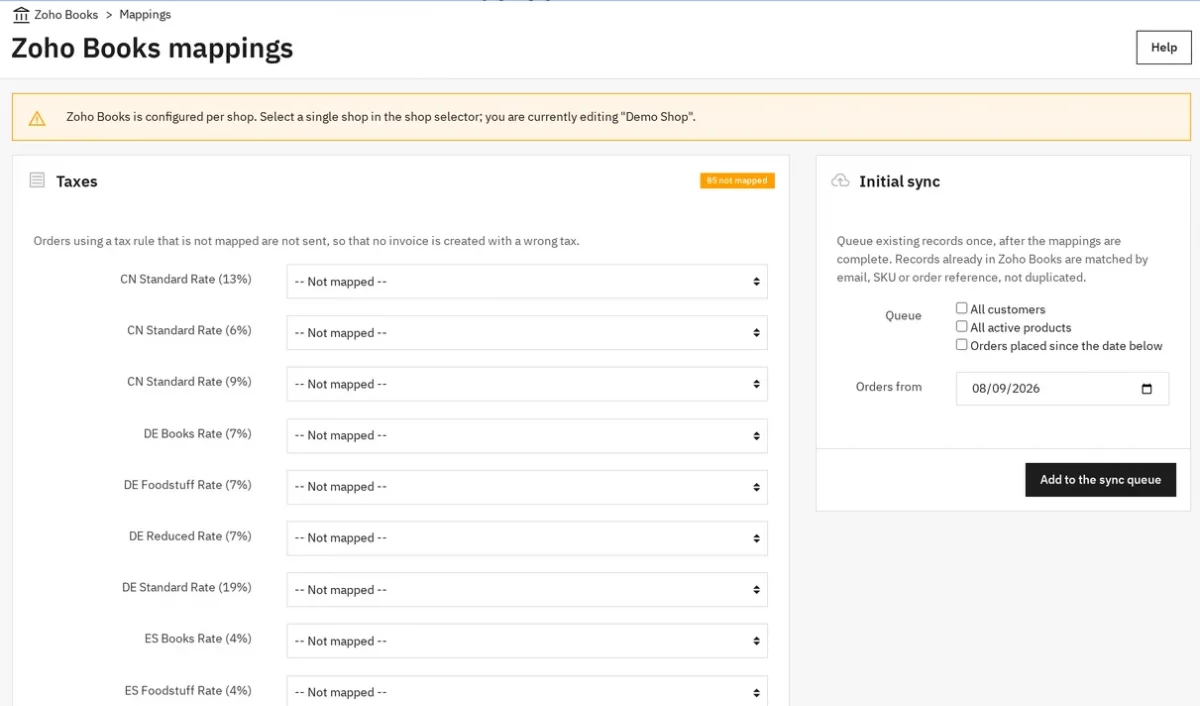
Go to Sell › Zoho Books › Mappings. Under Taxes, choose the Zoho Books tax for each PrestaShop tax rule.
An order that uses a tax rule with no mapping is not sent, so that no invoice is created with a wrong tax. Press Save when done.
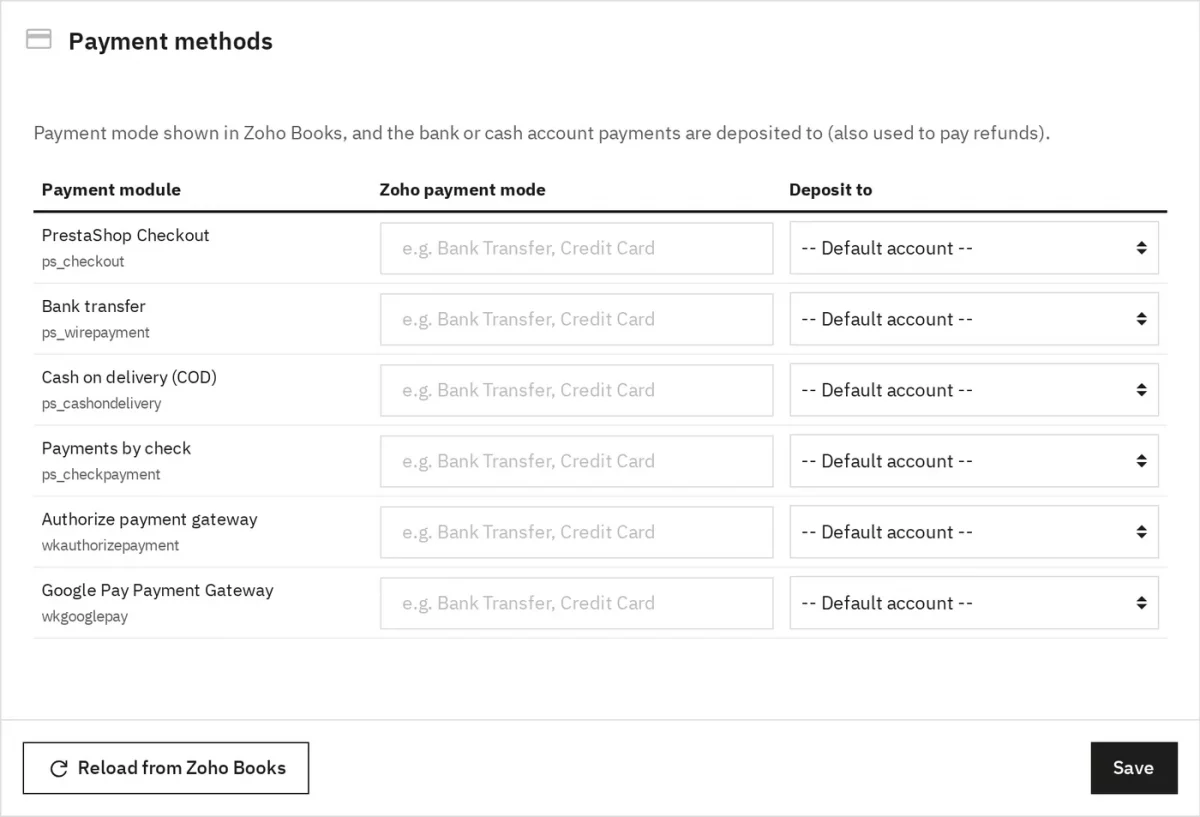
Under Payment methods, fill in a Zoho payment mode for each payment module and choose the Deposit to account.
The default account is used when you leave it as Default account. Reload from Zoho Books refreshes the lists after you add taxes or accounts in Zoho.
Send existing data to Zoho Books
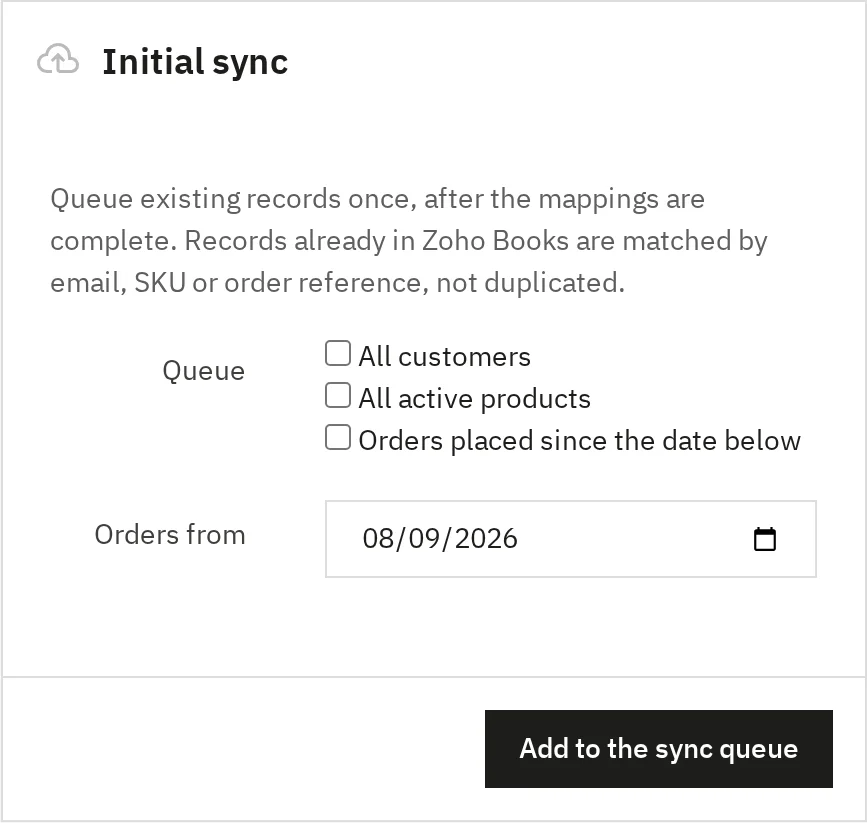
Use Initial sync on the Mappings page once the mappings are complete.
Tick All customers, All active products or Orders placed since the date below, set Orders from, and press Add to the sync queue.
Records that already exist in Zoho Books are matched by email, SKU or order reference, so they are not duplicated.
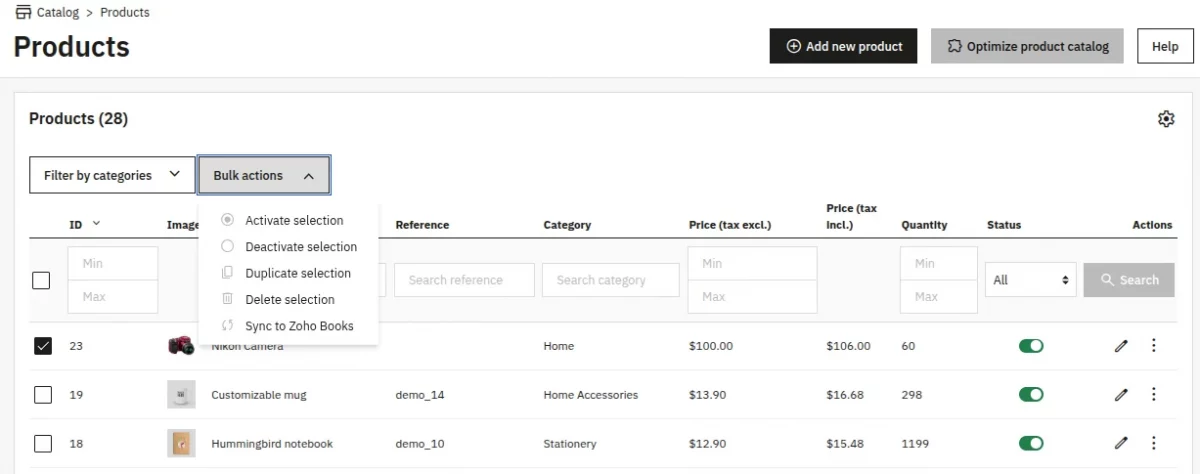
You can also select rows in the Customers, Products or Orders grids and choose Sync to Zoho Books in Bulk actions.
Follow the sync work
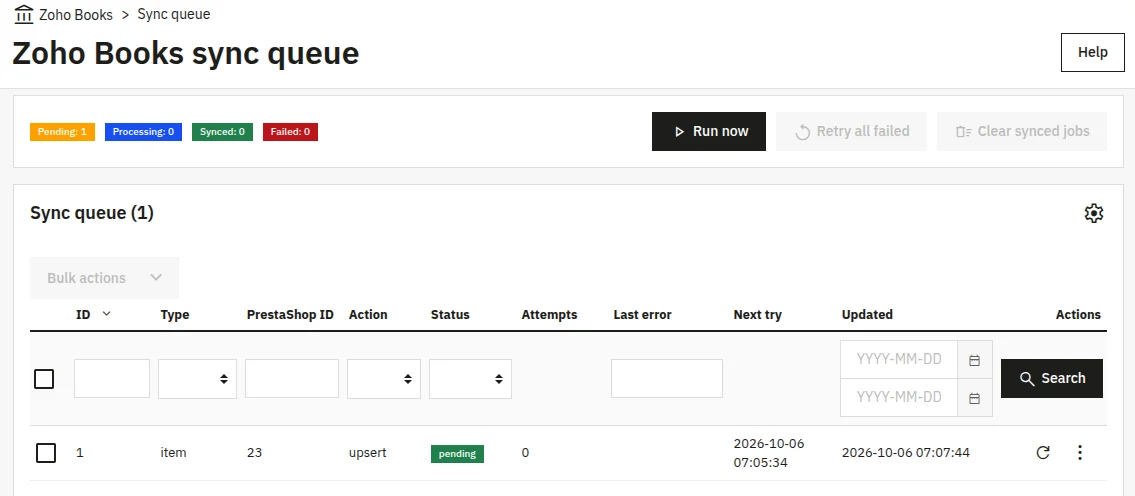
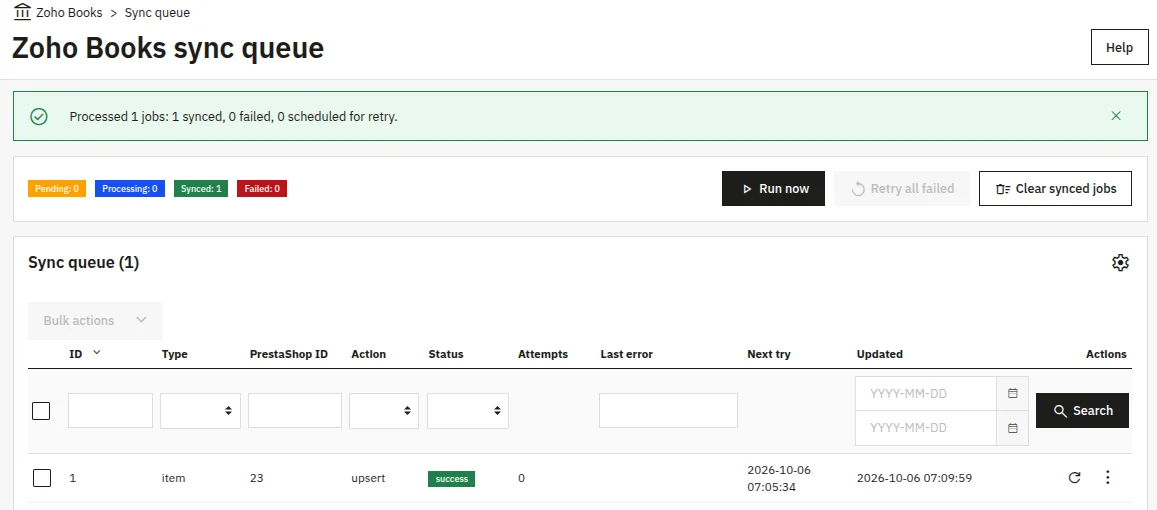
Sell › Zoho Books › Sync queue shows the counters Pending, Processing, Synced and Failed.
Press Run now to process the queue without waiting for the cron task, Retry all failed to requeue failed jobs, and Clear synced jobs to remove finished ones. Each row has retry and delete actions.
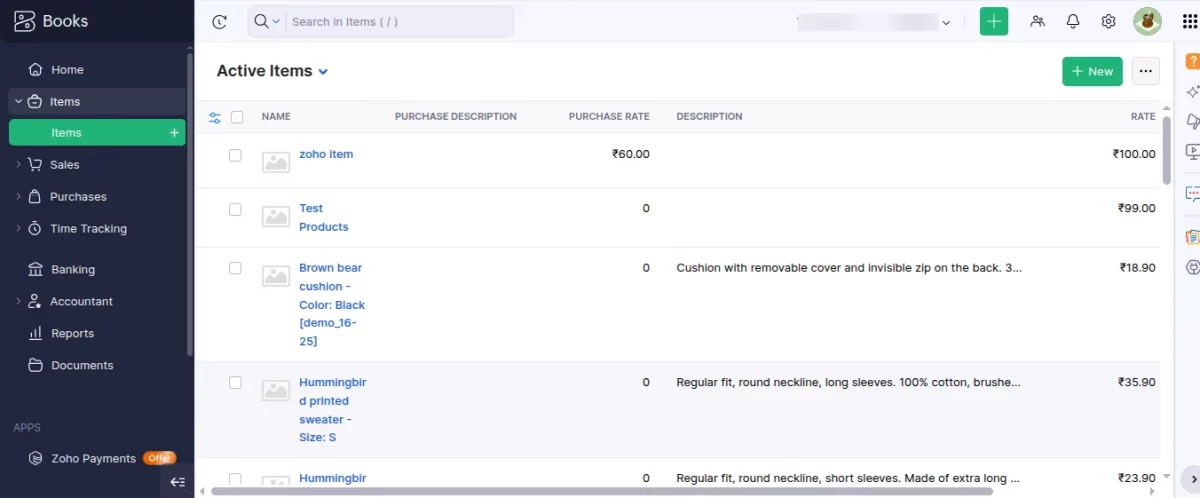
Entity added on Zoho Books:
After successfully syncing the entity from PrestaShop, it will be added to Zoho Books.
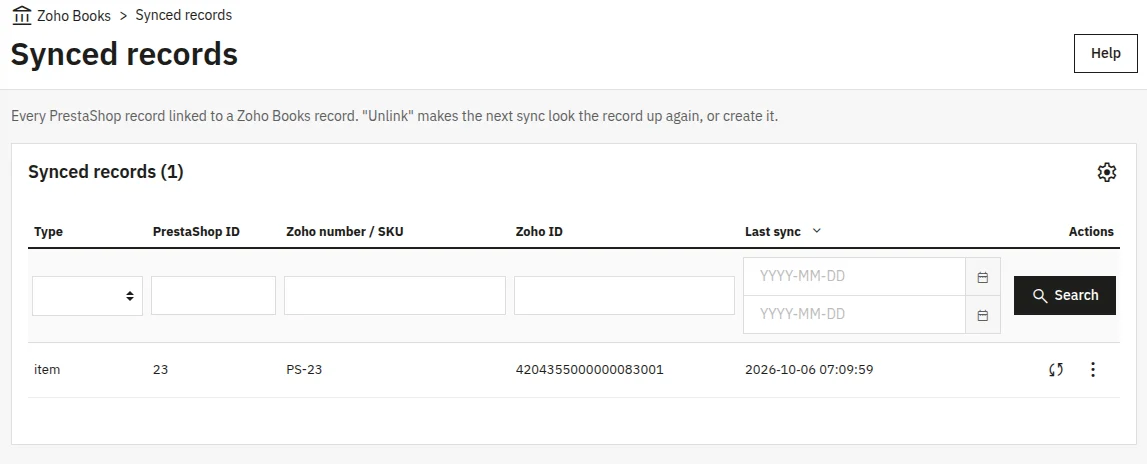
Synced records lists every PrestaShop record linked to a Zoho Books record, with the Zoho number or SKU and the Zoho ID. Unlink makes the next sync look the record up again, or create it.
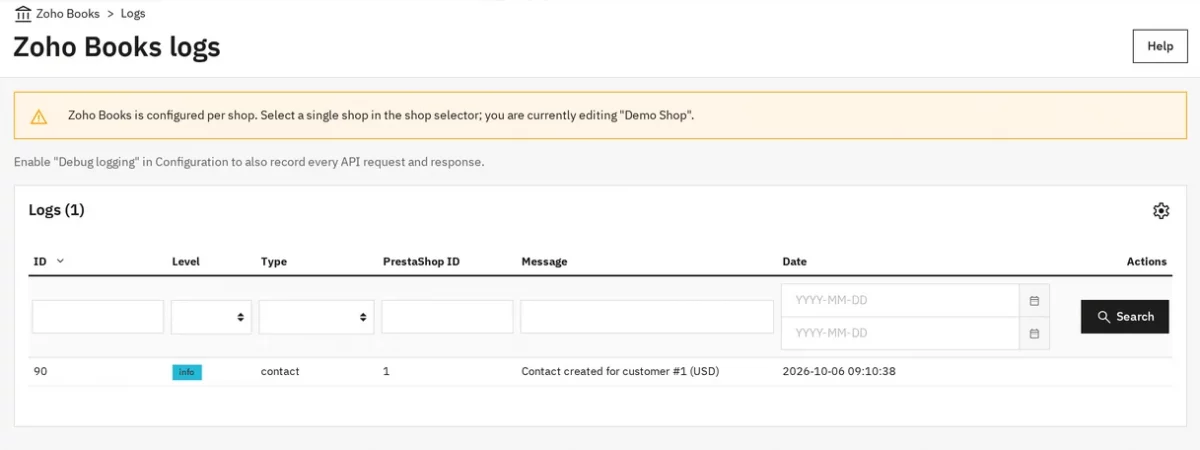
Logs shows the level, type, PrestaShop ID and message of each event.
Two-way sync
Two-way sync is off by default. Open the Real-time & two-way sync card and switch Enable two-way sync on. PrestaShop → Zoho Books keeps working as before. The options below apply only when it is on.
Under What to bring from Zoho Books you choose what comes back:
Contacts → Customers, Items → Products, Invoice status → Order state and Payments → Order payments, all off by default.
You can also allow the module to create customers and products that exist only in Zoho Books, choose the Group of new customers, and decide whether new products are active.
Existing records are matched by email or SKU.
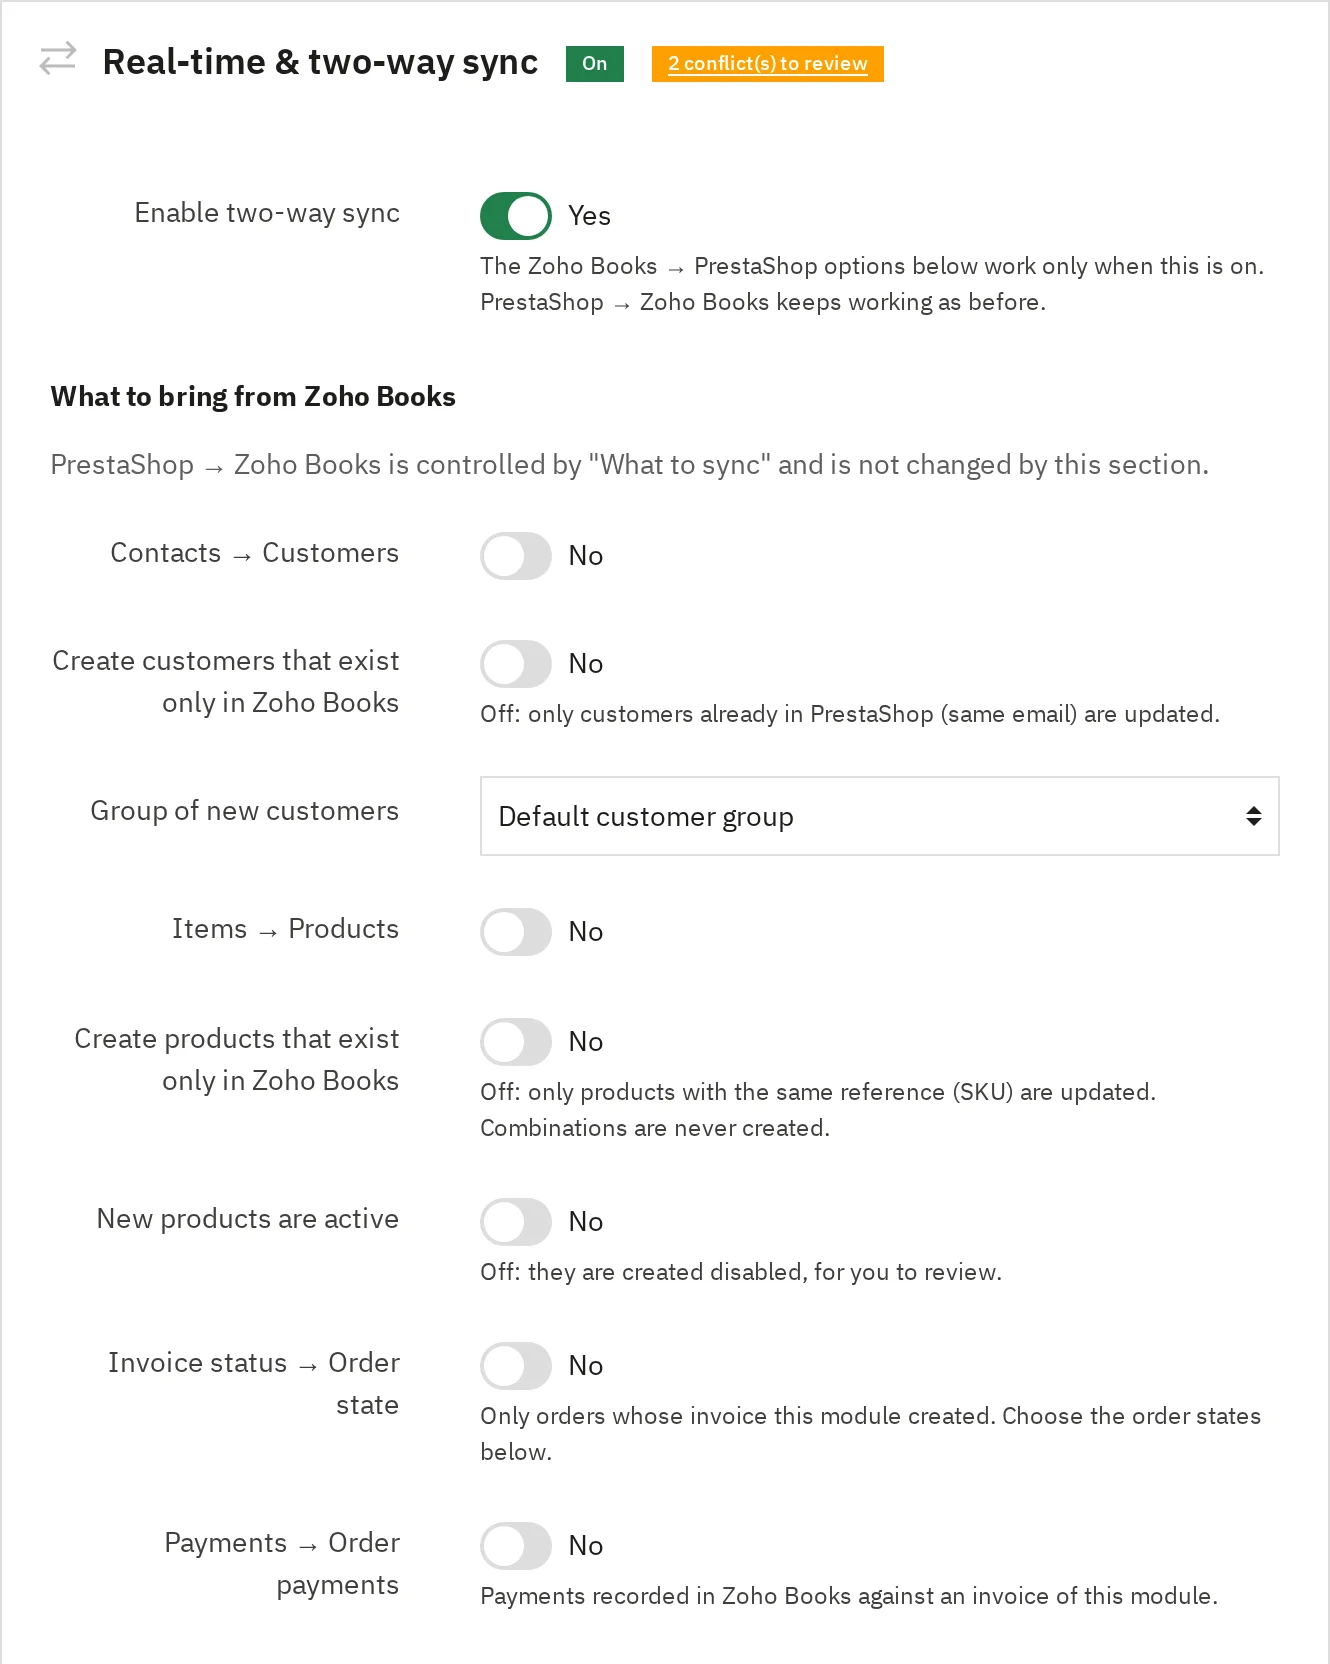
When the admin enables the two-way sync option, entities will update on platforms when updating any platform.
From PrestaShop to Zoho Books
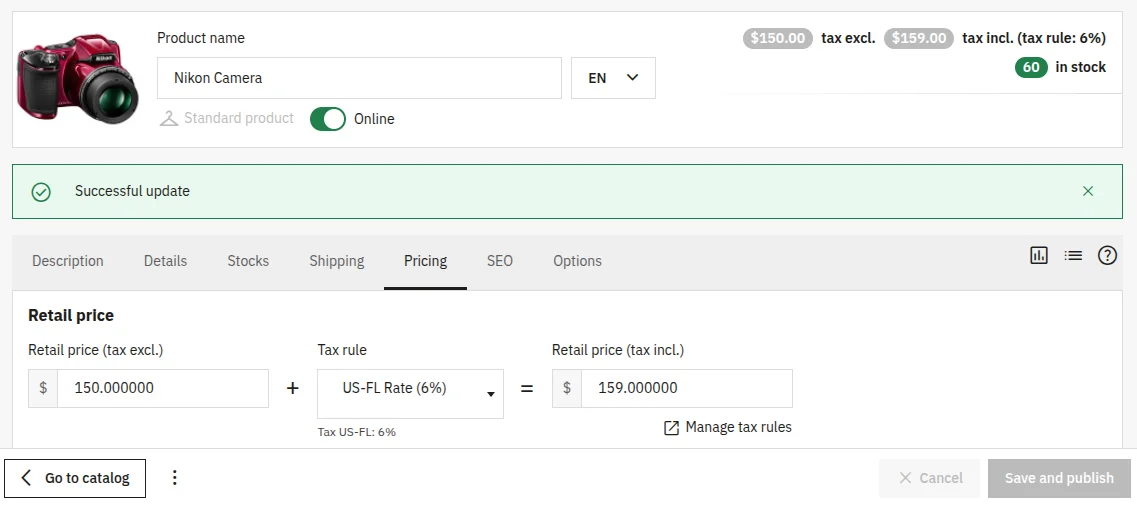
As you can see in the image below, the admin has updated the product price on the PrestaShop end from $100 to $150.
Update product on Zoho Books in real time:
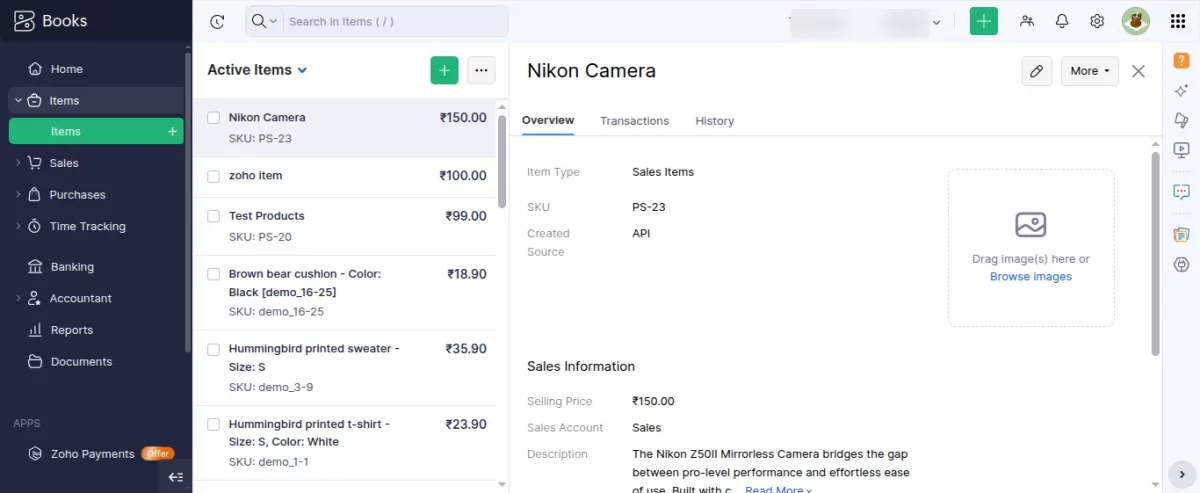
Now, the updated product price is displayed on Zoho Books.
From Zoho Books to PrestaShop
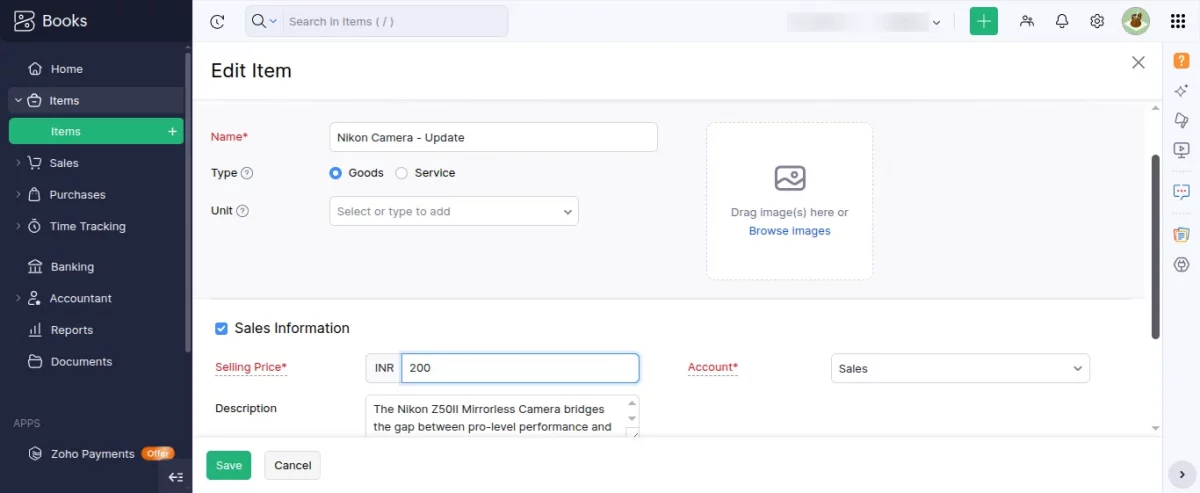
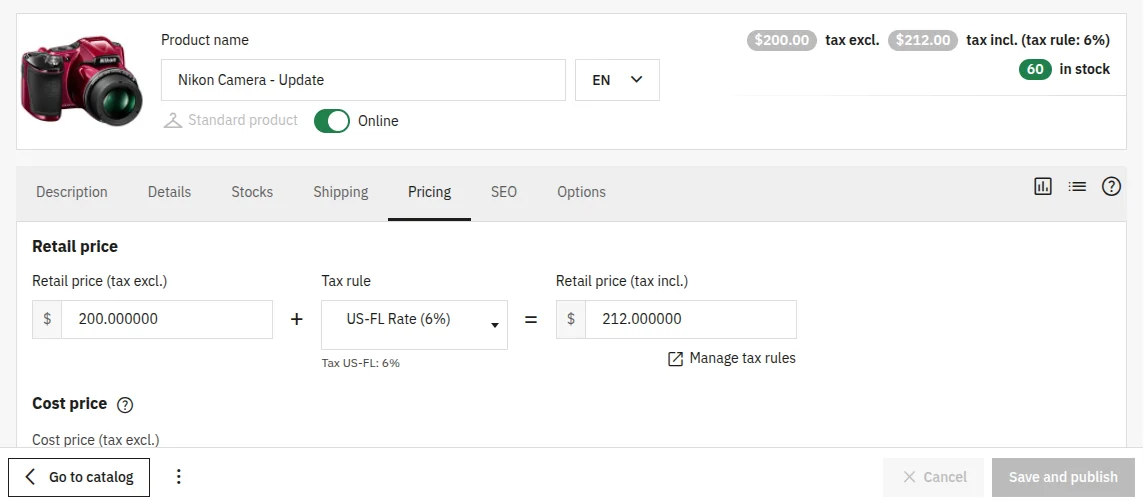
Now, the admin updates the product name and price on Zoho Books, and the same information will update on PrestaShop’s end.
Product name and price updated on PrestaShop’s end:
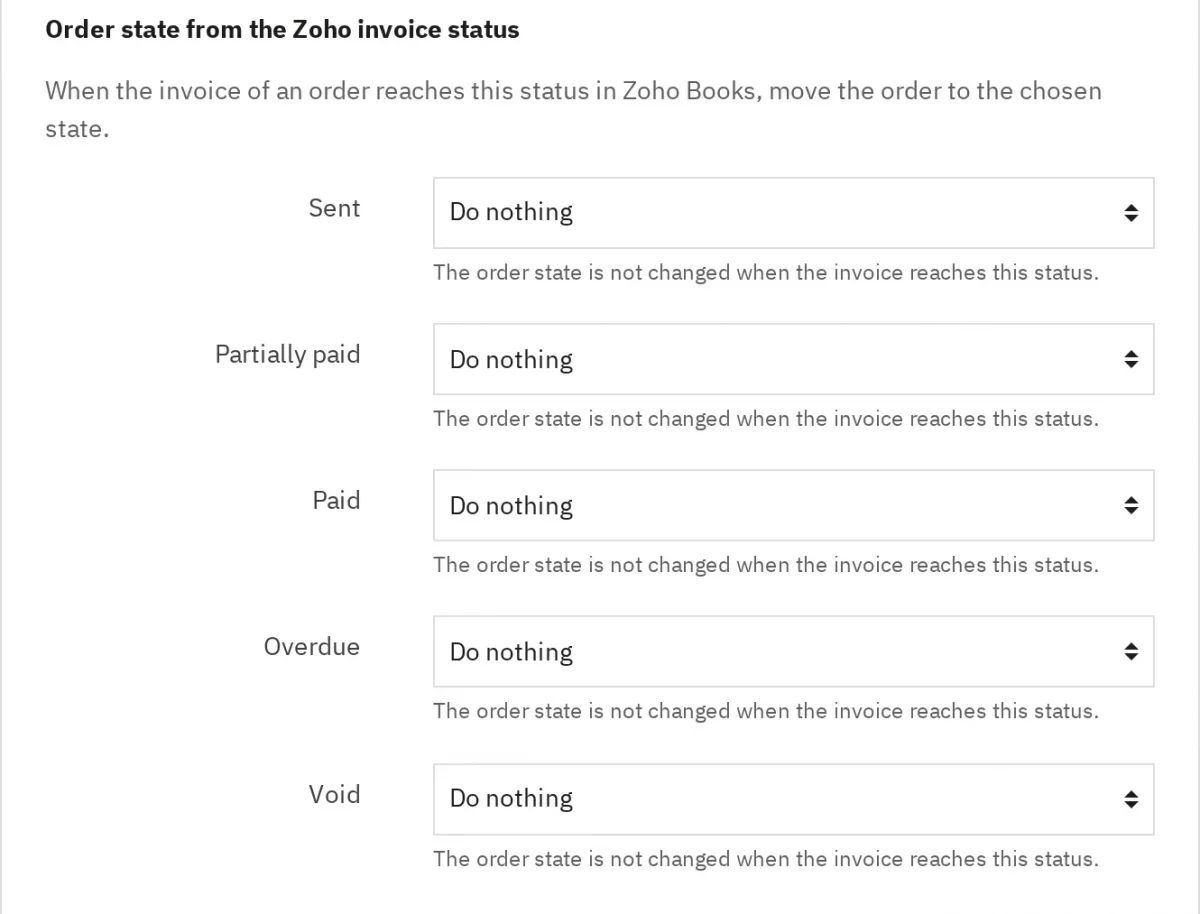
Under Order state from the Zoho invoice status, choose the PrestaShop order state for each invoice status: Sent, Partially paid, Paid, Overdue, and Void. Do nothing leaves the order state unchanged.
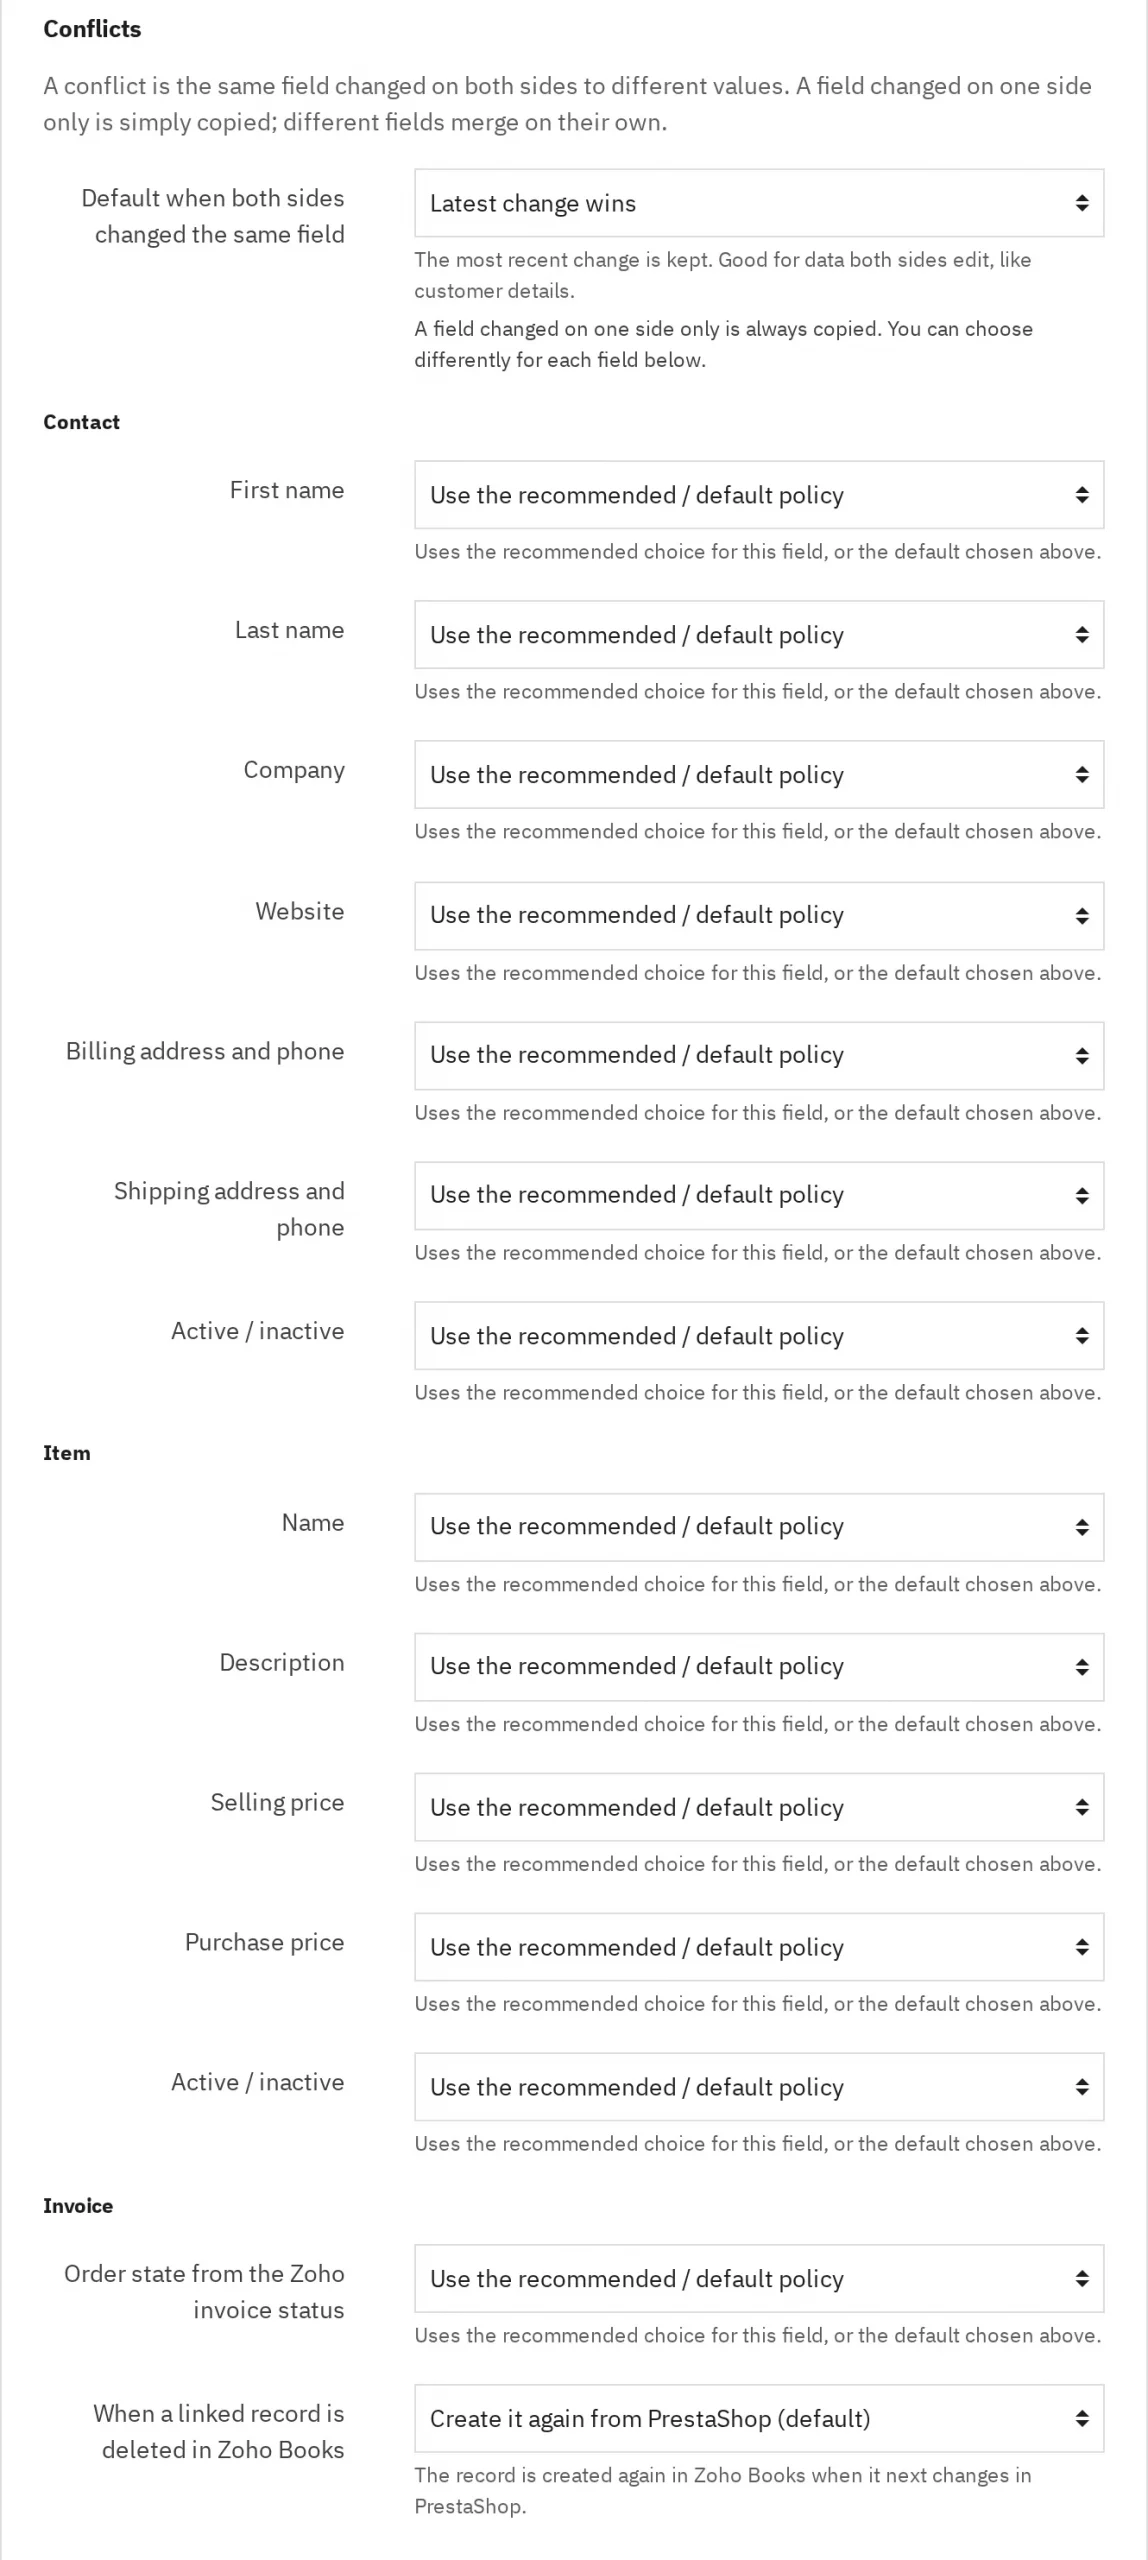
Under Conflicts, set Default when both sides changed the same field: PrestaShop wins, Zoho Books wins, latest change wins, or ask me.
A field changed on one side only is always copied. Below it you can override the policy for each Contact, Item, and Invoice field.
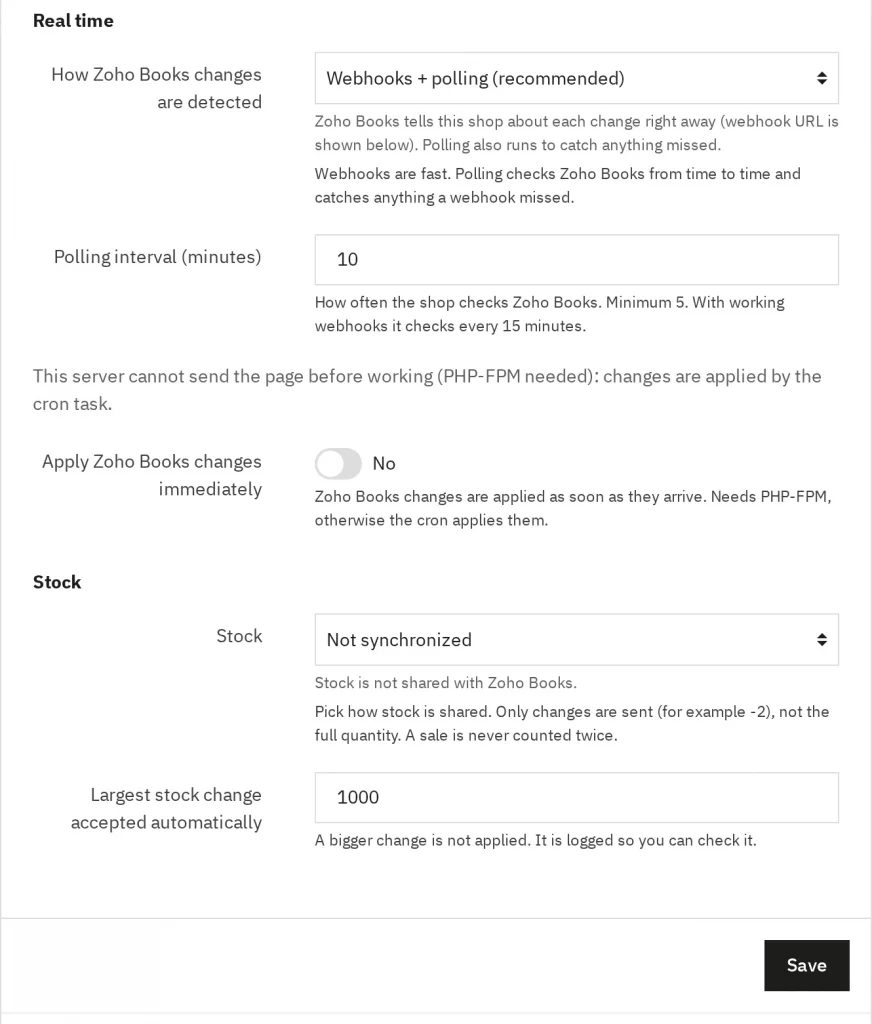
Under Real time, choose how Zoho changes are detected: webhooks plus polling (recommended) or polling alone, and set the Polling interval (minutes). The minimum is 5.
Under Stock, choose whether stock is shared. Only changes cross over, and Largest stock change accepted automatically defaults to 1000. Press Save.
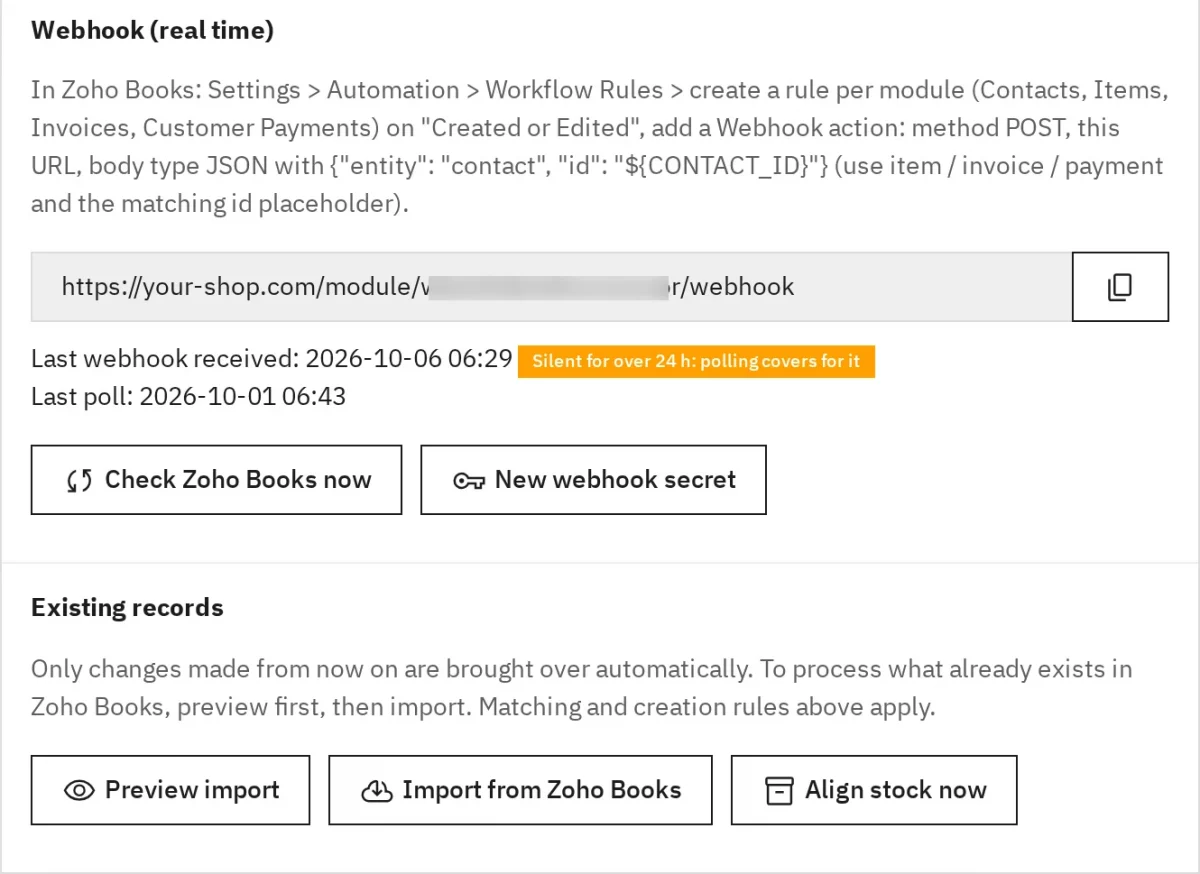
Webhook
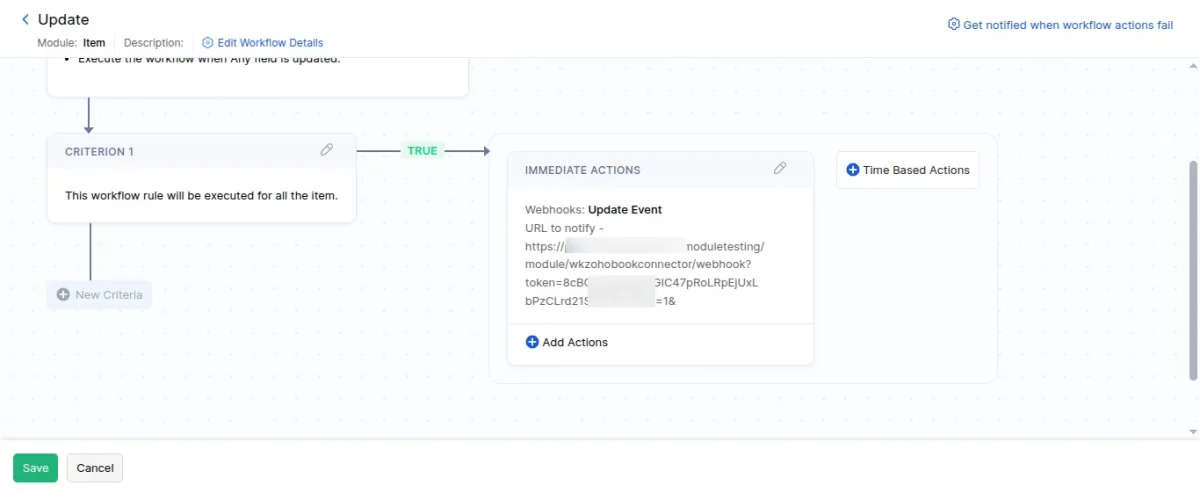
For real-time updates, create a Workflow Rule in Zoho Books for each module (Contacts, Items, Invoices, Customer Payments) on Created or Edited.
Add a Webhook action with method POST, the webhook URL shown here, and a JSON body such as {"entity": "contact", "id": "${CONTACT_ID}"}.
The card shows the last webhook received and the last poll. Check Zoho Books now polls immediately and New webhook secret replaces the secret.
Preview import shows what an import would match or create. Import from Zoho Books processes records that already exist in Zoho, and Align stock now aligns stock.
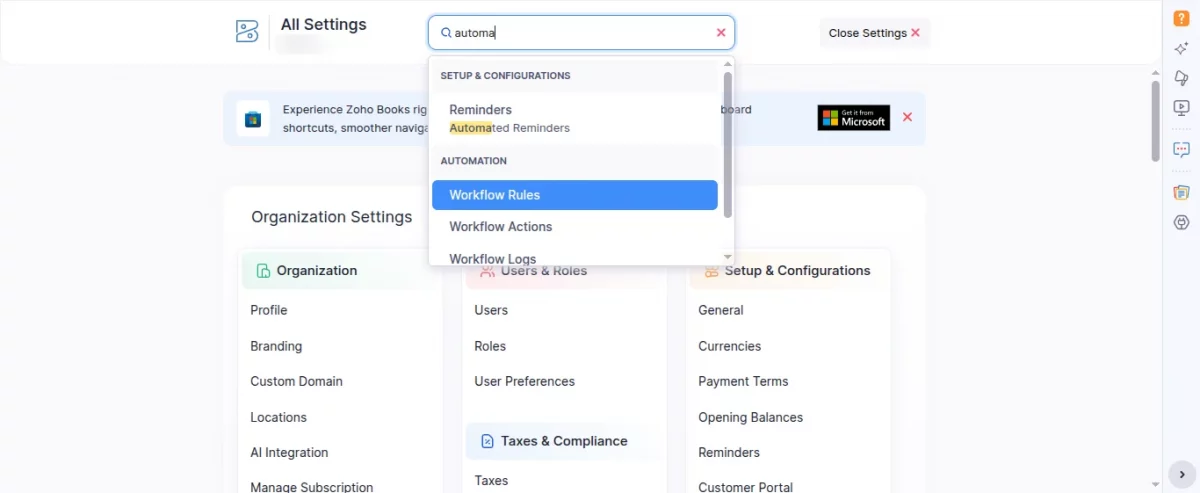
Creation of Webhooks on Zoho Books:
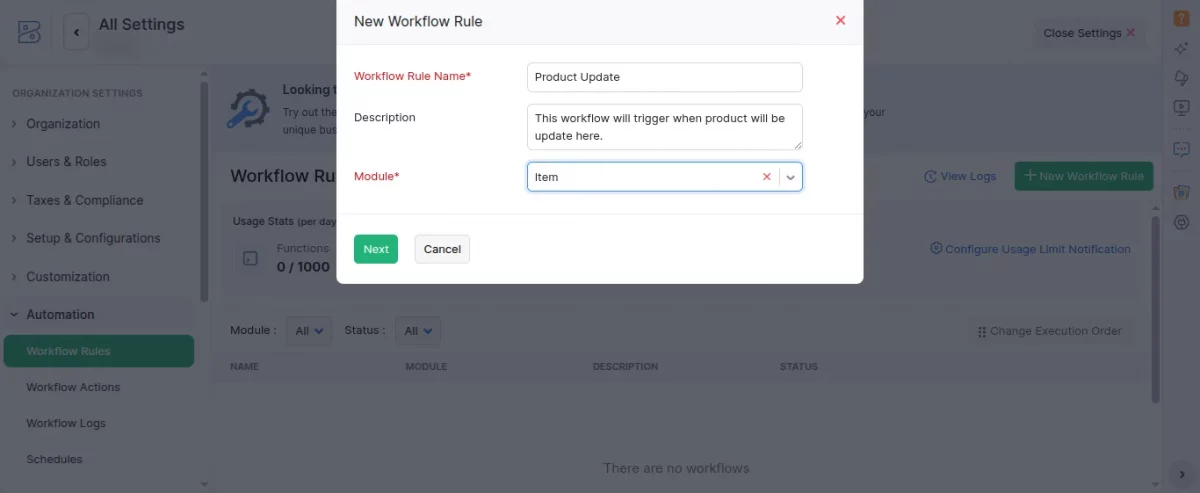
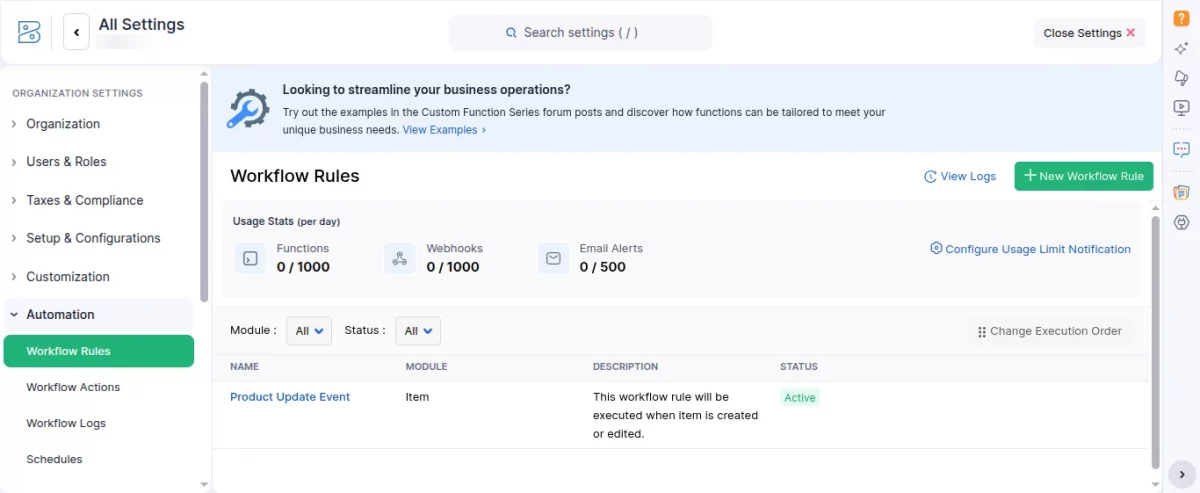
First, the admin has to go to “All Settings” on your Zoho Books account and search for “Workflow Rules”.
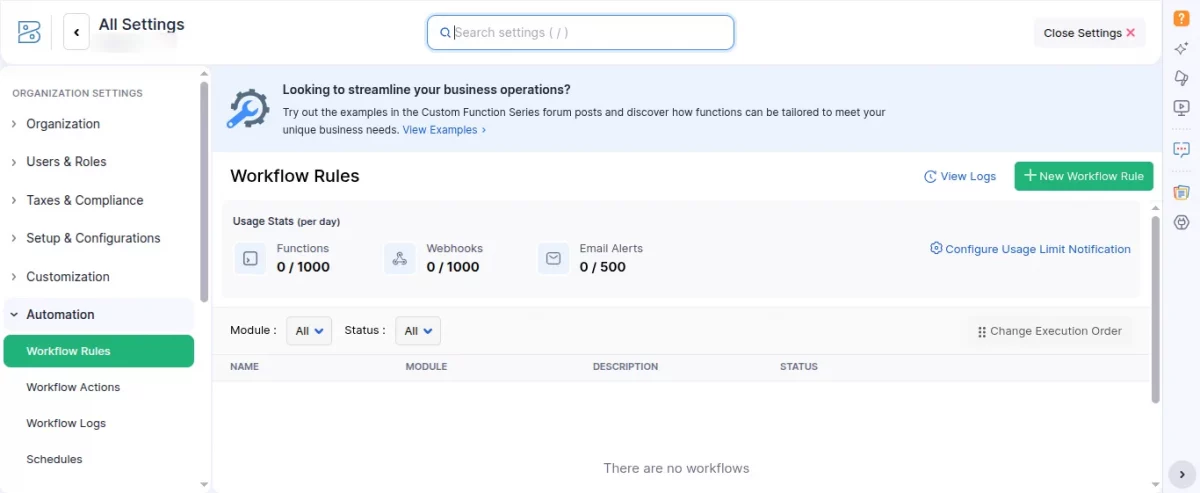
Then, the admin has to click on “New Workflow Rule” button.
A new pop-up window will appear on the screen; fill in the required fields and click on the “Next” button.
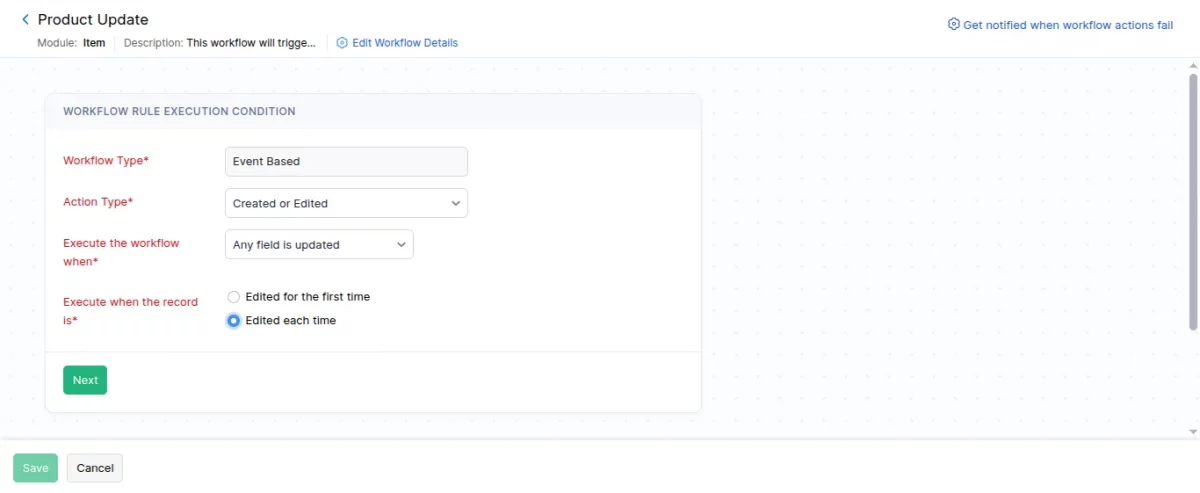
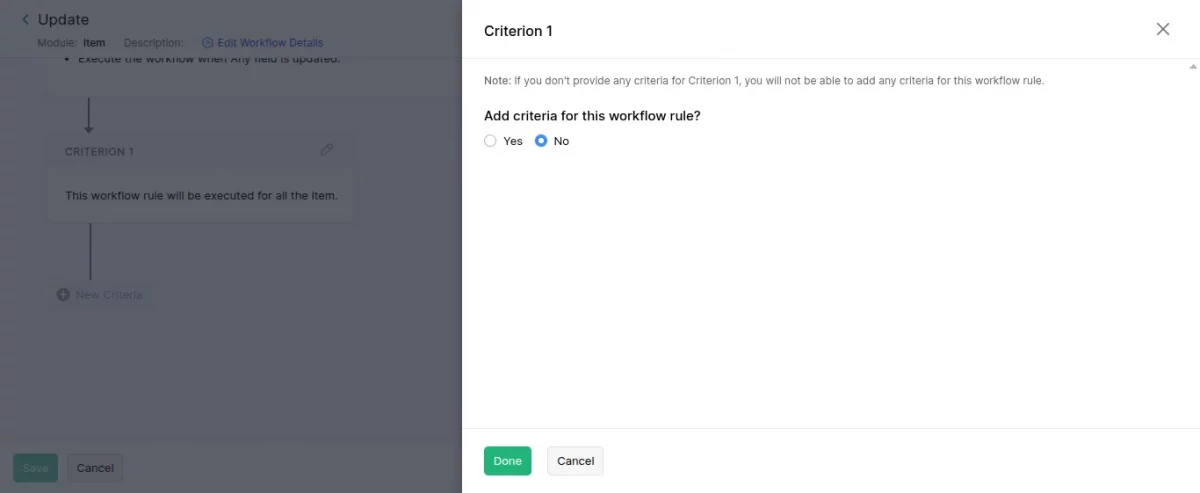
Now assign “Associate immediate actions” by selecting the “Action Type” and “Name”.
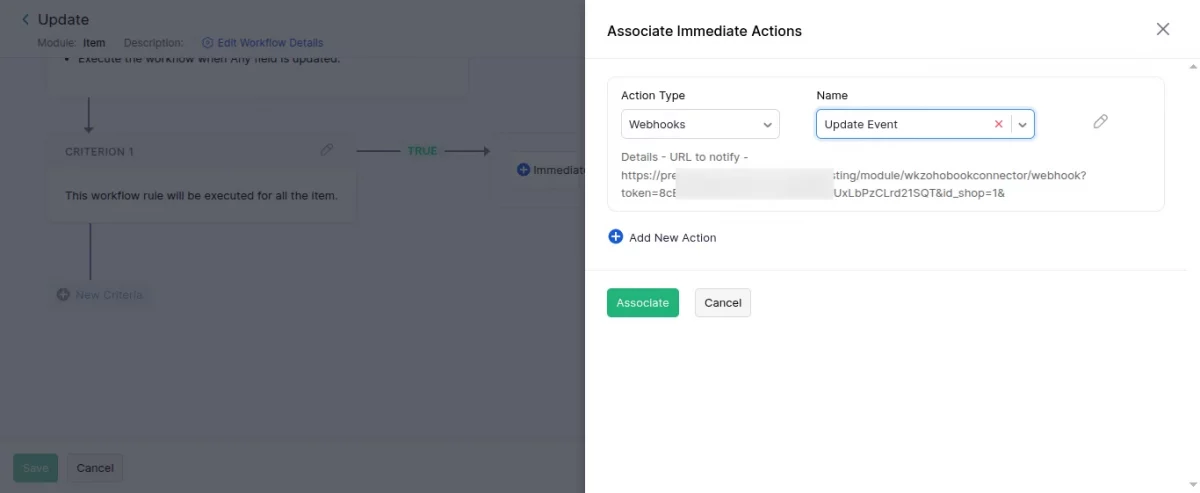
Click on the “Save” button to save the workflow rule.
Resolve conflicts
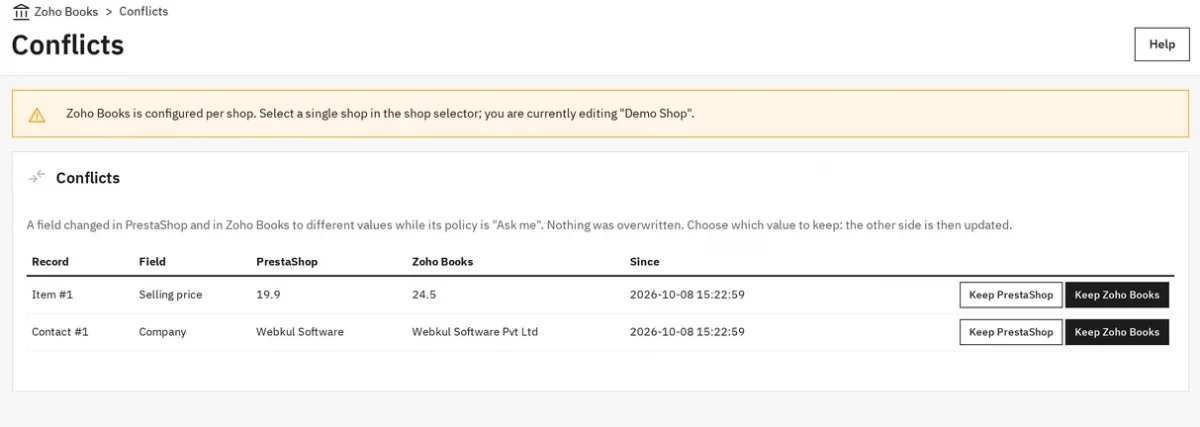
When a field policy is Ask me, a conflict waits on Sell › Zoho Books › Conflicts. Nothing is overwritten until you decide.
Press Keep PrestaShop to write the PrestaShop value to Zoho Books, or Keep Zoho Books to write the Zoho value to PrestaShop.
Support
For any kind of technical assistance or query, please raise a ticket at webkul.uvdesk.com or send us a mail at [email protected].
You can also explore our PrestaShop development services and our range of PrestaShop addons.
Current Product Version - 1.0.0
Supported Framework Version - 9.x.x, 8.x.x, 1.7.x.x

Be the first to comment.