The race to excel in this continuously evolving eCommerce domain is increasing with each passing day.
The new players are coming continuously to try their luck. But instead of luck, this business favours those who experiment with new ideas regularly.
With the same motive & to provide you with a tool that helps to establish the authenticity of your brand, we bring you the Prestashop Watermark Images module.
One of the distinctive features of a watermark is prevention against theft or unauthorized use.
These days, it’s very common practice to use the relevant images available on the web. And, many other participants of the same industry can use your image without your consent.
Hence, it becomes even more important to disseminate the information of authority over your products with the help of a watermark.
Features of the Prestashop Watermark Images
- Apply watermark on various types of images of your store.
- Upload any image of your choice to use it as a watermark.
- Enter the rotation value to rotate the watermark by a certain angle.
- Set the horizontal offset value in positive or negative to move the watermark sidewards.
- Set the vertical offset value in positive or negative to move the watermark upward & downward respectively.
- Adjust the height and width of the watermark on the image.
- Enter the opacity value to set the transparency level of the watermark.
- Choose to show the watermark at multiple positions on the image.
- Select all types of images on which you want to show the watermark.
- Either show or hide the watermark from the images to your logged-in customers.
- Apply watermark on new added images instead of all images.
- Enable or disable watermark image for specific products.
- Watermark images can be generated with CRON
Note:
- Prestashop Watermark Images module is compatible with PrestaShop multi-store feature.
- “GD” library is required to use this module.
How to install the Prestashop Watermark Images module
- Firstly, go to the module manager in back office and click on ‘upload a module’.
- After that, drag and drop the module file or select the file from the system.
- In this way, the module installation will be successful.


Module Configuration
After the successful installation of the module, a new tab ‘Watermark Image’ gets available under Catalog. From here, the admin can configure the module settings and generate watermark images.

Watermark Settings
- Upload Watermark File: Here, you can upload an image file that you want to use as a watermark image. After uploading the file, you can also have a preview of it.
- Rotation: Using this option, you can set any value between 0 to 360. It rotates the image on the set value in a clockwise direction. Suppose you enter 57, then the image will rotate to a 57-degree angle.
- Horizontal Offset: Set the value between -100 to 100 to shift the watermark image sidewards. I’ll just explain the significance of positive & negative values. In case, if you put a negative value, then the image will shift to the left side. And, with a positive value, the image will shift to the right side.
- Vertical Offset: This particular setting also work in the same manner as the horizontal offset works. Instead of shifting sideways, it either shifts the image upwards or downwards. With a positive value, the image shifts in an upward direction & with a negative value, the image shifts in a downward direction.
- Relative width of watermark: With this option you can increase or decrease the width of the watermark relative to the image size.
- Relative height of watermark: This option allows you to increase or decrease the height of the watermark relative to the image size.
- Watermark opacity: This feature allows you to set the transparency level of the watermark image.
- Position: Using this option, you can choose to show the image at the following 8 positions.
- Center
- Top
- Bottom
- Left
- Top Left
- Top Right
- Bottom Left
- Bottom Right
- Where to apply: Select the type of images on which you want to apply the watermark image.
- Hide watermark for logged-in customers: You can enable this option to hide the watermark images from your logged-in customers.

Generate Images
After configuring the settings for watermark images, you need to generate each type of image to apply the watermark.
In case, if you don’t generate the images, then the settings would create no effect on the images.
To generate the images, first select the type of images & then click on “Generate Watermark” button.

On clicking the button, you will see a progress bar showing the generation of watermark images is in process. The number alongside each image type also confirms the generation of watermark images.
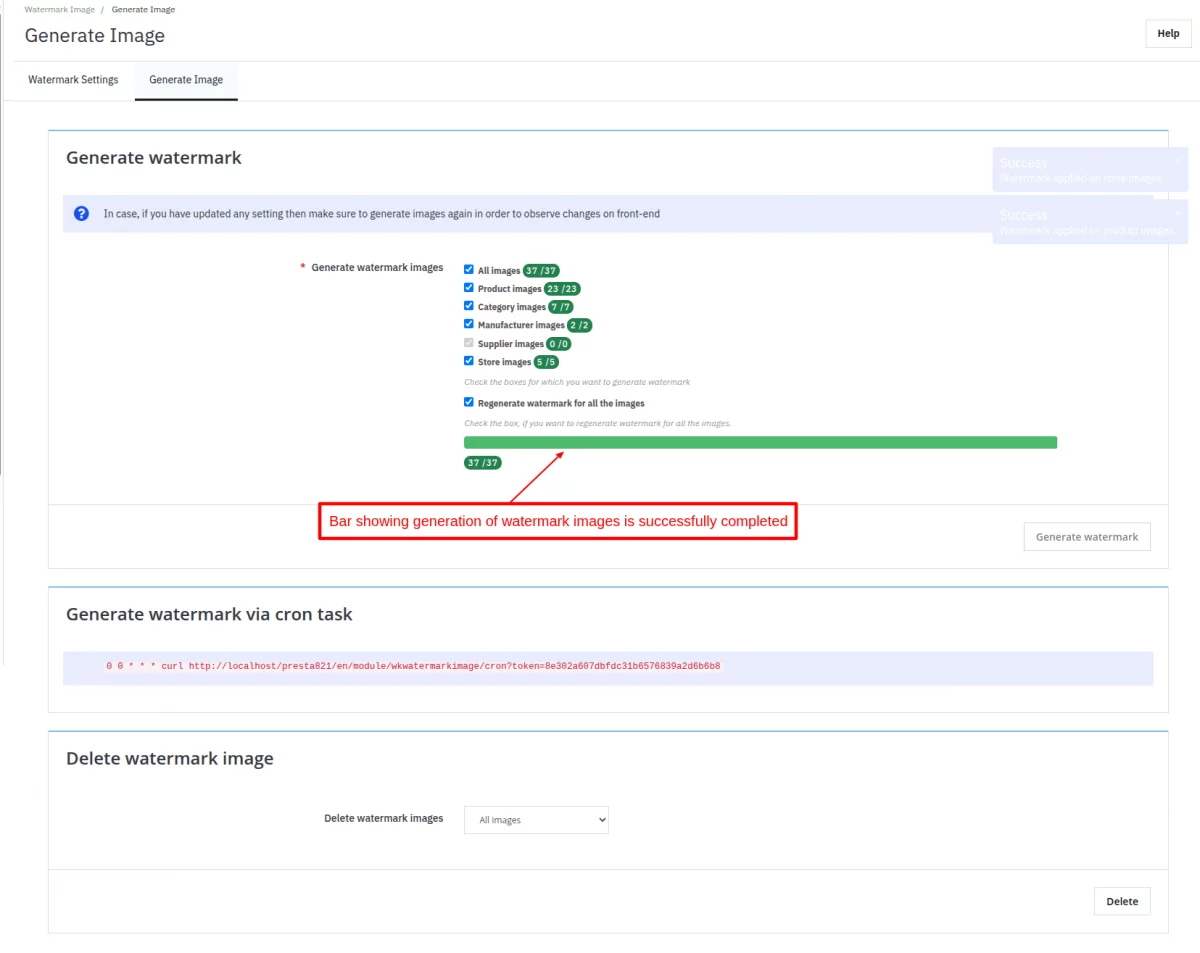
If you only want to generate watermark on new added images, then leave the “Regenerate watermark for all the images” check box unchecked.
This will only add the watermark on images which have been newly added.
Note: If you change any setting afterwards, then also generate the images again to observe the changes.
Also, Generate watermark images using CRON with your specified time in URL, set the time in the CRON URL and add this to your server CRON tab.
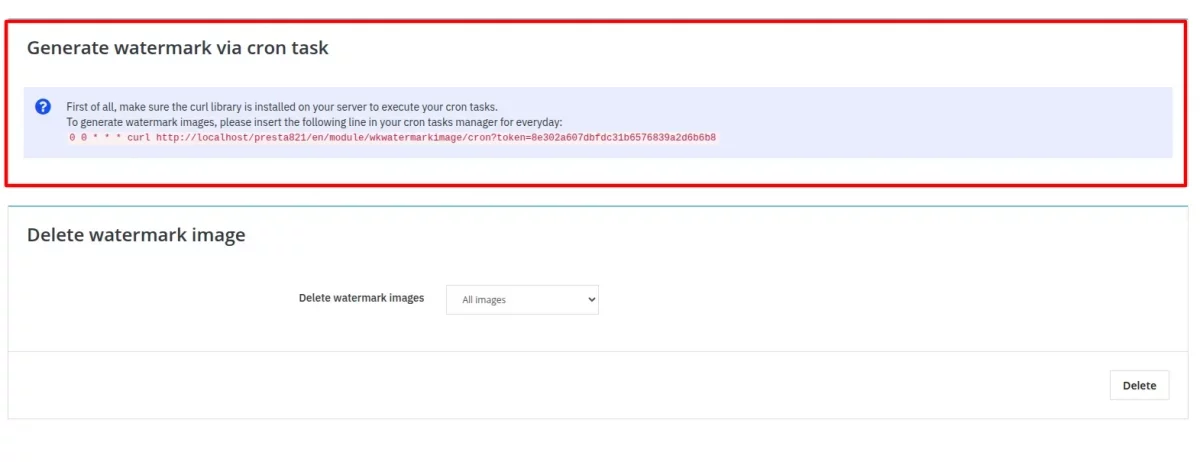
Delete Watermark Images
You can delete all the watermark images or can delete the watermark images by selecting any of these options from the drop-down:
- Product images,
- Category images,
- Manufacturer images,
- Supplier images and
- Store images

Disable Watermark Image
The admin can disable watermark for specific product from the edit product page.
Go to Catalog > Products > Edit Product > Modules.


Watermark Images – Front End View
After generating the watermark image for each image type, a customer can see watermark on each product image.

While generating the watermark image, the admin choose to generate for category image too. Hence, the watermark is also displaying on the category image.

Watermark image is applied to the product image as well as the thumbnail as shown in the below screenshot.

Support
For any kind of technical assistance or query, please raise a ticket at http://webkul.uvdesk.com or send us a mail at [email protected]
Also, please explore our PrestaShop development services & vast range of featureful PrestaShop Addons.
Current Product Version - 4.1.1
Supported Framework Version - 9.x.x, 8.x.x, 1.7.x.x

Be the first to comment.