Integrate Authorize.net Payment Gateway with your PrestaShop store and allow customers to make payment for their orders using various credit cards.
Accept payments from Visa, American Express, JCB, Mastercard, Discover, and Diners Club cards.
Create custom subscription plans and let your customers subscribe to their favourite products in a few clicks.
Easily process refunds for the orders placed via Authorize.net payment gateway right from the back office.
Features of PrestaShop Authorize.net Payment Gateway
- A secure and reliable Authorize.net payment option available for customers in store.
- Integrated Google Pay for seamless checkout experience.
- Let your customers subscribe to products using Authorize.net payment option.
- Create unlimited subscription plans.
- Assign products and combinations to the subscription plan.
- Customers can view subscription plan details on the product page and subscribe to the product.
- Customers can view a list of subscriptions and their status from their accounts.
- Allow customers to cancel their subscriptions.
- View a list of transactions done via Authorize.net under a single tab in the back office.
- Refund the full or partial order amount to the customer.
- Enable or disable the payment through HPP (Hosted Payment Page).
- Show order summary, credit card, bank account, shipping address, billing address, email, CAPTCHA, and merchant name on hosted payment page.
- Make credit card code, shipping address, billing address, and email mandatory to fill.
- Use the module in test or live mode.
- View product details in an order in the Authorize.net dashboard.
Note: Prestashop Authorize.net Payment Gateway module is compatible with PrestaShop framework version 9.x.x. and multi-store feature.
How to Install Prestashop Authorize.net Payment Gateway
- Firstly, go to the module manager in the back office and click on ‘upload a module’.
- After that, drag and drop the module file or select the file from the system.
- In this way, the module installation will be successful.


Prestashop Authorize.net Payment Gateway Configuration
General Settings
Under General Settings, the admin:
- Can choose payment mode as Test or Live.
- Needs to specify API login ID and transaction key.
- Enable or disable payment through HPP.

Payment through HPP
Enable to redirect customers to Authorize.net hosted payment page for payment.

If enabled, then the admin needs to specify the signature key. Else, the admin needs to specify both public client and signature keys.
How to Get the Keys
To obtain the credentials, you need to create a sandbox account on https://developer.authorize.net/
Click on Get Started under Hello World tab.

Now click on Create Sandbox Account button.

Fill the form to create your sandbox account.

Now, specify the username and password to login.

To obtain the keys, click on API Credentials & Keys under Account tab.


Google Pay
Google Pay payment method is offered by Authorize.net and it supports recurring payments.
Under Google Pay, the admin:
- Can enable or disable Google Pay payment method for customers.
- Need to specify Google Pay merchant ID & name and payment gateway ID.
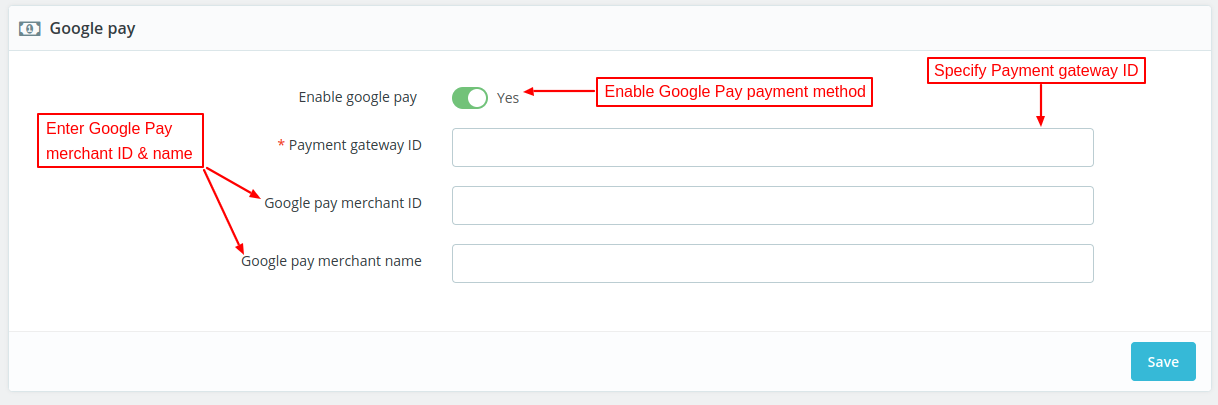
Please note that if you are using the module in test mode, then it is not mandatory to fill Google Pay merchant ID.
But, in case of live mode, you need to enter the Google Pay merchant ID.
How to Get Google Pay Credentials
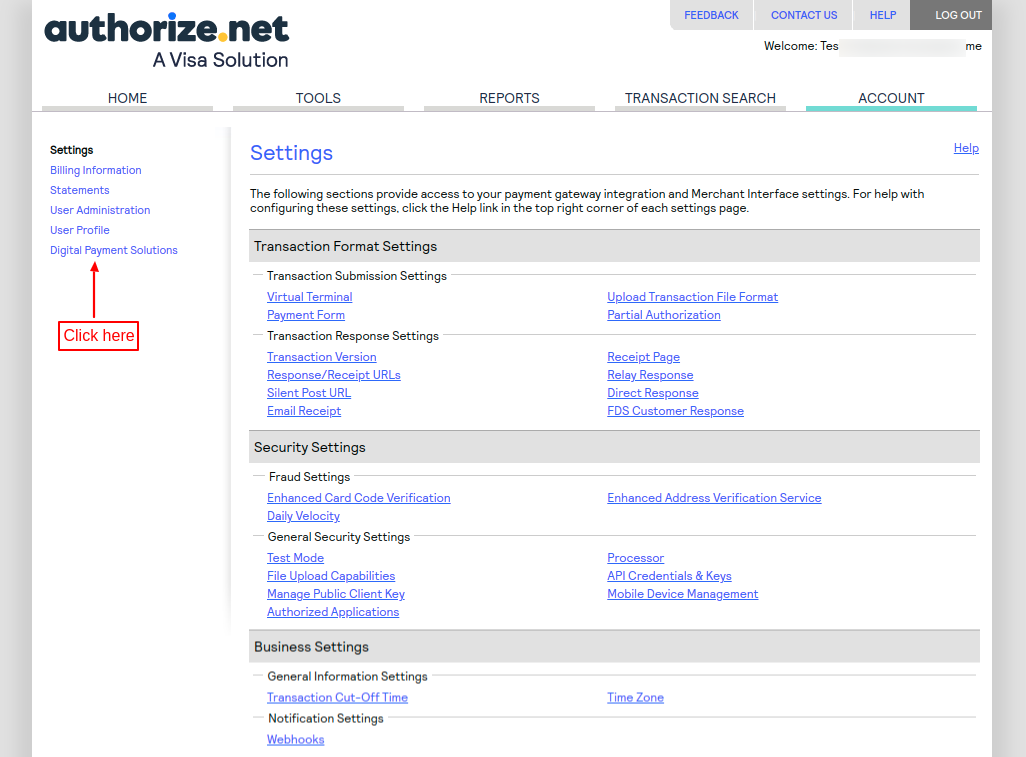
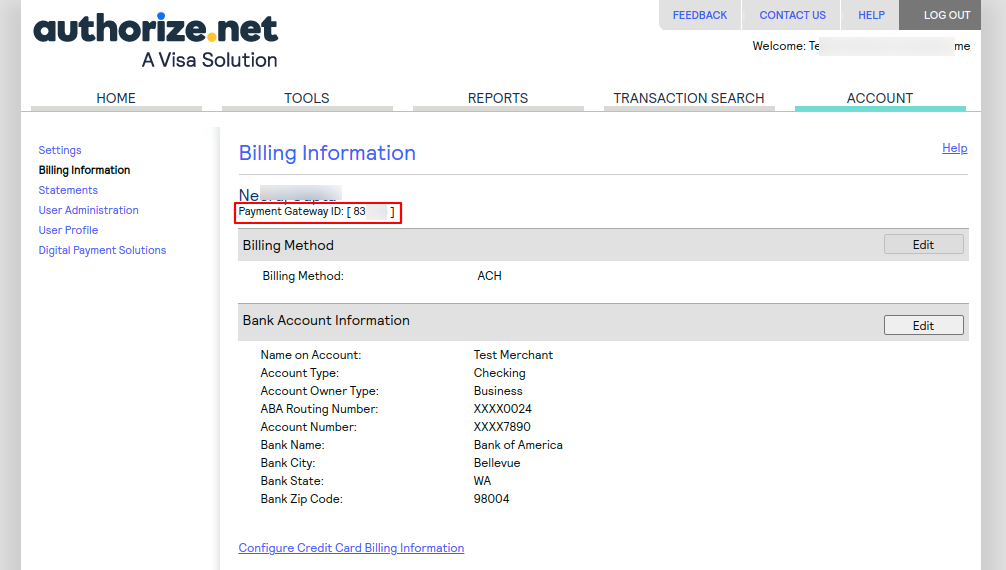
In order to get Google Pay merchant ID and payment gateway ID, the admin needs to log in to his Authorize.net account.

Once logged in, click on Account section.

Under Account section, click on ‘Digital Payment Solutions’.
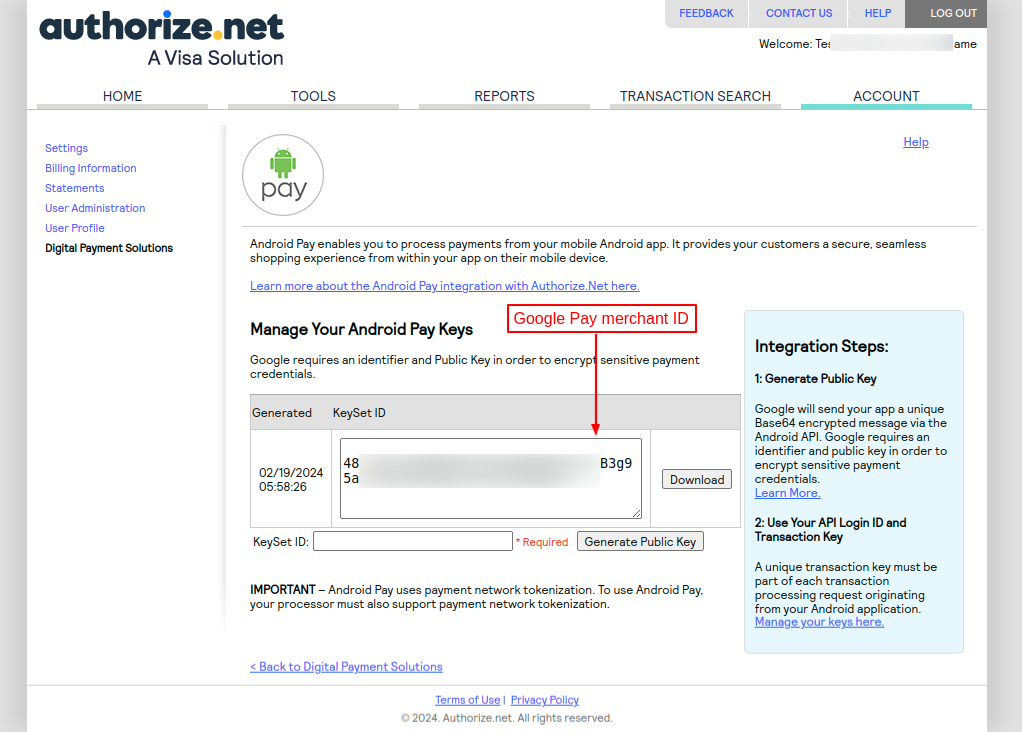
While creating an account on Authorize.net, the admin needs to sign up Android Pay. Once done, click on ‘enabled’ button to view Google Pay merchant ID.

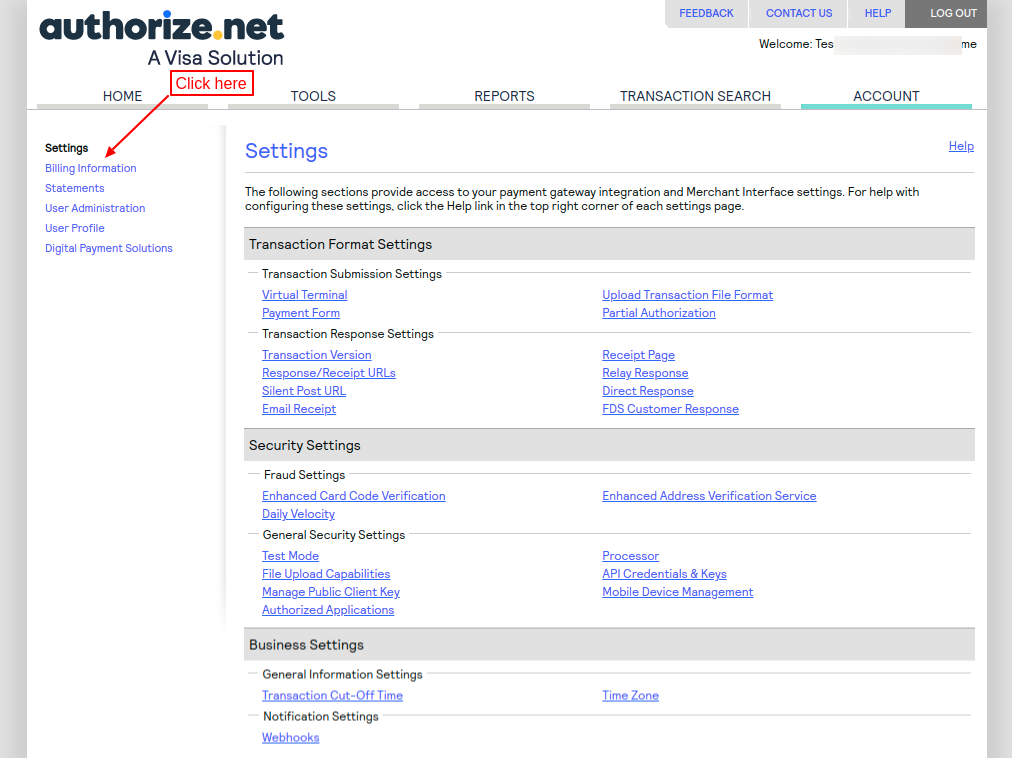
The admin can view payment gateway ID under “Billing Information” tab.
Customer End Flow
Once the admin has successfully configured the general settings, a new “Authorize.net payment method” gets available for customers on the checkout page.
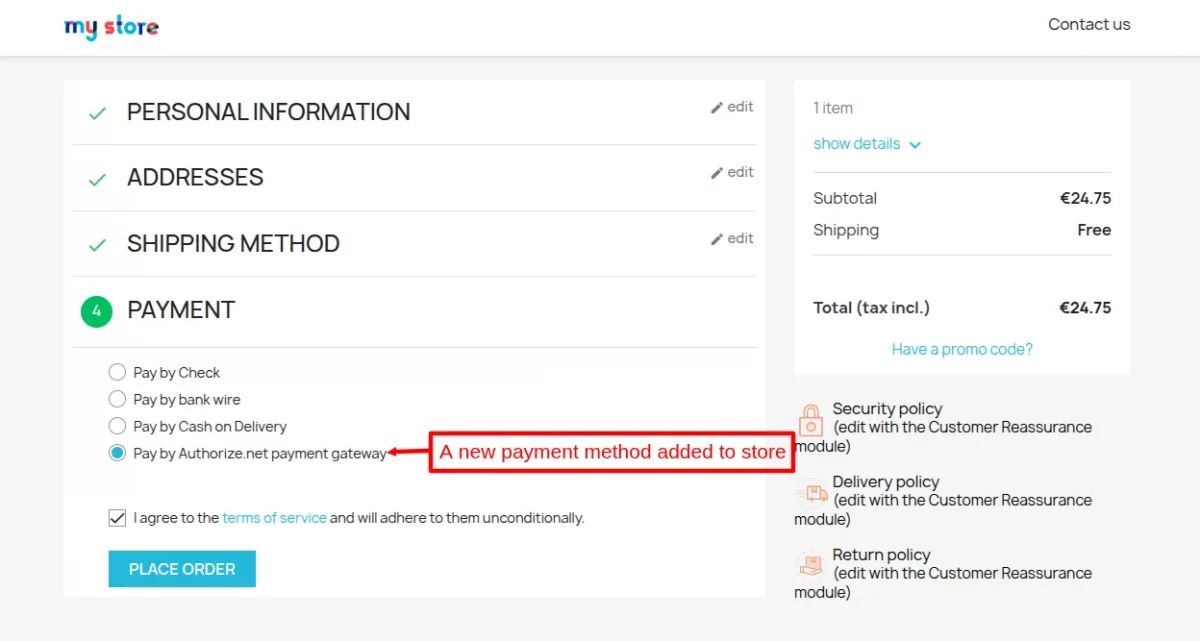
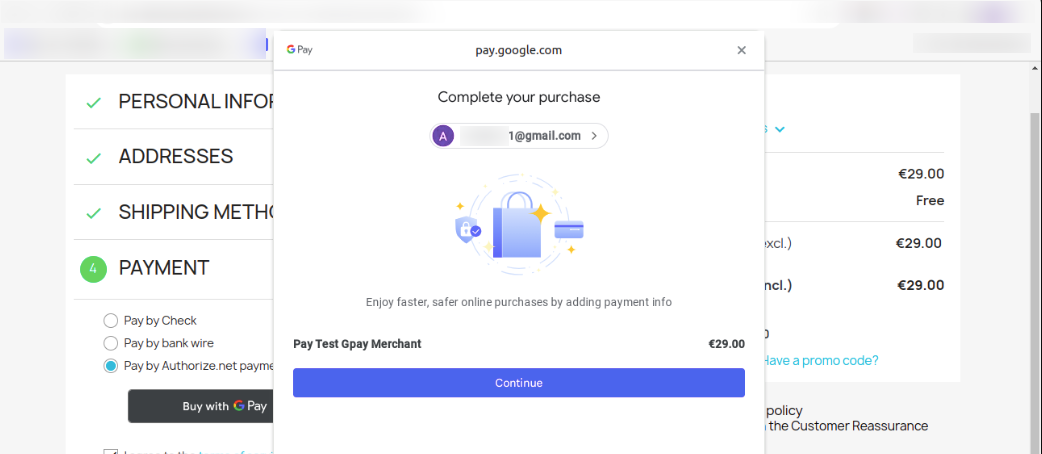
After selecting Authorize.net payment method, when a customer clicks on place order button, a popup appears on the checkout page.

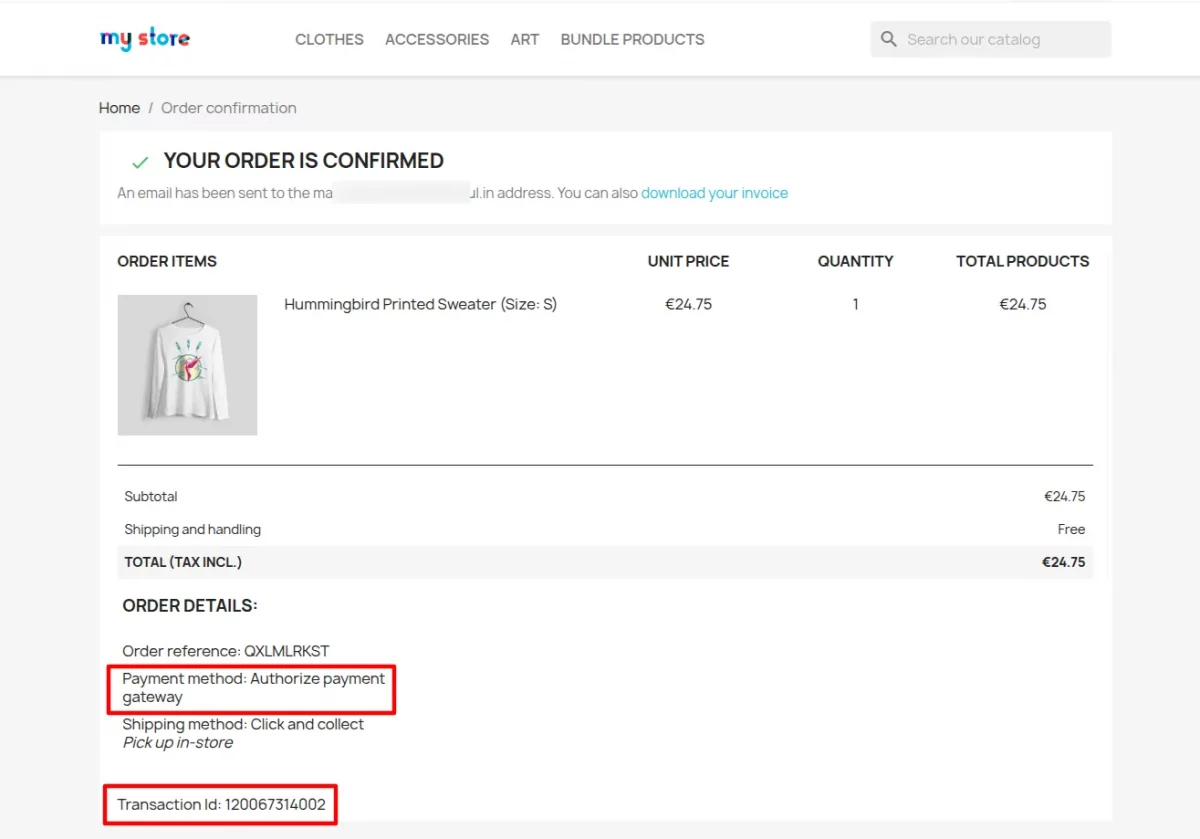
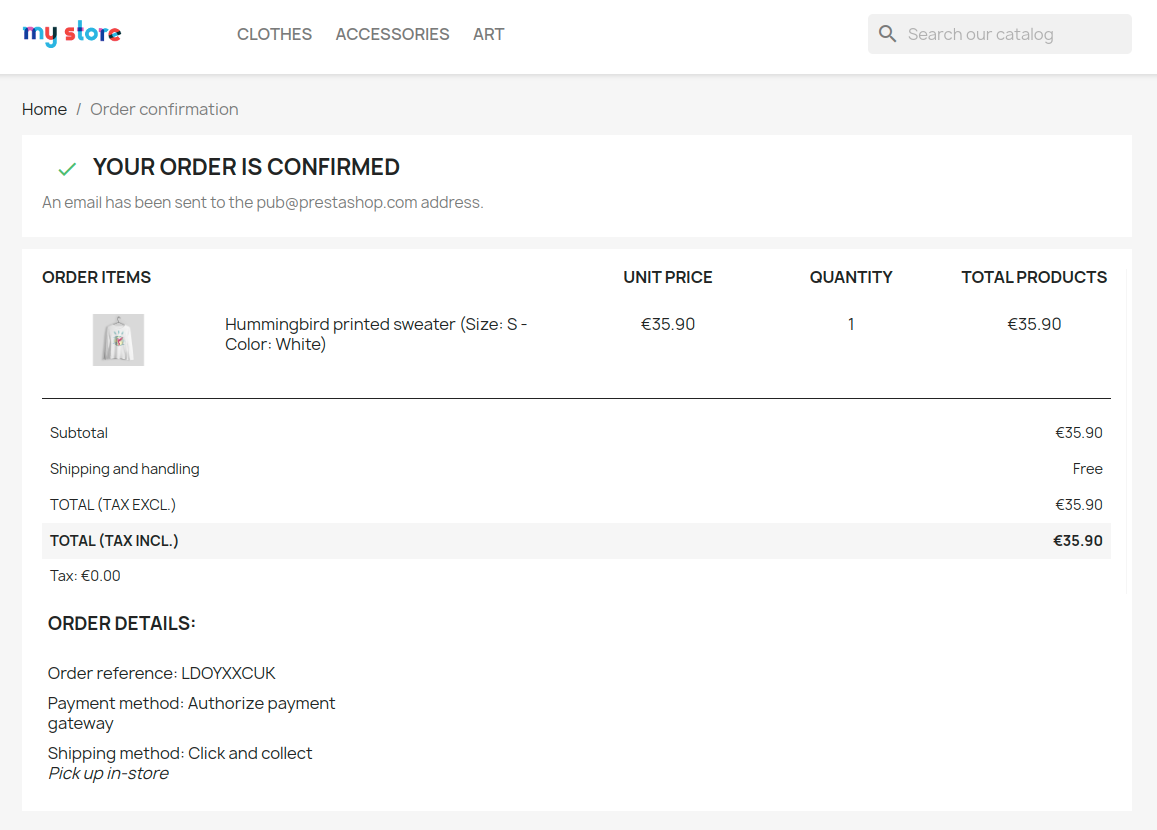
After placing an order, the payment method name will display on the order confirmation page.
Customers can make payments for their orders in currencies selected by the merchants in their authorize.net account.
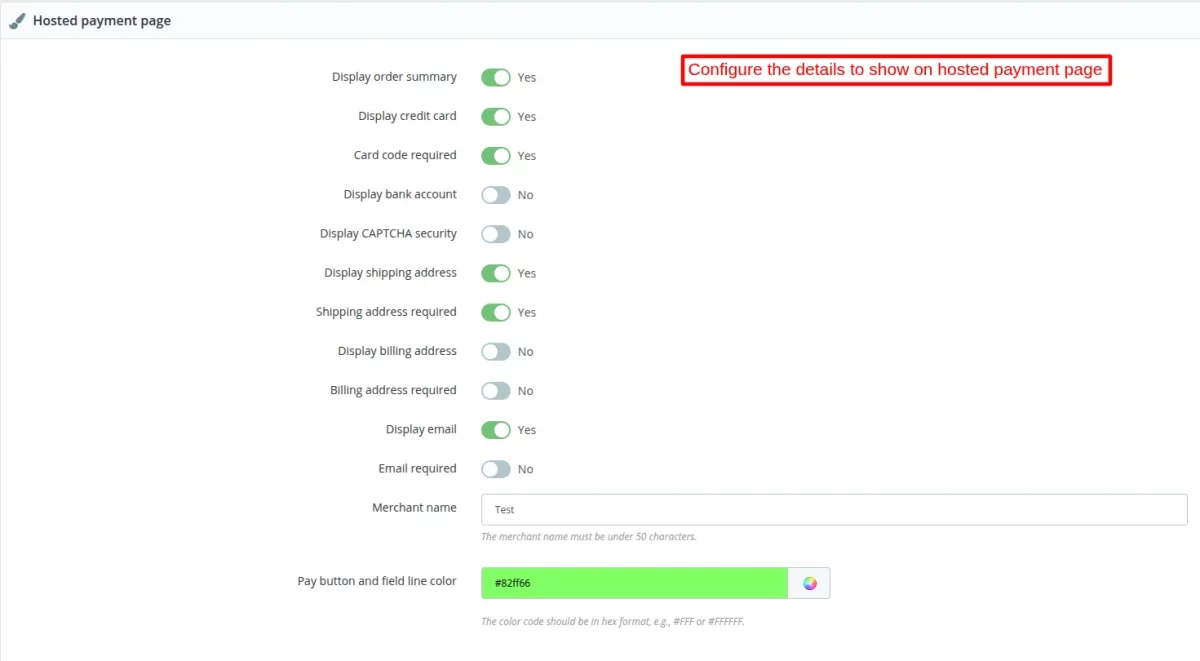
Hosted Payment Page Settings
These settings lets admin configure the details that he wants to show on the Authorize.net hosted payment page.
Under Hosted Payment Page, the admin can:
- Choose to show order summary, credit card, bank account, shipping address, billing address, email, and merchant name on hosted payment page.
- make card code, shipping address, billing address, and email mandatory to fill.
- Choose to show CAPTCHA on hosted payment page.
- Set the color of pay button and field line.
If payment through HPP is enabled
If this option is enabled by the admin under general settings, then the customers will be redirected to the Authorize.net hosted payment page to complete the payment.
Details configured by the admin will displayed on the hosted payment page as shown in the below screenshot.
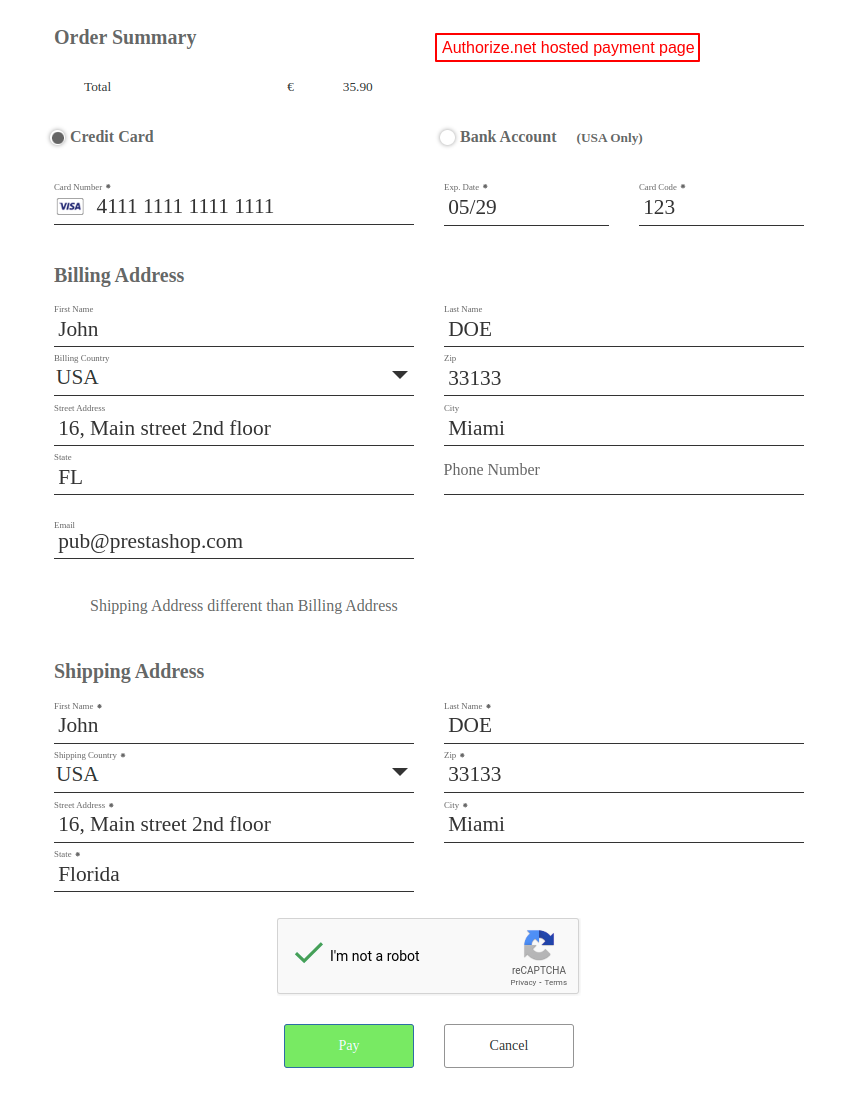
After making payment, the customer can view order total, billing address, transaction ID, etc.

On clicking the continue button, the customer gets redirected to the PrestaShop store.
Payment via Google Pay
PrestaShop Authorize.net Payment Gateway module supports Google Pay.
When enabled by admin from the back office, Google Pay payment method gets available for customers during checkout.
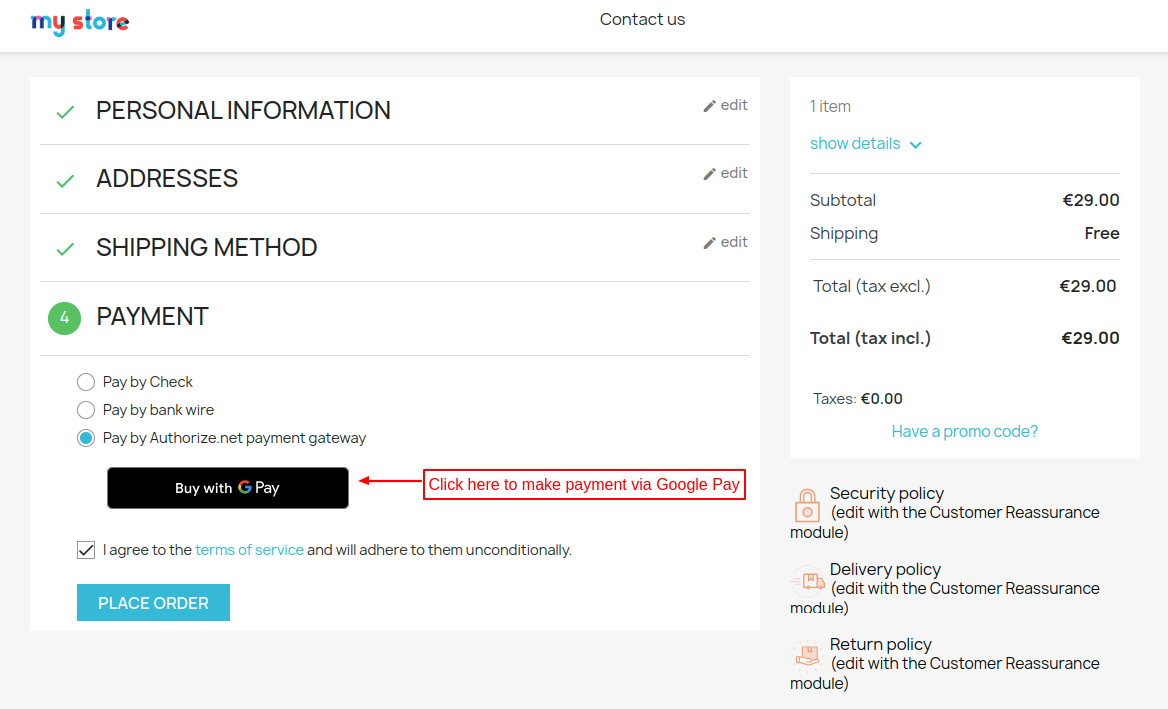
On clicking the “Buy with GPay” button, a popup appears on the page from where the customer can log in to his Google account and proceed with the payment.
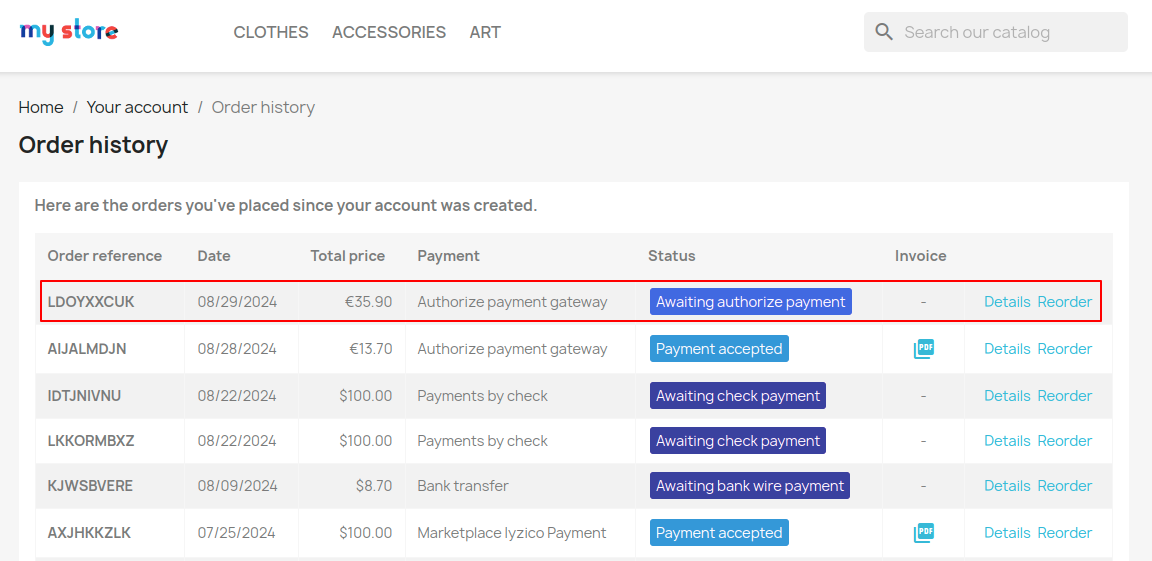
After the installation of the module, a new order status “Awaiting authorize payment” gets added by default in the back office.
If a customer has made the payment for an order on Authorize.net hosted payment page. Then, the status of an order will be “Awaiting authorize payment” as shown in the below screenshot.
Notifications

For getting the notification, you need to add the URL in your authorize.net merchant account. Go to account -> Business Settings -> Webhooks -> Add Endpoint.
If payment through HPP is disabled and a customer purchase subscription, then a notification is received on URL.
If payment through HPP is enabled and customer has ordered a normal product, then also a notification is received on URL


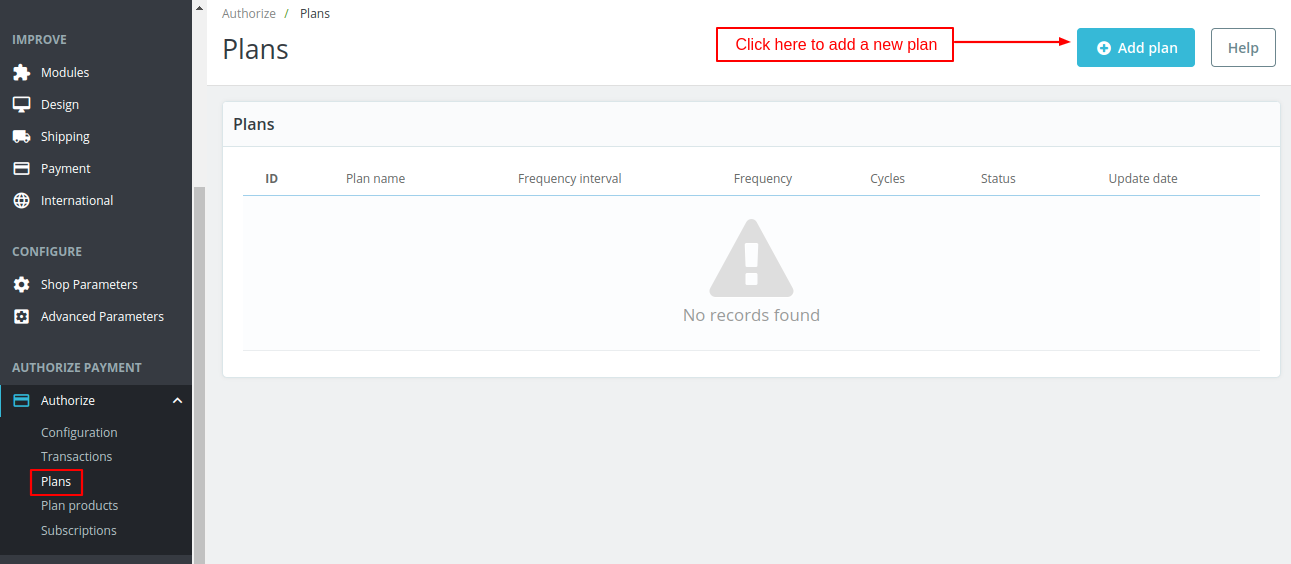
Create Subscription Plans
To create a new subscription plan, click on the “Add Plan” button.
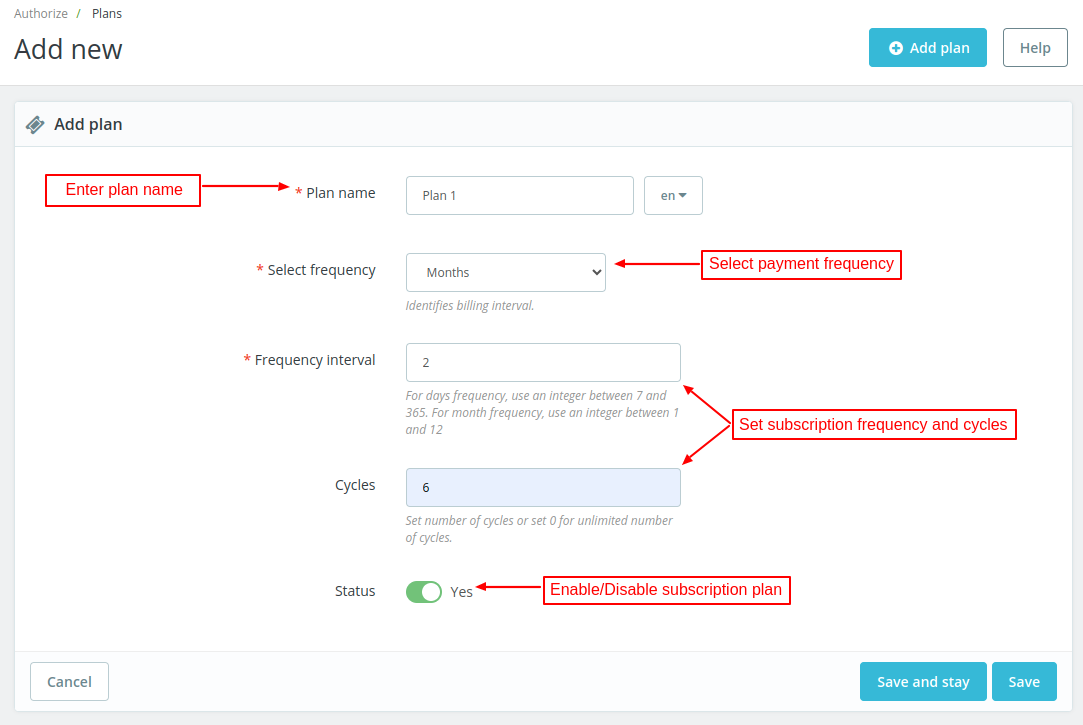
On clicking the Add plan button, a form appears with following options:
- Plan name – Specify the name of the subscription plan.
- Select frequency – Select frequency of the delivery cycle in days or months.
- Frequency interval – Enter the interval between two payments.
- Cycles – Specify the number of payment cycles for which the subscription plan will be active.
Suppose you have selected frequency as months and set frequency interval and cycles as 2 and 6. Now, if a customer subscribes to a product, then payment will deduct every 2 months for 1 year.
Once added, the admin can view it under plans tab.

Plan Products
Once the admin has added a plan, he can assign products to plan from ‘Plan products’ tab.
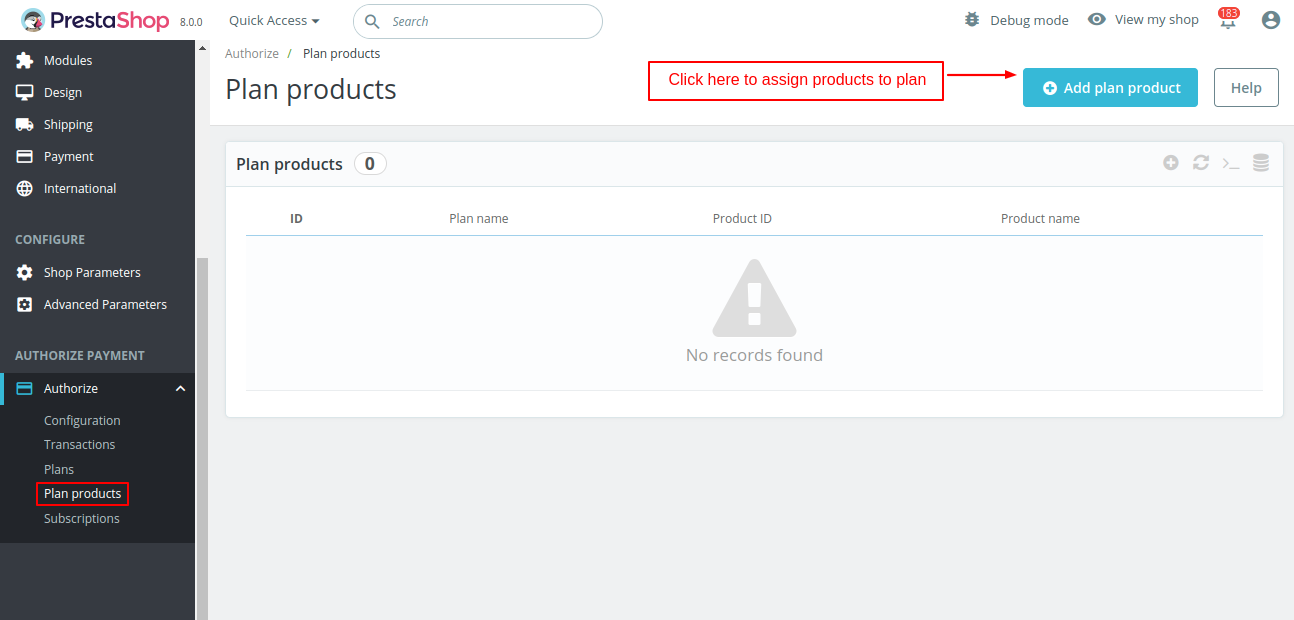
On clicking the add plan product button, a form appears on the page with following options:
- Select plan: Select the subscription plan here.
- Choose product: Choose the product to which you want to assign the subscription plan.
- Select combinations: You can select the combinations of a product on which the plan will be active. You can choose to assign the subcription plan to specific combinations or all the combinations at once.

Once assigned, the admin can view a list of products under the plan products tab.

Customer End Flow
The customer can view the subscription details on the product page.
Please note that the subscription option will only display if “Payment through HPP” is disabled.

After selecting the subscribe option when the customer adds a product to the cart, he can view label indicating the subscription product on the cart page.

The checkout process for purchasing product subscription will be same as the standard product.
Customer Account
After the installation of the module, a new tab “My Authorize Subscription” gets available under in customer’s account.

From this tab, the customers can view a list of products subscribed using Authorize.net payment method and track the status of subscriptions. Also, the customers can cancel the subscription.
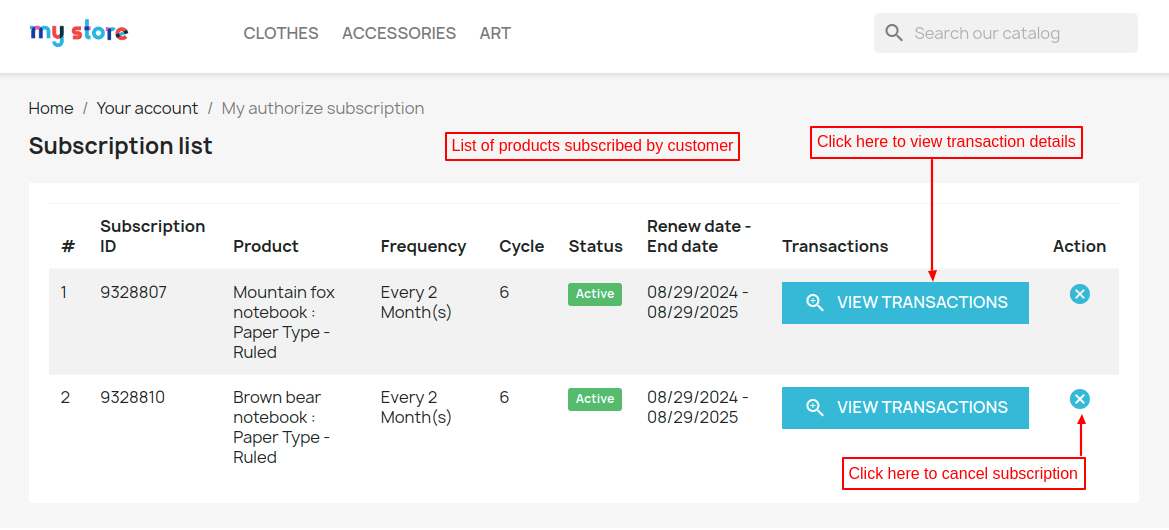
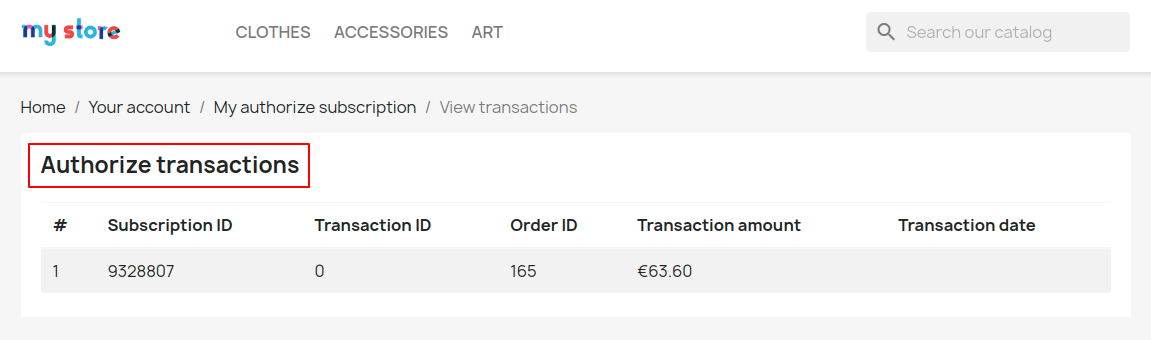
Click on ‘View Transactions’ button to view the transaction details of subscription.
Admin can view a list of all the subscriptions under “Subscriptions” tab in the back office.

Authorize.net Transactions
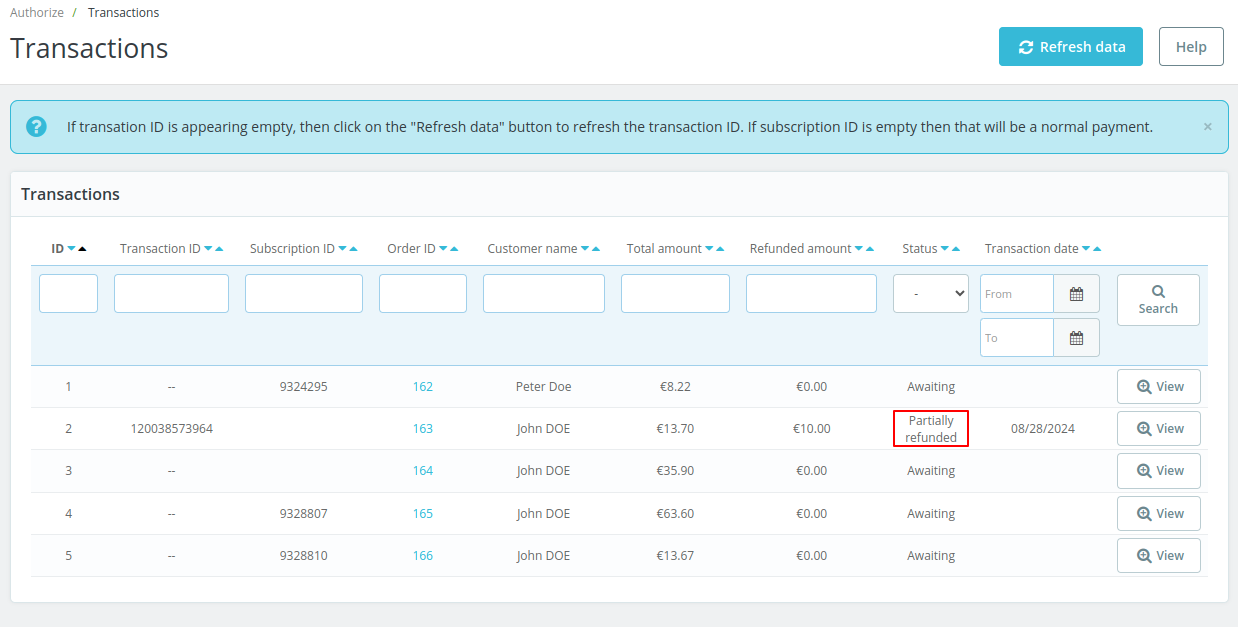
View a list of all the transactions done via Authorize.net payment gateway under the transactions tab.
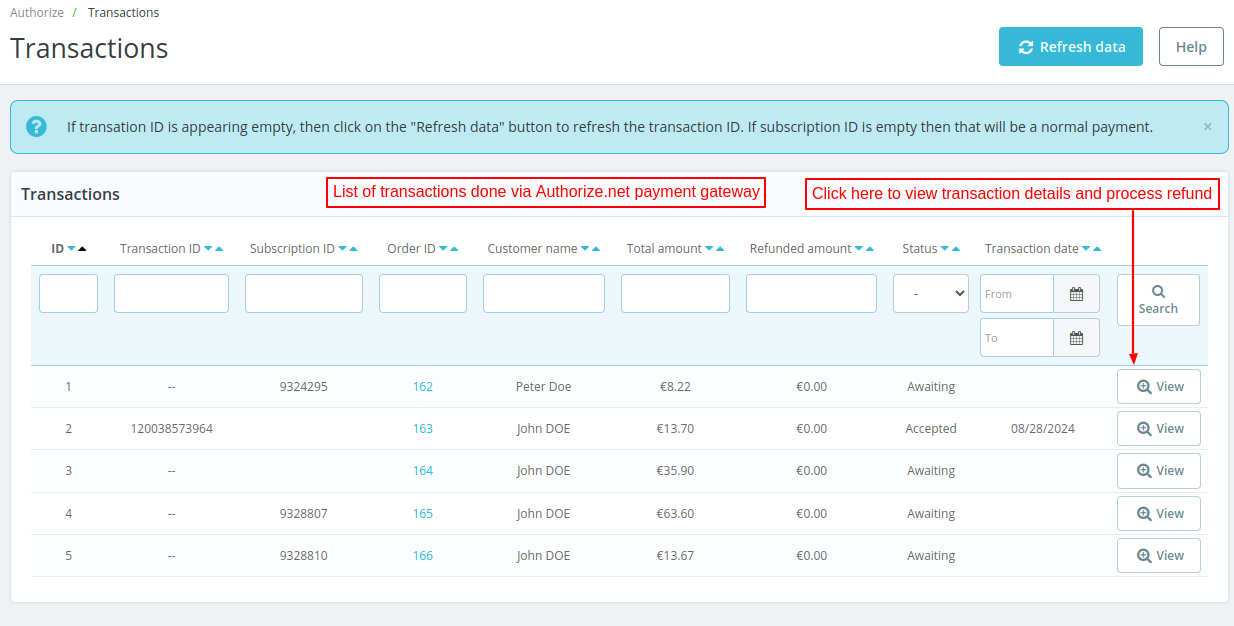
In the above screenshot, it can be seen that transaction ID for some of the transactions are missing.
This is because the payment for an order has been done on the authorize.net hosted payment page.
If transation ID is empty, then click on the “Refresh data” button to refresh the transaction ID.
If subscription ID is empty then it means that the transaction is done for a normal product and not for subscription one.
And, if the transaction ID is empty and subscription ID is mentioned, then this means that the card or payment details has been authorized but the transaction is not done yet.
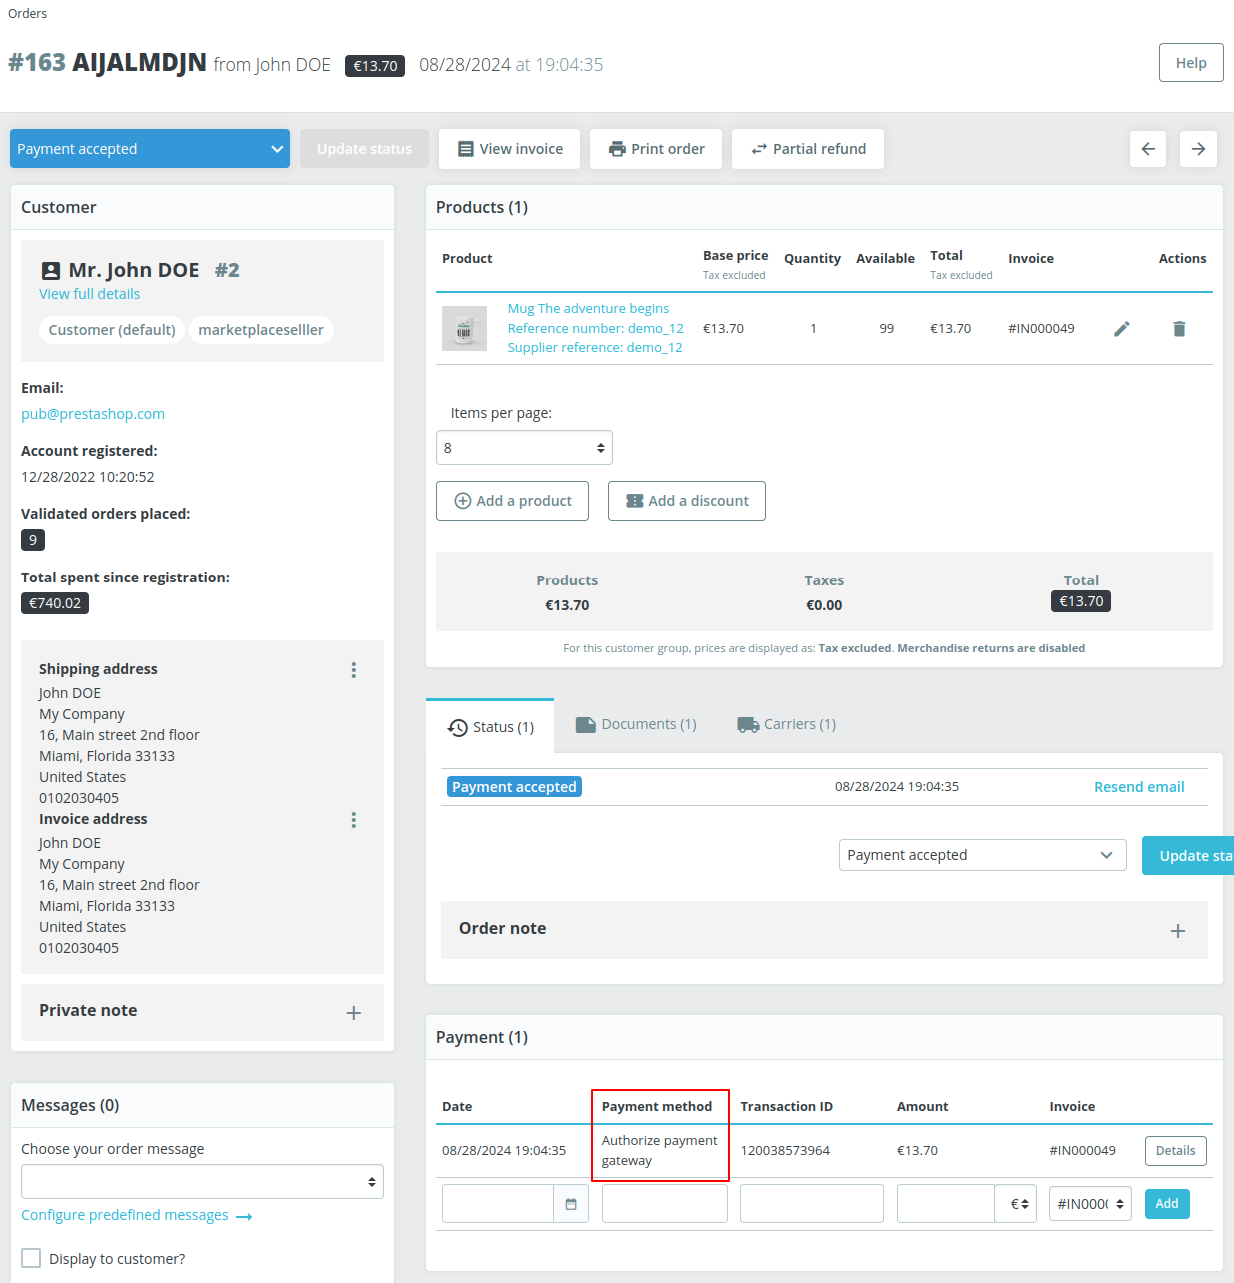
On clicking the order ID, the customer gets redirected to the order details page and view the payment method used for placing order.
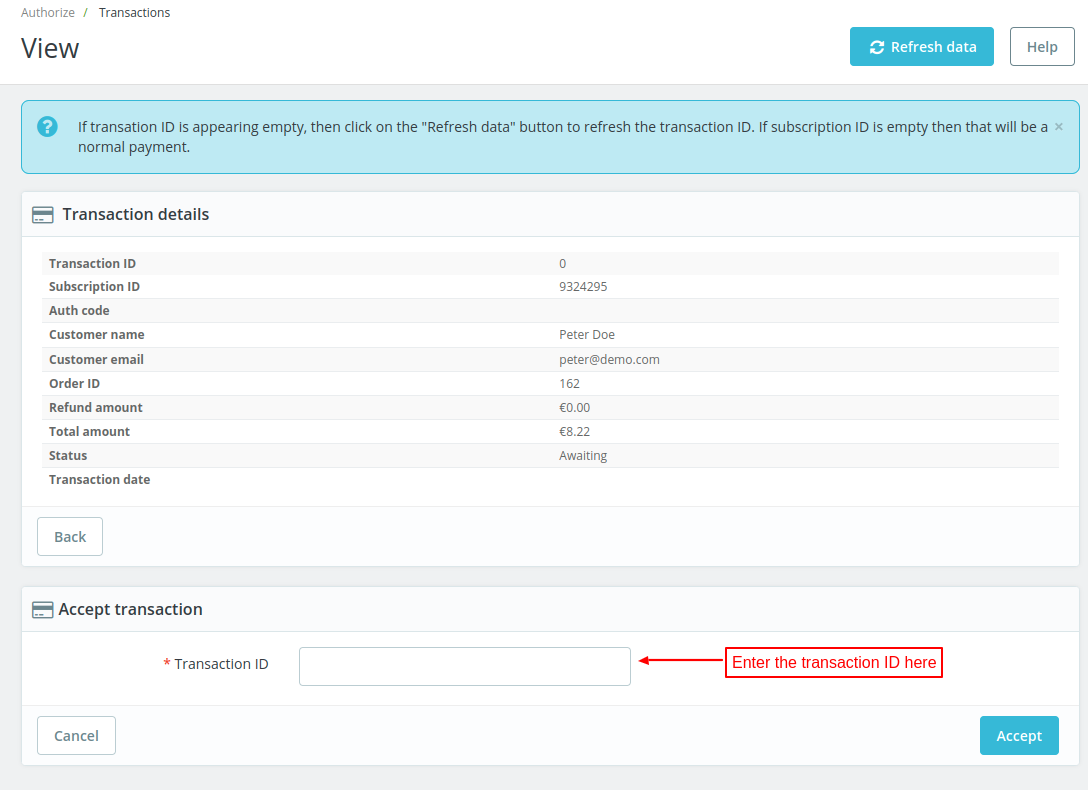
The admin can see the transaction details by clicking on the ‘View’ button. Some of the transactions are ‘Awaiting’ state. The admin can change the status to ‘Accepted’ by entering the transaction ID.
Refund Process
PrestaShop Authorize.net Payment Gateway extension allows you to refund the order amount. You can choose to refund the full or partial amount to the customer.


Once refunded, the status will update under the transactions tab.
This was all about PrestaShop Authorize.net Payment Gateway module.
I hope this document will help you in checking the functionality of the module in a better way. Also, do let us know about your views in the comments.
Support
For any kind of technical assistance or query, please raise a ticket or send us a mail at [email protected]
Also, please explore our Prestashop development services and vast range of quality Prestashop addons.
Current Product Version - 2.1.0
Supported Framework Version - 9.x.x, 8.x.x, 1.7.x.x

2 comments
Greetings of the day!
I have created a ticket related to your query. Our support team will connect you soon to assist you. Also, you can view your ticket from 440533.
Thanks & Regards
Ritika Singh