Introduction
Odoo MCP Server Integration enables Odoo to communicate with MCP-compatible AI applications through the Model Context Protocol (MCP).
It allows AI clients such as ChatGPT, Claude, Gemini, and other compatible applications to securely access Odoo data and capabilities.
The module supports Odoo as a Self MCP Server, allowing AI clients to connect directly to Odoo through its MCP endpoint.
It can also connect Odoo to an externally deployed MCP Server, giving users flexibility to use the server that best suits their requirements.
The integration supports OAuth-based authentication, User API Keys, model access control, and CRUD permissions.
It also provides request monitoring to help manage MCP access while maintaining Odoo’s security controls.
It also provides health and documentation endpoints that allow users and external systems to check the MCP server status and access API information.
Features
- Use Odoo MCP Server Integration as a Self MCP Server with a generated MCP endpoint.
- Connect supported AI clients through Instant Connect and OAuth.
- Generate user-specific API keys for Bearer Token authentication.
- Restrict Read, Create, Update, and Delete operations through MCP.
- Configure request limits, timeouts, global restrictions, and log retention.
- Use Odoo MCP Server Integration to connect Odoo with a compatible external MCP Server.
- Configure an AI provider and use the chatbot in Odoo Discuss.
- Review MCP activity, request status, and operation details.
- Monitor MCP server activity through the Analytics Dashboard.
- Check MCP server health through the /mcp/health endpoint.
- Access MCP API and endpoint documentation through the /mcp/docs endpoint.
Installation
- Once you purchase the App from Webkul store, you will receive a link to download module’s zip file.
- Extract the file on your system after download finishes. As a result, you will be able to see a folder named- ‘odoo_mcp_server’
- Copy and paste this folder inside your Odoo Add-Ons path.
- Now, open Odoo App and click on the Settings menu. Here, click on Activate Developer Mode.
- Then, open Apps menu and click on ‘Update Modules List.’
- In the search bar, remove all the filters and search ‘‘odoo_mcp_server’’
- You will be able to see module in the search results. Click on ‘Install’ to install it.
Note: An optional External MCP Server Deployment, provided by us, is also available if you prefer to host the MCP Server externally.
Workflow
The Odoo MCP Server Integration workflow covers server configuration, secure authentication, access control, AI client connections, and request monitoring.
1. Self MCP Server Configuration
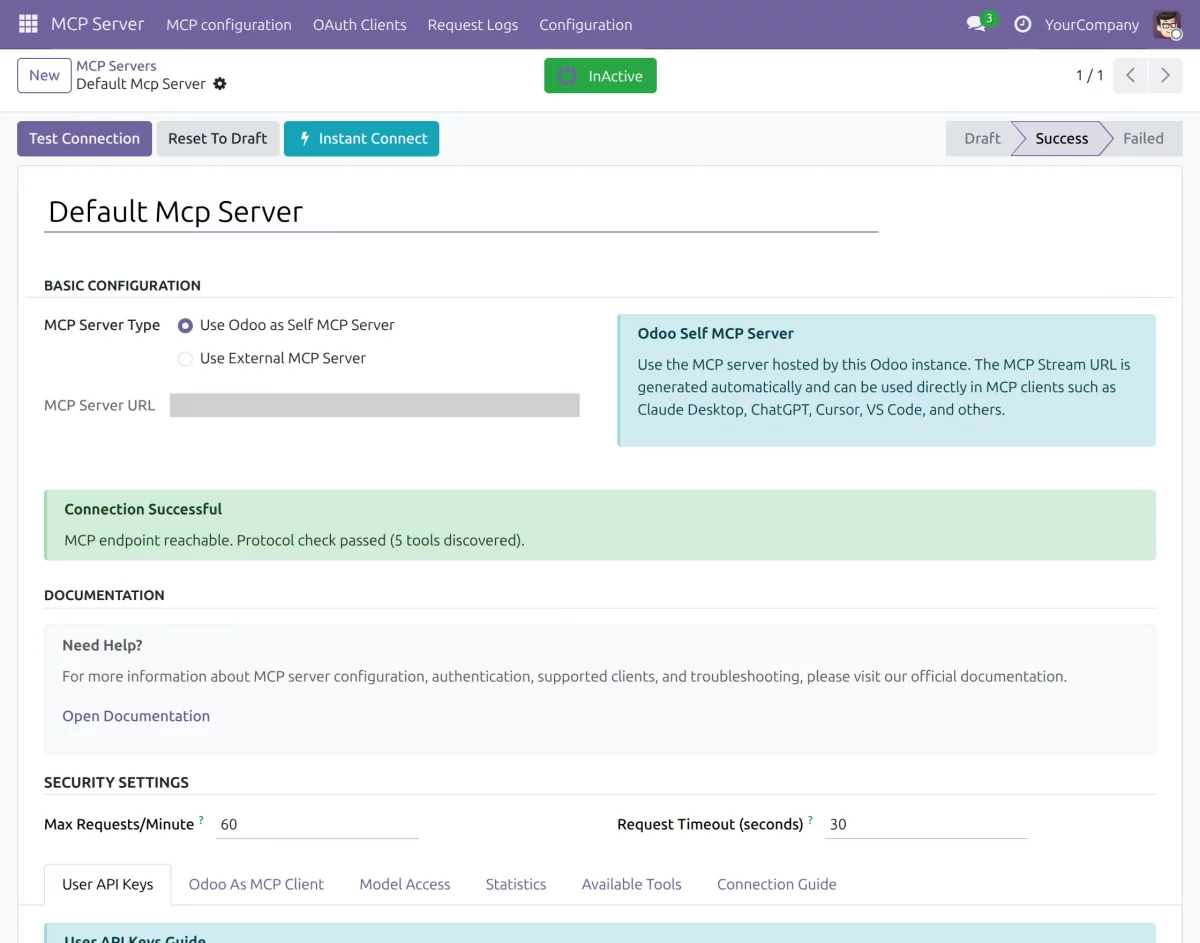
Go to MCP Server → MCP Server Configuration and click New.
Enter the configuration name and select Use Odoo as Self MCP Server. Odoo automatically generates the MCP Server URL.
Under Security Settings, configure Max Requests/Minute and Request Timeout (seconds).
Save the configuration and click Test Connection to verify that the MCP endpoint is reachable.
2. Model Access Control
Open the configured Self MCP Server and go to Model Access.
Add the required Odoo model and configure the operations that MCP users can perform.
You can restrict Read, Create, Update, or Delete access for the selected model. These restrictions work in addition to the authenticated user’s existing Odoo permissions.
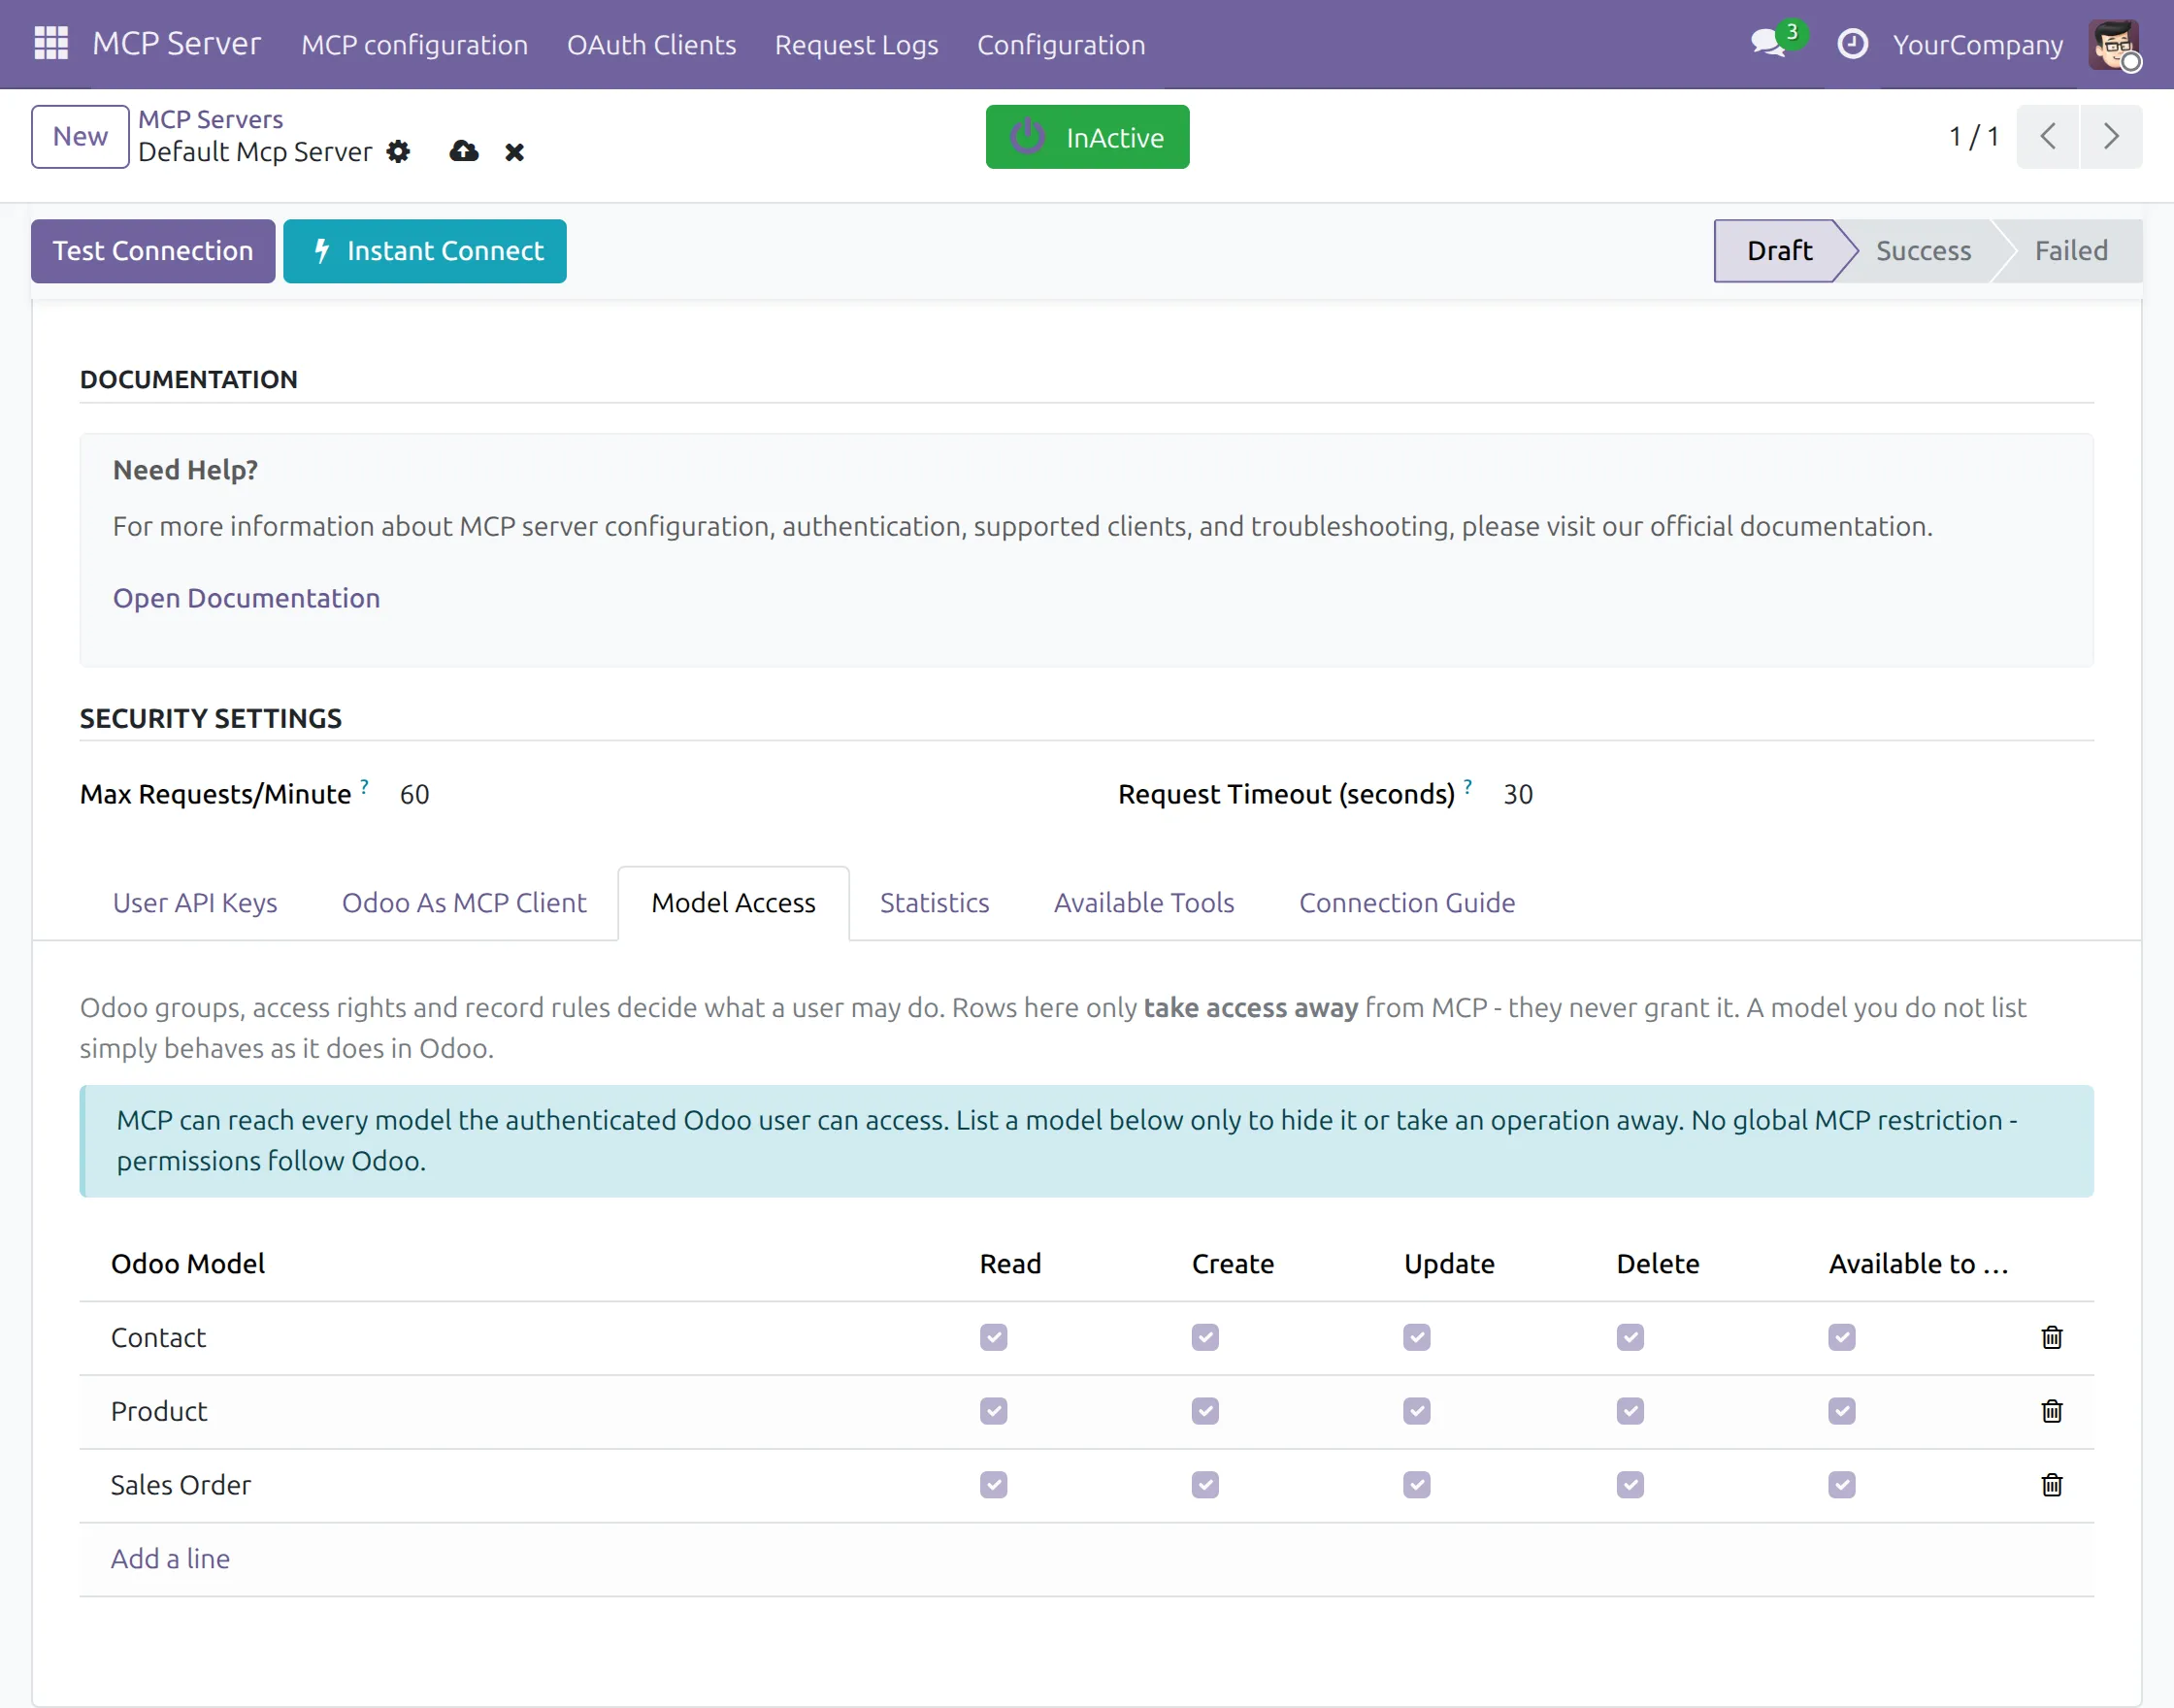
MCP restrictions do not grant permissions to users who do not already have the required Odoo access rights.
3. Global MCP Security and Log Retention
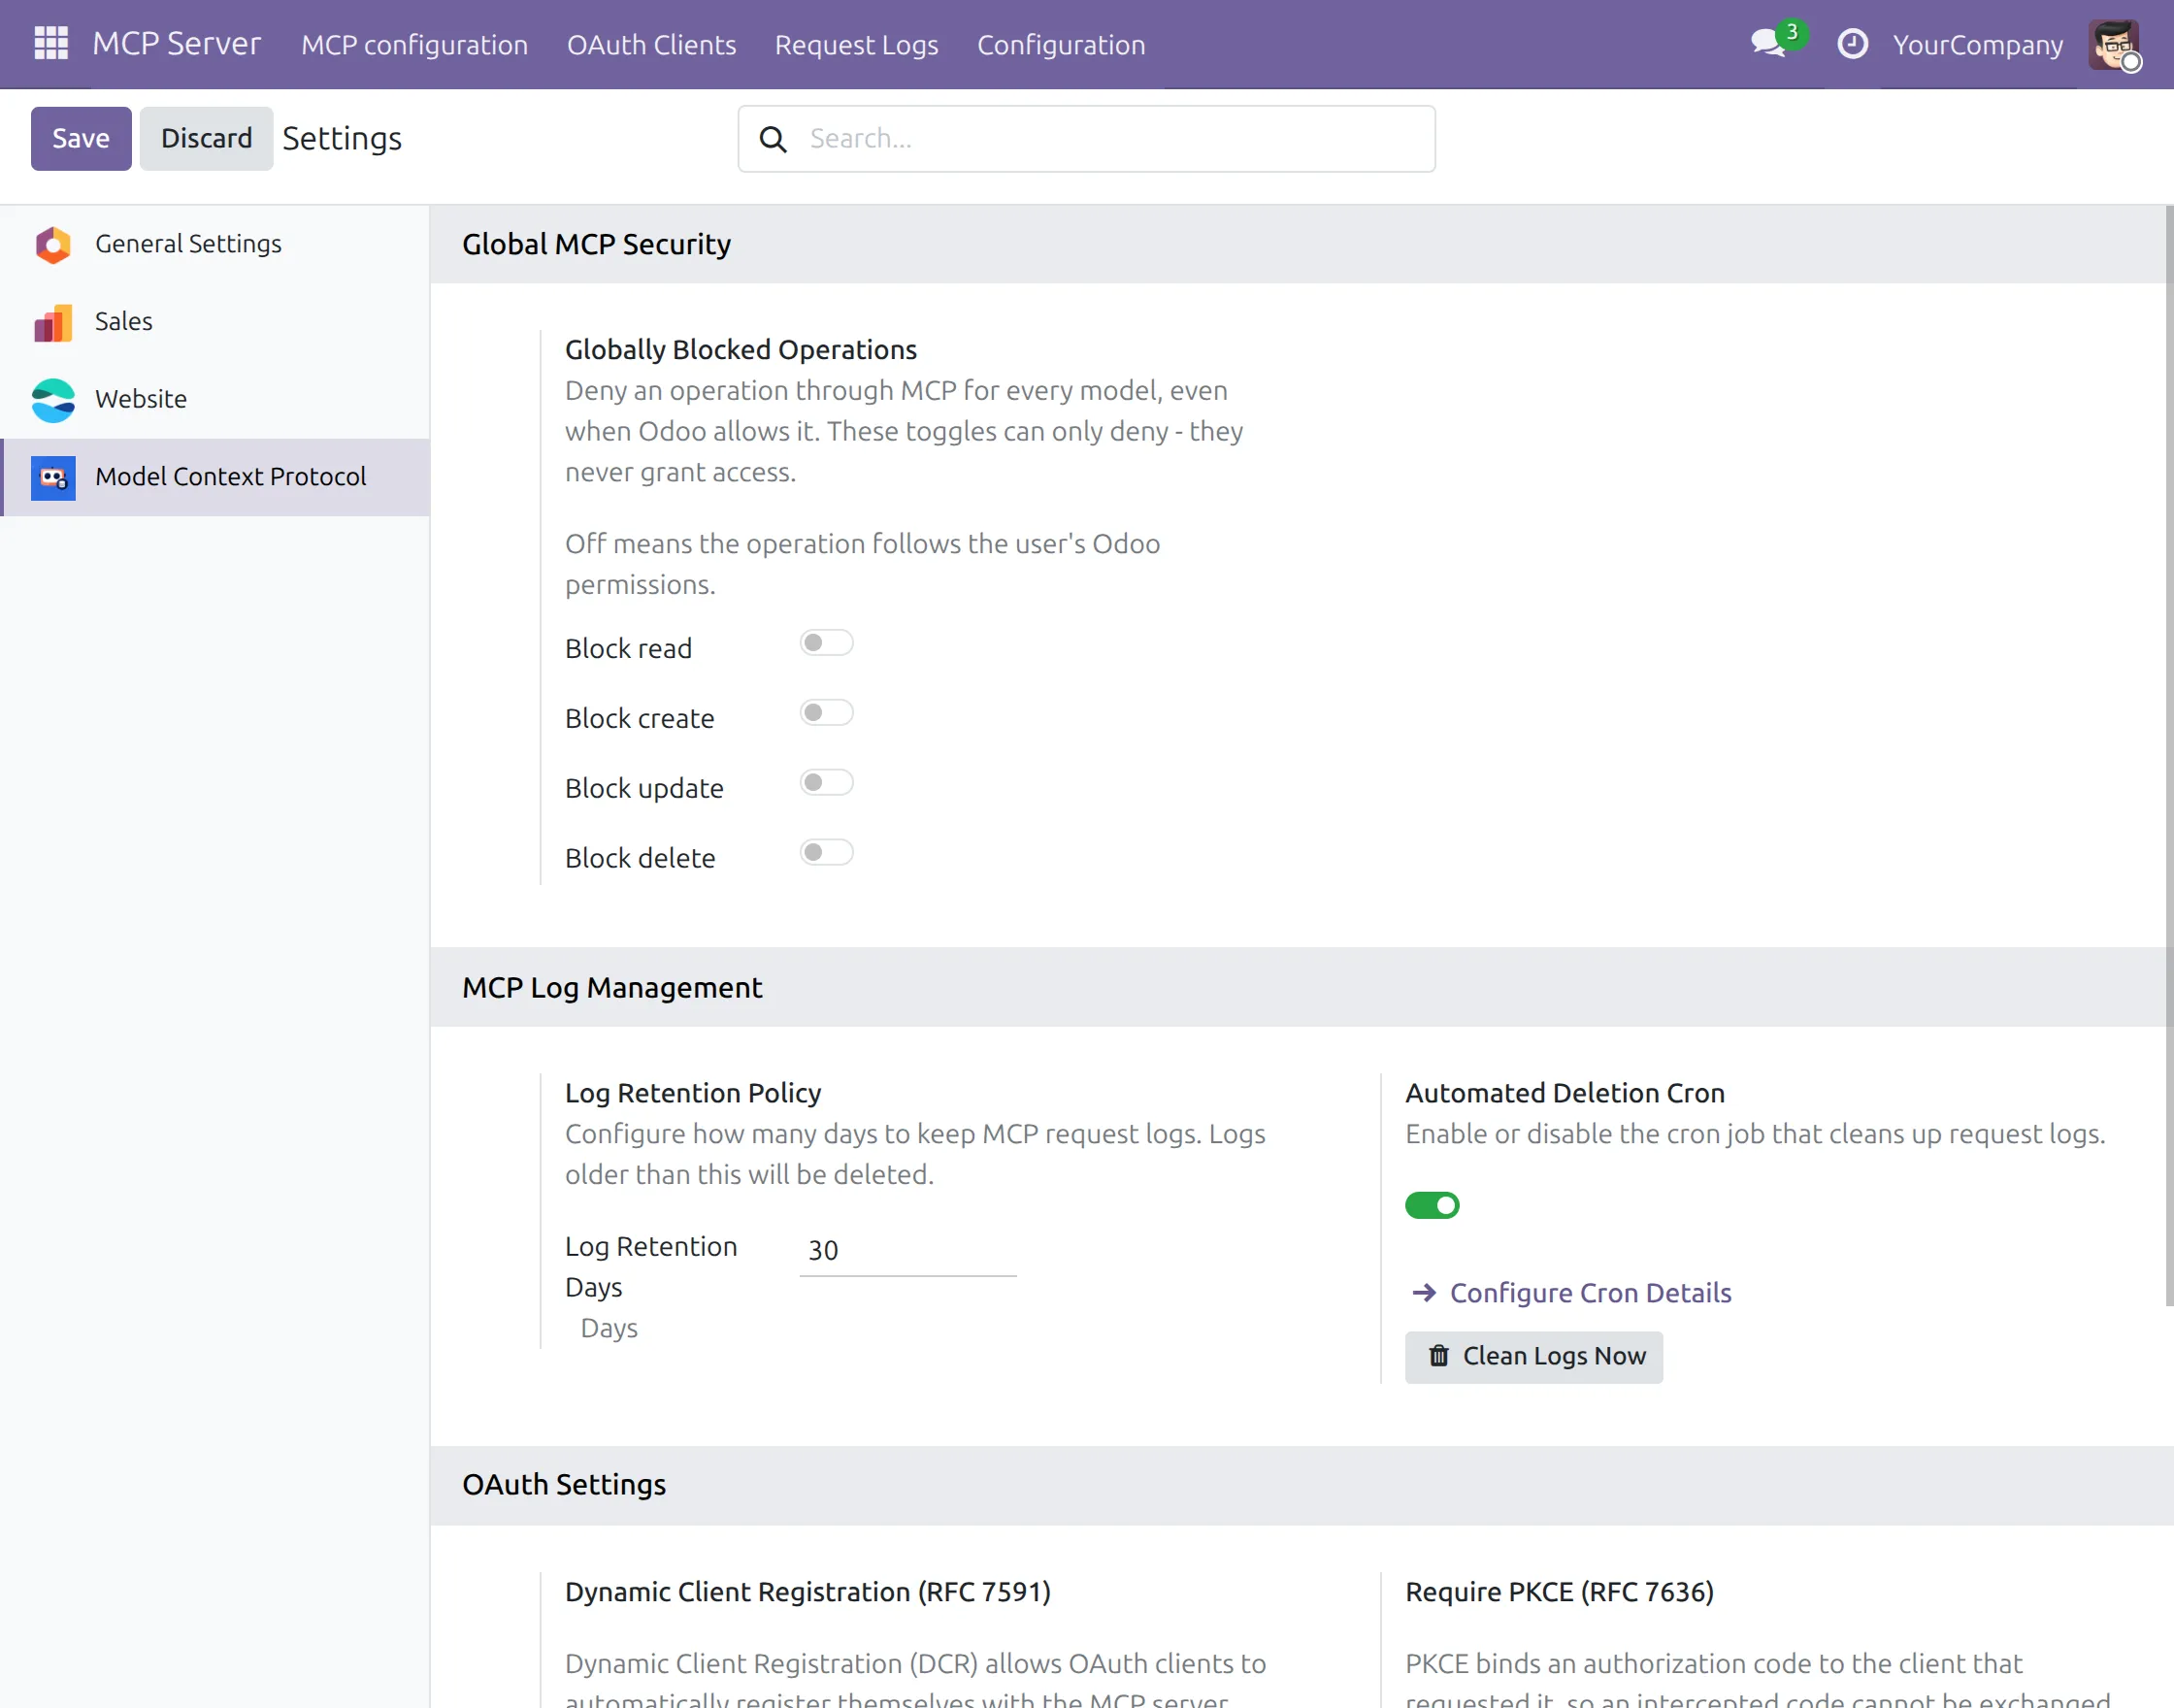
Go to Settings → Model Context Protocol.
Under Global MCP Security, configure the global restrictions for Read, Create, Update, and Delete operations as required.
Under the log management settings, configure Log Retention Days and enable the automated deletion cron when older MCP logs should be removed automatically.
4. Instant OAuth Connection
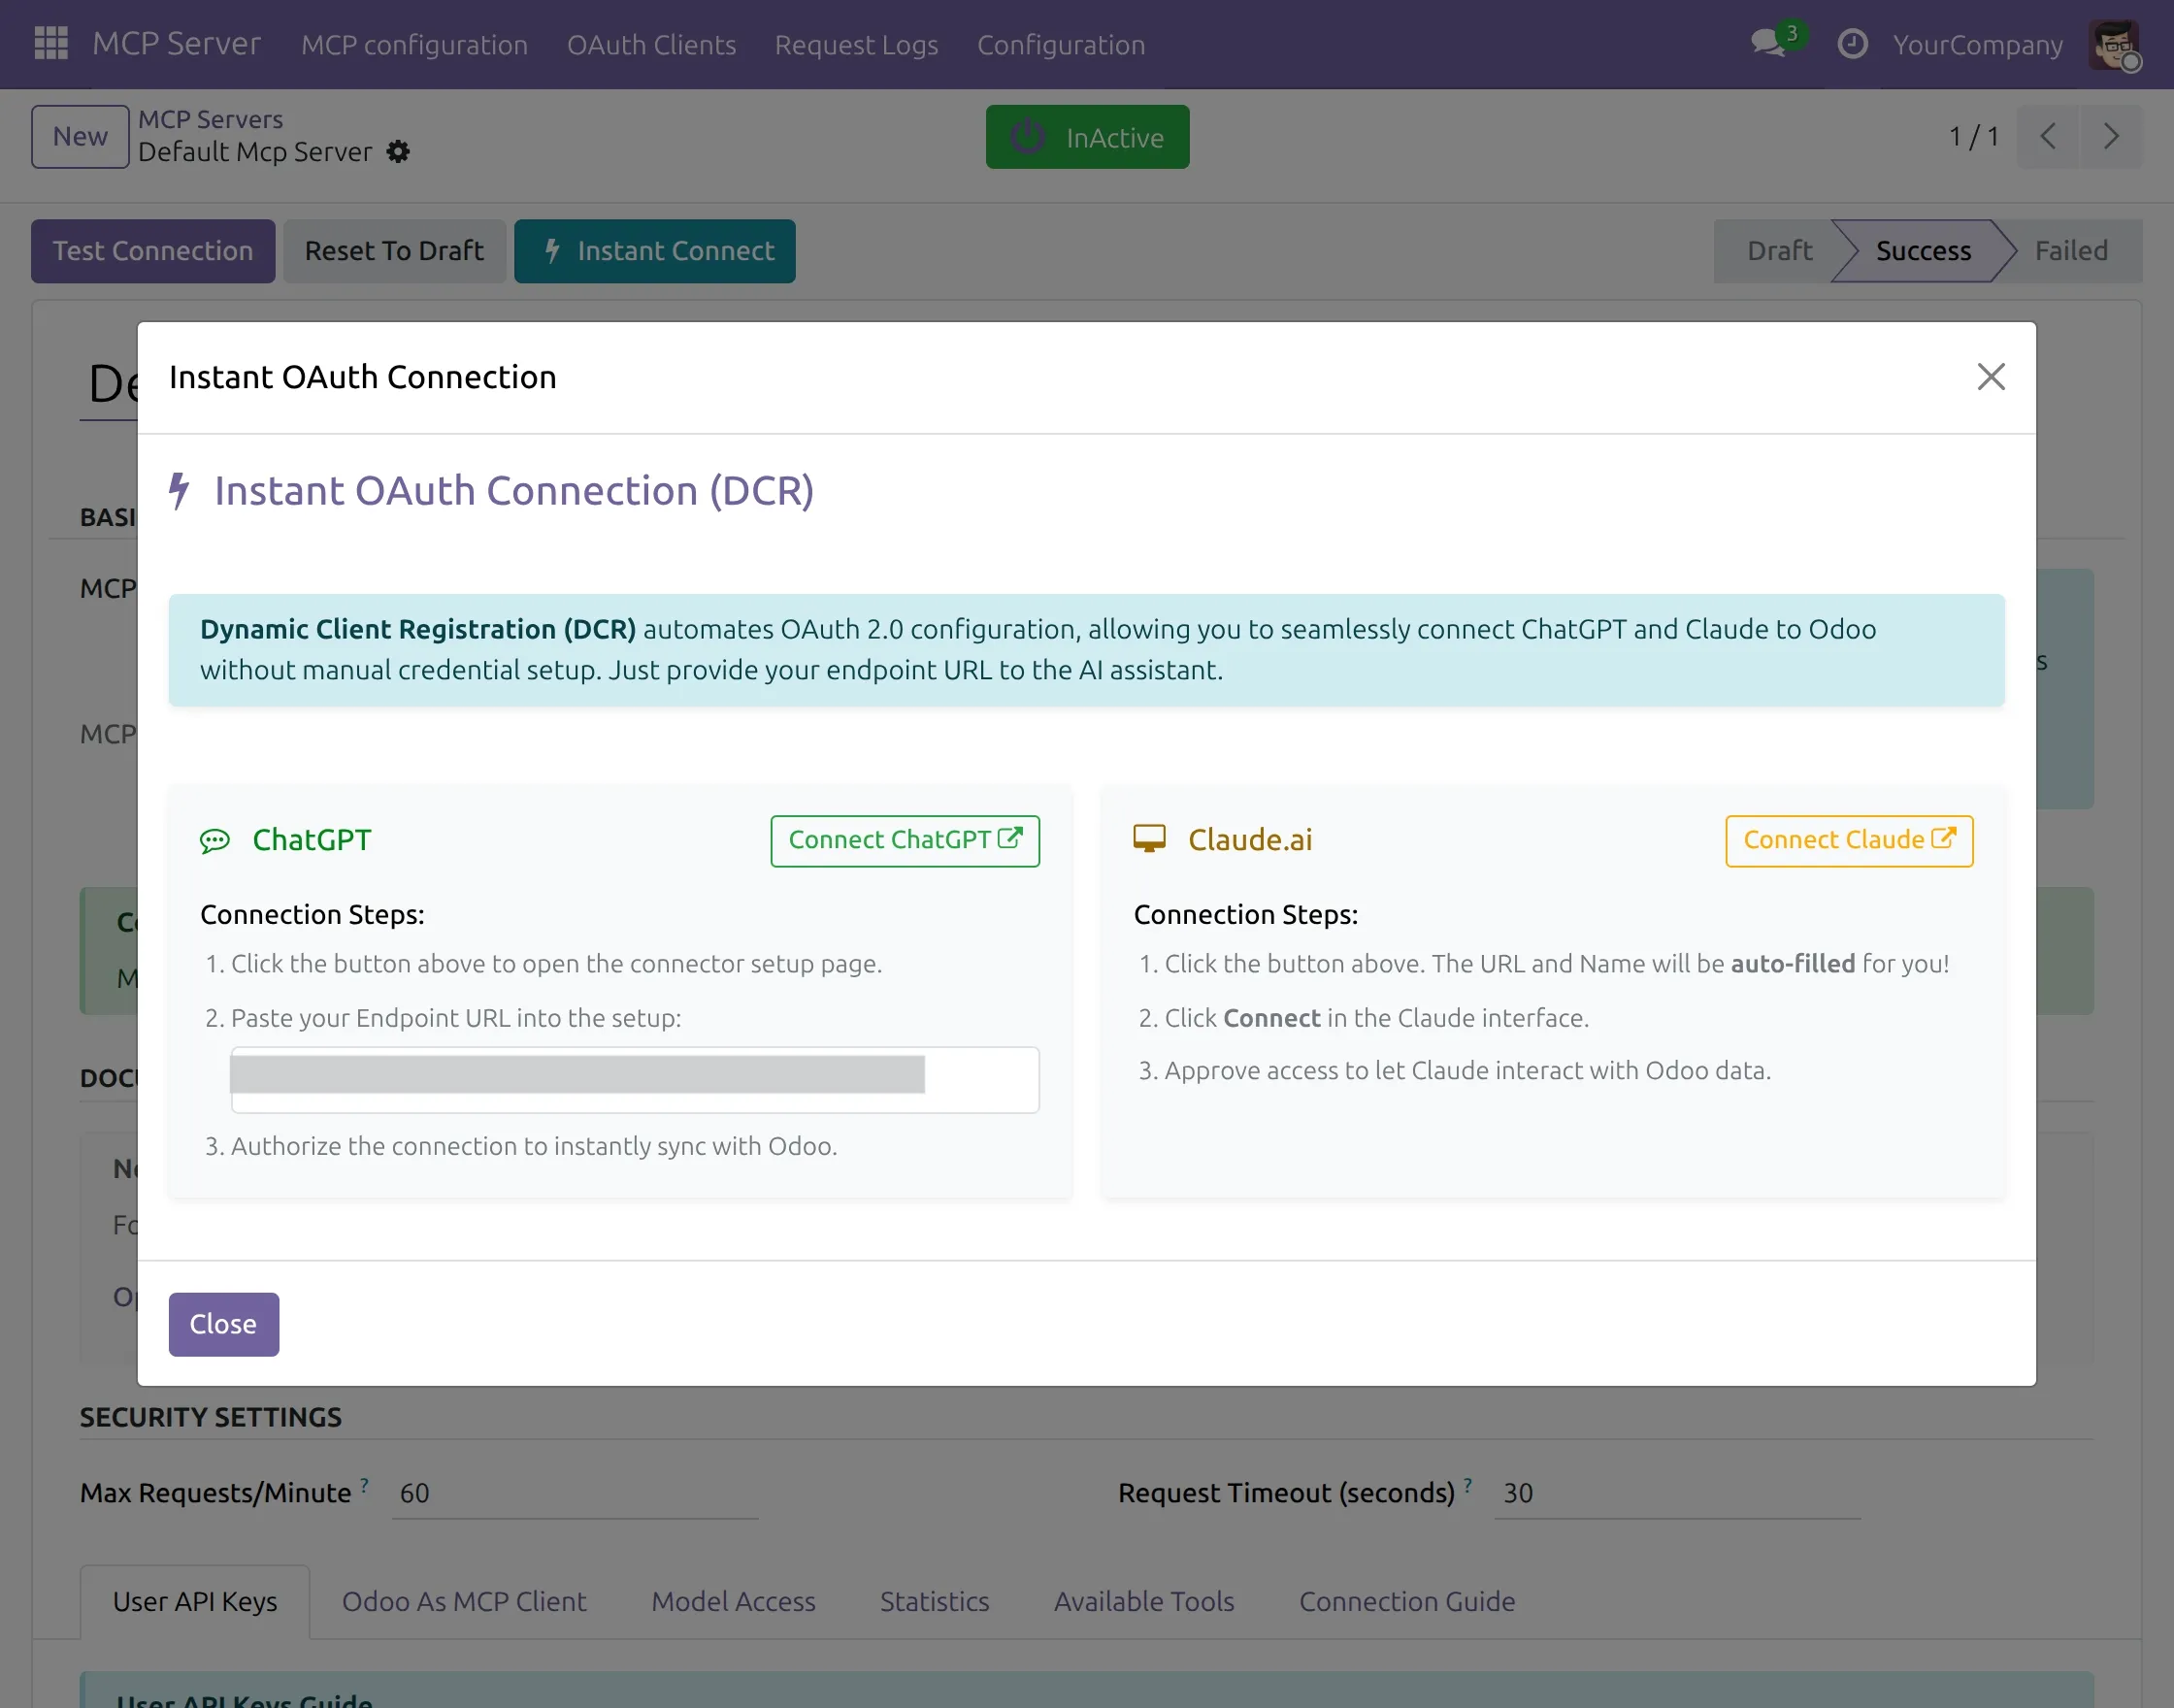
Return to the Self MCP Server configuration and click Instant Connect.
Select the required supported AI client, such as ChatGPT, Claude, or Gemini, to start the guided OAuth connection.
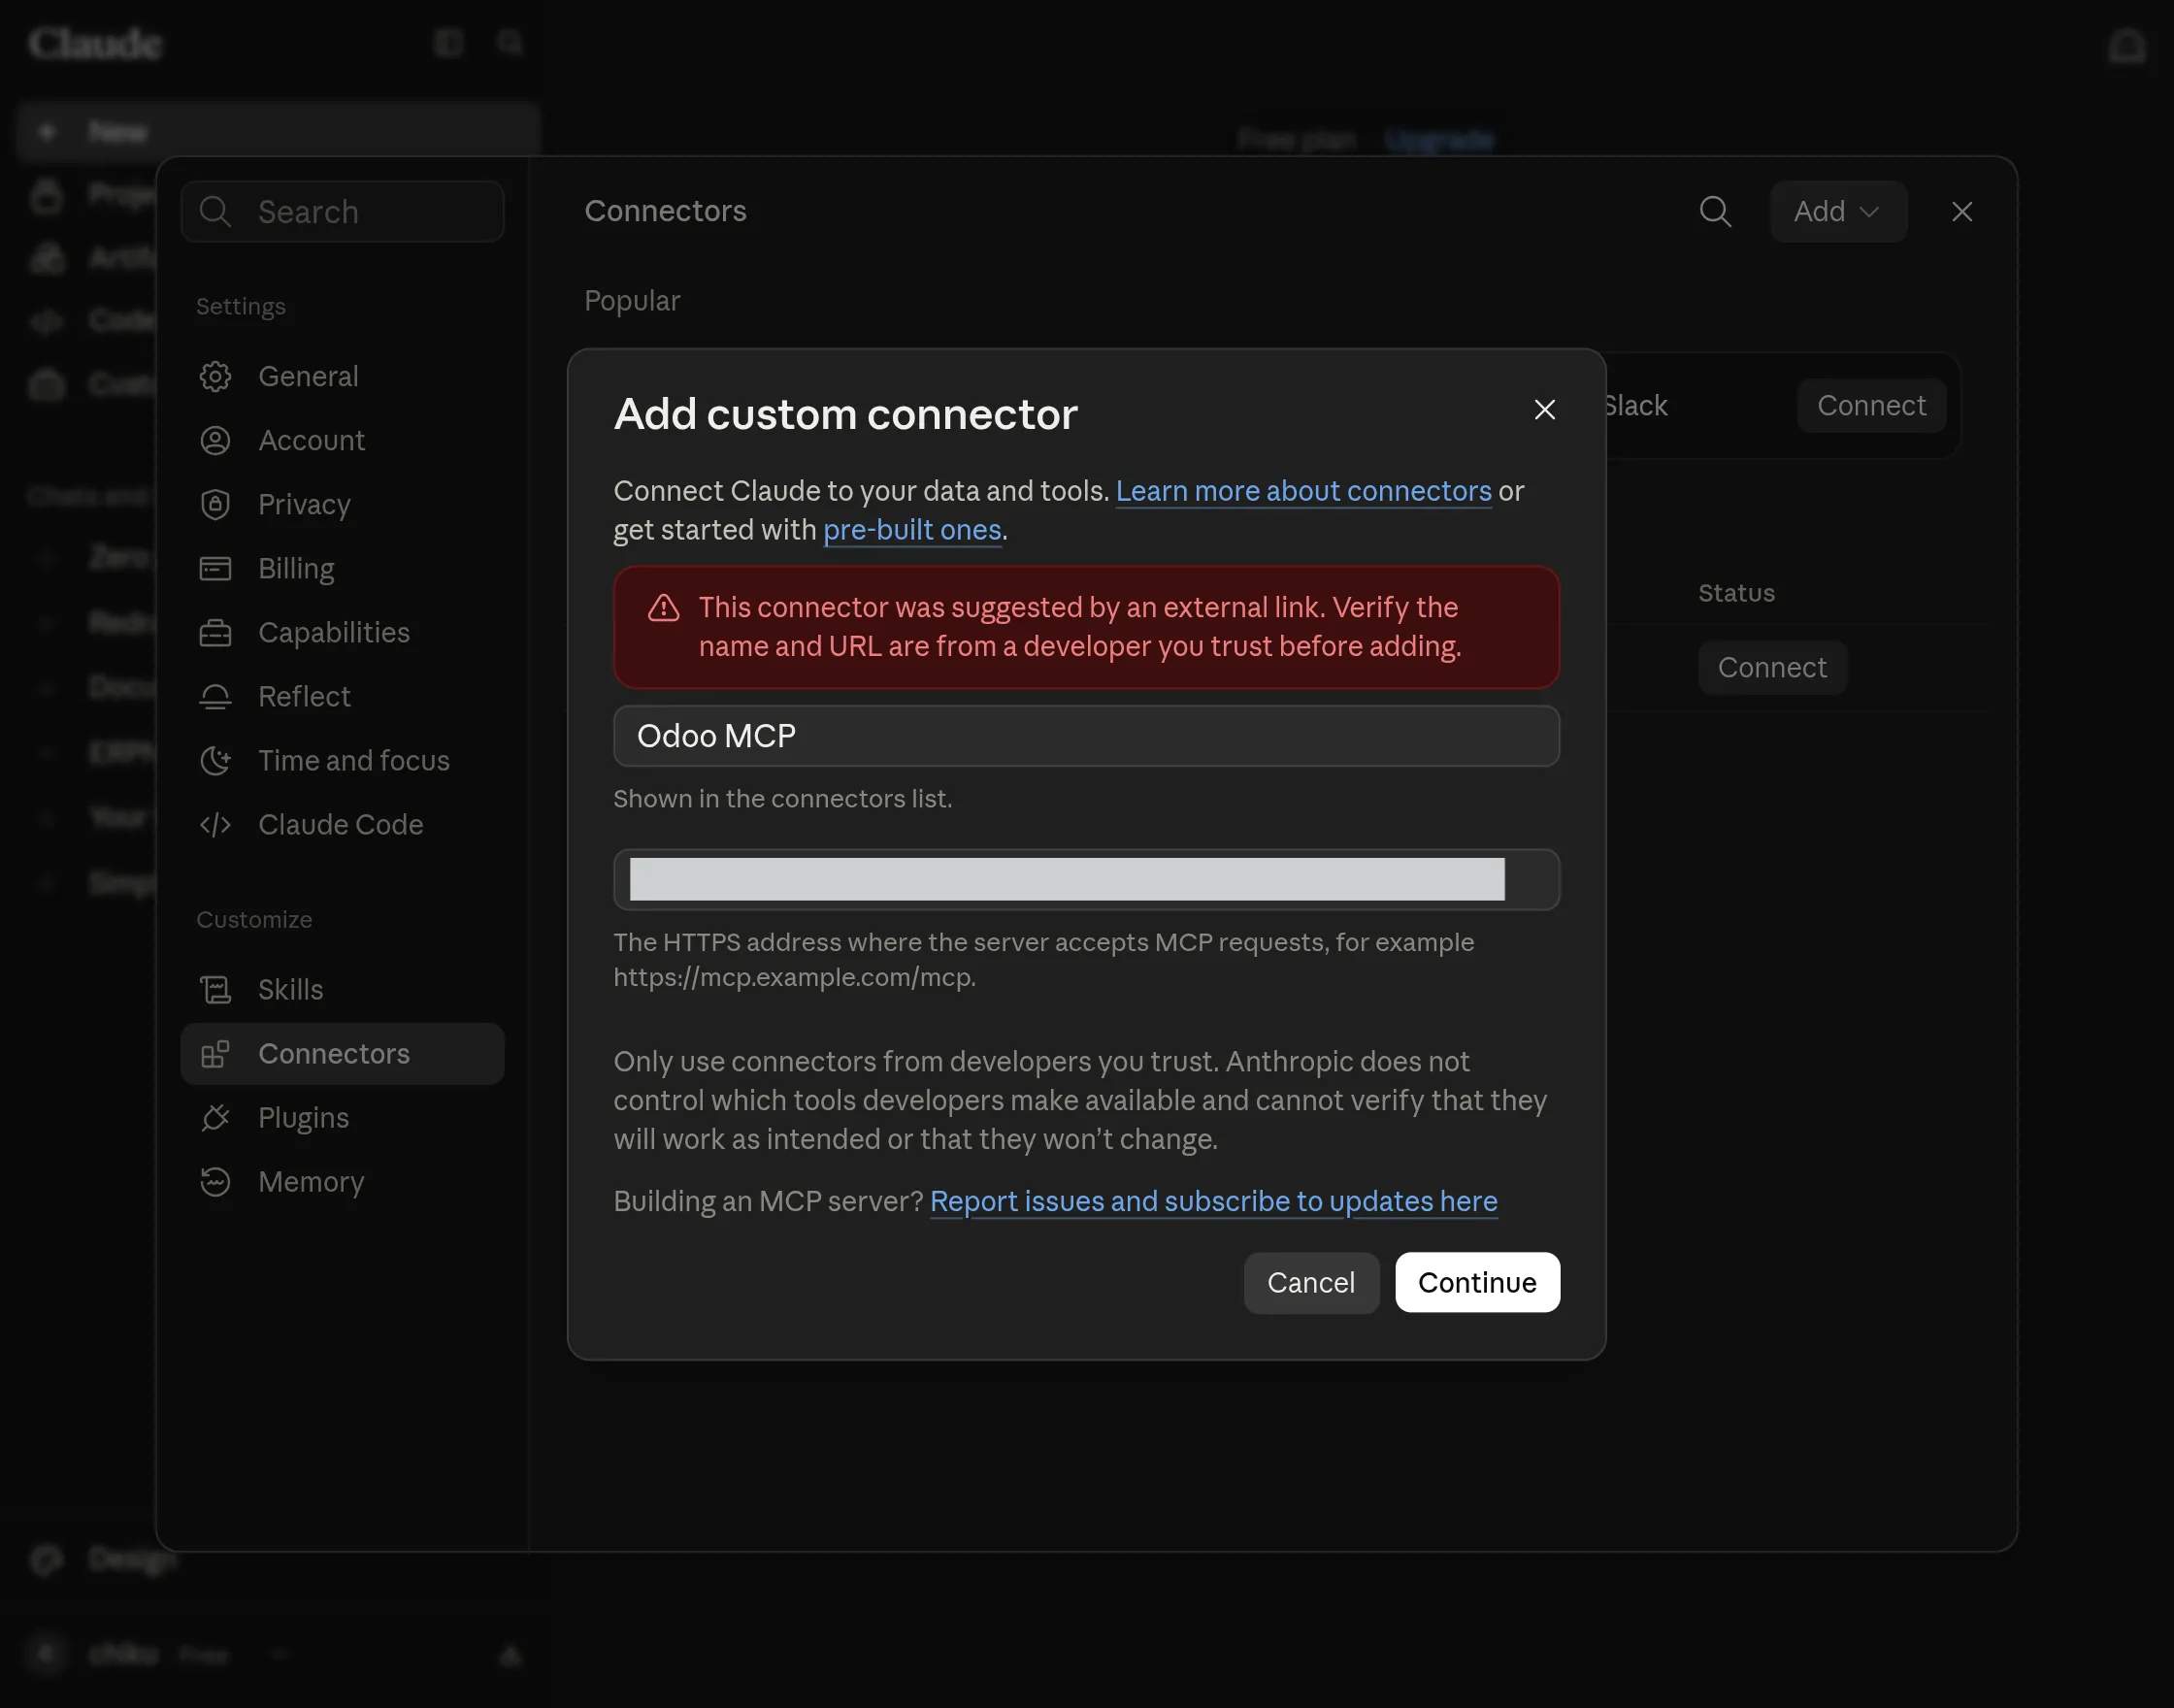
5. Claude Connector Setup
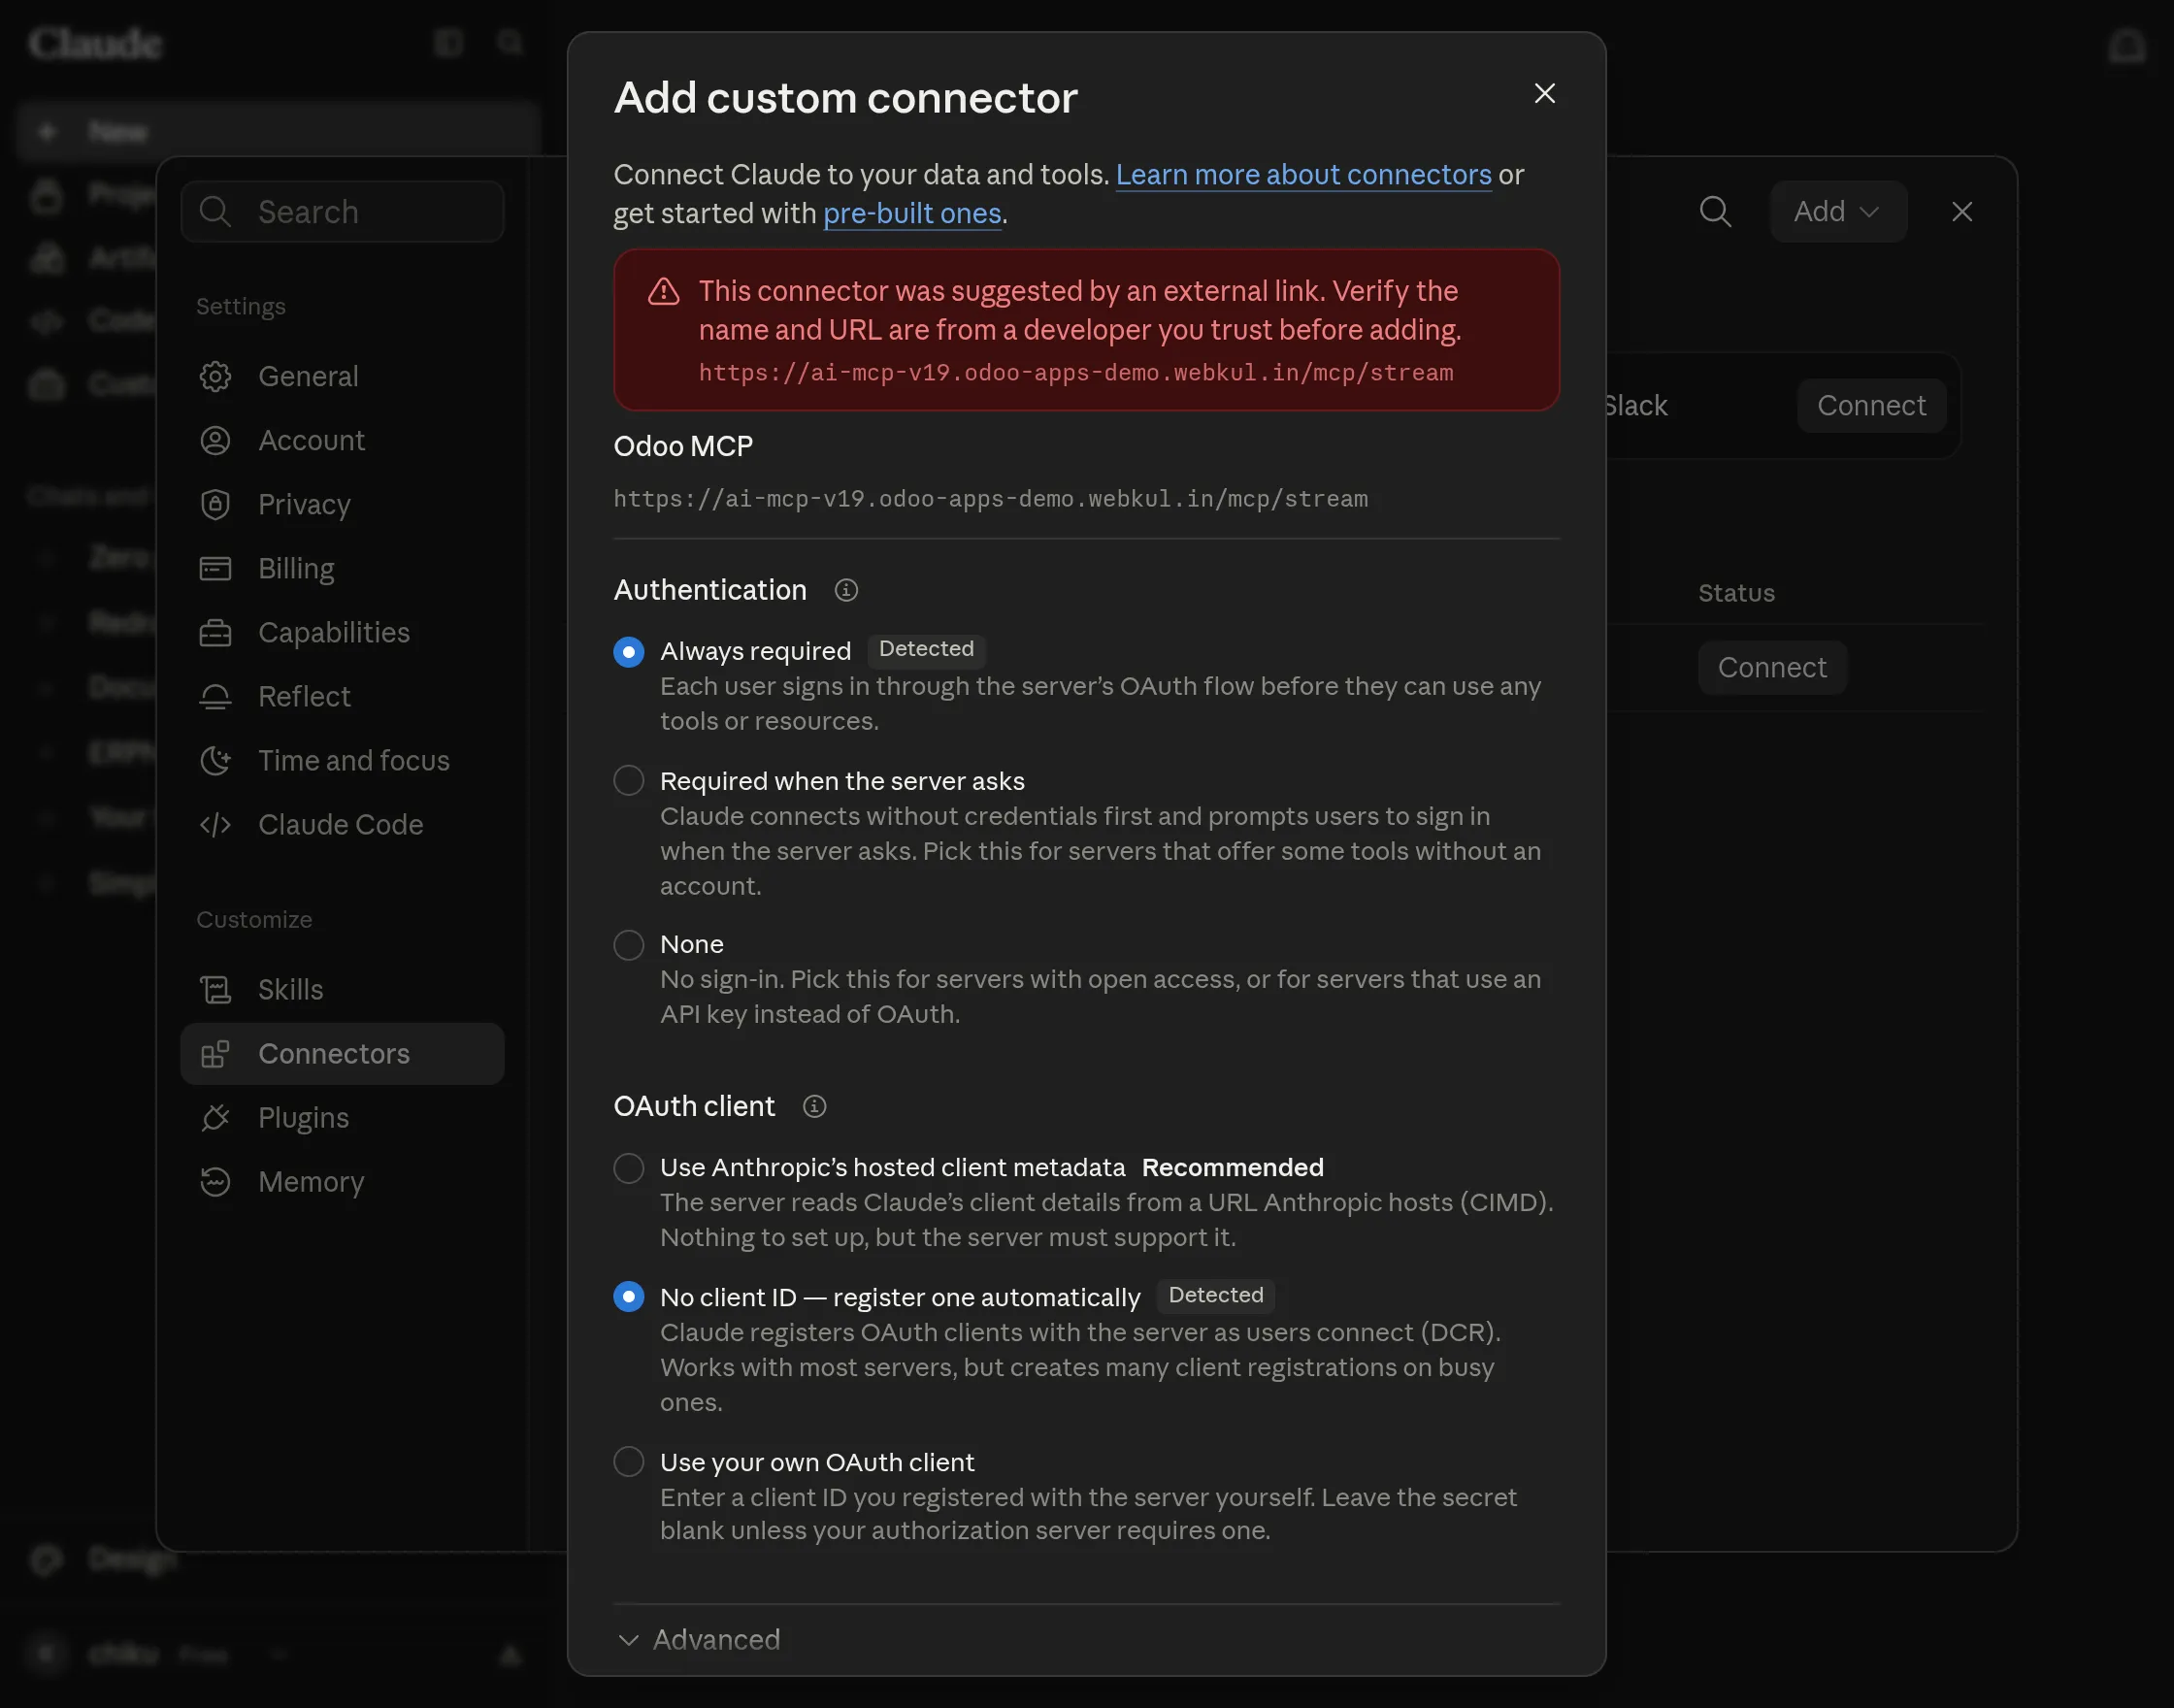
In the selected AI client, open the option to add a custom connector.
Enter the Odoo MCP connector details and provide the MCP Server URL generated in Odoo.
Continue with the connector setup to proceed with authentication.
6. OAuth Authentication and Authorization
Select OAuth as the authentication method and continue with the authorization flow.
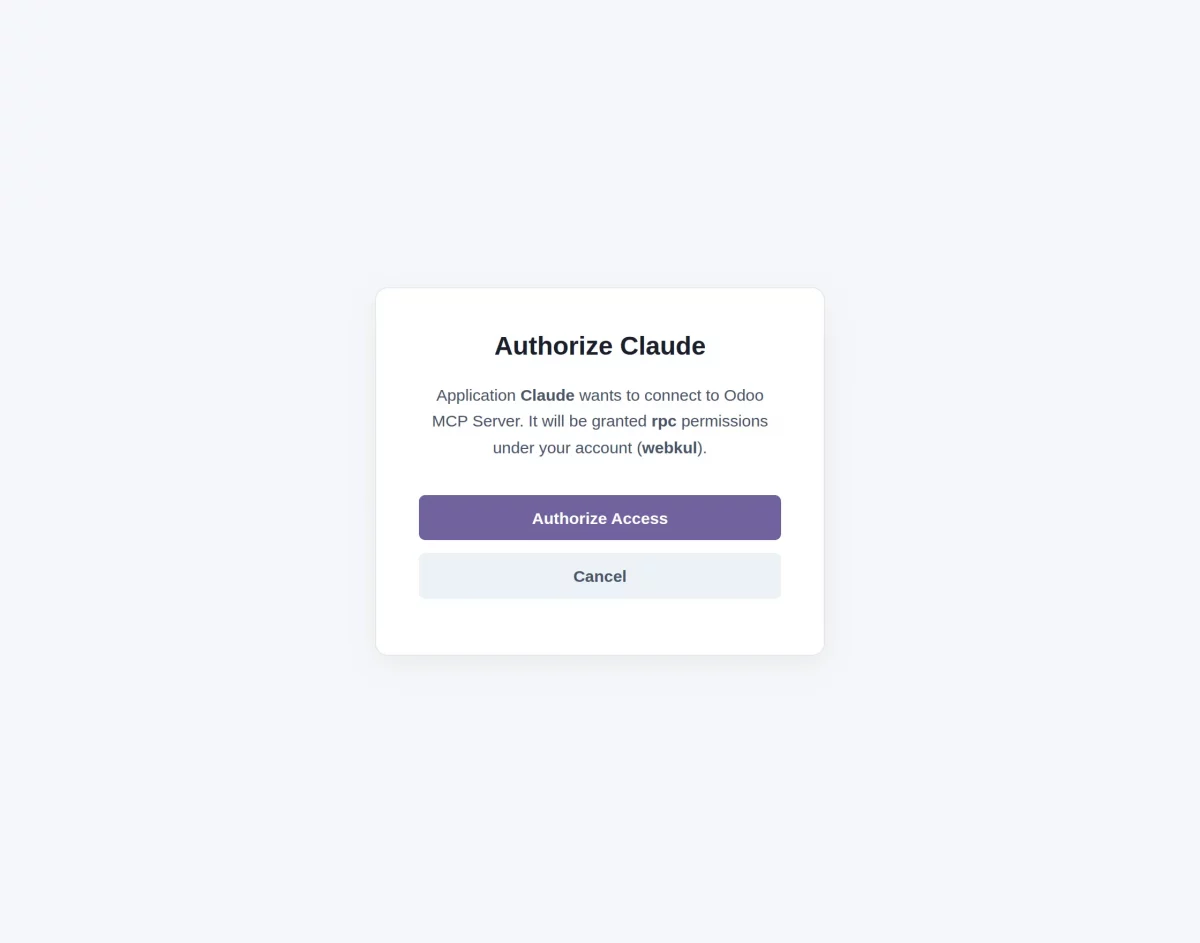
Sign in to Odoo when prompted and review the requested access.
Click Authorize Access to complete the connection.
The MCP session operates using the Odoo access context of the user who completes the authorization.
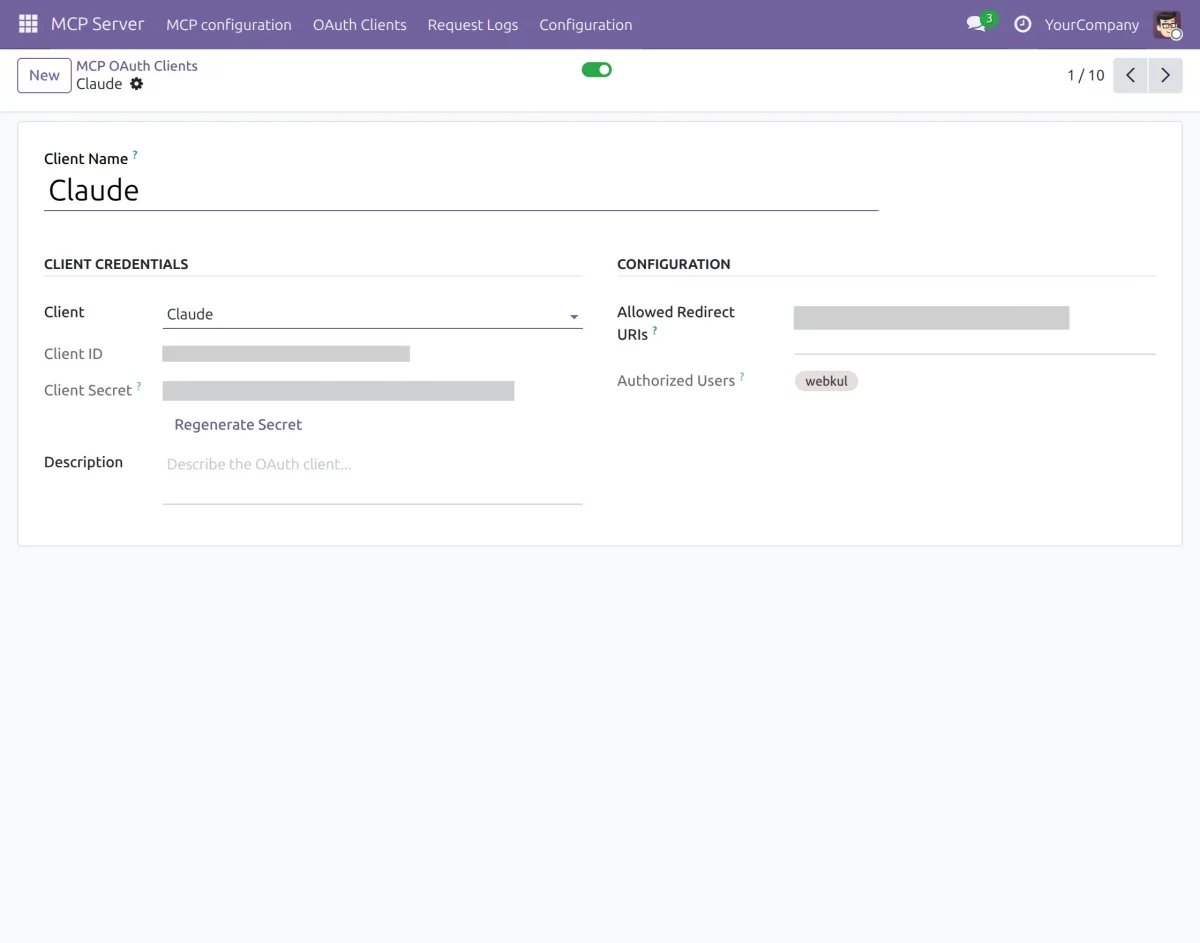
7. Verify OAuth Client
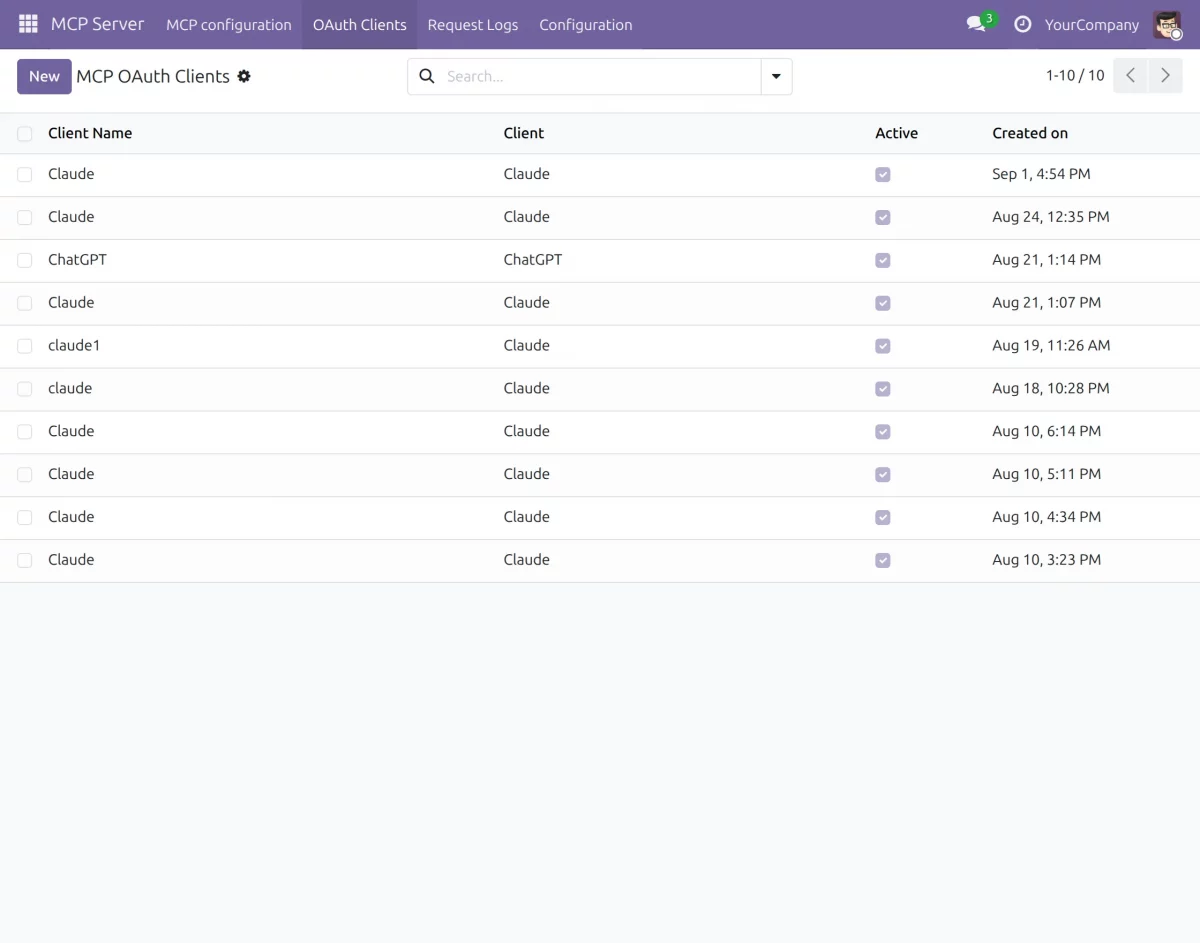
After completing the OAuth authorization, open OAuth Clients in Odoo.
Review the registered client and open its record to view the client configuration, including the registered client details and authorized users.
8. User API Key Authentication
For MCP clients that require manual configuration, open User API Keys and click Generate New API Key.
Select the Odoo user whose access should be used and generate the API key.
Use the generated key with the MCP Server URL in the supported client through Bearer Token authentication.
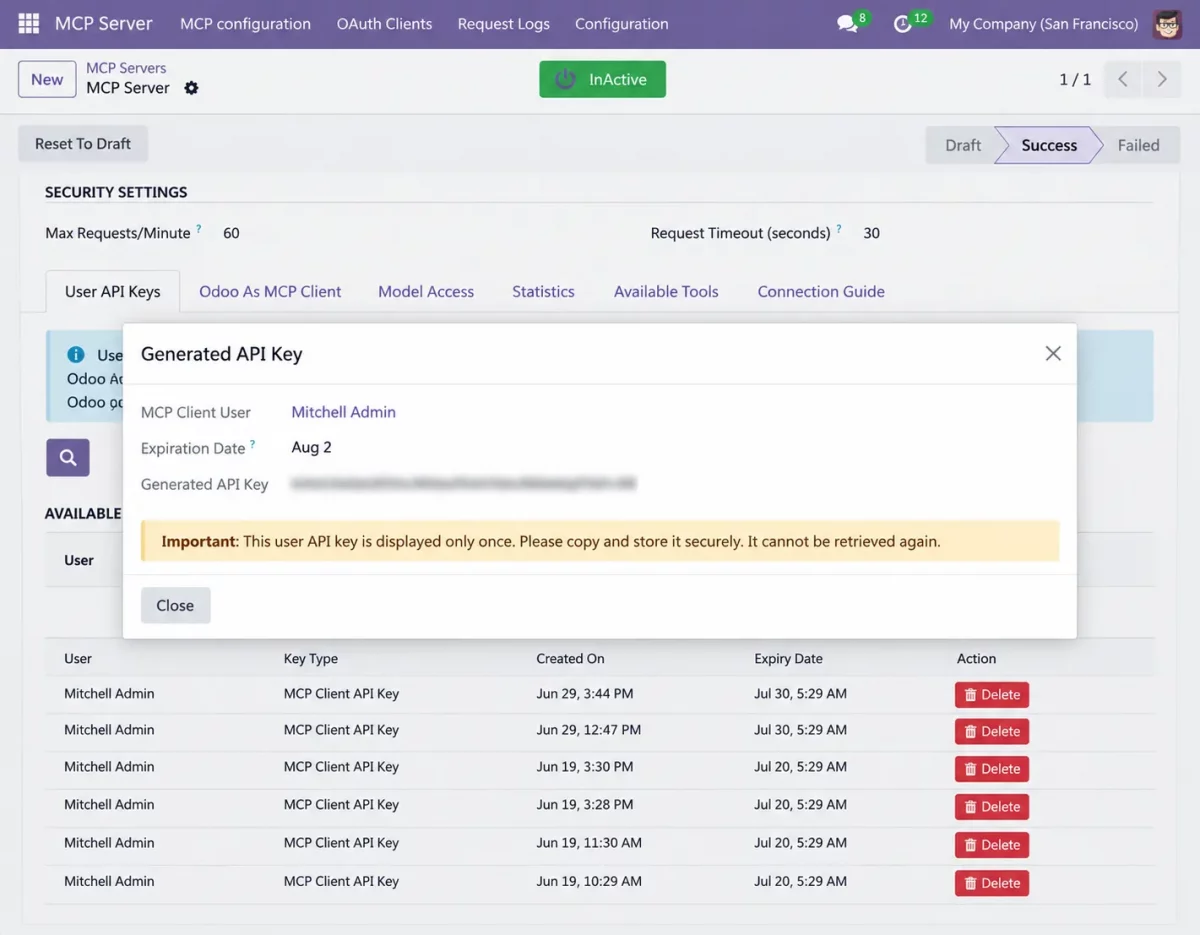
The MCP client operates according to the permissions of the Odoo user associated with the API key.
9. Query Odoo Data
Once the AI client is connected, enable the Odoo MCP connector and start a conversation.
Ask the AI client about Odoo data that the authenticated user is permitted to access.
For example, you can ask which customers generated the highest revenue and which products they frequently purchase.
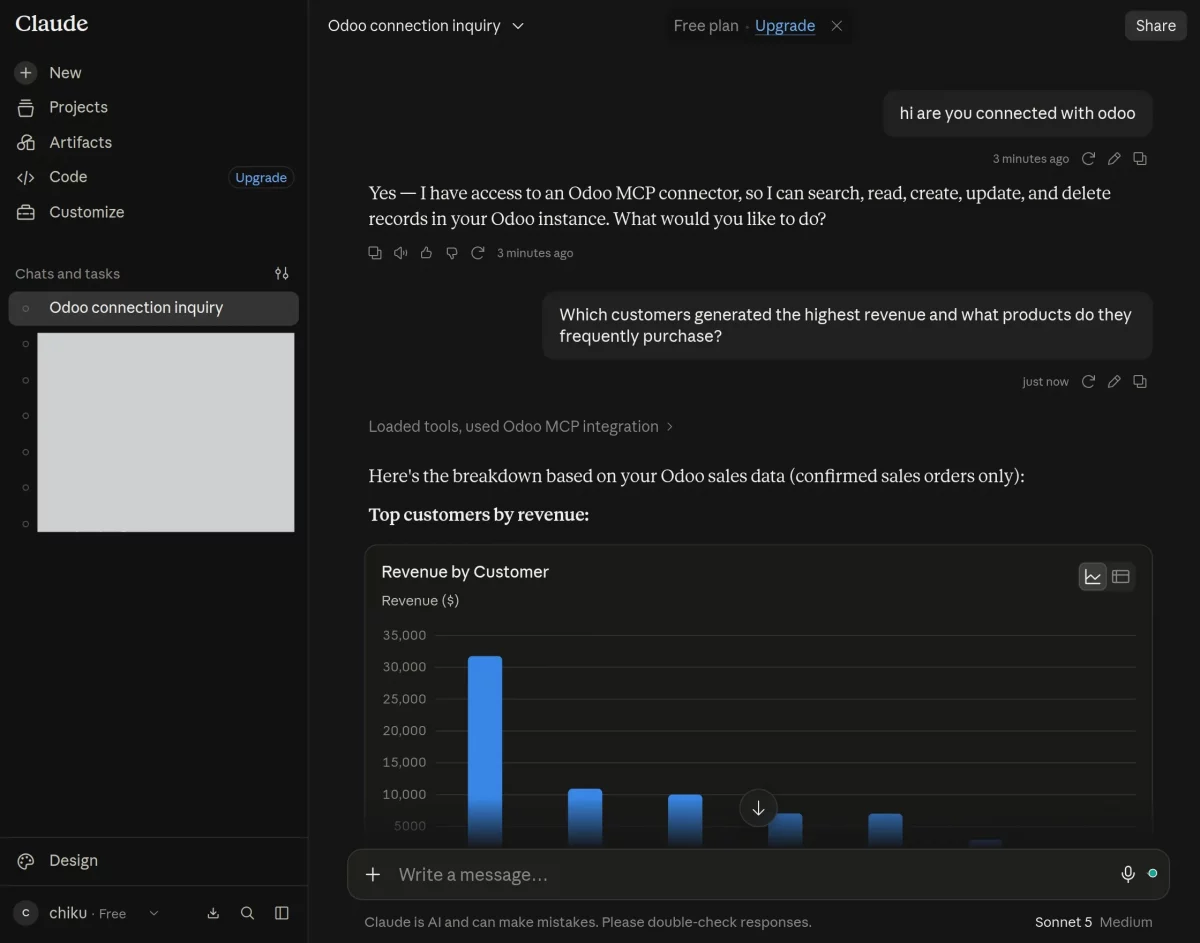
The response is generated using the accessible Odoo data and the permissions configured for the authenticated user.
10. Use Odoo as an MCP Client
External MCP Server Configuration
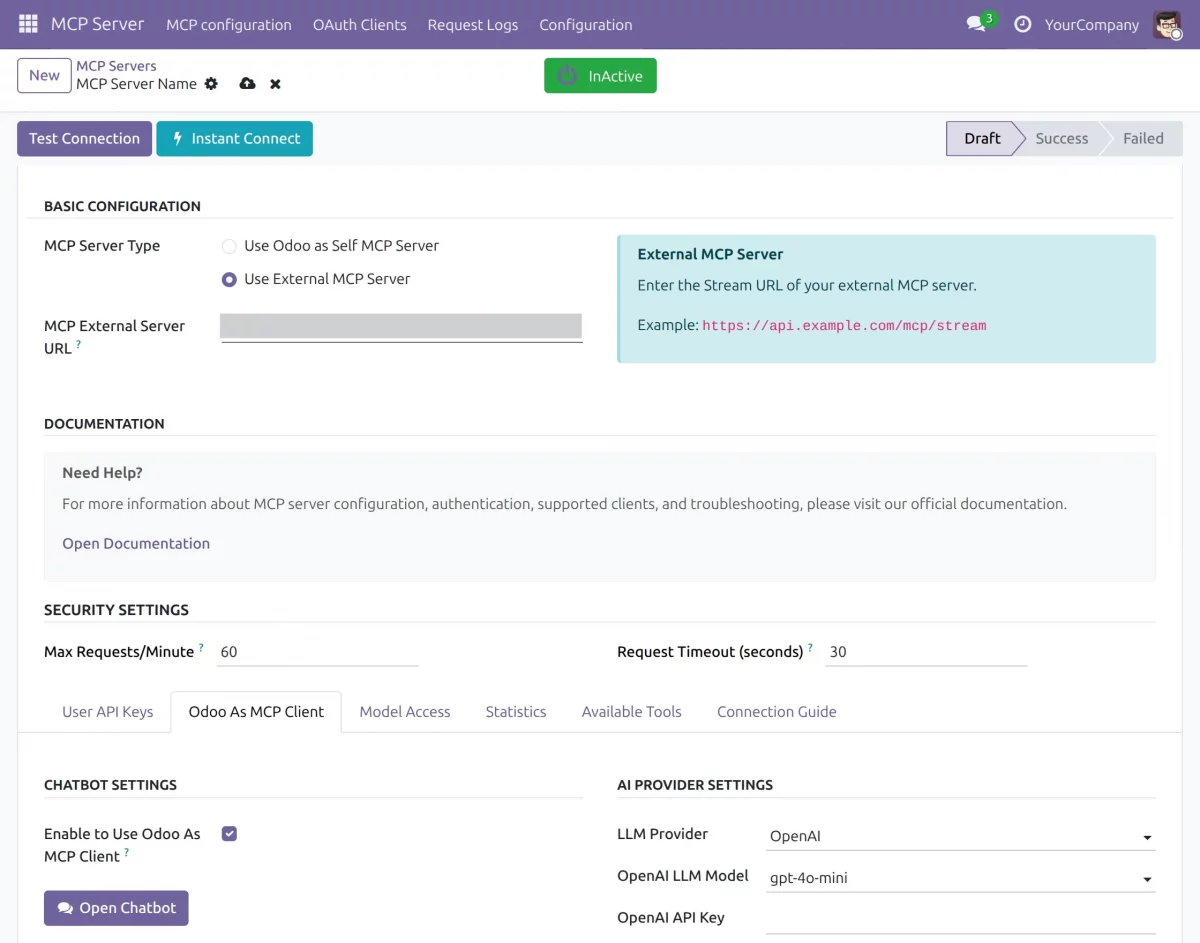
Create a new MCP configuration and select Use External MCP Server.
Enter the required MCP External Server URL and authentication details for the external MCP Server.
LLM Configuration
Under Odoo As MCP Client, enable Enable to Use Odoo As MCP Client.
Select the required LLM Provider and LLM Model, then enter the provider API key.
Save the configuration and test the connection.
Open the Odoo MCP Chatbot
Click Open Chatbot and use the configured chatbot from Odoo Discuss.
The chatbot can use the configured external MCP Server and its available capabilities.
11. Statistics and Request Monitoring
Open the available MCP analytics views to review MCP activity, usage, and request trends.
Analytics Dashboard
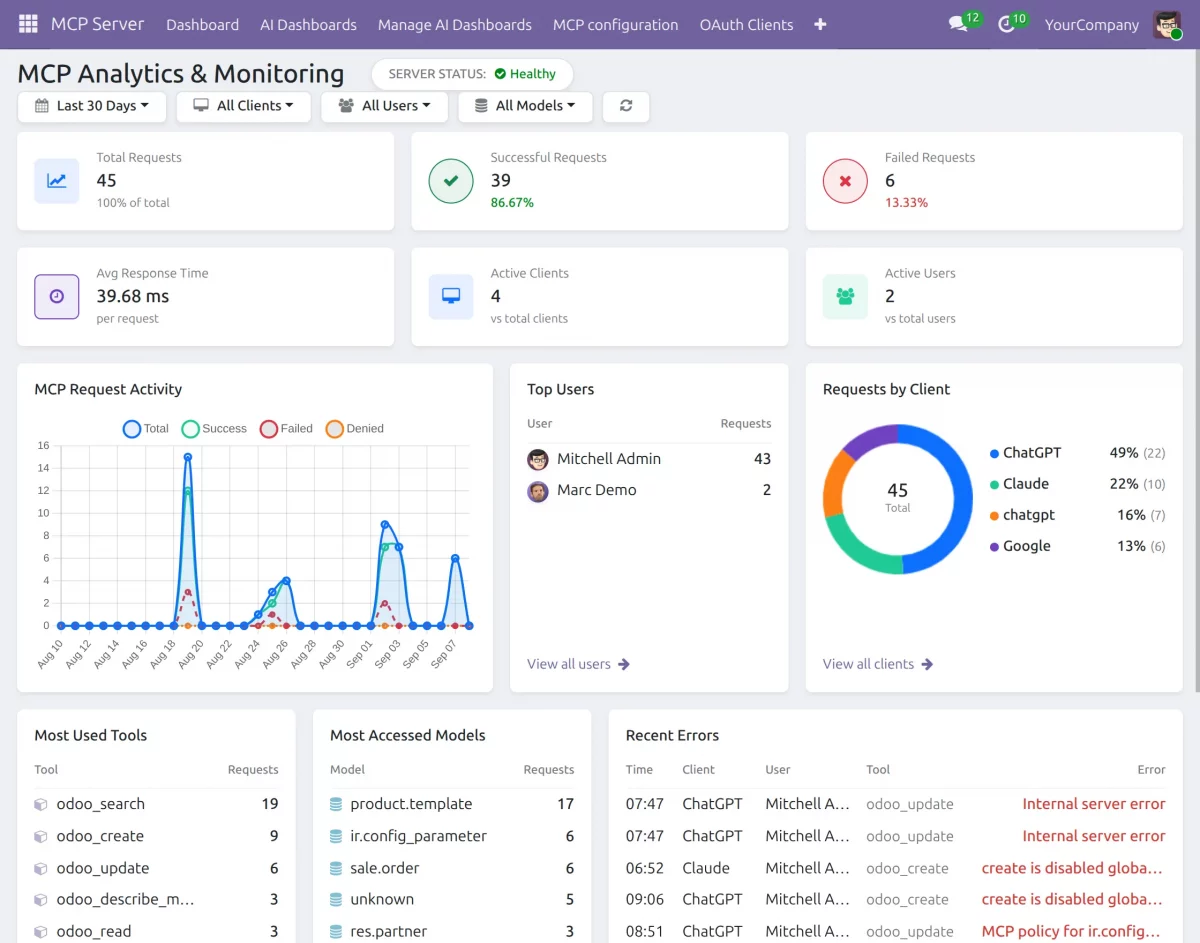
Open the MCP Server → Dashboard to view the Analytics Dashboard.
The dashboard provides an overview of MCP server activity, including Total Requests, Successful Requests, Failed Requests, Average Response Time, Active Clients, and Active Users.
Use the available filters to review activity by date range, client, user, or model.
The dashboard also provides insights into MCP Request Activity, Top Users, Requests by Client, Most Used Tools, Most Accessed Models, and Recent Errors.
Request Logs
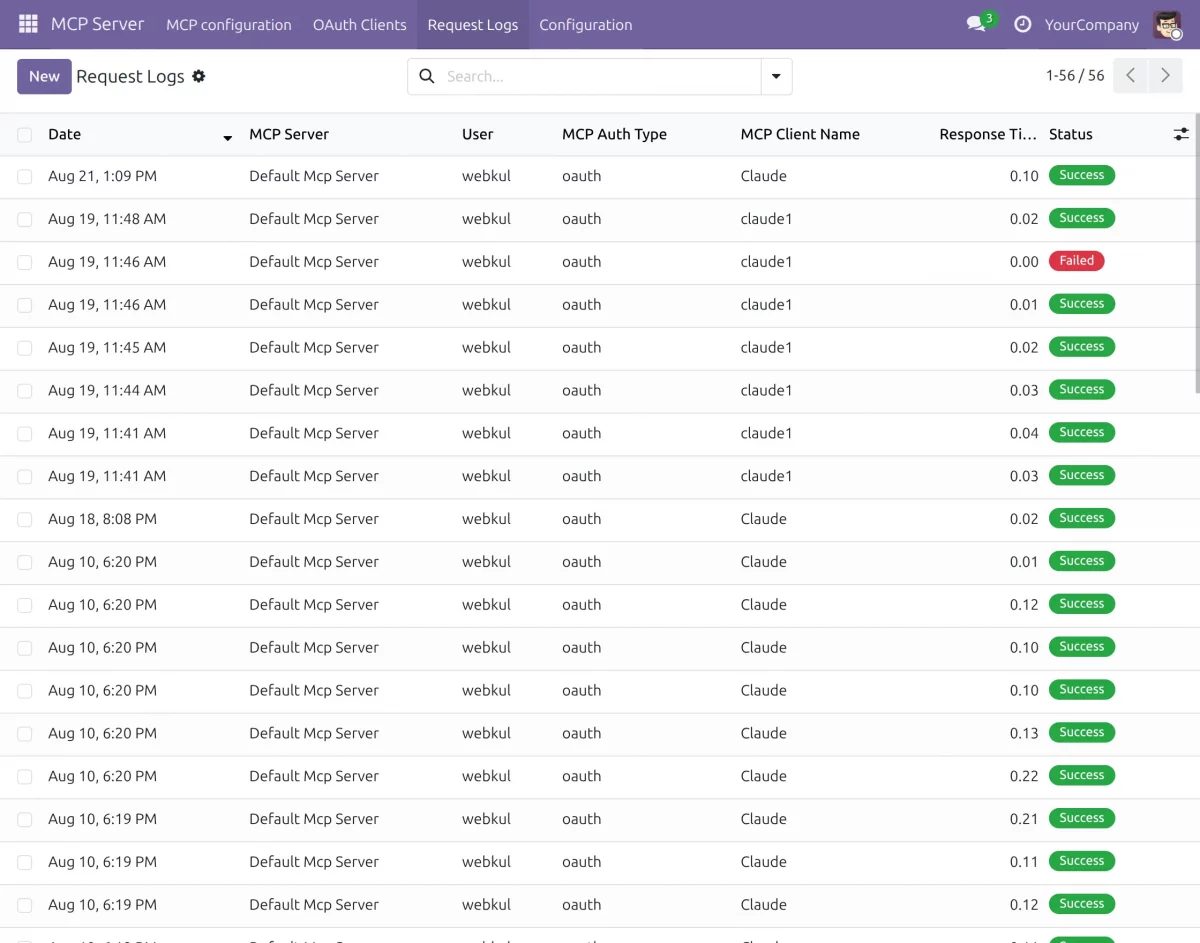
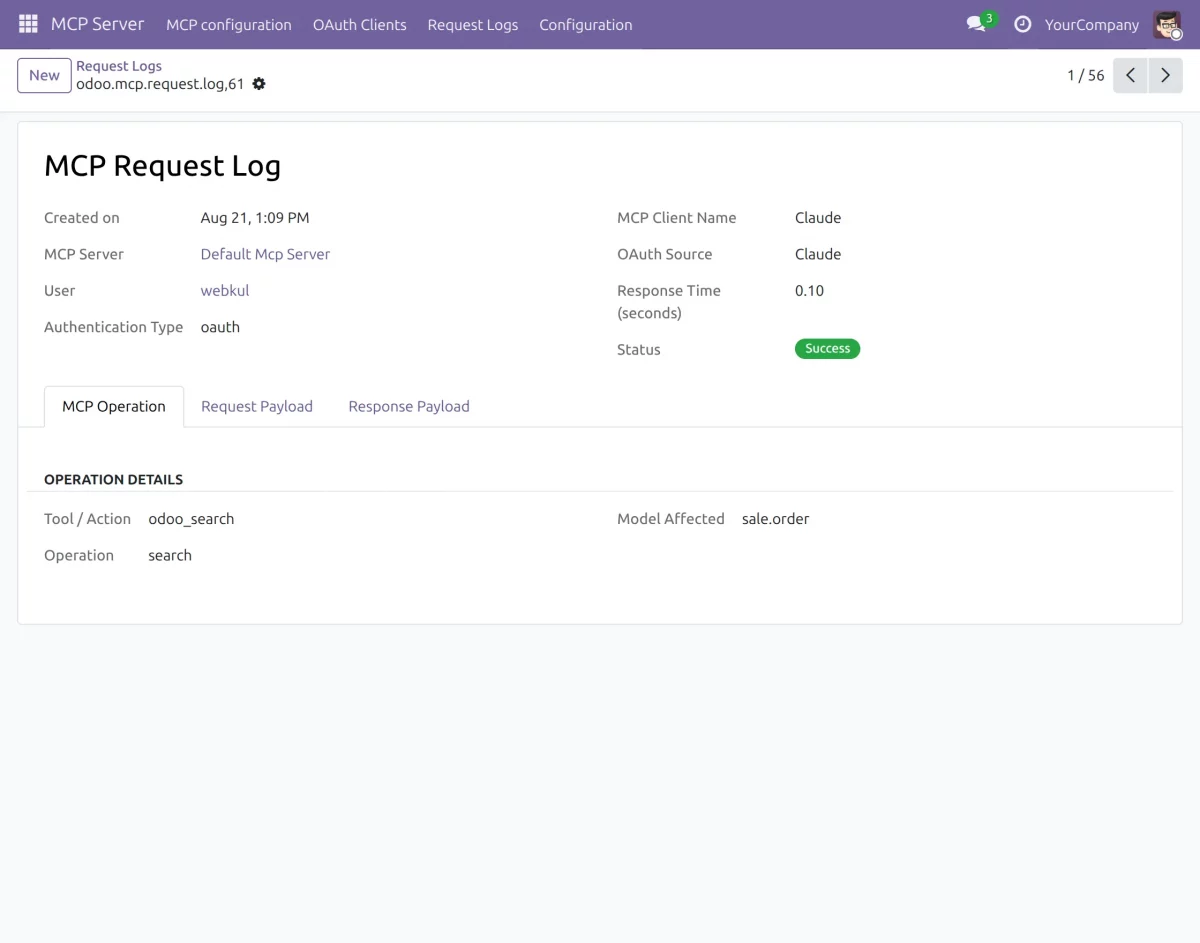
For detailed request-level information, go to MCP Server → Request Logs.
The request details allow you to review the authenticated user, MCP client, authentication type, response time, status, MCP operation, and request/response payloads.
12. Health and Documentation Endpoints
Check MCP Server Health
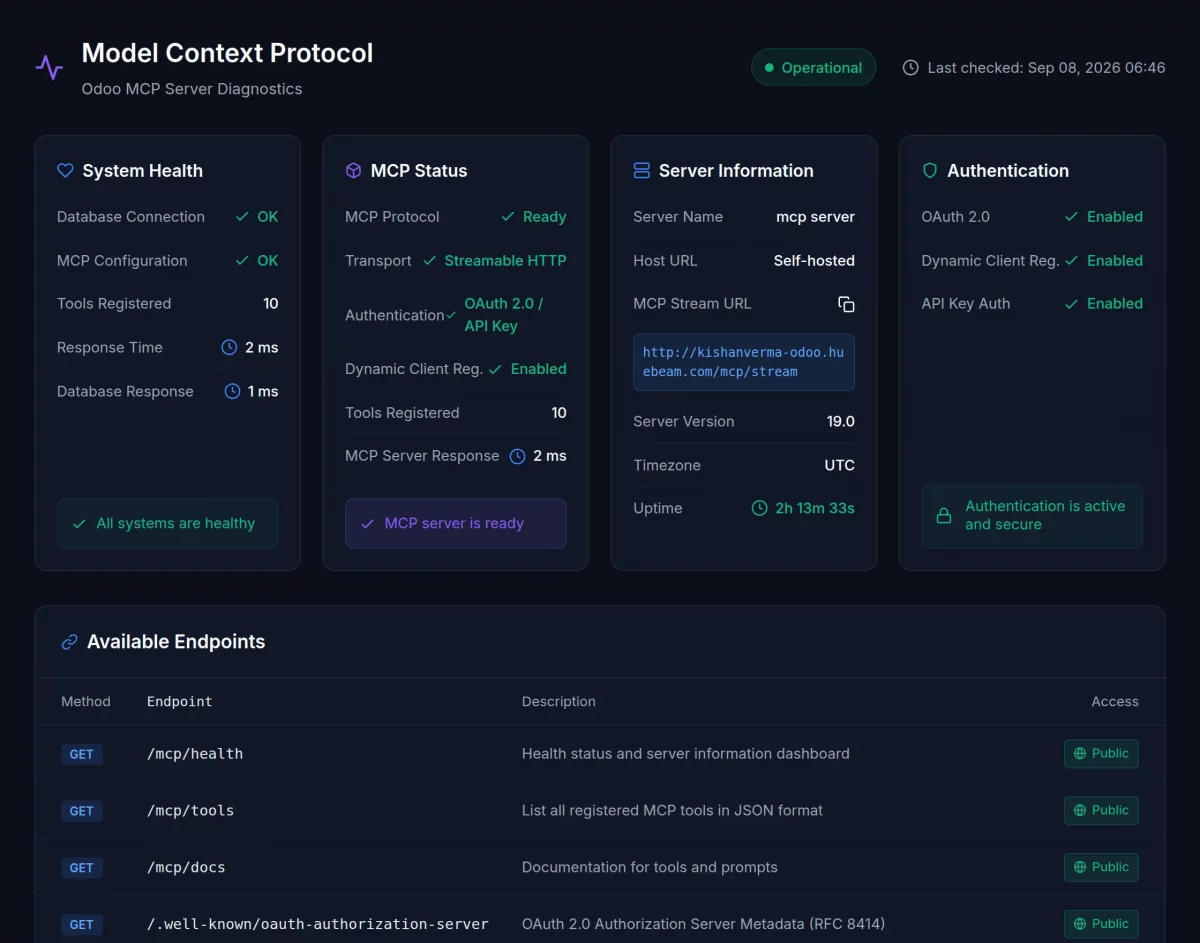
Open the /mcp/health endpoint to check the health and availability of the MCP Server.
The endpoint provides server health and operational information, allowing users or external monitoring systems to verify whether the MCP Server is active and functioning properly.
The health information includes details such as database connection, MCP configuration, registered tools, response time, MCP protocol status, authentication status, server version, and uptime.
Access MCP API Documentation
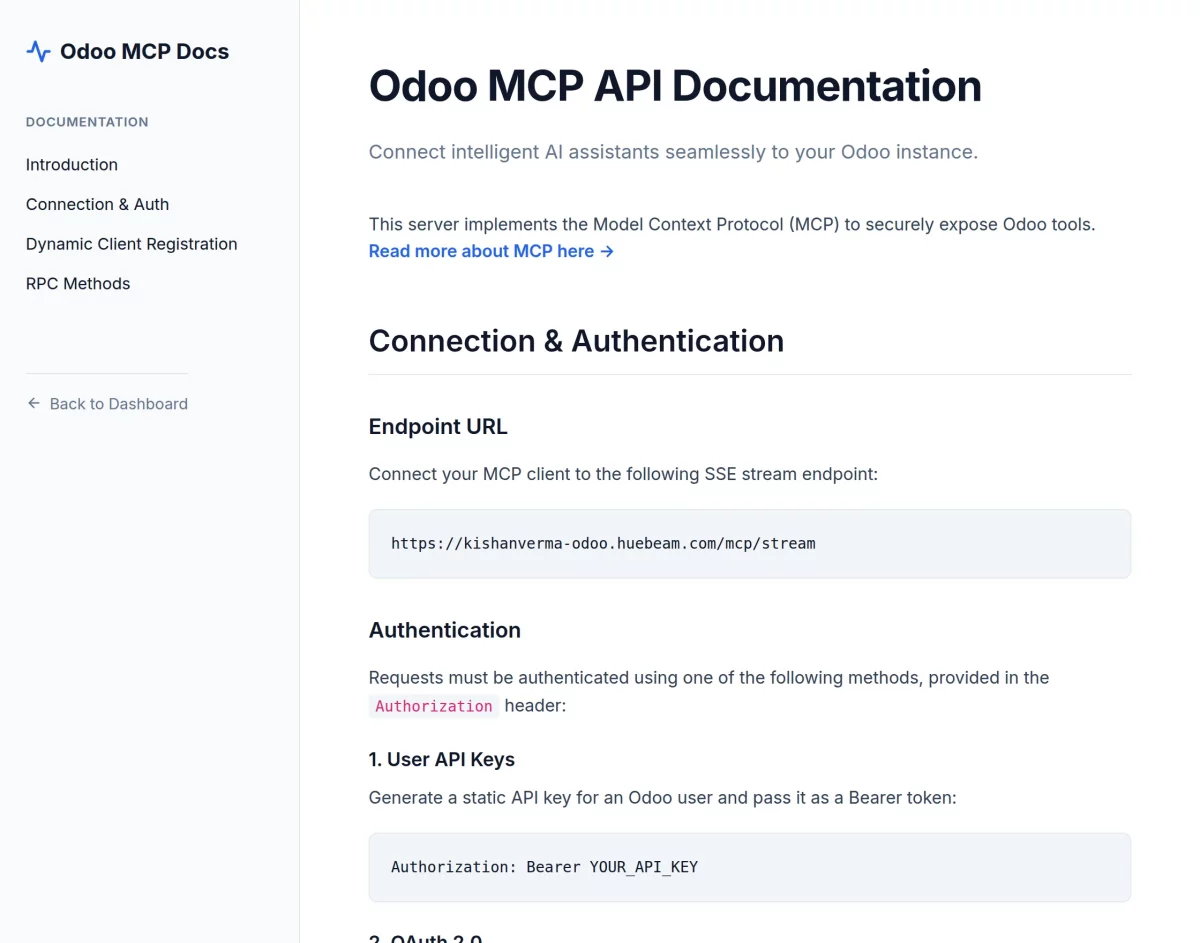
Open the /mcp/docs endpoint in a browser to access the MCP Server API documentation.
The documentation provides the information required to understand and interact with the MCP Server, including connection and authentication details, endpoint information, and API usage.
Users and developers can refer to this documentation when working with the available MCP endpoints.
Need Help?
Hope you find the guide helpful! Please feel free to share your feedback in the comments below.
If you still have any issues/queries, please create a ticket at the UV Desk.
I hope this helps. In case of any further queries, contact us at our support mail.
Thanks for paying attention!!
Current Product Version - 1.3.1
Supported Framework Version - V19, V18, V17

2 comments
We have created a ticket on your behalf and our team will connect with you soon regarding your queries.
Thanks and Regards,
Team Webkul