Introduction
Odoo AI-OCR Document Digitization utilizes advanced AI tools to extract text from scanned documents and convert it into structured data.
This module automates data entry for various documents, reducing manual effort and minimizing errors.
With Odoo AI-OCR Document Digitization module, businesses can design custom templates tailored to different document types, ensuring consistent and accurate data capture every time.
Features
- Extract text from scanned documents using advanced OCR and AI models.
- Convert documents like invoices and sales orders into records within Odoo, minimizing manual input.
- Create and reuse templates for efficient and accurate data extraction.
- Add custom keywords to ensure accurate data capture, even with changing document layouts.
- Automate the process to reduce errors and enhance data reliability.
- Speed up document processing, allowing staff to focus on core business activities.
- The Odoo AI-OCR Document Digitization module can handle increasing document volumes as business needs grow.
- Simplify the processing of similar documents in the future.
- Reduce labour costs associated with manual data entry tasks.
Installation
- Once you purchase the App from the Webkul store, you will receive the link to download the zip file of the module.
- Extract the file on your system after the download finishes. As a result, you will be able to see a folder named- ‘odoo_invoice_digitization’
- Copy and paste this folder inside your Odoo Add-Ons path.
- Now, open the Odoo App and click on the Settings menu. Here, click on Activate the Developer Mode.
- Then, open the Apps menu and click on ‘Update Modules List.’
- In the search bar, remove all the filters and search ‘odoo_invoice_digitization’
- You will be able to see the module in the search results. Click on ‘Install’ to install it.
AI Pricing Policy
When you upload a PDF to the Odoo AI-OCR Document Digitization module, the AI reads the text and converts it into a structured format. But how does it calculate the cost?
Let’s break it down in simple terms:
1. AI Charges Based on Tokens
- AI models like OpenAI GPT-4o and Gemini AI charge per token.
- Each AI provider (OpenAI or Gemini) has different rates per 1,000 tokens.
2. Example for Cost Calculation for GPT-4o, GPT-4o Mini & Gemini AI
> GPT-4o Pricing Cost Example
OpenAI charges $0.01 per 1,000 image tokens for GPT-4o.
If 1 image contains 500 tokens, the cost calculation is:
(500 tokens ÷ 1,000 tokens) × $0.01 = $0.005
🔹 So, the pricing cost for 1 image in a PDF is $0.005 using GPT-4o.
> GPT-4o Mini Image Processing Cost
OpenAI charges $0.0075 per 1,000 image tokens for GPT-4o Mini.
If 1 image contains 500 tokens, the cost calculation is:
(500 tokens ÷ 1,000 tokens) × $0.0075 = $0.00375
🔹 So, the pricing cost for 1 image in a PDF is $0.00375 using GPT-4o Mini.
> Gemini AI Pricing Example
Google charges $0.0375 per 1 million tokens for Gemini AI (for prompts up to 128k tokens).
If 1 image contains 258 tokens, the cost calculation is:
(258 tokens ÷ 1,000,000 tokens) × $0.0375 = $0.000009675
🔹 So, the pricing cost for 1 image in a PDF is approximately $0.00001 using Gemini AI.
⇒ Learn More About AI Pricing
- OpenAI GPT-4o & Mini Pricing: Open AI Pricing Details
- Google Gemini AI Pricing: Gemini Pricing Details
Workflow
Configuration
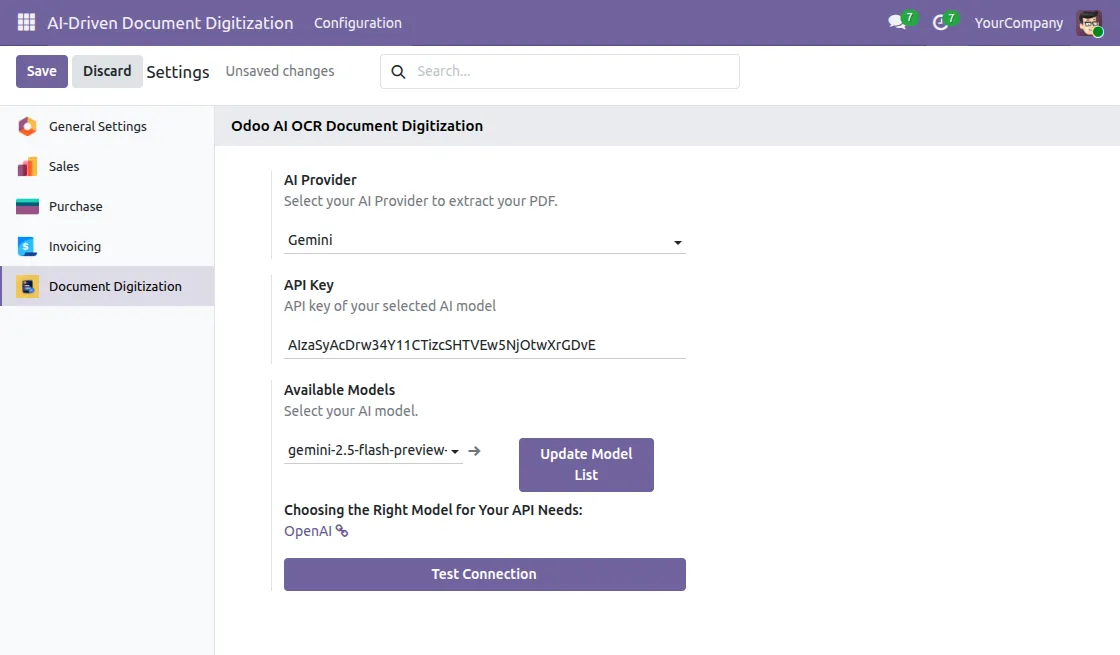
1. Go to Configuration > Settings and navigate to the Document Digitization section. Select your preferred AI Provider (Gemini or OpenAI) and enter the API Key.
Select the Available Models from the dropdown and click Update Model List to fetch or refresh the models. Click Test Connection to verify and then click Save.
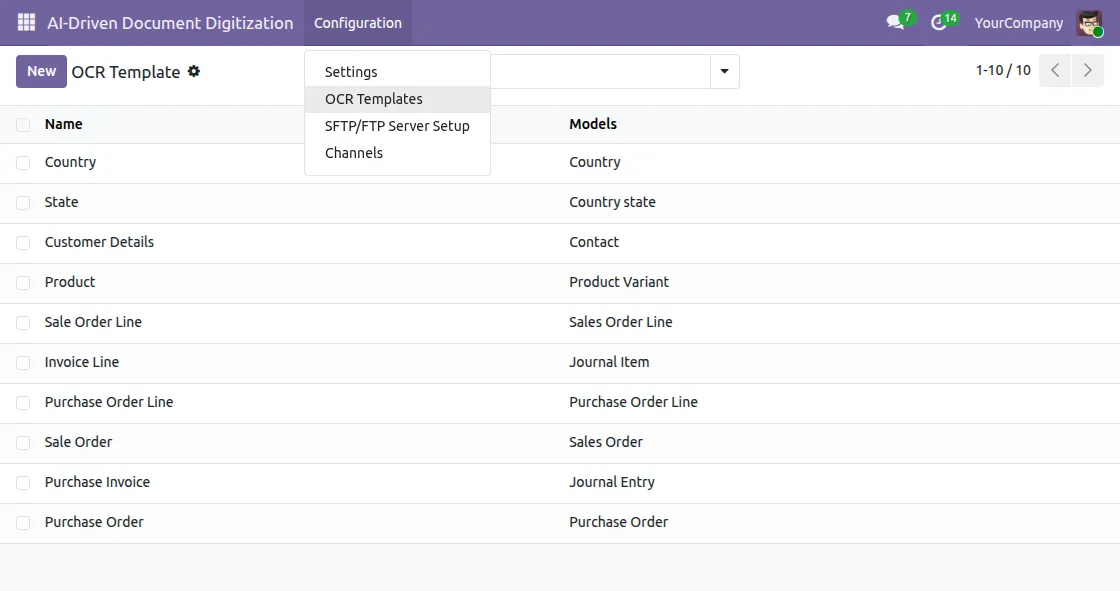
2. Go to Configuration , then click on OCR Templates .

3. After opening the OCR template, you will see templates like these. Then you can click on “New” to create a template.
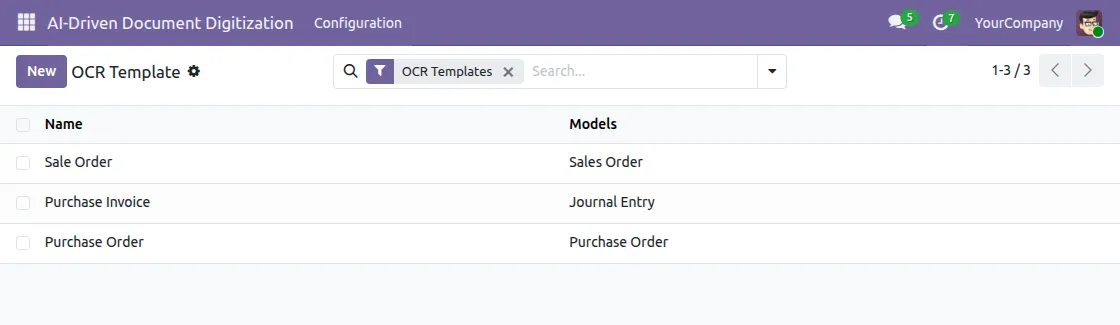
4. Click on the New button to create a fresh OCR template for a new document type.
5. Enter the Name of the template to identify it easily, for example – “Purchase Invoice Template“ or “Sale Order Template“.
6. Model – Select the Odoo model for which you want to extract data. For example, If extracting from a sale order document, select Sales Order.
7. Select the language of the document to extract data from. This helps the AI model understand and read the document more accurately.
8. Is Child Template – Enable this checkbox if the current template is a sub-template of an existing parent template.
Use this when a document has line-level data that you need to extract separately, such as product line items in a purchase order.

Field Mapping
9. Field Mapping is the process of defining which fields the AI should extract from the document and where to save that extracted data in Odoo.
With Odoo AI-OCR Document Digitization, this mapping process becomes simple and accurate.
For example – if you are processing a Purchase Invoice, you will map fields like Invoice Number, Vendor Name, Invoice Date, and Total Amount.
So the AI knows exactly what to look for in the document.
10. Field Type defines the nature of the field you want to extract.
There are 3 types:
- Simple – Use this when the field contains a plain, direct value such as text, number, or date. For example, Invoice Number, Invoice Date, Total Amount – these are simple standalone values that the AI can directly read and extract from the document.
- Relational – Use this when the field links to another Odoo record. For example, Vendor Name or Customer Name — these are not just plain text values but link to a Partner record in Odoo.The AI will extract the value and try to match it with an existing record in the system.
- Submodel Simple Field – Use this when you want to extract data from a child/line level of a document. For example, in a Purchase Order, each product line has its own Product Name, Quantity, and Unit Price. The system extracts these line-level fields using the Submodel Simple Field type, which works in combination with a Child Template.
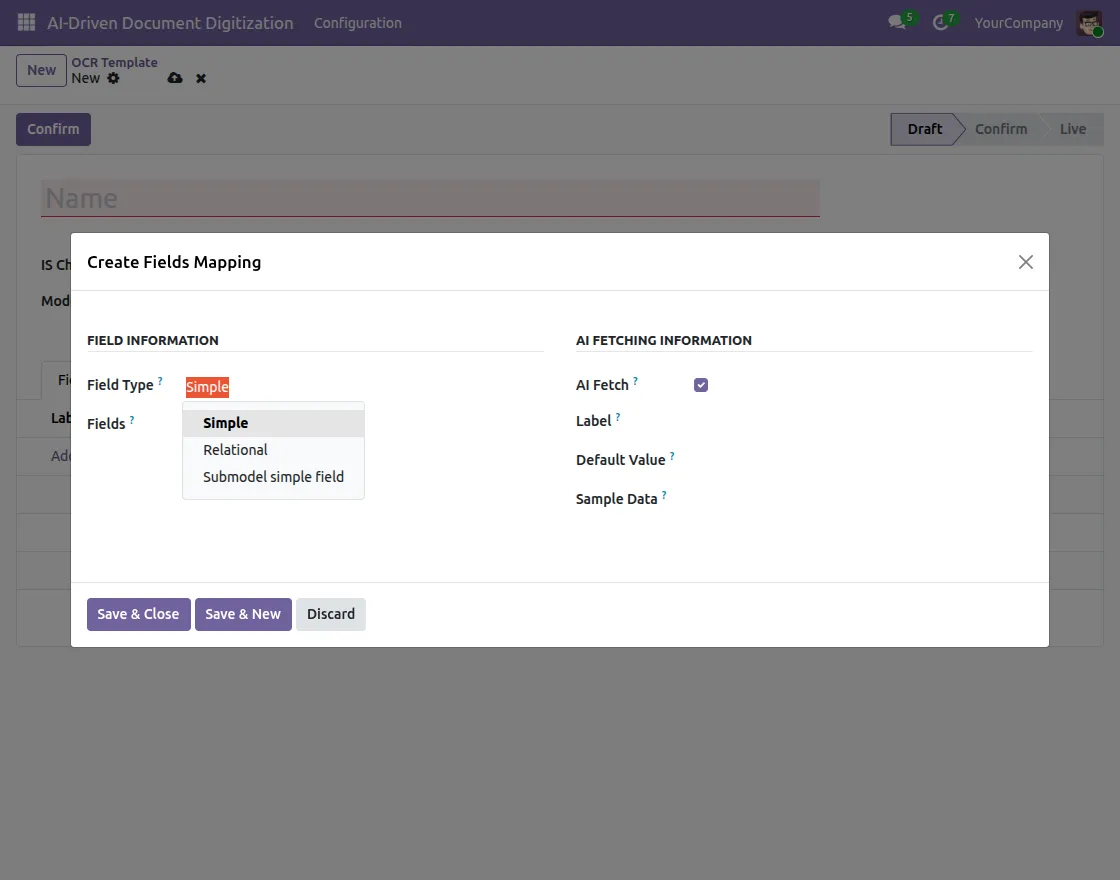
11. Field type : Simple
The pop-up divides into two sections:
FIELD INFORMATION – Define the field details here :
- Field Type – Select Simple for fields that contain plain text, numbers, or dates.
- Fields – Select the actual Odoo field where the system will map and save the extracted value in the record.
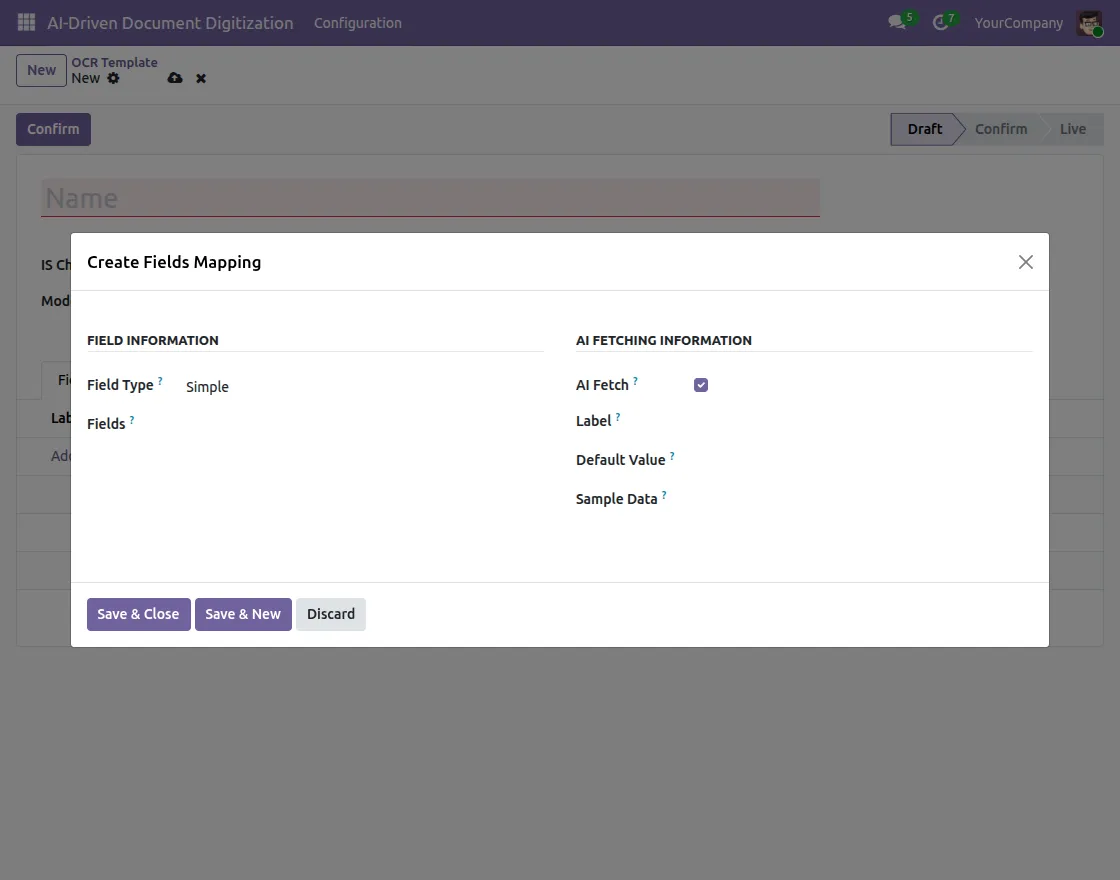
AI FETCHING INFORMATION – Define how the AI should fetch this field :
- AI Fetch – Enable this checkbox to allow the AI to automatically extract this field’s value from the document
- Label – Enter the keyword that the AI should look for in the document, e.g., “Invoice Number”, “Vendor Name”, “Total Amount”
- Default Value – Set a fallback value in case the AI is unable to find this field in the document
- Sample Data – Provide an example value so the AI better understands what kind of data to extract, e.g. “INV/2024/001” for an invoice number
Once you fill all fields, click Save & Close to save the mapping or Save & New to save and immediately add another field mapping.
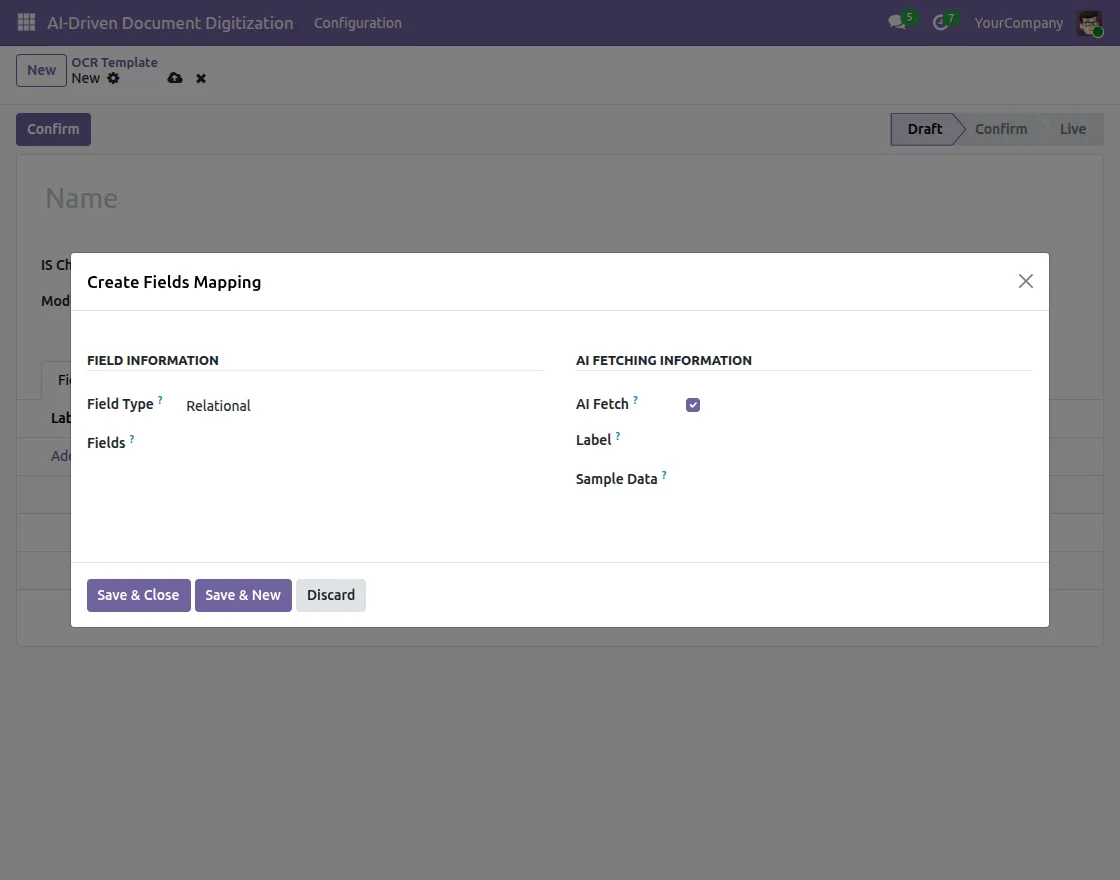
12. Field Type : Relational
The pop-up divides into two sections:
FIELD INFORMATION
- Field Type – Select Simple for fields that contain plain text, numbers, or dates.
- Fields – Select the actual Odoo field where the system will map the extracted value. For example – the Vendor field links to the Partner record in Odoo.
AI FETCHING INFORMATION
- AI Fetch – Enable this checkbox to allow the AI to automatically extract this field’s value from the document.
- Label – Enter the keyword that the AI should look for in the document, e.g., “Vendor Name”, “Customer Name”
- Sample Data – Provide an example value so the AI better understands what kind of data to extract, e.g. “Azure Interior” for a vendor name
13. Value Selection Algo – This defines how the AI should find and match the relational field value in Odoo. There are 2 options:
- Use Default – The AI uses the default record already set in the system and performs no additional search.
- Search Existing Records – The AI will search through the existing records in Odoo and try to match the extracted value with the correct record. For example, if the document contains “Mitchel Admin” as the customer name, the AI will search for this name in the existing Contacts/Partners list in Odoo and link it to the correct record automatically.
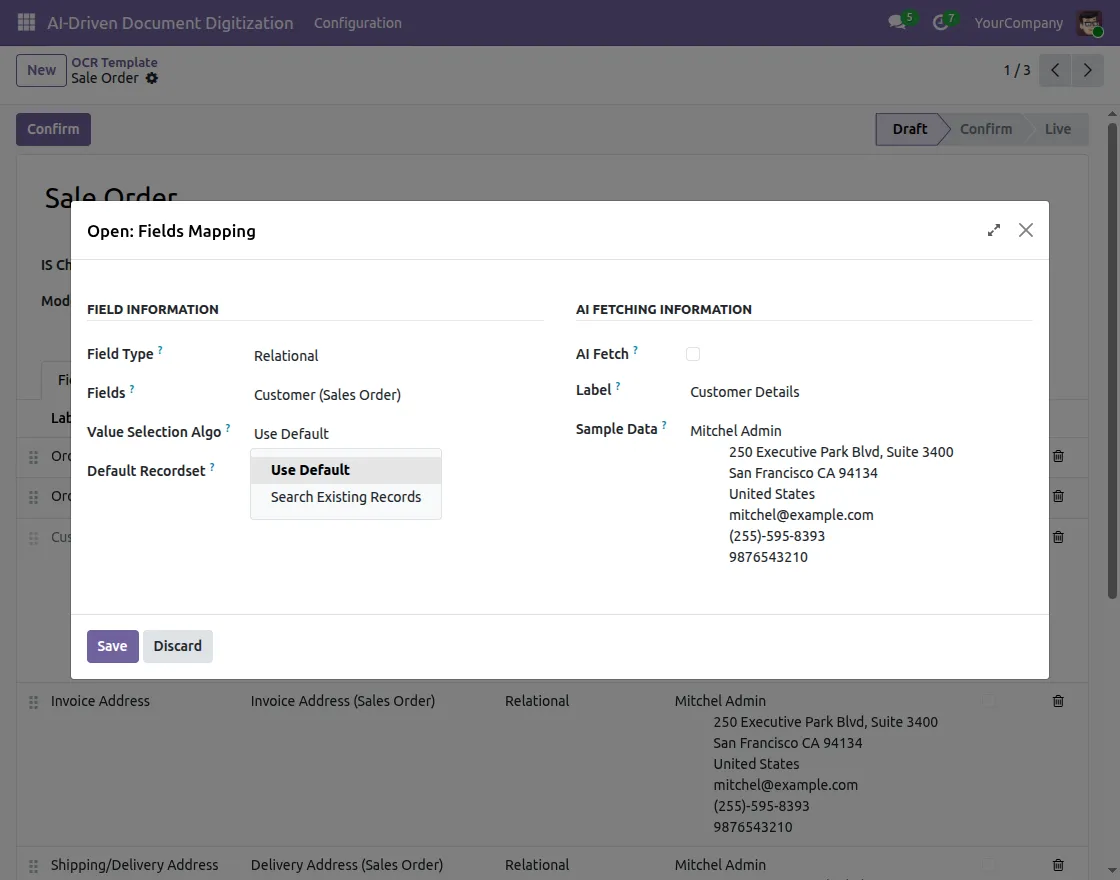
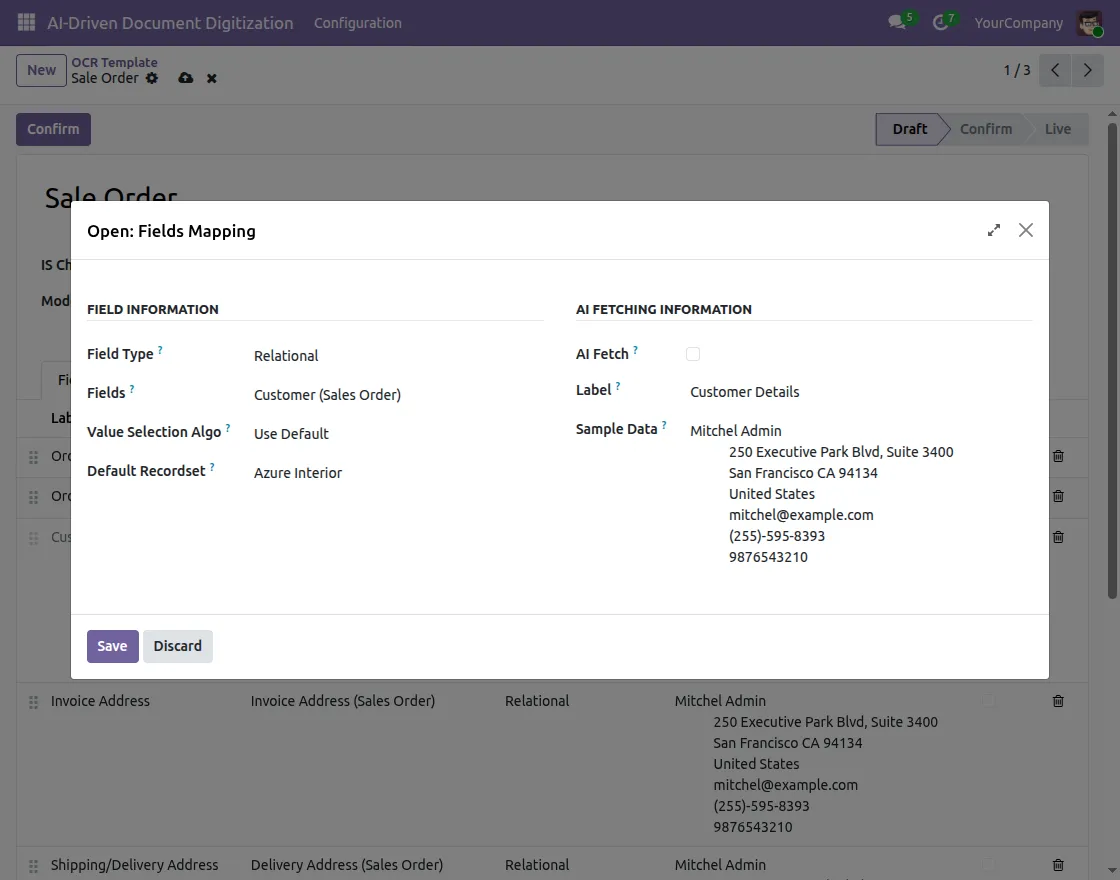
14. Value Selection Algo – Use Default
When you select Use Default, a Default Recordset field appears below.
- Default Recordset – Set a default record that will be used as a fallback value when the AI is unable to find or match the correct record from the document. For example, if the customer name is not found in the document, the system will automatically assign Azure Interior as the default customer.
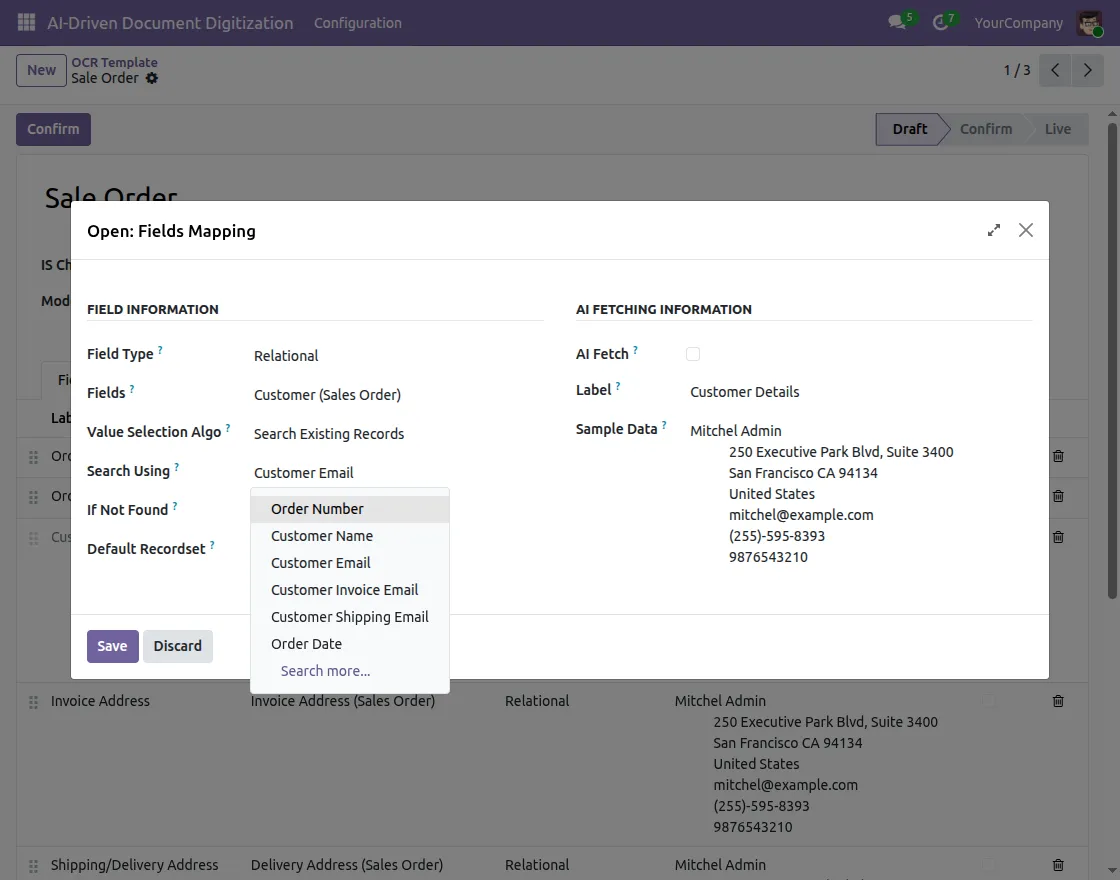
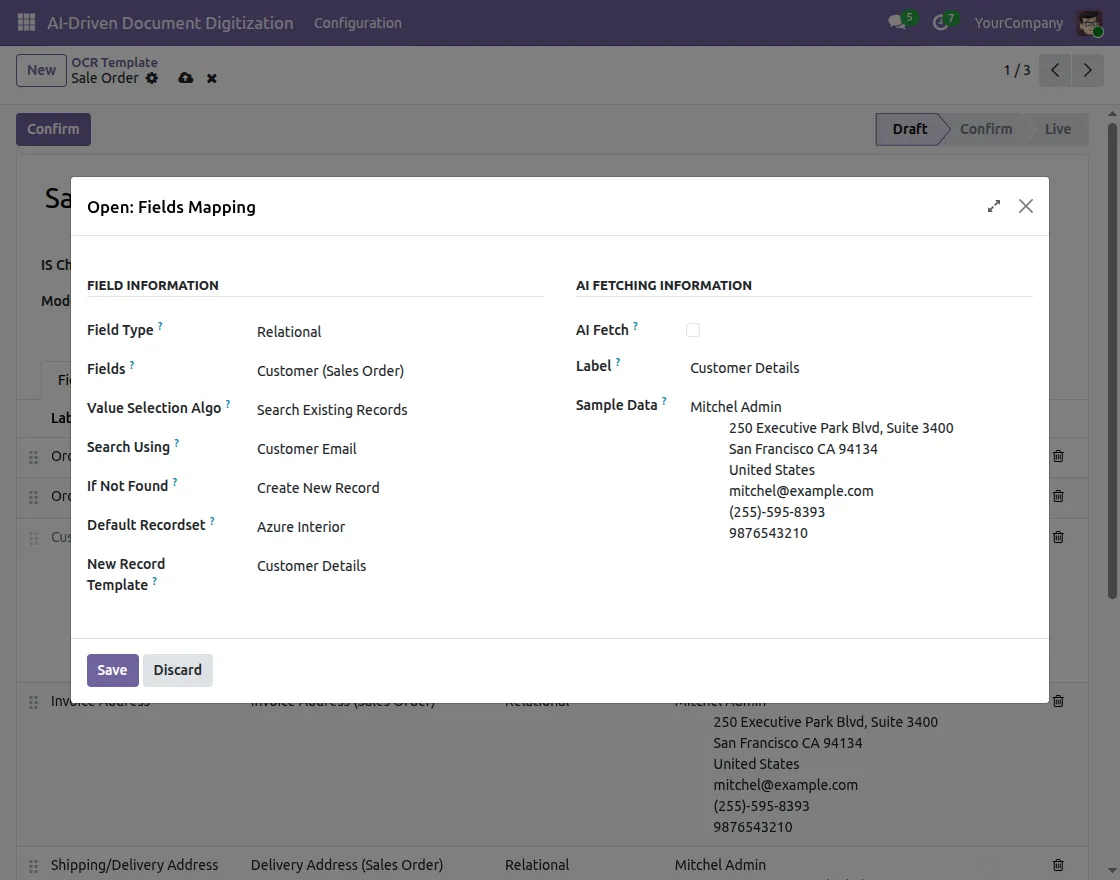
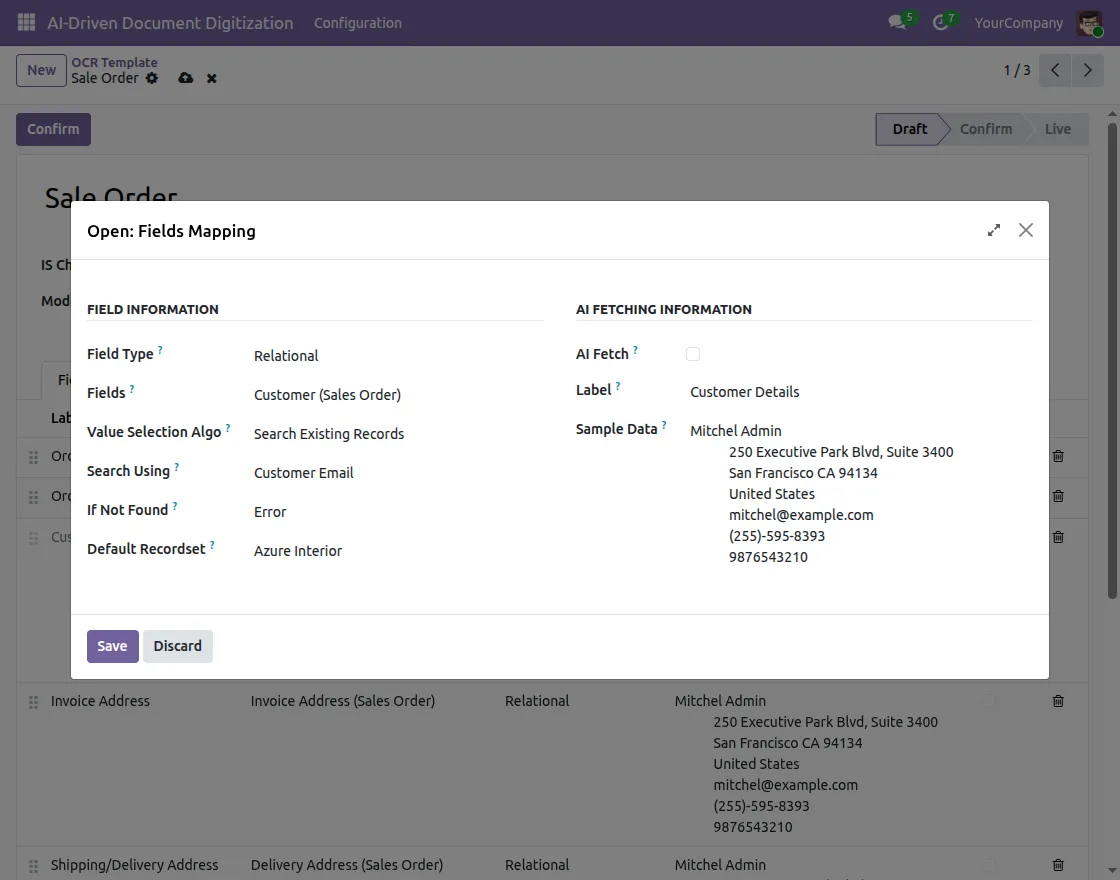
15. Value Selection Algo – Search Existing Records
When you select Search Existing Records, 3 additional fields appear below – Search Using, If Not Found, and Default Recordset.

- Search Using – Select the field by which Odoo will search and match the correct record from the system. For example, you can search using Customer Name, Customer Email, Order Number, Order Date, etc.
16. If Not Found – Define what should happen when the AI is unable to find a matching record in Odoo. There are 3 options:
i. Use Default
- When Use Default is selected, the system will fall back to the Default Recordset value if no matching record is found.
For example, if the customer is not found in Odoo, the system will automatically assign Azure Interior as the default customer record.

ii. Create New Record
When Create New Record is selected, 2 additional fields appear:
- Default Recordset – Set a default record to be used as a base reference while creating the new record
- New Record Template – Select a template that will be used to create the new record automatically. For example, if the customer is not found in Odoo, the system will create a new customer record using the Customer Details template.
iii. Error
- When Error is selected, the system will throw an error and stop the extraction process if no matching record is found in Odoo.
- This option is useful when you want to ensure that only existing records are used and no new records are created automatically.
Once all fields are filled, click Save & Close to save the mapping or Save & New to save and immediately add another field mapping.
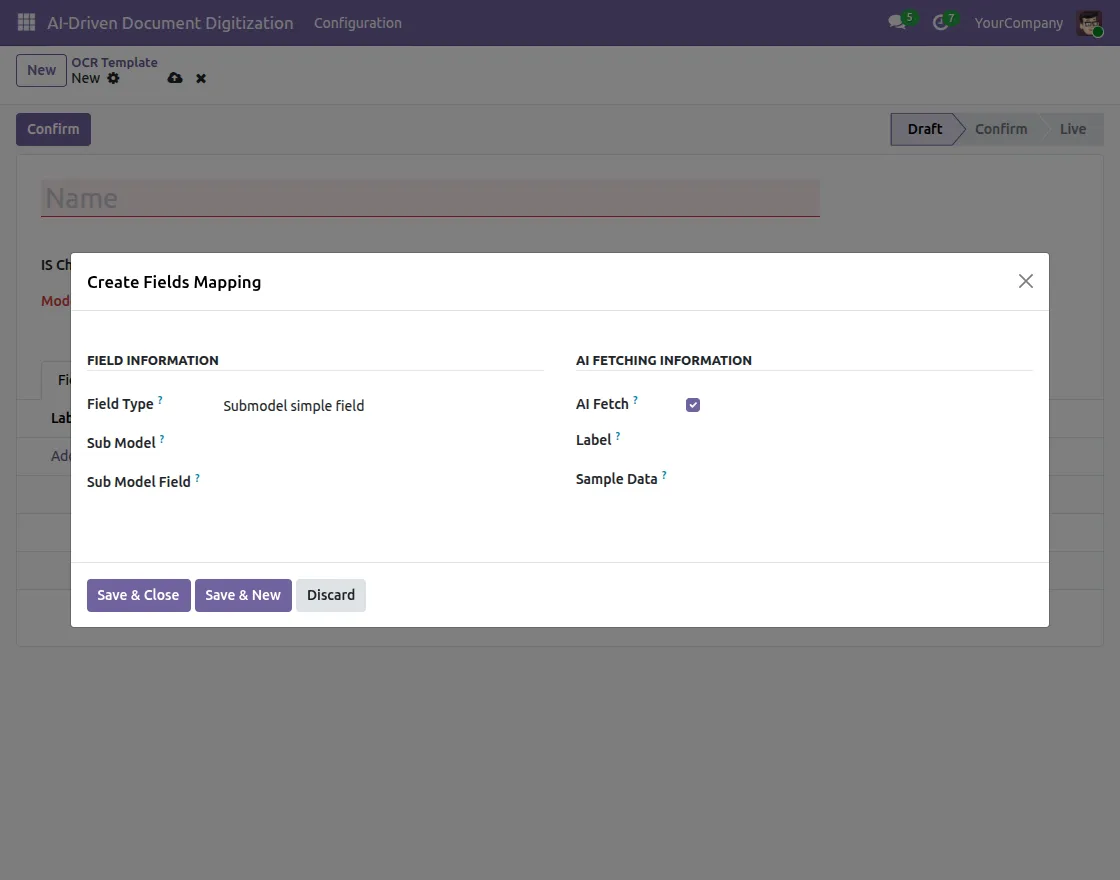
17. Field Type : Submodel Simple Field
The pop-up is divided into two sections :
FIELD INFORMATION – Define the field details here :
- Field Type – Select Submodel Simple Field for extracting line-level data from the document
- Sub Model – Select the child model from which line-level data will be extracted. For example, in a Purchase Order, the sub model would be the Order Lines
- Sub Model Field – Select the specific field within the sub model that you want to extract. For example, Product Name, Quantity, or Unit Price from each order line
AI FETCHING INFORMATION – Define how the AI should fetch this field :
- AI Fetch – Enable this checkbox to allow the AI to automatically extract this field’s value from the document
- Label – Enter the keyword that the AI should look for in the document, e.g., “Product”, “Qty”, “Price”
- Sample Data – Provide an example value so the AI better understands what kind of data to extract, e.g., “Laptop” for a product name
Once all fields are filled, click Save & Close to save the mapping or Save & New to save and immediately add another field mapping.
18. Dry Run
Odoo AI-OCR Document Digitization provides a Dry Run feature to test your template before processing real documents.
Go to Configuration > OCR Templates from the top navigation menu, where you will see the list of all available OCR Templates.
Click on any template on which you want to perform a Dry Run, for example, click on Sale Order.
19. After clicking on the template, you will see the complete template details, including all configured Fields Mapping such as Order Number, Order Date, Customer Details, etc.
You will also notice some additional fields on this page:
- Record Reference – The reference number of the last record that was created using this template
- Unique Field – The field that is used to identify a unique record, for example Order Number
- Duplicate Action – Defines what should happen if a duplicate record is found during extraction, for example Ignore
Once you have reviewed the template, click on the Dry Run button at the top left to test the extraction process with a sample document.

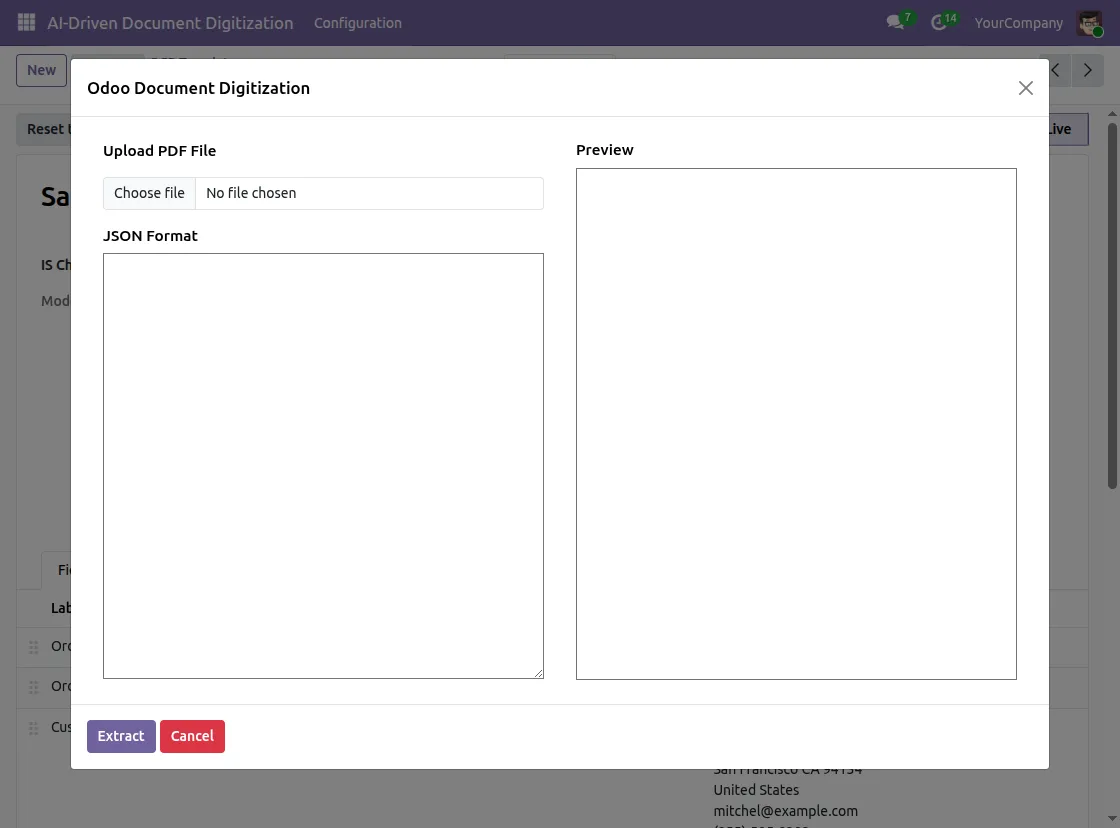
20. After clicking on Dry Run, a popup titled Odoo Document Digitization will appear with the following sections:
- Upload PDF File – Click on Choose File to upload a sample PDF document that you want to test the extraction on
- JSON Format – Once the file is uploaded and extracted, the AI will display the extracted data in JSON format here, showing exactly which fields were captured and what values were fetched from the document
- Preview – The uploaded PDF document will be previewed here on the right side so you can visually verify the document being processed
After uploading the PDF file, click on Extract to trigger the AI extraction process.
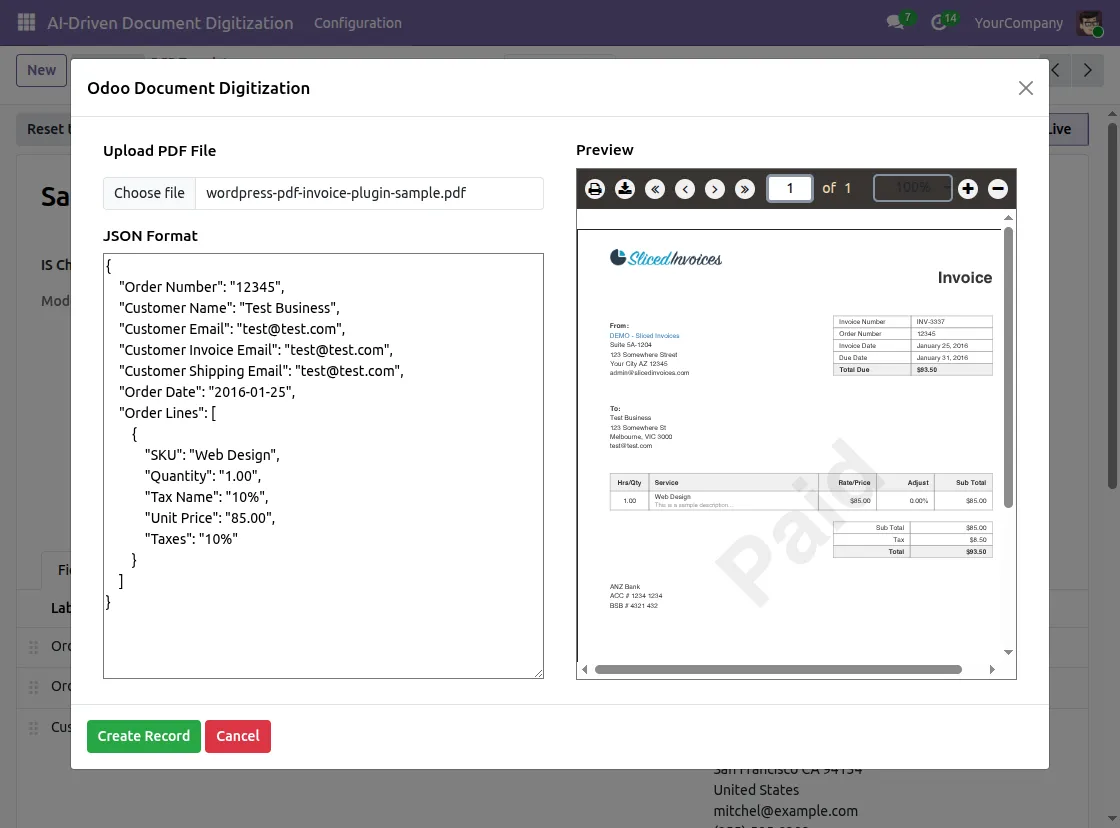
21. Once the extraction is complete, the JSON Format section will display all the data extracted from the uploaded document. For example:
- Order Number – 12345
- Customer Name – Test Business
- Customer Email – [email protected]
- Order Date – 2016-01-25
- Order Lines – including SKU, Quantity, Tax Name, Unit Price, and Taxes for each line item
The Preview section on the right will display the uploaded invoice so you can cross-verify the extracted data with the original document.
After reviewing the extracted data, click on CreateRecord to automatically create a structured Odoo record with the extracted information.
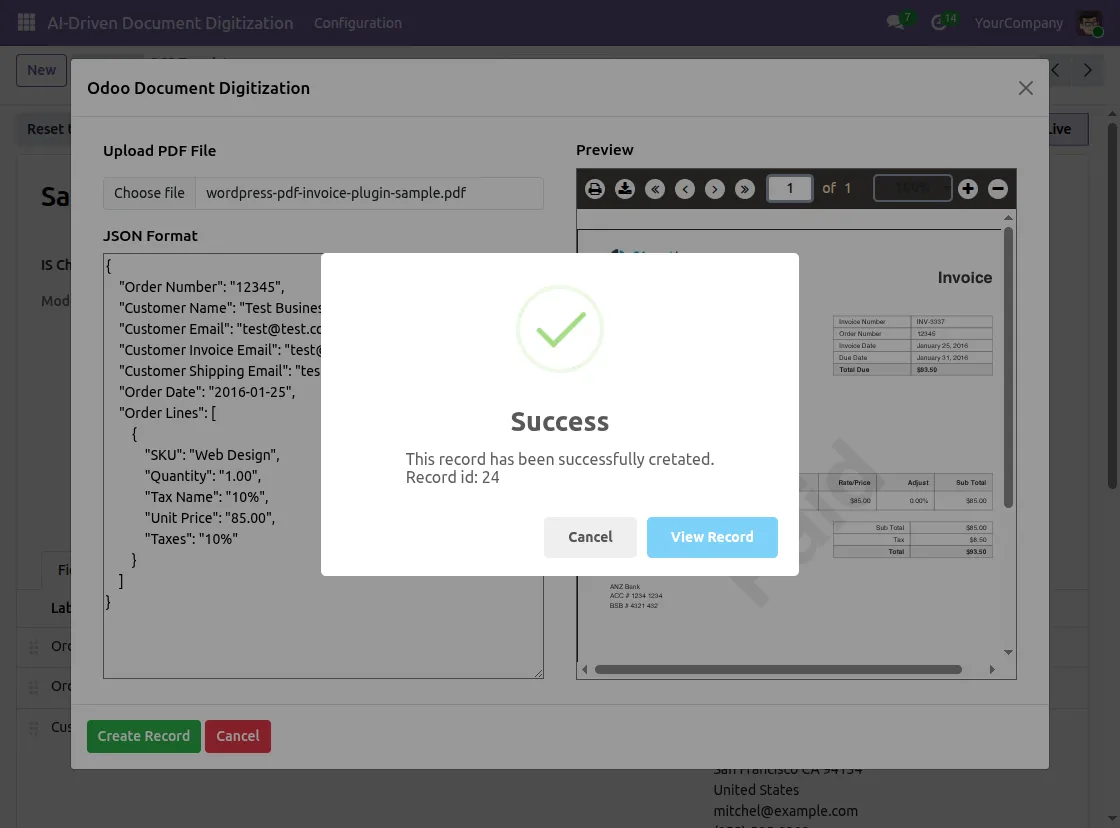
22. Once you click Create Record, a Success popup will appear confirming that Odoo has successfully created the record, along with the Record ID.
Once you click Create Record, a Success popup will appear confirming that Odoo has successfully created the record, along with the Record ID.
Click View Record to directly open and verify the newly created Odoo record with all the extracted data populated automatically.
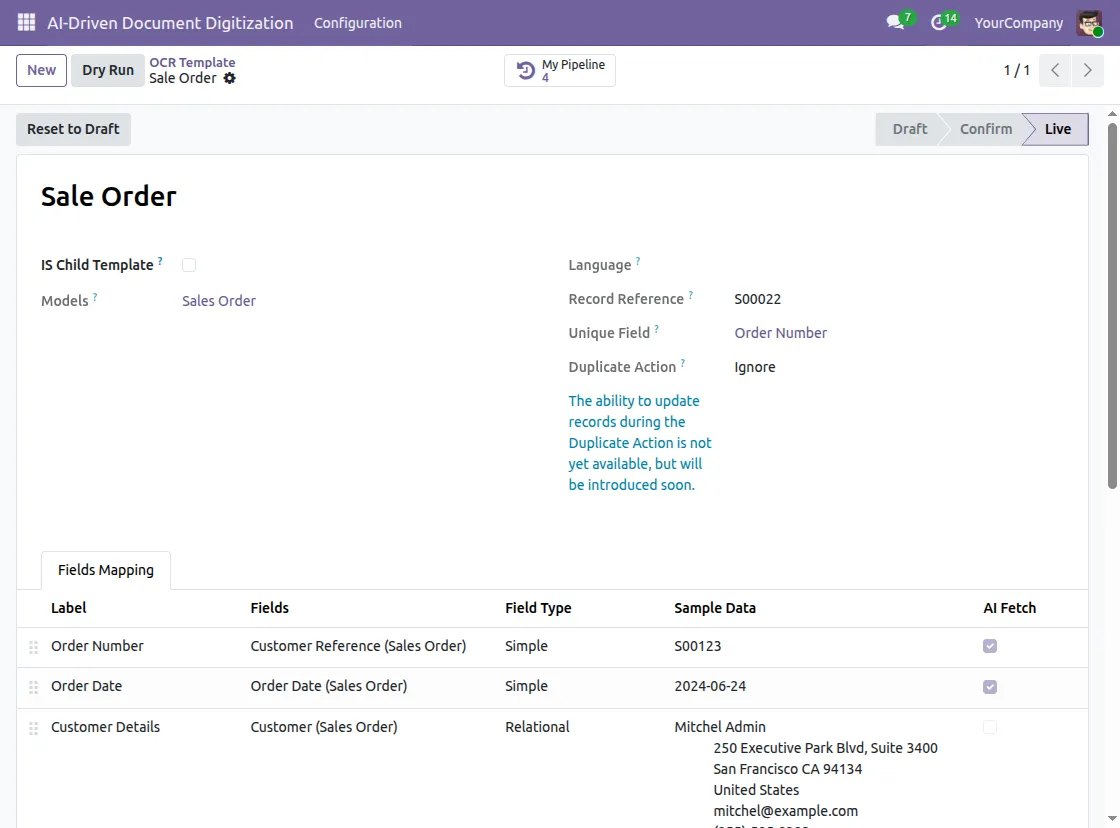
23. After you click View Record, you will be redirected back to the Sale Order OCR Template page.ck to the Sale Order OCR Template page.
Here you will notice that the My Pipeline count has increased, confirming that the system has successfully added the new record.
Click My Pipeline to view all the records that the OCR extraction process has created.
24. SFTP/FTP Server Setup
Go to Configuration > SFTP/FTP Server Setup from the top navigation menu.
This section allows you to connect a remote folder (via SFTP or FTP server) from which Odoo AI-OCR Document Digitization will automatically fetch documents for data extraction.
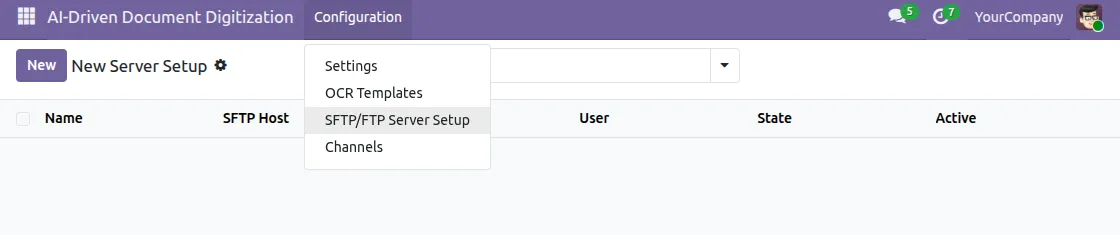
25. Once you navigate to SFTP/FTP Server Setup, you will see the list of all configured servers with details like Name, SFTP Host, SFTP Port, User, State, and Active status.
Since you have not configured any server yet, click New to create a new SFTP/FTP server setup.

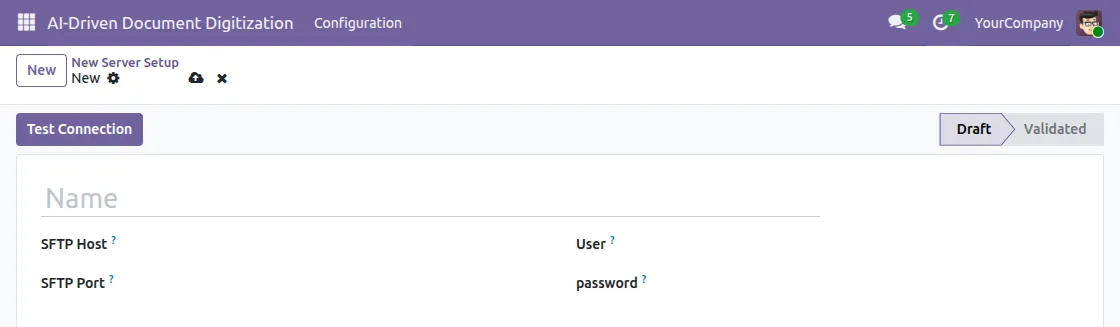
26. Click on New to open the server setup form. Fill in the following details:
- Name – Enter a name to identify this server setup, for example “Invoice SFTP Server”
- SFTP Host – Enter the hostname or IP address of your SFTP/FTP server from which the system will fetch documents.
- SFTP Port – Enter the port number of the SFTP/FTP server. The default port for SFTP is 22
- User – Enter the username to authenticate and connect to the SFTP/FTP server
- Password – Enter the password associated with the above username for server authentication
Once you fill in all the details, click Test Connection to verify that the server credentials are correct and that the connection establishes successfully.
If the connection is successful, the state will move from Draft to Validated, confirming that the server is ready to use for automatic document fetching.
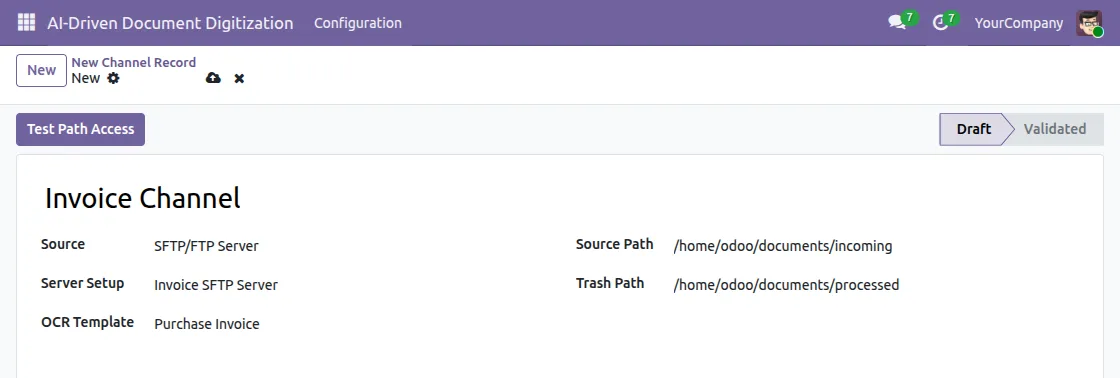
27. To create a new channel, go to Configuration > Channels and click New.
Fill in the following details:
- Name – Enter a name to identify the channel, for example, Invoice Channel.
- Source – By default, set it to SFTP/FTP Server.
- Server Setup – Select the configured SFTP/FTP server, for example, Invoice SFTP Server.
- OCRTemplate – Select the OCR template to use for extraction, for example, Purchase Invoice.
- Source Path – Enter the folder path from where the system will fetch documents, for example – /home/odoo/documents/incoming.
- Trash Path – Enter the folder path where the system will move processed documents after extraction, for example – /home/odoo/documents/processed.
Once you fill in all details, click Test Path Access to verify that the configured paths are accessible on the server.
If the verification succeeds, the state changes from Draft to Validated.The channel then starts fetching and processing documents automatically from the configured source folder.
28. Once you validate the channel, the Create Pipeline button appears at the top.
Click on CreatePipeline to fetch all documents from the configured source folder.
A Success message will appear confirming that the system has successfully created the OCR Pipelines. The OCR Pipelines tab will list all fetched documents with Draft state.
Note:
- Successfully created pipelines will not appear here again on next fetch
- The system will create records only for pipelines in the extracted state.
Click on AI Extract Data to trigger the AI extraction on all Draft pipelines. Once extraction is complete, the state of all documents will change from Draft to Data Extracted.
After extraction, click on Create Record to save the extracted data as structured Odoo records.
To view the created records, go to Configuration> OCR Templates and click on the relevant template, for example Sale Order.
All the processed records will be visible in the pipeline list with Source as SFTP/FTP Server and State as Done.
Need Help?
Hope you find the guide helpful! Please feel free to share your feedback in the comments below.
If you still have any issues/queries regarding the same, please raise a ticket at the UV Desk.
I hope this helps. In case of any further queries, contact us at our support mail.
Thanks for paying attention!!
Current Product Version - 1.0.0
Supported Framework Version - Odoo V19, V18, V17

Be the first to comment.