Introduction
Odoo Affiliate Management – Make affiliate customers in Odoo!!
Odoo Affiliate Management helps businesses create and manage affiliate programs from their website. With this setup, customers can register as affiliates, promote products, and earn commissions through PPS or PPC programs.
In addition, affiliates can use referral links, promotional banners, and custom promo codes to promote products. The module also tracks clicks, sales, commissions, and promotional code performance.
Meanwhile, admins can manage approvals, commission rules, payouts, and reports from one backend. As a result, businesses can manage the complete affiliate program from a single place.. Integration with Odoo Discount & Loyalty also helps apply customer discounts and track affiliate sales.
Candidates can sign up through the website, managed conveniently from the Odoo backend. You can check Odoo Multi-Level Marketing for smooth marketing of your products.
Check the video mentioned below for an overview of the functionality of Odoo Affiliate Management:
Features
- Create and manage a complete affiliate program from your website using a centralized backend.
- Allow customers to register as affiliates and manage applications through a simple approval workflow.
- Configure flexible Pay Per Sale (PPS) and Pay Per Click (PPC) commission models for your business.
- Generate unique product referral links and promotional banners for effective affiliate marketing campaigns.
- Assign custom promotional codes to affiliates and connect them with Odoo Discount & Loyalty programs.
- Apply customer discounts through affiliate promo codes and automatically attribute eligible sales to affiliates.
- Configure Affiliate Cookie Validation with One-Time or Always Valid options for accurate commission attribution.
- Track affiliate clicks, traffic, orders, commissions, earnings, promotional code usage, and generated sales.
- Generate affiliate invoices, manage payout settings, and process commission payments from the backend.
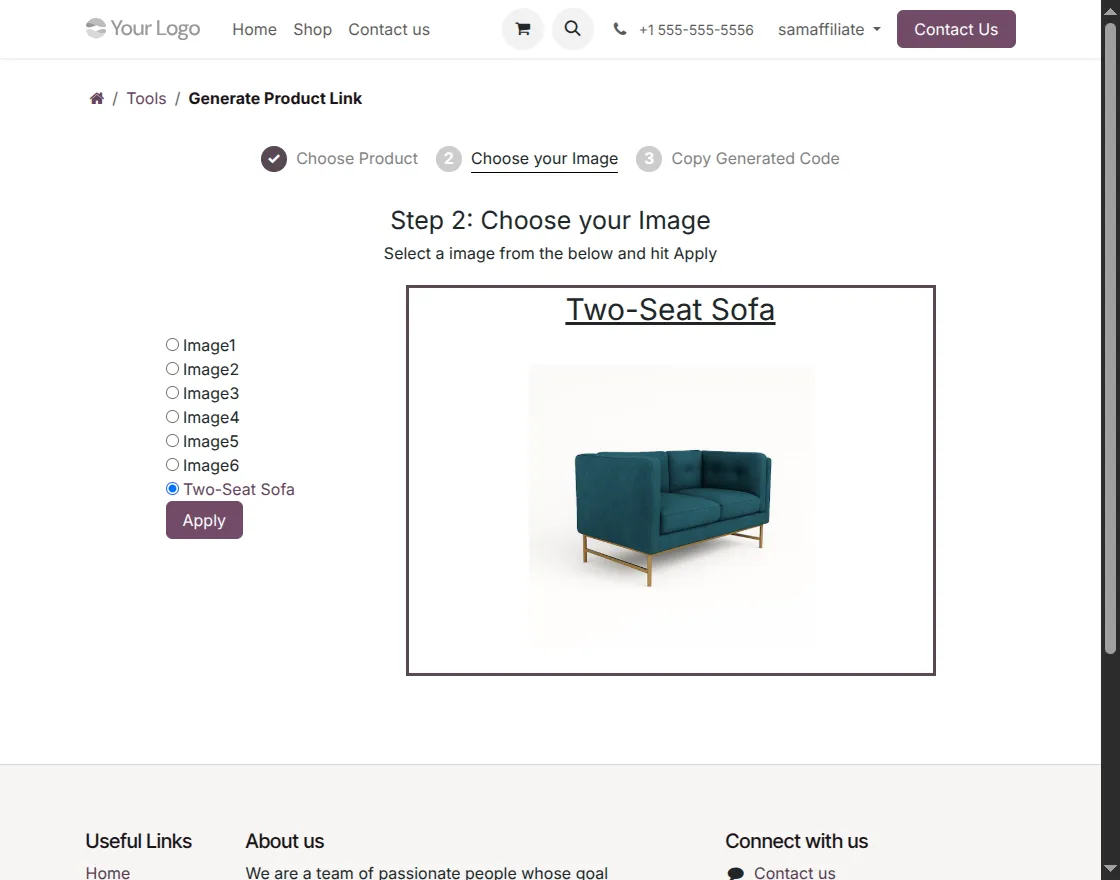
Installation
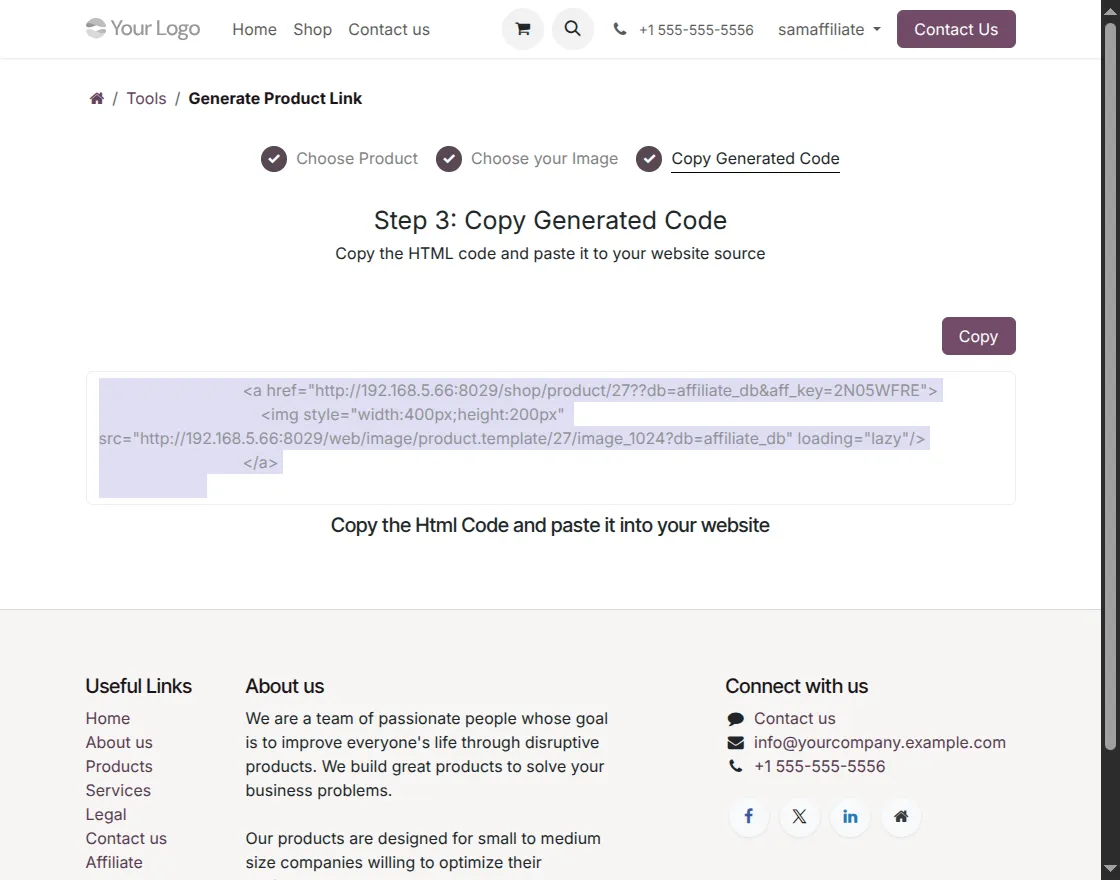
- Once you purchase the App from the Webkul store, you will receive a link to download the module’s zip file.
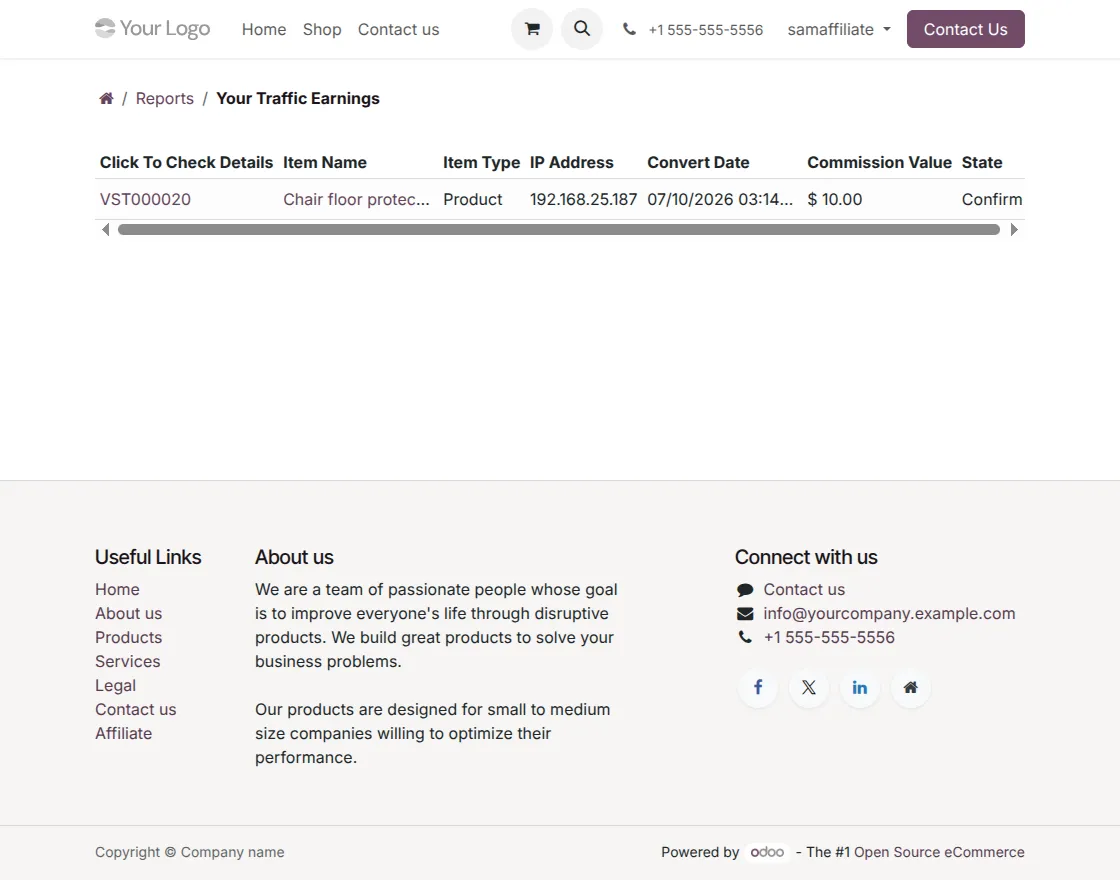
- Extract the file on your system after the download finishes. As a result, you will be able to see a folder named- ‘affiliate_management’.
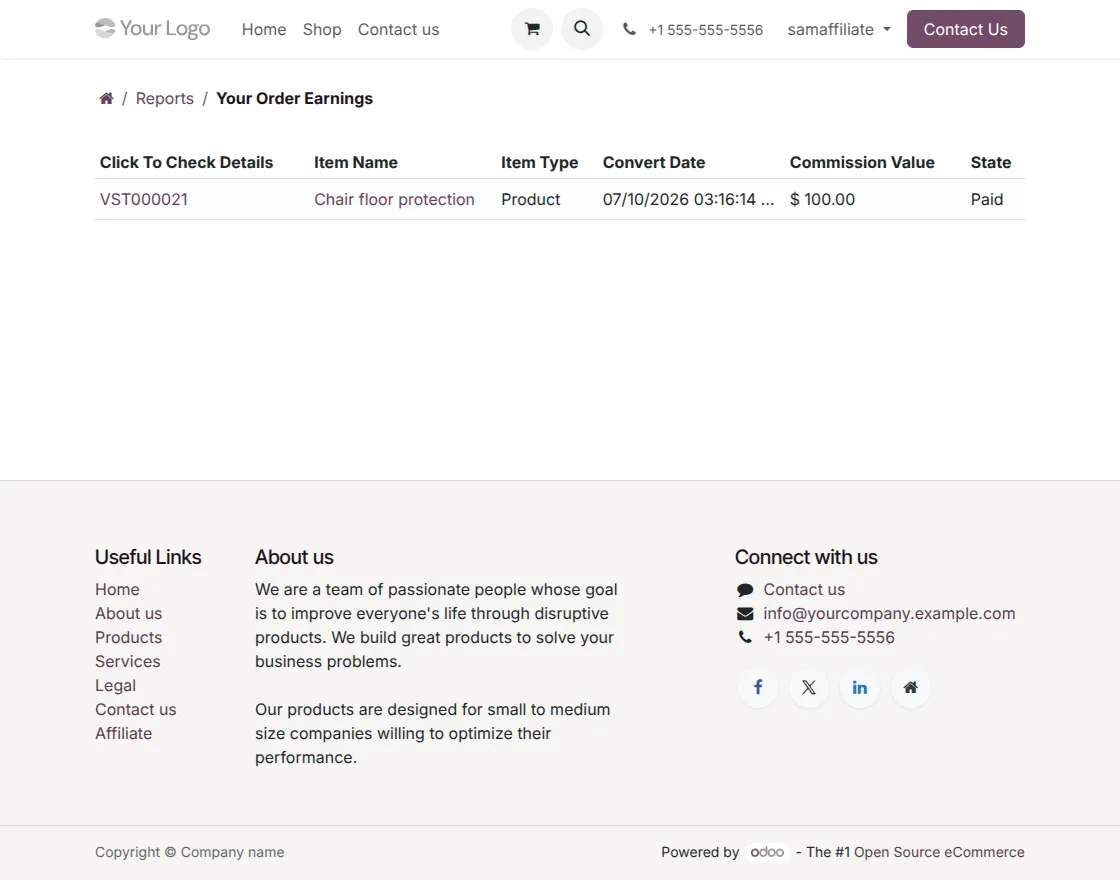
- Copy and paste this folder inside your Odoo Add-Ons path.
- Now, open the Odoo App and click on the Settings menu. Here, click on Activate Developer Mode.
- Then, open the Apps menu and click on ‘Update Modules List.’
- In the search bar, remove all the filters and search ‘affiliate_management’.
- You will be able to see the module in the search results. Click on ‘Activate’ to install it.
Before proceeding further, you can also explore our Odoo development services and extensive range of quality Odoo Apps.
Workflow
Configuration of Odoo Affiliate Management
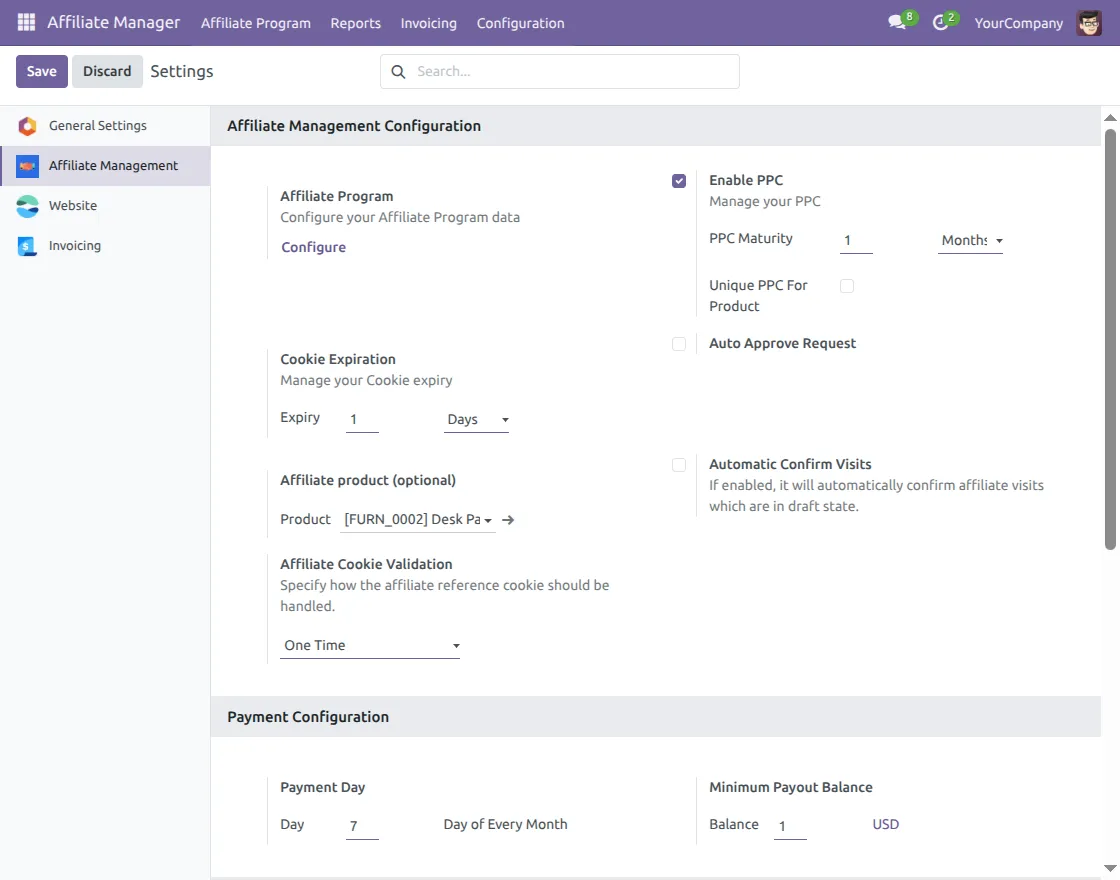
1. Go to Affiliate Program → Configuration → Settings. Enable the affiliate program and configure PPC options, payment schedule, minimum payout balance, cookie expiration, and Affiliate Cookie Validation according to your business requirements.
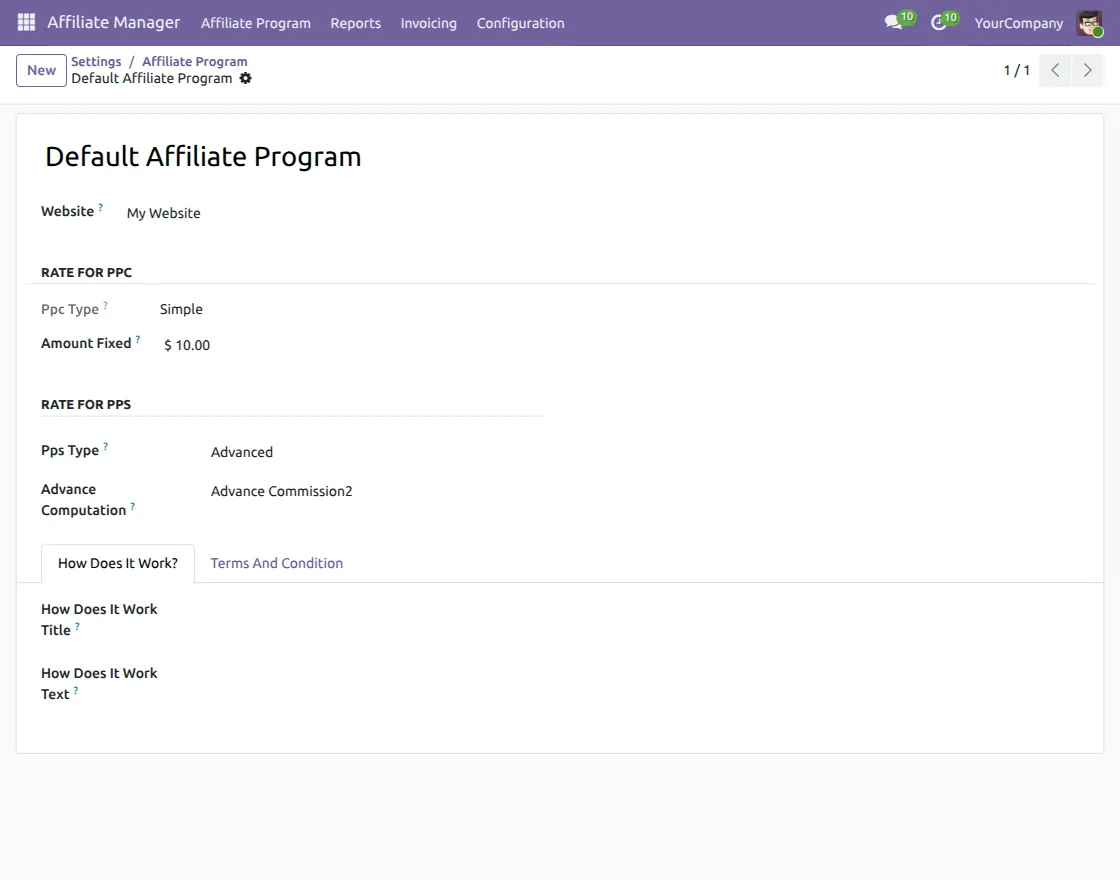
2. First, go to Affiliate Program → Configuration → Affiliate Program. Then, set the Pay Per Sale (PPS) and Pay Per Click (PPC) commission types, define the commission values, and configure the default rules for your affiliate program.
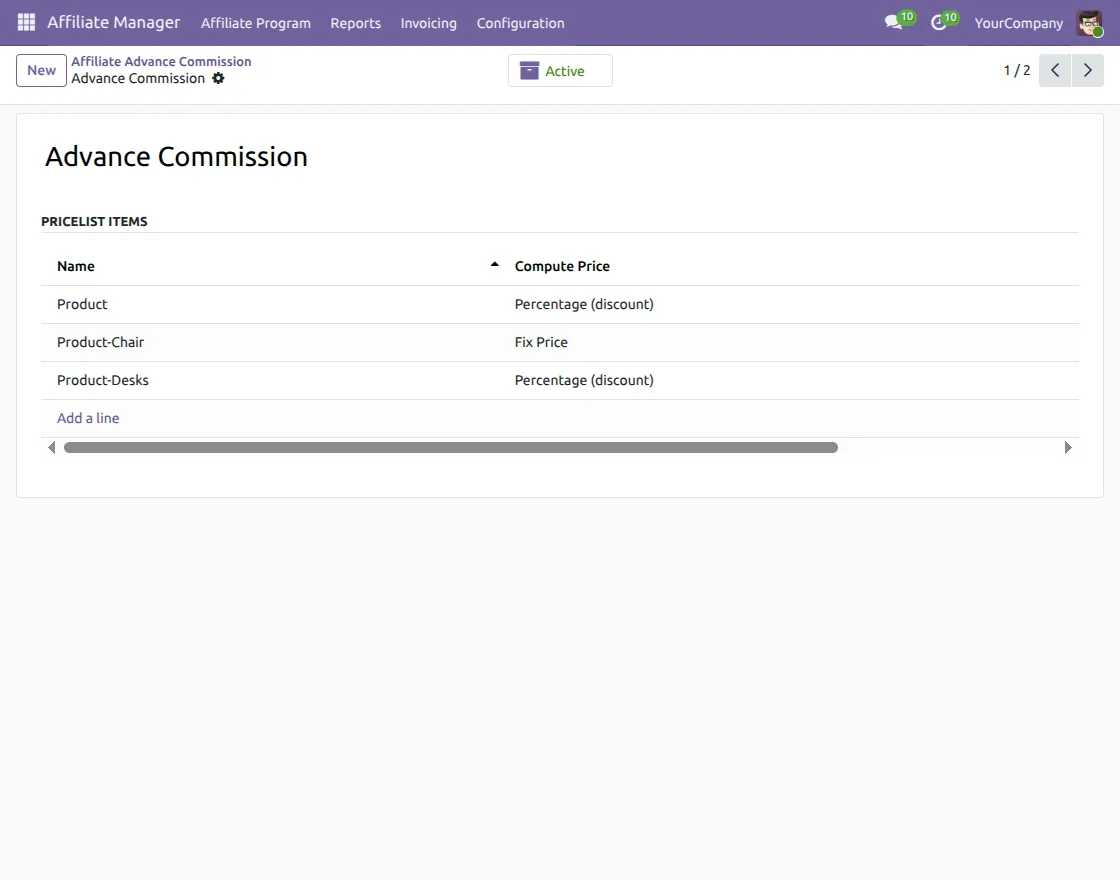
3. First, go to Affiliate Program → Configuration → Advanced Commission. Then, add product-specific commission rules by selecting the required products and defining fixed-price or percentage-based commission values.
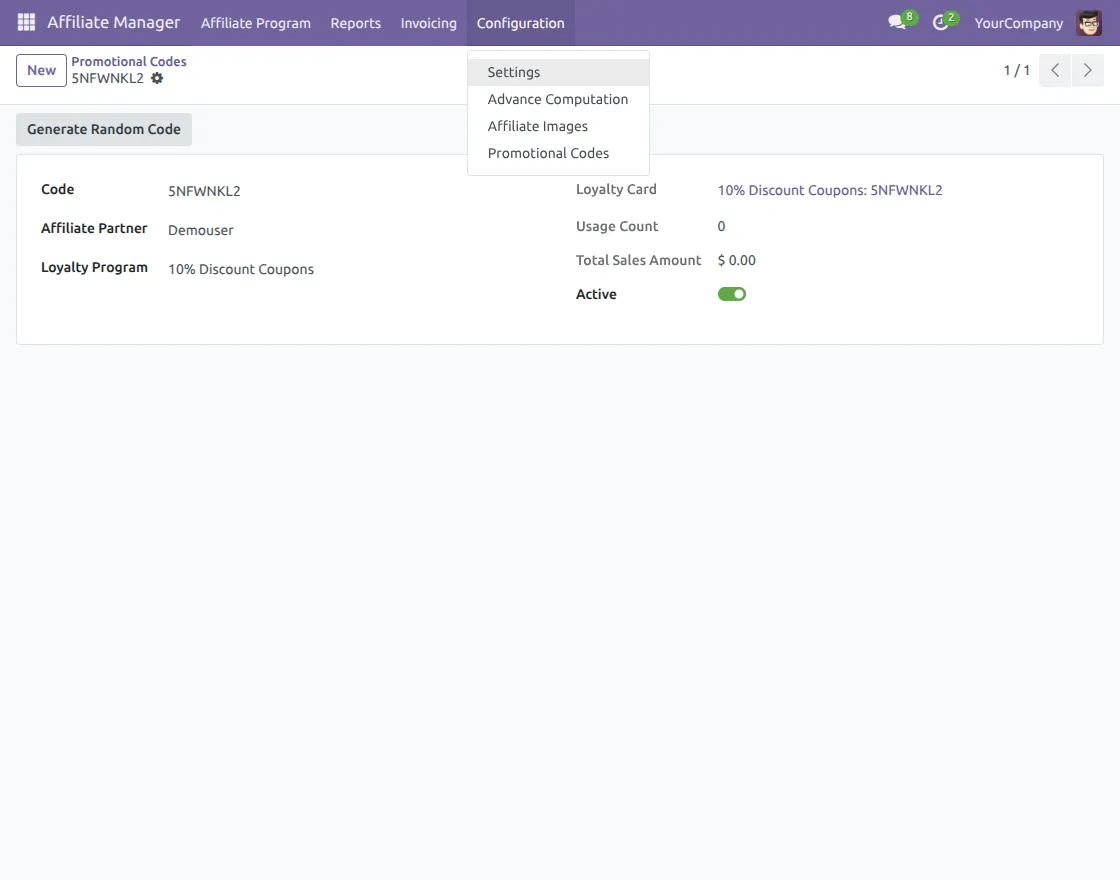
4. Go to Affiliate Program → Configuration → Promotional Codes to access the promotional code management section. Furthermore, you can create promotional codes, generate random codes, and link them with the required affiliate partner and loyalty program.
5. Go to Affiliate Program → Configuration → Affiliate Images and open an existing image template. Review the template title, dimensions, product image, pricing, and banner preview before making it available for affiliate promotions.
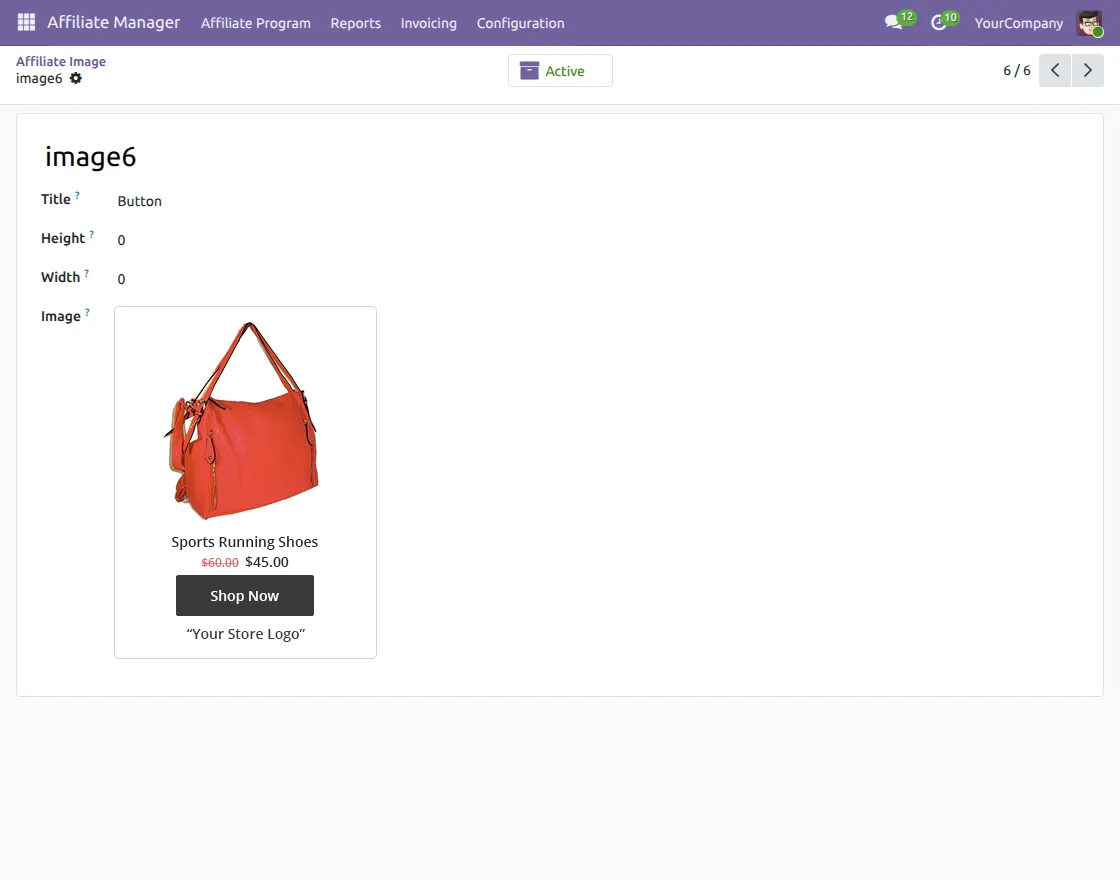
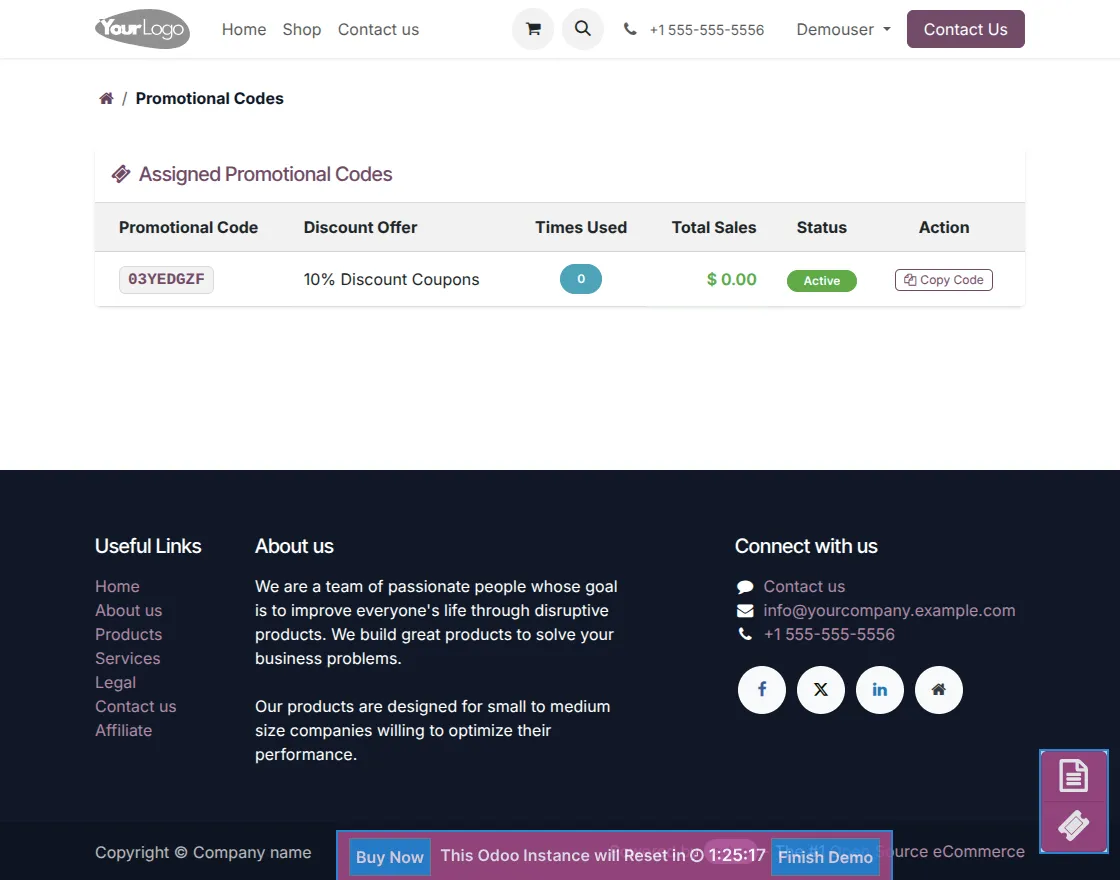
6. Open the required Affiliate Partner record and go to the Promotional Codes section. Next, add or assign a promotional code. Then, link it with the required discount program and make it available to the affiliate for sharing with customers.
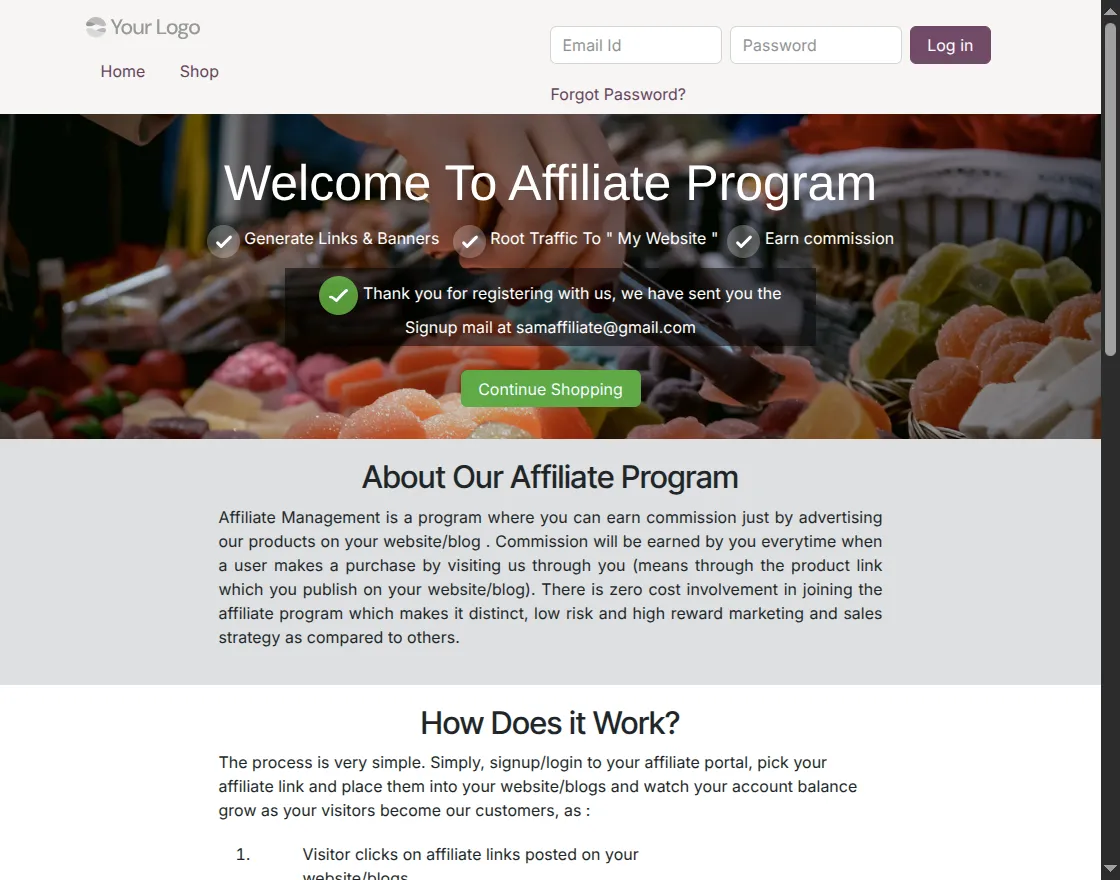
7. Navigate to the website and click Affiliate under the Useful Links section. Afterward, submit the affiliate registration request by entering the required details. Finally, after successful submission, an invitation email is sent to the registered email address to complete the signup process.
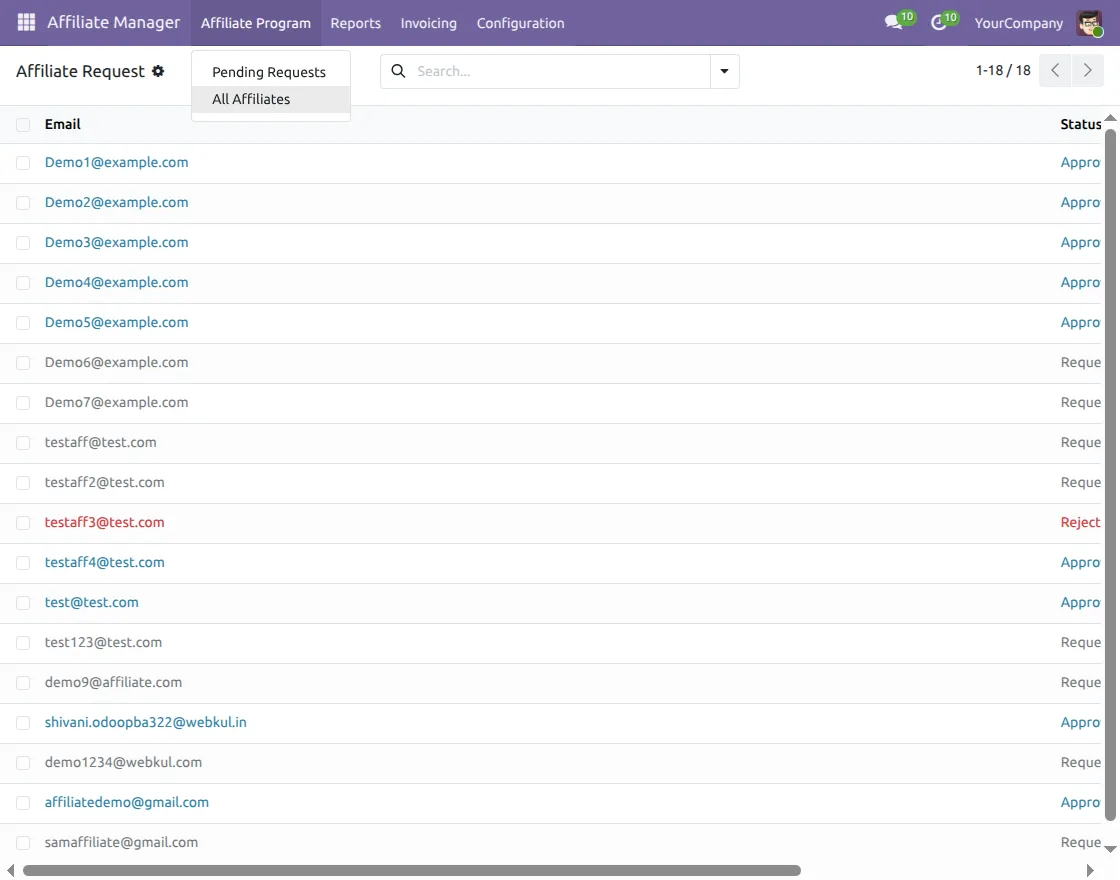
8. After an affiliate registration request is submitted, navigate to Affiliate Program → Affiliate Request from the backend. Furthermore, administrators can view all pending requests and open any application to review its details.
9. First, open the affiliate request to review the applicant details. Then, click Approve to activate the affiliate account or Reject to decline the request. Finally, the request status is updated accordingly.
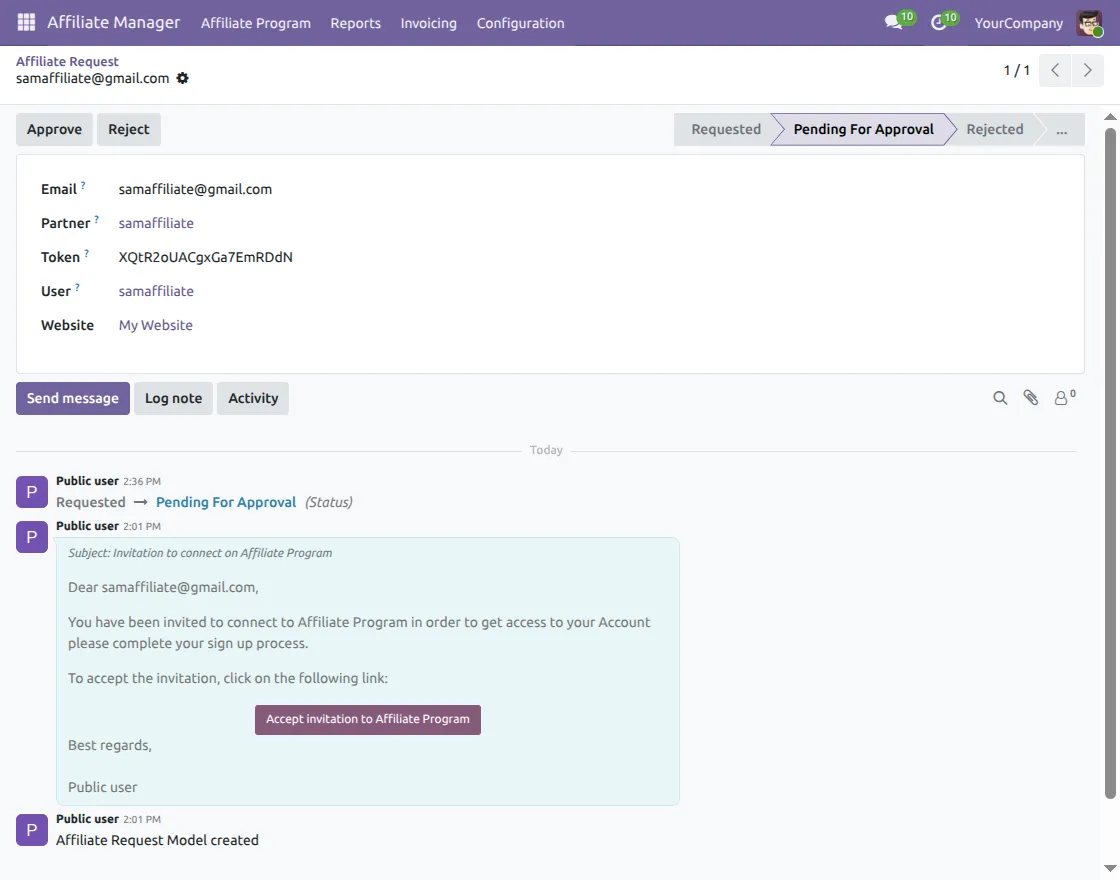
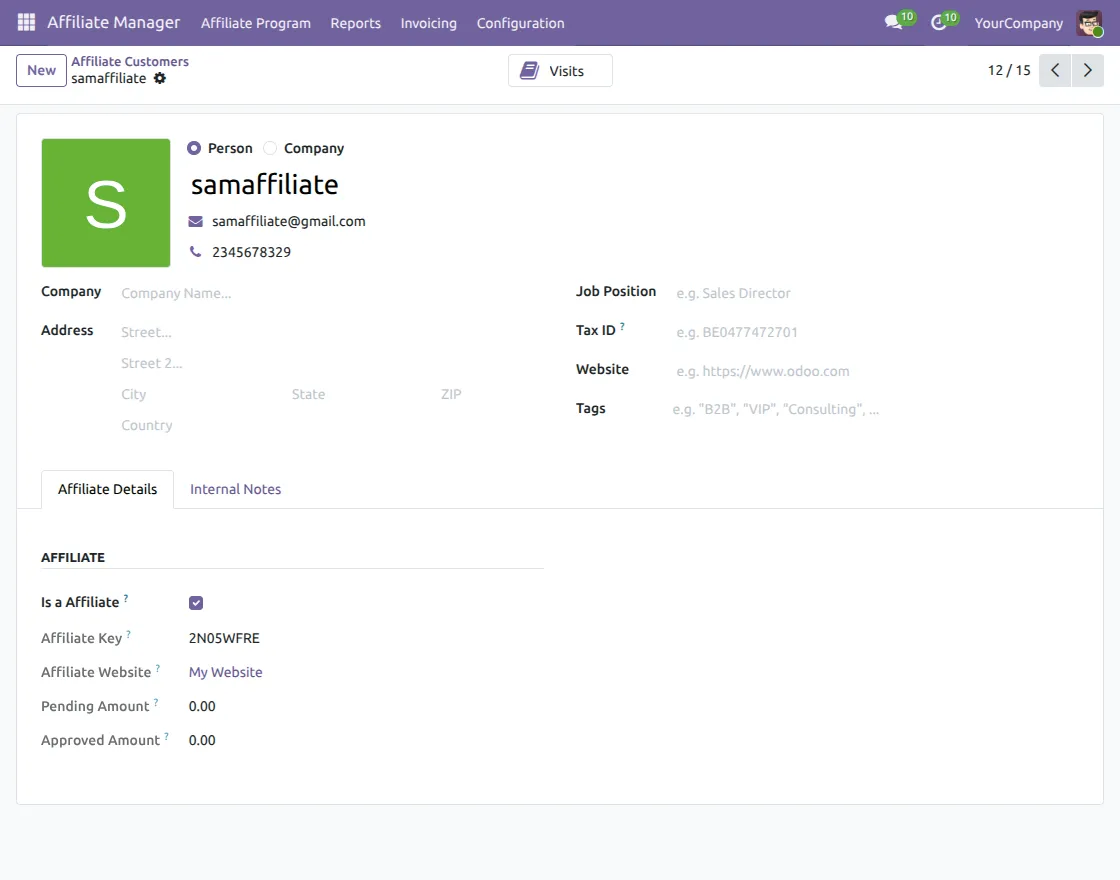
10. After the affiliate request is approved, an affiliate profile is automatically created. As a result, administrators can open the affiliate record to view the affiliate key, website, pending amount, approved amount, and other affiliate details.
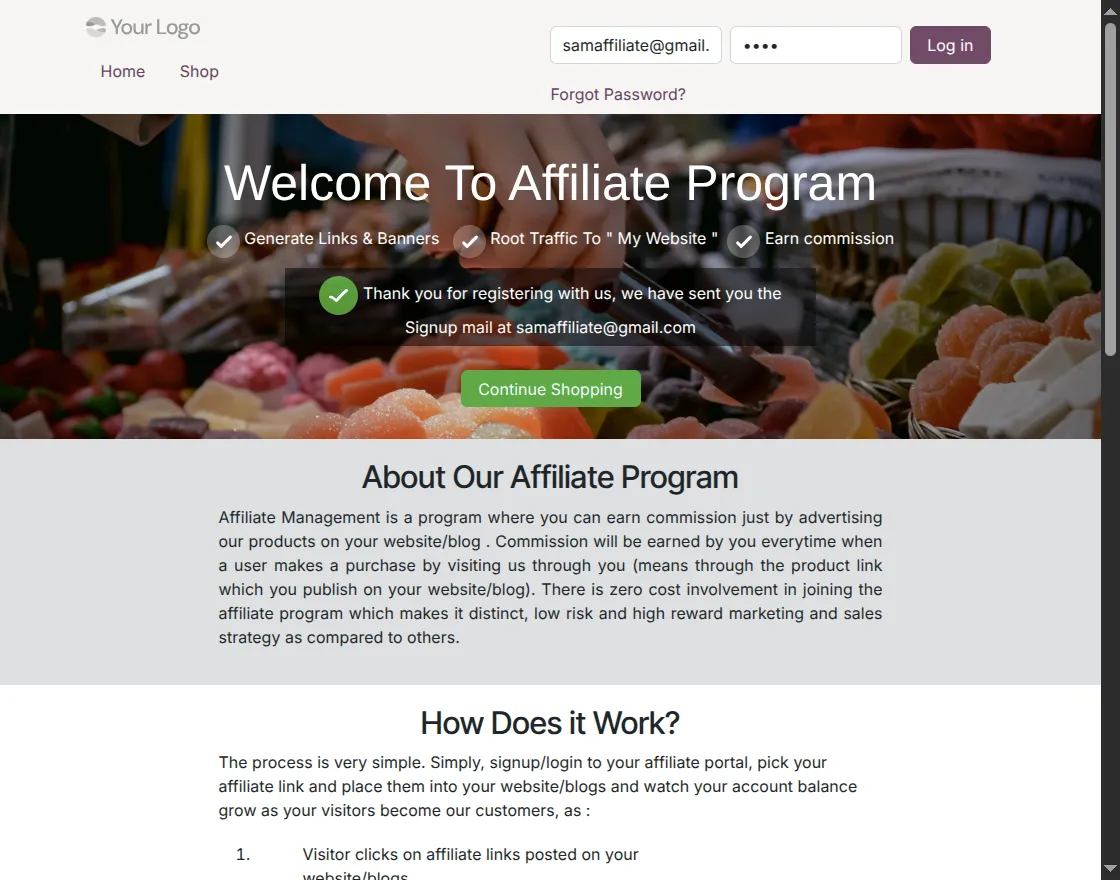
11. Once the affiliate request is approved, the affiliate can log in to the website using the registered credentials. Afterward, the affiliate can access the affiliate portal and its available tools.
12. Once logged in, affiliates are redirected to the Affiliate Dashboard. From there, they can view clicks, orders, earnings, payments, referral links, program details, and reports. They can also access the available affiliate tools.
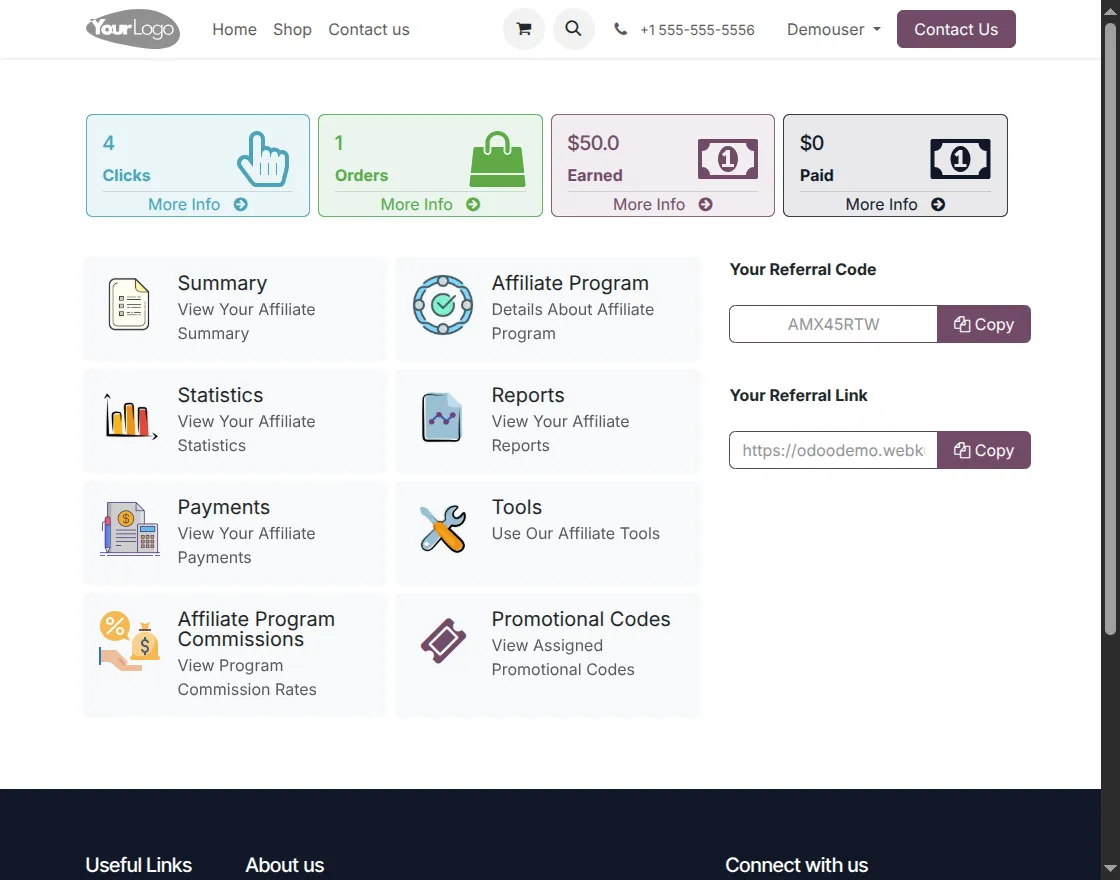
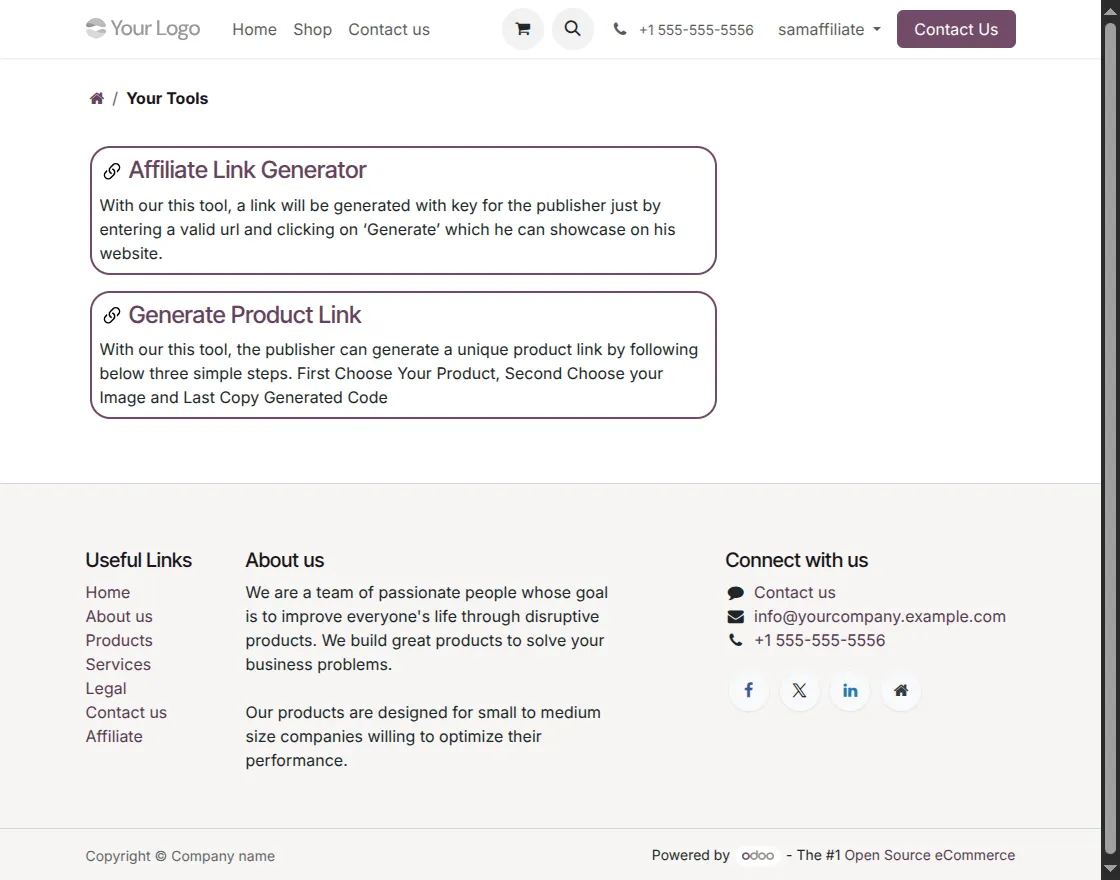
13. First, from the Affiliate Dashboard, click Tools to access the available affiliate utilities. Then, affiliates can generate product referral links or create promotional banners to share across different marketing channels.
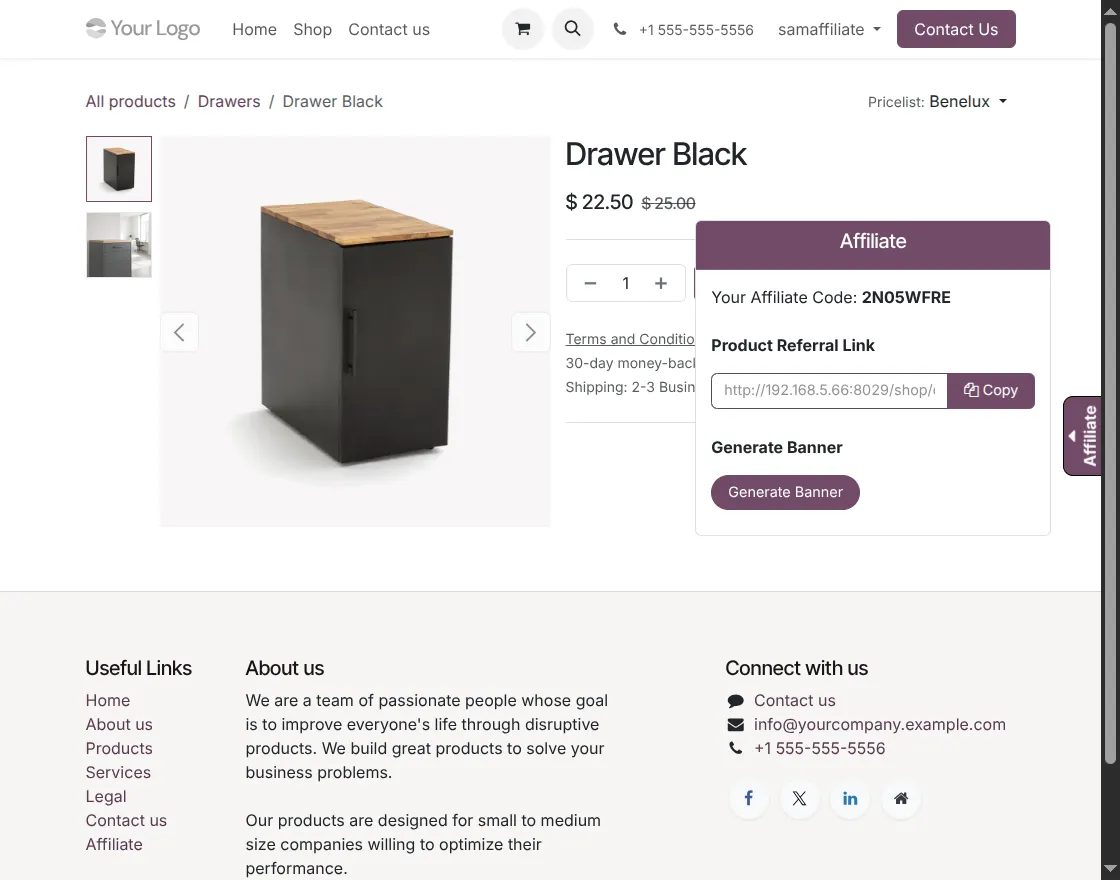
14.First, open any product page from the website. Then, the affiliate panel displays the referral code and a unique product referral link. Finally, copy the link or click Generate Banner to create a promotional banner for the selected product.
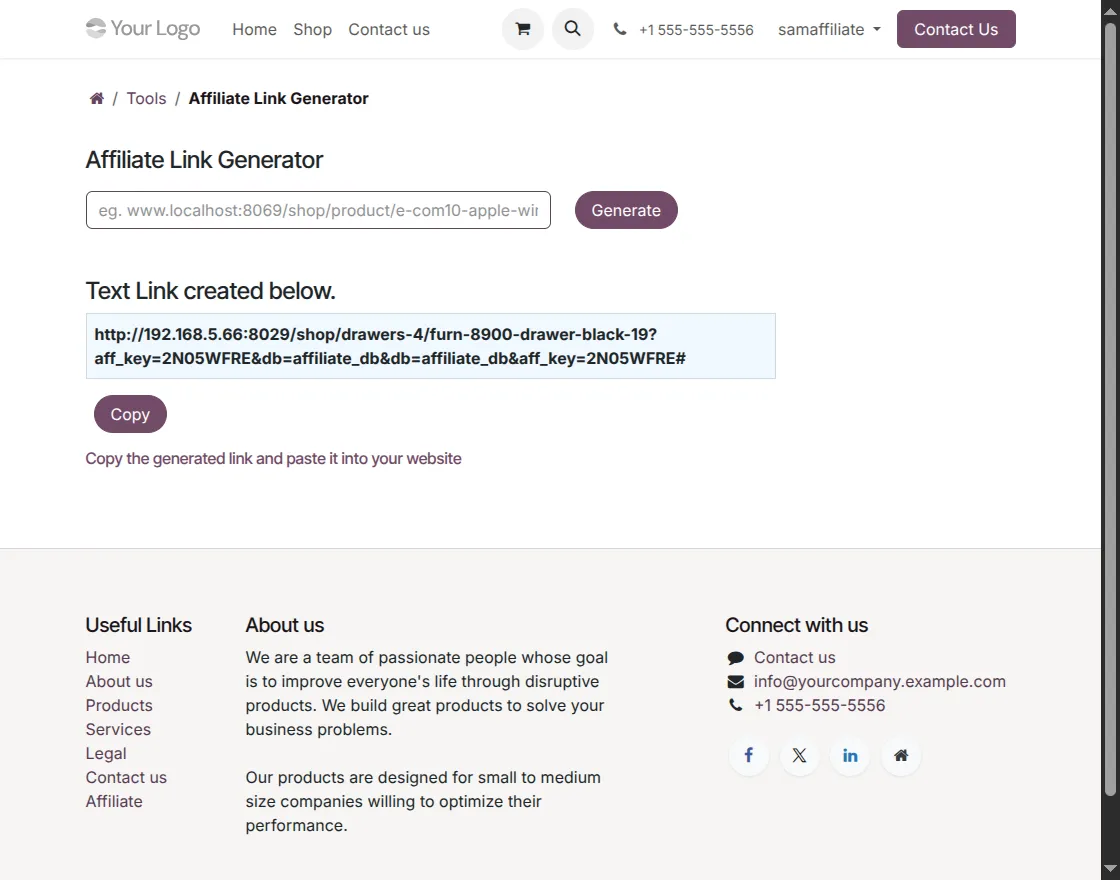
15. First, navigate to Tools → Affiliate Link Generator and enter the product URL. Then, click Generate to create a unique affiliate referral link. The link can be copied and shared across websites, blogs, emails, or social media.
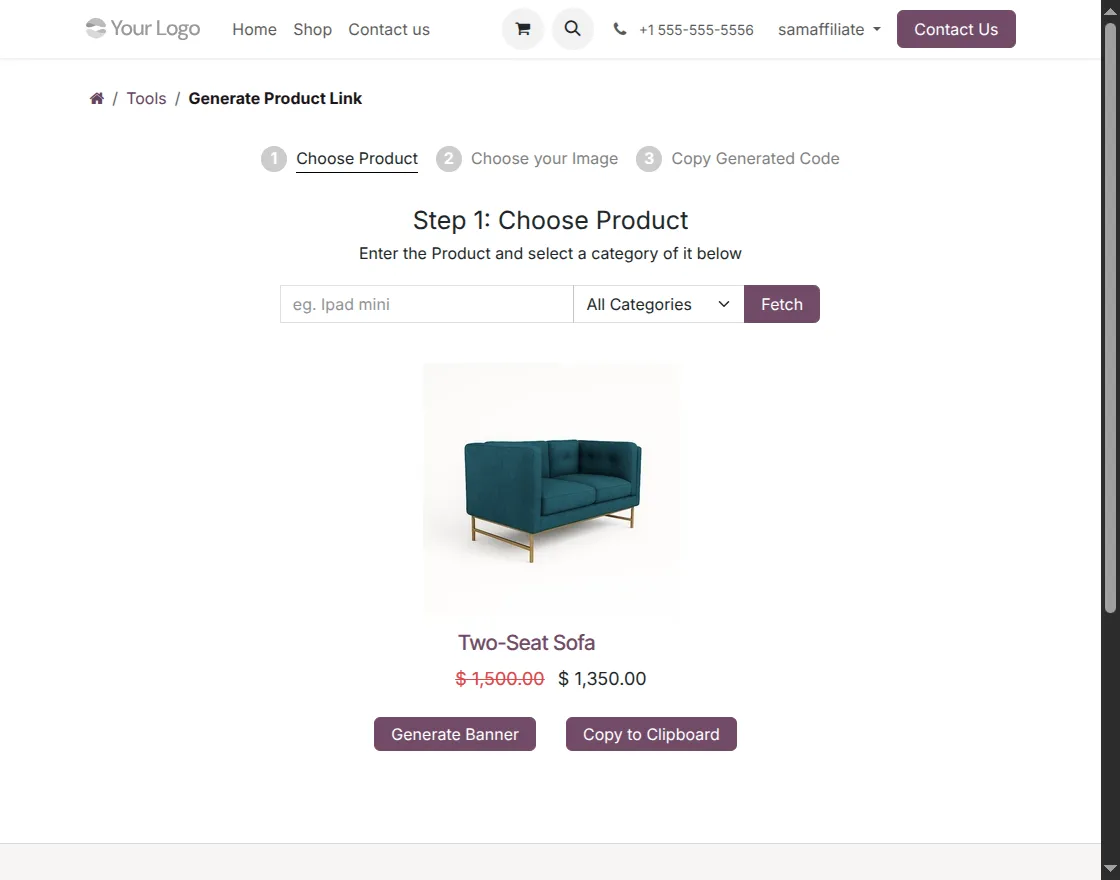
16. First, open Generate Product Link from the Tools section. Then, search for the required product, select it from the results, and click Generate Banner or Copy to Clipboard to create a product-specific affiliate link.
17. Next, after selecting a product, choose one of the available banner templates or product images. Then, click Apply to use the selected image for generating the affiliate banner.
18. After selecting the product image, the module automatically generates the HTML banner code. As a result, you can click Copy and paste the code into your website, blog, or supported webpage to display the affiliate banner.
19. Navigate to Reports → Your Traffic Earnings to view commissions earned through affiliate clicks. Furthermore, the report displays product details, IP address, conversion date, commission value, and the current report status.
20. Navigate to Reports → Your Order Earnings to view commissions earned from successful affiliate orders. Furthermore, the report displays order details, product name, commission amount, conversion date, and payment status.
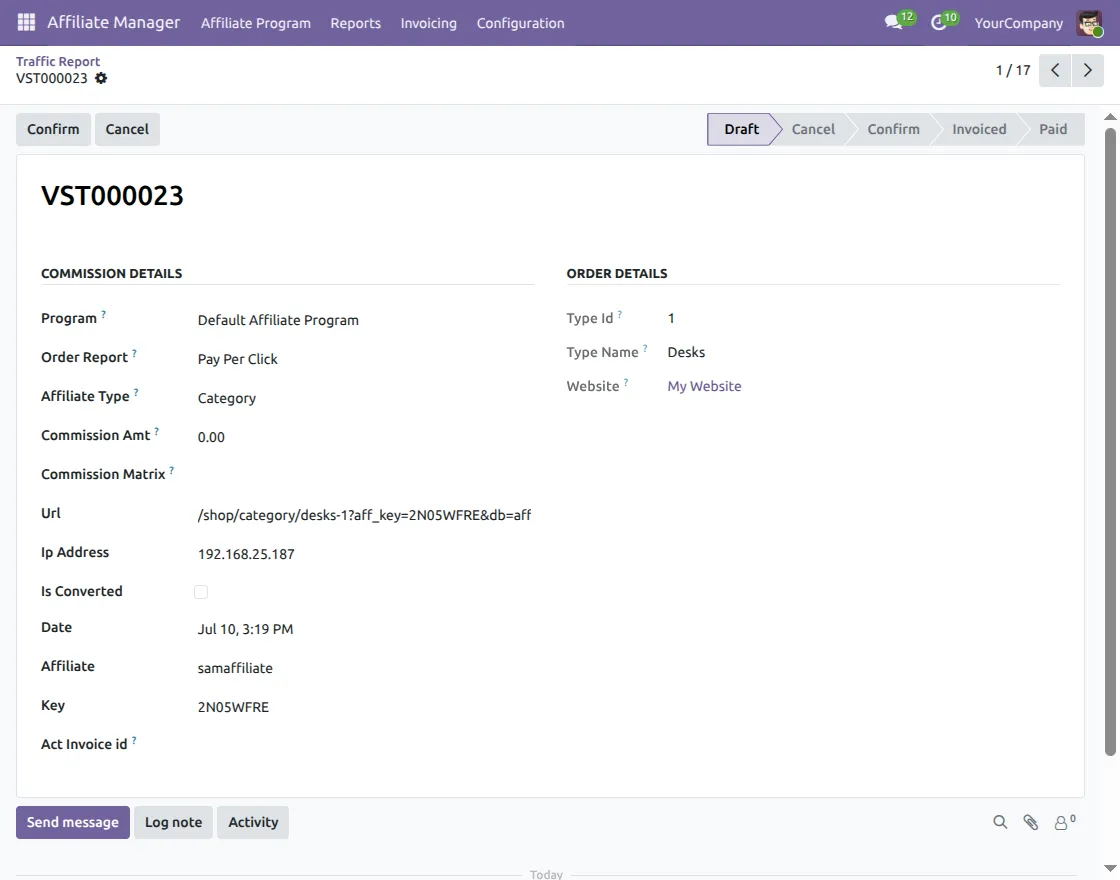
21. The administrator reviews the generated traffic report, verifies the commission details, and clicks Confirm to validate the traffic commission before proceeding with invoicing and payment.
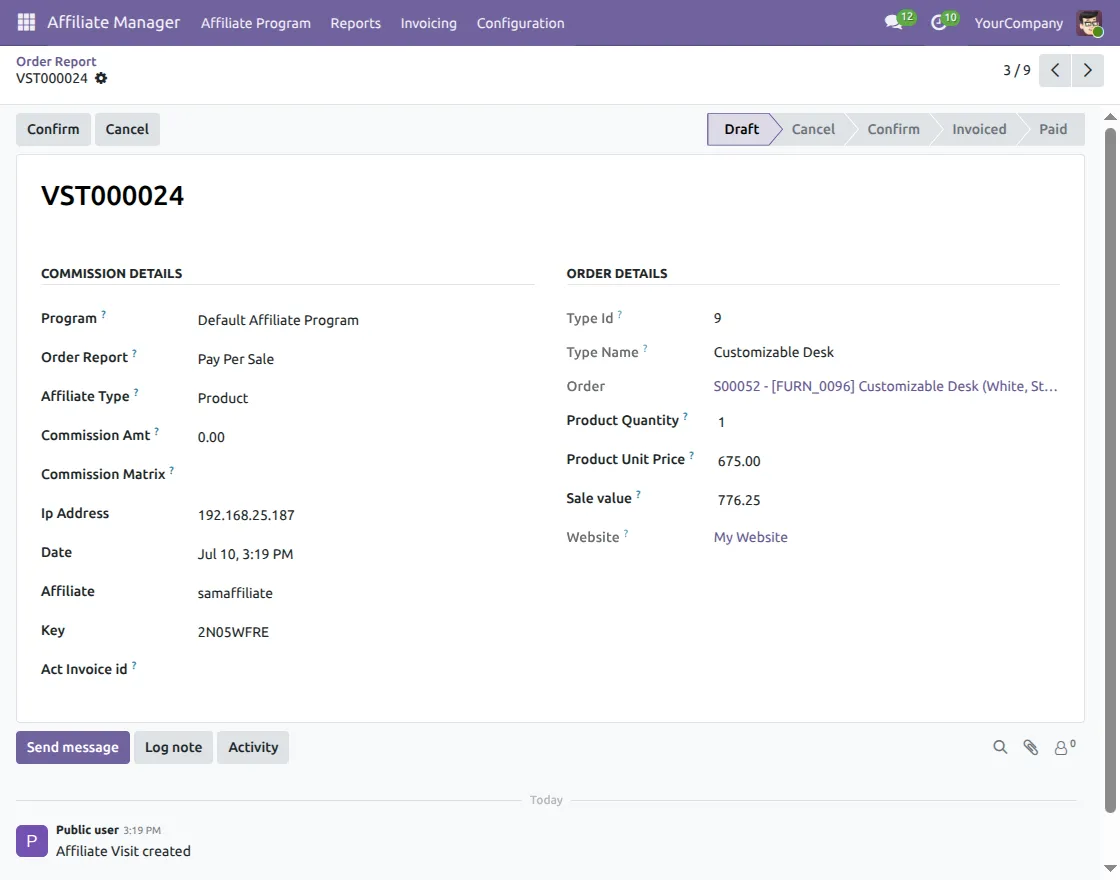
22. After a successful affiliate order is created, the administrator reviews the order report and confirms the commission. Then, the report becomes ready for affiliate invoice generation and payment processing.
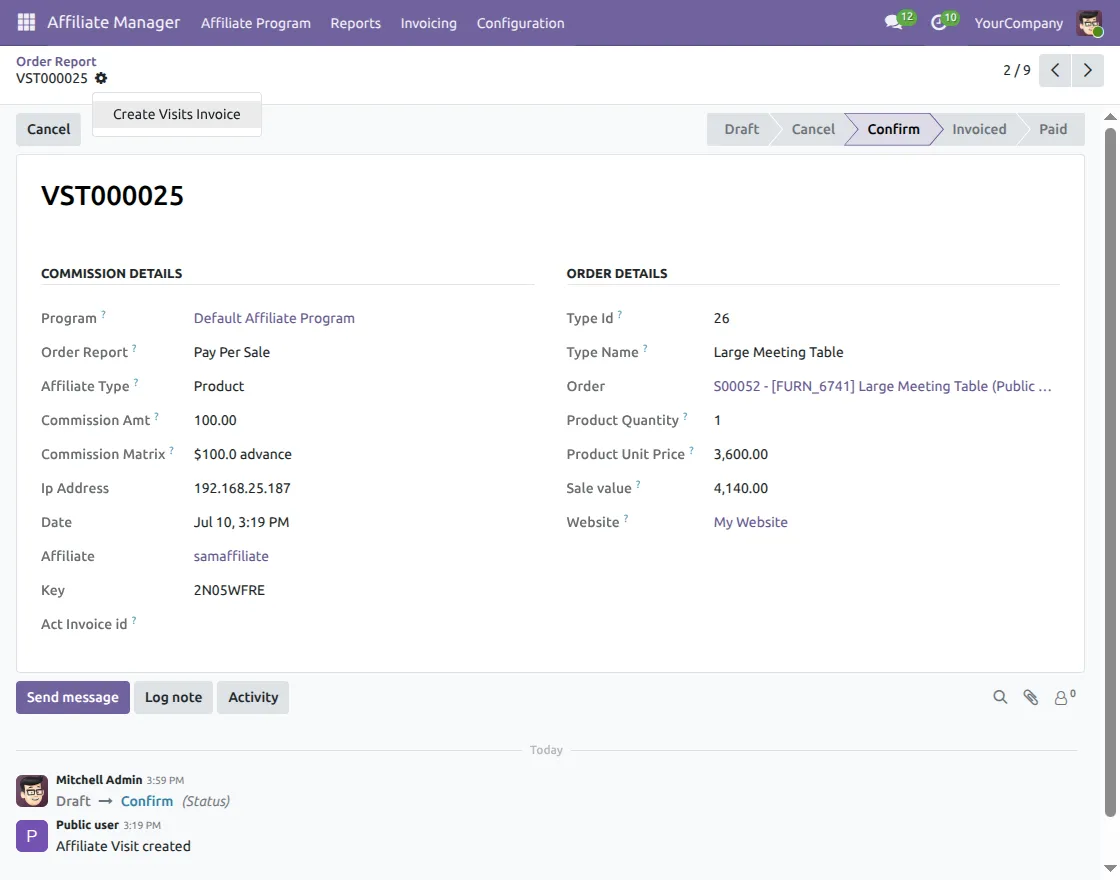
23. After confirming the affiliate order report, click Create Visits Invoice to generate the affiliate commission invoice. Then, the system automatically prepares the invoice based on the confirmed commission amount.
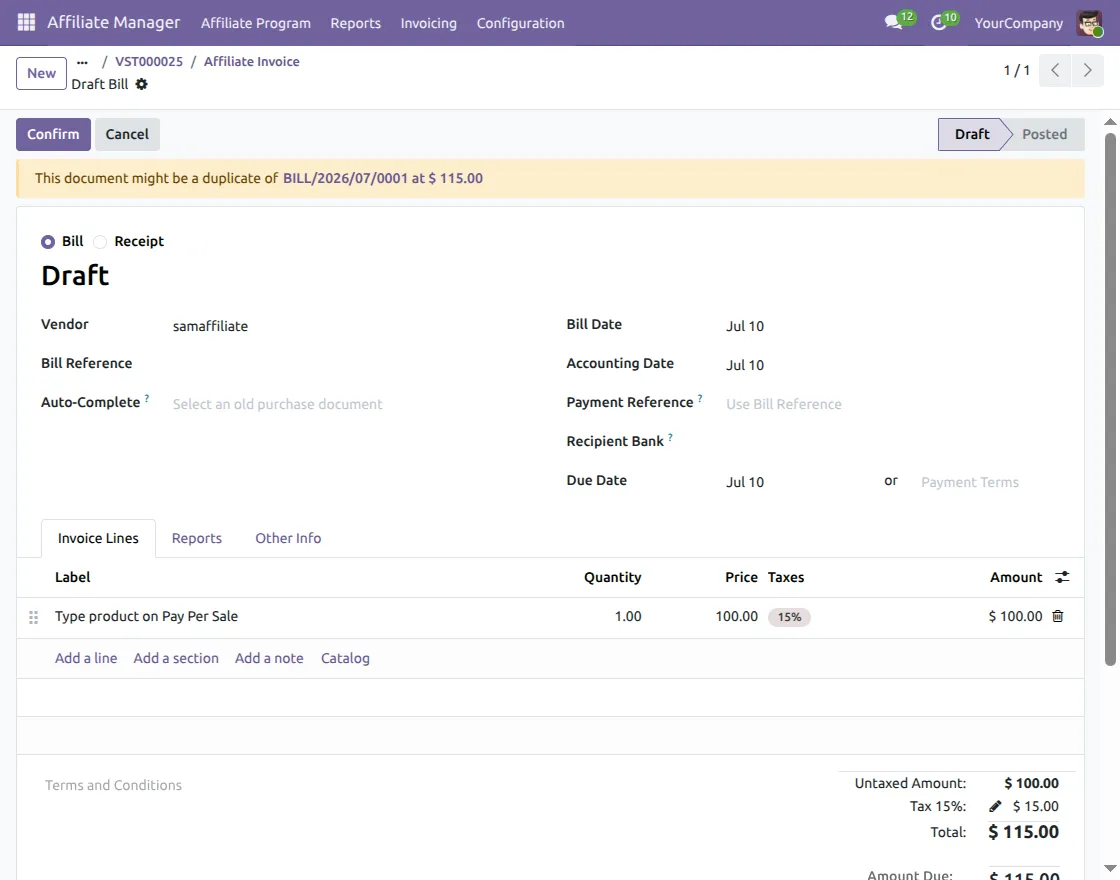
24. The generated affiliate commission invoice opens in Draft status. Review the vendor, invoice details, commission amount, and applicable taxes, then click Confirm to post the invoice.
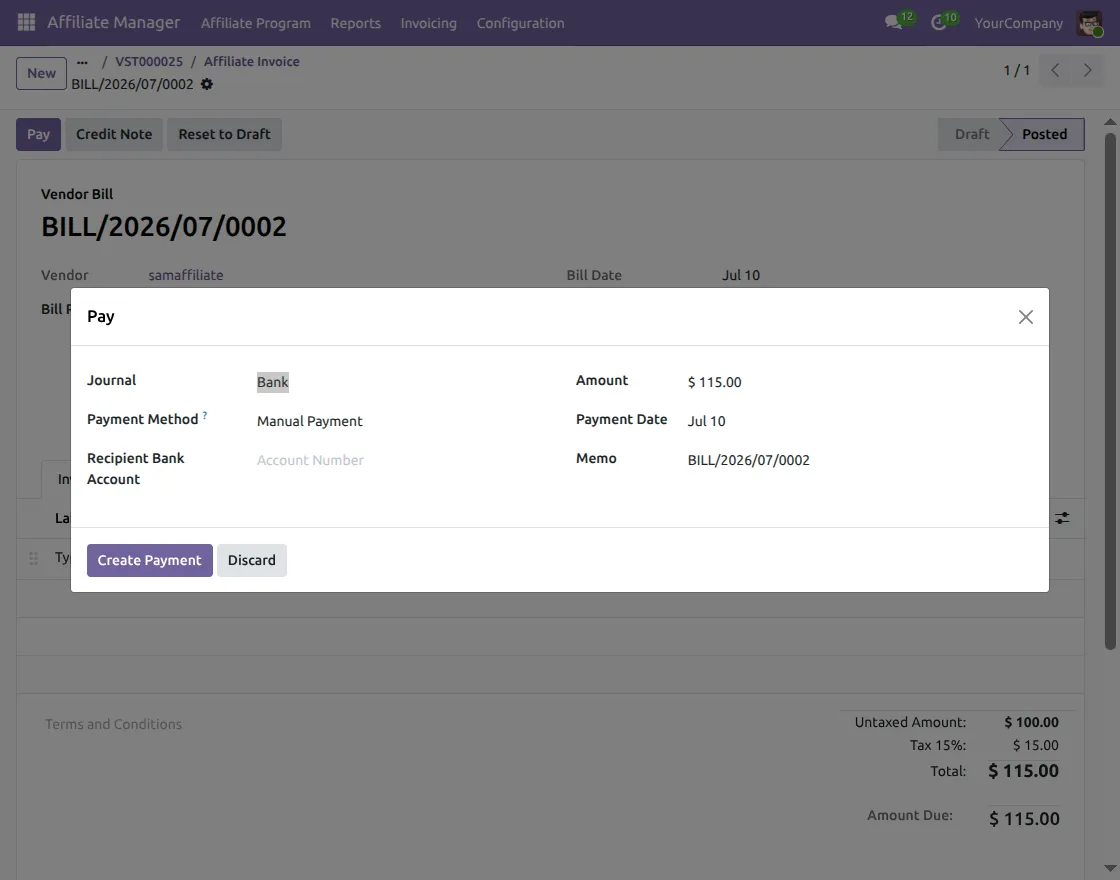
25. After the invoice is posted, click Pay to open the payment form. Select the payment journal and method, verify the payment amount and date, then click Create Payment to complete the affiliate payment.
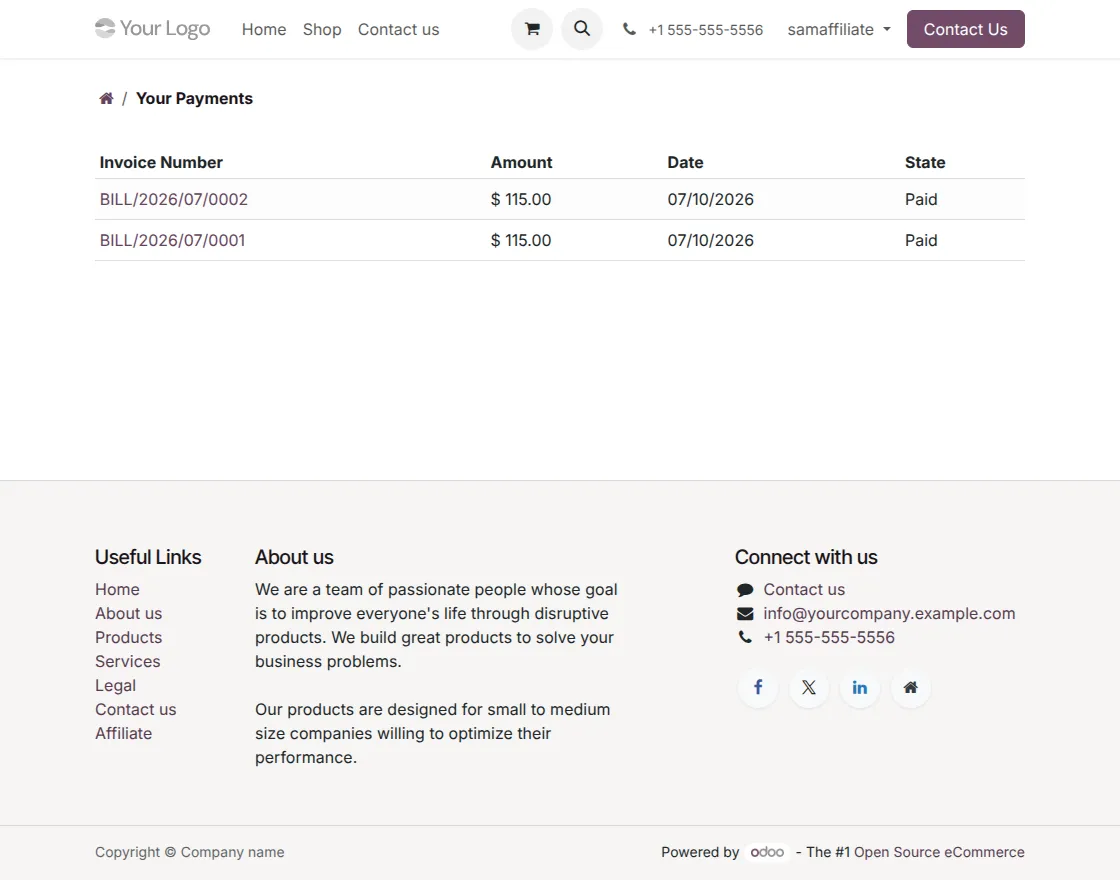
26. In addition, affiliates can open Your Payments from the portal to view their payment history. The page shows invoice numbers, payment amounts, dates, and the current payment status.
Need Help?
Hope you find guide helpful! Please feel free to share your feedback in the comments below.
If you still have any issues/queries, please create a ticket at the UV Desk.
I hope this helps. In case of any further queries, contact us at our support mail.
Thanks for paying attention!!
Current Product Version - 1.0.2
Supported Framework Version - Odoo V17, V18, V19

20 comments
We have raised a ticket on your behalf, and our team will reach out to you soon regarding your queries.
Thanks and Regards,
Team Webkul
Tôi check thấy trong sale.order, không có field affiliate_partner_id & affiliate_program_id >> Nên rất có thể vì vậy mà không thể ghi nhận được PPS
Bạn có thể hỗ trợ tôi tình huống này được không
Note: Odoo tôi xài là community 18 và có kích hoạt sale_management
We have created a ticket on your behalf and our team will connect with you soon regarding your queries.
Thanks and Regards,
Team Webkul
We have created a ticket on your behalf and our team will connect with you soon regarding your queries.
Thanks and Regards,
Team Webkul
We have created a ticket on your behalf and our team will connect with you soon regarding your queries.
Thanks and Regards,
Team Webkul
We have created a ticket on your behalf and our team will contact you soon regarding your queries.
Thanks and Regards,
Team Webkul
I would like to know if this addon works with eLearning sales or not
Regard
We have created a ticket on your behalf and soon our team will revert to you regarding your queries.
Ticket Link – https://webkul.uvdesk.com/en/customer/ticket/view/540667
Thank You
We have created a ticket on your behalf and our team will soon revert to your queries over it.
Thanks.
Hope you are doing well!
Kindly, create a ticket at webkul.uvdesk.com and let us know the exact issue that you are facing while accessing the demo so our support team can guide you.
Thanks & Regards
Mohd. Razdar Hasan
All our modules are compatible with Odoo Community and Odoo Enterprise Edition. However, third-party apps/plug-ins are not allowed to be installed on the Odoo Online edition specifically. Now, if you want to use third-party apps in your Odoo, then you would need to host your Odoo on Odoo.sh then you will be able to install and use our plug-in perfectly. Also, after purchasing our app you will get a free 90 days support.
Thanks & Regards,
Mohd. Razdar Hasan
Your query is not clear; please share your exact requirement to us at [email protected]
Regards
Anisha Bahukhandi