Magento 2 Multi eBay Account Connector(Adobe Commerce) module is used to synchronize the category and orders from eBay to Magento 2 Store.
Also, products can be synced from Magento 2 (Adobe Commerce) store to eBay.
The admin can get all the products from different eBay accounts using the Multi eBay Account Connector module.
The admin can also get all the categories & orders related to these synchronized eBay products.
Note:
- After installing the extension, you must first run – composer require webkul/eBay connector command for the proper working of this extension.
- You must have an eBay developer account to get the Keys that are required for configuring the module.
Video Tutorial of Magento 2 Multi eBay Account Connector
Features – Multi eBay Account Connector
- Synchronize the Magento 2 products to eBay and vice versa.
- eBay account authorization feature enabled.
- The admin can set eBay platform notifications for real sync.
- The admin can import products either only from mapped eBay categories or all.
- Magento account-specific fields move to the eBay account from configuration.
- The custom option is also exported along with the product from Magento.
- The admin can add multiple eBay Accounts.
- The admin can create multiple price rules to update the price of the synced products automatically.
- The admin can create and use the listing template.
- Import eBay orders to Magento 2 store.
- The admin can set a default category for the imported products in the Magento 2 store.
- Revise the changes for product’s price and quantity occur in the Magento 2 store, the results will reflect on the eBay store.
- Import Simple as well as Configurable product types.
- Export Simple, Configurable, Bundle, and Grouped product types.
- The product information like base image, name, price, and quantity gets imported along with the product.
- The product information like SKU, price, and quantity gets exported along with the product.
- Set the default store view and order status for the imported order in the Magento 2 store.
- The admin can manage the imported orders through an eBay account only.
- Synchronized eBay product work like same as Magento products.
- The admin can also import categories of eBay to map with Magento 2 category.
Addition Feature List –
- Products can sync with Specifications and Variations.
- If the products that are synced from eBay to Magento 2 get purchased on Magento 2 store
- Then the inventory sold out is updated on the eBay store.
- If there are eBay orders that have been already synced with the Magento 2 store and the tracking and shipping are generated for them on the Magento 2 store, then the tracking information is synced automatically with the eBay orders.
- The orders will fetch automatically via Cron and if order items do not exist in Magento, it will automatically be created.
- Message queue feature for event notification in which products will import from eBay to Magento in a queue and then create into Magento according to cron run.
- Option to import products along with their images. If this option is disable, product images will not import during product import.
Installation
Customers will get a zip folder and they have to extract the contents of this zip folder on their system.
The extracted folder has an src folder, inside the src folder you have the app folder. You need to transfer this app folder into the Magento 2 root directory on the server as shown below.

If you have downloaded the module from Magento Connect then unzip the respective extension zip.
Then create Webkul (vendor) then MultiEbayStoreMageConnect (module) name folder inside your Magento 2 root directory as
app/code/Webkul/MultiEbayStoreMageConnect.
After that, move all module’s files inside
/app/code/Webkul/MultiEbayStoreMageConnect/
folder in Magento 2 root directory.

After the upload, you can see the folders in your Magento 2 Root Directory.

After the successful installation, you have to run the below-mentioned commands in the Magento 2 root directory.
composer require webkul/ebayconnector
php bin/magento setup:upgrade
php bin/magento setup:di:compile
php bin/magento setup:static-content:deploy
php bin/magento indexer:reindex
php bin/magento cache:flush
Multilingual Support
For multilingual support, the admin will navigate through Store->Configuration->General ->Locale Options and select the locale as German.
German is the language into which the admin want to translate his store content.

Translation
If user wants to translate their module from English to German then they need to follow the path app/code/Webkul/MultiEbayStoreMageConnect/i18n in their unzipped Magento 2 MultiEbayStoreMageConnect folder and will get a csv file with name “en_US.csv”.
Now, rename that csv as “de_DE.csv” and translate all right side content after comma in German language.
After editing the CSV, save it and then upload it to the path app/code/Webkul/MultiEbayStoreMageConnect/i18n where they have installed Magento 2 on the server.
The module will get translated into German Language. It supports both RTL and LTR languages.


The user can edit the CSV like the image below.
How to Create Ebay Account?
After the successful installation of Multi eBay Account Connector For Magento 2 module, you will need to fill your eBay developer keys (App Id, Cert Id, Dev Id, User Id, Auth Token) from https://developer.ebay.com/ account.
If you don’t have an account then create an account and get these required keys as under –
Step1: To create a new account go to developer.ebay.com and click on the sign in/Join link.

Step 2: Now, create a username and password for your account and then click the join button.
Step 3: After the above step, you need to create an app. Enter the app name and choose the environment to generate your key set. Note that app name is not saved until you generate the keys set.
Step 4: After clicking on the Create a Keyset link(for the environment you choose), you need to confirm the primary contact for this account first and then you can click Continue to Create Keys button.
Step 5: Now you can see your selected environment key. For creating the production keys just click on the “Create a Key Set” and you will get your production keys.
Step 6: For generating the User Token go to your Application keys page. In the App ID row of the Sandbox keyset, click the User Tokens to access the Tokens page for your Sandbox keyset.
Step 7: After you click on “User Tokens” in the snapshot above, you will see a “Sign in to Sandbox” button. Click it to access the sandbox account.
8: Enter your Sandbox Username and Password now.
Step 9: After clicking the “Sign in” button, you will see another page and click on where you have to click the “Agree” button.

Step 10: lastly, you will be redirected back and will get the App Token.
How to create RuName of eBay Application?
After creating the eBay account, you need to create the RuName. This RuName is a key that is used for authorizing eBay accounts.
- Log in to your developer account and click on “user tokens”.

- Click on “Get a Token from eBay via Your Application” to create eBay application.

- Fill all required fields.
Your auth accepted URL: This field is the most important. It should be set as shown below like –
https://domainname/multiebaystoremageconnect/index/fetchtoken

Initial Configuration(Admin)-Multi eBay Account Connector
After the module installation, the admin will configure the module settings. For this, the Admin will navigate to Store > Configuration > Multi eBay Magento Connect as per the below image.
Here, the admin can –
General Settings:

- Global Sites – Select your eBay store according to the region or country.
- eBay User Id – Enter the eBay login username here.
- eBay Authentication Token – Enter the eBay user token which you have created.
- eBay Developer Token – Enter Dev ID here.
- eBay Application Id – Enter App ID here.
- eBay Certification Id – Enter Cert ID here.
- Mode – Two modes are available, Sandbox mode is for testing purpose,s and Production mode for the live purpose.
- Application RuName – Enter you RuName which you have created.
Platform Event Notification:
Subscribe eBay events: Select the eBay store events for which you want the update in your Magento store –

- ItemRevised – If changes in the product detail occur in the eBay store, the results will also reflect on the Magento store.
- ItemSold – If a product is sold on the eBay store, then it will either decrease the inventory in the Magento store.
- or Orcreate an order and update the inventory in the Magento store.
- ItemClosed – If any product is made invisible on the eBay store, then that product will get deleted from the Magento store.
- ItemListed – If any new product is listed on the eBay store, then that product will get created in the Magento store.
- Fixed Price Transaction: It is a real-time synchronization event that will work with product updates.
On ItemSold Event: Select the update action you want to have in the Magento store for the “On ItemSold Event” of the eBay store –
- Update Inventory Only – If a particular product is sold on the eBay store, then only the inventory will get updated in the Magento store.
- Create Order – If a particular product is sold on the eBay store, then an order will be created and the inventory also gets updated in the Magento store.
Import eBay Categories:

After setting up all the configuration settings above, click the Save Config button to save the configuration settings for the extension.
After this, you need to import all the eBay categories data into the Magento 2(Adobe Commerce) store.
To do so click the Import eBay Categories button and which imports all the eBay categories.
Listing Options:
At the time of product export, the admin will be able to add a subtitle for the product export to eBay.
The subtitle can be selected from the available list of attributes for the product like – SKU, Product Name, Cost, Description, and many more.
- Add Subtitle on eBay Product
Select a Yes for adding a subtitle to the product being exported to the eBay store. - Select Subtitle Attribute
Choose a subtitle attribute from a list of available attributes that will export and will be visible along with the product at eBay.
Vat Tax Customization:

The admin can set the VAT tax when a product exports to the eBay store.
- Tax applies on product export Select yes to enable VAT tax to apply on product export.
- Tax Percentage Set VAT Tax percentage which is applies to export products.
After, setting up the listing options, the product is visible on eBay with the selected attribute as per the snapshot below.

Add eBay Account-Multi eBay Account Connector
The admin will have a menu option Multi-Store eBay Magento (Adobe Commerce)Connect with other submenu options:
- eBay Account Connect
- eBay Category Map
- Listing Templates
- Price Rule
- Configuration

eBay Account Connect:
Clicking on the “eBay Account Connect” option will navigate the admin to the eBay Account page as per the below image.

Here, the admin can:
- View the complete list of all eBay accounts.
- Edit and delete the eBay accounts.
- Add new eBay accounts.
To add a new eBay account, click on the Add New Account button. This will navigate the admin to the eBay Account page as per the below image.
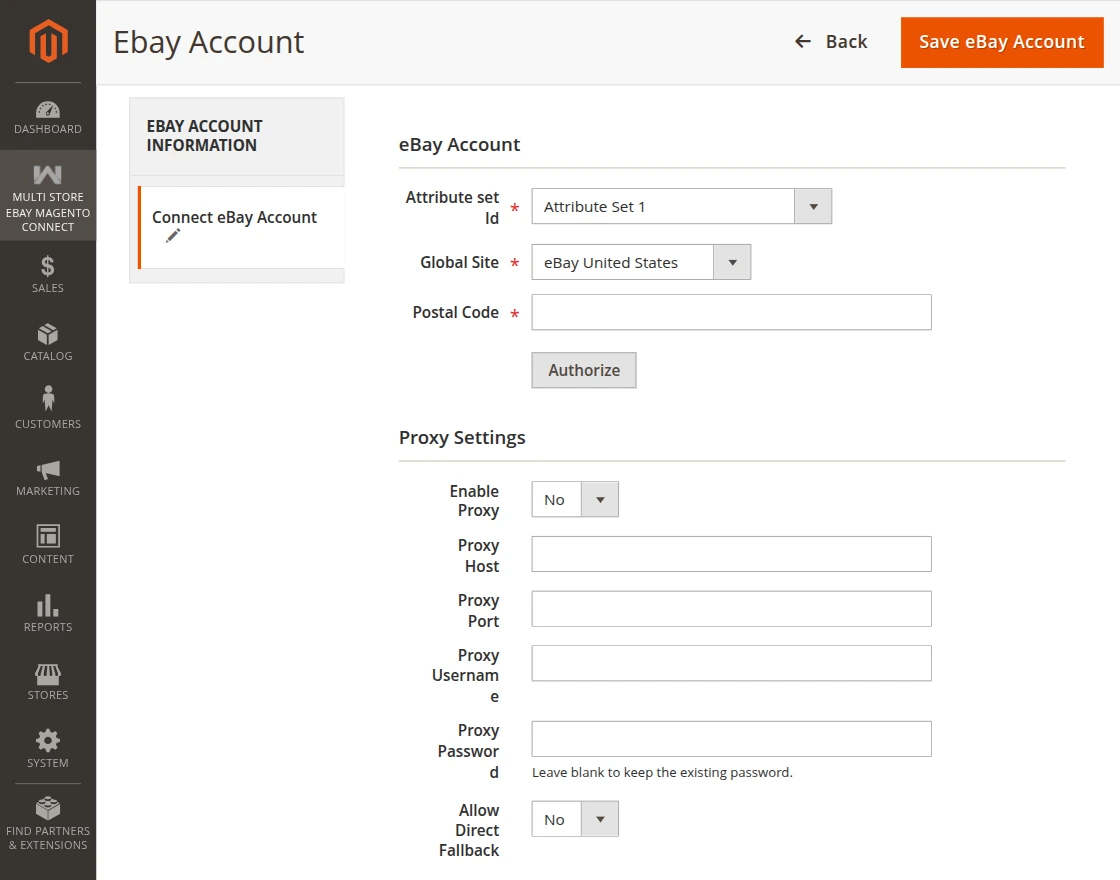
Here, the admin will be able to –
- Attribute Set ID – Select the default attribute for the synchronized products.
- Global Sites – Select your eBay store according to the region or country.
- Postal Code – Enter your eBay store zip code.
Configure Proxy Server Settings
The admin can configure proxy server settings to route eBay API requests through a proxy IP instead of the server’s original IP.
the admin can manage multiple eBay accounts. During operations like product synchronization, order import, and inventory updates, a large number of API requests are sent from the Magento server. Sending all requests from a single IP may lead to API rate limiting or temporary blocking by eBay.
To avoid this, the proxy server feature allows the requests to be routed through a proxy IP, which helps distribute the request load and minimizes the chances of blocking.
From your configuration screen:
- Enable Proxy – Enable/Disable proxy usage
- Proxy Host – Proxy server IP address
- Proxy Port – Port number used for connection
- Proxy Username – Authentication username
- Proxy Password – Authentication password
- Allow Direct Fallback – Allows direct connection if proxy fails
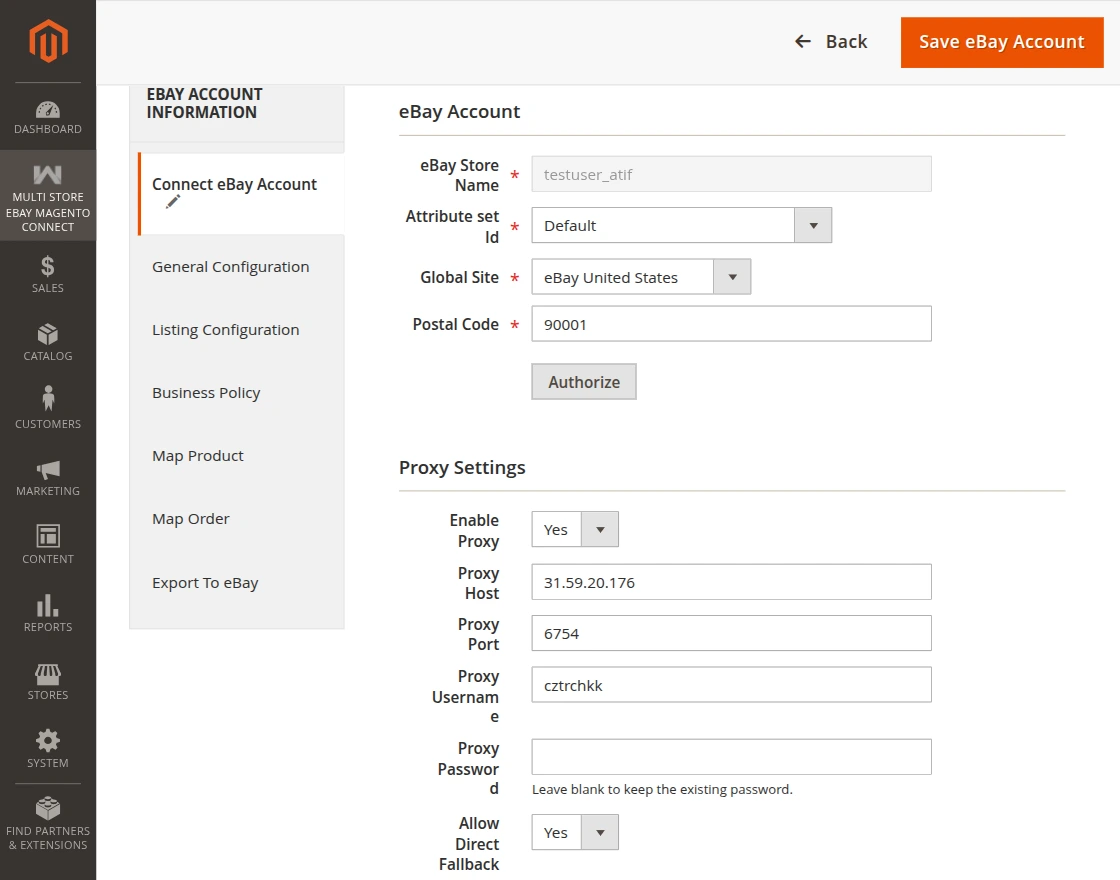
After filling in the details, the admin needs to authorize the eBay account. For this, the admin will click on the “Authorize” button and a pop-up will display for eBay login as per the below image.

Fill in the login details and proceed to hit the sign-in button and the next pop-up will display.

Click on Agree button and your account authorizes successfully.
When the admin clicks on the “Save eBay Accounts” button, the following options become visible as per the image:
General Configuration:
Under this section, the admin will configure the basic settings of the eBay account.

Here, the admin will-
- Revise eBay Products- If select Yes. Then any changes in the product’s price and quantity occur in the Magento 2 store,
- And the results will also be reflected on the eBay store.
- However, the changes that occur in the eBay store will not be reflected in the Magento 2 store. Otherwise, select No to disable product updating on eBay.
- Default Category- Select the Default Category of the Magento 2 store for assigning to imported products of eBay.
- Default Store View- Select Default Store View of the Magento 2 store for order syncing.
- Import Product- Select “All Products” if want to import all the products. Else select “Only Mapped Categories Product”
- if you want to import only those products whose eBay store categories have been mapped with Magento 2 Store.
- Product with specification- Set “Yes” if want to import the specifications along with the product. Else set ‘No”.
- Product Description with HTML- Set “Yes” if want to show the product description in HTML format while importing and exporting.
- Otherwise set “No” if you want to show the product description in plain text format.
- Price Rule Applicable For- Select the product sync type either the Import or Export option for which you want to apply the Price Rule.
- If it’s selected for Import Products then will work in a reverse manner for Export Products or vice versa.
Example – Suppose “Price Rule Applicable For” is set to Import Products. - And as per the price rule, the price value of the imported products will increase by value 10 more.
- But the price value of the exported products will be reduced by value 10.
- Order Status- Set default order status for the order imported from eBay.
Listing Configuration:
Under this section, the admin will configure the listing settings.

Here, the admin will –
- Default Product Quantity – Set the default product quantity for a product exported to eBay if the product quantity is zero on the store.
- Select Template – The admin can select the template.
- As per the selected template, the additional information will be exported along with the product.
- Product Type for Export – Select the product type that you want to export.
- eBay Store Currency – Choose the currency that you are using for your eBay store products.
- Listing Location – Choose the listing location for products where you want to list your products, it should be country-specific according to your eBay store.
- Listing Duration – Select Good Till Canceled, 1, 3, 5, 7, 10, or 30 days. It is the duration of exported products on eBay.
- PayPal Email Address – Enter your PayPal email ID.
- Shipping Free – Select Yes to set free shipping service for the Magento products created on eBay else select the No option to not apply the free shipping.
Additional Settings – Listing Configuration
- Shipping Service – Select the shipping service for the Magento product created on eBay.
- Shipping Service Cost – Set shipping amount that applies to the product when syncs eBay.
- Shipping Service Additional Cost – Additional Shipping Amount that applies to the product when syncing with eBay.
- This applies when a customer purchases the same product in additional quantity.
- Shipping Service Priority – Enter the shipping service priority.
- Shipping Time Min & Max(In Days) – Set the minimum and maximum shipping time(In Days) for the exported products.
- Define Return Policy – Select Returns Accepted or Not Accepted. This option is for the exported product.
- Returns within – Select the return duration for the exported products as – 14, 30, or 60 days.
- Pay By – Select who will pay for the returned product – Seller or Buyer.
- Other Information – Write any information about the Return Policy for exported products.
Map Product:
From here admin can import products from the eBay store.

To import products from the eBay store, the admin will click on Import Product From eBay tab as per the image.

When the admin clicks on “Import Products From eBay”, all the products from the eBay account are imported into the Magento 2 store database.

You need to run the product profiler “Run Profiler” in order to create the product in Magento 2 catalog from Magento 2 Database (synchronized from eBay). After completing the product profiler process, the imported products will be visible on the storefront immediately.

The admin can check the imported products by navigating either to the mapped product category if mapped. Else navigate to the set default category for the imported product from eBay.

NOTE:
- The admin can import simple and configurable products from the eBay store to the Magento Store.
- The product information like base image, name, price, and quantity gets imported along with the product.
How to Change the Category Of Imported Products?
The admin can change the default category of the imported products. For this, the admin will click on the Map Product tab as per the image.

To change the default category of the imported products, the admin will do the following:
- Select one or more than one product from the imported products list.
- Select the Assign to Category option from the Actions drop-down list. This will display the Category field and Submit button beside the Actions drop-down list.
- Select the desired category from the Category drop-down list.
- Proceed further by clicking on the Submit button.

Map Order:
To import the orders from the eBay store, the admin will click on the Map Order tab as per the image.

Here the admin will:
- Import Order from eBay: when clicking on the “Import Order from eBay” button will create the temporary order data in Magento 2 database.

- Run Profile: clicking on the “Run Profile” button will create/add the imported orders to Magento 2 store.

After the complete execution of the run profile, a list will be generated for the imported orders with details like eBay Order Id, Store Order Id, Order Status on eBay, and Created Date.
The admin can check the details of imported orders by navigating to Sales>Orders.
The admin can manage the imported orders through an eBay account only.
Note –
- A cron is set for this module. So, for auto synchronization of orders, the admin has to configure the cron on Magento 2 server.
- This will automatically import the orders from the eBay store to Magento 2 store after every hour.
- The admin will not get any Email notifications for any order placed on the eBay store for the admin products.
- However, the admin needs to check those orders normally by navigating to Sales > Orders after importing them.
Export to eBay:
The admin can export the Magento store products to the eBay shop. For this, the admin will click on “Export To eBay” option under eBay Account Information.

To Export the products to the eBay store using Multi eBay Account Connector, the admin will:
- Select the products that the admin wants to export to the eBay store.
- Then select the “Export to eBay” option from the “Action” drop-down list.
- Proceed further by clicking on the “Submit” button which gets visible when selecting the “Export to eBay” option from the “Action” drop-down list.
- This will navigate the admin to the “Run Profile” page as per the image.

Once the execution is completed, the admin can click on the “Back” button to navigate back. Then, the admin will go to his eBay account and navigates to the Selling page.

Here, the admin can check the exported product after 15 minutes because the process of exporting products takes 10-15 minutes to reflect the exported products on the eBay store.
CONFIGURABLE PRODUCTS:
The admin can even export configurable products to the eBay store.

After the product export, the admin will go to his eBay account and navigates to the Selling page to check the exported product.

NOTE:
- The export includes the product’s base image, name, price, and quantity.
- The admin can export simple, configurable, bundle, and grouped products from the Magento store to the eBay Store.
eBay Category Map
By clicking on the eBay Category Map option admin can map the Magento store category to the eBay store category.

By clicking on the eBay Category Map option the following page will appear:

Here admin can select the category from the existing Mapped Categories list or the admin can create a new mapped category by clicking on Map New Category.
This will navigate the admin to the following page:

Store Category: The admin will choose which store category to map with the eBay store.
Admin can also choose the sub-category for these store categories.
eBay Category: Admin will select the eBay category that the Magento store will map to.
The admin can also select subcategories for this eBay category.
Magento Attribute set: Now admin will select the attribute set.
Listing Template
This Multi eBay Account Connector allows the admin to export the product’s additional information along with the product as per the choice.
For this, the admin needs to create the eBay Template Listing by navigating to eBay Magento Connect-> Listing Templates as per the below image.

Clicking on the “Listing Templates” option will navigate the admin to the eBay Listing Template page as per the below image.

Here, the admin can:
- View the complete list of the Template.
- Edit or delete the template.
- Add or create an unlimited number of Templates.
Create Template:
When the admin clicks on the “Create Template” button, they will navigate to the eBay Template Listing page.

Here, the admin will:
- Title- Enter the title name.
- Template Content- Define the Template variables.
- Status- Can enable or disable a template.
- Map Products Attribute with Template Variables- Map the Magento Store Product Attributes to the configure Template variables that are been define in the field Template Content.
Note: Each Variable should be unique within the same template.

When the product gets exports, the additional details will also export to the eBay store.
And on the edit product page at eBay, you can see these values under the Item Description section.

Price Rule
The admin can easily update the price of the synced products automatically.
For this, the admin needs to create the Price Rules by navigating to eBay Magento Connect-> Price Rule as per the below image.

After clicking on the Price Rules option, the following page will open showing the Price Rules list.

Here, the admin can:
- Edit – edit the Price Rule details by clicking on this link.
- Delete – remove the existing Price Rule from the list.
- Add Rule – Add/create a new Price Rule.
After clicking on “Add Rule“, the admin will navigate to the New price rule page as per the below image.

Here, the admin using Multi eBay Account Connector will:
- Product Price From Select the minimum price for the price rule to be active from.
- Product Price to set the maximum price for the price rule to get inactive.
- Operation Type: Select the operation type as fixed or percentage.
- Operation: Select the operation as increase or decrease.
- Price: enter the amount.
- eBay Store: select the store.
- Status: enable/disable the price rule.
HOW WILL IT WORK?
Suppose the price of the synced product is 100 and the admin has configured –
- Operation Type: Percentage
- Operation: Increase
- Price: 10
Then the original price of the product will increase by 10%, calculated as (10% of 100) + 100, resulting in a total of 110.
Else if the admin has configured –
- Operation Type: Fixed
- Operation: Decrease
- Price: 10
Then the original price of the product will decrease by 10, resulting in a new price of 90.
That’s all for the Multi eBay Account Connector For the Magento 2 extension. Still, have any issues please feel free to create a ticket at our HelpDesk System.
Current Product Version - 4.0.7
Supported Framework Version - Magento 2.0.x, 2.1.x, 2.2.x,2.3.x, 2.4.x

Be the first to comment.