Magento 2 Mass upload marketplace add-on allows the sellers to add products to the store using CSV/XLS/XML files.
The mass upload marketplace add-on supports simple, configurable, virtual, and downloadable types of products.
Mention all the details such as name, category, price, stock, description, tax, etc. in the file including the images.
The admin can also upload the products for the seller from the back-end.
Note:
- To make this module work you will be using Webkul’s Magento 2 Multi Vendor Module module.
- In Magento 2 root, run this command –composer require phpoffice/phpspreadsheet.
- For uploading products with custom attributes, you need to install Custom Attribute Marketplace Add-On
- For uploading products with custom options, you need to install Custom Option Marketplace Add-On
- If you want to upload mass products with custom attributes and options then you can check here.
- It is compatible with Adobe Commerce Cloud as well.
Watch the video to understand the plugin workflow:-
Features
- Upload multiple product images using the images zip file and also through image links ( Publicly Hosted Image URL ).
- Works with simple, configurable, downloadable, virtual product types.
- Mass Upload Profile Listing Option is available at the seller end to manage the profiles which are not executed successfully.
- Download sample CSV/XLS/XML files for every product type.
- Mass upload related, cross-sale, and up-sale products through the supported files.
- Export existing product data using the CSV file.
- The admin will be able to export the products based on sellers.
- Dataflow profile for mapping the product attributes correctly.
- Add any number of products, there is no limitation.
- The admin can do mass product upload for the sellers.
- Mass upload is compatible with multi-store.
- View product upload process result to view any errors.
- Add a product in various categories or subcategories.
- It supports many language translations.
- The module source code is open for customization.
- The extension is compatible with GraphQL as well.
- This extension is compatible with the HYVA theme as well.
Note – If you want to sell your products on various platforms like CS-Cart then you can use our Magento 2 CS-Cart Connector extension for the same.
Installation
Customers will get a zip folder and they have to extract the contents of this zip folder on their system.
The extracted folder has an src folder, inside the src folder you have the app folder.
You need to transfer this app folder into the Magento 2 root directory on the server as shown below.

After the successful installation, you have to run the below-mentioned commands in the Magento 2 (Adobe Commerce) root directory.
First Command –
composer require phpoffice/phpspreadsheet
Second Command –
php bin/magento setup:upgrade
Third Command –
php bin/magento setup:di:compile
Fourth Command –
php bin/magento setup:static-content:deploy
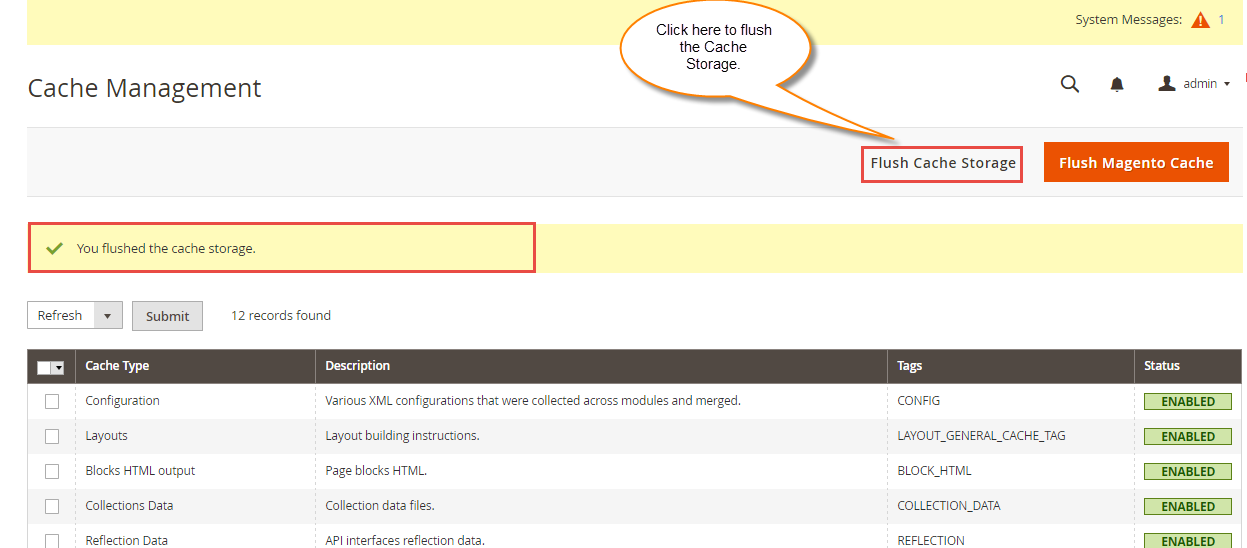
After running the commands, you have to flush the cache from Magento (Adobe Commerce) admin panel by navigating through->System->Cache management as shown below.
Multi-lingual Support
For the multilingual support, the admin will navigate through Store->Configuration->General ->Locale Options
And select the locale as German (the language into which admin wants to translate his store content).

Translation
If a user wants to translate their module from English to German then they need to follow the path
app/code/Webkul/MpMassUpload/i18n in their unzipped Magento 2 MpMassUpload folder and will get a CSV file with the name “en_US.csv”.
Now they will rename that CSV as “de_DE.csv” and translate all right side content after the comma in the German language.
After editing the CSV, save it and then upload it to the path
app/code/Webkul/MpMassUpload/i18n where they have installed Magento 2 (Adobe Commerce) on the server.
The module will get translated into the German Language. It supports both RTL and LTR languages.


The user can edit the CSV like the image below.
Admin Panel Configuration
Please note that the sellers can only mass upload those product types which have been selected by the admin from the backend panel configuration.
For selecting the product type for the seller, please go to
Stores>Configuration>Marketplace>Seller Product’s Settings>Product Type For Seller and select the product types for the sellers that they can add to their catalog.
The sellers can mass upload simple, downloadable, virtual, and configurable products as selected by the admin.

Seller Management
After the installation of Marketplace Mass Upload for Magento 2 module, the seller can find an option called “Mass Upload Product”.
On clicking on that option, the seller will be re-directed to a new page as seen in the screenshot below: 
If the seller select “Is Downloadable” checkbox then there will an additional “Upload link files zip” option with two other options i.e.
Is Links have samples and Is Samples Available will appear.

Now if the seller checks the Is Links have samples checkbox then additional “Upload Link sample files zip” option will appear.

& if the seller checks the Is Samples Available checkbox then additional “Upload samples file zip” option will appear.

Now we will see how to upload products through CSV.
Uploading Simple Products
The sellers will be able to mass upload the products using three types of file types – CSV, XLS, and XML.
The seller will select the attribute set, upload the CSV file and images zip files, and then click on the Upload Profile button. You can see below.

Further, a success message will appear as “Your file was uploaded and unpacked”.
After that, the seller will select that profile and then click on the “Run Profile” option.
You can see the screenshot for the same.
Please check the CSV file for the simple products.


Also while editing the CSV File, now the seller can also use external image links for a product. For this only the image link needs to be entered under the Images field.
When profile run will be successful then you can see this message:

Now the seller can see the uploaded products under the option called “My Product List”.

Example 1 Using CSV File:
After creating the CSV file for upload you can easily assign the products to the various categories and their sub-categories as well.
Below you can see a sample simple CSV file that has some products in it and we are assigning these
Products to the electronics category that has two more sub-categories computers and cameras.

- For assigning the product only to the main category, under the category column directly write – Electronics
- For assigning the product only to the first sub-category of the main category, write – Electronics>>Cameras
- Now, for assigning the product only to the 2nd sub-category of the main category, write – Electronics>>Computers
- If you want to assign a product to the first and second category of the main category write –
Electronics>>Computers,Electronics>>Cameras - If you want to assign a product into different sub-categories write – Electronics>>Computers, Footwear>>Stilettos
Example 2 Using XML :
After creating the XML file for upload you can easily assign the products to the various categories and their sub-categories as well.
Below you can see a sample simple XML file that has a product in it and we are assigning this product
To the electronics category that has two more sub-categories computers and cameras.
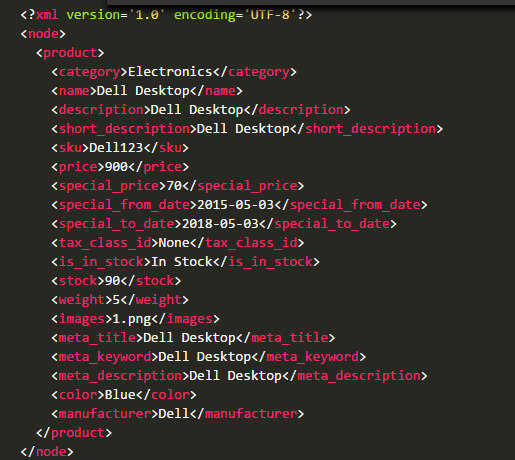
- For assigning the product only to the main category, within the category tag directly write – Electronics
- For assigning the product only to the first sub-category of the main category, within the category tag write – Electronics>>Cameras
- Now, for assigning the product only to the 2nd sub-category of the main category, within the category tag write –Electronics>>Computers
- If you want to assign a product to the first and second category of the main category, within the category tag write –
Electronics>>Computers,Electronics>>Cameras - If you want to assign a product into different sub-categories, within the category tag write – Electronics>>Computers, Footwear>>Stilettos
Uploading Configurable Products
Sellers will be able to mass upload the products using three types of file types – CSV, XLS, and XML.
The seller will select the attribute set, upload the CSV file and images zip file and then click on the upload products as shown in the image below.
Sellers can see the available configurable super attributes and view the options from the drop-down.
After this, a profile will be created as shown in the screen below. Seller will select that profile and then click on the “Run Profile” button.
In the CSV file, the seller will also include the associated products along with the configurable products as shown in the screenshot below.
It is important to note that, parent configurable product will not upload if any of its associated products already exist in the Marketplace.

You can also see the message when the profile runs successfully.
 Now the seller can see the uploaded Configurable products under the option called “My Product List”.

Uploading Virtual Products
The sellers will be able to mass upload the products using three types of file types – CSV, XLS, and XML.
For uploading the virtual product, the seller will select the attribute set, upload the CSV file and images zip files and then click on the upload products button.
uploading simAfter this, a profile will be created like the screen below. Seller will select that profile and then click on the “Run Profile” button.

When the profile runs successfully, you can see the message.
 Please check the CSV file for uploading Virtual products. Here, the seller will enter all the details regarding the products expect the weight.

Now the seller can see the uploaded products under the option called “My Product List”.

Uploading Downloadable Products
For uploading the downloadable product, the seller will first tick the checkbox for the downloadable product and then
The seller will then select the attribute set, upload the CSV file and images zip files, and then click on the Upload profile button.

Please note that, for uploading the link file for the downloadable products, the seller will compress each link files separately and then copy them into another zip folder.
In the CSV, the seller will enter the name of the zip link for each downloadable product and then upload it.
After this, a profile will be created as shown in the screen below.
The seller has to click on the checkbox for mass upload for downloadable products and will select that profile and then click on the “Run Profile” option.
You can see the screenshot for the same.
Please check the CSV file for uploading the downloadable products. In the CSV file, the seller will also include the link file, link type as shown in the screenshot below.


When the profile runs successfully then you will see this message.
 Now the seller can see the uploaded products under the option called “My Product List”.

Note:
If there is an error in the CSV file then you will get an error message and products will not be uploaded.
By this error detection technique, the uploader can see the error and can rectify those errors. The product will not be uploaded if there is an error.
So this module provides 100% error-free mass upload. You can see a few of the error messages below.
Mass Upload Dataflow profile
Mass Upload Dataflow profile: It is a column mapping feature that allows you to keep other names of the columns in your CSV file, you just have to link them to the appropriate database fields.
The sellers will navigate to the “Mass Upload DataFlow Profile” menu option under the “Marketplace” block. Here the seller can create data flow profiles as per need.

To create a data flow profile, enter the name for the profile first, then select the attribute set for which it will be applicable. Now, click the “Save Profile” button to save the profile.

After clicking the “Save Profile” button, you will have to do the field mapping i.e you will have to set the In file name for the corresponding database entries.

After this, the seller will find the CSV file with these in file names in place of the database names as shown below in the snapshot.
MassUpload Product Export
Under this section, the sellers can export their products into the CSV file format. The sellers can also select the Custom Attributes to export in the file.
To export the products, the seller will go to the Mass Upload Product Export section as shown below.

The sellers can find here all the custom attributes that are available.
The seller will first select the product type (Simple, Configurable, Downloadable, and Virtual) to export, then select the custom attributes to export in the file.
Lastly, click the Export button to export the products to the CSV file.

After clicking the export button, the CSV file will get downloaded with the selected custom attributes as shown below in the snapshot.

Mass Upload Profile Listing
In case any profile not getting executed successfully or the seller doesn’t want to run a particular
Profile than for deleting that profile sellers can use the Mass Upload Profile Listing option.

Admin Management
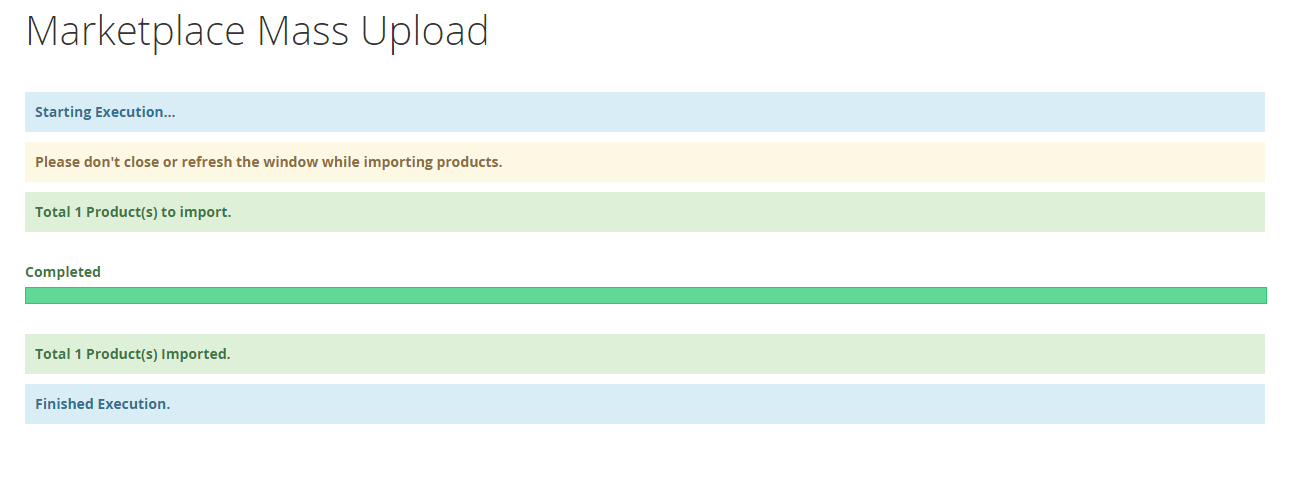
The Admin can also mass upload the products for individual Seller. Under Marketplace Management > Mass Upload Manager

From the backend, admin can upload any product (simple, virtual, downloadable, configurable).
The admin will upload the CSV file and Image ZIP file for the mass upload of products. The seller has to click on the checkbox for the mass upload of downloadable.

After uploading the CSV and Image ZIP, the admin will see the success message as per the below image.

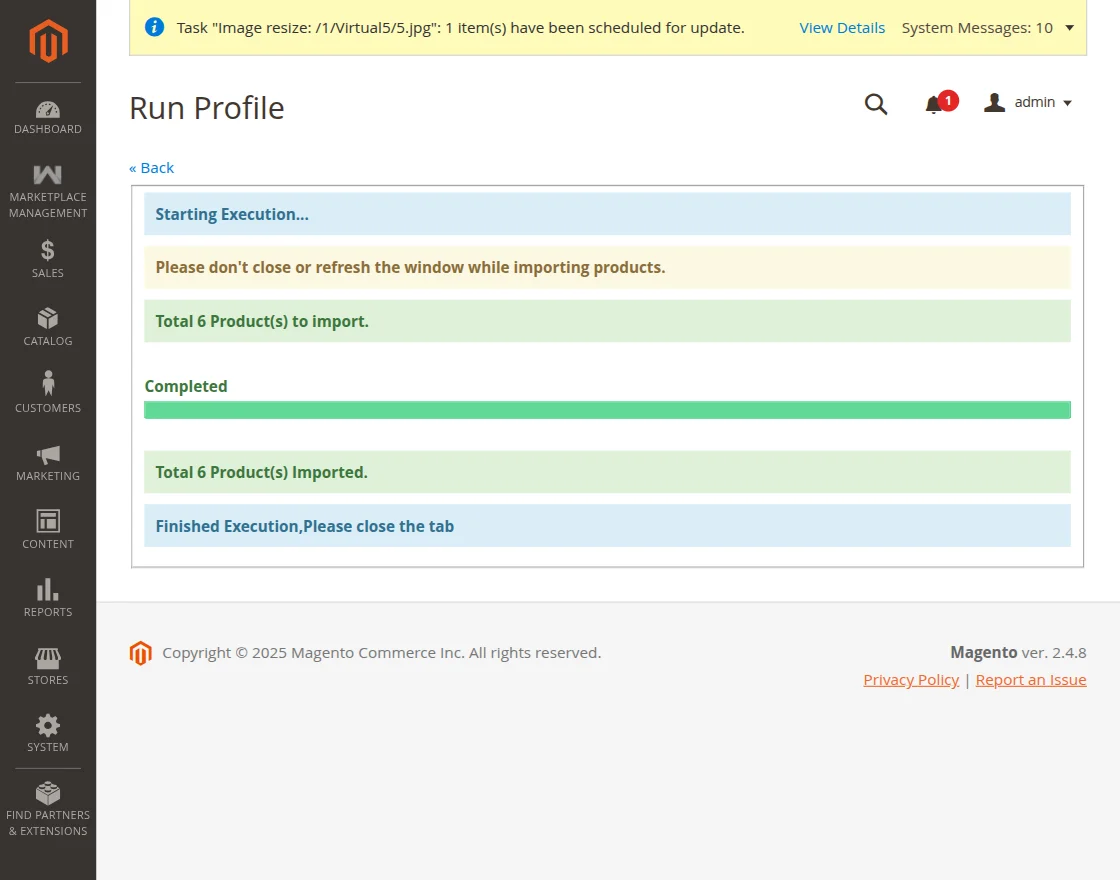
Now, the admin will go to “Run Mass Upload Profile”, and select the seller for whom he wants to upload the products in mass.

You can also see Profiler running and executing like in the image shown below.
 Now, the admin can see the uploaded products under Marketplace Management->Manage Product section.

Import Product for Multiple Sellers
Also, after the upload and unpacking of the file, click on “Import product for multiple Seller(s)”
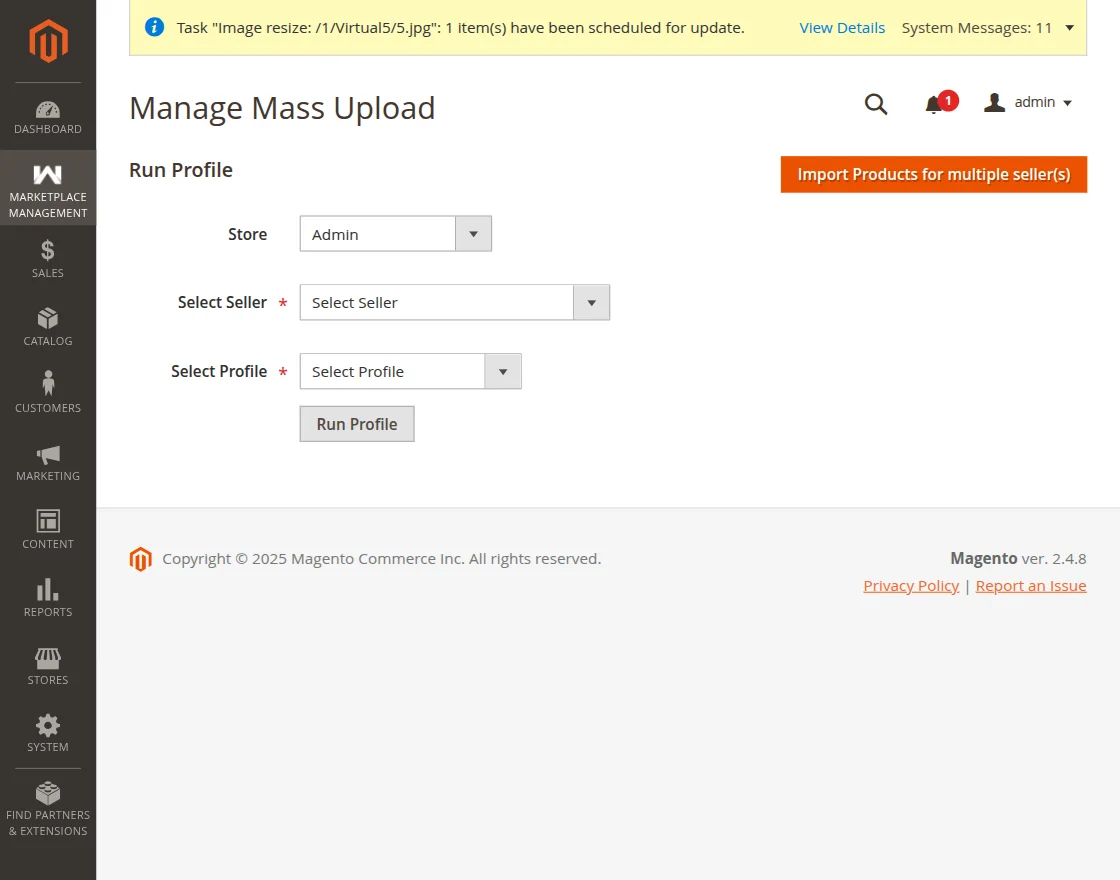
In the CSV file, the admin needs to provide the seller id to which seller they want to assign a product.

The admin will be redirected to Manage Mass Upload page.
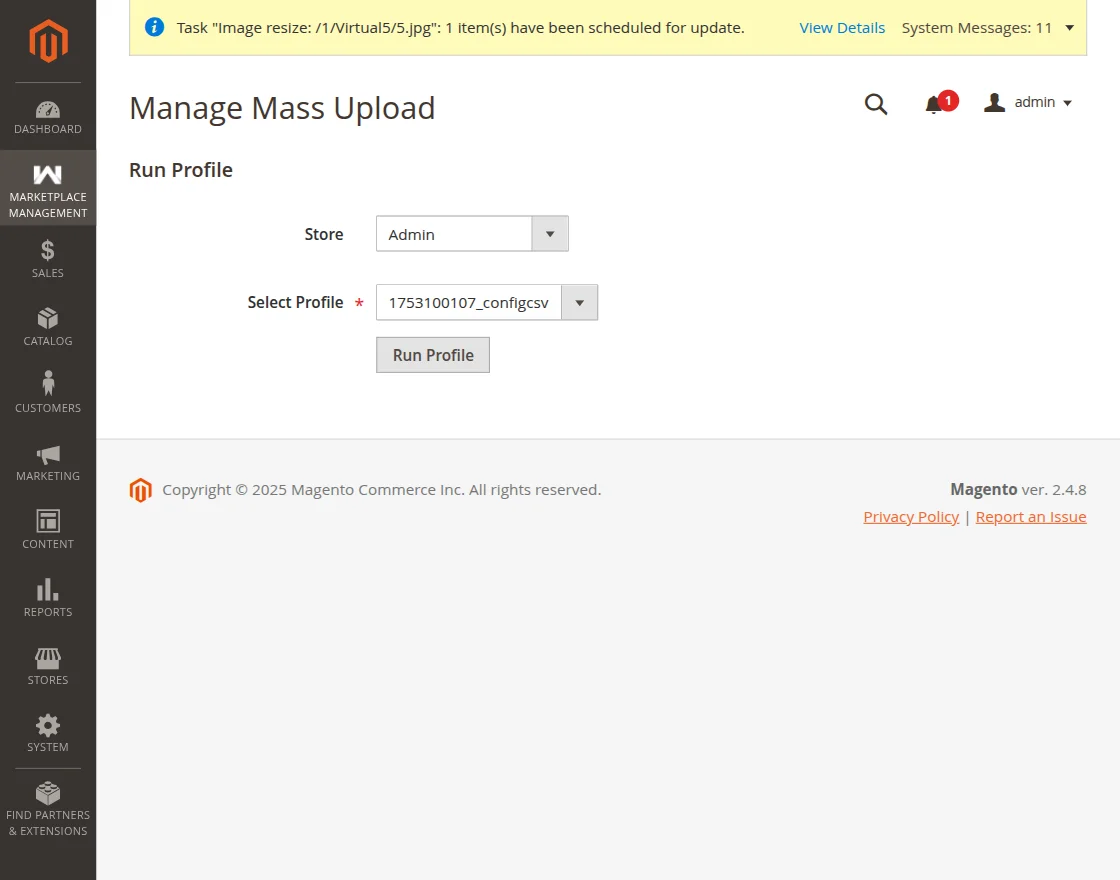
Store– Here the admin needs to select the store.
Select Profile– The need to select the seller profile.
After that click on the Run Profile tab, which will begin the uploading process.
Mass Upload Dataflow Profile
MassUpload Dataflow Profile: It is a column mapping feature that allows you to keep other names of the columns in your CSV file
You just have to link them to the appropriate database fields.
To add the mass upload data flow profile click the “Mass upload Dataflow Profile” button as shown below in the snapshot.

After clicking the button, another page will appear to add the Profile name and select the Attribute Set as shown below in the snapshot.
After clicking the Save button, the field mapping section will appear. Here the admin will have to do the field mapping
You will have to set the In file name for the corresponding database entries.
After doing the mapping click the Save button to save the configurations shown below in the snapshot.

Mass Upload Product Export
The admin can export the products for the selective seller by navigating to Marketplace Management>Manage Mass Product Export. The admin can select the following:
- Select Seller: The admin can choose which seller’s products are needed to be exported.
- select product Type: The admin will select which product type for the products that are to be exported.

Mass Uploaded Profile List
The admin can view the list of sellers by navigating to Marketplace Management> Mass Upload Profile Listing.
If any profile is not successfully executed or the admin does not want to run a specific profile then the Mass Upload Profile Listing option can be used by profile admin to delete it.
Product Edit Page
Once the admin or the seller has mass-uploaded the product through the CSV/XML/XLS files. They can see all the uploaded cross-sell, related, and up-sale products while editing it.
Also, they can add or add or Remove new products by navigating to Marketplace Management> Catalog> Product > Edit the product.
After that, product details will be visible then the admin can see all the uploaded cross-sell, related, and up-sale products or the reference.
For reference you can check the below image:

For the Cross-sell and Up-sell products, check the below image:

Product Page – Front view
After successful uploading of the CSV/XML/XLS files, the customer can view all the uploaded products at the front-end as per below image:

Also, the customer can view the related, and up-sale uploaded product on the product page as shown below:

And the uploaded cross-sell products will be visible on the cart page as shown below:

Support
That’s all for the base Marketplace Mass Upload for Magento 2 module still have any issues
Feel free to add a ticket and let us know your views to make the module better at HelpDesk Support.
You may also browse other Magento 2 marketplace addons and our quality Adobe Commerce extensions.
Current Product Version - 5.0.4
Supported Framework Version - Magento 2.0.x, 2.1.x, 2.2.x,2.3.x, 2.4.x

28 comments
Please email us at [email protected] if you are facing the issues (if any) and we will get back to you accordingly.
Thank You
Webkul Team
Currently, the sellers can upload/update products in bulk using CSV/XML/XLS files on their respective shops.
Can you please share your complete requirement over [email protected] so that the team can check and update you accordingly.
Thanks
Currently, the seller can not provide its own URL for the product. Please contact us at [email protected] so that we can develop the same for you.
Thanks
For example
Main category: Home & Living
sub-category: Kitchen and Dining
sub -sub-category: Cookwares
Do we prepare mass upload CSV file like:
1. Home & Living>>Kitchen and Dining>>Cookwares
or
2. Home & Living,Kitchen and Dining,Cookwares
Please provide the correct way to mention the three-level category in the category column of CSV as such that the commission will be used of the 3rd level only. And what happens when there is a duplicate 3rd level category of a different Main category?
Also, the breadcrumbs have to be Home & Living->Kitchen and Dining->Cookwares
How to do that? Please Suggest.
You can upload products for the 3rd level category by entering Home & Living>>Kitchen and Dining>>Cookwares on the category column of CSV file for mass uploading products.
You can also set commission sub-category wise by navigating through Marketplace> manage commission> seller> category commission and set commission.
You can mail us at [email protected] for further queries.
Thanks & Regards,
Webkul Team
Greetings for the day!
You can upload the product description in HTML format. In the description section just add the complete HTML and on the front end the description will be displayed in the desired format.
For example, You can add the description in the CSV file as shown in the image(https://prnt.sc/rf4f68) and on the frontend, the description will be displayed as shown in the image(https://prnt.sc/rf4fwf).
If you still face issue feel free to revert us back on [email protected]
Thanks & Regards
Team Webkul
1. Does the system append a unique code in the SKU itself ?
2. Does a error come form the system that those SKUs aren’t available ?
3. Are products from Vendor 1 who had originally uploaded the products replaced by Vendor 2 using hte Same SKUs ?
If by any chance two vendors tend to upload the same SKU, the CSV gets uploaded but an error message will display during the run profiler process.
Please find the screenshot for reference- https://prnt.sc/rbis3k
Please get back to us for any further queries at [email protected]
Thanks!
Thank you for suggesting this feature. You may find this feature incorporated into our module in future updates.
Please get back to us for further queries and suggestion at [email protected]
Thanks!
Could you please elaborate the query so that we could assist you in a better way.
Please get back to us at [email protected] for further queries and suggestions.
Sorry for the delayed revert.
Please could you elaborate further so as to which relationship between the imported products you’re talking about?
Please get back to us [email protected] so that we could assist you in a better way.
Thanks!
Greetings for the day!
If you upload the product with same SKU as the existing one from the other seller then on uploading the same SKU, the CSV gets uploaded but an error message will display during the run profiler process.
Please find the screenshot for reference- https://prnt.sc/rbis3k
Please get back to us for any further queries at [email protected]
Thanks & Regards
Team Webkul
Can i update product fields like Stock Quantity, Images on the existing product, If yes how do you do it
Yes, the product quantity and images can be updated through uploading the CSV/XML/XLS file for already existing products the same way as it is done while uploading a CSV file for new products.
You just need to change the data in the CSV file for updating the same.
In case of further doubts, you can mail us at [email protected] and we will for sure assist you.
Thanks