Magento 2 ZATCA Invoice module helps store owners comply with Saudi Arabia’s e-invoicing regulations. It automates invoice creation, validation, and submission to ZATCA.
The module ensures that all invoices follow ZATCA (FATOORA) guidelines. It also reduces manual work and improves accuracy in invoice processing.
With this extension, admins can generate QR code-enabled invoices, track their status, and manage credit notes directly from the Magento admin panel.
Features
- Automatically generate ZATCA-compliant invoices
- Add QR codes to invoice PDFs
- Submit invoices directly to ZATCA
- Get real-time validation status
- Track invoice details from order view
- Generate simplified tax invoices
- Create credit notes for refunds
Installation
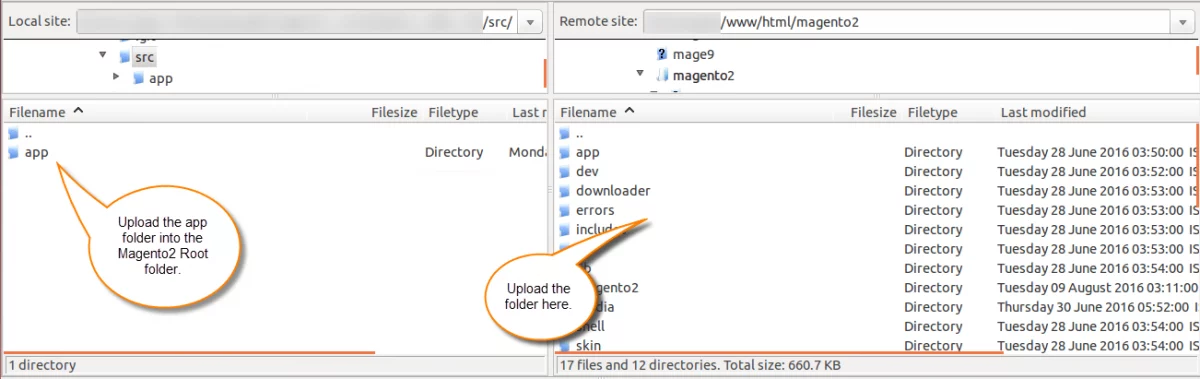
Customers will get a zip folder then they have to extract the contents of this zip folder on their system.
The extracted folder has an src folder, inside the src folder you have the app folder. You need to transfer this app folder into the Magento 2 root directory on the server, as shown below.
After the successful installation, you have to run these commands in the Magento 2 root directory:
php bin/magento setup:upgrade
php bin/magento setup:di:compile
php bin/magento setup:static-content:deploy
php bin/magento indexer:reindex
php bin/magento cache:flush
Multi-lingual Support
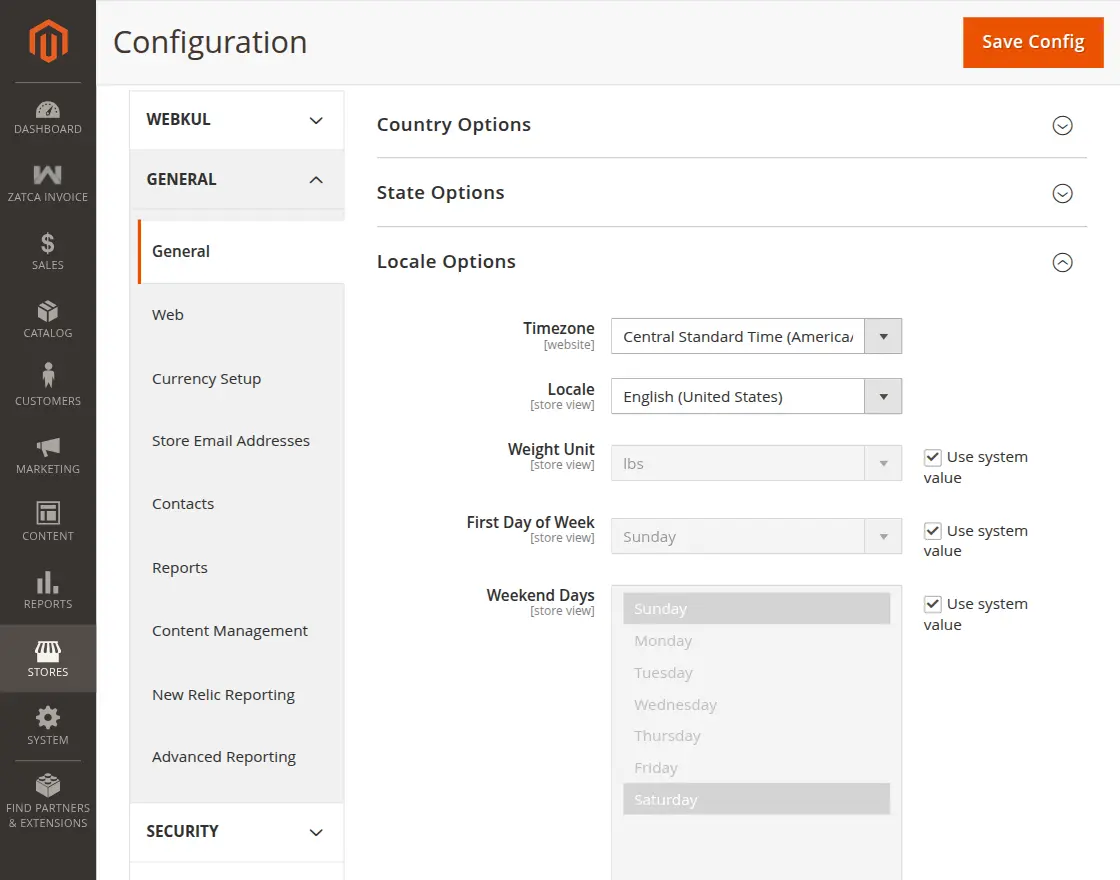
For the multilingual support, the admin will navigate through Store->Configuration->General ->Locale Options and select the locale as German
(the language into which the admin wants to translate his store content).
Language Translation
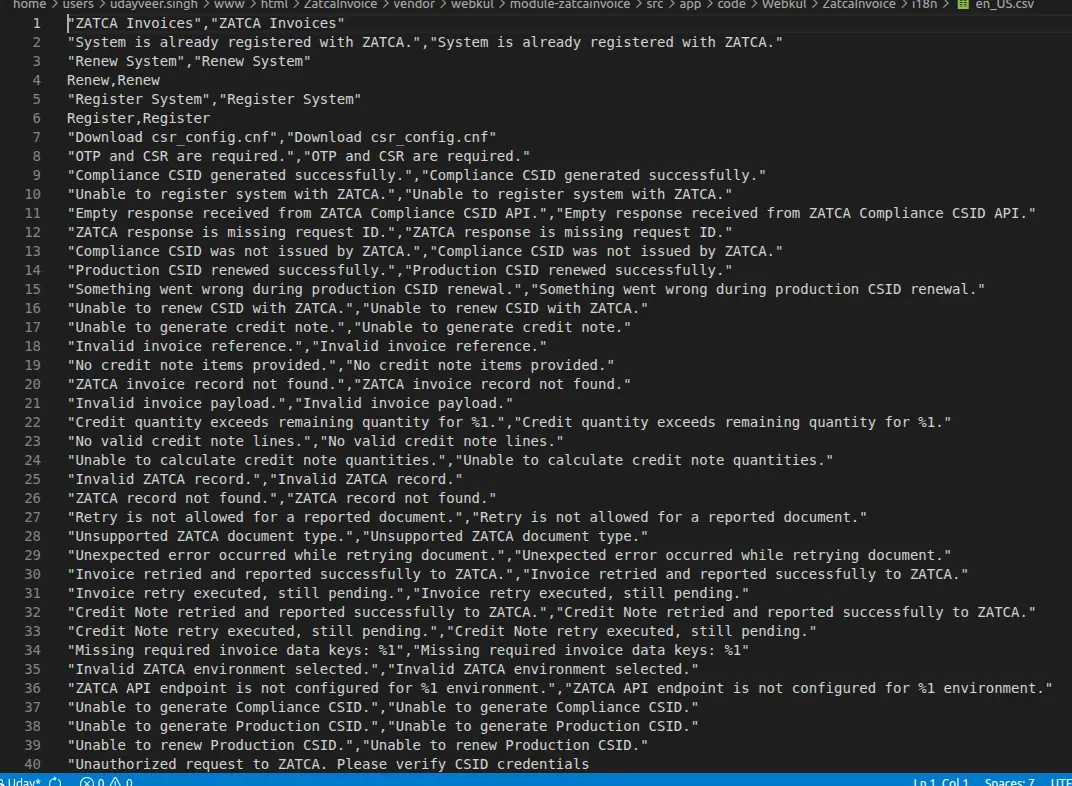
For Magento 2 Zatca Invoice translation, navigate to the following path in your system src/app/code/Webkul/ZatcaInvoice/i18n.
Open the file named en_US.CSV for editing as shown in the below screenshot.

Now, upload it to the path src/app/code/Webkul/ZatcaInvoice/i18n where the installation of Magento 2 is on the server. The module gets translated into the desired language.
The user can edit the CSV like the image below.
After editing and translating the CSV file, you need to save the translated file name according to your region, language, and country code, such as – de_DE.CSV.
Followed by uploading the translated file to the same folder from where you have obtained it. Now your module translation is complete.
Module Configuration
After installation, the admin can configure the module by navigating to: Stores → Configuration → Webkul → ZATCA Invoice
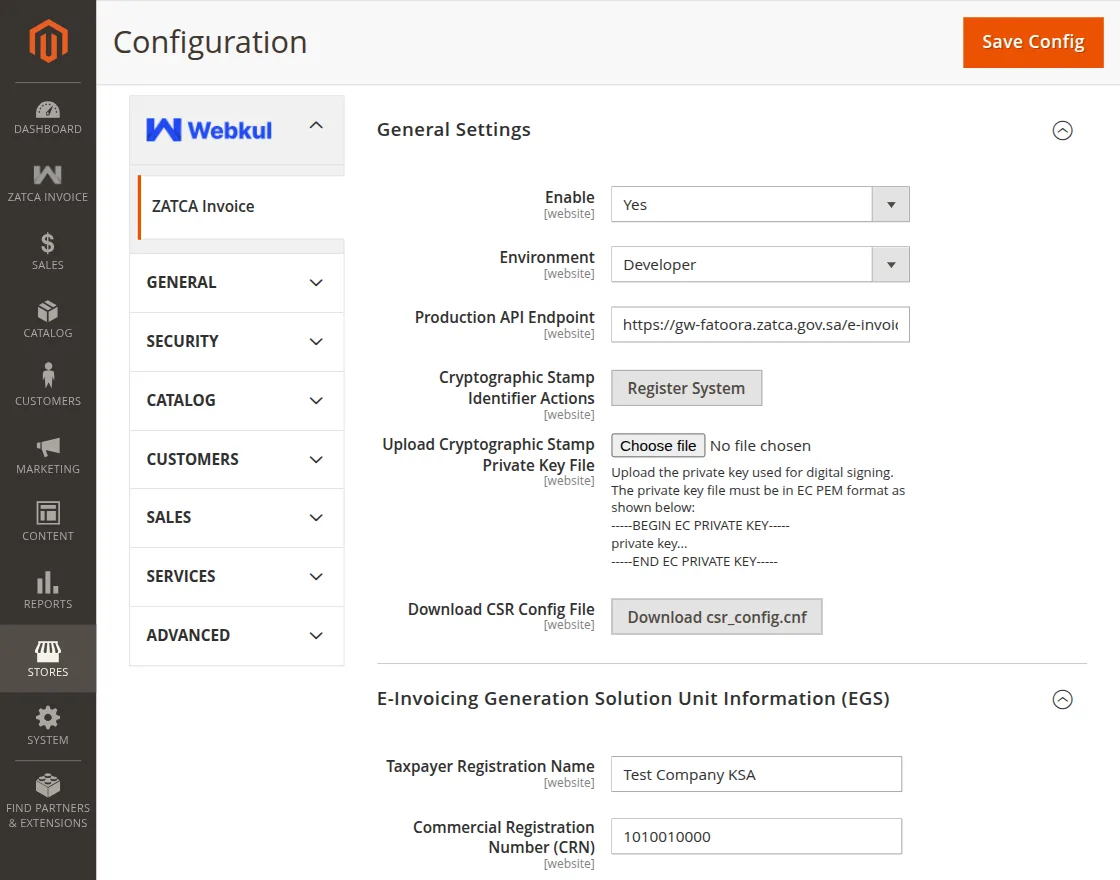
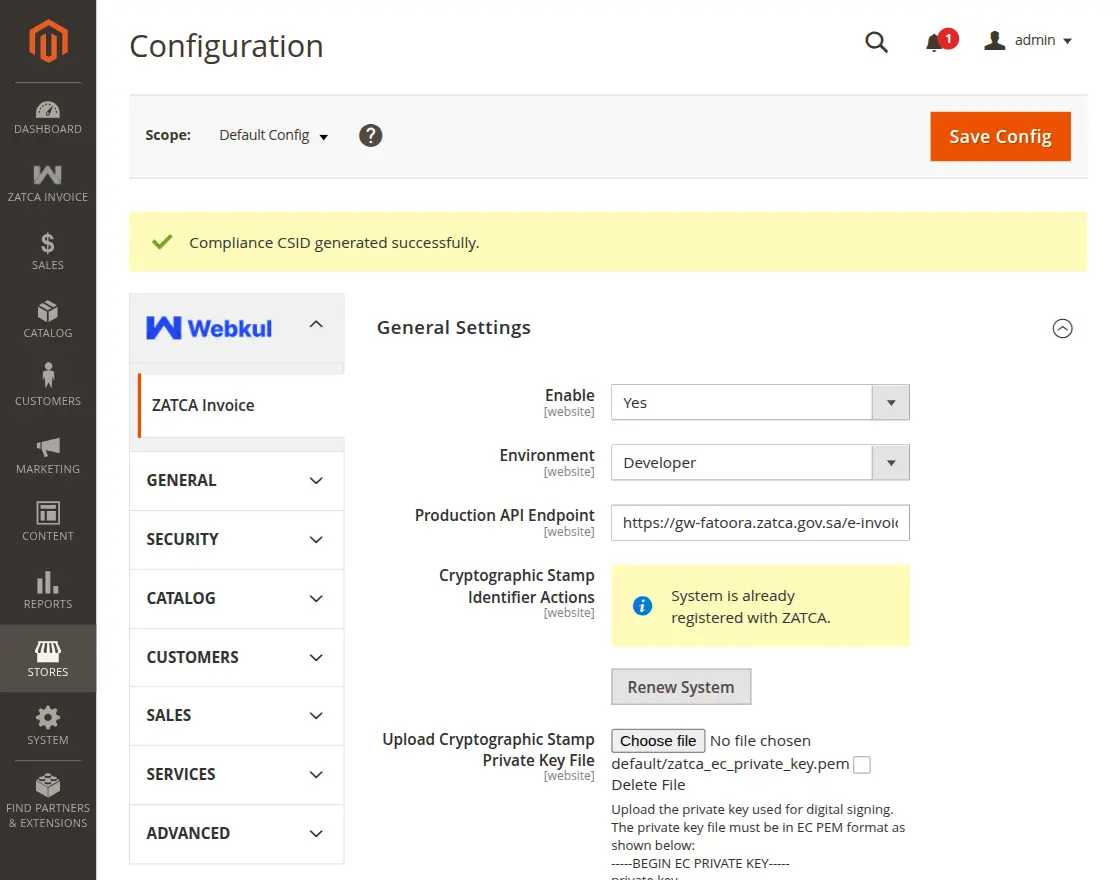
General Settings
- Enable Module – Enable or disable the module functionality.
- Environment – Select the environment (Sandbox/Production/Developer).
- API Endpoint – Enter the ZATCA API URL for invoice submission.
Upload Private Key: Before registration, you need to generate and upload a private key.
To Generate Private Key, Run the command:
openssl ecparam -name secp256k1 -genkey -noout -out zatca_ec_private_key.pem
Upload Private Key in Admin
- Click Choose File under Upload Cryptographic Stamp Private Key File
- Upload the generated
.pemfile - Click Save Config
Generate CSR File:
Create CSR Config File: Download csr_config.cnf from the admin or create it manually.
Fill the required details:
- EGS Serial Number (SN)
Format:1-SolutionName|2-Version|3-SerialNumber - VAT Number
Must be 15 digits (starts and ends with 3) - Invoice Type
Example:0100(simplified invoice) - Business Details
Address, category, and company name
Generate CSR
openssl req -new -sha256 -key zatca_ec_private_key.pem -config csr_config.cnf -out zatca.csr
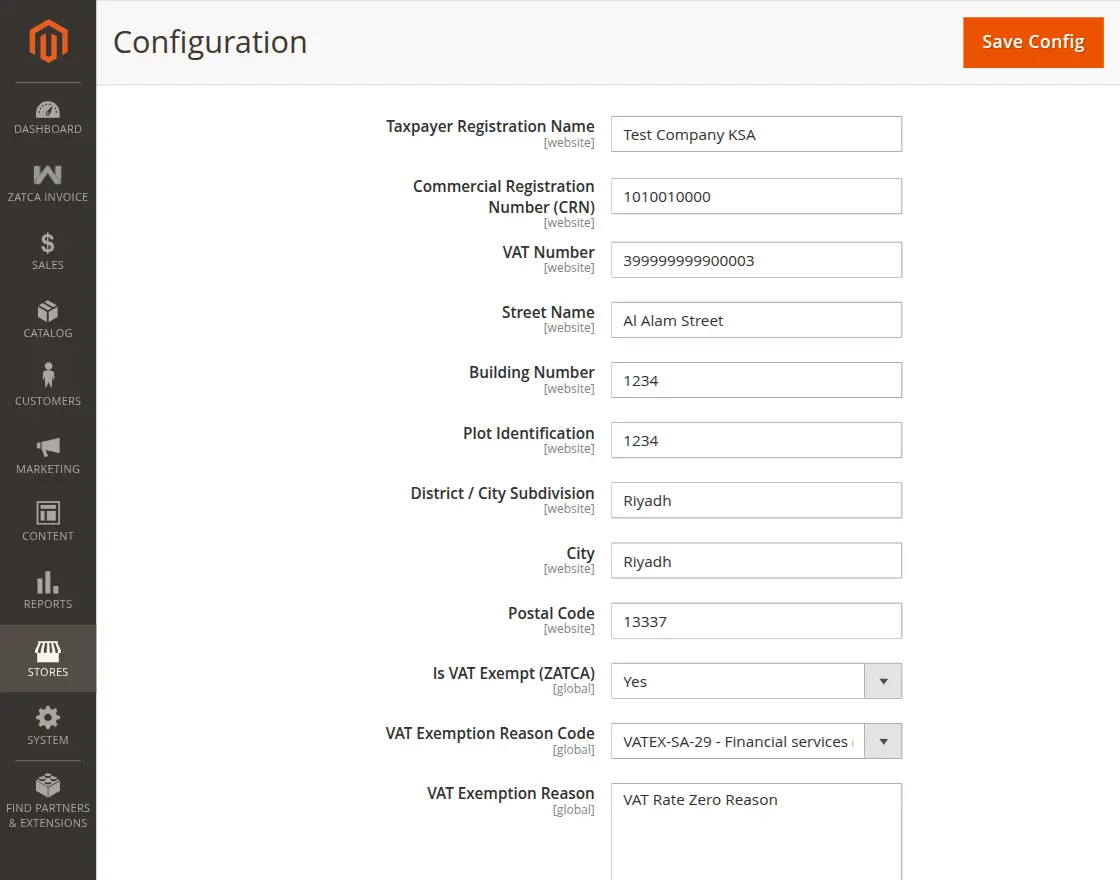
E-Invoicing Generation Solution Unit Information (EGS)
Enter your business details:
- Taxpayer Registration Name → Company name
- Commercial Registration Number (CRN) → Business registration number
- VAT Number → 15-digit VAT number
- Street Name / Building Number / Plot Identification → Address details
- District / City / Postal Code → Location details
VAT Settings
- Is VAT Exempt (ZATCA) → Select Yes/No
- VAT Exemption Reason Code → Select if applicable
- VAT Exemption Reason → Add description if needed
Click Save Config after filling all EGS details
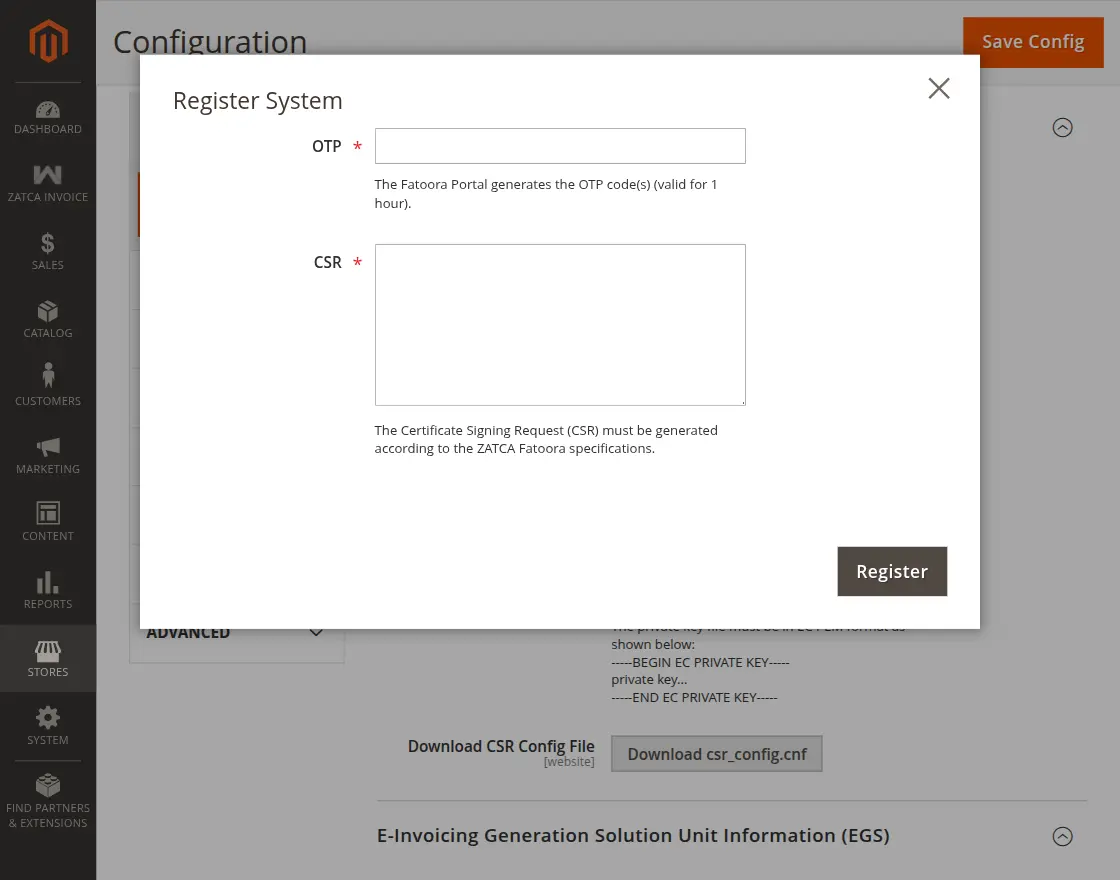
Register System
After uploading the private key file (zatca_ec_private_key.pem) and saving the configuration, click on Register System.
ZATCA OTP Generation Guide
For Production / Sandbox Environment:
- Go to the ZATCA (FATOORA) portal and log in using your taxpayer account.
- Open Onboarding Section
- Navigate to Onboarding / E-Invoicing section and Click on Onboard new solution unit/device
- Generate OTP by click on “Generate OTP Code”
- Enter number of devices and Submit the request
For Developer Environment:
- For basic testing, you can use a sample OTP:
123345 - You can also generate OTP using the ZATCA sandbox API. It returns OTP for testing purposes
OTP: Enter the OTP obtained from the ZATCA portal.
CSR: Open the generated zatca.csr file, copy all its content, and paste it into the CSR field.
After entering both OTP and CSR, click Register to complete the system registration.
Once the module is fully configured and the system is registered with ZATCA, the invoice process works automatically.
When the admin generates an invoice for an order, the module prepares the invoice data according to ZATCA rules and the required format.
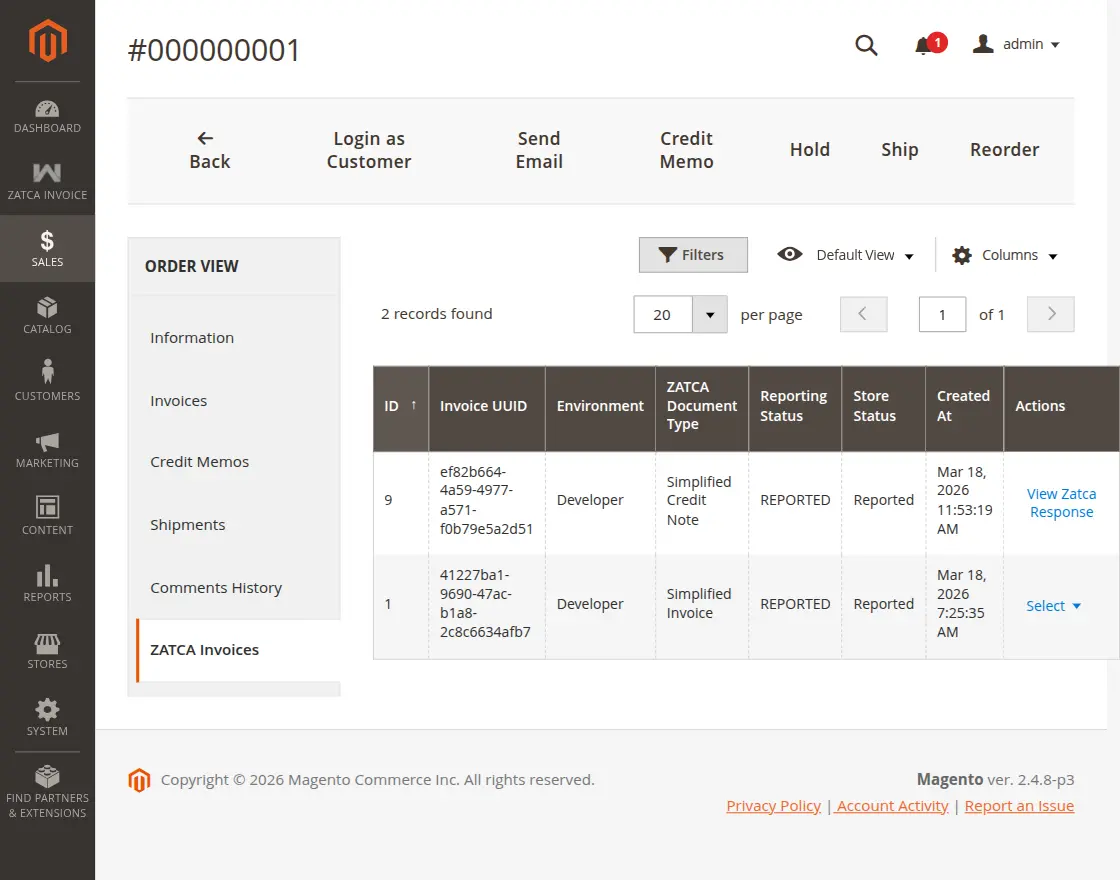
ZATCA Invoices Tab
ZATCA Invoices tab in the order view displays all ZATCA-related invoice details for the selected order.
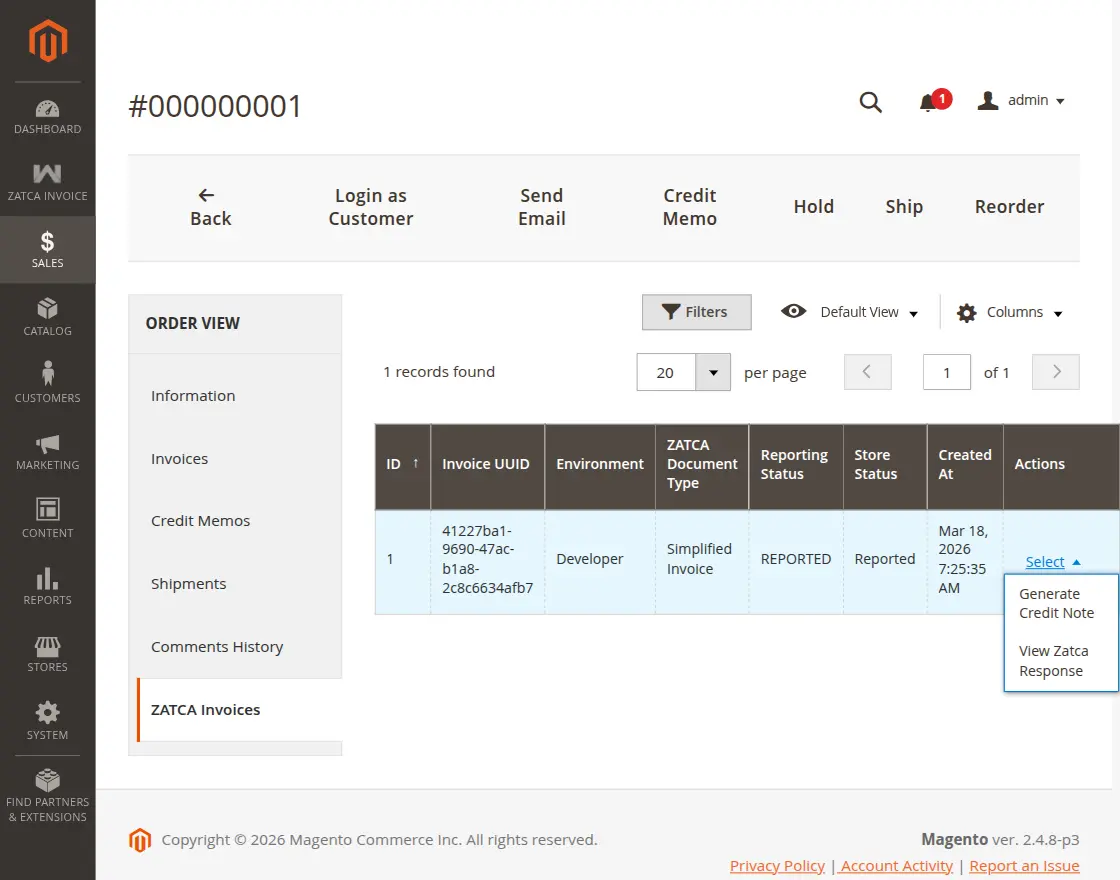
Admins can also perform actions like: Generate Credit Note and View ZATCA Response
Generate Credit Note
Admin can easily generate a credit note by clicking the Generate Credit Note option from the ZATCA Invoice grid for any invoice.
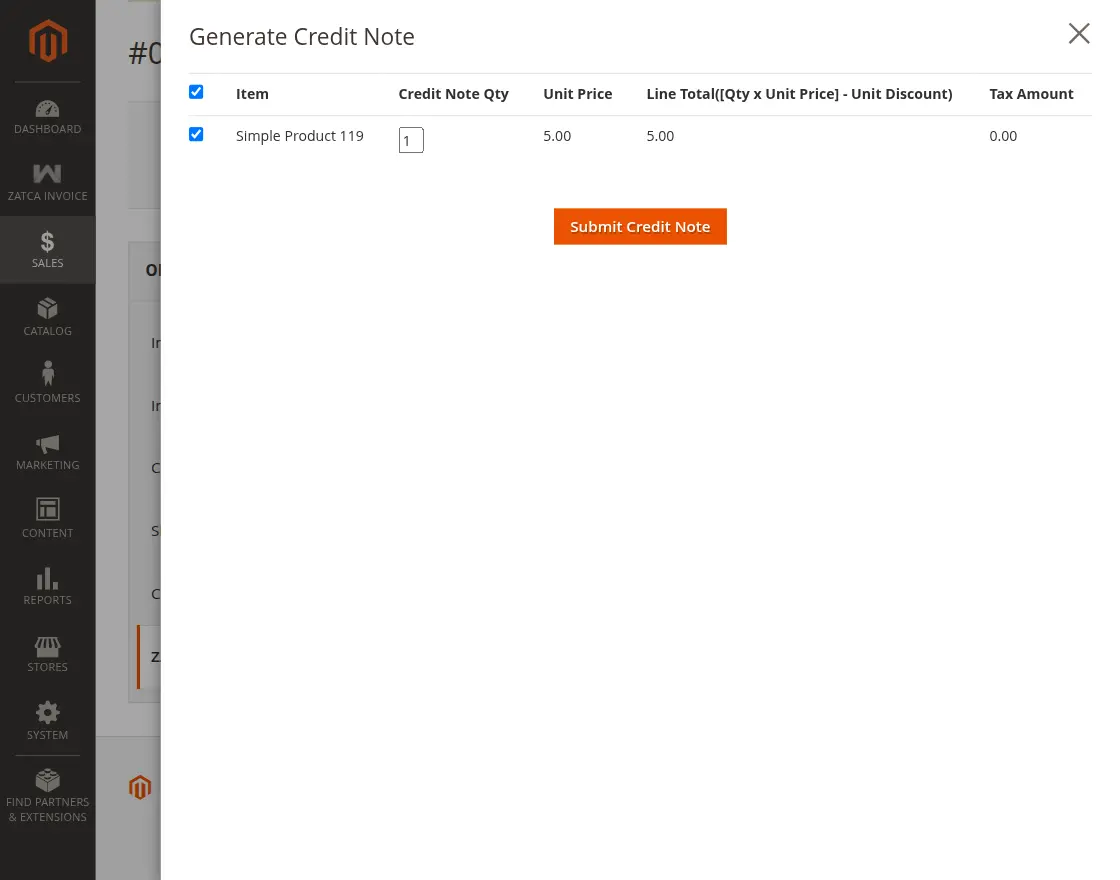
Then, select the items and quantity to refund, and submit the credit note
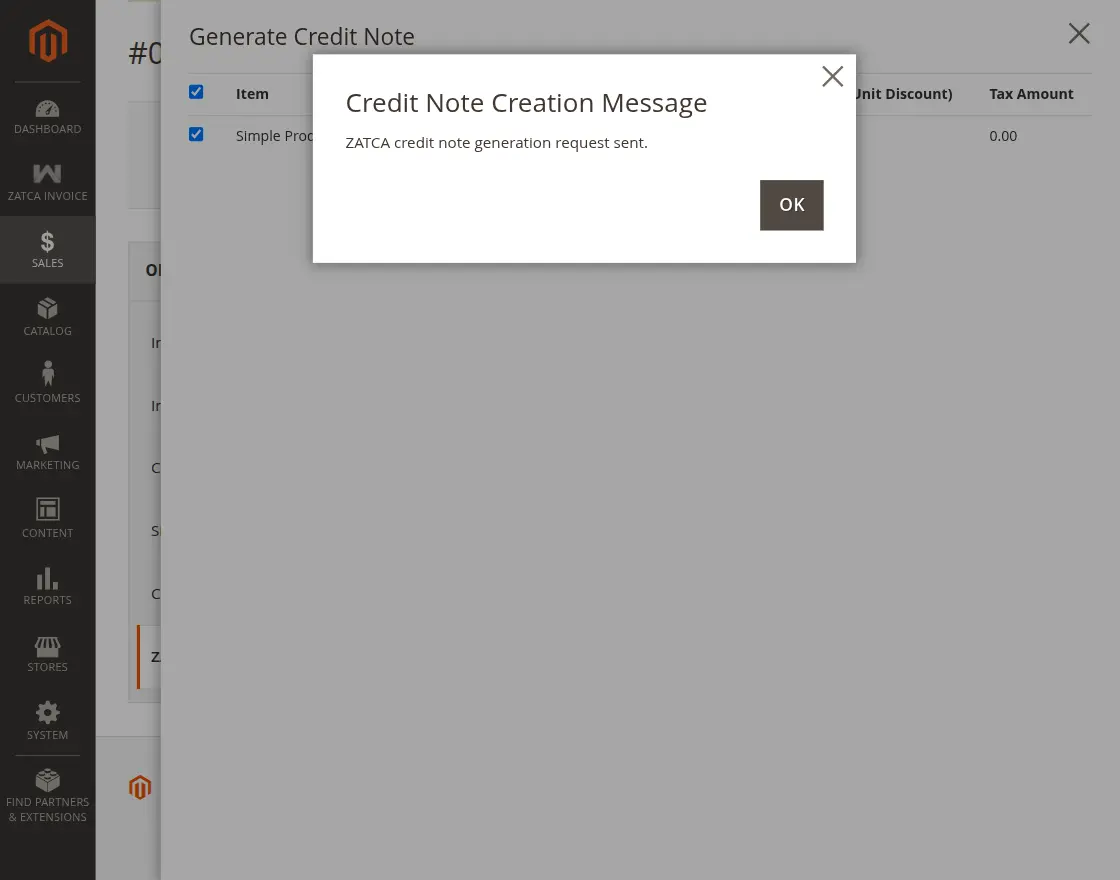
Once the credit note is created, it will be listed in the ZATCA Invoices section under the order view.
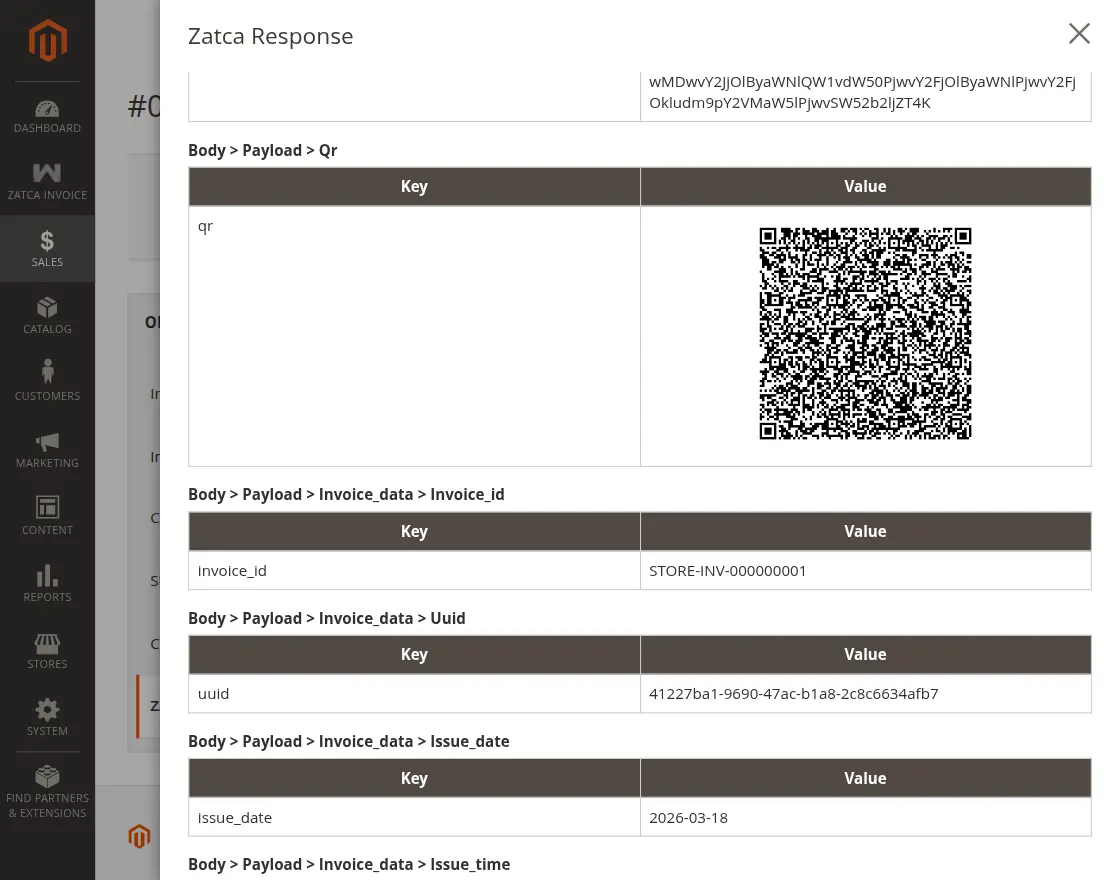
ZATCA Response Details
ZATCA Response popup displays the result of the invoice submission to ZATCA.
- Success – Indicates if the request was successful
- Validation Status – Shows compliance status (PASS)
- Reporting Status – Displays if the invoice is reported
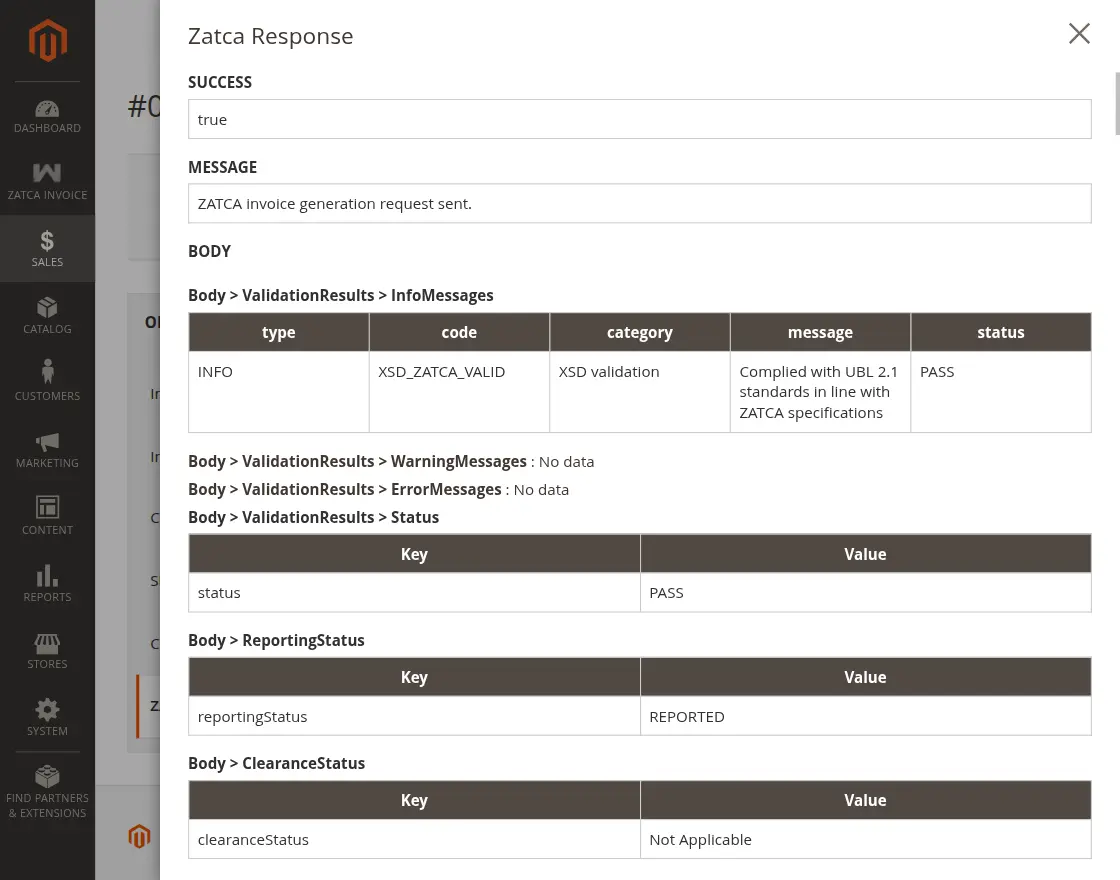
- QR Code – Contains encoded invoice data
- Invoice Details – Includes ID, UUID, and date
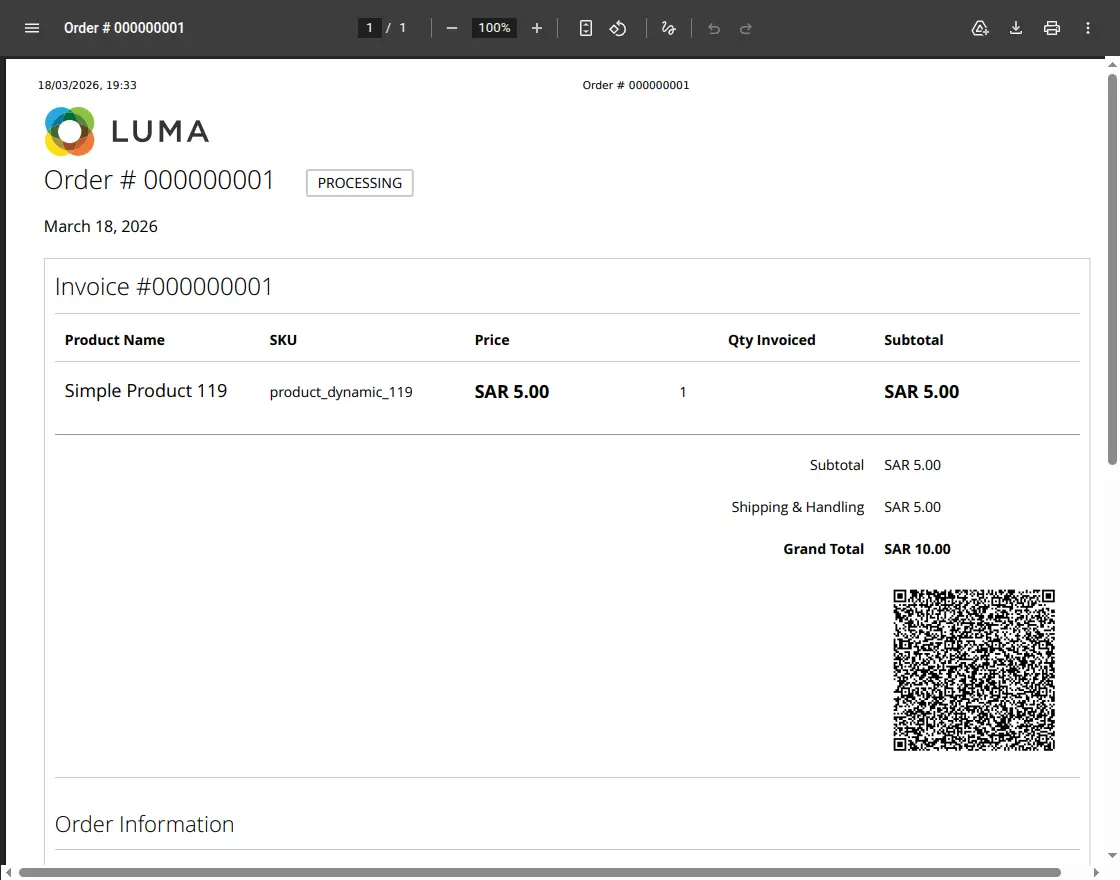
Invoice PDF with QR Code
Both admin and customers can print invoices with a QR code, allowing quick and easy ZATCA verification
That’s all for Magento 2 ZATCA Invoice. However, if you still have any issues, feel free to add a ticket and let us know your views to make the module better at webkul.uvdesk.com
Current Product Version - 4.0.4
Supported Framework Version - Magento 2.0.x, 2.1.x, 2.2.x,2.3.x, 2.4.x

Be the first to comment.