Magento 2 Pre Order extension lets your store sell products before they are physically
available.
With the help of the Magento 2 backorder extension, the admin can allow customers or guest users to place pre-orders for upcoming or unavailable products in the store.
The admin can set whether the customer will pay a full or partial amount for the product.
Adobe Commerce Pre Order extension addresses three key pain points by capturing demand before products arrive, collecting upfront deposits to reduce cash-flow risk, and keeping customers informed with automated updates that help lower support requests and cancellations.
Magento 2 backorder extension is for merchants and e-commerce store owners who want to sell products before they are in stock, manage cash flow more effectively, and keep customers informed while reducing support overhead.
Additionally, You can also check the Magento 2 Scan and Go extension if you require to enable a self checkout system for customers in your physical outlet.
Using the Magento 2 One Step Checkout extension, streamline your entire checkout process into a single page for a faster customer experience.
Check the Magento 2 backorder Plugin working in the video mentioned below –
Features
- Buyers can pre-order products.
- Magento 2 backorder module also supports the product with custom options.
- Admin can set a custom message to display on the preorder product page.
- Admin can set preorder status and availability dates.
- Using Magento 2 Pre Order modules customers can pay the full or partial payment.
- Set the custom percentage or, fixed partial amount to pay for pre-ordering.
- Customers can receive an automatic email notification when a product is made available in the store and removed from the PreOrder state.
- Customer can also order preorder product with normal product.
- Customer can also order two preorder product at once.
- Customers can see pre-order listing from seperate section.
- Admin can display Free Preorder notes to customers.
- Admin can enable or disable auto-enable pre-order when product goes out of stock.
- Admin can auto-disable pre-order when product comes back in stock.
- Admin can globally set stock threshold for pre-order.
- Admin can set full-payment pre-order label from both global and product-level settings.
- Admin can set partial-payment and pay-on-release pre-order labels from both global and product-level settings.
- Admin can enable/disable show countdown timer on pdp.
- Admin can set countdown label.
- Admins can allow or prevent customers from canceling pre-orders.
- Admins can allow or prevent customers to edit shipping address before release.
- Admin can set cutoff days for pre-order cancel and shipping address edit.
- Admin can enable/disable backorder mode for pre-order.
- Admins can set the backorder label globally or at the product level.
- Admin can enable or disable preorder banner visibility on cart page.
- Admins can allow or restrict customer groups from placing pre-orders.
- Admins can allow or prevent guest users from placing pre-orders.
- Admins can set a default maximum pre-order quantity per product.
- Admins can set a default maximum pre-order quantity per customer.
- Admins can set a low pre-order slot warning threshold.
- Admin can see pre-order reports.
- Admin can see pre-order notification reports.
- Admin can create discounts & promotions campaigns for their stores.
- Badges and Visual merchandising feature for admin and customers.
- Seperate email configuration section for admins.
- Multi-Lingual support / All language working including RTL.
- Magento 2 backorder Plugin is compatible with the Hyva Storefront.
- The code is fully open & you can customize it according to your need.
Note –
- Partial payment info is visible on the product page and the cart page only when admin enables the partial’s payments from the configurations.
- For the configurable, bundle and grouped products admin needs to add its associate product in the preorder state.
- All product types are compatible only with module version 3.0.0 and above. Module Versions below 3.0.0 will only support Simple, Configurable, Downloadable, and Virtual Products.
- MSI is compatible with module version 3.0.0 and above (not compatible with versions below 3.0.0).
Installation
Customers will get a zip folder and they have to extract the contents of this zip folder on their system.
The extracted folder has an src folder, inside the src folder you have the app folder.
You need to transfer this app folder into the Magento2 root directory on the server as shown below.
After the successful installation, you have to run these commands in the Magento2 root directory.
You need to run the following commands:
php bin/magento setup:upgrade
php bin/magento setup:di:compile
php bin/magento setup:static-content:deploy
php bin/magento indexer:reindex
php bin/magento cache:flush
Multilingual Support
For the multilingual support, the admin will navigate through Store->Configuration->General ->Locale Options
Then select the locale as German (the language the admin wants to translate his store content).

Module Translation
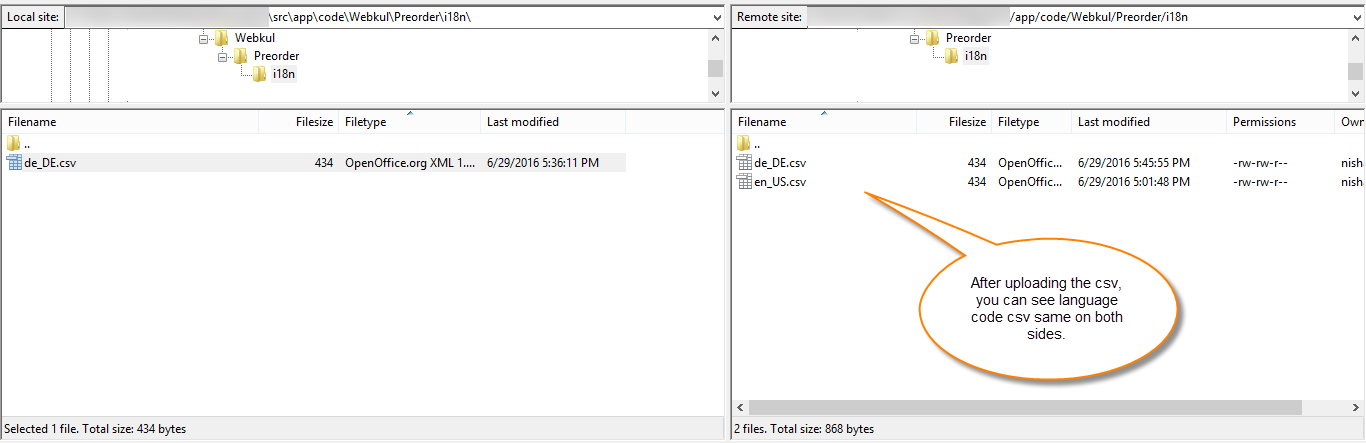
If you want to translate their module language from English to German then follow the path app/code/Webkul/Preorder /i18n
It is the unzipped Magento2(Adobe Commerce) Preorder folder and then you will get a CSV file with the name “en_US.csv”.
Now, rename that csv as to your region code and language code “de_DE.csv” and translate all right-side content after the comma in your language.
After editing the CSV, save it and then upload it to the path app/code/Webkul/Preorder /i18n where you have installed Magento 2 on the server.
Magento 2 Pre Order plugin will get translated into your desired Language. It also supports RTL and LTR languages.

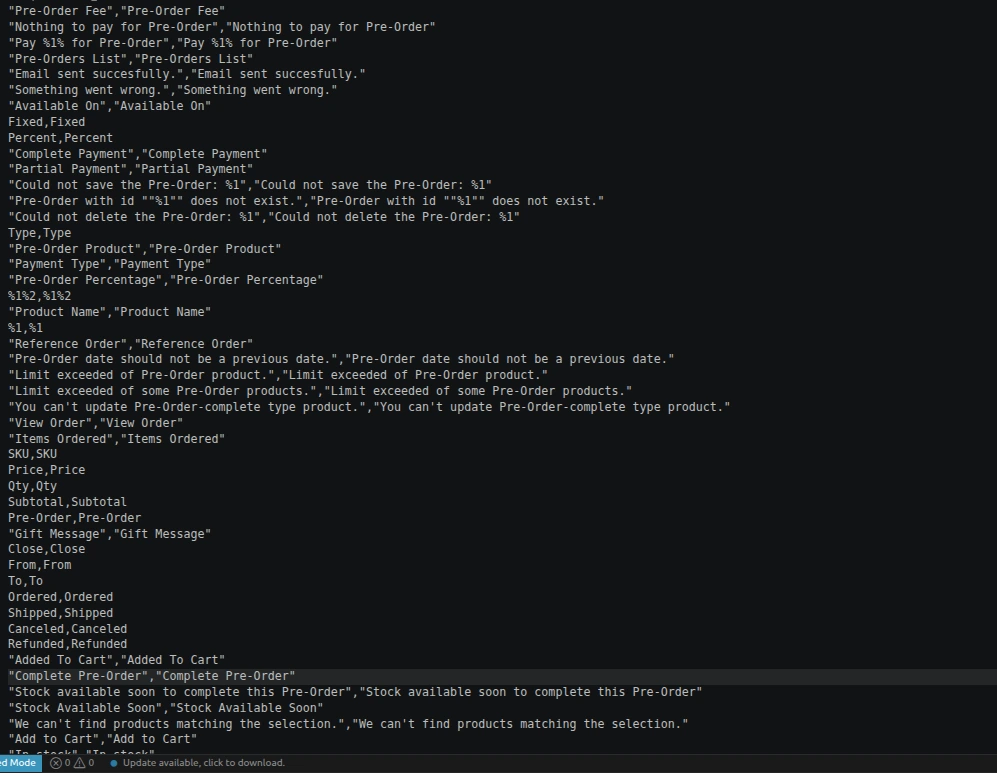
The user can edit the CSV like the image below.
Pre-Order Configuration
For configuring Magento 2(Adobe Commerce) Pre-order extension go to Stores>Configuration>Webkul>Pre-order. The following options will be available:-
Enabled- Select Yes or No to enable or disable pre-order module.
Preorder Type – Select how the customers will make the payment for pre-order – Full Payment or Partial Payment.
Preorder Message – You have an option to display a small message on the pre-order product page.
Enable Automatic Email – When the product is made available in the store, the customers receive an email notification for completing the order process.
Select Yes for auto-email notification, else select No for manual email notification.
Store Email Address – Enter the sender’s email address for the pre-order email notification.
Email Order Note For Preorder – You have to enter a note or a message for the order email.

Free Preorder Note – Enter the message for the preorder product page that requires no advance payment.
The Preorder Percent must be ‘0’ to display this note. This note will be visible on the product page.
The product In Stock Email Template – Select the email template for the product availability notification which will be sent to the customers.
Preorder Additional Fee Type – Select the preorder additional fee calculation type as fixed or percentage.
The preorder additional Fee – Enter the preorder additional fee value.
Auto-enable Pre-Order When Out of Stock – Select Yes for enable this feature , else select No to disable it.
When this configuration is enabled, Pre-Order will be automatically enabled for out-of-stock products.
Auto-disable Pre-Order When Back in Stock – Select Yes for enable this feature , else select No to disable it.
When this configuration is enabled, Pre-Order will be automatically disable when product will be back in stock.
Stock Threshold to Trigger Pre-Order – Enter the quantity threshold below which the Pre-Order functionality will be triggered.

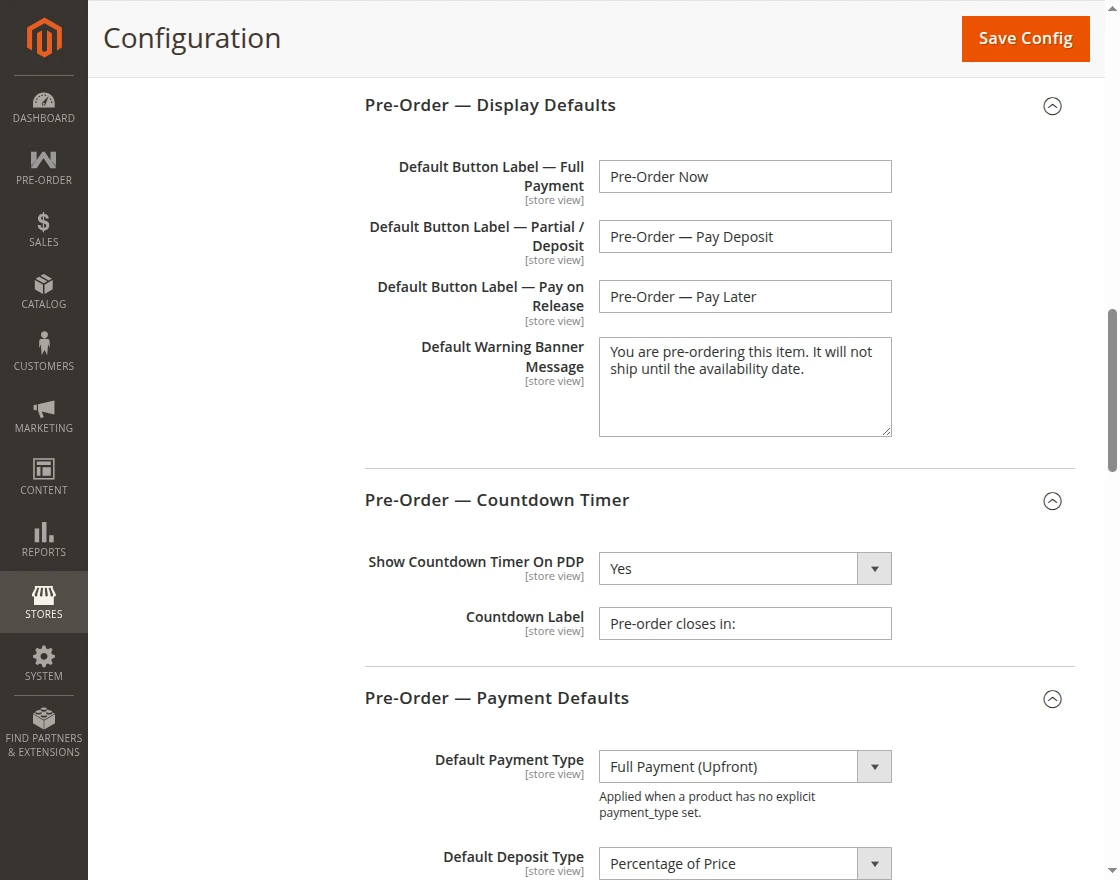
Default Button Label — Full Payment – Specify the text shown for the Pre-Order Full Payment option.
Default Button Label — Partial / Deposit – Define the label displayed for the Pre-Order Partial/Deposit Payment option.
Default Button Label — Pay on Release -Set the button name for the Pre-Order Pay Later payment option.
Default Warning Banner Message – Configure the default pre-order notice displayed on the product page.
Show Countdown Timer On PDP – Select Yes to display the countdown timer on the product page or, select No to hide it.
Countdown Label – Enter the countdown label to be displayed for the Pre-order PDP.
Default Payment Type – Select how the customers will make the payment for pre-order – Full Payment, Partial Payment or, Pay on Release.
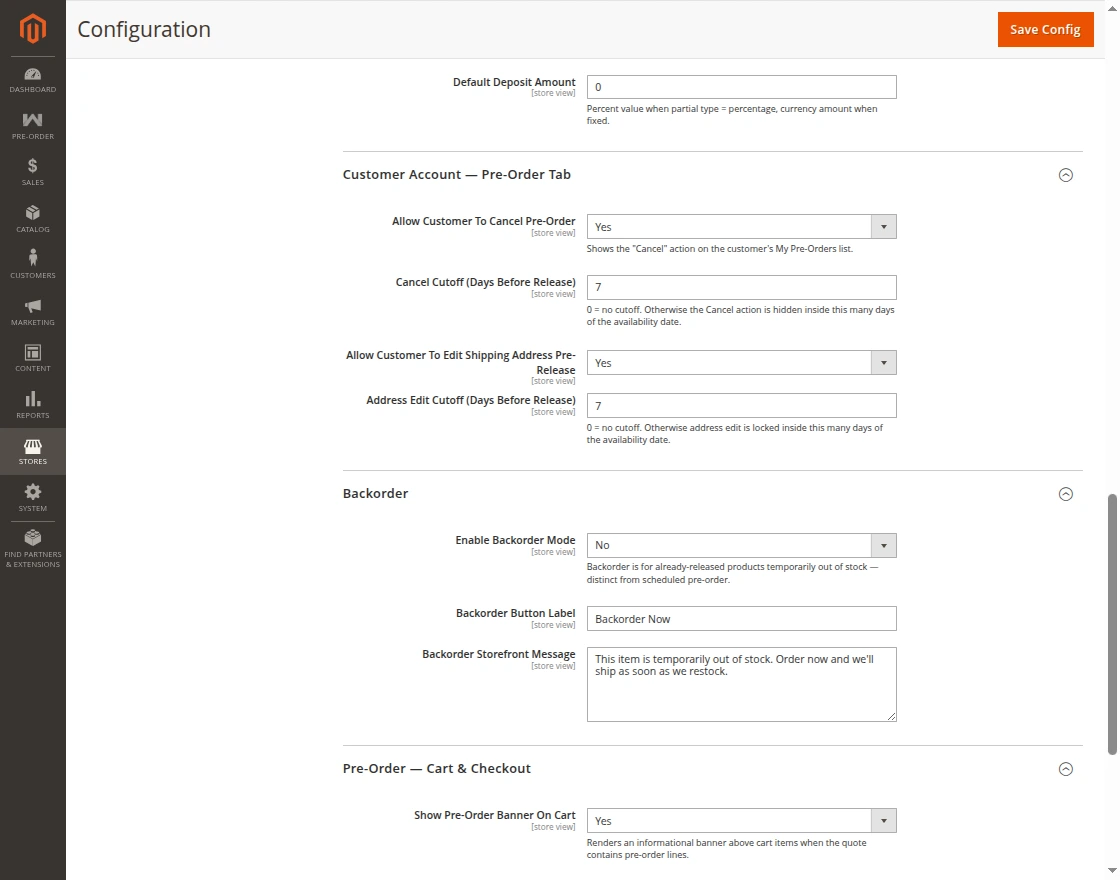
Allow Customer To Cancel Pre-Order – Select Yes to allow customer for pre-order cancel, else select No to prevent pre-order cancellations.
Cancel Cutoff (Days Before Release) – Enter the number of days before the availability date to hide the Cancel option. Set 0 for no restriction.
Allow Customer To Edit Shipping Address Pre-Release – Select Yes to allow customer for shipping address edit before product release, else select No to disable shipping address editing.
Address Edit Cutoff (Days Before Release) – Enter the number of days before the availability date during which customers can edit the shipping address. Set 0 for no restriction.
Enable Backorder Mode – Select Yes for enable backorder feature , else select No to disable it.
Backorder Button Label – Enter backorder button label.
Backorder Storefront Message – Enter the backorder message to be displayed on the Pre-order PDP.
Show Pre-Order Banner On Cart – Select Yes to enable pre-order banner on cart, else select No to disable it.
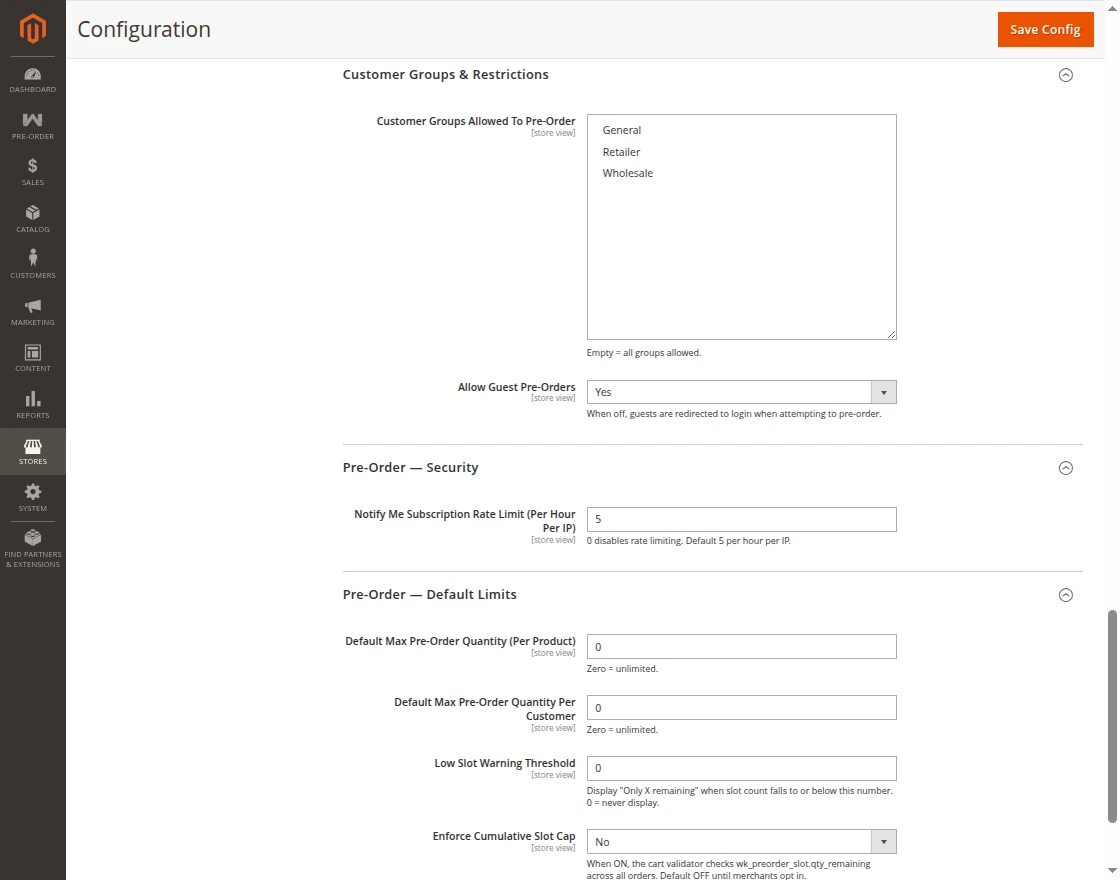
Customer Groups Allowed To Pre-Order – Select the customer groups eligible for pre-orders.
If no group is selected, pre-orders will be enabled for all customer groups.
Allow Guest Pre-Orders – Select Yes to allow guest pre-orders, else select No to disable it.
When disabled, guests will be redirected to the login page when attempting to place a pre-order.
Notify Me Subscription Rate Limit (Per Hour Per IP) – Enter the rate limit value. Set 0 to disable rate limiting.
Default Max Pre-Order Quantity (Per Product) – Enter the maximum quantity allowed for pre-order per product.
Default Max Pre-Order Quantity Per Customer – Enter the maximum quantity a customer can pre-order.
Low Slot Warning Threshold – Enter the pre-order slot quantity at which the low stock warning should be displayed.
Enforce Cumulative Slot Cap – When enabled, the cart validator checks the remaining quantity across all pre-orders. Disabled by default until enabled by the merchant.
If you are using module versions below v3.0.0 such as – v2.1.0, 2.0.6, 2.0.5, etc
If the store admins are using the Initial versions i.e. module version less than 3.0.0, they need to make some changes to the configuration.
After which the PreOrder product will be displayed in the store.
The admin needs to navigate to Store -> Configuration -> Catalog -> Inventory -> Stock Options.
Here on the Display Out of Stock Products, select the Yes option. After that click on the Save button.

After this, on the product edit/creation page, the admin will set the Stock Status as In Stock, quantity 0, and enable the PreOrder status for the product.
Then enter the PreOrder Availability Date that will be visible on the product page at the front end.
Also, enter the maximum PreOrder quantity of the PreOrder product that can be placed by the customers.

Preorder Additional Fee
The admin can even charge Pre-order Additional fees to customers. For this, the admin needs to navigate to Customer -> All Customers as per the below image.

This will redirect the admin to the customer list page.
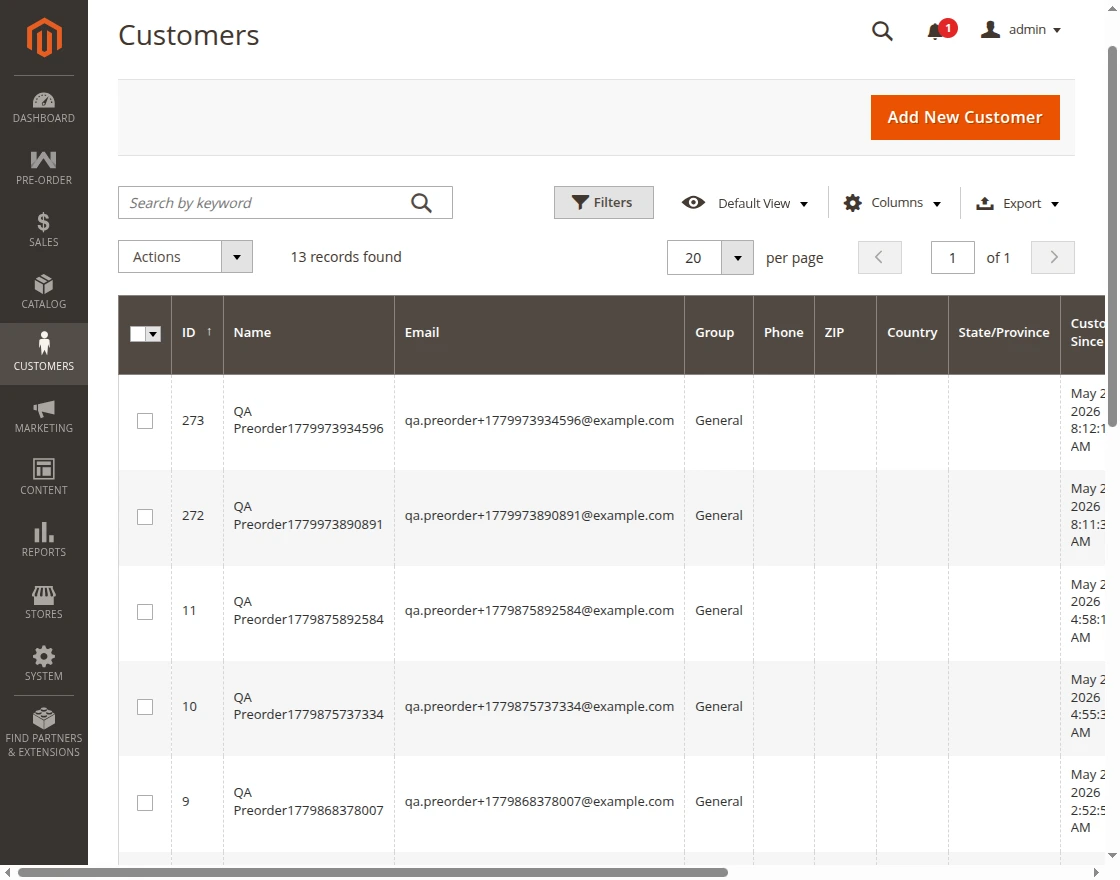
Here, the admin will select the customer from the list and navigate to account information tab to define the preorder additional fee.

Under the Account Information section, the admin will –
- Allow Custom Preorder Fee: Set Yes to allow the preorder additional fee. Else set No.
- Preorder Fee: Enter the preorder additional fee amount.
- Preorder Fee Calculation Method: Select the preorder additional fee calculation type as fix or percentage.
And finally hit the Save Customer button.
Admin Pre-order Product
Now the admin needs to go to Catalog>Product and Edit the product.
- Pre-Order – Then, toggle the Pre-Order option as ‘Yes’
- Pre-Order Product Availability – Select the date of Product Availability.
- Pre-order Quantity– And can also define the allowed preorder product purchase limit for the customer.

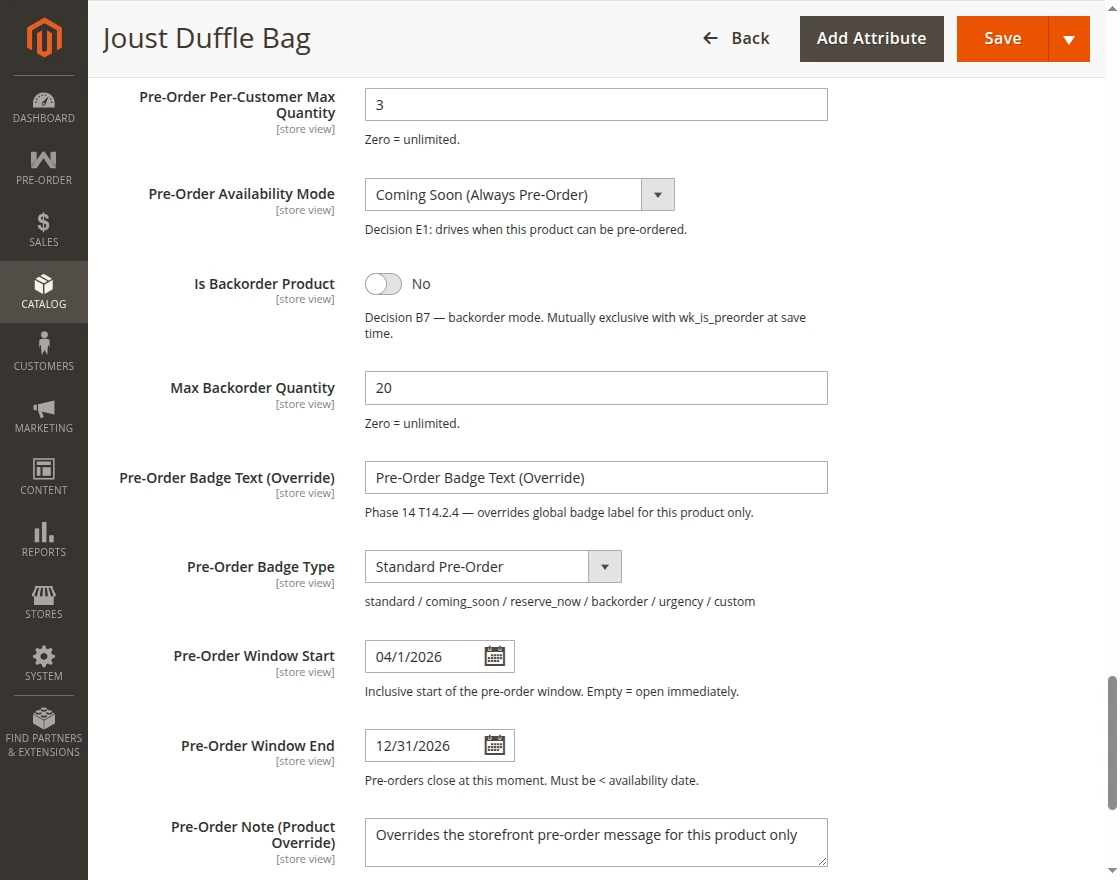
Admin can also configure product level pre-order settings by navigating to pre-order tab at bottom of product add/edit page as shown in the image below.
Pre-Order Payment Type – Choose full payment, partial payment, or pay-on-release options for the product based on requirements.
Pre-Order Deposit Type – select fixed amout or percentage of price.
Pre-Order Deposit Amount – Enter fixed amount or percentage of the product price for the pre-order payment.
Pre-Order Special Price – Enter pre-order special price.
Pre-Order Discount Type – Select percentage or fixed amoutn discount.
Pre-Order Discount Value – Enter discount value for pre-order.
Pre-Order Button Label – Enter pre-order button label.
Pre-Order Warning Message – Enter pre-order warning message.

Pre-Order Per-Customer Max Quantity – Enter max quantity for per customer pre-orders.
Pre-Order Availability Mode – Select preorder availability mode such as Available When Out of Stock, Coming Soon (Always Pre-Order), Scheduled Window (Open/Close Dates).
Is Backorder Product – Set the toggle to Yes to enable the option or No to disable it.
Max Backorder Quantity – Enter max backorder quantity.
Pre-Order Badge Text (Override) – Enter pre-order badge text for this product.
Pre-Order Badge Type – Select available pre-order badge type.
Pre-Order Window Start – Select start date for preorder.
Pre-Order Window End – Select end date for preorder.
Pre-Order Note (Product Override) – Enter pre-order note for this product.
Assigning Bulk Products
You can enable or disable the action of assigning products to Pre Order.

After selecting all the products click on the Apply Pre-Order option.

- Stock Status: Select the status of the product In stock or out of stock.
- Quantity: Enter the available quantity of the product.
- Pre-Order Availability: Select the date when ever you want to start the pre-booking or pre-order of the product.
- Pre-Order Quantity: Set the limit on how much quantity will be pre-ordered.
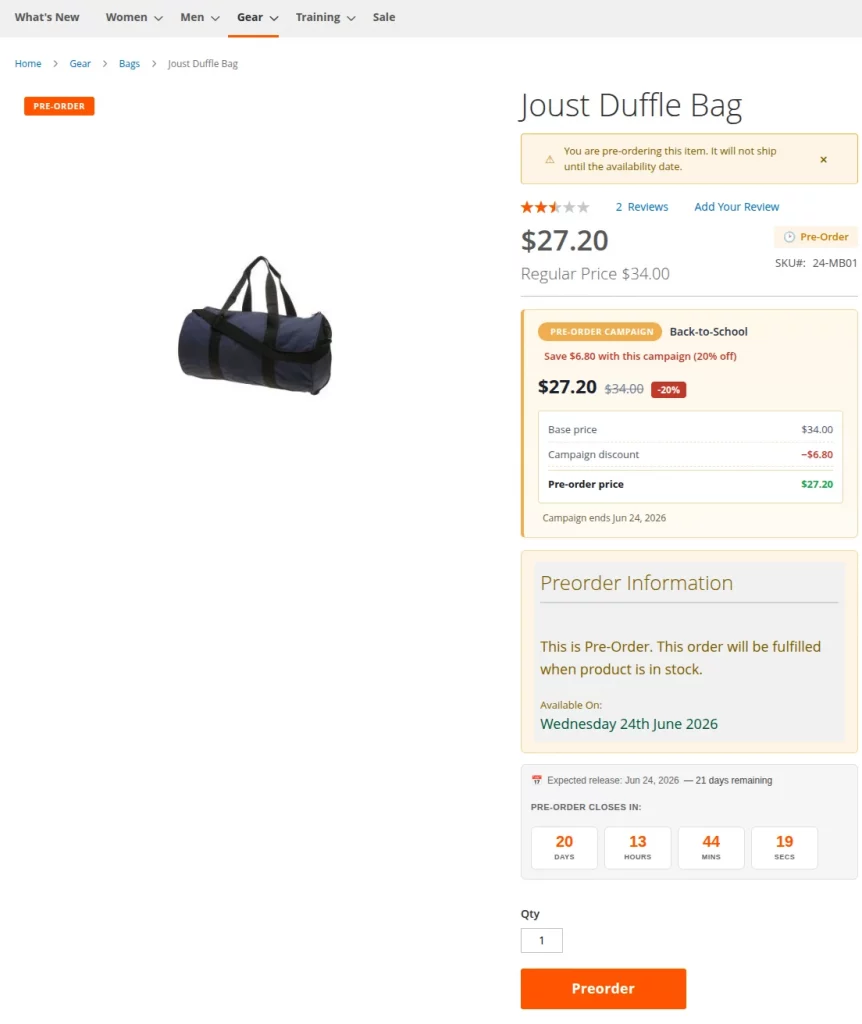
Simple Product Pre-Order — Customer View
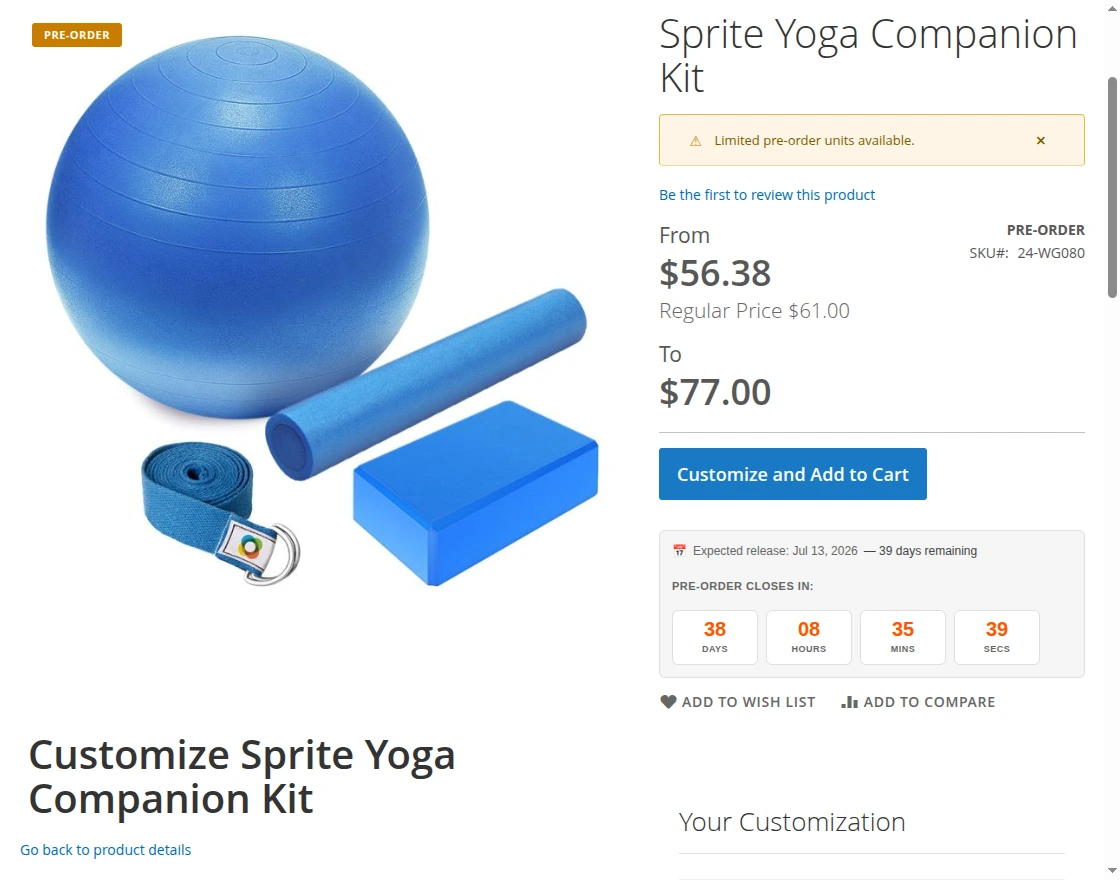
Product Detail Page (PDP) for simple products displays the Pre-Order button, availability date, and pre-order message.
Customers can place a pre-order instantly with a single click, without selecting any additional options.
Customers will also see the Countdown Timer (if enabled) and applicable campaign details on the Product Detail Page (PDP).
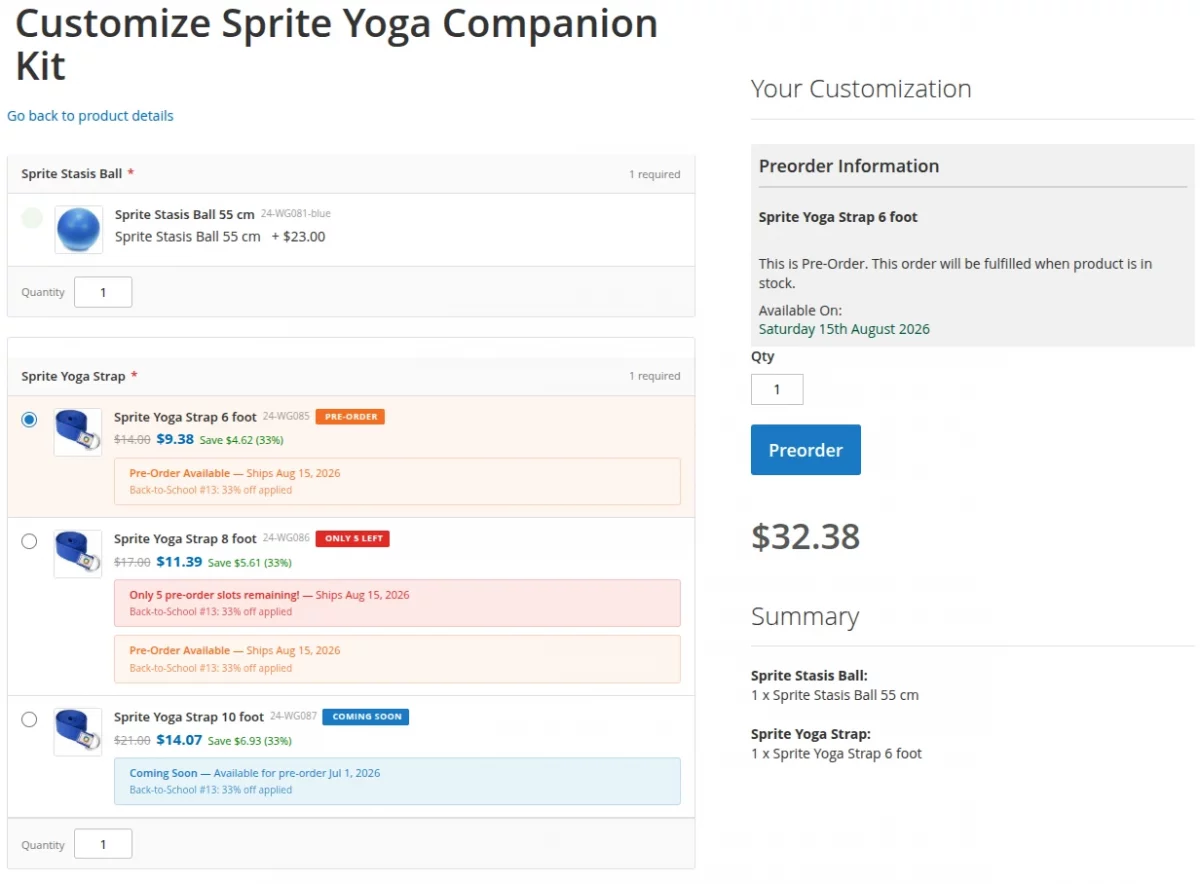
Configurable Product Pre-Order — Customer View
Configurable products, the Pre-Order option is displayed only after all required options are selected.
Once a pre-order variant is chosen, the button label changes to Pre-Order, and the pre-order details are displayed on the Product Detail Page (PDP).

Placing Order
Case 1 – Full Payment
The product purchase process is the same as before, the customer can make the full payment including the shipping cost, and place the order.
Now, when the product is available on the store, the customer receives an email notification.
Case 2 – Partial Payment
In partial payment, two separate orders IDs are created for completing the pre-order process. In the first order, the customer pays some percentage of the product’s price plus the shipping cost.
When the product is available on the store, the customer receives an email notification for making the remaining payment using the second-order ID.
Shopping Cart:
After adding the product to the shopping cart, the customer can see the following details about preorder:
- Type: The type can be preorder the product.
- Payment Type: The preorder type can be partial or full payment for preordering the product.
- Preorder Percent: Here the percentage of the partial type payment is set by the admin.

Once the order is placed, the customer can view the order information from My Accounts>My Orders section.
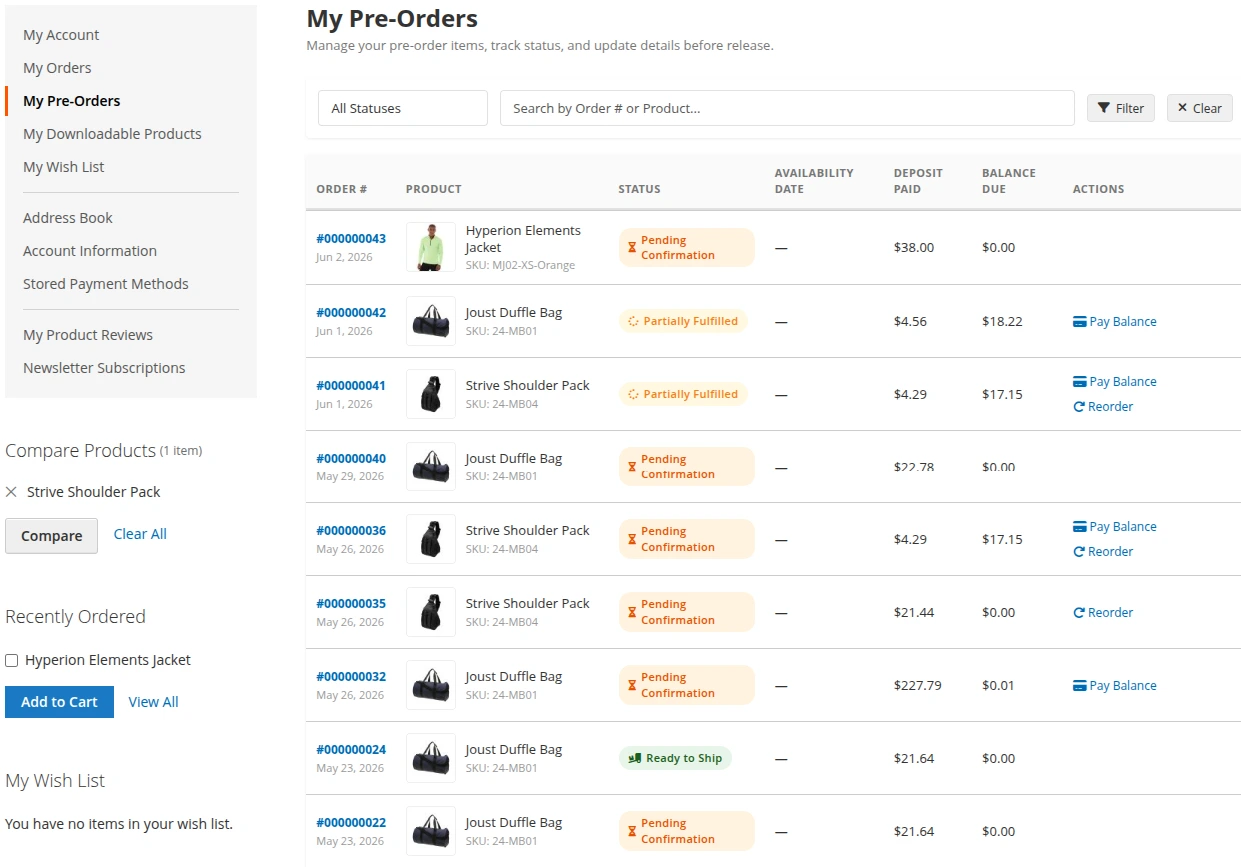
My Pre-Orders
Customers can view all their placed pre-orders under My Account > My Pre-Orders section.
Here, customers can reorder pre-order products, pay the remaining balance amount, view the pre-order status, and check the product availability date.
Customers can also view the deposit amount and remaining balance amount for their pre-orders.
Completing Pre-order
Product Availability Email Notification
When the product will be available on the store, the customers will get an email notification. Then they can complete the order and pay the remaining amount.

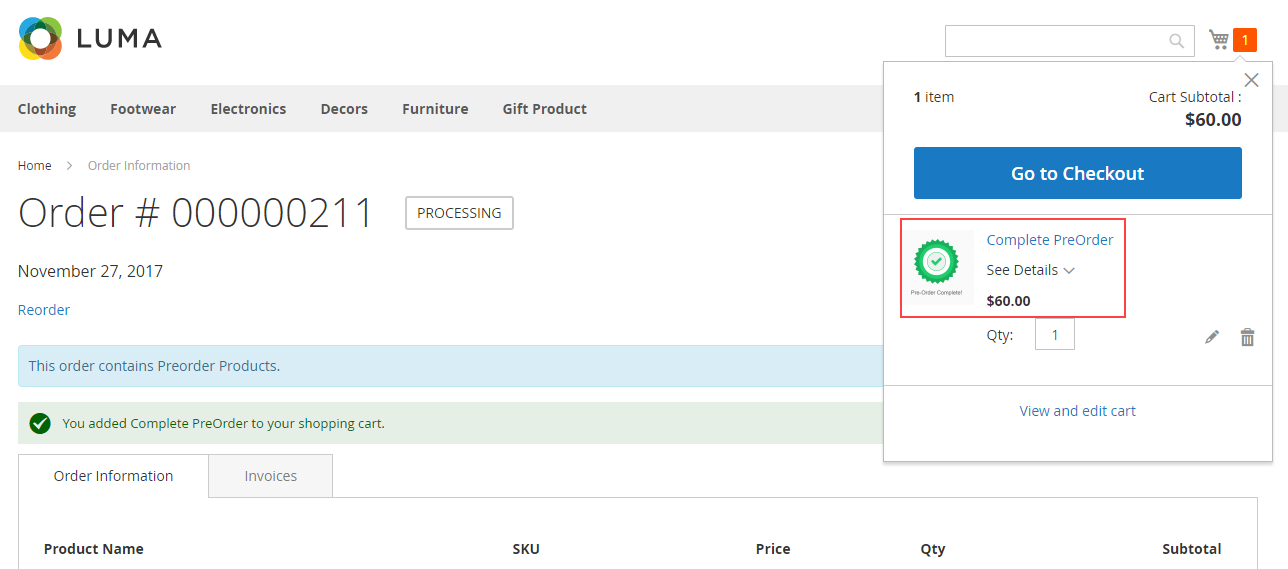
After clicking the link in the email, the order page will open to the customer. Here, the customer will see the ‘Complete Preorder‘ button.
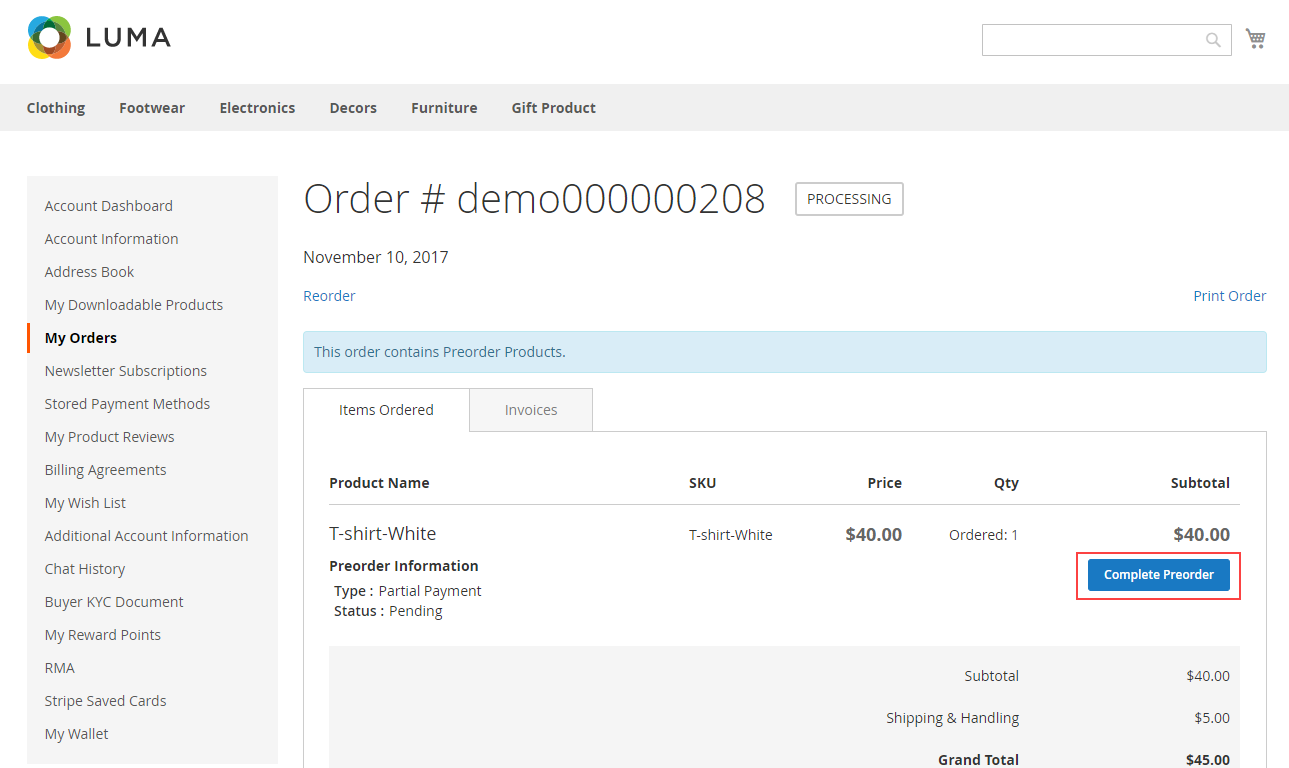
Pay Remaining Amount
After clicking on Complete Preorder, the remaining amount will be added to the shopping cart.
The product will have a new image and a new name as it is a part of the preorder product.
Also, at the checkout, the customer will not have to pay for the shipping again.

Remaining Amount Paid
When the remaining payment is paid for the pre-order product, the customer can see the second-order information from ‘My Account>My Orders’.

Order Management & Admin Grid :
This feature provides store owners with a dedicated section to view and manage all pre-orders.
It also offers bulk actions and detailed order information to help streamline the fulfillment process.
Admin Pre-Order List
Admins can view and manage all pre-orders by navigating to Pre-Order > Pre-Orders List, as shown in the image below.
It shows all pre-order orders in one grid with columns such as:
Order ID
Purchase date
Customer name
Amount paid
Remaining amount due
Pre-order type
Status
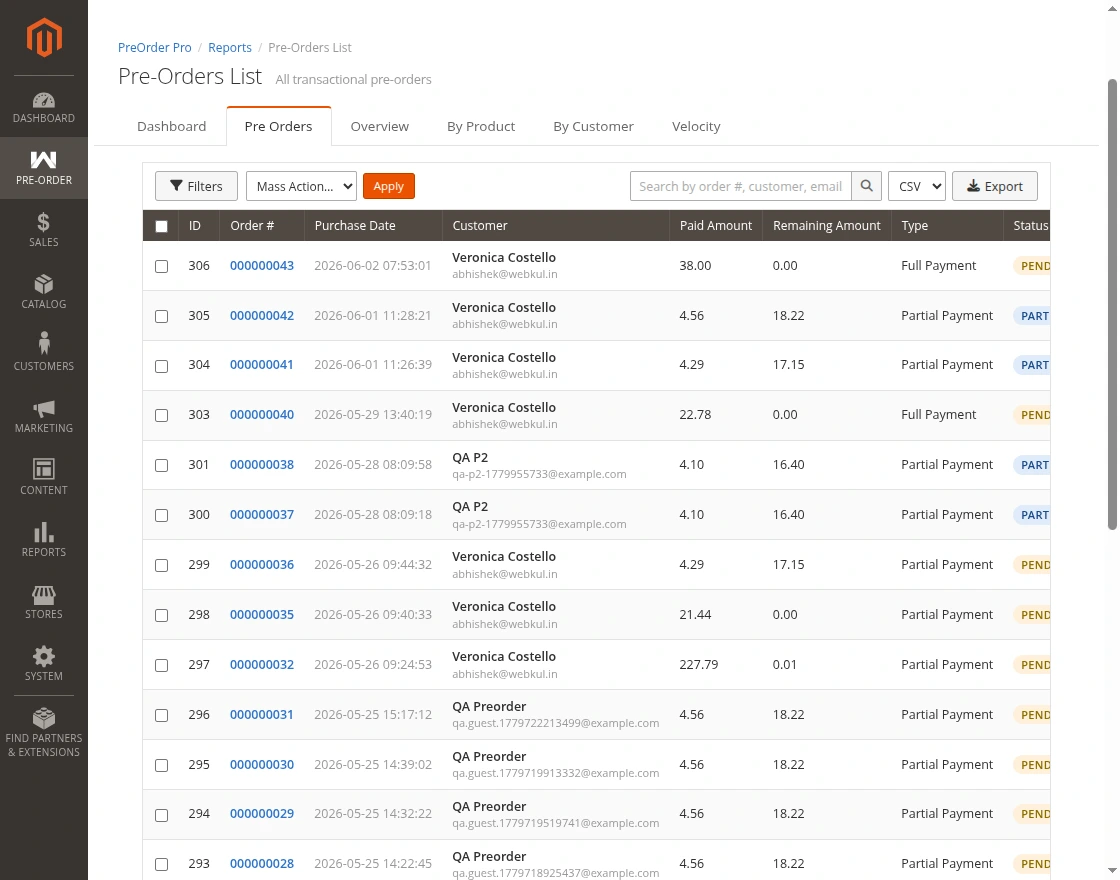
On the following page, the admin will see the Order, Purchase Date, Customer Name, Customer Email, Paid Amount, Remaining Amount, Preorder Type, and Preorder Status.
To view the detailed order information, click order link or, arrow icon.

Pre-Order Analytics Dashboard:
The Pre-Order Reports & Analytics Dashboard gives you a complete, at-a-glance view of how your pre-orders are performing.
From a single admin area you can track demand, revenue, customer behaviour, and product velocity, and export the data you need.Open the Reports area under the Pre-Order menu in your admin panel.
The dashboard is organised into tabs so you can move quickly between a high-level summary and detailed, filterable reports.
Across every tab you can:
- Refresh the data on demand.
- Export the data you are viewing.
- See clear status indicators and badges (for example, order status or guest vs. registered customers.
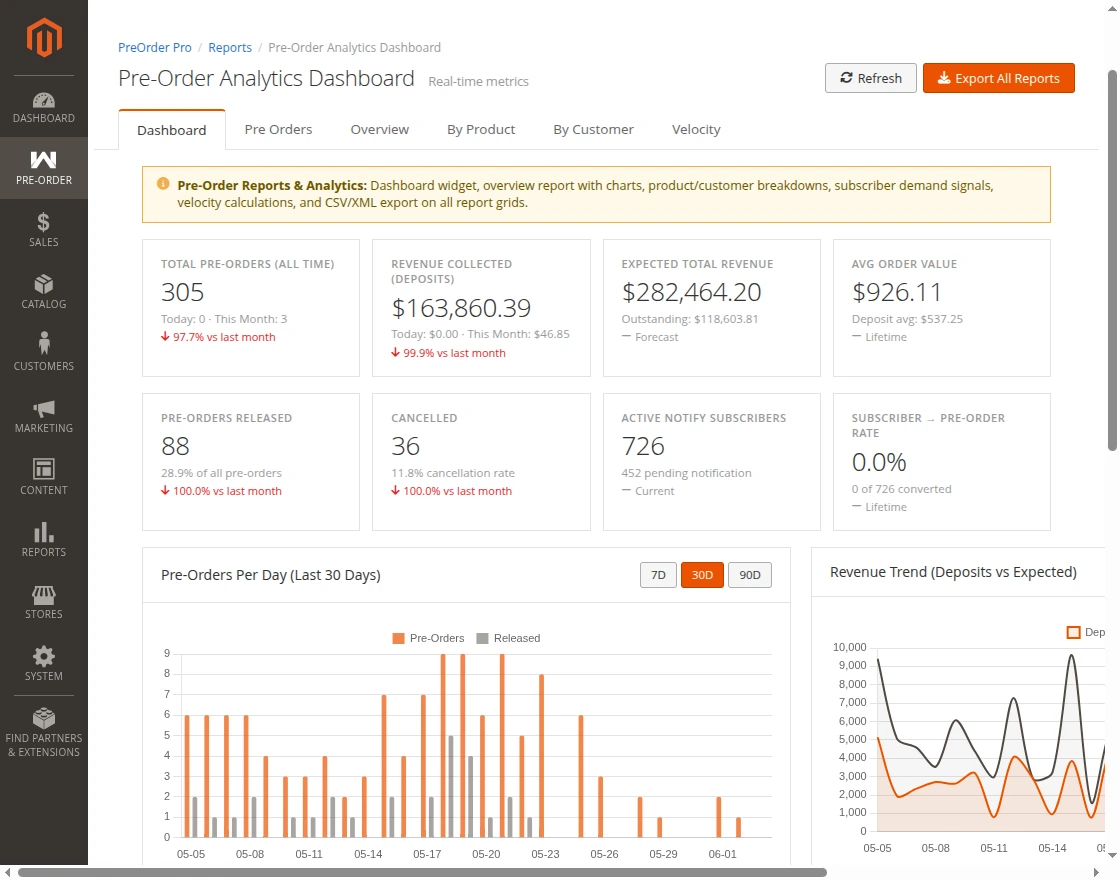
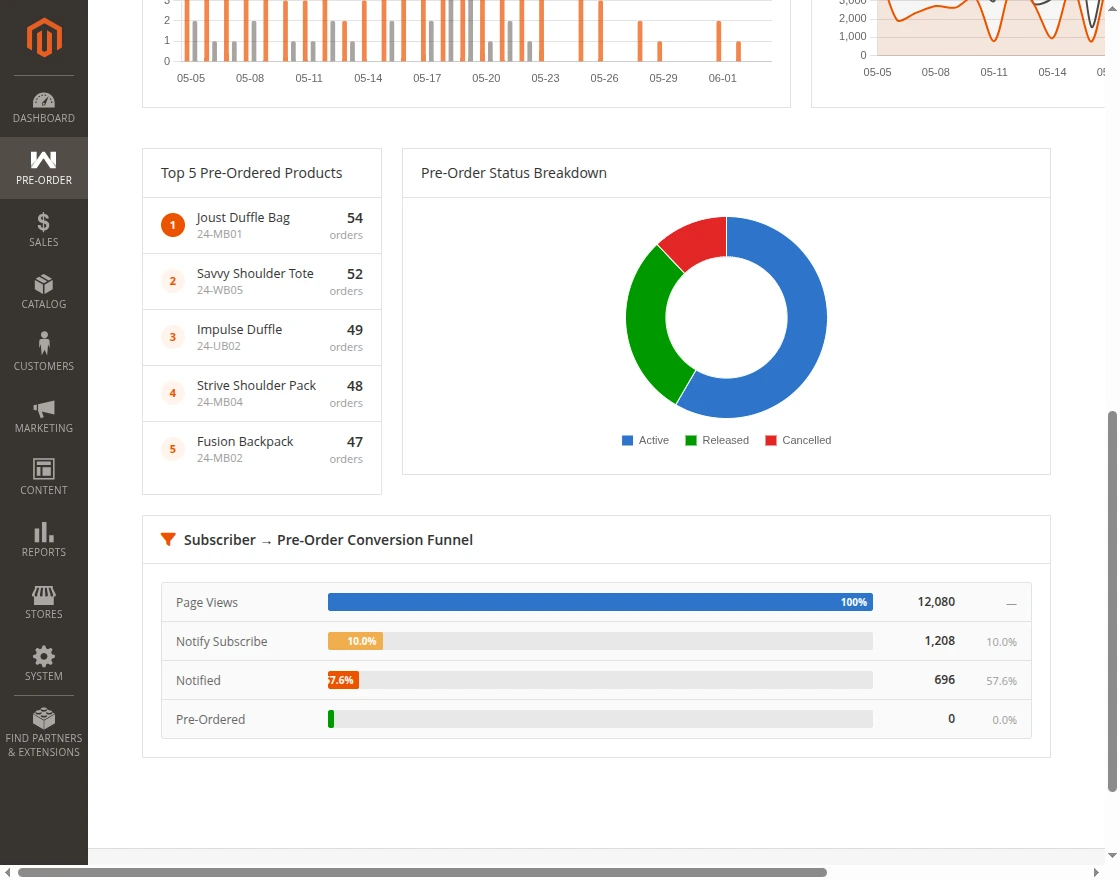
Dashboard Overview:
The main Dashboard tab presents your key pre-order numbers and trends.
Eight summary cards give you the headline figures, each with a comparison against the previous period:
- Total Pre-Orders
- Revenue Collected
- Expected Revenue
- Average Order Value
- Released
- Cancelled
- Active Subscribers
- Subscriber-to-Pre-Order Rate
Charts and breakdowns:
- Pre-Orders Per Day bar chart, with quick range buttons for the last 7, 30, or 90 days.
- Revenue Trend line chart comparing collected deposits against expected revenue.
- Top 5 Pre-Ordered Products ranked list.
- Pre-Order Status Breakdown doughnut chart.
- Conversion funnel showing how shoppers move from page views, to notify-me
- subscriptions, to being notified, and finally to placing a pre-order.
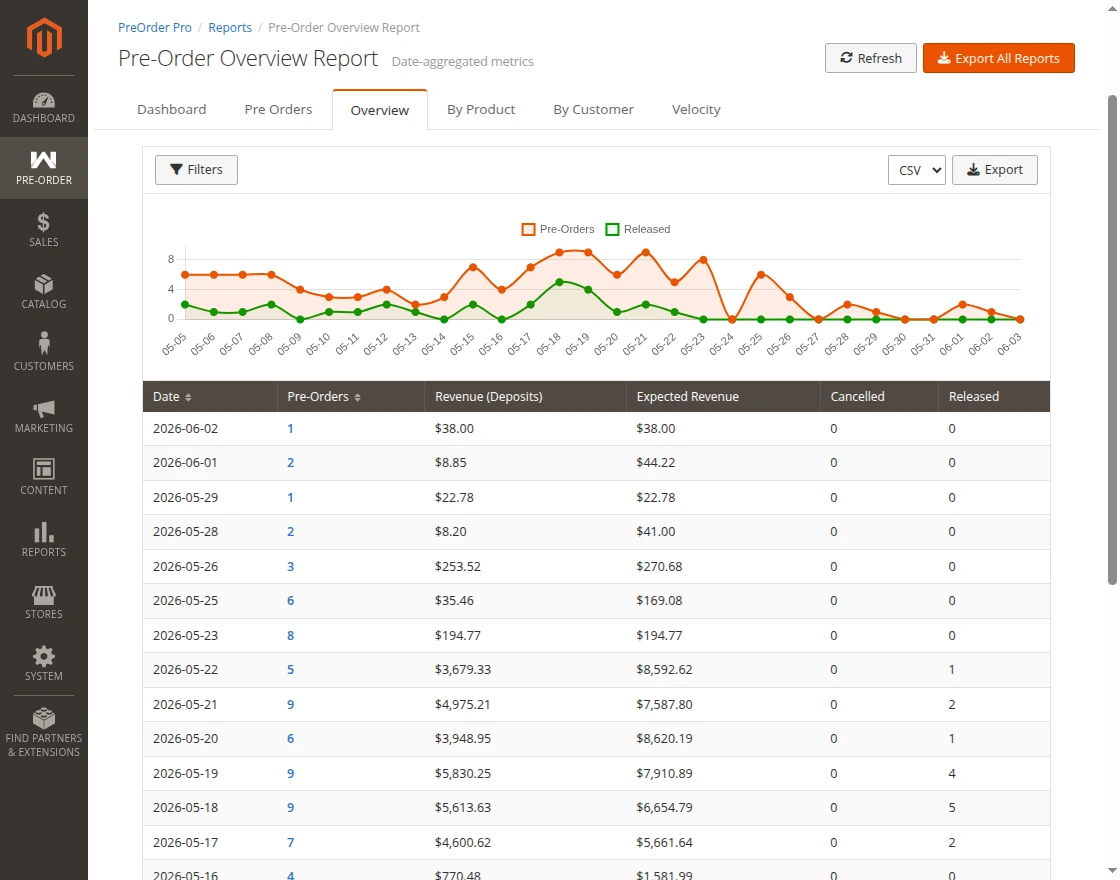
Overview Report
A date-aggregated report of pre-order activity over time.
- Filter by date range and status.
- View a line chart of pre-orders placed versus released.
- See a sortable table with daily figures: Pre-Orders, Revenue (Deposits), Expected Revenue, Cancelled, and Released.
- Export to CSV or XML.
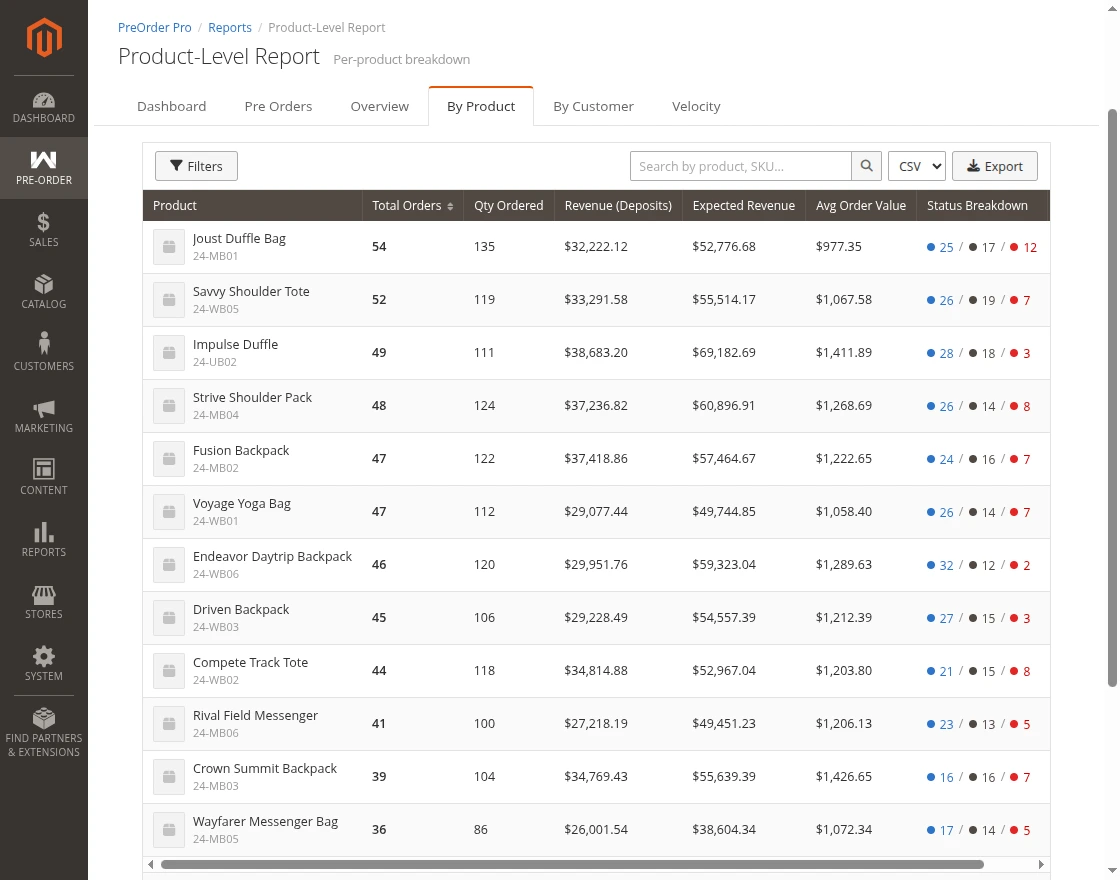
By Product Report
Understand which products are driving pre-order demand.
- For each product you see total orders, quantity ordered, revenue (deposits), expectedrevenue, average order value, and a status breakdown.
- Filter by status or minimum quantity, and search by product.
- Export the product data in csv, xml format.
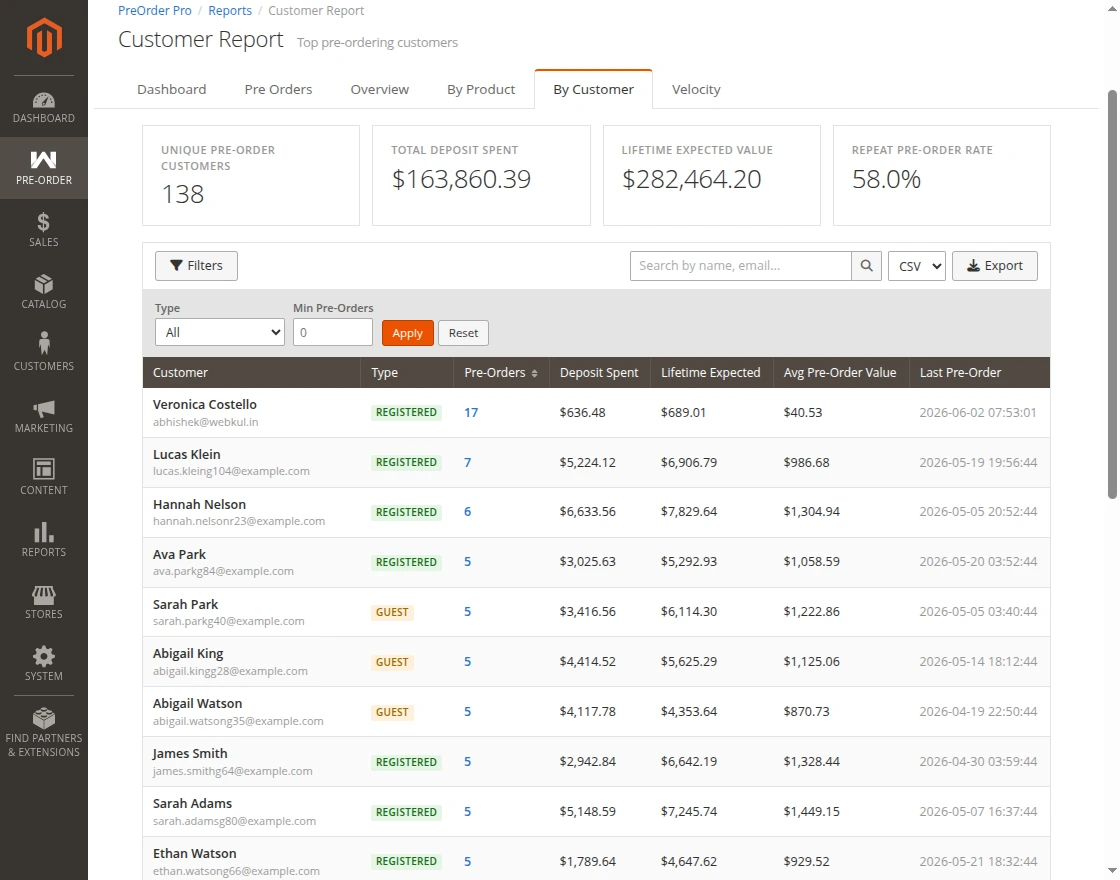
By Customer Report
See who your pre-order customers are and how much they are spending.
- Summary cards show Unique Pre-Order Customers, Total Deposit Spent, Lifetime Expected Value, and Repeat Pre-Order Rate.
- The table lists each customer’s name and email, type (registered or guest), number of preorders, deposit spent, lifetime expected value, average pre-order value, and last pre-order date.
- Filter by customer type or minimum number of pre-orders, and search by customer.
- Export the customer data in csv, xml format.
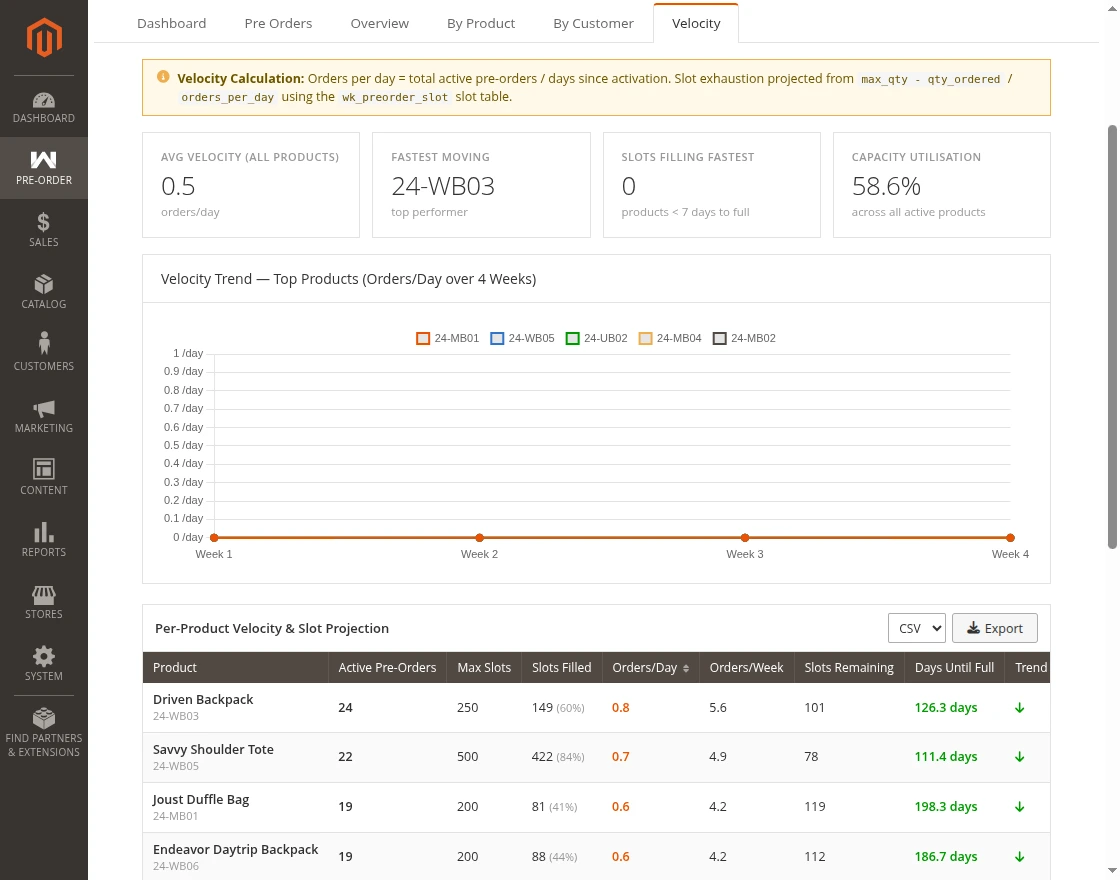
Velocity Report
Track how fast your pre-order slots are filling so you can plan ahead.
- Summary cards highlight Average Velocity, Fastest-Moving Product, Slots Filling Fastest, and Capacity Utilisation.
- A trend chart shows orders per day for your top products over recent weeks.
- The table shows, per product, active pre-orders, maximum slots, slots filled, orders per day, and per week, slots remaining, an estimated time until slots are full, and a trend indicator.
Catalog Price Rule (On Pre Order)
You can also set the catalog price rule for pre-orders Marketing> Catalog Price Rule> New Rule. you have to set the condition and selected YES from the drop down list.
Then you have to select some action as per the condition.

Cart Price Rule (On Pre-Order)
You can also set the cart price rule for pre-orders Marketing> Cart Price Rule> New Rule.
Then set the condition and select YES from the drop-down list. Then you have to select some action as per the condition.

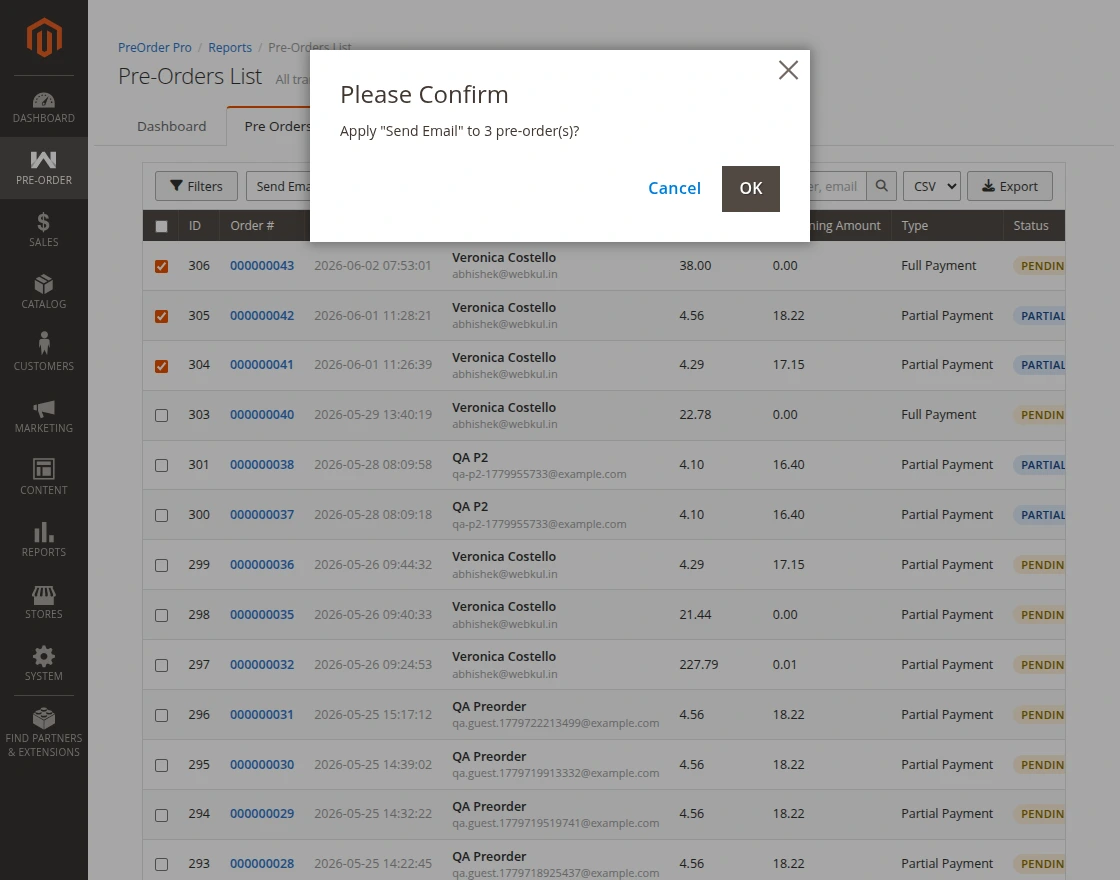
Notify Customers (Manually)
To send an email notification to the customer, first, select the customers from the list. Then go to Actions and select Notify Customers option.
A pop-up confirmation box will appear, click OK and an email will be sent to the customer if the product is available.
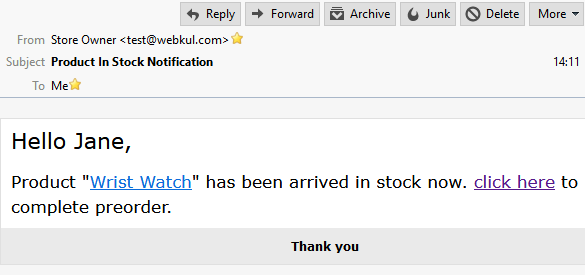
Here is the sample Product Availability Email Notification.
Guest Users Pre-Order

The guest users can also use pre-order functionality without logging into the store. After clicking the Pre Order button, the product will be added to the cart.
The guest users then have to go to the checkout and fill in the information.
For Sign In you can click on the Sign In button.

Order Placed

After that, the guest users will select the payment method and place the order. Order ID will be created for guest users. The guest users can check the pre-order details using their email address.
Guest User Pre-Order Details
After clicking any of the pre-order from the list, the admin can see the detailed information about the pre-order.
Product Availability Email Notification

Once the invoice has been generated and the product is available, an email notification will be sent to the guest user for completing the pre-order.
Complete Pre-Order
The guest user can complete the pre-order either by clicking the link in the email or go to the store and click ‘Orders and Returns‘ option in the footer section.

After clicking the Orders and Returns the guest user will be redirected to order and return page. Here the guest user will provide essential data for viewing their order like:
- Order ID: Here the guest will provide the order ID
- Billing Last Name: The last name which was given during the time of partial payment billing.
- Find Order By: The order can be search based on the email or zip code.
- Email: The email address provide for the preorder.

On submitting the order details the guest user will redirect to the order information page for completing the preorder via the “Complete Preorder” button.
The guest users will see the partial preorder reference and the remaining amount to pay on the shopping cart page.
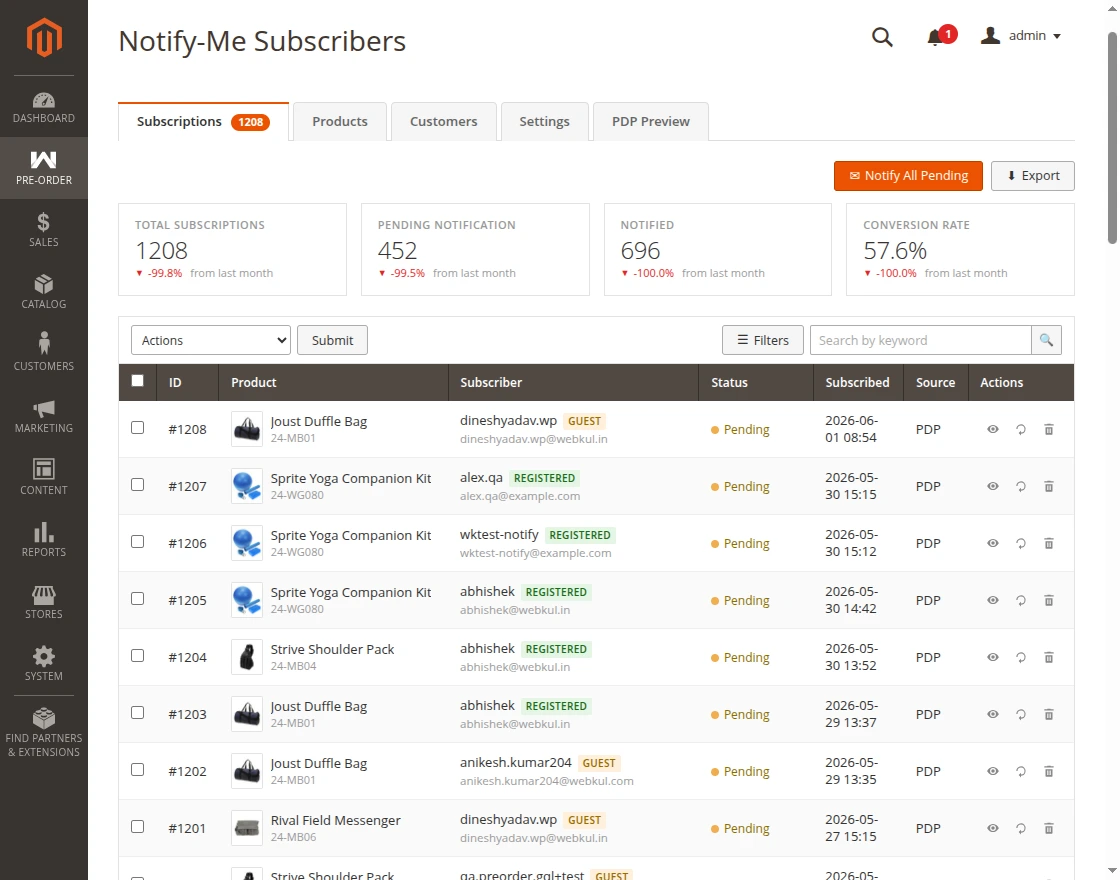
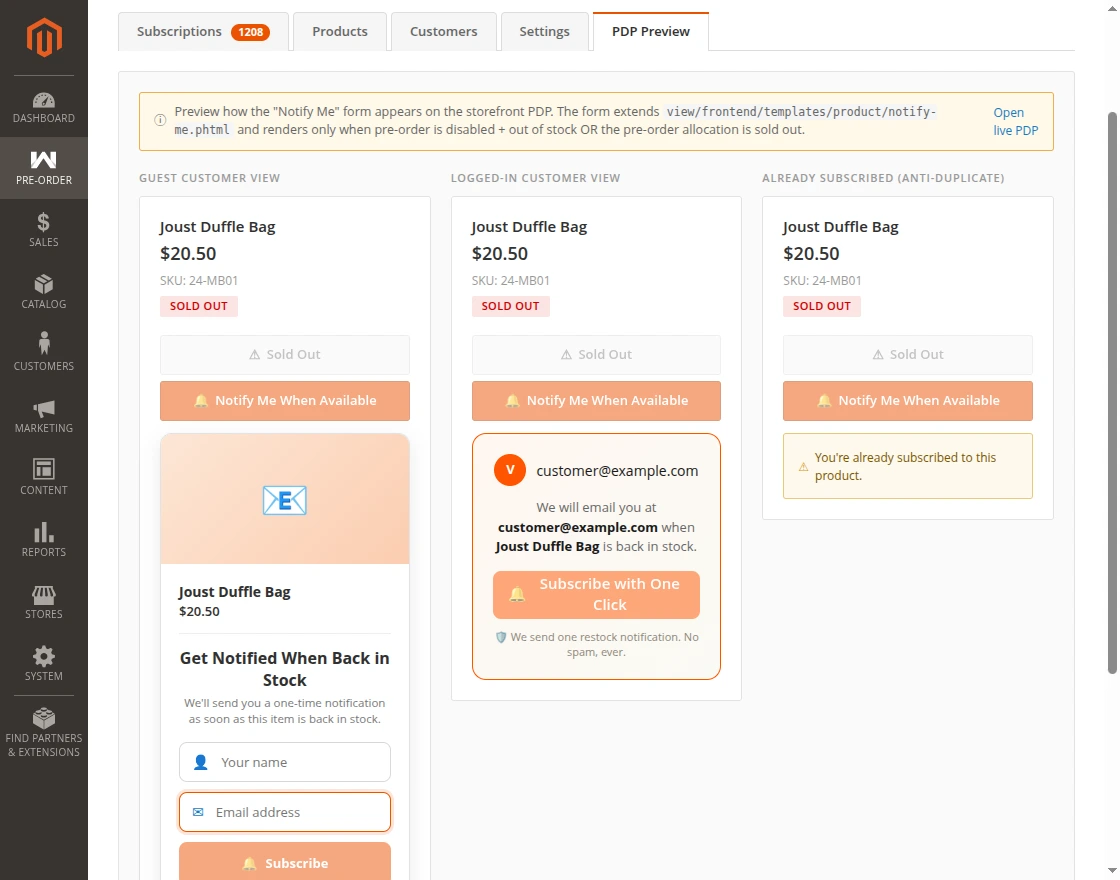
Notify-Me Subscribers
Notify-Me Subscribers dashboard in the admin panel gives you a full view of demand
organised into subscriptions, products, customers, settings, and pdp preview tabs.
here, admin can see preorder subscribed products, products notification listing, subscribers, product display page preview.
Subscriptions tab displays summary cards for total, pending, notified, and converted subscriptions, along with a complete list of subscriptions and detailed information for each entry as shown in the image below.
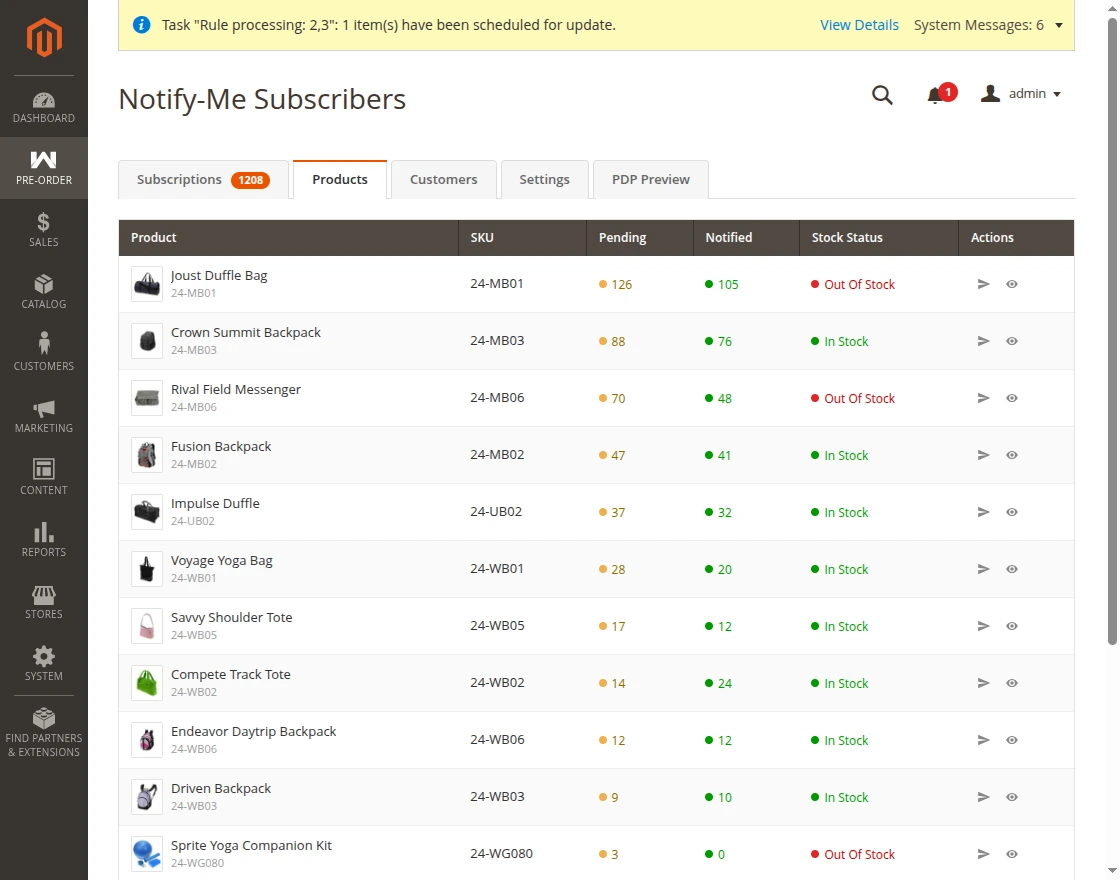
Products —Products tab shows subscriber counts and stock status for each product, along with quick actions to notify pending subscribers or view the subscriber list.
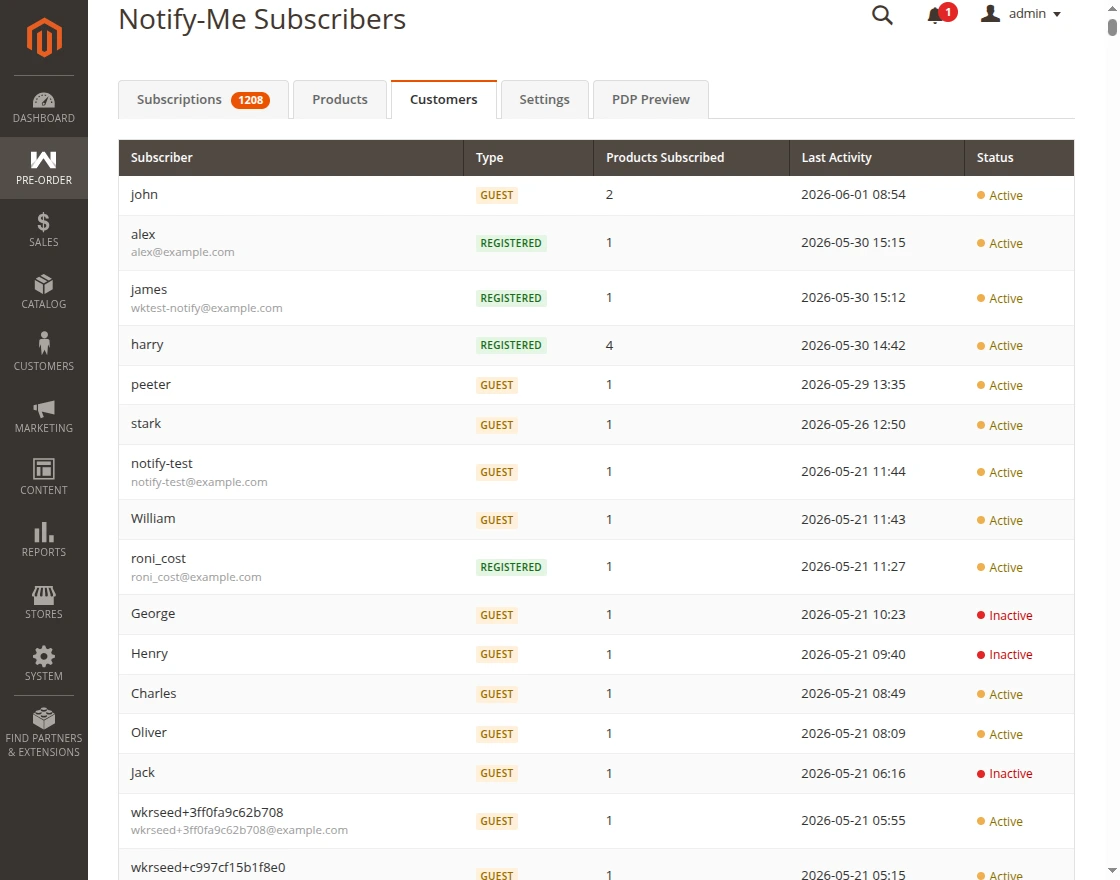
Customers — Subscribers grouped by email, each marked as a guest or registered
customer.
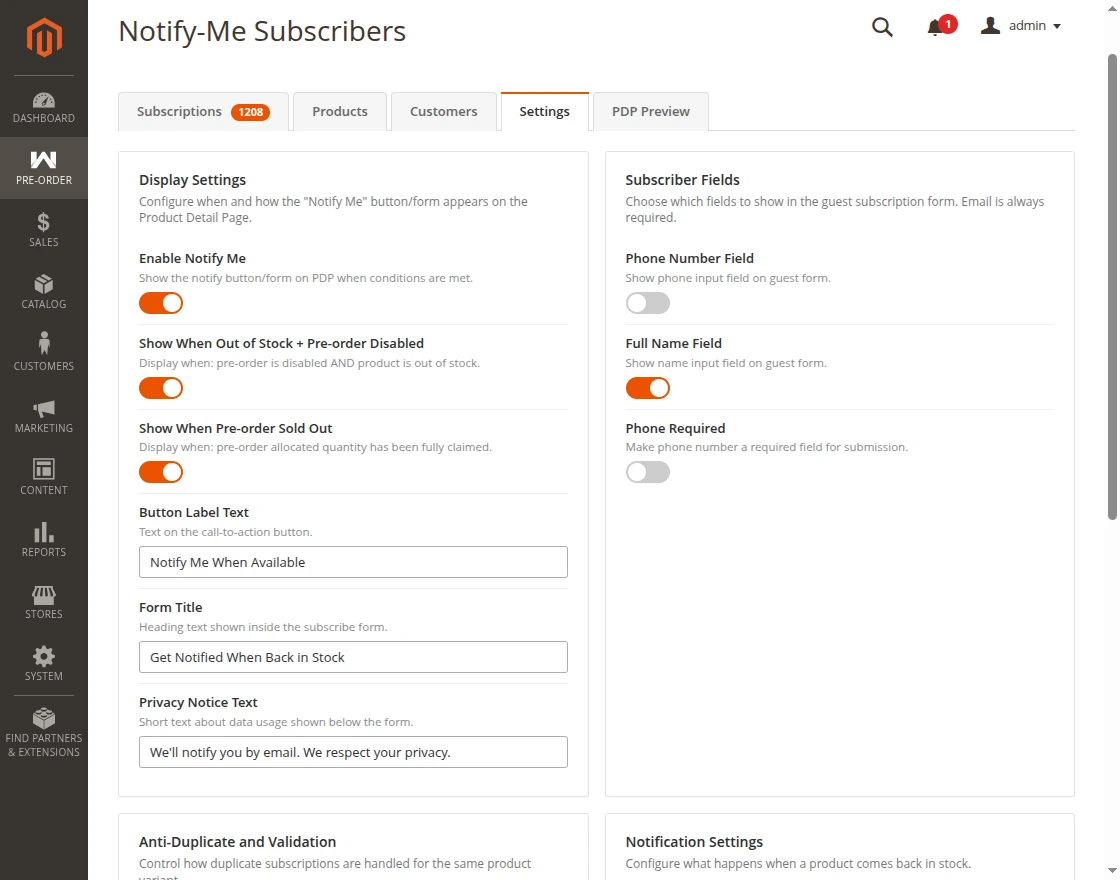
Settings — Controls for the storefront display, the subscriber form fields, duplicate
handling, and notification behaviour.
PDP Preview — A preview of how the Notify Me experience appears to guests and
logged-in customers.
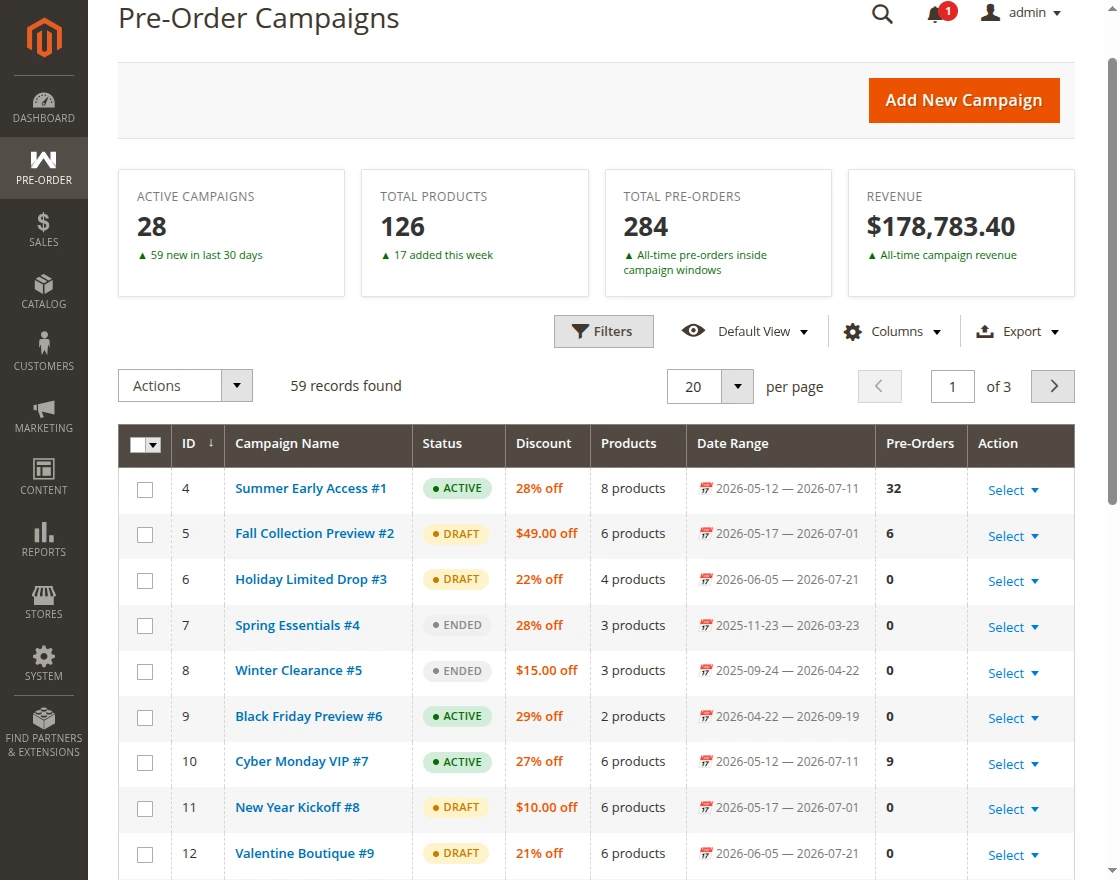
Pre-Order Campaigns
Create time-limited pre-order campaigns that group multiple products under a single promotion by navigating to Pre-Order > Campaigns from the Admin sidebar.
From here, the admin can view a summary bar displaying key metrics, including active campaigns, total products, total pre-orders, and revenue, along with comparisons to the previous month.
Admins can also create new campaigns, edit or delete existing ones, and use bulk actions to delete campaigns or change their status to Active or Draft in a single step.
Add New Campaign
From the Campaign Listing page, click the Add New Campaign button and enter the campaign details, including the campaign name, description, start date, end date, and status, as shown in the image below.
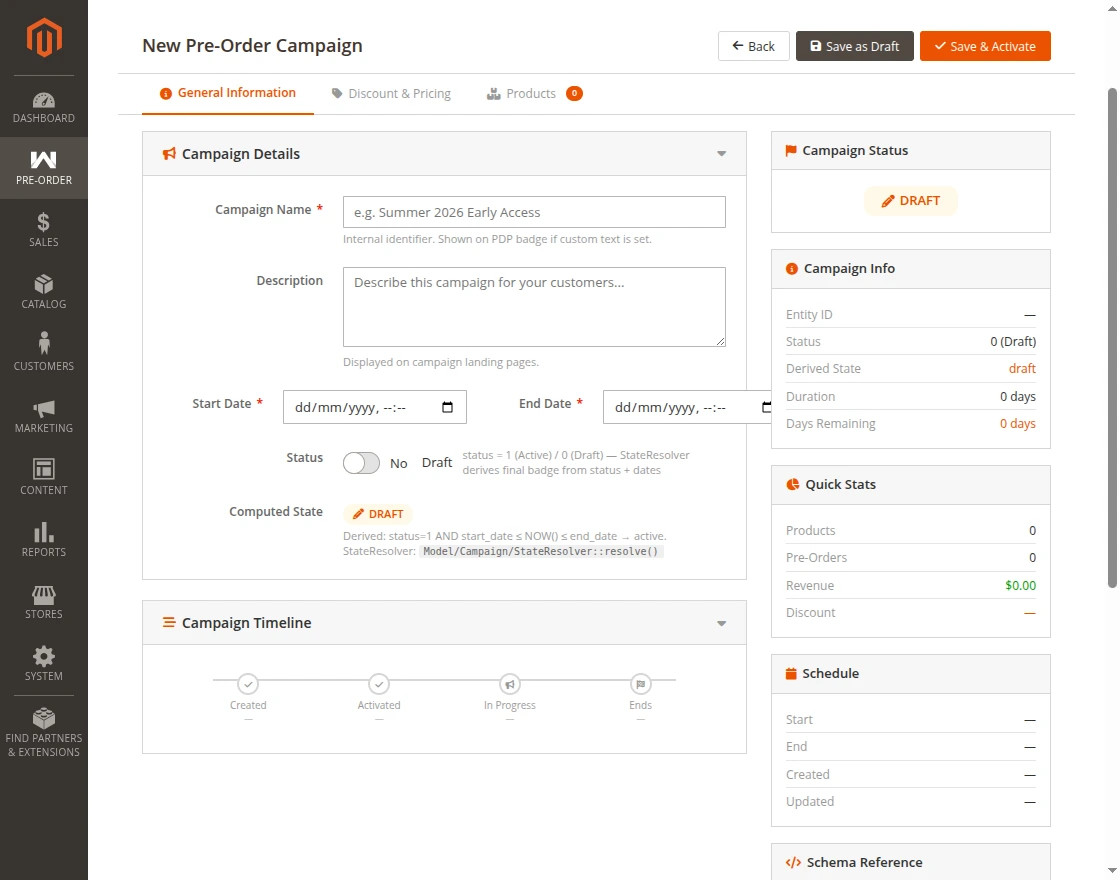
Now, click on Discount & Pricing tab, configure the discount type, discount value, and discount precedence, as illustrated in the image below.

Now, click on products tab, here admin can assign or unassign products to the campaign and review the list of assigned products.

Once the above mentioned configurations are complete, save the campaign as a draft or click Save & Active to publish it.
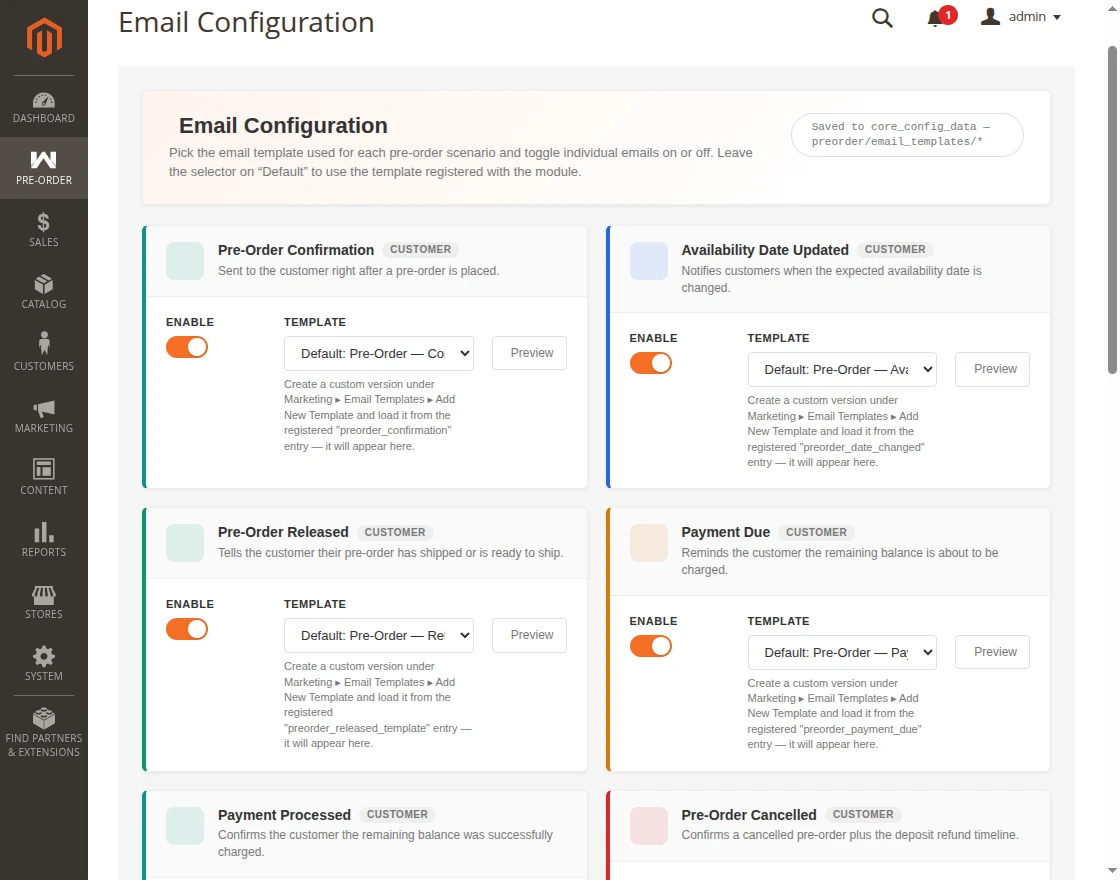
Email Configuration
A dedicated Email Configuration page allows you to manage all pre-order email templates from a single location. From this page, you can:
- View the complete list of pre-order email scenarios and check whether each one uses a default template or a custom template.
- Choose a custom template for any email scenario and tailor the content and branding of each email independently.
- Preview the email content with sample data before going live to see exactly how the message will appear to recipients.
- Send a test email to a selected email address and verify how the message appears in a real inbox.
Badges & Visual Merchandising
Add configurable visual badges to your storefront and help shoppers instantly identify pre-order, backorder, and limited-availability products.
from here you can manage
- The badge colour, using a built-in colour picker.
- Where the badge appears on the product (its position).
- The badge size.
- Enable or disable individual badge types.
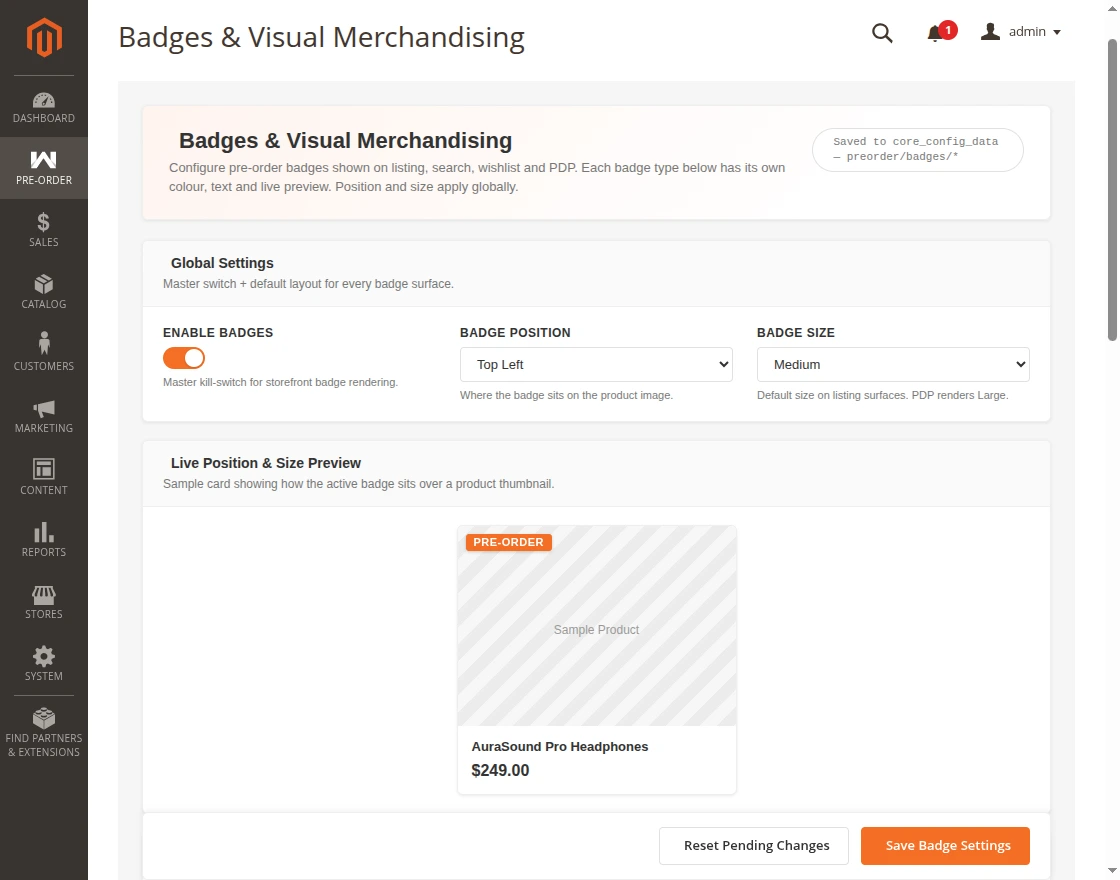
Configure badge text, text color, background color, and enable or disable individual badges directly from the admin panel.
Grouped Product Pre-Order — Customer View
Grouped products display a redesigned selection table on the product page, allowing shoppers to easily view pre-order status, pricing, and deposit details for each item before pre-order.
Status Badges & Notices:
Each item displays a badge that reflects its current state, so shoppers immediately understand
what they are ordering:
Pre-order — the item is open for pre-order.
Coming soon — the item’s pre-order window has not opened yet.
Reserve — the item can be secured with a partial deposit.
Backorder — the item is out of stock but available on backorder.
Urgency — only a few pre-order slots remain.
Discount — the item is part of an active campaign offering a discount.

Bundle Product Pre-Order — Customer View
Bundle products get a redesigned customization area on the product page, presenting each
option and selection as clear, visual cards with pre-order status, pricing, deposits, and savings,
while keeping the familiar bundle building experience.
main bundle product displays as shown in below image.
Associated bundle products appear as shown in the image below.
Support
That’s all for Magento 2 backorder (Preorder) module still have any issues feel free to add a ticket.
And let us know your views to make the module better http://webkul.uvdesk.com/ You may also check our quality Magento 2 Extensions.
Current Product Version - 5.0.5
Supported Framework Version - Magento 2.0.x, 2.1.x, 2.2.x,2.3.x, 2.4.x

Be the first to comment.