Using the Magento 2 Marketplace Pricelist module, the marketplace sellers and store owners can create various price rules based on the product, category, product quantity, and total product price.
Pricelist is a kind of a list having custom price rules. This is very beneficial for the ones who want to keep their various customers available with different and attractive pricing.
For creating the price list, the seller and admin will add the existing price rules to the price list as per the choice. The seller and admin can very easily set a price list targeting potential customers.
Note:
- The Price Rules will be applicable to the Base Price and not on the Special/Group/Tier Pricing.
- Marketplace Multi-Vendor Pricelist module is an add-on to our Magento 2 Multi Vendor so you need to install the marketplace module first to use the pricelist module.
Watch the below video tutorial to understand the extension workflow:
Features of Marketplace Pricelist
- The admin and vendor can create various custom price rules.
- Admin and vendor can assign multiple custom price rules to a price list.
- The admin and vendor can assign multiple pricelists to a customer.
- Admin and vendor can create custom price rules based on the product.
- The vendor and admin can create custom price rules based on category.
- The vendor and admin create custom price rules based on product quantity.
- Admin and vendor can create custom price rules based on the total product price.
- The admin and vendor can set price calculation type for the custom price to increase or decrease type.
- The admin and vendor can set the priority of custom price rules and price lists.
- Admin and vendor can set the active or inactive date for the custom prices.
- The admin can also edit the price list and price rules created by the seller.
-
The admin can create the price list and price rule for the seller as well as admin products.
- The module does not work on grouped and bundle products.
Installation
The customers will get a zip folder and they have to extract the contents of this zip folder on their system. The extracted folder has an src folder, inside the src folder you have the app folder. You need to transfer this app folder into the Magento 2 root directory on the server as shown below.

After the successful installation of Magento 2 Marketplace Pricelist module, you have to run these commands in the Magento 2 root directory.
First command –
php bin/magento setup:upgrade
Second Command –
php bin/magento setup:di:compile
Third Command –
php bin/magento setup:static-content:deploy
After running the commands, you have to flush the cache from the Magento admin panel by navigating through->System->Cache management as shown below.

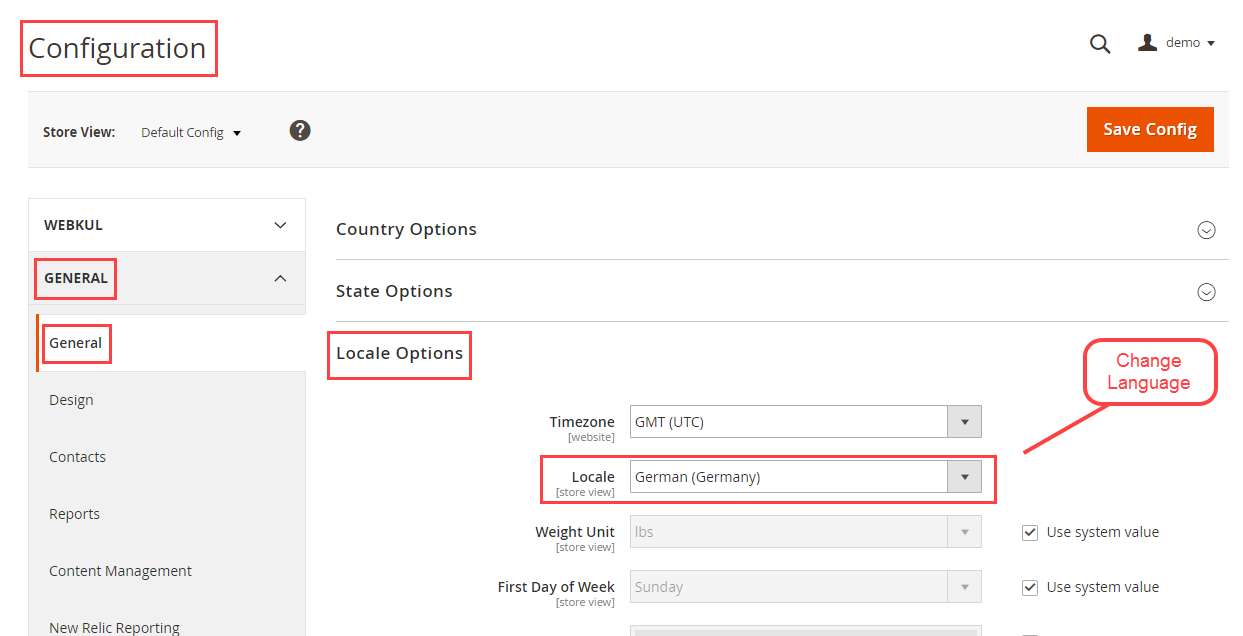
Multi-Lingual Configuration
For Multilingual support, please navigate to Store>Configuration>General >Locale Options. And select your desired language from the Locale option.
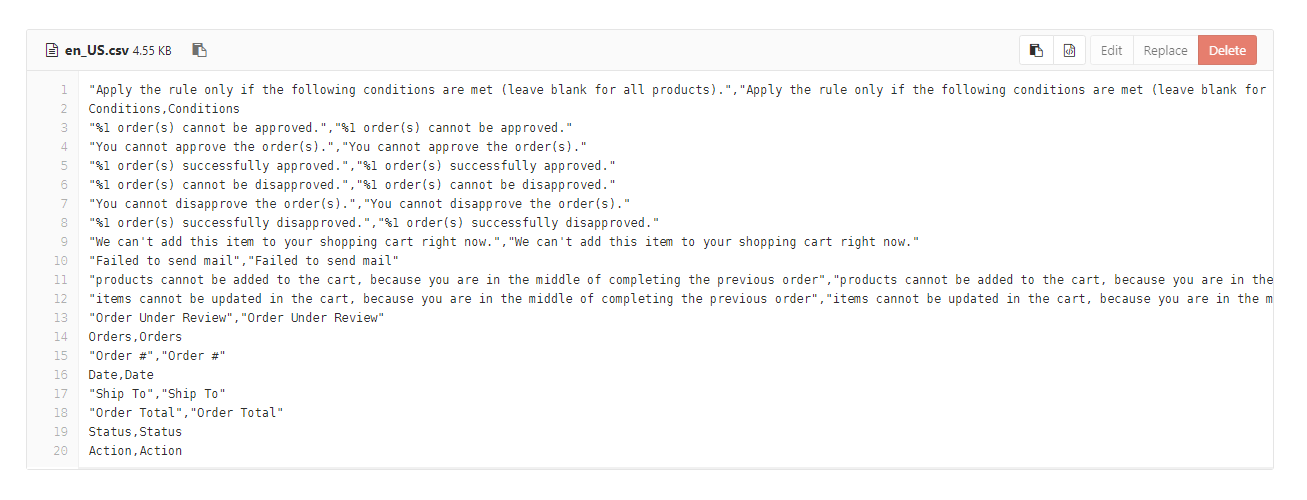
Language Translation
For Marketplace Pricelist module translation, navigate to the following path in your system app/code/Webkul/MpPriceList/i18n/en_US.csv. Open the file named en_US.CSV for editing as shown in the below screenshot.

Then replace the words after the comma(,) on the right in the file with your translated words.
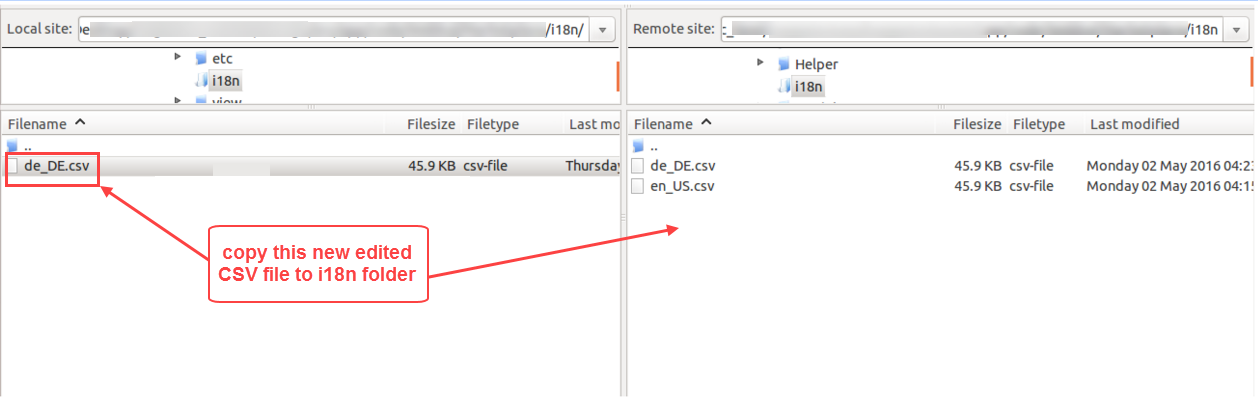
After editing and translating the CSV file, you need to save the translated file name according to your region language and country code such as – de_DE.CSV. Followed by uploading the translated file to the same folder from where you have obtained it. Now Magento 2 Marketplace PriceList module translation is complete.
Module Configuration
After the module installation, the admin will configure the Marketplace Pricelist module settings. For this, the admin will navigate to Stores > Configuration > Webkul > Marketplace PriceList as shown below.
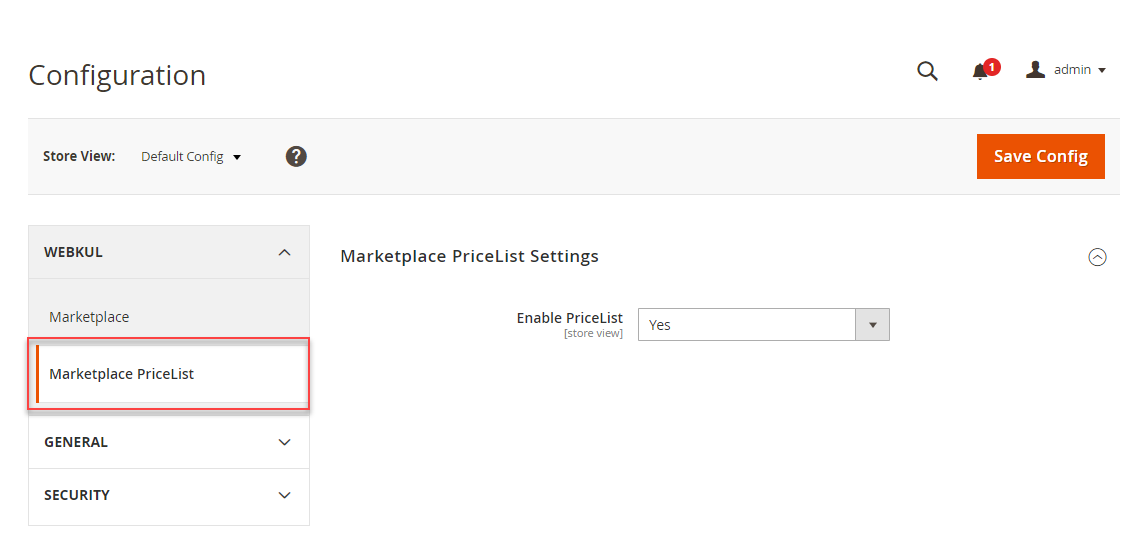
Here, the admin will enable the module by selecting Yes else, select No to disable the module.
Admin End – Manage Price Rules
The module also allows the admin to create, manage, and edit the price rules. The admin can also edit the price rules even if it is created by the sellers that are present in the list.
For managing the price rules, the admin will navigate to Marketplace Management > View Price List Rules. Here, the admin can see the list of rules.

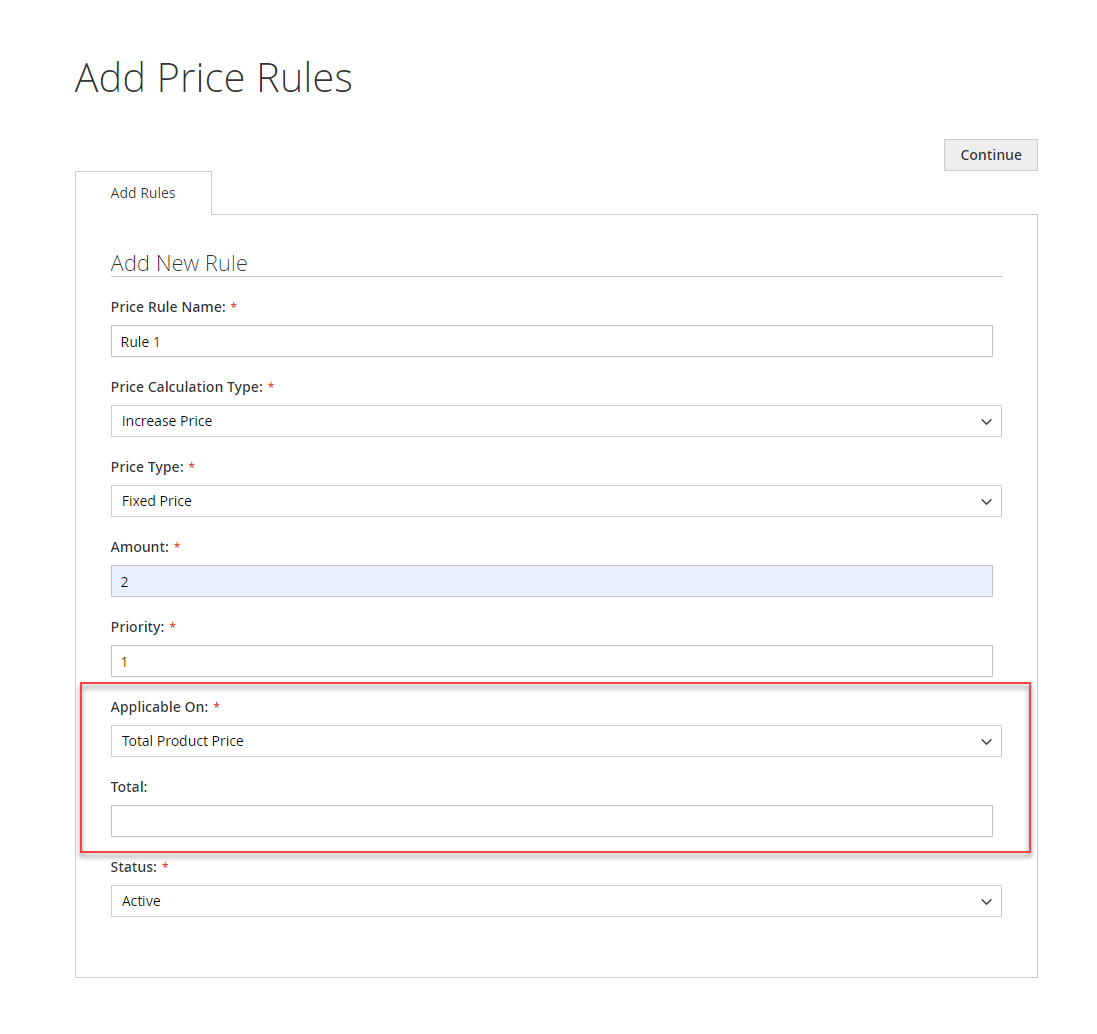
By clicking on the Create Rule button, the admin can create a new rule.

Here, the admin will add the following fields –
- Price
- Rule Name – Enter the name of the price rule.
- Calculation Type – Either choose the “Increase Price” option to add the calculated amount to the product’s price or “Decrease Price” option to subtract the calculated amount to the product’s price.
- Price Type – Select the price operation type as fixed or percentage.
- Amount – Set the amount for the “Price Type” operation.
- Priority – Set the priority for the price rule.
- Applicable On – Select the application type for the price rule – Product, Category, Product Quantity, and Total Product Price.

- Status – Select “Active” to enable the price rule. Else, select “Inactive” to disable the price rule.
Types of Application from Admin End
The admin can select multiple types of applications while creating or editing the price rules. Every Application type has its unique functionalities and reflections to the frontend. For each application type the description is given below:
Product
If the admin selects Product as the Application type for any rule1 as shown in the image below:

Further, the admin will select the products on which the price rule1 will be applicable:

After that, if rule1 is active from the admin end for any specific price list, the changes will be reflected in the products on the frontend.
Note: If the admin and vendor select a configurable product then all child products of that configurable product will auto select for price rule condition. Also, the admin and vendor can select only one or two child products but then the parent configurable products will remove from the price rule condition.
For Example, Joust Duffle Bag is a product with a price of $34.00 as shown in the above image. After the rule1 is applied to the product, the customer will be able to see the increased amount as $134.00 as shown in the image below:

Category
If the admin selects Category as the Application type for any rule2 as shown in the image below:

Further, the admin will select the categories on which the price rule2 will be applicable:

After that, if the rule2 is active from the admin end for any specific price list, then the changes will be reflected in the selected categories on the frontend.
For Example: For the Bag category if the rule2 is applied then the customer will get to see the decreased amount on the category page for all the bags and also on the product page. That means $20.00 will be decreased from each product of the selected category as shown in the image below:

Product Quantity
If the admin selects Product Quantity as the Application type for any rule3 as shown in the image below, then the admin will enter the quantity of the product above which the rule will be applied:

After that, if the rule3 is active from the admin end for any specific price list, then the changes will be reflected in the products above or equal to a specific quantity in the frontend.
For Example: For the product Luma Analog Watch if the rule3 is applied then the customer will get to see the increased amount of product once it is added to the cart with more or equal to quantity 2.

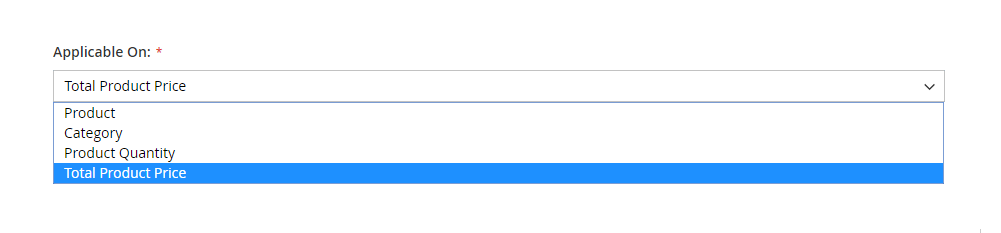
Total Product Price
If the admin selects Total Product Price as the Application type for any rule4 as shown in the image below, then the admin will enter the total price of the product above or equal to which the rule will be applied:

After that, if the rule4 is active from the admin end for any specific price list, then the changes will be reflected in the product’s price above or equal to the configured total price in the price rule in the frontend.
For Example: For the Didi Sport Watch shown below, if the rule4 is applied then the customer will get to see the increased amount of products whose total amount is greater than or equal to the configured total price. In rule4, total price is set at $70.00.

Admin Manages Price List
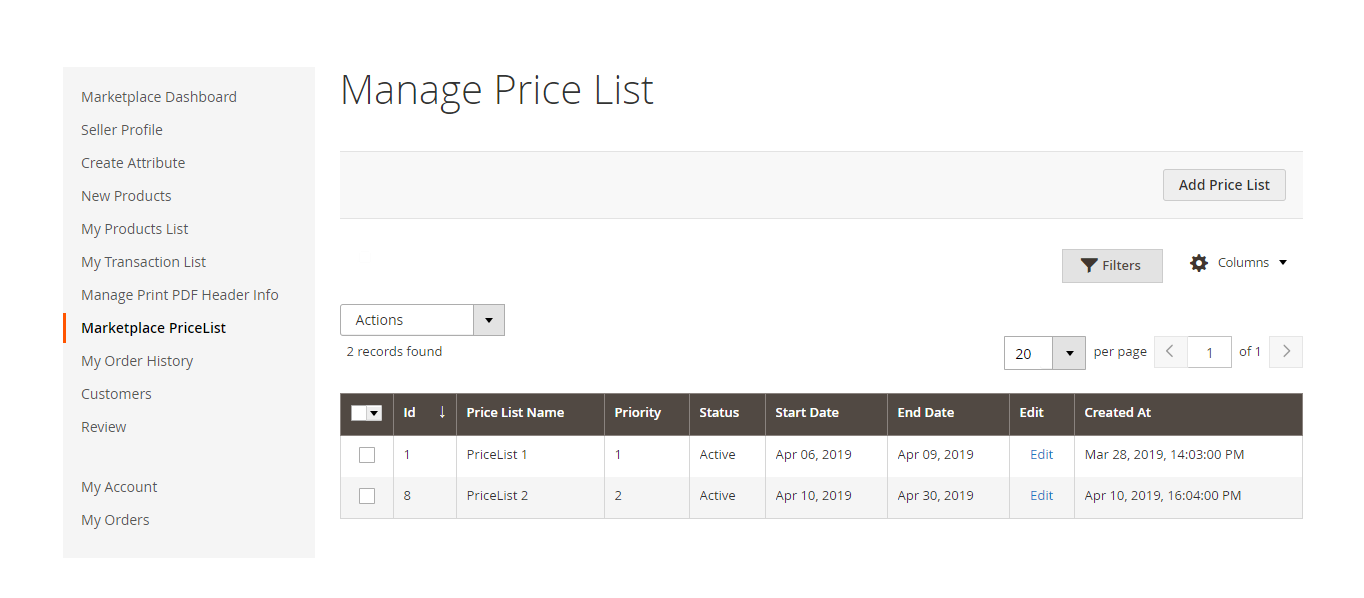
Further, the admin can also create, edit, and manage the Product list by navigating to the Marketplace Management > View Price List.
Here, the admin will –
- View the complete list of the existing price list.
- Activate, Deactivate or Delete the selected price list by selecting the required action from the Actions drop-down list.
- Edit the price list by clicking the edit link available.
- Filter the price lists from the filter button available.
- Create a new price list by clicking the Add Price List button.

Here, the admin will –
Add New Price List
- Price List Name – Enter the name of the price list.
- Priority – Set the priority of the price list.
- Start Date – Set the start date for the price list to be active from.
- End Date – Set the end date for the price list to get inactive.
- Status – Active/Deactive the price list.

Assign Rules
Under this section, the admin will assign the multiple price rules to the new price list.

Customers
Under this section, the admin will select the customers and enable the price list for the selected customers.

Note: For the seller products, the priority of seller pricelist will be greater than the admin price list.
PriceList – Seller End
Once the admin has enabled the module, the sellers can view the Manage PriceList menu option in their seller account as shown below.

The Manage PriceList menu option will two sub-menu options for pricelist management – Manage PriceList and Manage PriceRules.
Manage Price Rules
Clicking the Manage Price Rules sub-menu option will navigate the seller to the “Manage Price Rule” page as shown below:

Here, the seller will –
- View the complete list of the existing price rules.
- Activate, Deactivate or Delete the selected price rules by selecting the required action from the Actions drop-down list.
- Edit the price rule by clicking the edit link available.
- Filter the price rules from the filter button available.
- Create new price rules by clicking the Add Rule button.
Clicking the Add Rule button will navigate the seller to the Add Price Rules page as shown below.

Here, the seller will –
- Price
- Rule Name – Enter the name of the price rule.
- Calculation Type – Either choose the “Increase Price” option to add the calculated amount to the product’s price or “Decrease Price” option to subtract the calculated amount to the product’s price.
- Price Type – Select the price operation type as fixed or percentage.
- Amount – Set the amount for the “Price Type” operation.
- Priority – Set the priority for the price rule.
- Applicable On – Select the application type for the price rule – Product, Category, Product Quantity, and Total Product Price.
- Status – Select “Active” to enable the price rule. Else, select “Inactive” to disable the price rule.
Price Rule Application Types
The seller can apply price rule in four ways –
Apply On Product
If the seller applies the price rule on Product. Then under the section Assign Rules On Product, the seller will select the product for assigning the price rule.

For example: If the seller applies the price rule on Joust Duffle Bag, then the customer will be able to see the increased price on the storefront as per that rule.
Below is the screenshot in which the price rule is applied to the product by the seller.

Apply On Product Category
If the seller applies the price rule on Product Category. Then, the seller will define the product categories for assigning the price rule as shown below.

For example: If the seller applies the price rule on the product category of Men and Women, then the customer will be able to see the changes reflected on the price of all the products of selected categories as per that rule.

Apply On Product Quantity
If the seller applies the price rule on Product Quantity. Then, the seller will define the product quantity for assigning the price rule as shown below.

For example: Suppose the customer orders two headphones and the seller applied the price rule that if the customer purchases more than or equal to 2 headphones then the price will be decreased.
So, the decreased product price will be visible on the storefront as per the applied rule.
Apply On Product Price
If the seller applies the price rule on Total Product Price. Then, the seller will define the product price for assigning the price rule as shown below.
 For example: If the seller applies the price rule for the total product price, then the rule will be applied once the product’s total price will be greater than or equal to the configured amount in the price rule.

Manage Price List – Seller End
Clicking the Manage Price List sub-menu option will navigate the seller to the “Manage Price List” page as shown below.
Here, the seller will –
- View the complete list of the existing price list.
- Activate, Deactivate or Delete the selected price list by selecting the required action from the Actions drop-down list.
- Edit the price list by clicking the edit link available.
- Filter the price lists from the filter button available.
- Create a new price list by clicking the Add Price List button.
Clicking the Add Price list button will navigate the seller to the Add Price List page as shown below.

Here, the seller will –
Add Price List
- Price List Name – Enter the name of the price list.
- Priority – Set the priority of the price list.
- Start Date – Set the start date for the price list to be active from.
- End Date – Set the end date for the price list to get inactive.
- Status – Active/Deactive the price list.
Assign Rules
Under this section, the seller will assign the multiple price rules to the price list.

Customers
Under this section, the seller will select the customers and enable the price list for the selected customers.

Note: The sellers can enable the price list only for those customers who have purchased their products.
Front-End
Please Note:
- If multiple price lists are having the same price rules for any particular product. Then, the price list with the most negligible value of priority will be applied.
- If a price list is having multiple different price rules for any particular product. Then, the price rule with the least value of priority will be applied.
Front End View of Products without Price List Rules
The image below shows two products Blue Shirt and Eve Mouse. There is no price list rule applied to both the products.

Front End View of Products with Price List Rules
As the price list will be applied, the different prices will be visible to the selected customers on the front-end.

That’s all for the Magento 2 Marketplace Pricelist extension. If you have any queries or suggestions regarding the extension then you can get back to us at webkul.uvdesk.com.
Current Product Version - 5.0.1-p1
Supported Framework Version - Magento 2.0.x, 2.1.x, 2.2.x,2.3.x, 2.4.x

Be the first to comment.