Magento 2 Multi-Vendor Attribute Set Mapping module, allows the admin to map the store categories with the attribute sets for the sellers.
Furthermore, while creating the product, this module will automatically assign an attribute set to the product as per the selected category. The module will let the sellers use only the enabled set of attributes.
Note-
- This module is a marketplace add-on. So, Magento 2 Marketplace Module module must be installed.
- This module will support Bundle and Grouped product types. if –
1. You have installed Magento 2 Marketplace Bundle Product module and
2. Magento 2 Marketplace Grouped Product module. - If you’re using the Magento 2 Marketplace Custom Attribute with Magento 2 Multi Vendor Attribute Set Mapping module, the priority of Magento 2 Multi Vendor Attribute Set Mapping will always be high.
- Please install Enterprise Edition 4.0.x of Webkul Marketplace Multi-Vendor Module with 4.0.x Enterprise Edition of Magento 2 Multi Vendor Attribute Set Mapping.
Likewise, you must install Community Edition 5.0.x of Webkul Marketplace Multi-Vendor Module with 5.0.x Community Edition of Magento 2 Multi Vendor Attribute Set Mapping.
Check a brief overview of the plugin –
Features
- Map attribute set with the store categories as per the choice.
- The admin can map multiple categories to a single attribute set.
-
The parent category of the selected category will also appear checked/ selected on add product page
-
A Default Attribute Set will appear when no mapping exists for the category.
- The seller can add products with attributes mapped with the category.
- As per the selected category, attribute set will get assign to the products automatically.
- The seller can use only the enabled attributes along with the default attributes.
- Default attribute set is assign if the category is not mapping with an attribute set.
- The module supports Simple, Configurable, Virtual, Downloadable, Bundle and Grouped product types.
- The module supports text field, text area, date, yes/no, multiple select, drop-down, and price input types.
- The extension is compatible with the Hyva Theme.
Installation
The installation is quite simple just like the standard Magento 2 extensions.
Customers will get a zip folder then they have to extract the contents of this zip folder on their system. The extracted folder has an src folder, inside the src folder you have the app folder. Furthermore, you need to transfer this app folder into the Magento 2 (Adobe Commerce) root directory on the server as shown below.

After the successful installation, you have to run these commands in the Magento 2 root directory.
First command – php bin/magento setup:upgrade

Second Command – php bin/magento setup:di:compile

Third Command – php bin/magento setup:static-content:deploy

After running the commands, you have to flush the cache from the Magento admin panel by navigating through->System->Cache management as shown below.

Multi-Lingual Configuration
For Multilingual support, please navigate to Store>Configuration>General >Locale Options. then select your desired language from the Locale option.

Language Translation
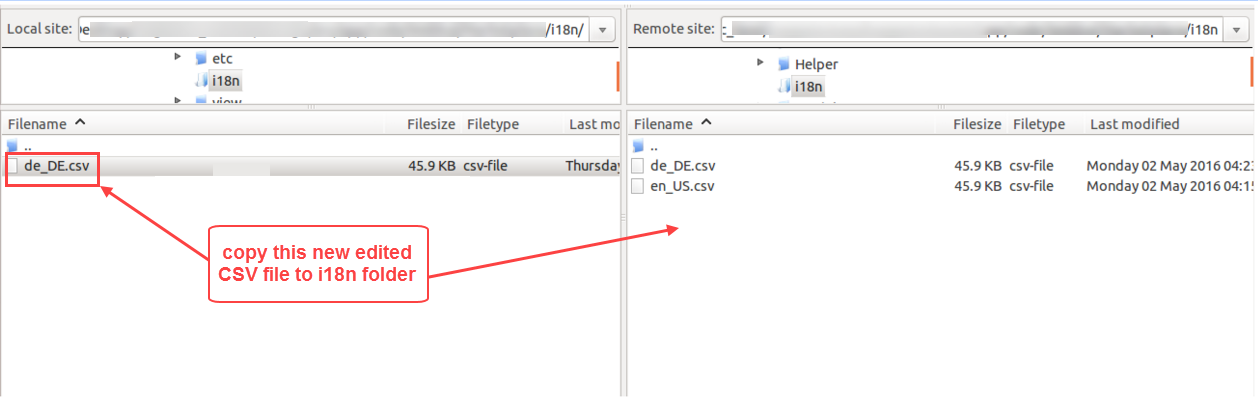
For module translation, navigate to the following path in your system app/code/Webkul/MpAttributeMapping/en_US.csv. Open the file named en_US.CSV for editing as shown in the below screenshot.

Then replace the words after the comma(,) on the right in the file with your translated words.

After editing and translating the CSV file, you need to save the translated file name according to your region language and country code such as – de_DE.CSV. And upload the translated file to the same folder from where you have obtained it. Now your module translation is complete.
Module Configuration
After the installation, the admin will configure the module settings. For this, the admin will navigate to Stores -> Configuration -> Webkul -> MpAttribute Mapping as shown below.

Here, the admin will configure Enable Marketplace Attribute Mapping & Category Settings-
Enable Marketplace Attribute Mapping
- Enable Module On Frontend: Select Yes to enable the module. Else, select No to disable the module.
Category Settings
Show Category Parents Selected: The admin sets this fields as ‘Yes,’ then the parent category, of the category chosen shall also appear as checked on add product page.

Default Attribute Set ID
Whichever Attribute Set is choose by the admin against this field will appear when no mapping exist for category.
- The dropdown list against this field will display the Attribute Sets that are select Marketplace configurations.
Case 1:
If the admin does Not Save the configurations after Choosing the Attribute Set under Marketplace configurations-
- Then, the first option of the Attribute Set will appear against the Default Attribute Set ID field under Category Settings.
Case 2:
If the admin Saves the configurations after Choosing the Attribute Set under Marketplace configurations-
- Then, the selected attribute set will appear against the Default Attribute Set ID field under Category Settings.
Category & Attribute Set Mapping
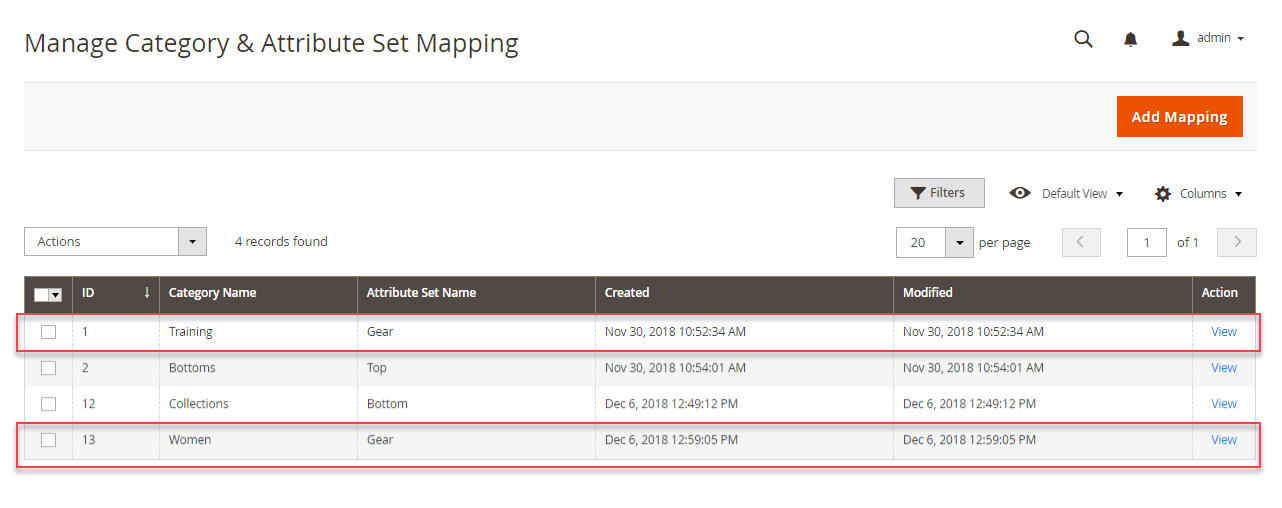
The admin will map the store categories with the attribute sets by navigating to Marketplace Management -> Marketplace Attribute Mapping -> Category and Attribute Set Mapping as shown below.

This will navigate the admin to a new page as per the below image.
Here, the admin will-
- View the complete list of mapped categories and attribute sets.
- Remove the selected mapping by selecting the Delete option from the Actions drop-down list.
- Edit the mapping by clicking the View link available.
- Map the categories and attribute sets by clicking the Add Mapping button.
Add Mapping
Henceforth, clicking the Add Mapping button will navigate the admin to the mapping page. Here, the admin will have two sections-
Map Attributes Set

Moreover, for mapping, select the desired attribute set from the Attribute drop-down list and category from the Category drop-down list which the admin wants to map with.
Map Attributes

Under this section, the admin will select the attributes which the admin wants to enable for the seller to use. For successful mapping, hit the Save button.
Note: The seller can use the default attributes and the enabled attributes only.
Furthermore, the admin can map multiple categories to a single attribute set ie; many to one type mapping.
And, even if the admin tries to map the category which is already been mapped with some other attribute set. Then, it will display an error message.

Assign Attribute Set ID to Seller
Furthermore, the admin will assign the attribute Set ID to the seller. To assign these attribute set ID, the admin will have to navigate Store>Configuration>Marketplace>Seller Product’s Settings
Now, the admin will select the Attribute Set ID that the admin wants to assign to the sellers.

Moreover, if the created attribute set is not assign to the seller it will display the error. The seller will see the error message while creating a product for the attribute set that is not assign to the seller.

Seller End
For adding the product, the seller will select the Category and the Product Type as shown below.

And at the Product Edit page, the attribute set will select automatically as per the selected Category. The sellers no more require to select the attribute set manually.
Note: The module supports Simple, Configurable, Virtual, Downloadable, Bundle and Grouped product types.

Furthermore, the enabled attributes of the “Attribute Set” will display on the Product Edit page along with the default attributes.

WHAT IF THE SELECTED CATEGORY IS NOT MAPPED WITH ANY ATTRIBUTE SET:
Henceforth, if the selected category doesn’t map with any attribute set then, it will first check the parent category mapping. Even if the parent category is also not mapped then, the “Default Attribute Set” which admin selects in the Configurations > Category Settings will display.

Likewise, in the seller end, the selected attribute set will display as shown in the image below. 
WHAT IF THE SELLER EDIT OR CHANGE THE CATEGORIES ON THE PRODUCT EDIT PAGE:
If the seller edits or changes the categories on the “Product Edit” page. Then, the attribute set will get assign according to the first category which the seller will select.

WHAT IF THE ADMIN ALTERS THE COMPLETE ATTRIBUTE SET :
The admin can choose to alter or change the complete atribute set mapped to a category.
In such a case, the attributes will alter as per the newly mapped attribute set.
- Suppose, the admin has mapped a category C1 with the attribute set A1 and wants to alter the complete attribute set then change it to A2.
- Then, all the existing attributes of the attribute set A1 will alter and will get replace with the attributes of set A2.
- The seller can view the attributes and fill in details of the same then save the details that will update then replace the attribute set.
WHAT IF THE ADMIN ADDS/ REMOVES ATTRIBUTES IN/ FROM AN EXISTING ATTRIBUTE SET IT REFLECTS LIKEWISE ON THE PRODUCT EDIT PAGE:
The admin can even choose to add/ remove attributes to an existing attribute set that is already mapped with a category, then-
- For instance, a category C1 is mapping with attribute set A1 which includes the given attributes- a1, a2, a3.
- If the admin adds another attribute, suppose, a4 to the attribute set A1, then the changes will reflect and the attribute a4 will display for the mapped category C1.
Attribute Type Supported
The module supports the following type of attributes –

- Text Field: This input type will help to enter a single editable line of text.
- Text Area: This input type helps the admin for multi-line area for displaying text.
- Date: This enables the user to enter a date either using a text box or using a date picker interface.
- Yes/No: This will allow the yes/no input selection type.
- Multiple Select: This input type helps the admin to select more than one option in the list.
- Drop-Down: This helps to select only one option in the list.
- Price: This input type helps to create additional price fields.
NOTE: This module doesn’t support Fixed Product Tax, Visual Swatch, and Text Swatch input types.
That’s all for the Magento 2 (Adobe Commerce) Multi-Vendor Attribute Set Mapping. If you still have any issues, feel free to add a ticket and let us know your views at http://webkul.uvdesk.com/
Explore the Adobe Commerce Cloud development services by Webkul. You may also browse other Magento 2 marketplace addons. Also our quality Magento 2 extensions.
Current Product Version - 5.0.5
Supported Framework Version - Magento 2.0.x, 2.1.x, 2.2.x,2.3.x, 2.4.x

Be the first to comment.