Magento 2 Mercadopago Payment Gateway module allows the admin to provide Mercadopago online payment method to customers for receiving payments for their purchases. Mercadopago is the leading online payment solution in Latin America and now it’s integrated with the Magento 2. This enables the customers to select Mercadopago payment method on the checkout page and make a payment.
The customers will be able to make use of their Credit Card and EMI(Easy Installments) option for making the online payments. This module lets your customers to conveniently shop without any hassle. It also boosts your sales providing an ultimate payment method to your customers.
Features
- The admin can configure his Mercadopago application from the module backend.
- The admin can enable/disable the payment method from the admin panel.
- Set the payment method title which will be displayed at the front-end.
- Define the Minimum and Maximum order total for enabling the Mercadopago payment method.
- Credit Cards & EMI(Easy Installments) payment option for making the purchases.
- The admin can make an easy refund to the customer.
- The source code is 100% open for customization.
- Supports multiple language translations.
Installation
Customers will get a zip folder and they have to extract the contents of this zip folder on their system. The extracted folder has an src folder, inside the src folder you have the app folder. You need to transfer this app folder into the Magento2 root directory on the server as shown below.

After the successful installation, you have to run these commands in the Magento2 root directory.
First command- php bin/magento setup:upgrade

Second Command – php bin/magento setup:di:compile

Third Command – php bin/magento setup:static-content:deploy

Lastly, run the below command for getting the Mercadopago.
Fourth Command – composer require mercadopago/sdk:0.5.2

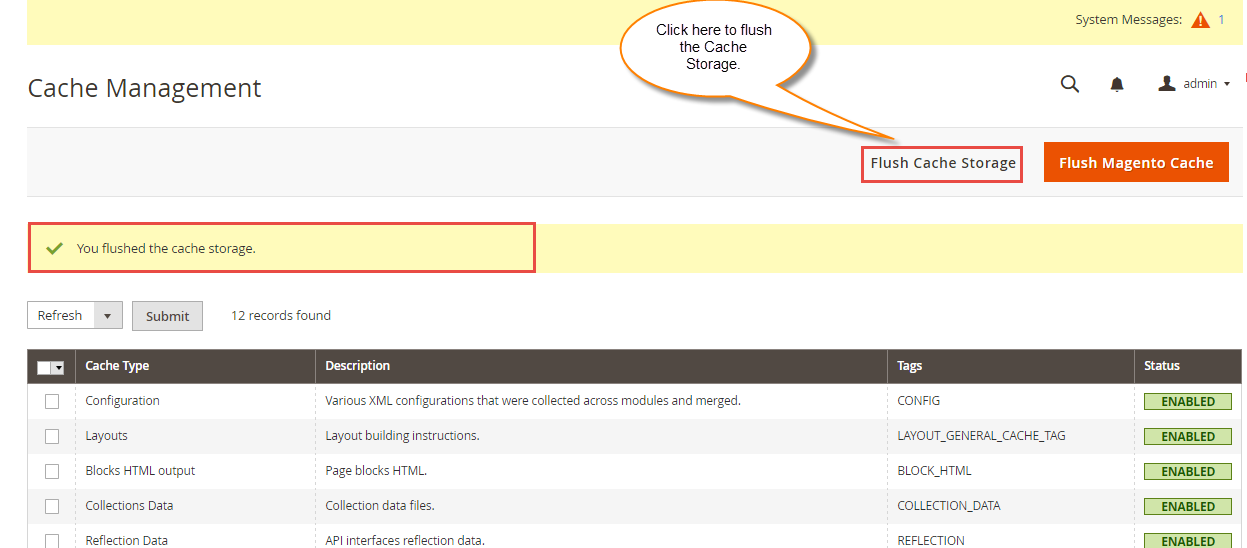
After running the commands, you have to flush the cache from Magento admin panel by navigating through->System->Cache management as shown below.
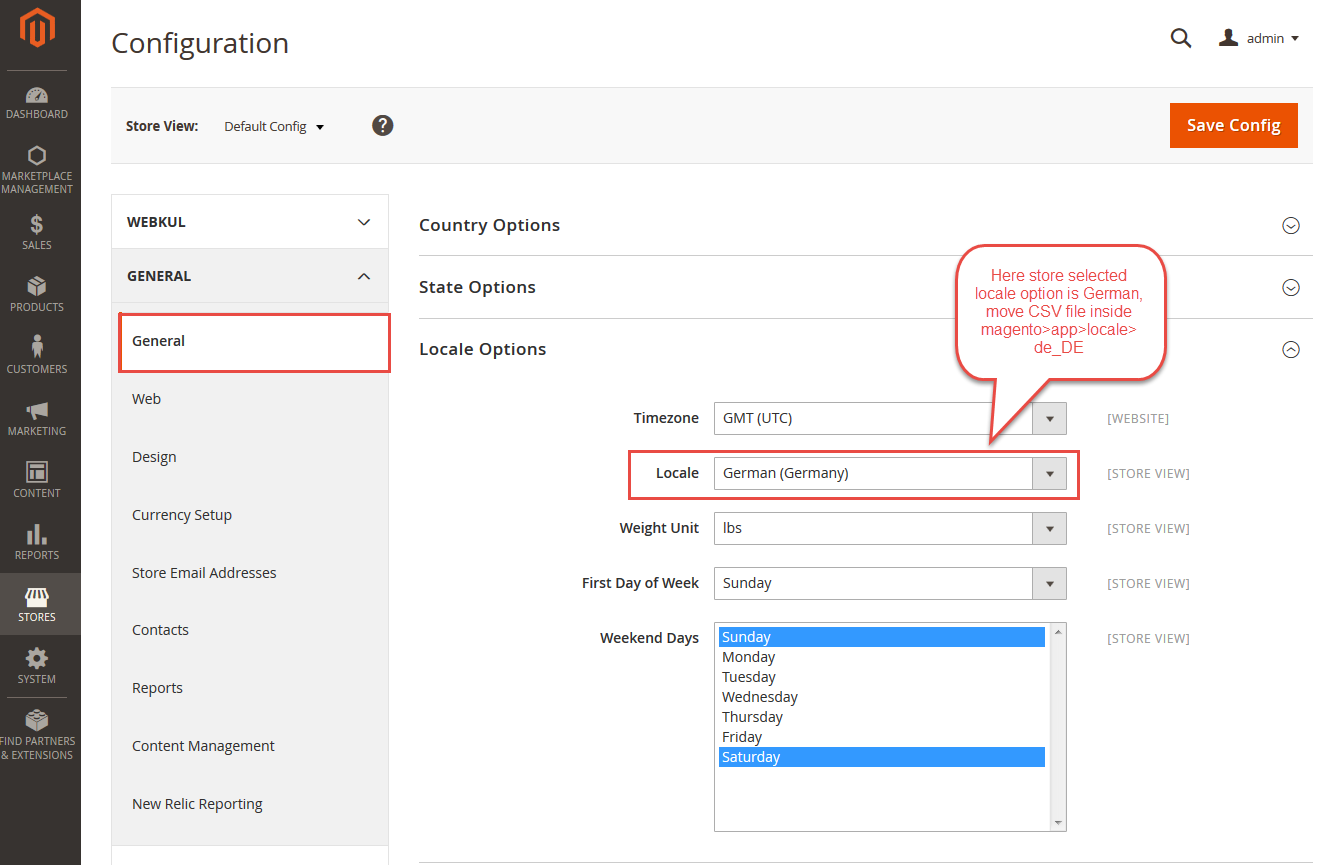
Configuration For Multi-Lingual Support
For the multilingual support, the admin will navigate through Store->Configuration->General ->Locale Options and select the locale as German (the language into which admin want to translate his store content).
Language Translation
If you need to do the module translation, please navigate the following path in your system. app/code/Webkul/Mercadopago/i18n. Open the file named en_US.CSV for editing as shown in below screenshot.

Once you have opened the file for editing. Replace the words after the comma(,) on the right with your translated words.

After editing the CSV file, save it and then upload it to the same folder. Now your module translation is complete.

How To Create Your Application
Step 1:
Go to this link and login to your account – MercadoPago Connect to create your first application and then click the “Create your application” link.
**Note: The admin should have an account at Mercadopago.
Step2:
Now, select the country in which you are going to manage your application.

Step3:
After selecting the country, tap the enter button.

Step4:
Now, enter your email address/username for your Mercadopago account and click continue after that. If you don’t have an account with the MercadoPago you can click here to create one.

After clicking the Continue button, you have to enter the password for the entered email address/username and then click the – Sign In button.

Step5:
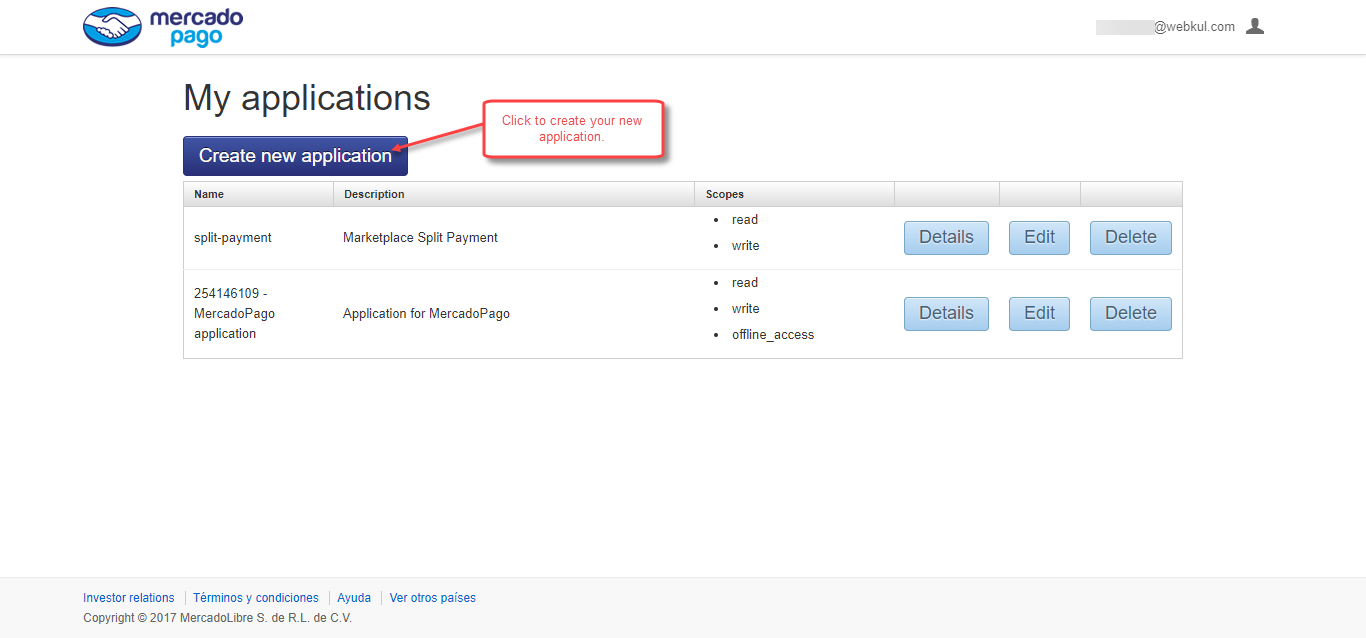
After login, you will now be able to create your application by clicking on the “Create New Application“.
Step6:
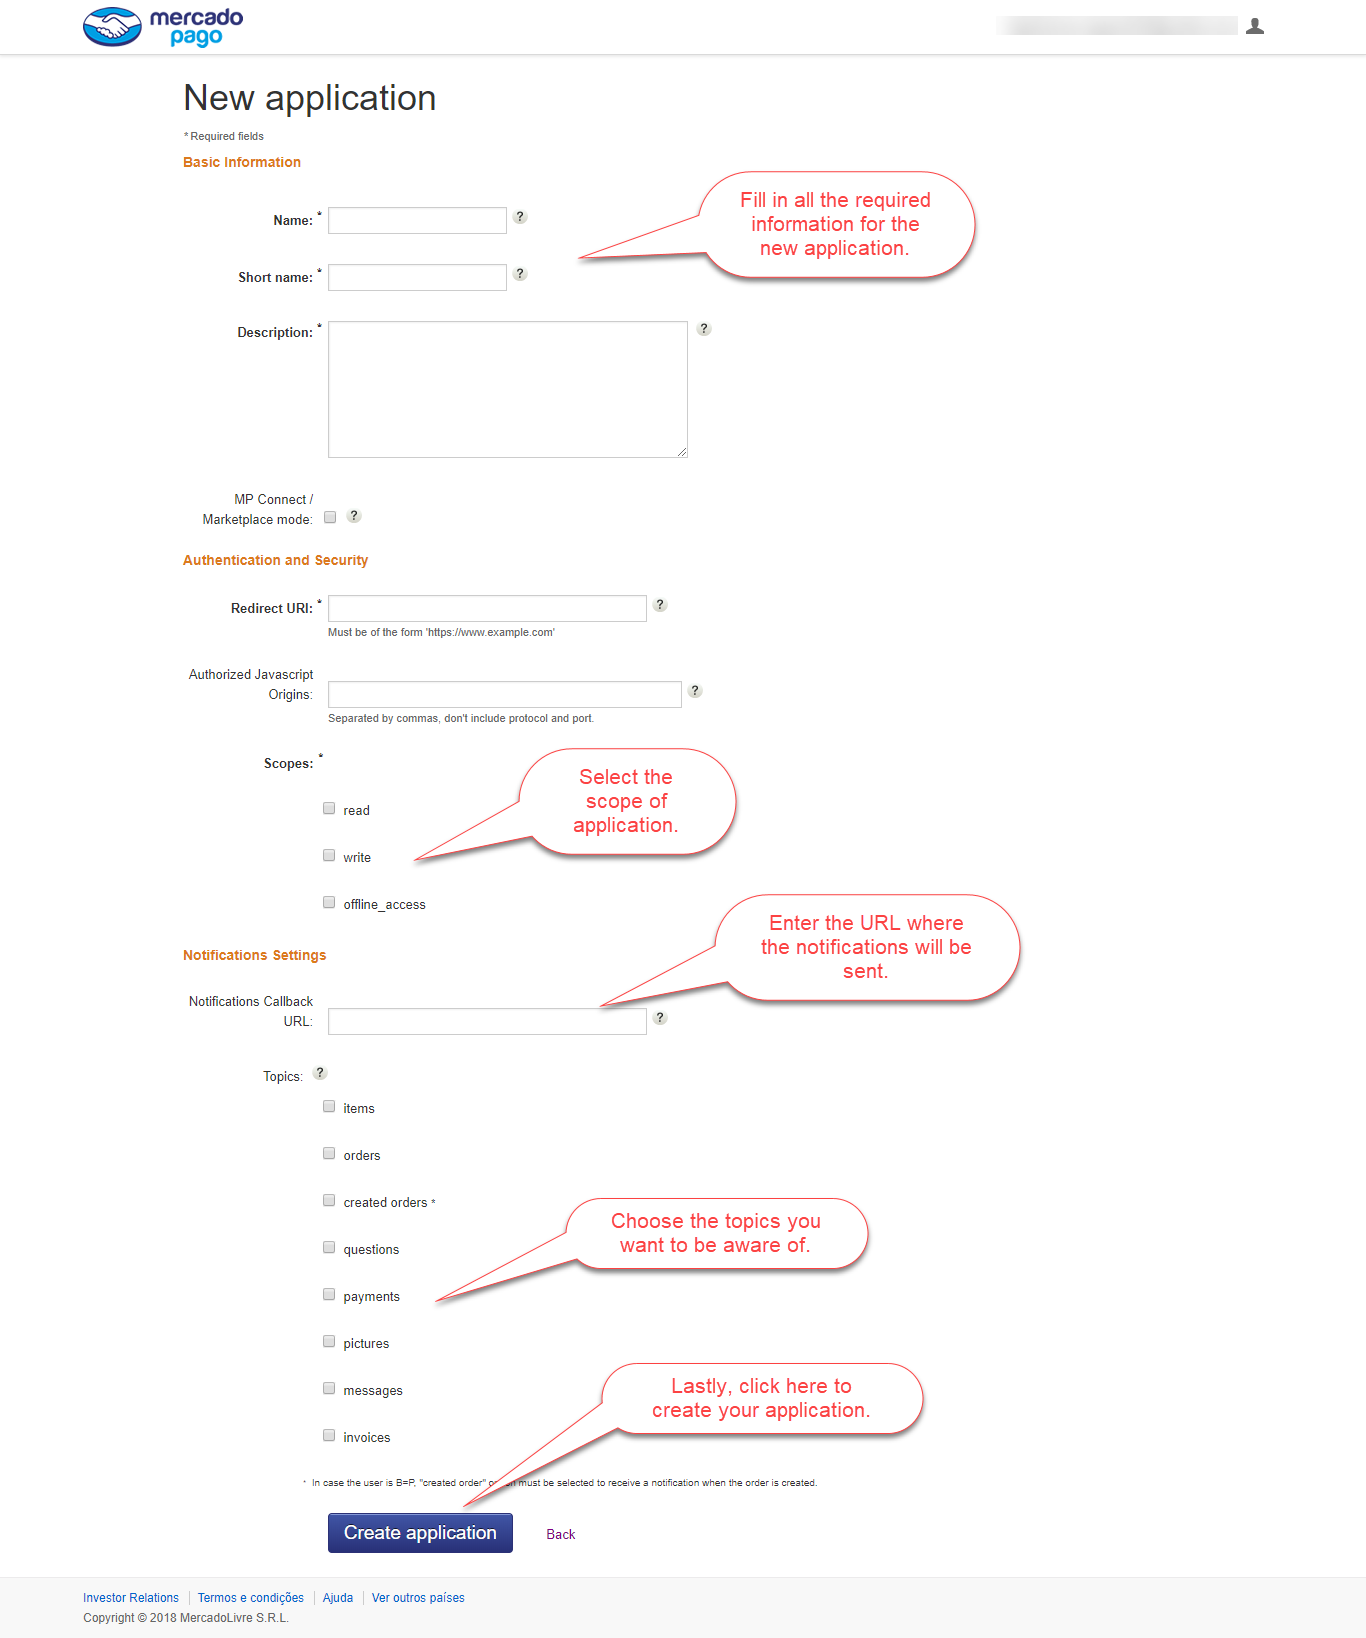
Clicking the “Create New Application” brings up a new page to create the application. Here, enter all the required information for creating the application and click “Create Application” to create one for you.
After you have created an application you can find it under the “My Applications“.

**Note: To get the App Id and the Secret Key click on the “Details” button visible in front of your created application as shown in the image above.

** Note:
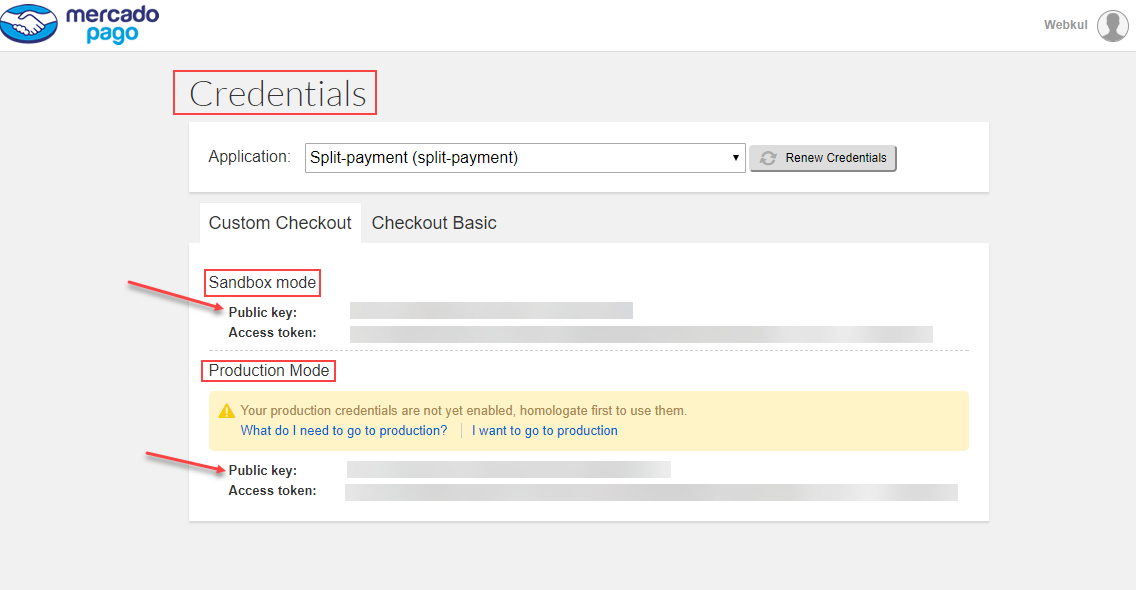
- To get the Public Key and the Access token click here.
If you are using the application in the Sandbox(testing) mode use the Sandbox – Public key and the Access token. Else if it’s in the production mode use Production mode – Public key and access token.
Module Configuration
After the installation, the admin will configure the module settings. For this, the admin will navigate to Stores -> Configuration -> Sales -> Payment Methods -> Mercadopago Connect Payment Method as per the below image.
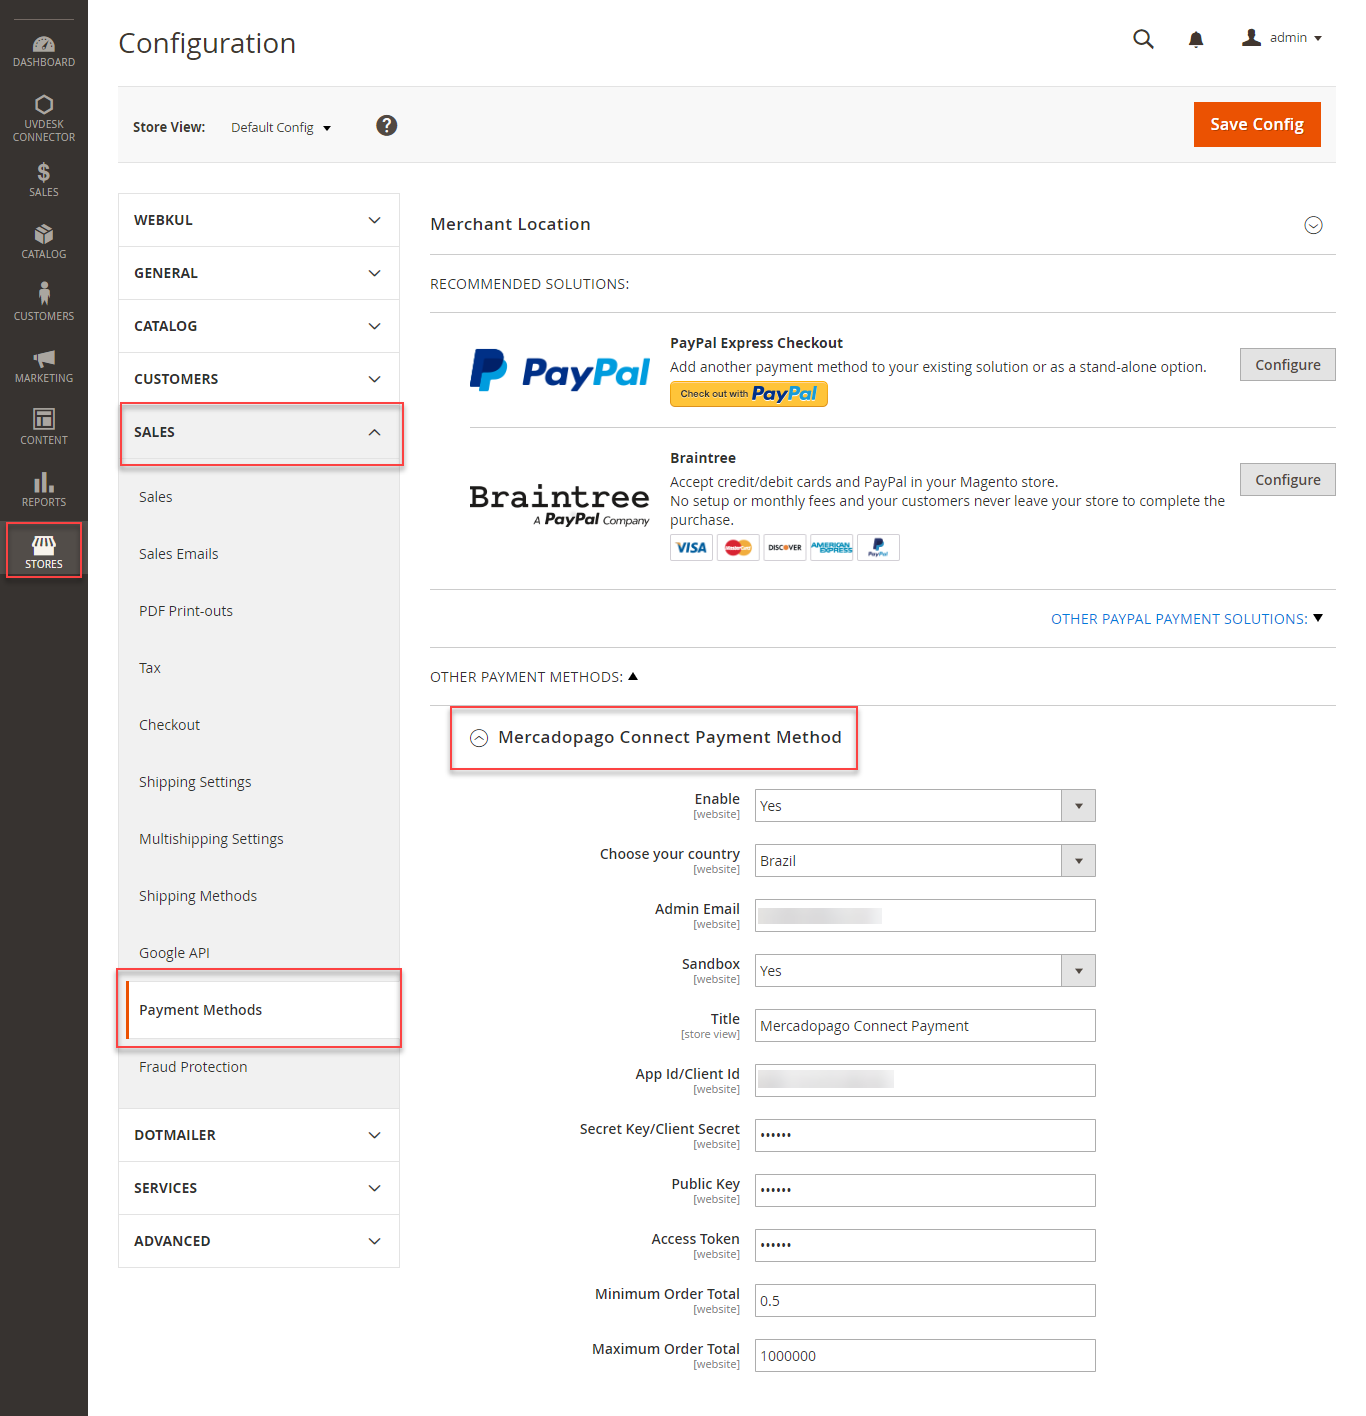
Here, the admin will –
- Set the payment method as Enabled or disabled.
- Choose your country in which you are going to manage your application.
- Enter the Admin’s Email address that will be used to validate the transactions and to receive the transaction communications.
- Choose the Payment method mode as Sandbox mode by selecting “Yes” else the Production mode by selecting No”.
- Set the Title for the payment method which is visible to the customers at the checkout time.
- Enter the App Id/Client Id, and the Secret Key/Client Key.
- Enter the Public key and the Access Token.
- Set the Minimum and Maximum order total for enabling the Mercadopago payment method.
Front-End
**Note: While using our Demo you can make use of the Test Cards specified by Mercadopago that can be used for making the purchases.
After adding products to the cart, the customer will go to the checkout page. On the checkout page, the customer can see the Mercadopago payment method under the payment methods. Selecting the Mercadopago Connect Payment(payment method name set in the admin backend) you will have 2 options to make the payment via –
1. Credit Card:

Here, without navigating to the Mercadopago gateway window the customer can fill all the payment details and proceed further by clicking on the Place Order button. The customer will get the success message as per the image.

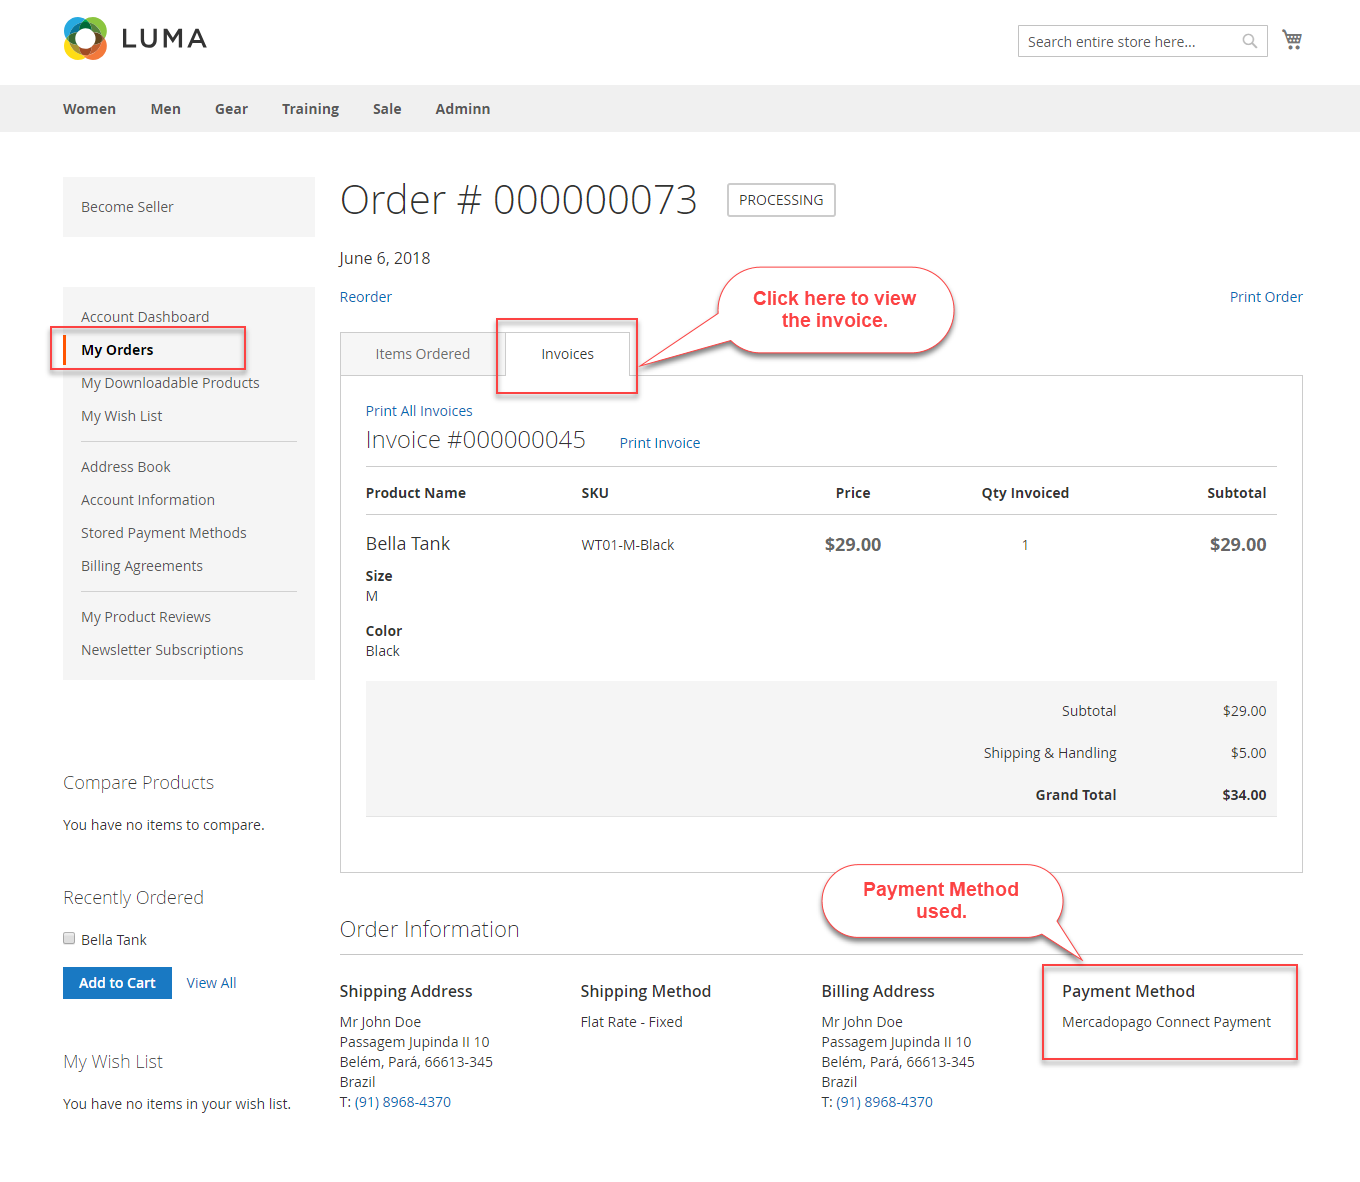
Once the order is placed successfully, the customer will navigate to My Orders to view the order details as per the below image.
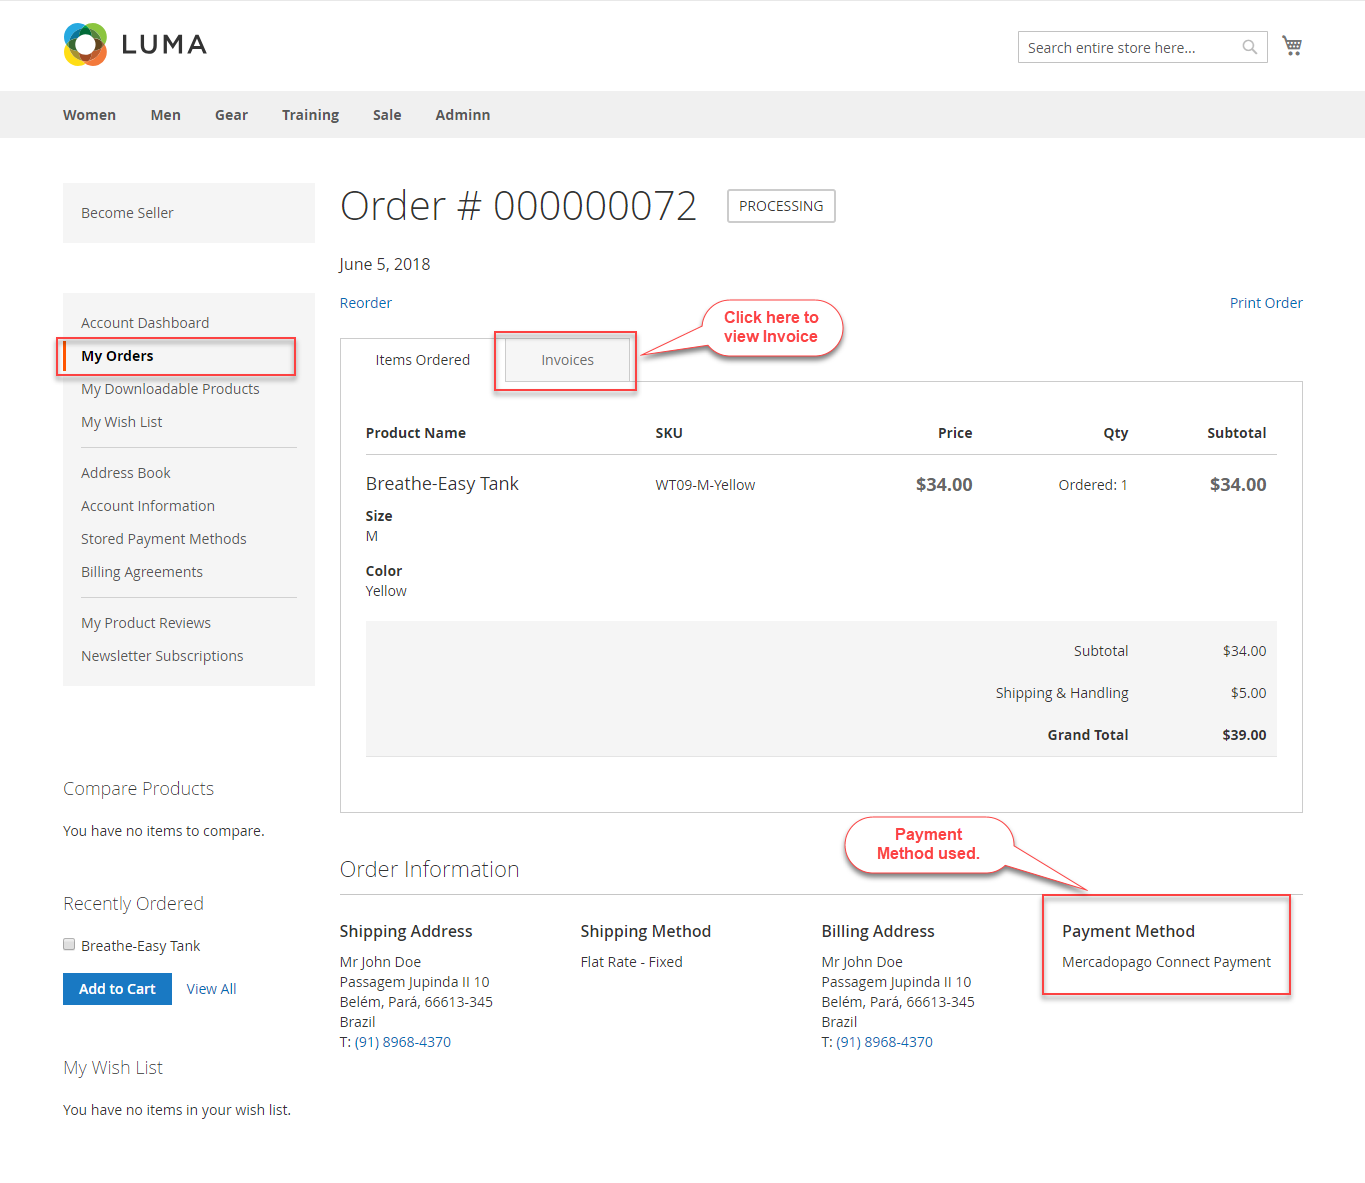
Here in the order details, the customer can view the payment method using which the order was placed.
2. EMI(Easy Installments):
Using this option the customers can pay using EMI(Easy Installments) for their purchase. This option will allow the customers to pay in easy monthly installments.

The customer simply selects the EMI installment plan from the drop-down list “Installments” as per the choice. And without navigating to the Mercadopago gateway window the customer can fill all the payment details and proceed further by clicking on the Place Order button. The customer will get the success message as per the image.

Once the order is placed successfully, the customer will navigate to My Orders to view the order details as per the below image.
Order Management
The admin can easily view and manage the orders placed through Mercadopago payment method. For this, the admin will navigate to Orders as per the below image.
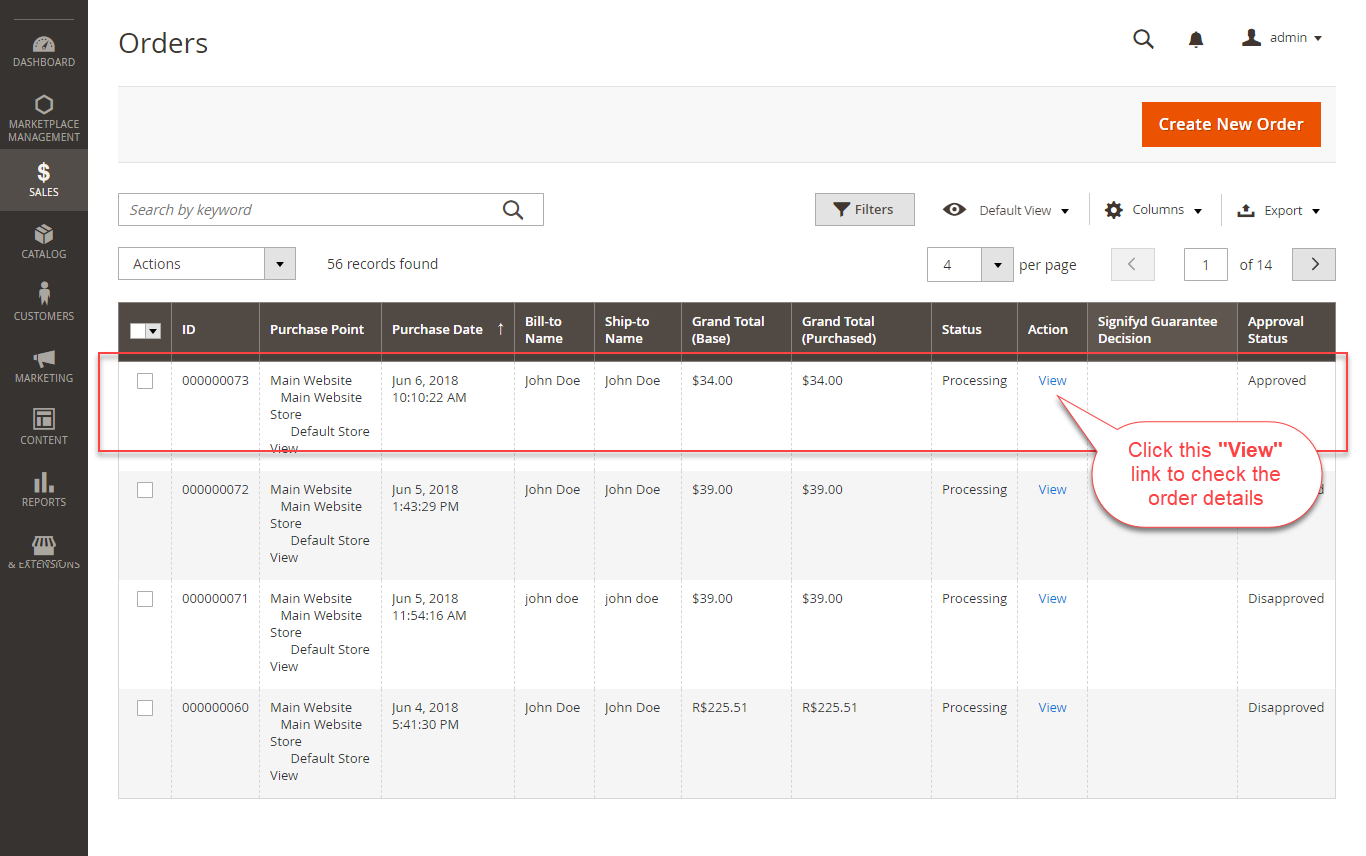
Here, the admin can view the complete list of orders. And can select the order to view and manage the orders.
Refund
After clicking the View link, the order information page will open up as per the below image.

Once the invoice has been generated, the admin can easily make the refund. For this, the admin will simply click on the Credit memo button to make a refund.

This will brings up a section where the admin can make a refund to the customer as per the below image.
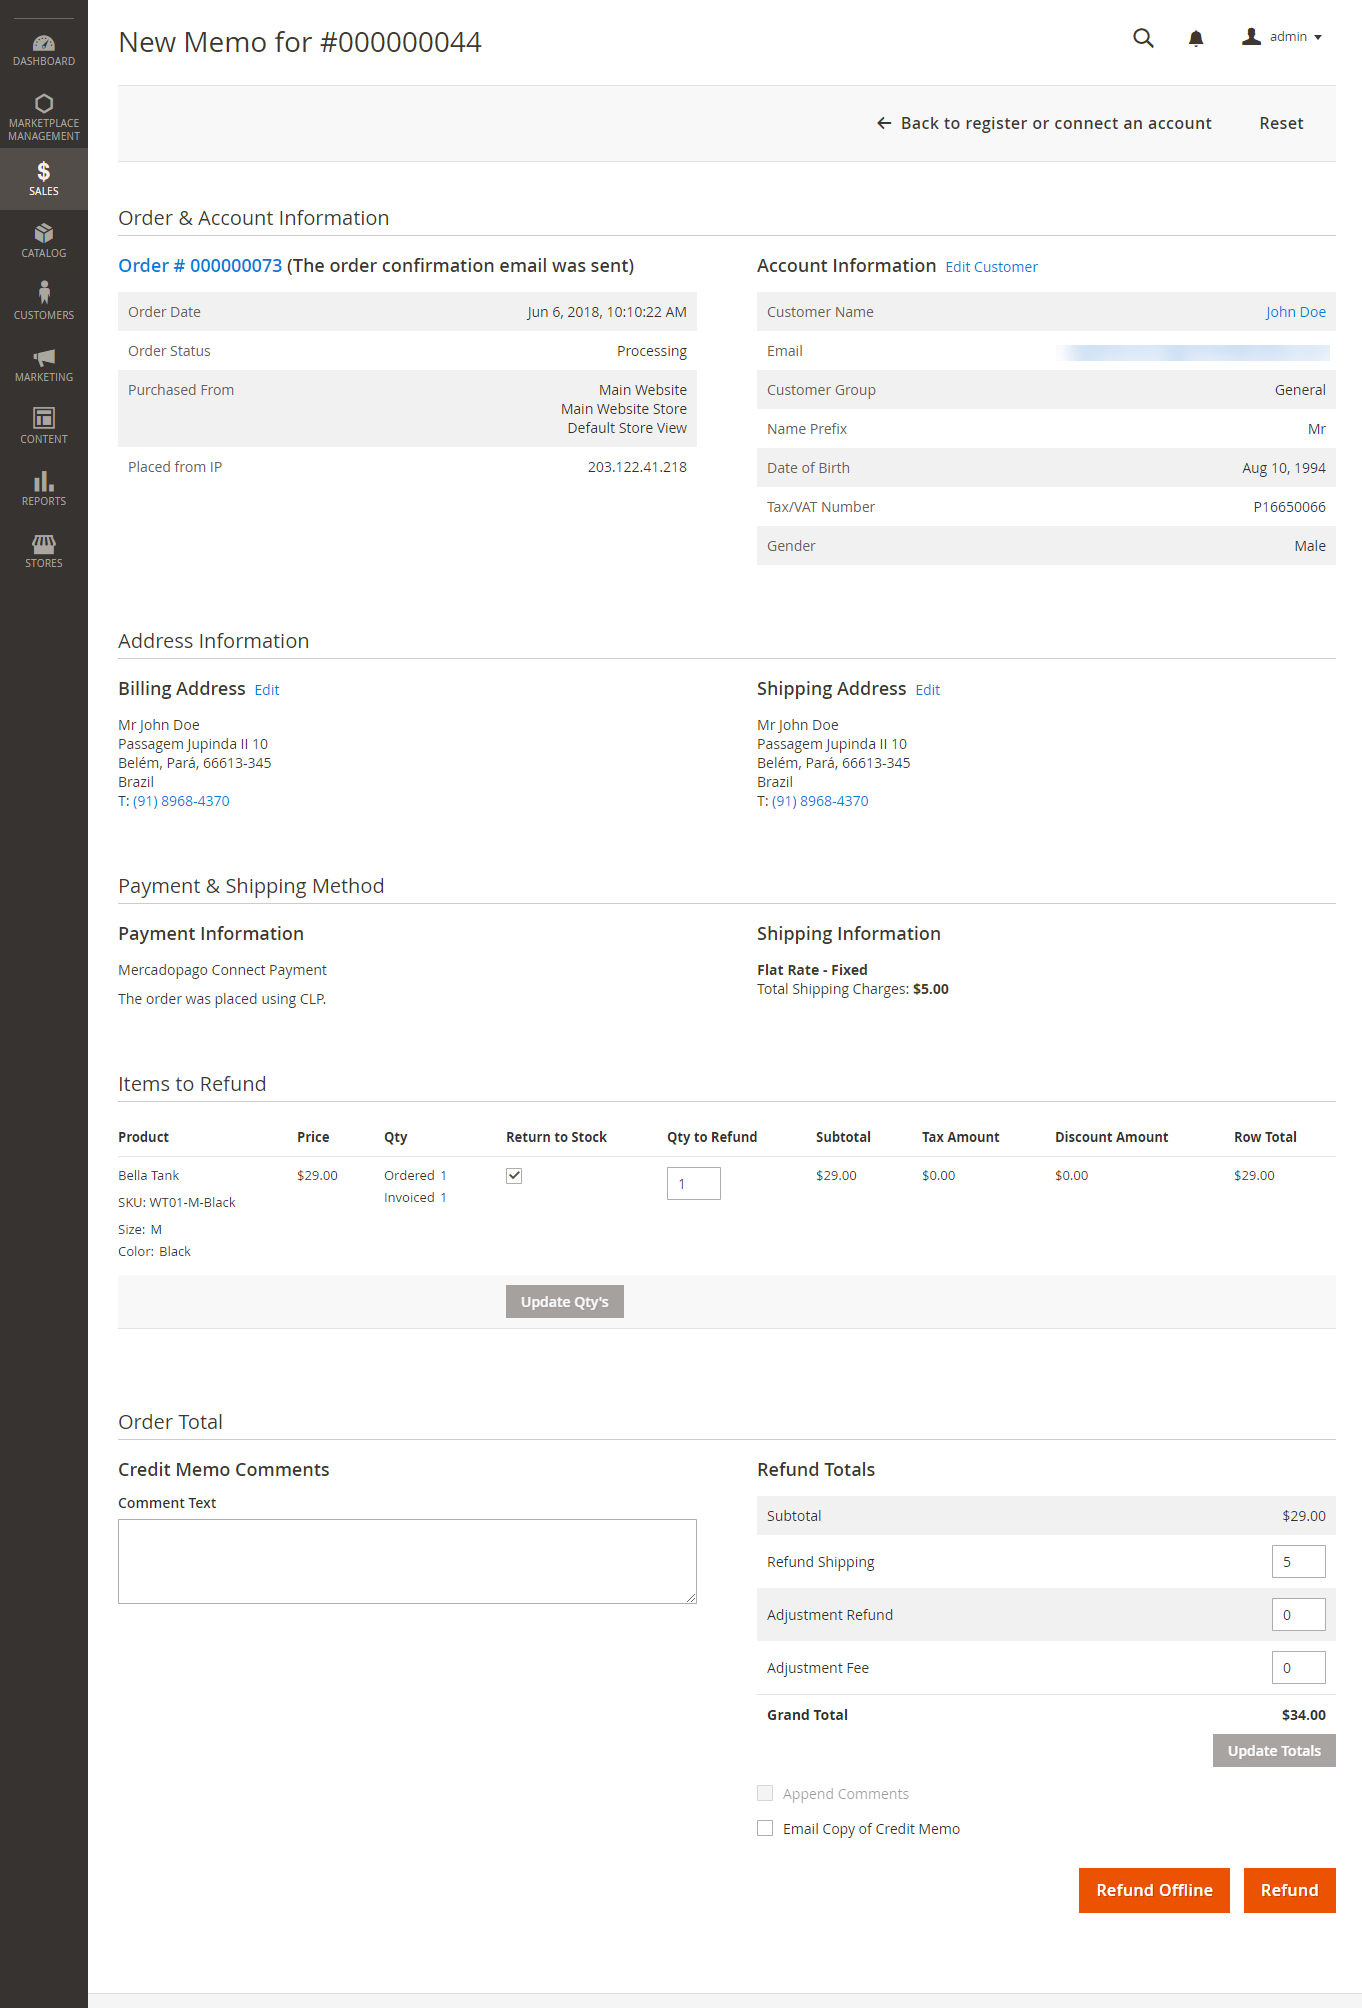
Here, the admin will select the items to be refunded, enter the comments for the credit memo and then lastly, click the Refund button to make a refund.
Transaction
The admin can also view the transaction details of Mercadopago Payment method of all the orders by navigating to Sales -> Transaction as per the image.

That’s all for the Magento 2 Mercadopago Payment Gateway module. If you still have any issue, feel free to add a ticket at https://webkul.uvdesk.com/.
Current Product Version - 2.1.0
Supported Framework Version - Magento 2.0.x, 2.1.x, 2.2.x,2.3.x, 2.4.x

Be the first to comment.