Magento 2 ChatGPT Checkout Message extension enables the admin to generate and display automated messages for the user or the customer at the point of checkout.
Admin can use the AI checkout message module to auto-generate messages shown to the customer at the checkout screen regarding their purchase.
This module customizes checkout messages using AI, tailoring prompts based on the purchased products, the customer’s name, and the store name.
Check the overview for the working of the extension –
Features
- The module uses AI and customer data to provide personalized messages and prompts during the checkout process.
- The module integrates smoothly with the checkout process, ensuring an uninterrupted shopping experience.
- The admin selects an AI provider (OpenAI, Gemini, Anthropic, OpenRouter, Mistral AI, or Ollama) and validates the corresponding API key before it can be used.
- The module supports many language translations.
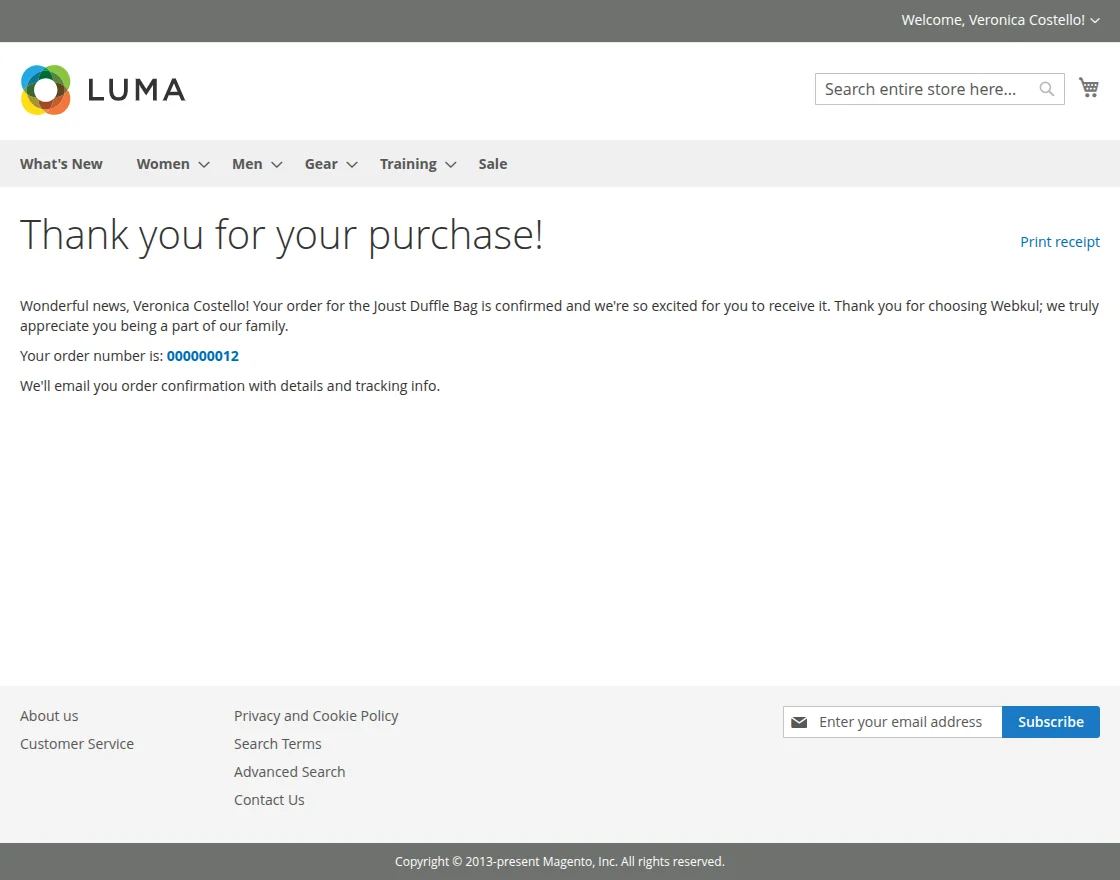
- After placing the order, the customer receives an auto-generated AI message referencing their purchase and the store name on the checkout success page.
- The module dynamically loads available text-chat models from the selected provider after key validation.
- Works on the standard one-page checkout success page and on the multishipping checkout success page.
Installation process
The installation is quite simple just like the standard Magento 2 extensions.
#1- Download Module:
Log in to the Webkul Store, go to My Account > My Purchased Products, verify, then download and extract the zip folder.
#2-Upload Folder:
After extracting the module zip, go to src>app and copy the app folder into the Adobe Commerce directory on the server, as shown below:

#3-Run commands:
After uploading the module folder, you need to run the following commands in the Magento 2 root directory:
php bin/magento setup:upgrade
php bin/magento setup:di:compile
php bin/magento setup:static-content:deploy
php bin/magento indexer:reindex
php bin/magento cache:flush
Note: For the Cloud AI providers you must also install the Symfony AI packages. Run this from the Magento root directory:
composer require symfony/ai-agent:^0.7 symfony/ai-platform:^0.7 symfony/ai-open-ai-platform:^0.7 symfony/ai-anthropic-platform:^0.7 symfony/ai-gemini-platform:^0.7 symfony/ai-open-router-platform:^0.7 symfony/ai-mistral-platform:^0.7
If these packages are missing, the module still works with Ollama; the cloud provider fields are hidden and a warning is shown in the configuration (see Cloud AI Providers availability below).
How to Get API Keys for LLM Providers
To use the AI Checkout Message extension, generate an API key from your chosen AI provider using the links below:
- OpenAI API Key: Generate your OpenAI API key here
- Gemini AI API Key: Generate your Google Gemini AI API key here
- Anthropic API Key: Generate your Anthropic API key here
- OpenRouter API Key: Generate your OpenRouter API key here
- Mistral AI API Key: Generate your Mistral AI API key here
- Ollama: No API key required — just run a local Ollama server and provide its endpoint URL (e.g.
http://localhost:11434)
Initial Admin Configuration:
After a successful install, the admin can configure the extension at Dashboard → Stores → Configuration → Webkul → AI Checkout Message.
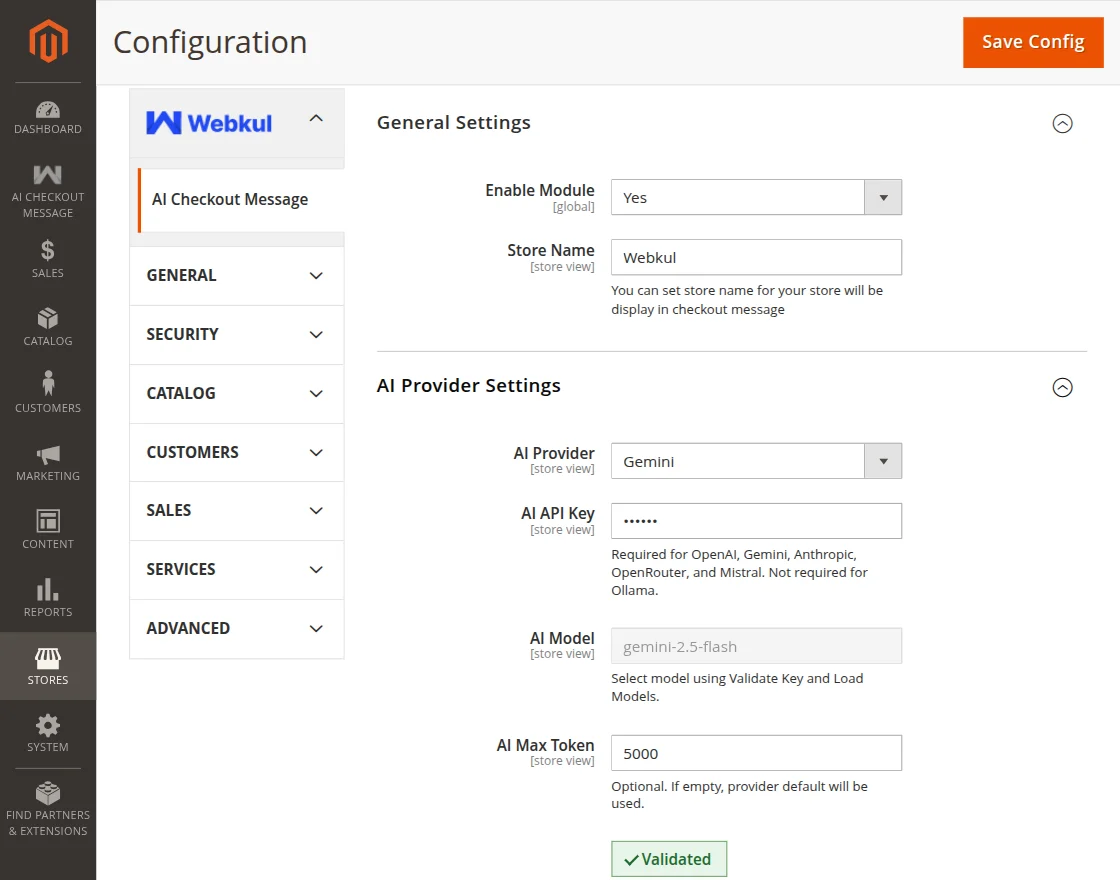
After accessing the Magento 2 AI checkout message module interface you need to fill out and set up settings according to your requirements.
General Settings:
- Enable Module: Enable or disable the extension.
- Store Name: The store name displayed in the AI-generated checkout message. (Required, shown when the module is enabled.)
AI Provider Settings:
Under AI Provider Settings, choose the AI Provider:
- OpenAI
- Gemini
- Anthropic
- Ollama
- OpenRouter
- Mistral AI
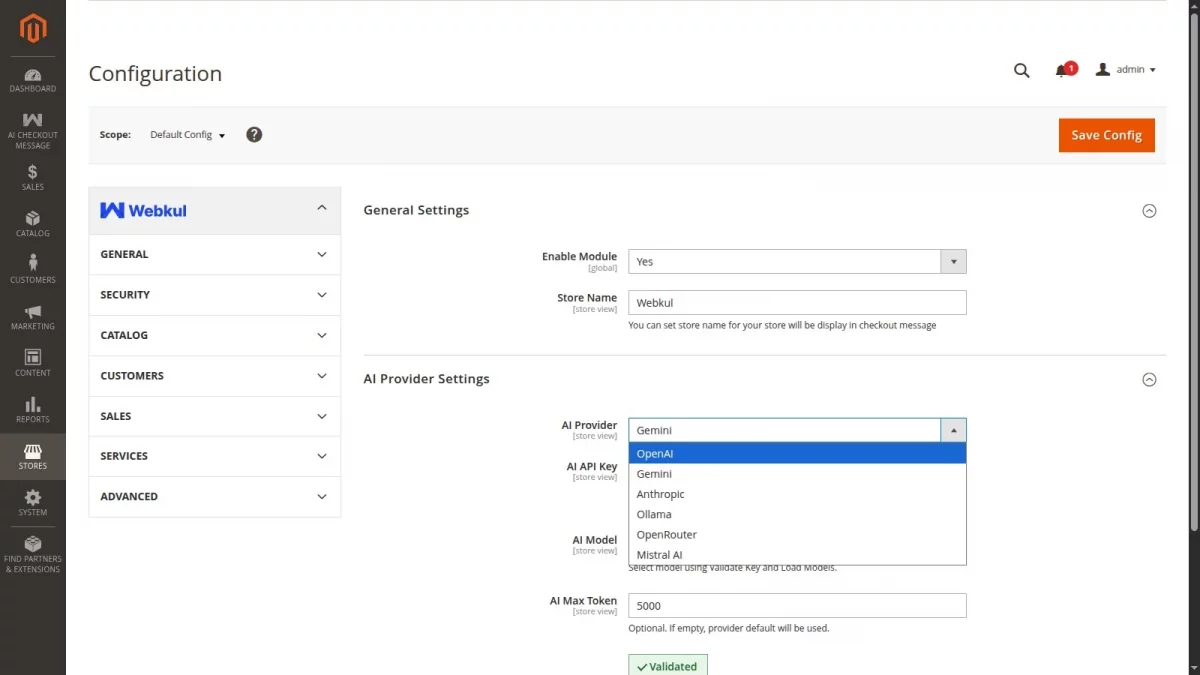
Cloud AI Providers availability: The cloud providers depend on the optional symfony/ai-agent, symfony/ai-platform and provider bridge packages. If these packages are not installed, the admin form shows an availability warning beneath the AI Provider field and the cloud provider fields are hidden, so you cannot save half-broken cloud credentials. Install the Composer packages listed under Installation (or use Ollama) before configuring a cloud provider.
Configuration when a Cloud AI provider is selected
This applies to OpenAI, Gemini, Anthropic, OpenRouter and Mistral AI.
- AI API Key: API key of the selected provider (required, stored encrypted, masked in the form).
- AI Model: The model used to generate the checkout message. The dropdown is populated only after the key is validated.
- AI Max Token: Optional. Maximum tokens per response. If empty, the provider default is used.
First click Validate Key and Load Models to validate the key and load the available models, then Save Config. The form blocks saving until the key is validated and a model is selected.
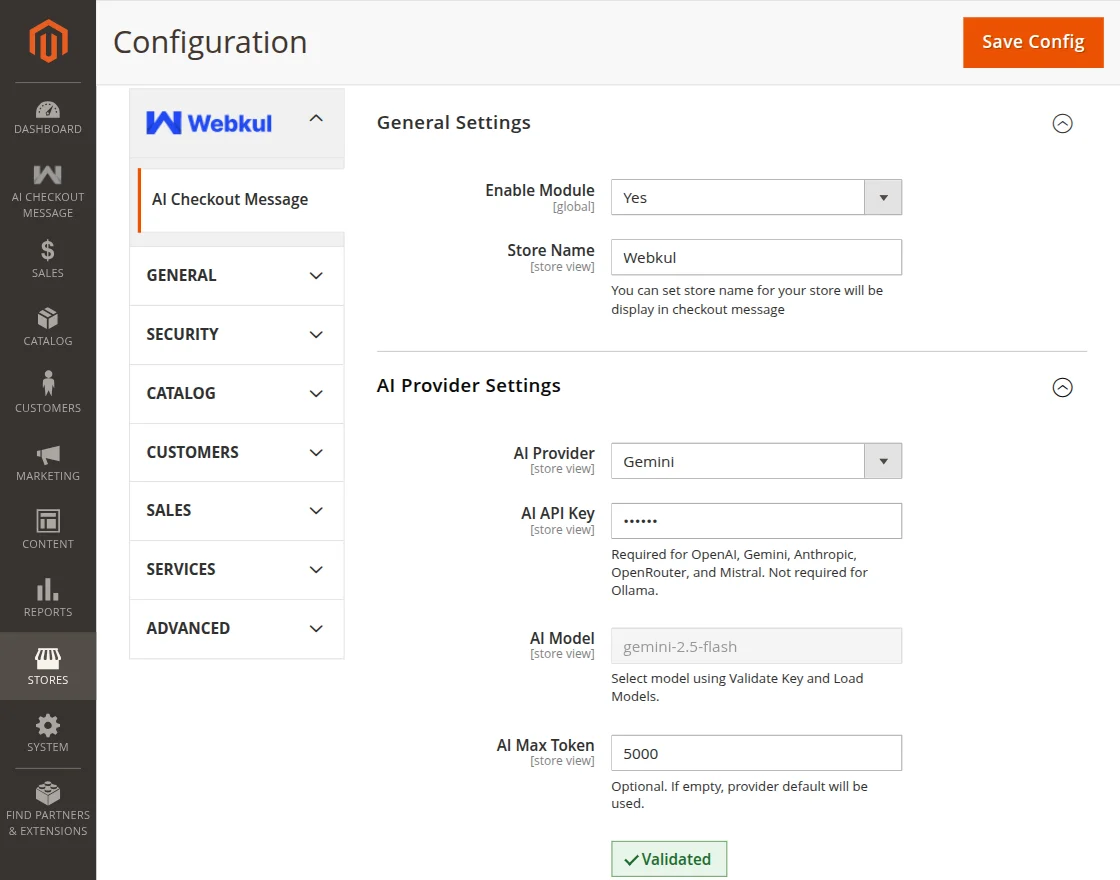
Configuration when Ollama is selected
Use this when you run your own local Ollama server. No API key is required, but you may enable authorization.
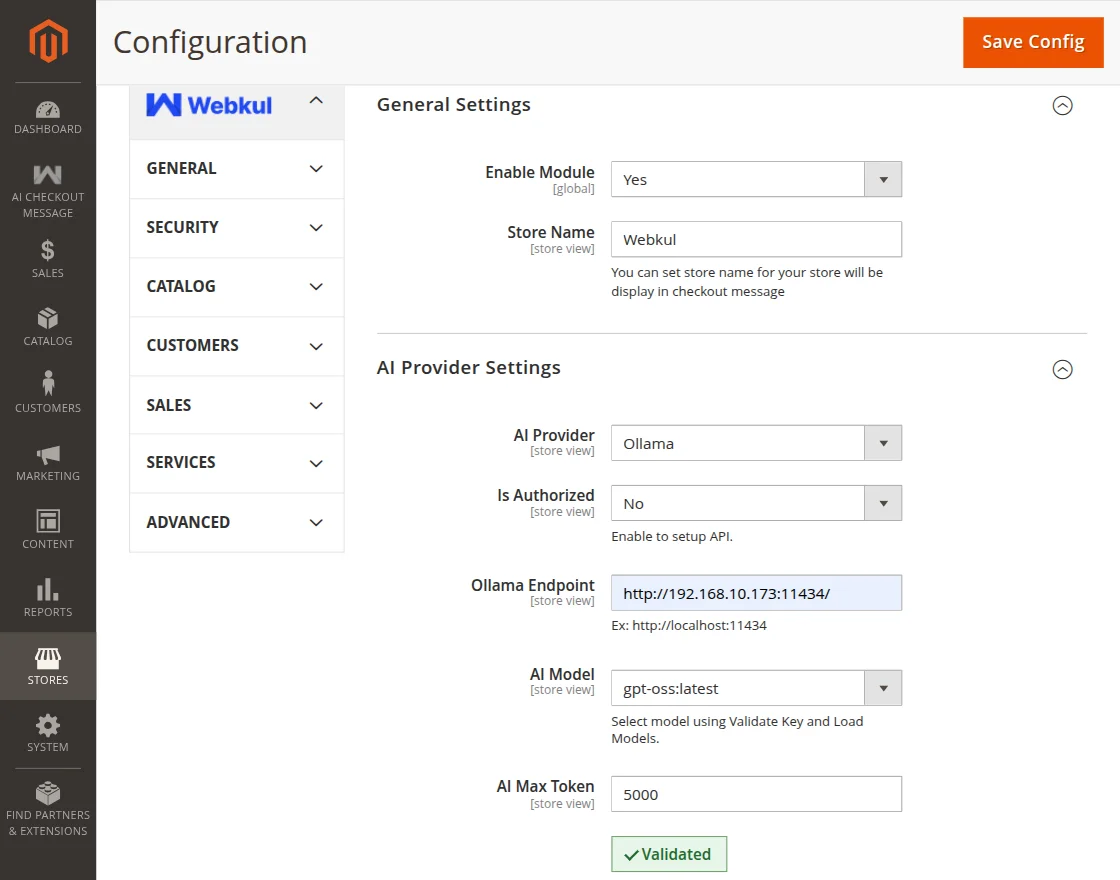
- Is Authorized: Set to Yes to use an API key with your Ollama server.
- AI API Key: API key used to authenticate against Ollama (required only when Is Authorized is enabled, stored encrypted).
- Ollama Endpoint: URL of your Ollama server, e.g.
http://localhost:11434. - AI Model: Select an installed Ollama model (loaded after validation).
- AI Max Token: Optional. Maximum tokens per response. If empty, the provider default is used.
Storefront Workflow

The Customers will select the product/products at the store and add it to the cart then further proceed to checkout.
After adding products to the cart, customer needs to fill out their details along with the shipping address and then select out shipping method.

The customer needs to verify their details and proceed to place an order by clicking on the place order button.

After placing the order, the customer will receive an auto-generated AI message with the order ID and store name on the checkout page, as shown below:
Support
That’s all about the “Magento 2 ChatGPT Checkout Message“. However, If you have any queries regarding the plugin, please contact us at Webkul Support System.
Current Product Version - 4.0.3
Supported Framework Version - Magento 2.0.x, 2.1.x, 2.2.x,2.3.x, 2.4.x

Be the first to comment.