Magento 2 AI Product Feed module connects your store catalog with AI-powered shopping assistants.
It uses structured, AI-compliant product feeds for modern conversational commerce.
It generates optimized feeds in JSONL.GZ and CSV.GZ formats, allowing AI systems to read product data like price, stock, attributes, and availability with high accuracy.
The module supports the Agentic Commerce Protocol (ACP), enabling AI assistants to manage the full shopping flow from product discovery to conversational checkout.
Customers interact with AI to search, compare, and buy products using natural language, removing the need for traditional browsing and improving shopping speed.
The module enables secure delegated Stripe payments and calculates taxes, shipping, and totals in real time using Magento’s native pricing engine.
Store owners use AI Product Feed to expand into AI commerce channels while maintaining full control over product data, pricing rules, and order management.
Also, check out Magento 2 Google Shopping Feed module to display products on Google search for better visibility.
Features
- Generate AI-compliant product feeds in JSONL.GZ and CSV.GZ formats.
- Integrate with AI platforms using Agentic Commerce Protocol (ACP).
- Enable admins to create and manage structured product feeds.
- Map Magento product attributes to AI-specific fields for accurate data representation.
- Make products discoverable within AI tools based on customer queries.
- Provide real-time updates for price, stock, and product availability.
- Calculate taxes, shipping, and order totals dynamically during AI-driven checkout.
- Enable conversational checkout directly within AI platforms.
- Support secure delegated payment processing via Stripe.
- Automate feed generation using Magento Cron scheduling.
- Validate system security with SSL, HMAC, and API connectivity checks.
Installation
Download Module
You need to log in to the Webkul Store, go to My Account>My Purchased Products section, and verify.
And then, download and extract the contents of this zip folder on the system.
Upload Folder
Once the module zip extracts, follow the path src>app & copy the app folder into Magento 2 root directory on the server, as shown below:

Run Commands
You need to run the following commands:
composer require stripe/stripe-php:^20.0.0
php bin/magento setup:upgrade
php bin/magento setup:di:compile
php bin/magento setup:static-content:deploy
php bin/magento indexer:reindex
php bin/magento cache:flush
Language Translation
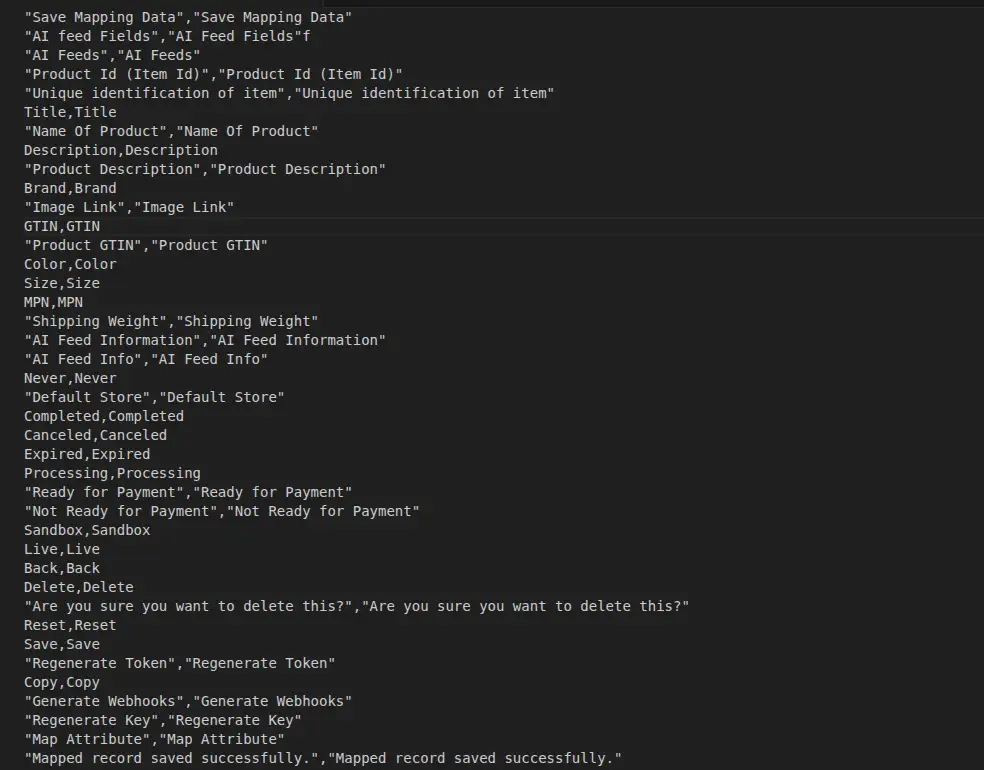
For translating the module language, navigate through src/app/code/Webkul/AiProductFeed/i18n and edit the en_US.csv file.
Thereafter, rename the CSV as “en_US.CSV” & translate all right-side content after the comma in the Arabic language. After editing the CSV, save it.

Now, upload it to the path src/app/code/Webkul/Webkul/AiProductFeed/i18n where the installation of Magento 2 is on the server.
The module supports translation into Arabic; it supports both RTL and LTR languages.
The user can edit the CSV like the image below:
Module Configuration | Admin
After successful installation of the extension, the admin will navigate through Stores > Configuration > Webkul > AI Product Feed

Further, the following options are available for configuration,
General Settings
This section manages the core activation and global settings of the extension across the entire store.
Enable: Select Yes or No from the dropdown to activate or deactivate the extension for the store.
Default Configurations
These settings define your store’s identity, legal compliance pages, and regional preferences for AI-powered product feeds and commerce operations.
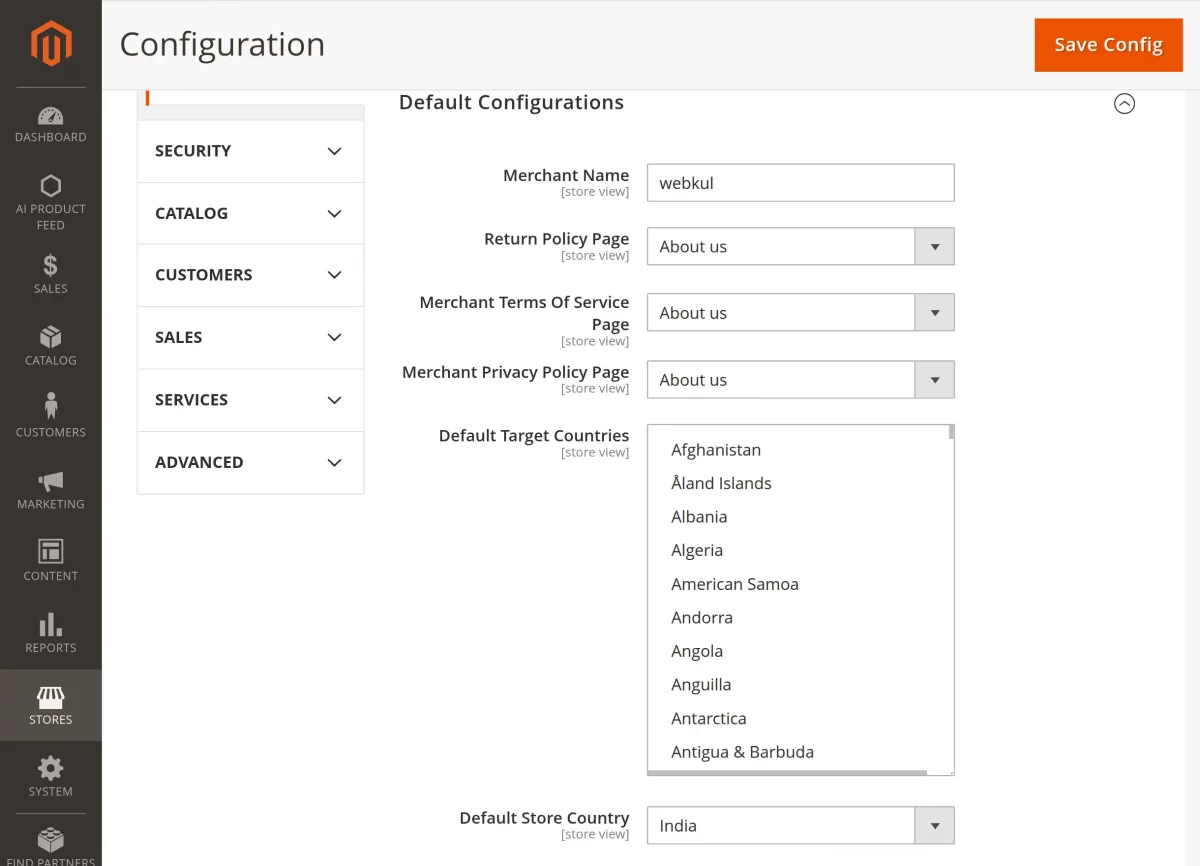
Merchant Name: Enter the official store name used to identify your business across AI platforms and product feeds.
Return Policy Page: Select the page that defines your return policy for AI-driven shopping experiences and customer reference.
Merchant Terms of Service Page: Choose the page that contains your store’s terms and conditions for AI and users.
Merchant Privacy Policy Page: Select the page that explains how customer data is collected, processed, and used in your store.
Default Target Countries: Choose the countries where products will be available for AI-based discovery and shopping.
Default Store Country: Select the primary country used for pricing, tax calculation, and regional store configuration.
Webhook Configuration
This section manages secure real-time notifications sent to external systems when AI product feed events occur.

Webhook URL: Enter the endpoint URL where the system sends webhook notifications for AI product feed events and updates.
Webhook Secret: Use the auto-generated signing key to verify webhook payloads via the X-WKCPF-Signature header using HMAC-SHA256 for secure communication.
Retry Attempts: Set the number of retry attempts for failed webhook deliveries; set to 0 to disable retries.
Retry Delay (seconds): Define the initial delay between retry attempts, which increases exponentially after each failure for reliable delivery.
ACP (Agentic Commerce Protocol)
This section manages the configuration required to enable AI-powered conversational checkout and secure commerce workflows between your store and AI platforms.
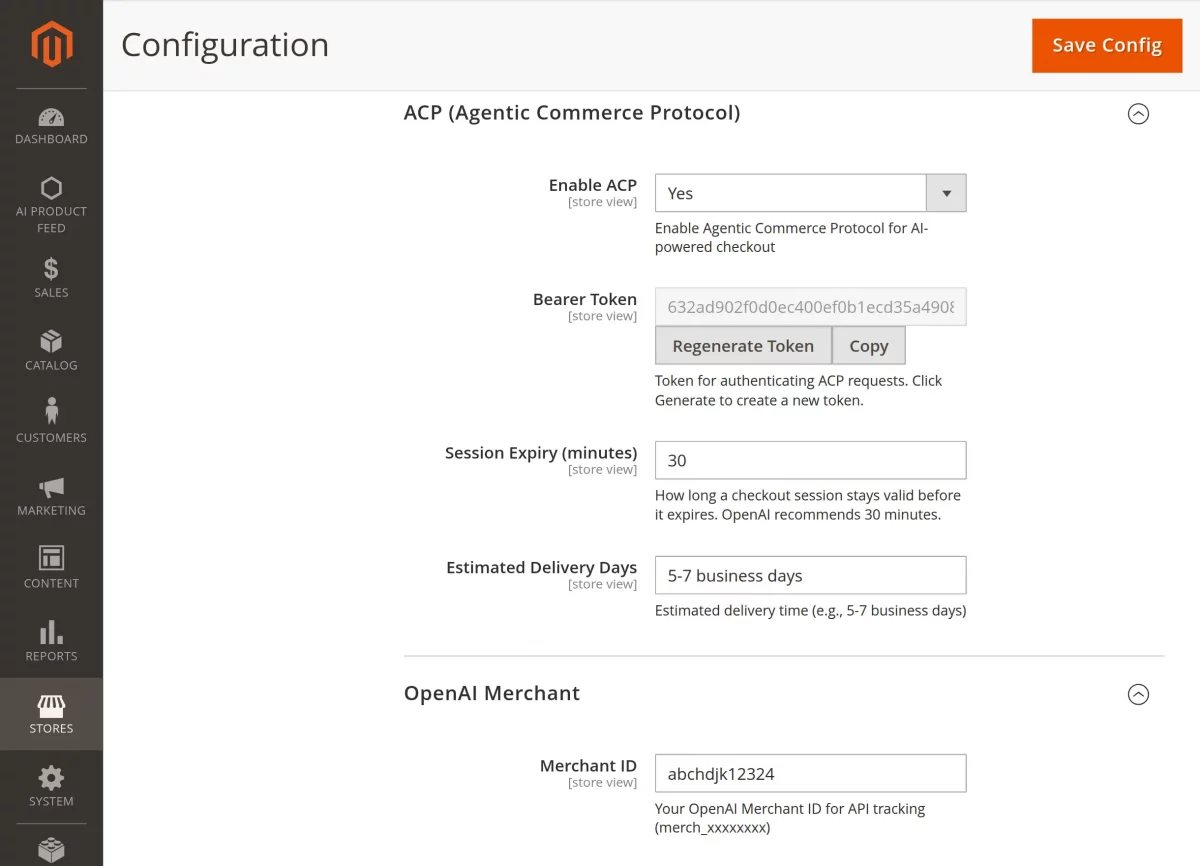
Enable ACP: Select Yes or No to activate or deactivate the Agentic Commerce Protocol for AI-driven checkout and transaction processing.
Bearer Token: Enter the secure authentication token used to validate ACP requests between your store and AI systems, with an option to regenerate it for better security.
Session Expiry (minutes): Set the duration for which an AI checkout session remains active before it expires, ensuring secure and time-bound transactions (recommended: 30 minutes).
Estimated Delivery Days: Define the expected delivery timeframe displayed during AI-assisted checkout, such as 5–7 business days.
OpenAI Merchant
This section stores the credentials and configuration required to connect your Magento store with OpenAI-powered commerce systems.
It enables AI-driven product discovery and checkout integration.
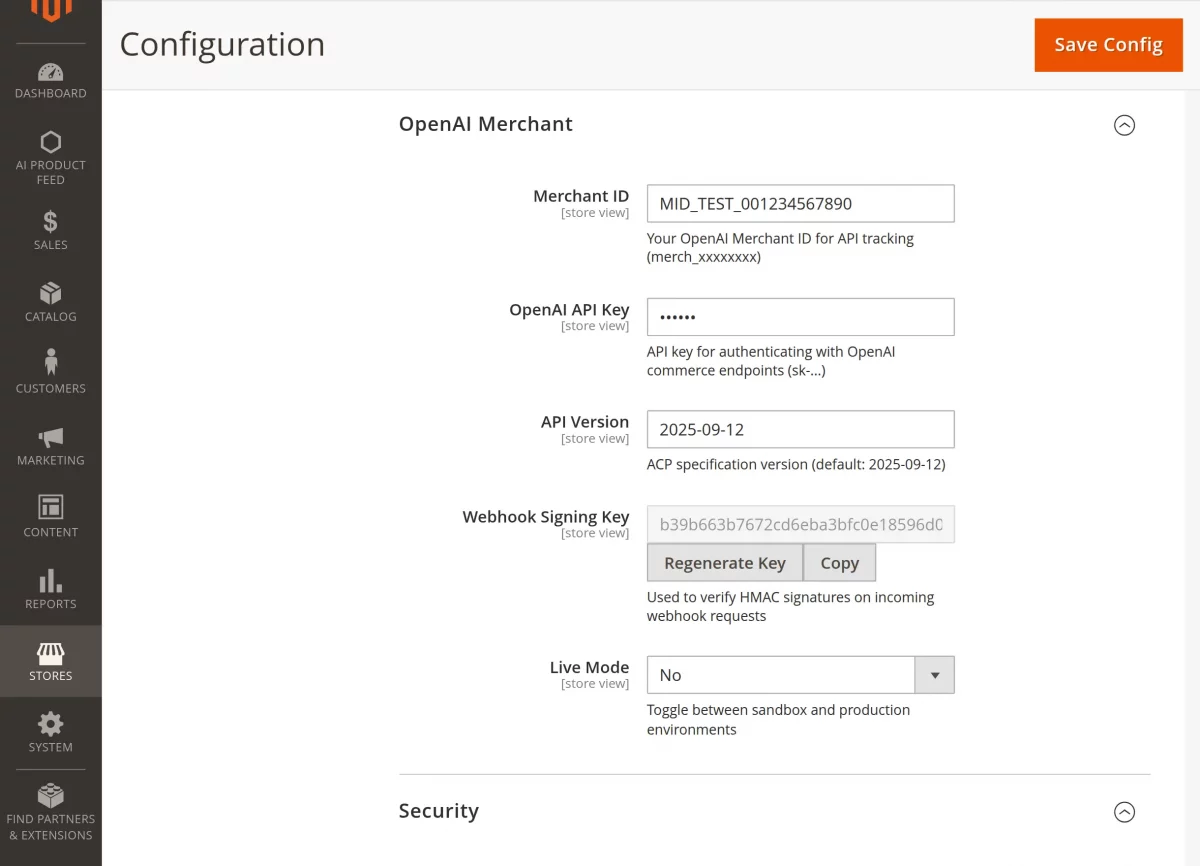
Merchant ID: Enter the OpenAI Merchant ID used to uniquely identify the store for API tracking and commerce operations.
OpenAI API Key: Enter the API key used to authenticate and authorize requests between the system and OpenAI commerce endpoints.
API Version: Specify the ACP specification version to ensure compatibility with OpenAI commerce integration standards.
Webhook Signing Key: Enter the HMAC signing key used to verify and validate incoming webhook requests for secure communication.
Live Mode: Select Yes or No to enable or disable live transactions, allowing switching between sandbox and production environments.
Security
This section manages access control settings to ensure that only trusted systems can interact with the API and AI commerce endpoints.
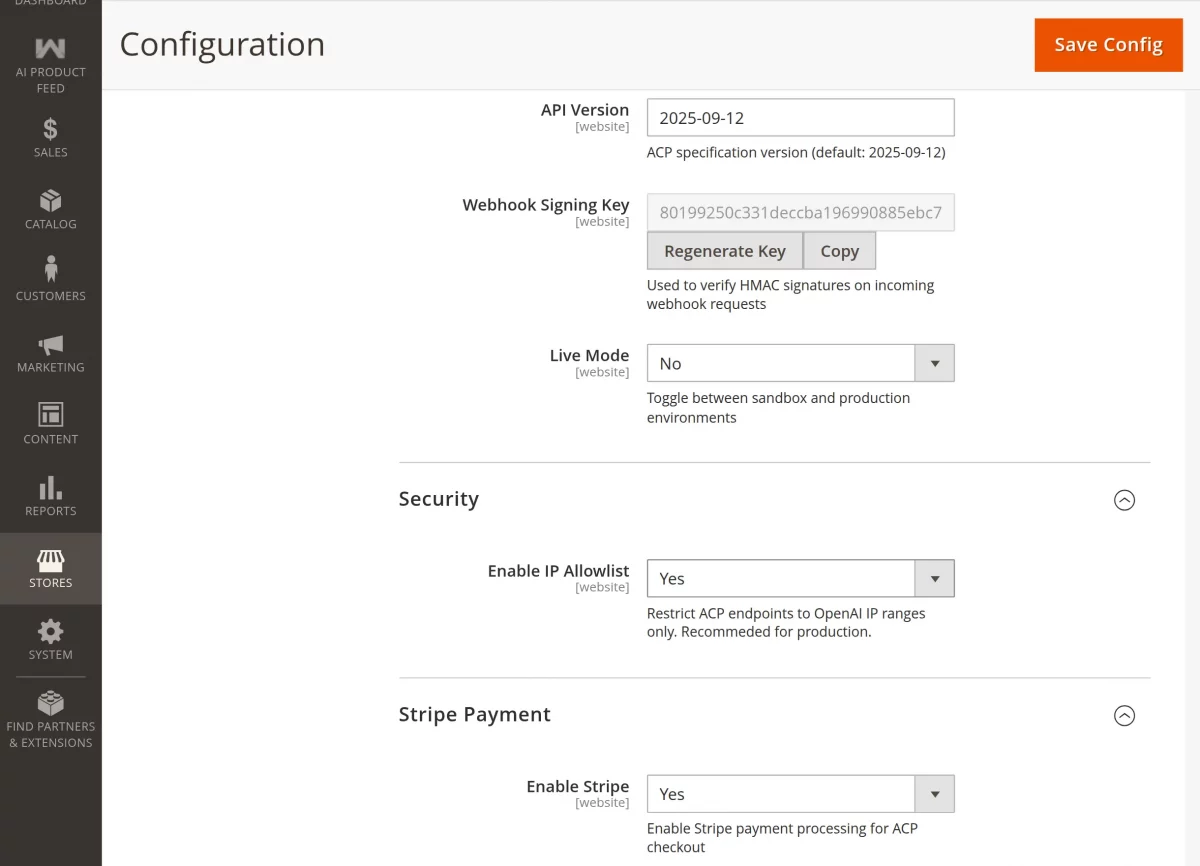
Enable IP Allowlist: Select Yes or No to restrict API access to only specified IP addresses for improved security and controlled access.
Stripe Payment
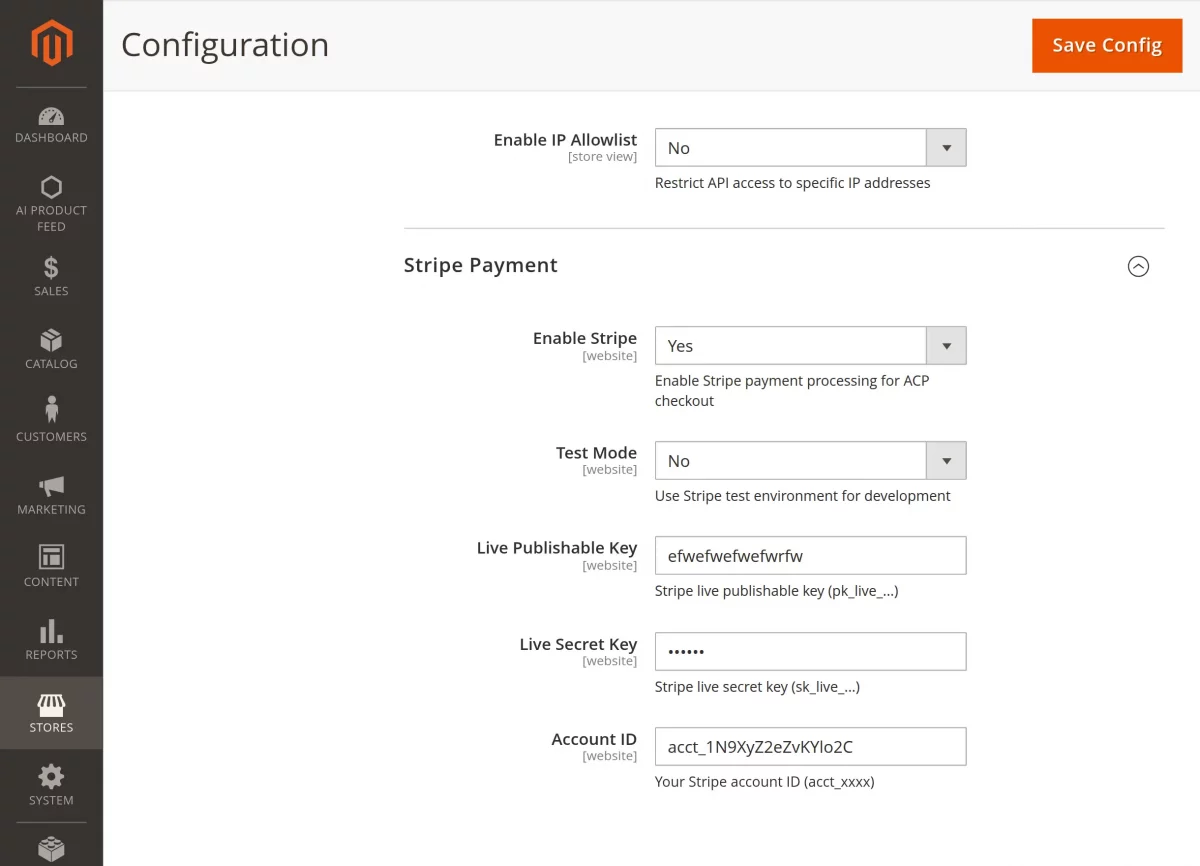
Enable Stripe: Select Yes or No to enable Stripe payment processing for ACP-based AI checkout transactions.
Publishable Key: Enter the Stripe publishable key used on the frontend to initialize and manage Stripe payment flows.
Secret Key: Enter the Stripe secret key used to securely authenticate and process payment requests on the server side.
Test Secret Key: Enter the Stripe test secret key used for secure authentication and processing of test payment requests during development.
Account ID: Enter the Stripe account ID used to identify and link the merchant account for payment processing and settlements.
Webhook: Click the Generate Webhook button to create or regenerate the webhook endpoint and secure signing configuration for Stripe event handling.
AI Product Feed
After the successful installation and configuration, the AI Product Feed menu option is visible to the admin.
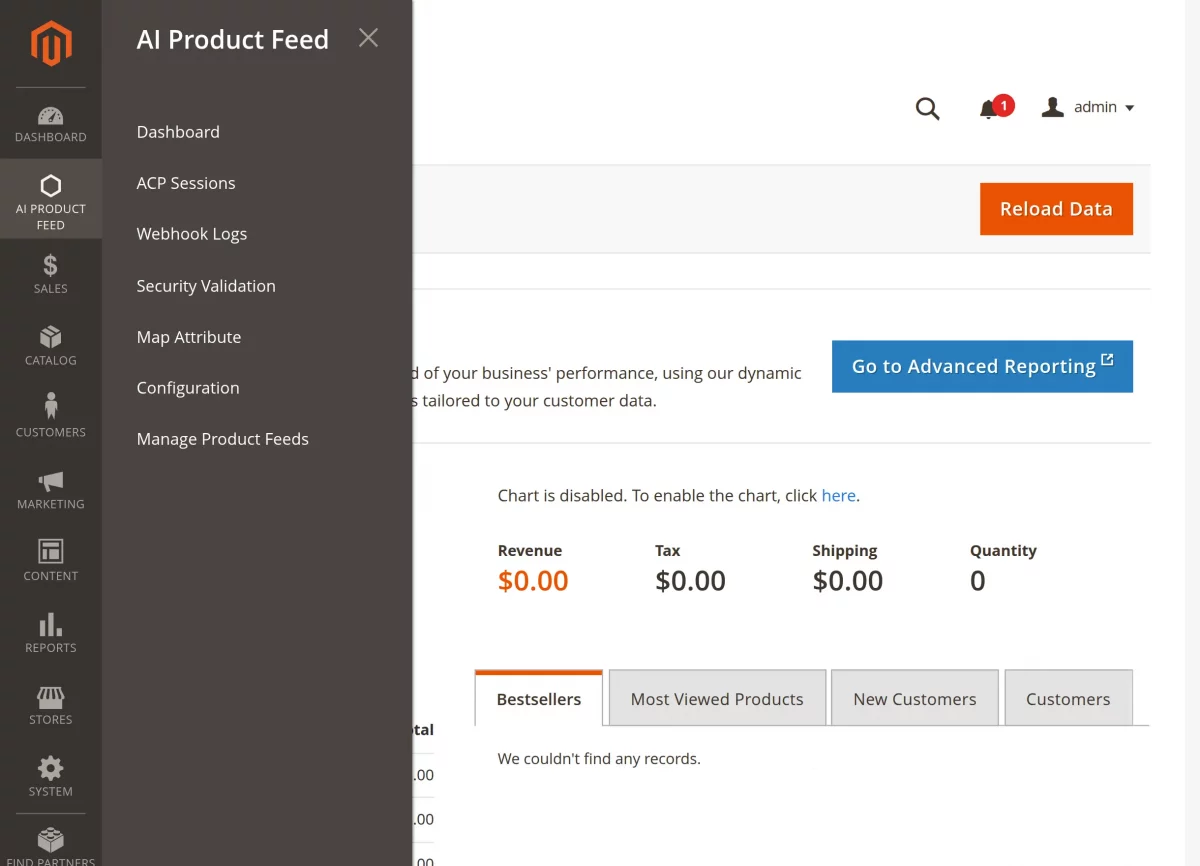
Here, the admin has the following options to configure and manage AI product feed operations across the store –
- Dashboard
- ACP Sessions
- Webhook Logs
- Security Validation
- Map Attribute
- Configuration
- Manage Product Feed
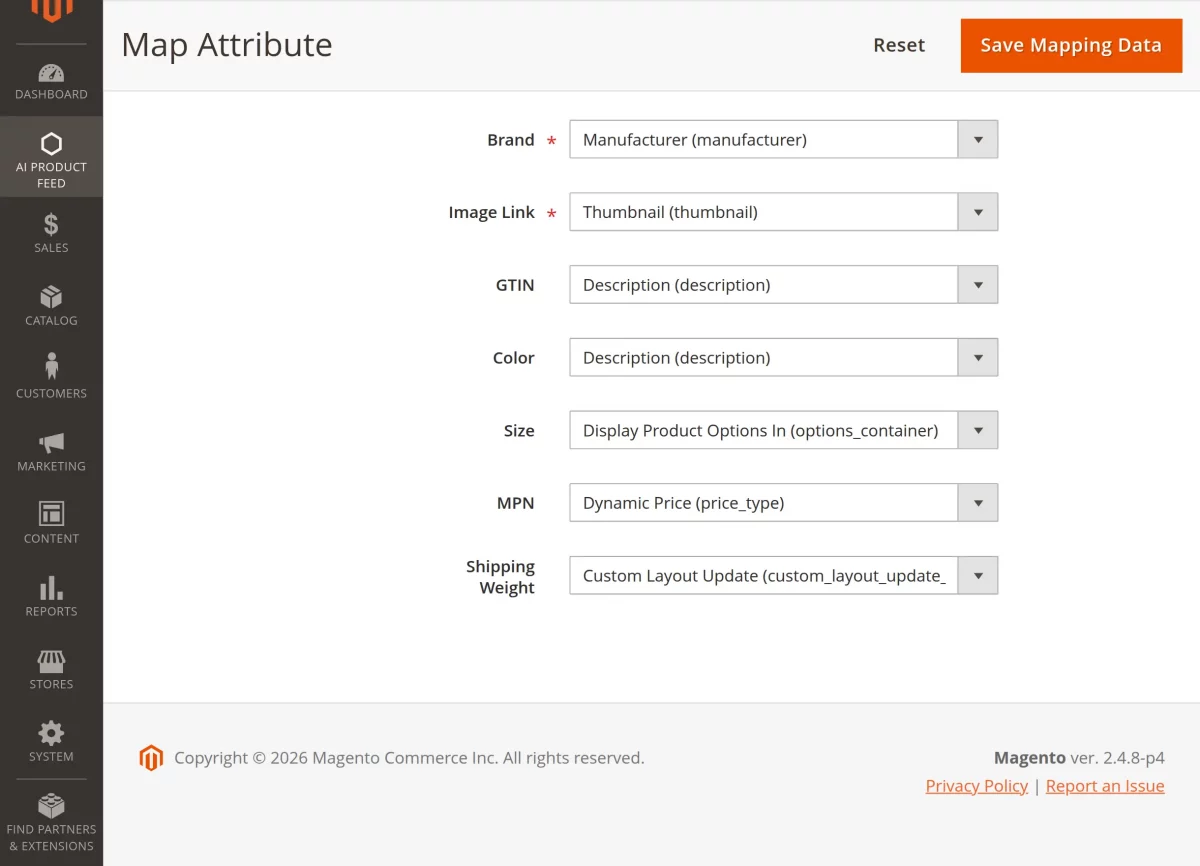
Map Attribute
Under this section, the admin can map AI feed attributes with Magento store attributes as shown in the snapshot.
Here, the admin can select the respective attributes, reset the configuration if required, and save the mapping data.
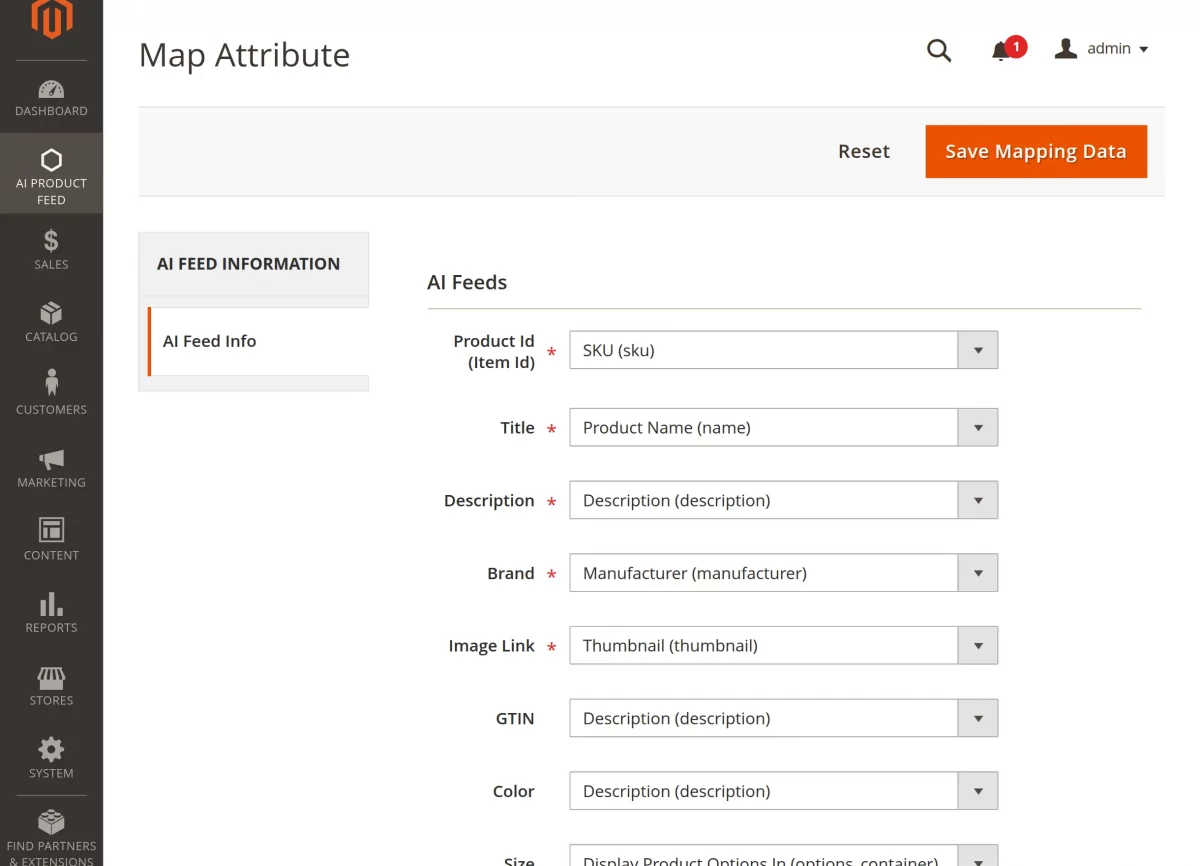
After selecting the appropriate fields for the AI product feed, click the Save Mapping Data button to store the configuration.
Once saved, a confirmation message is displayed to indicate that the mapping has been successfully updated.
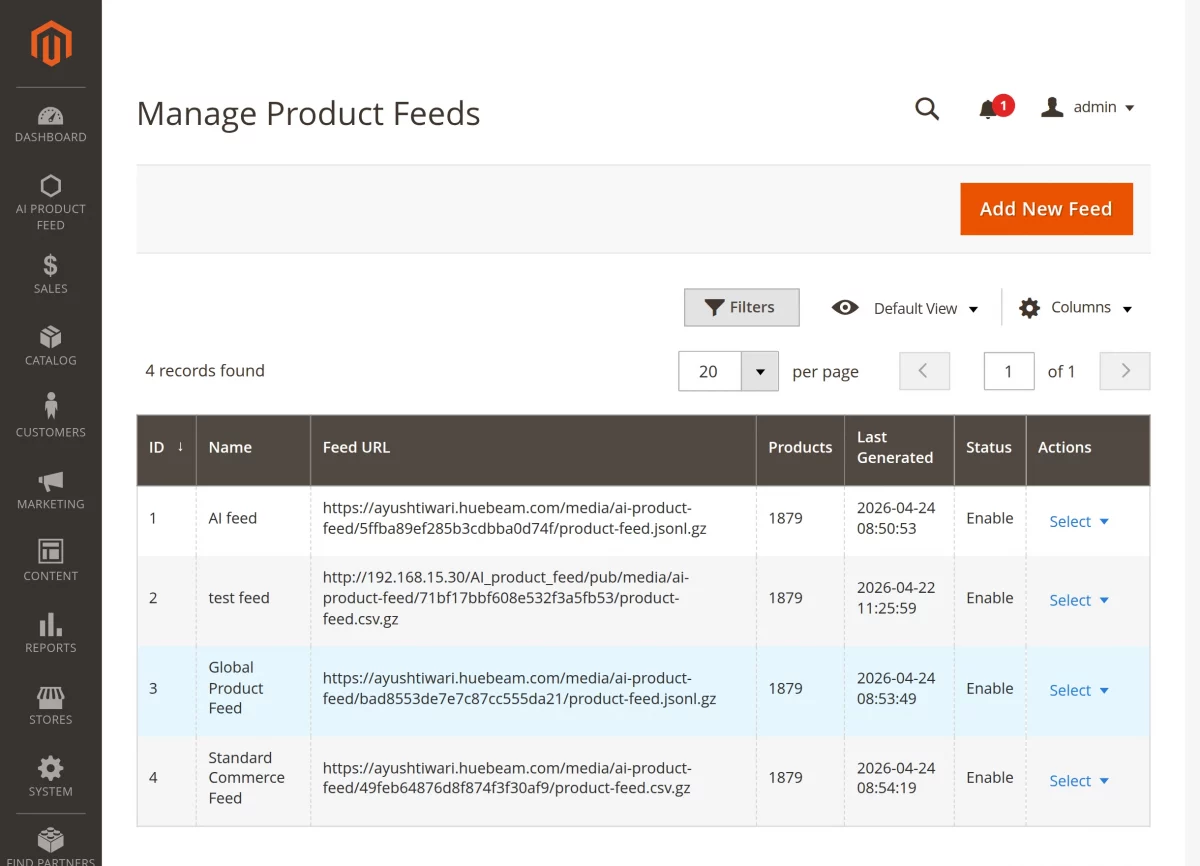
Manage product feed
Under this section, the admin can create and manage AI-ready product feeds for the store as shown in the snapshot.
Here, the admin can add new feeds, edit existing feeds, apply filters, and configure feed settings as required.
To add a new feed, the admin needs to click on the Add New Feed button, which opens the section shown below.
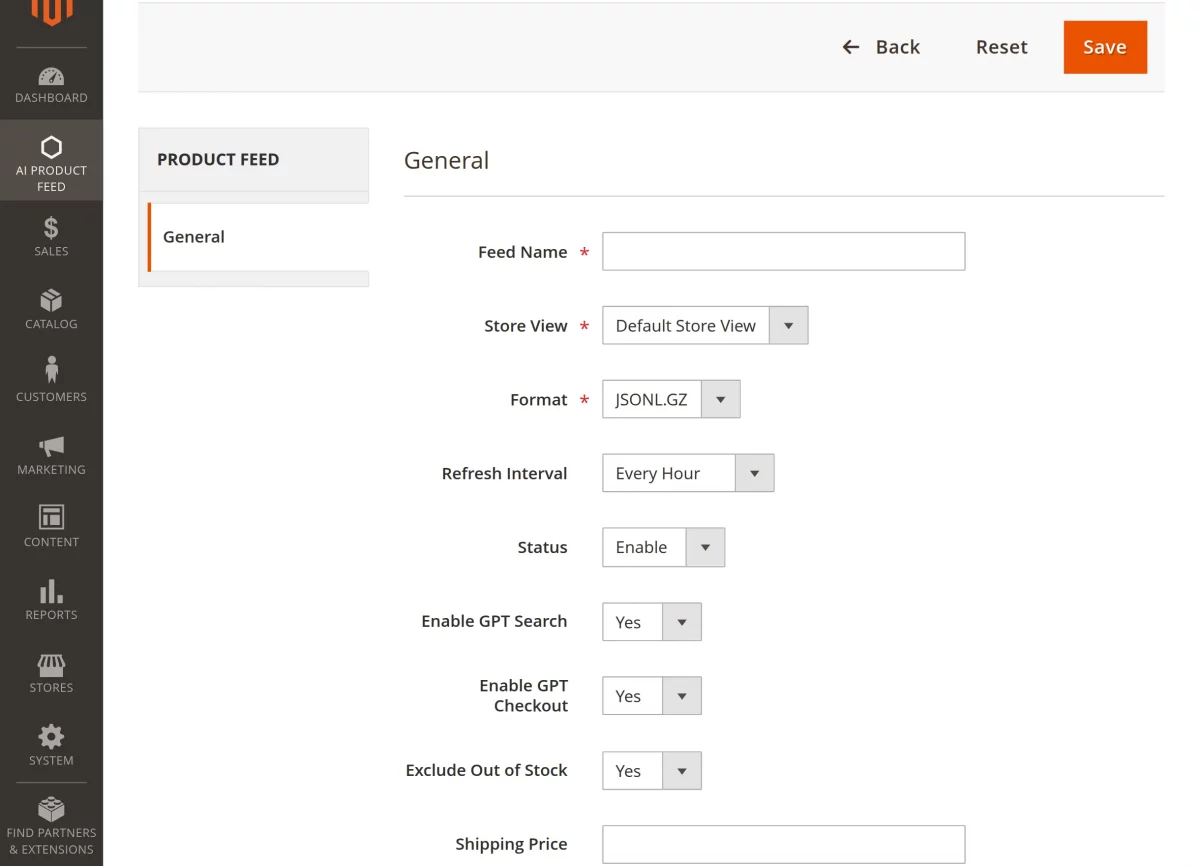
Feed Name: Enter a unique name to identify the product feed for AI platforms.
Store View: Select the store view for which the product feed will be generated.
Format: Choose the output format of the feed (e.g., JSONL.GZ or CSV.GZ).
Refresh Interval: Set how often the feed should be automatically updated (e.g., hourly, daily).
Status: Select Yes or No to enable or disable the product feed.
Enable GPT Search: Select Yes or No to allow AI platforms to search products from this feed.
Enable GPT Checkout: Select Yes or No to allow AI-driven checkout using this feed.
Exclude Out of Stock: Select Yes or No to remove out-of-stock products from the feed.
Shipping Price: Enter the default shipping price used in AI-based checkout calculations.
After configuring the feed details, click the Save button to generate and store the product feed.
Once saved, a confirmation message is displayed indicating that the product feed has been successfully created or updated.
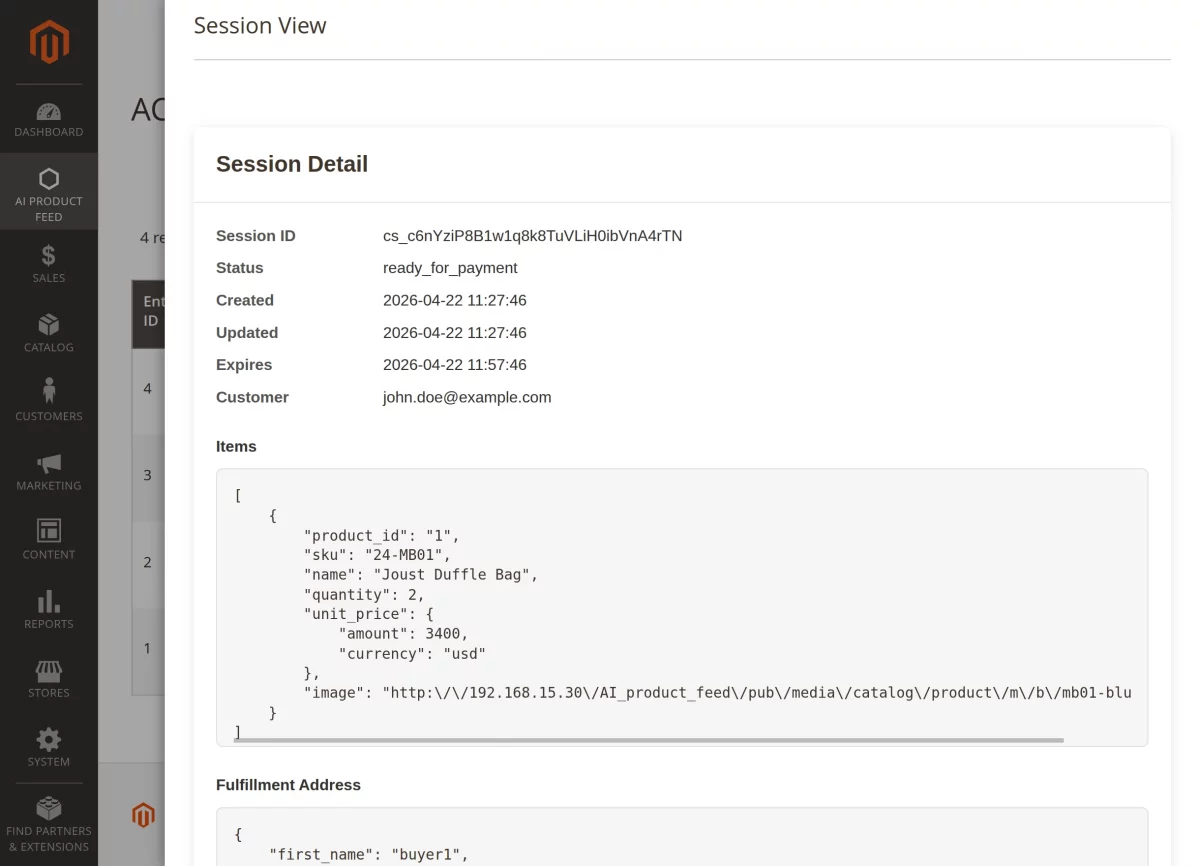
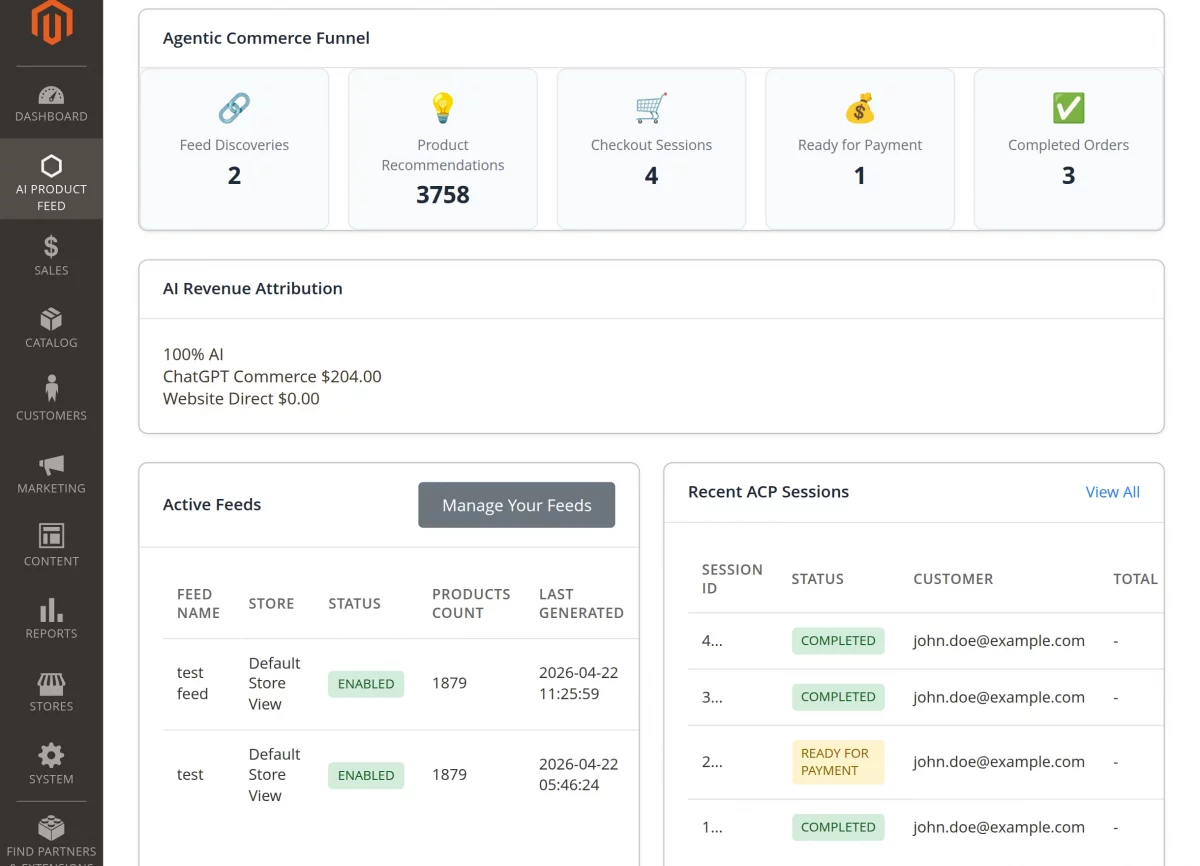
ACP Sessions
Under this section, the admin can view and manage all Agentic Commerce Protocol (ACP) checkout sessions initiated through AI platforms.
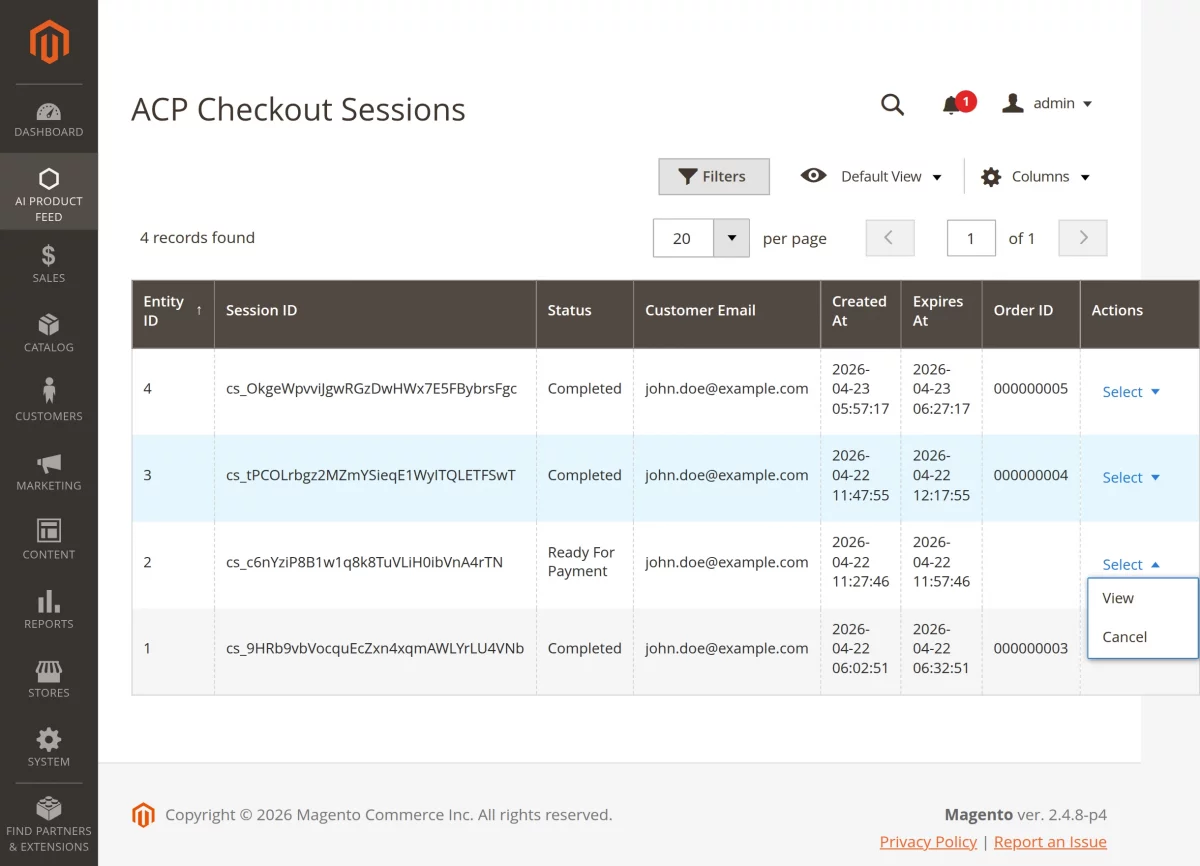
Here, the admin can track active, completed, and failed sessions to monitor AI-driven checkout activity in real time.
Each session displays key details such as session ID, customer interaction, cart status, and payment progress.
The admin can view session details by clicking on Action → View for any session.
The admin can cancel a session by clicking on Action → Cancel for any session.
This section helps the admin analyze AI shopping behavior and ensure smooth conversational checkout execution.
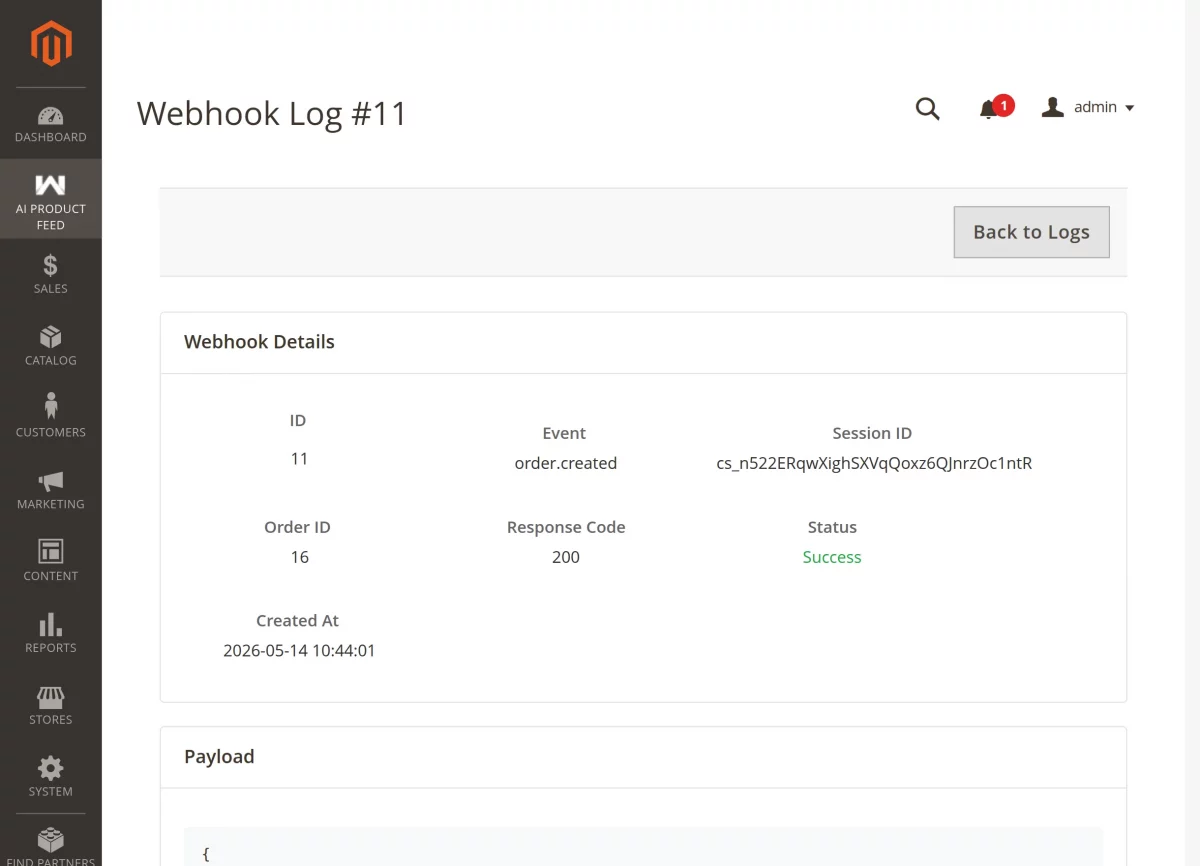
Webhook Logs
This section displays all webhook activities and helps monitor how the system sends secure real-time notifications to external services when AI product feed events occur.
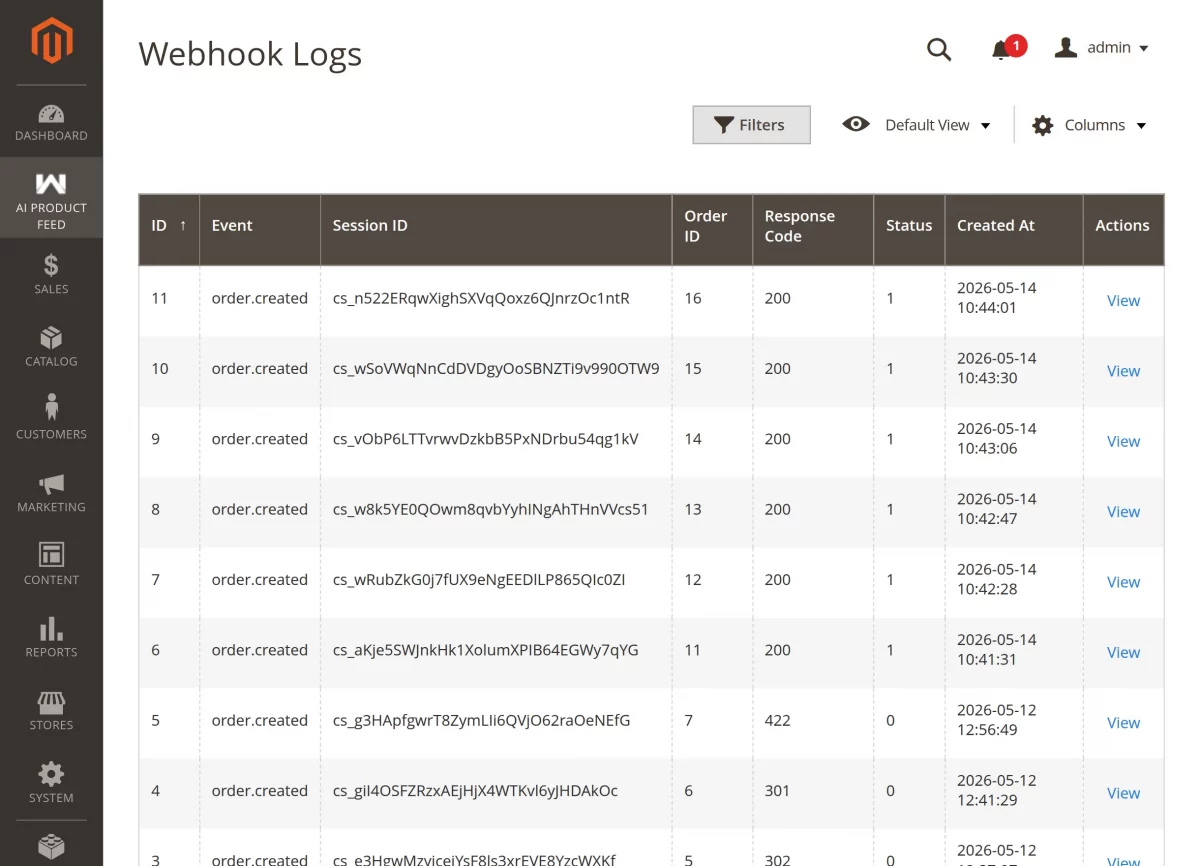
To see details about a single transaction, click the View button in the list to open the full log.
This section is vital for developers and store owners to verify the Payload—the raw JSON data sent by the AI agent.
Security Validation
This section verifies system security and ensures all required configurations are properly set for AI-powered commerce operations.
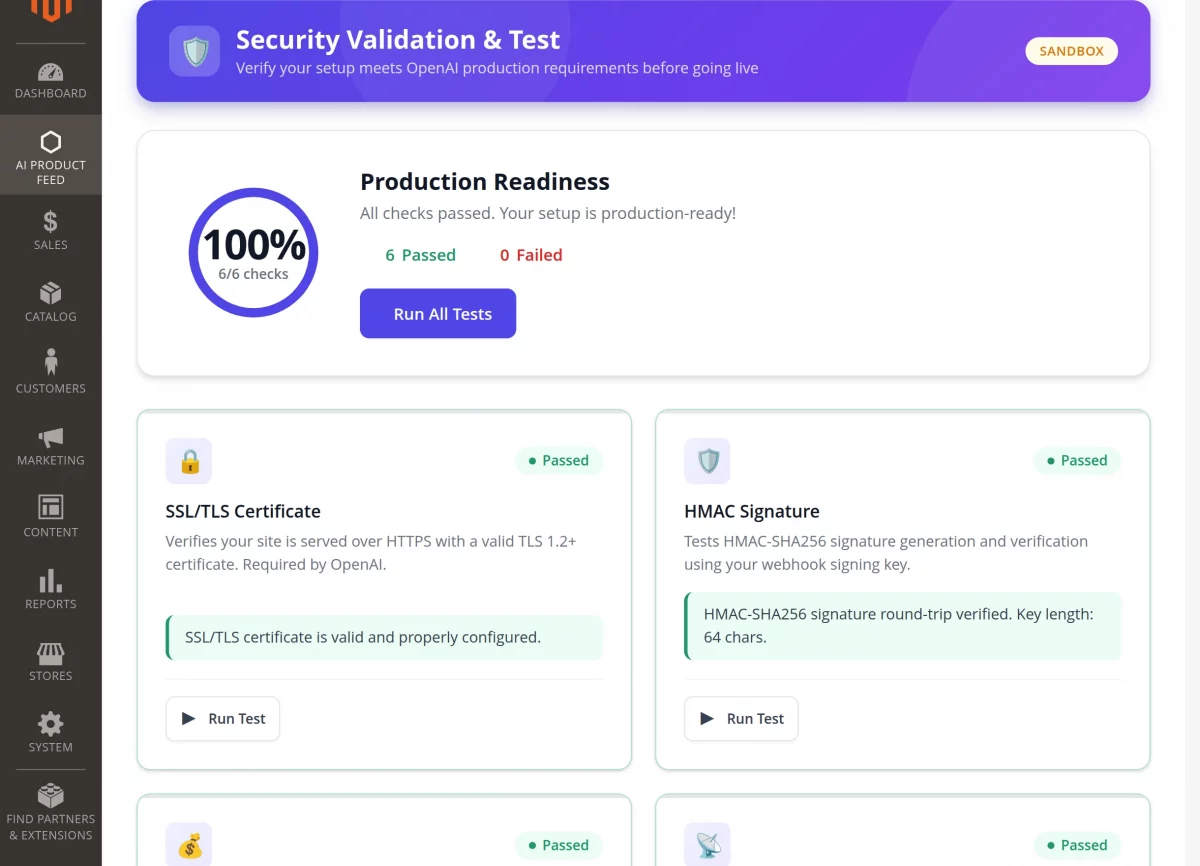
Here, the admin can check SSL status, HMAC signature validation, and API connectivity to confirm secure communication.
It helps identify configuration issues and ensures the system is ready for reliable and secure AI interactions.
Dashboard
This section provides a centralized overview of AI-driven commerce performance across the store.
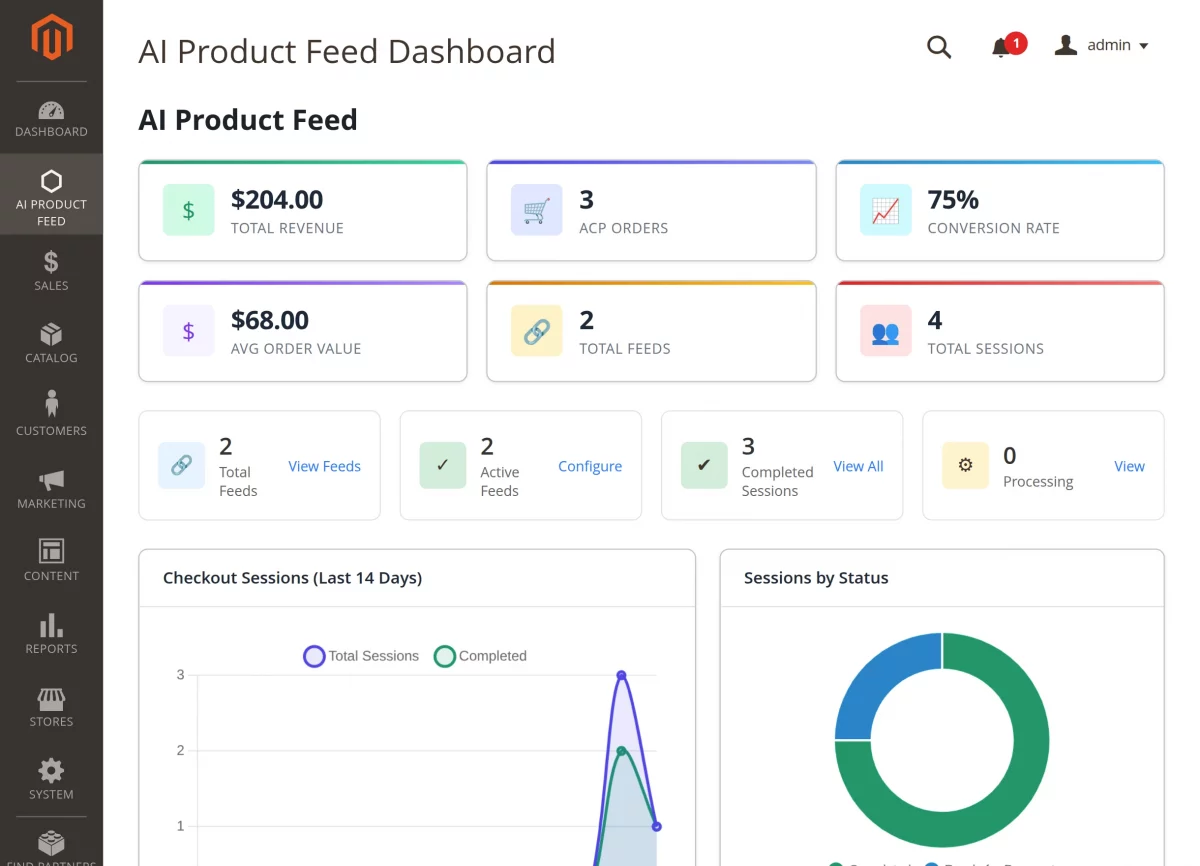
Here, the admin can monitor key metrics such as total AI-generated revenue, number of ACP sessions, and conversion rates from AI interactions.
It also highlights feed activity and overall engagement, helping track how customers discover and purchase products through AI platforms.
The admin can also manage product feeds directly from this section for quick access and control.
This section helps analyze performance trends and make data-driven decisions to optimize AI-powered shopping experiences.
Support
So, that’s all for Magento 2 AI Product Feed.
If you have any questions, suggestions, or customization requests, feel free to contact us at [email protected] or submit a ticket at webkul.uvdesk.com.
Please explore our Magento Development Services and Quality Magento 2 Extensions.
Current Product Version - 4.0.0-p1
Supported Framework Version - Magento 2.0.x, 2.1.x, 2.2.x,2.3.x, 2.4.x

Be the first to comment.