Magento 2 Age Verification extension, is a must-needed module for the store owner who wants to sell the products to a particular age group of customers.
With the help of Magento 2 Age Verification extension, the admin can restrict the users to access the store from the store category, cms pages, and the product page. Then a pop-up will show to the user to confirm the age.
Now, the users can easily confirm the age by providing the date of birth then access the restricted page easily.
Check the plugin overview in the video mentioned below –
Features
- The admin can upload custom image for the pop-up.
- The admin can manage the pop-up contents.
- The admin can choose from various methods to verify users’ age, such as a checkbox, date of birth input, or yes/no button.
- The admin can enter the custom text for Enter and Leave buttons.
- The admin can set the Leave button URL.
- The admin can enable or disable the display of the age verification popup on products, categories, or CMS pages globally.
- The admin can select or deselect CMS pages where the age verification popup will be displayed.
- The admin has option to enable or disable the display of the age verification popup on individual products, categories, or CMS pages.
- Customizable design – width, button color, background color, text color.
- This Extension is Hyva storefront compatible.
- The extension also supports GraphQL APIs.
Installation
Customers will get a zip folder then they have to extract the contents of this zip folder on their system. Then, the extracted folder has an src folder, inside the src folder you have the app folder.
You need to transfer this app folder into the Magento2 root directory on the server as shown below.

After the successful installation, then you have to run these commands in the Magento2 root directory.
php bin/magento setup:upgrade
php bin/magento setup:di:compile
php bin/magento setup:static-content:deploy
php bin/magento indexer:reindex
php bin/magento cache:flush
Language Translation
For translating the module language, navigate through src/app/code/Webkul/AgeRestriction/i18n then edit the en_US.csv file.
Now rename the CSV as “en_SA.csv” and translate all right side content after the comma in the Arabic language. Then after editing the CSV, save it.
Now upload the file to the path src/app/code/Webkul/AgeRestriction/i18n which already have Magento2 installed, on the server.
Now the module will be translate into the Arabic Language which supports RTL & LTR languages.

Module Configuration
The admin can configure the module from the back-end easily. To configure the module, the admin can navigate to Stores> Configuration> Age Verification

You can also access the initial configuration by navigating Age Verification->Configuration Settings

Here, the admin can-
- Enable or Disable the module from the back-end.
- Upload the image to show on the front end on the pop-up screen.
Content:
In the content section, the admin can-
- Enter the title for the pop-up
- Enter the pop-up content title/ Description
- Select the method to verify user age-
The admin can select the different type of method to verify the user age as: Date of Birth, Checkbox Option, and Yes/No button - Select the format of date of birth.
- The will enter the age required for the age confirmation
- The text which will be shown on the button
- Enter the text for the leave button.
- Enter the url for the leave button.
- Enter Cookie Lifetime in days.
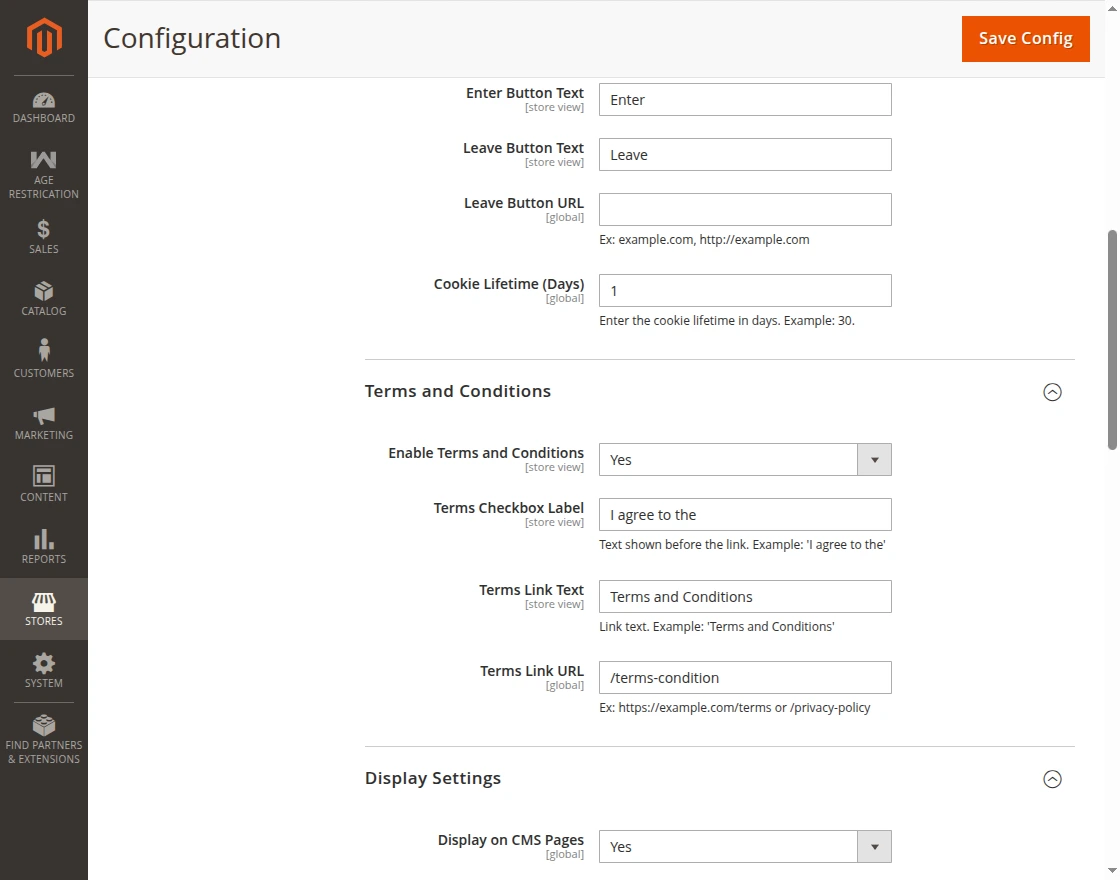
Terms and Conditions: Admin can manage terms and condition related settings under this section.
- Enable Terms and Conditions – Enable this option to show the Terms and Conditions checkbox to customers.
- Terms Checkbox Label – Enter the text displayed before the Terms and Conditions link, such as “I agree to the”.
- Terms Link Text – Enter the clickable text for the Terms and Conditions link, such as “Terms and Conditions”.
- Terms Link URL – Enter the URL that customers will be redirected to when they click the Terms and Conditions link. You can use a full URL or a store-relative URL, such as
/privacy-policy.
Display Setting: In the display section, the admin can configure the module where the age restriction should be applied then-

- Select yes, if you want to apply age restriction on CMS Pages and after that, the admin can select the CMS pages where he want to apply age restriction.
- The admin can select if, the age verification should be applied on the Categories
- The admin can decide if, the age verification should be applied to the Products.
Design: The admin can set the design for the pop-up. Here, the admin can-
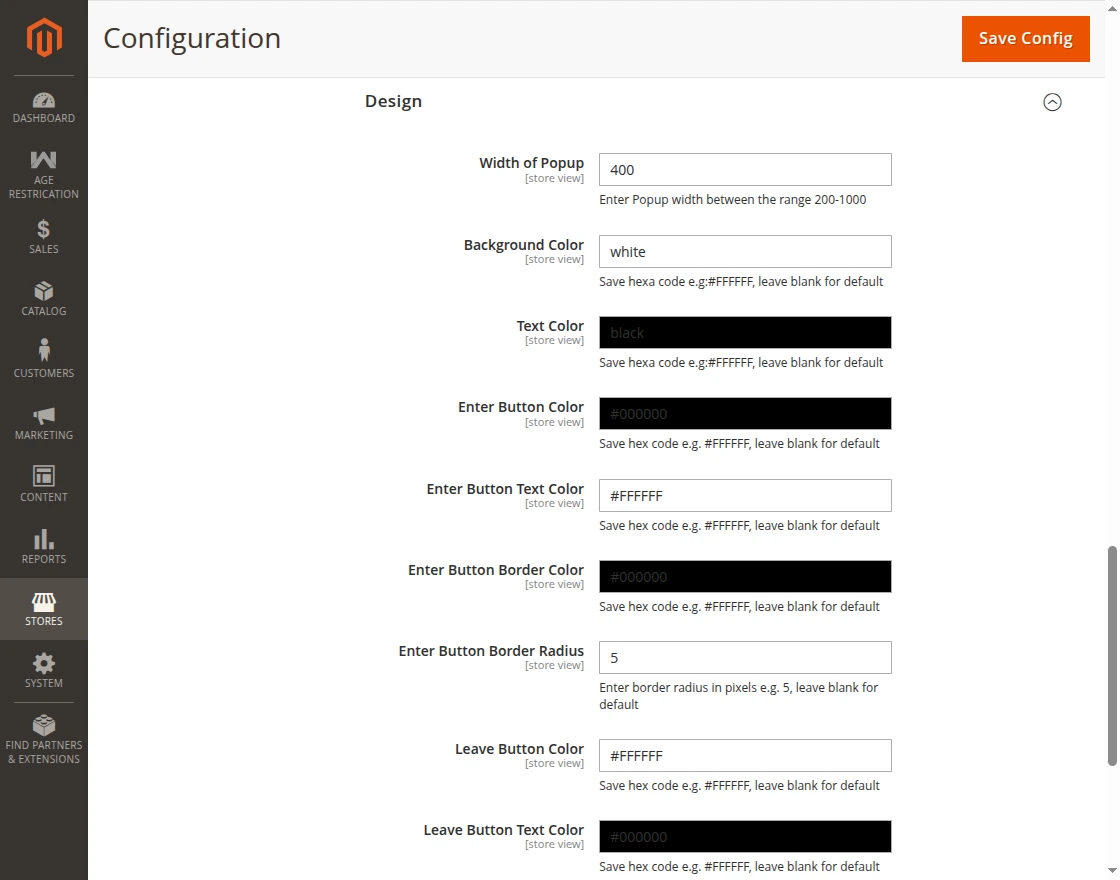
Age verification on the product page
The admin can enable or disable the age verification on the product page. To manage the age verification on the product page the admin can navigate to catalog> products

Now select the product for which the admin wants to enable the age verification then click on the edit button as shown in the image below-

Now the admin can enable or disable the age verification then click on the save button as shown in the image below-

Age verification on the category page
The admin can enable or disable the age verification on the category page. To manage the age verification on the category page, the admin can navigate to catalog> categories

Now the admin can select the category for which the admin wants to enable or disable the module as shown in the image below-

Front-end view
Age Verification on the Product Page- When age verification is applied to the product page, the customer can’t access to that product page until the customer verifies the age according to the applied age restriction.
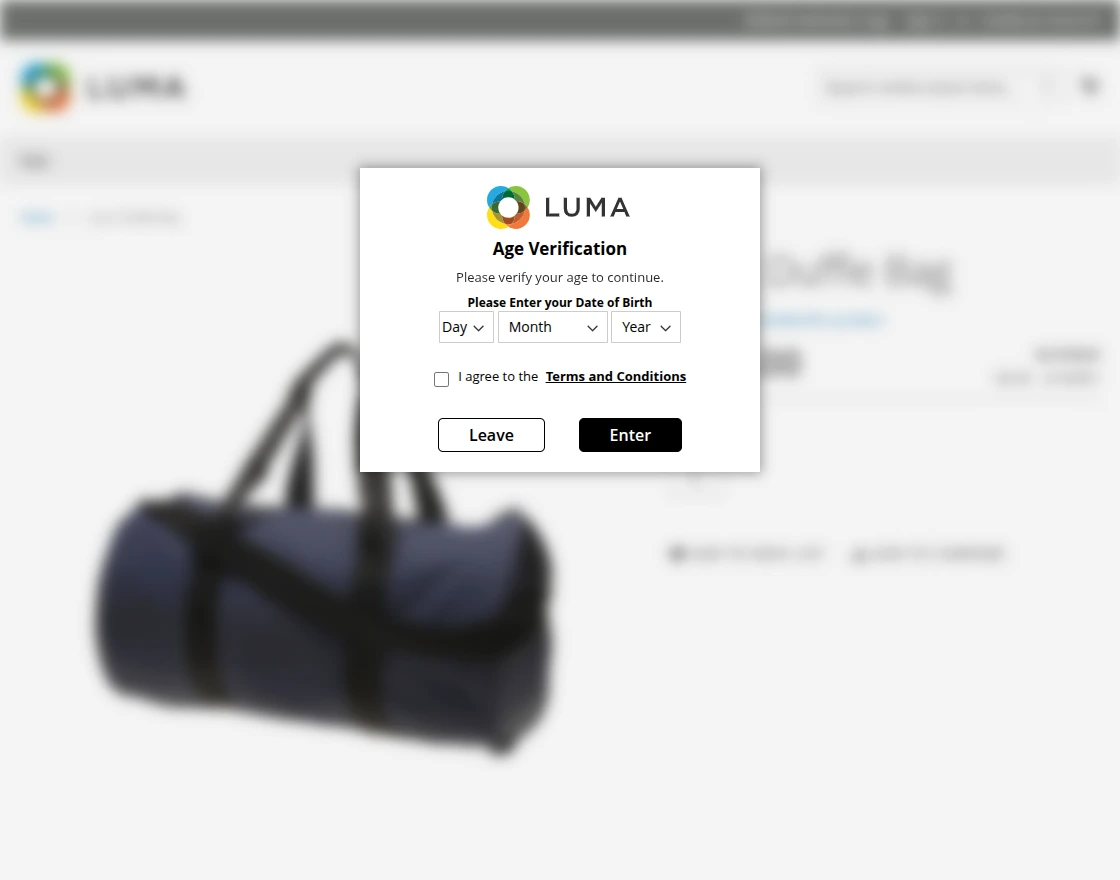
After verifying the age, the customer can access that product page then shop for that particular product too.

If the customer clicks on the Leave button, then the customer will be redirected to the URL which is set by the admin.

Note: The layout of the age verification pop-up will change in terms of Content and Design, according to the select Store View but the method will remain same.

Age Verification on the Cateogy Page
Now, when the age verification is apply to the category page then the customers will not be able to access that category page until the customer verify the age-

After verifying the age according to the set by the admin, the customer can access to that particular category-

If the customer clicks on the Leave button, the customer will be redirect to the URL which is set by the admin.
Age Verification on the CMS Pages
Not only category, product, but also cms pages can be restrict using this module. The admin can apply the age verification for the cms pages too.

That’s all for Age Verification For Magento2. Still, have any issues please raise a ticket or get back to us at [email protected]
Current Product Version - 5.0.4
Supported Framework Version - Magento 2.0.x, 2.1.x, 2.2.x,2.3.x, 2.4.x

Be the first to comment.