Laravel eCommerce SaaS Delivery Time Slot lets every tenant of your Bagisto SaaS store offer a delivery date and time window at checkout.
Each tenant builds its own delivery calendar. Moreover, nothing a tenant creates is ever visible to another tenant on the same installation.
Customers pick a convenient day and window while placing the order. Afterwards, they can see that choice again in their order history.
Check a brief overview the plugin –
Features
- Every tenant manages its own delivery days, time windows and bookings
- Generate several time windows for any date from a single screen
- Copy a whole day’s windows onto another date in one step
- Set a booking quota for each window, so a slot stops being offered once it fills
- Set the minimum days required in order processing before a delivery date
- Activate or deactivate several windows together through a mass action
- Maintain serviceable zip code ranges per tenant
- Customers check delivery availability for their zip code on the product page
- Customers choose a date and a time window during checkout
- A window that already has bookings cannot be deleted by mistake
- Slots, zip codes and delivery orders stay separate for every tenant
- The super admin gets a module information panel and plan level control
Installation
Unzip the respective extension zip and then merge “packages” folder into the project root directory.
This extension needs the base Bagisto Delivery Time Slot package as well, so merge both packages before continuing.
Goto bootstrap/providers.php file and add the following lines.
Webkul\DeliveryTimeSlot\Providers\DeliveryTimeSlotServiceProvider::class,
Webkul\DeliveryTimeSlotSaas\Providers\DeliveryTimeSlotSaasServiceProvider::class,
Both entries must sit after the SAASCustomizer service provider, otherwise the tenant behaviour will not apply.
Goto composer.json file and add following lines under ‘psr-4’.
"Webkul\\DeliveryTimeSlot\\": "packages/Webkul/DeliveryTimeSlot/src",
"Webkul\\DeliveryTimeSlotSaas\\": "packages/Webkul/DeliveryTimeSlotSaas/src"
Next, goto config/concord.php file and add the following line under the ‘modules’ array.
Webkul\DeliveryTimeSlot\Providers\ModuleServiceProvider::class,
Finally, run these commands below to complete the setup.
composer dump-autoload
php artisan saas-delivery-time-slot:install
The install command migrates the tables, publishes the assets and clears the cache in one go.
That’s it, now just execute the project on your specified domain.
Step-by-Step: Installing the Extension
- Unzip both extension archives and merge the packages folder into your project root.
- Open bootstrap/providers.php and register both service providers after SAASCustomizer.
- Open composer.json and add the two PSR-4 autoload entries.
- Open config/concord.php and add the Delivery Time Slot module service provider.
- Run composer dump-autoload from the project root.
- Run php artisan saas-delivery-time-slot:install to finish the setup.
Tenant Subscription
Before a tenant can use the module, it needs an active subscription plan. Otherwise every admin route redirects to the subscription overview.
The tenant opens Billing >> Plans and chooses a plan as shown below:-
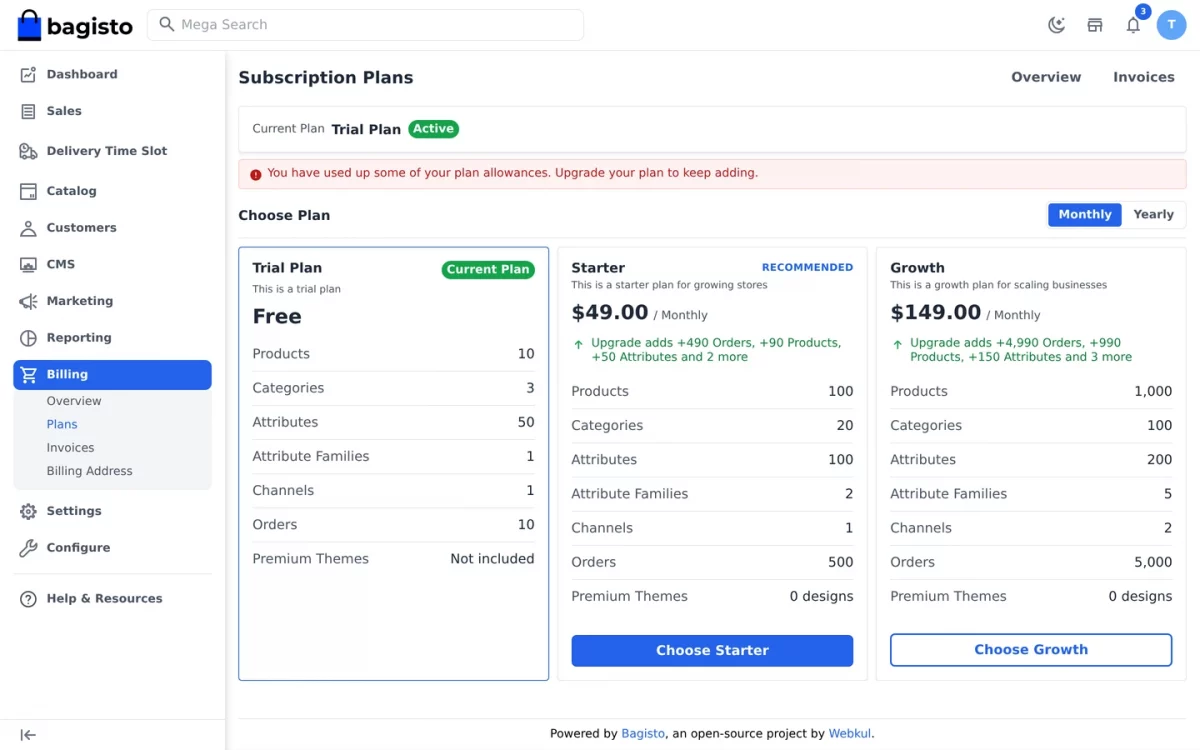
The super admin can also decide which plans include this extension, so delivery slots become a paid feature when required.
Step-by-Step: Activating a Plan
- Log in to the tenant admin panel.
- Go to Billing >> Plans from the left sidebar.
- Review the listed plans and their allowances.
- Click Choose on the plan you want to activate.
- Confirm the plan now appears under Billing >> Overview.
Module Configuration
To configure the module the admin/tenant needs to navigate to the Configure >> Delivery Time Slot >> Settings
Under the Delivery Time Setting section the admin/tenant can configure the module as shown in the image below:-
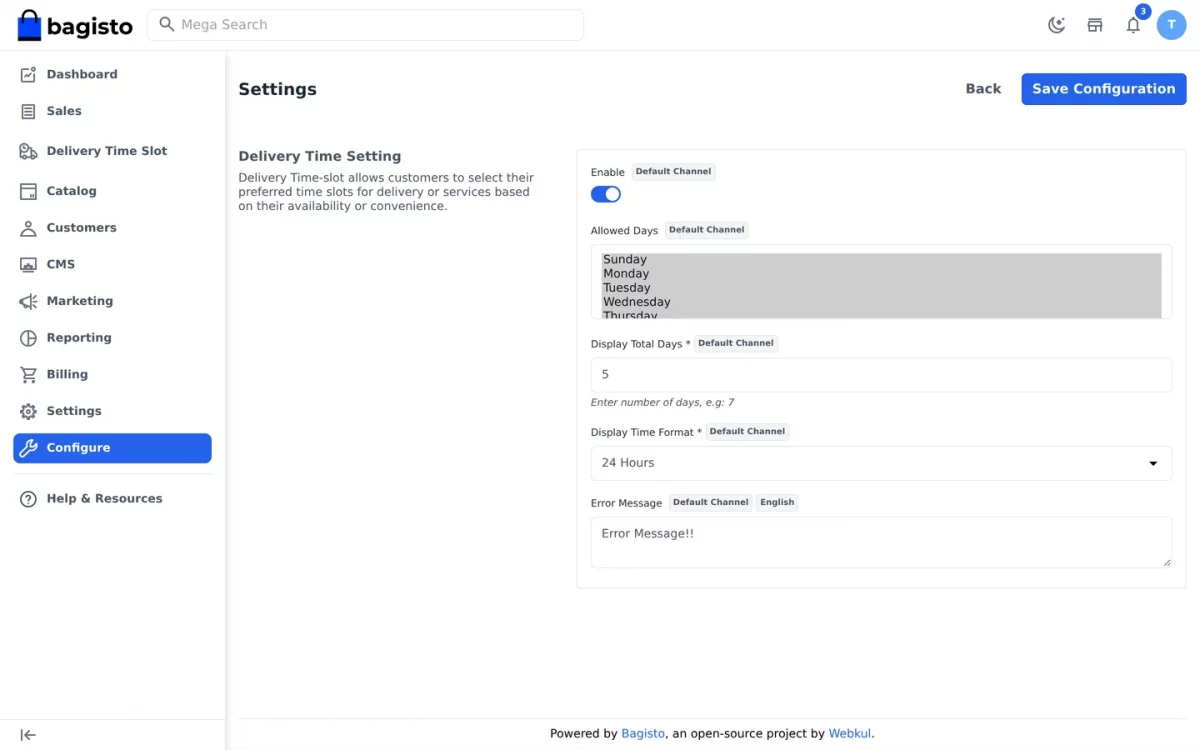
Enable:- The admin/tenant can enable or disable the module for their own store.
Allowed Days – Select the weekdays the store delivers on. Consequently, a window on any other weekday never reaches the checkout page.
Display Total Days – Enter how many delivery dates to display at checkout. For example, a value of five shows the next five dates that actually have windows.
Display Time Format – Choose whether the windows appear in a 12 hour or a 24 hour format.
Error Message – Enter the message that will be visible if there is no time slot available.
Saving this form also adds the Delivery Time Slot entry to the sidebar menu, where the tenant manages the slots.
Step-by-Step: Configuring the Module
- Go to Configure in the tenant admin sidebar.
- Open the Delivery Time Slot settings group.
- Turn the Enable switch on.
- Select the weekdays under Allowed Days.
- Enter a value in Display Total Days and pick a Display Time Format.
- Write an Error Message, then click Save Configuration.
Default Delivery Time Slots
Now the admin/tenant needs to navigate to the Delivery Time Slot that is available in the sidebar menu as shown below:-
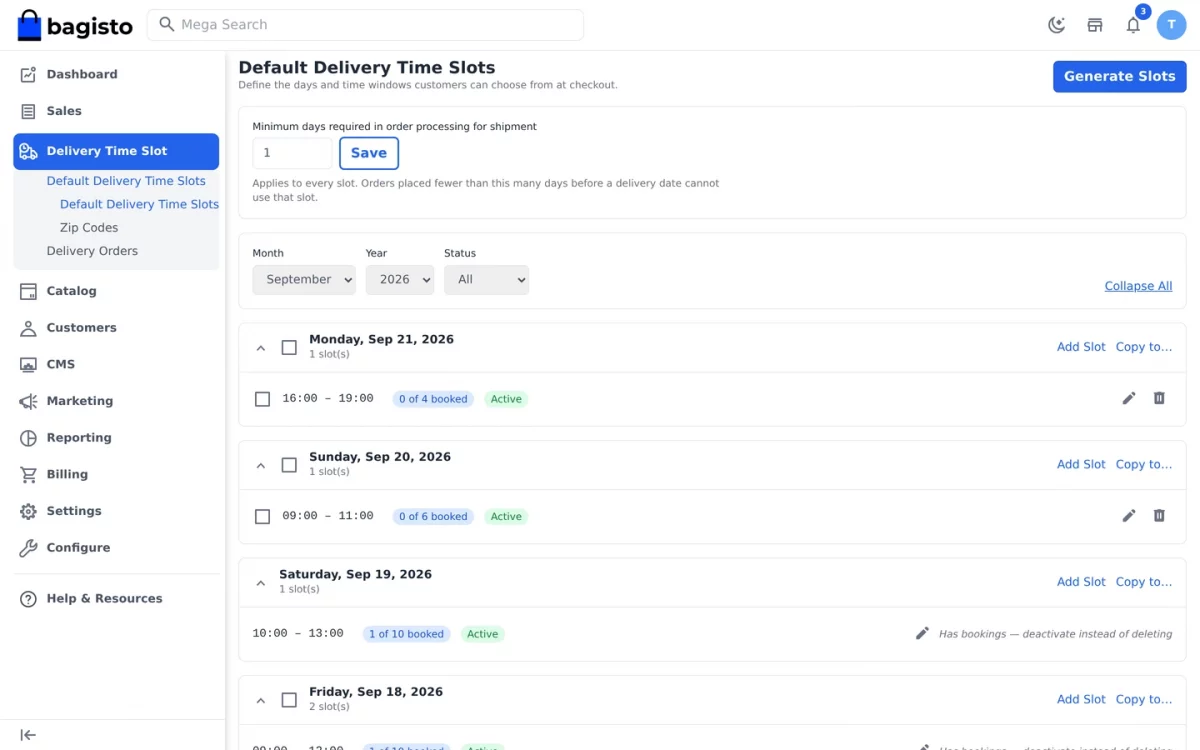
In the Minimum days required in order processing for shipment field, the tenant sets how much notice each order needs.
Above the list, the Month, Year and Status filters narrow the view. In addition, Expand All opens every date group at once.
Each date group shows its windows with the time range, the booking count and the status. Furthermore, Add Slot appends another window to that same date.
A window that already has orders against it shows Has bookings — deactivate instead of deleting, so a customer never loses a booked slot.
To create windows for a new date, the tenant clicks the Generate Slots button as shown below:-
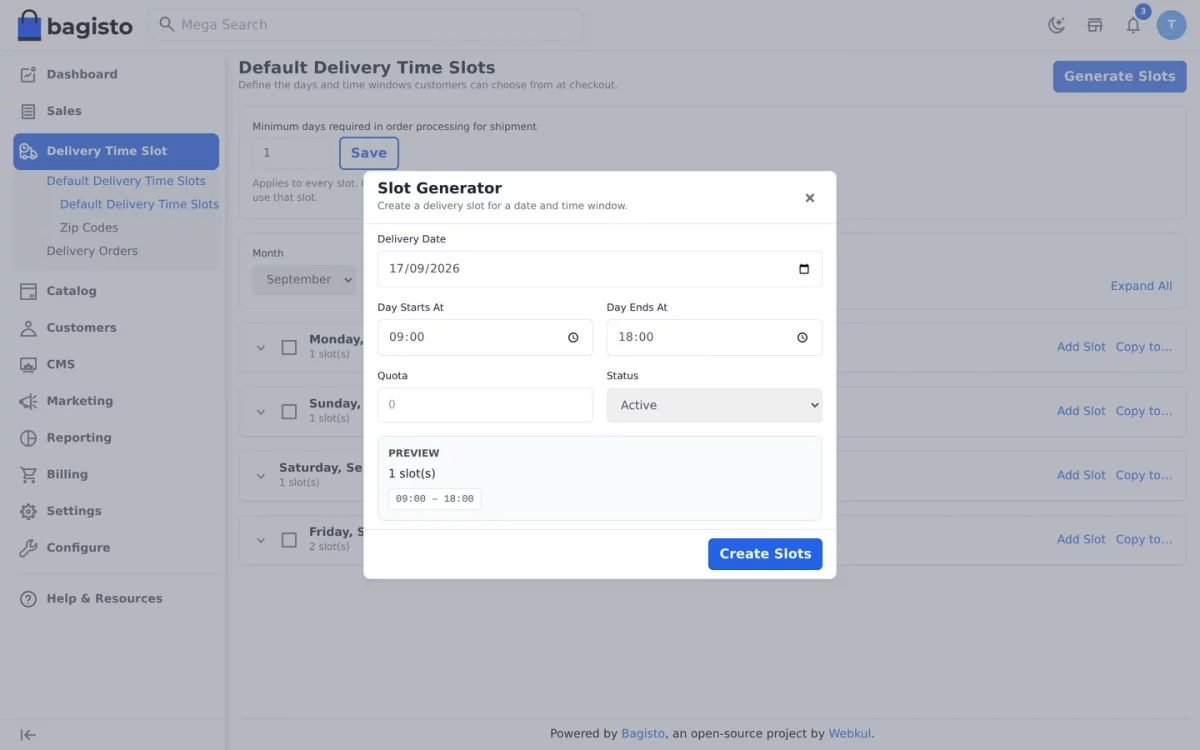
The generator takes a date, a start and end time, and a quota. Additionally, it rejects any window that overlaps another on the same date.
Step-by-Step: Creating Delivery Slots
- Open Delivery Time Slot >> Default Delivery Time Slots.
- Click the Generate Slots button at the top right.
- Pick the delivery date in the dialog.
- Enter the start time, the end time and the booking quota.
- Click Create Slots and wait for the confirmation message.
- Use Add Slot on the date group to append a second window, or Copy to… to reuse the whole day elsewhere.
Zip Codes
Each tenant also maintains the areas it delivers to. Therefore, the Zip Codes screen lists the serviceable ranges as shown below:-
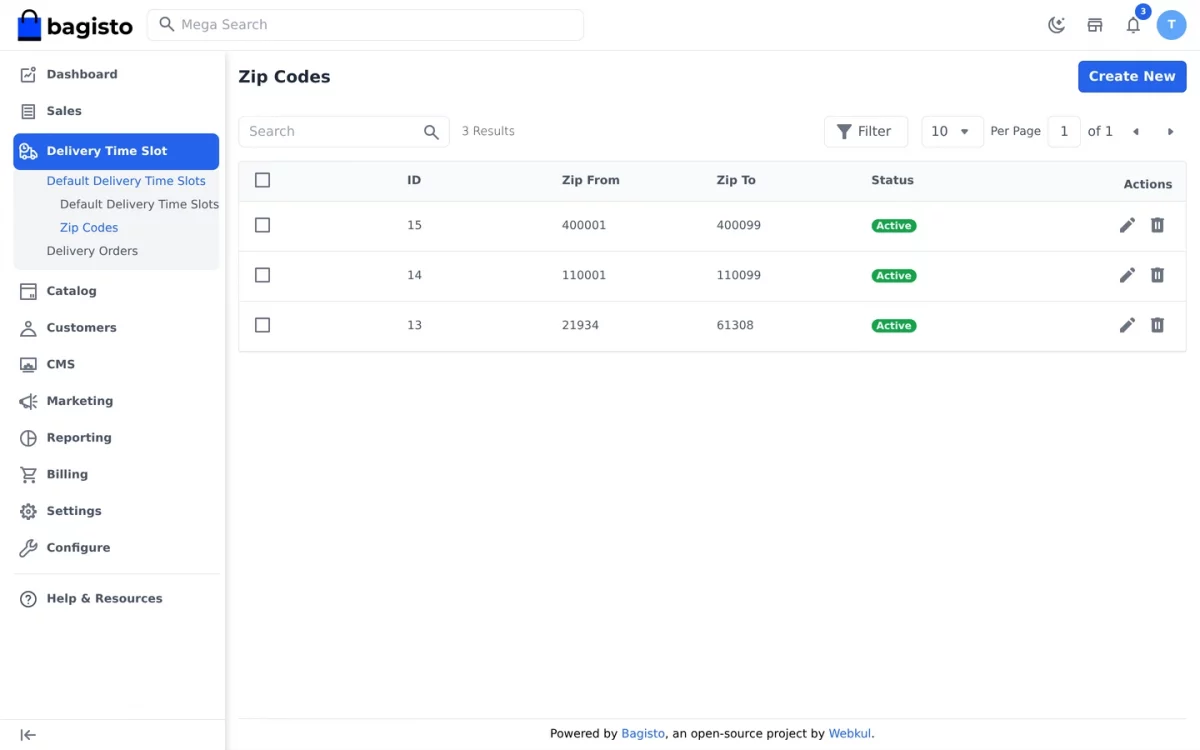
A range added here belongs to that tenant only. As a result, one tenant editing its areas never changes delivery availability for another.
To add a range the tenant clicks Create New and fills the short form shown below:-
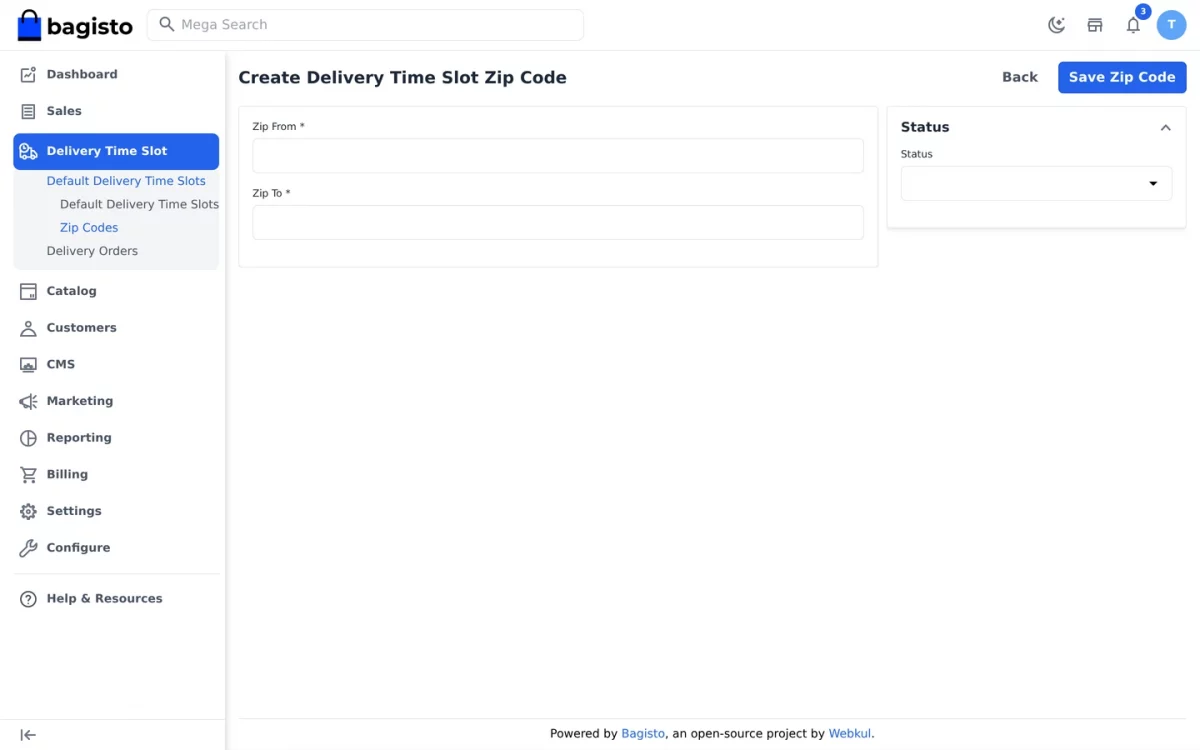
Zip From and Zip To define the range, while Status decides whether it is active.
Step-by-Step: Adding a Zip Code Range
- Open Delivery Time Slot >> Zip Codes.
- Click the Create New button.
- Enter the starting value in Zip From.
- Enter the ending value in Zip To.
- Set Status to Active.
- Click Save Zip Code to store the range.
Delivery Orders
Under this the admin/tenant can find all the orders that have made by the customers as shown below:-
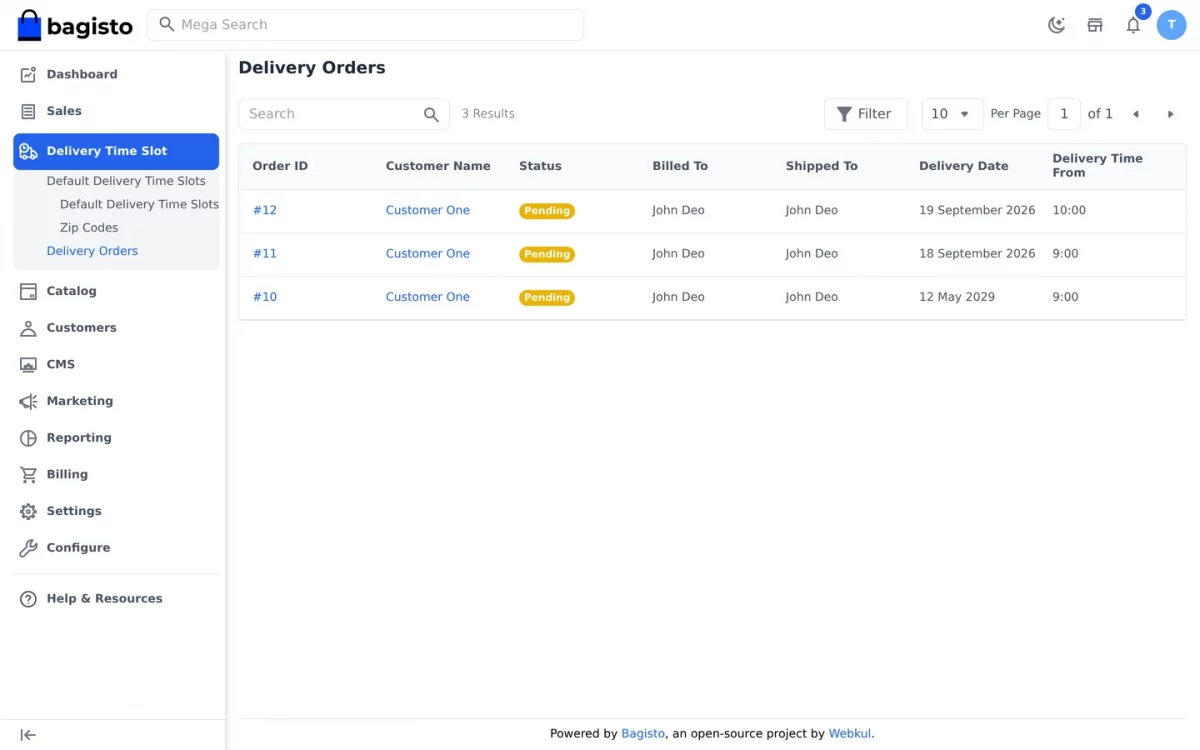
The grid lists the order, the customer, the status and the booked delivery date with its time range. Moreover, the list is filterable and searchable.
By clicking on the Order ID the admin/tenant can see the details for the order as shown below:-
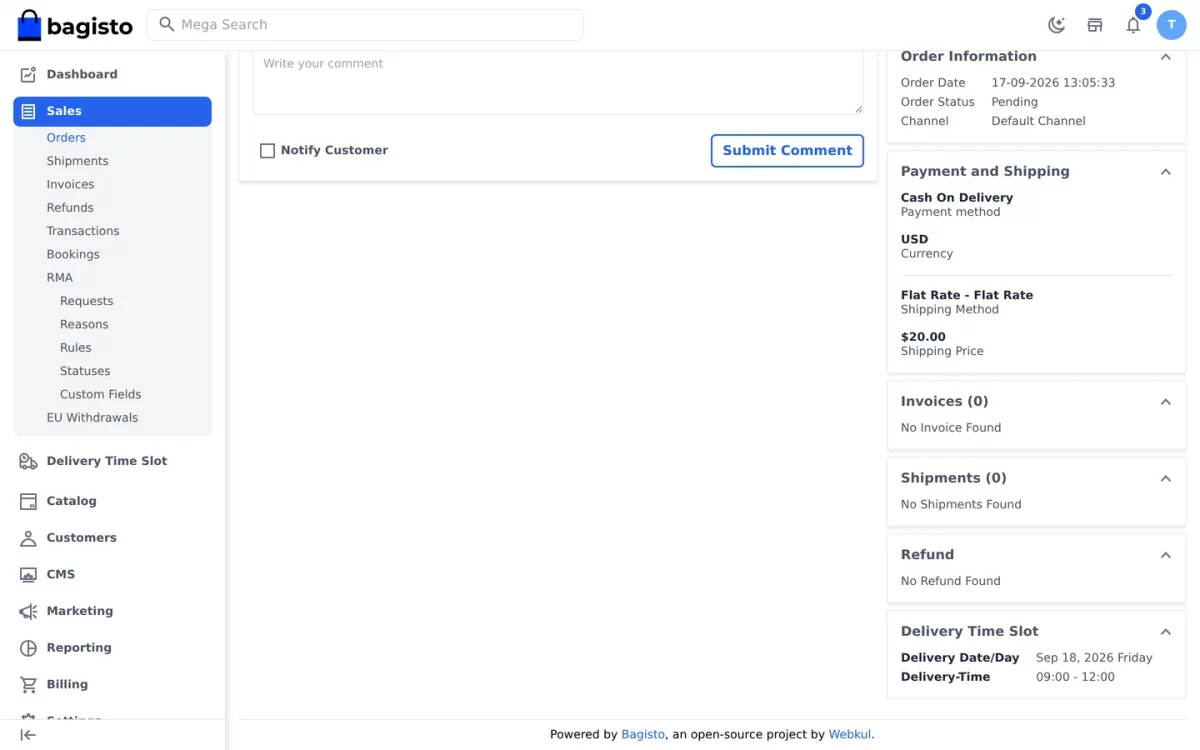
The slot appears beside the usual order information, so support staff can see the promised delivery window immediately.
Step-by-Step: Reviewing a Delivery Order
- Open Delivery Time Slot >> Delivery Orders.
- Use the Search box or the Filter panel to find an order.
- Check the Delivery Date and time columns on the row.
- Click the Order ID link to open the full order.
- Read the Delivery Date/Day block on the order view.
Super Admin View
The super admin gets a read only panel for the extension under Configure >> Sales >> Shipping Methods as shown below:-
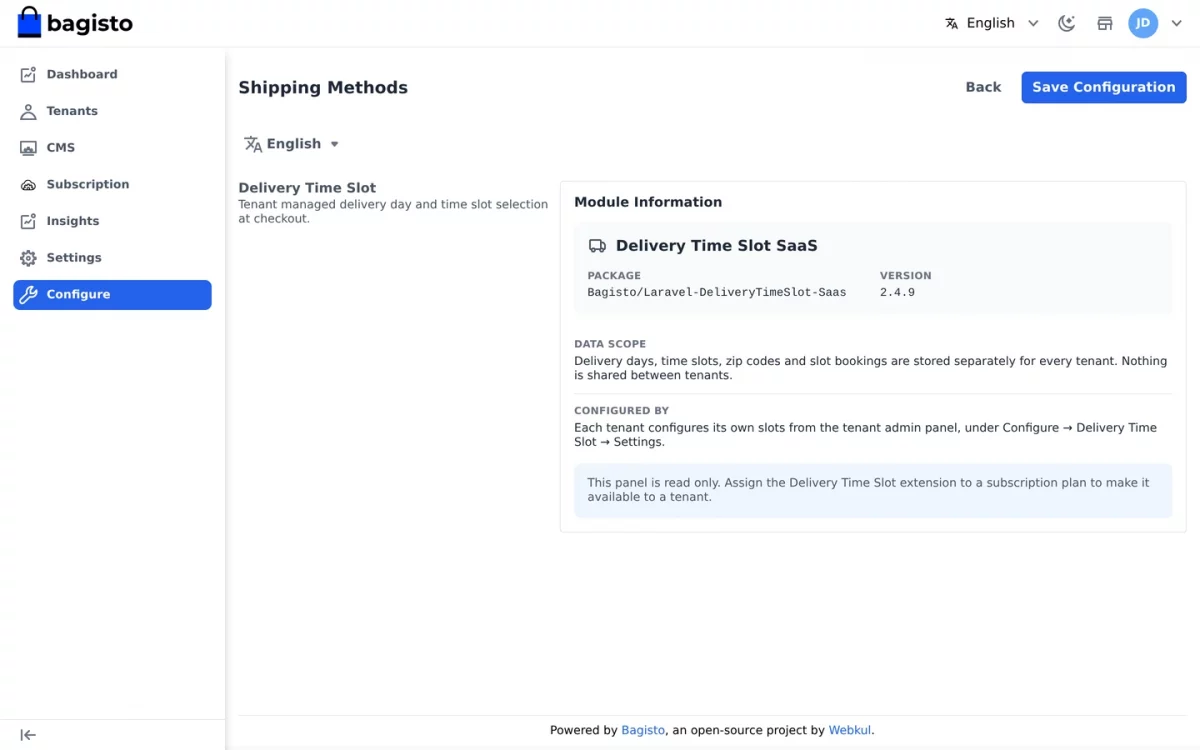
Module Information names the installed package and its version. Besides that, it states plainly how the module separates delivery data between tenants.
Nobody edits a tenant’s slots from this screen. Instead, each tenant configures its own calendar, which keeps the super admin out of tenant data.
Step-by-Step: Opening the Module Panel
- Log in to the super admin panel at /super/login.
- Click Configure in the sidebar.
- Open Sales >> Shipping Methods.
- Read the Delivery Time Slot module information panel.
Front End
On the product page, the customer can check whether the store delivers to their area before adding anything to the cart.
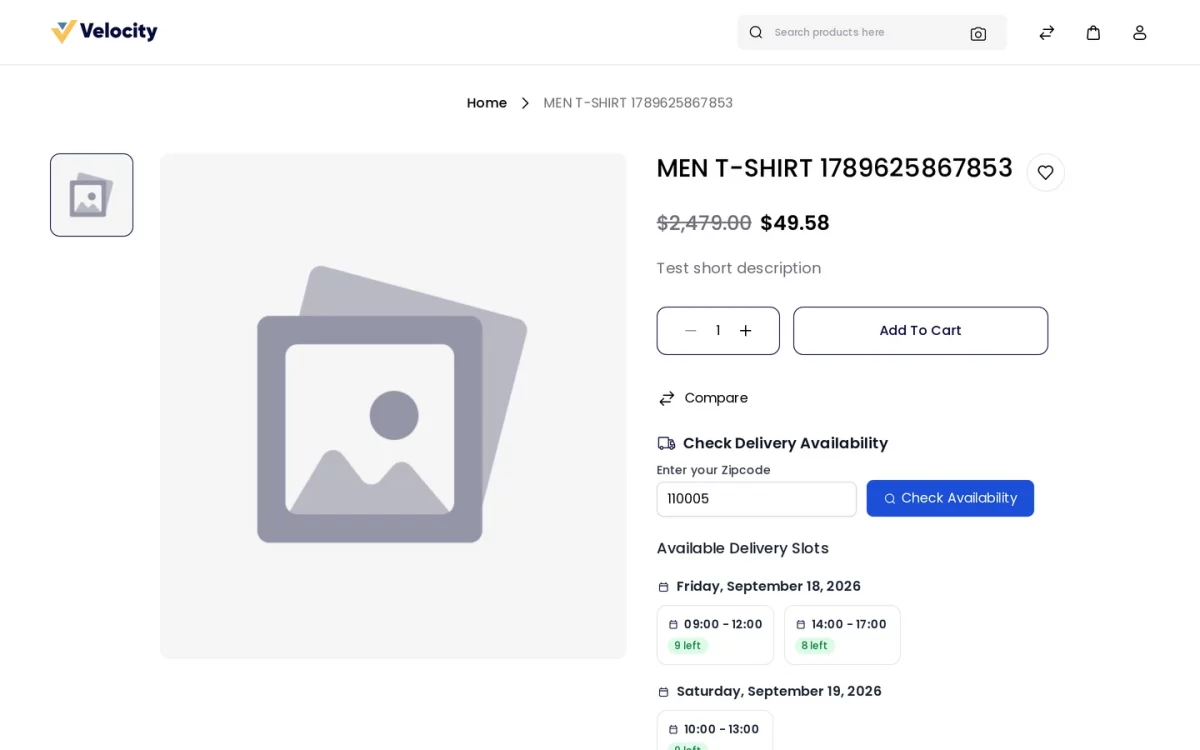
The customer enters a zip code and clicks Check Availability. Subsequently, the widget lists every window serving that area.
If the area falls outside every range, the widget says so instead of listing windows.
At the time of checkout, the customer will also be able to see the available delivery days and time slots as shown below:-
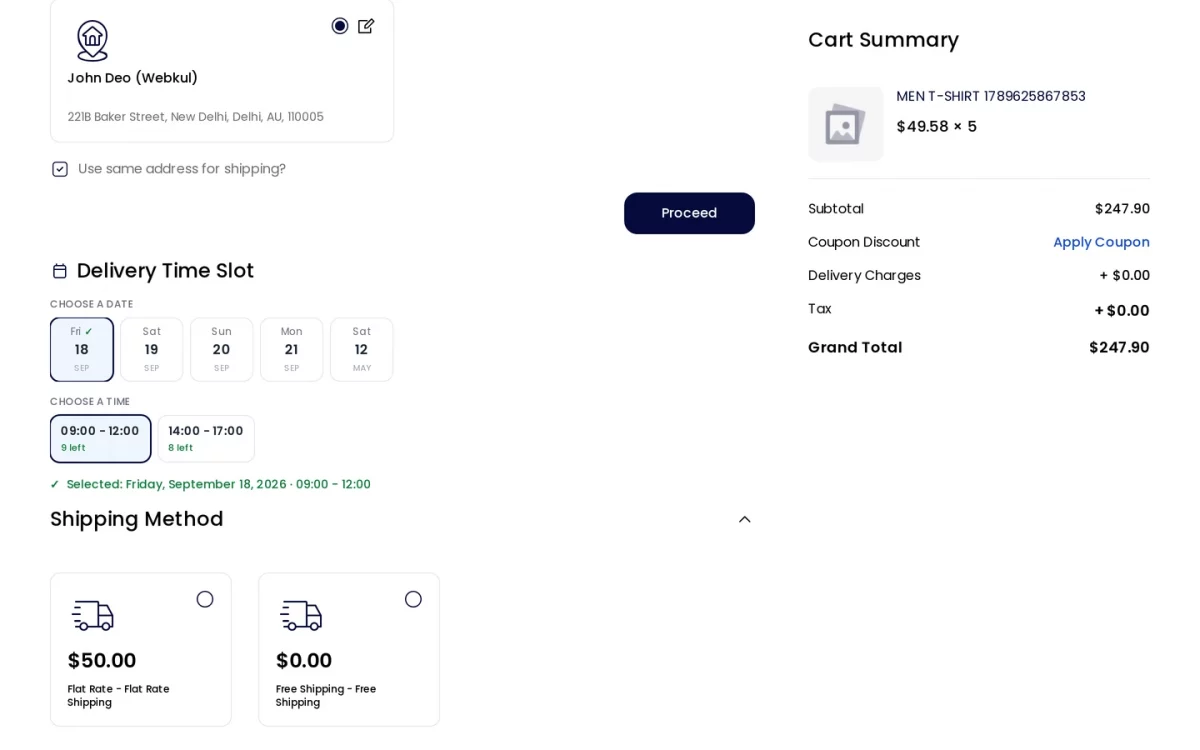
The picker appears above the shipping methods, so the customer chooses when they want delivery before deciding how it ships.
Each window shows how many bookings are left. Likewise, a window that already filled up appears greyed out and refuses selection.
**Note: The time slots will be unavailable in two conditions –
- Orders are full (i.e, if the quota set for each of the slots gets full).
- The delivery date falls inside the minimum days required in order processing set by the tenant.
After the order is placed, the customer can find it under their account as shown below:-
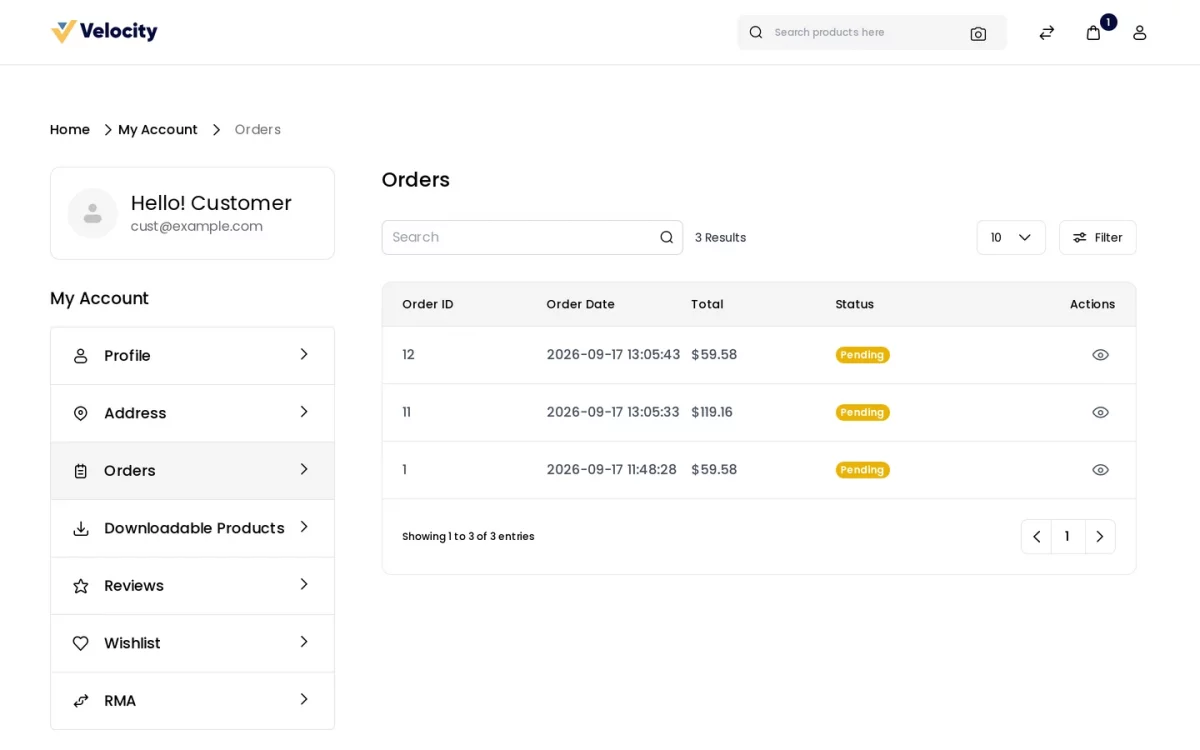
The customer will be able to see the delivery details under each order shown below.
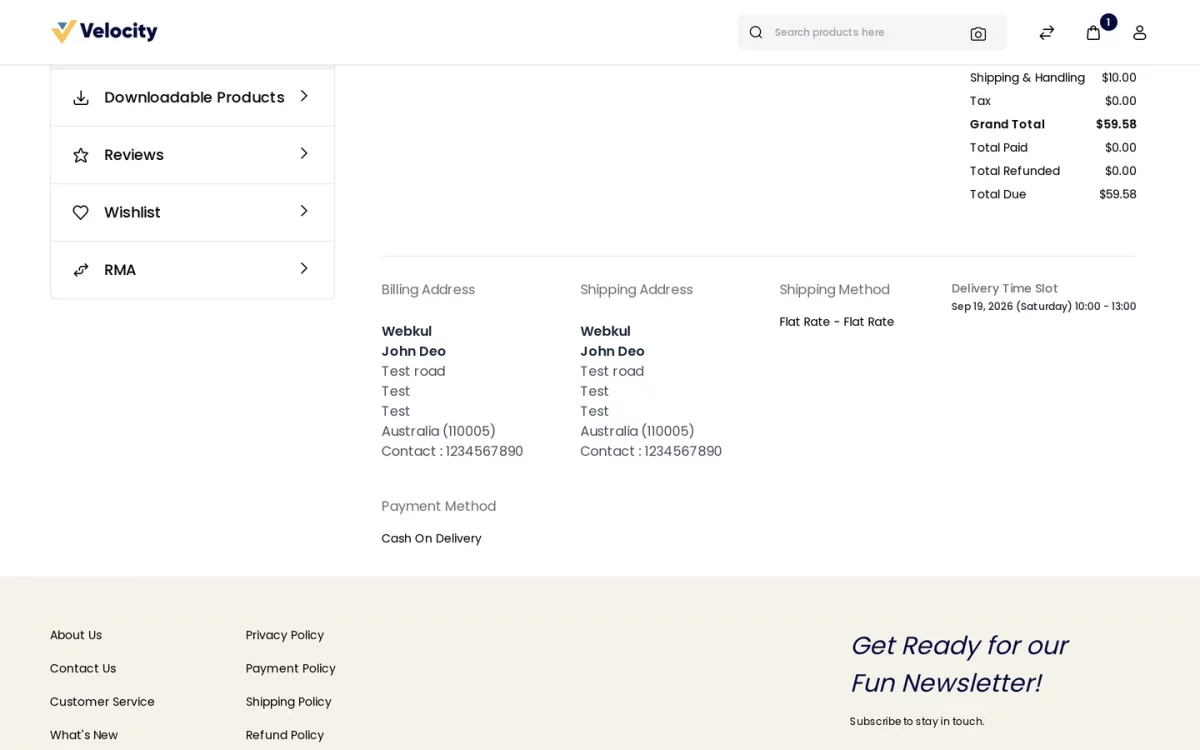
The chosen date and window sit next to the shipping method, which keeps the delivery promise visible after the purchase.
Step-by-Step: Booking a Delivery Slot
- Open a product on the tenant storefront.
- Enter a zip code and click Check Availability.
- Add the product to the cart and continue to checkout.
- Save or select a billing address, then click Proceed.
- Pick a date under Choose a date in the Delivery Time Slot block.
- Pick a window under Choose a time, then select a shipping and payment method.
- Click Place Order to confirm the booking.
Support
So, that was much about the User Guide of Laravel eCommerce SaaS Delivery Time Slot for any queries or doubts reach out to us at [email protected].
You can also raise a ticket at our HelpDesk System. Additionally, the developer documentation is available at Bagisto DevDocs.
Please explore our Laravel Development Services and Quality Bagisto Extensions.
Current Product Version - v2.4.9
Supported Framework Version - Bagisto v2.4.9

Be the first to comment.