The Laravel eCommerce PreOrder SaaS module lets every store on your Bagisto SaaS platform sell out-of-stock products.
Each company gets its own preorder settings, attributes and records, so tenant data never mixes.
Requirements of Laravel eCommerce PreOrder SaaS
This add-on needs the Bagisto SaaS (Multi-Tenant) platform installed first.
It builds on the base Laravel PreOrder module, which ships and installs together with it.
This release targets Bagisto v2.4.11, Bagisto SaaS v2.4.11.0 and PreOrder v2.4.11.0.
Feature List of Laravel eCommerce PreOrder SaaS
- Allows the preorder feature for out-of-stock Simple and Configurable products.
- Each tenant (company) can enable or disable preorder independently from its own admin panel.
- Two preorder types set by the admin: Partial Payment and Complete Payment.
- Admin can set the percentage that the customer must pay in advance for Partial Payment.
- Admin can add a custom preorder message (channel and locale based) shown on the product page.
- Per-product settings: Allow Preorder, Preorder Qty and Product Availability date.
- Maximum Preorder Quantity caps how many units a product without its own Preorder Qty can take.
- Accept Preorders Until closes reservations on a chosen date.
- Cancel Unpaid Balance After (Days) cancels a reservation whose balance stays unpaid for too long.
- The storefront shows a Preorder button in place of Add To Cart on the product page, listing cards and wishlist.
- The product page shows the amount to pay now and the expected availability date.
- A confirmation email reaches the customer the moment they place the preorder.
- The store emails customers automatically when the product comes back in stock (if enabled).
- Reminder emails go out daily to customers whose item has arrived while the balance is still unpaid.
- Admin can also notify customers manually from the preorder listing with the Notify Customer mass action.
- The admin order page shows payment type, status, amount paid, amount remaining and a link to the balance order.
- Shipment and refund stay blocked while a reservation still owes money.
- Multi-tenant ready: preorder attributes are auto-provisioned per company and all preorder data is company-scoped.
- The super admin can switch preorder on or off for each subscription plan.
- A read-only super admin panel reports the installed package, its version and how the platform separates tenant data.
Installation of Laravel eCommerce PreOrder SaaS
- Unzip the extension package and merge the packages folder into your project root directory.
- Goto composer.json file and add the following lines under psr-4
"Webkul\\PreOrder\\": "packages/Webkul/PreOrder/src",
"Webkul\\PreOrderSaas\\": "packages/Webkul/PreOrderSaas/src"
- Run the following command
composer dump-autoload
- Goto bootstrap/providers.php file and add the following lines under providers. Keep the PreOrderSaas provider after the PreOrder one.
Webkul\PreOrder\Providers\PreOrderServiceProvider::class,
Webkul\PreOrderSaas\Providers\PreOrderSaasServiceProvider::class,
- Run the following commands to complete the setup
php artisan pre-order-saas:install
php artisan optimize:clear
The pre-order-saas:install command installs the base PreOrder module first, then runs this package’s own migration.
Next it seeds the preorder attributes and settings for every company, and finally clears the cache.
That is it, now just execute the project on your specified domain.
Note: This module is an add-on of the Bagisto SaaS (Multi-Tenant) platform, so install the main platform first.
Step-by-Step: Install the Module
- Merge the packages folder from the extension zip into your project root.
- Next, add both PSR-4 namespaces to composer.json and run composer dump-autoload.
- Then register both service providers in bootstrap/providers.php.
- Run php artisan pre-order-saas:install to migrate and seed every company.
- Then run php artisan optimize:clear so the new configuration loads.
- Finally, open any tenant admin panel and confirm the Preorder menu appears.
Admin Configuration of Laravel eCommerce PreOrder SaaS
After installation, the admin of each company opens Configure > Preorder > Settings > General.
Each admin enables or disables preorder for their own store on the Bagisto SaaS platform.
Once enabled, the general settings offer the following options:
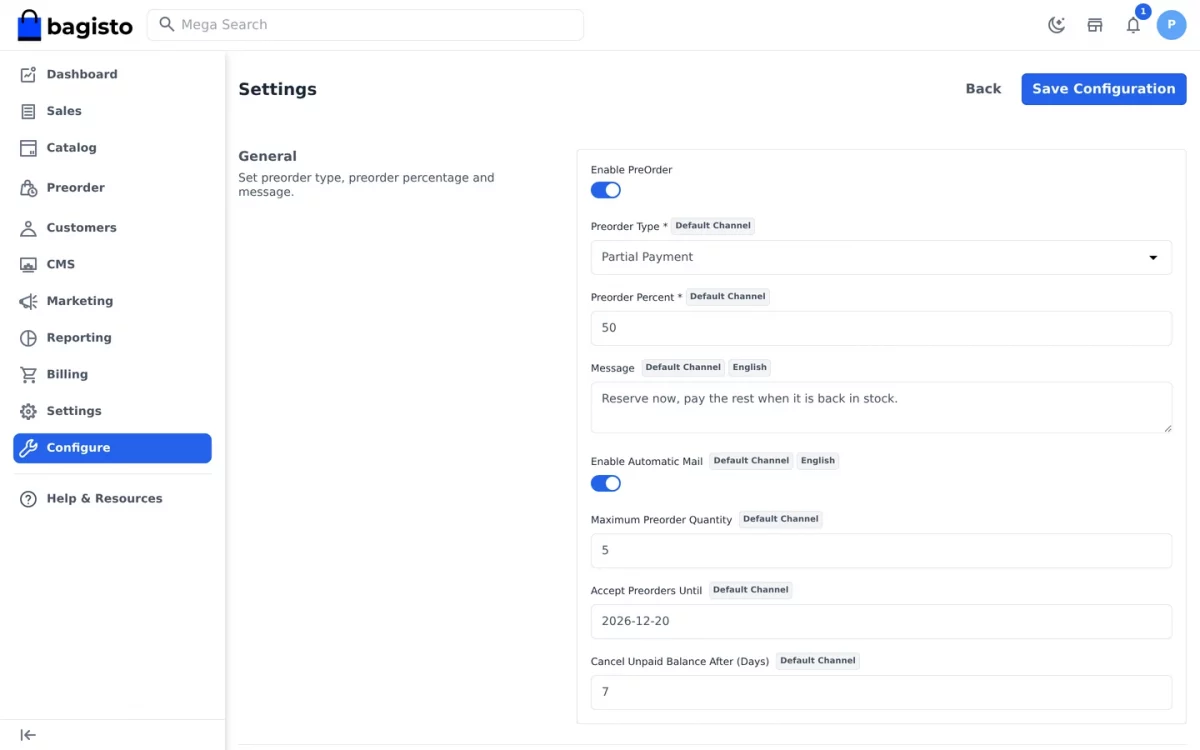
- Enable PreOrder turns the preorder feature on or off for the store.
- Preorder Type chooses between Partial Payment and Complete Payment (channel based).
- Preorder Percent is the advance the customer pays. It applies to Partial Payment and accepts 0.01 to 99.9.
- Message is a custom note (max 150 characters, channel and locale based) shown on the product page.
- Enable Automatic Mail sends the stock-notification email when the product returns to stock.
- Maximum Preorder Quantity caps any product that carries no Preorder Qty of its own.
- Accept Preorders Until is the last day the store takes reservations, written as YYYY-MM-DD.
- Cancel Unpaid Balance After (Days) is the grace period before the scheduled job cancels an unpaid balance.
Every value above belongs to that company alone. Consequently, one store can run a 50% deposit while its neighbour asks for the full amount.
Step-by-Step: Configure Preorder for a Tenant
- Log in to the tenant admin panel and open Configure.
- Next, choose Preorder and then Settings.
- Switch Enable PreOrder on.
- Then pick a Preorder Type, and set Preorder Percent for a partial payment.
- Write the storefront Message that customers read on the product page.
- Optionally set the three limits: quantity cap, closing date and auto-cancel window.
- Finally, click Save Configuration.
Preorder Type in Laravel eCommerce PreOrder SaaS
The admin selects how the customer pays for a preordered product with the Preorder Type option.
Partial Payment
In Partial Payment, the customer pays only the configured percentage of the price to reserve the product.
They pay the remaining amount later, once the product is back in stock.
Here is a brief example.
| Product Price | Preorder Percent | Paid Now (Advance) | Remaining Amount |
| $100 | 20% | $20 | $80 |
| $500 | 30% | $150 | $350 |
| $1000 | 50% | $500 | $500 |
The customer pays the advance while placing the preorder. Afterwards, they settle the balance once the product returns to stock.
Complete Payment
In Complete Payment, the customer pays the full amount up front while placing the preorder.
The customer owes nothing later, so the store fulfils the order as soon as stock arrives.
Product Preorder Settings in Laravel eCommerce PreOrder SaaS
Once a store enables preorder, three extra attributes appear on the product edit page.
They sit in the General group and belong to the preorder module.
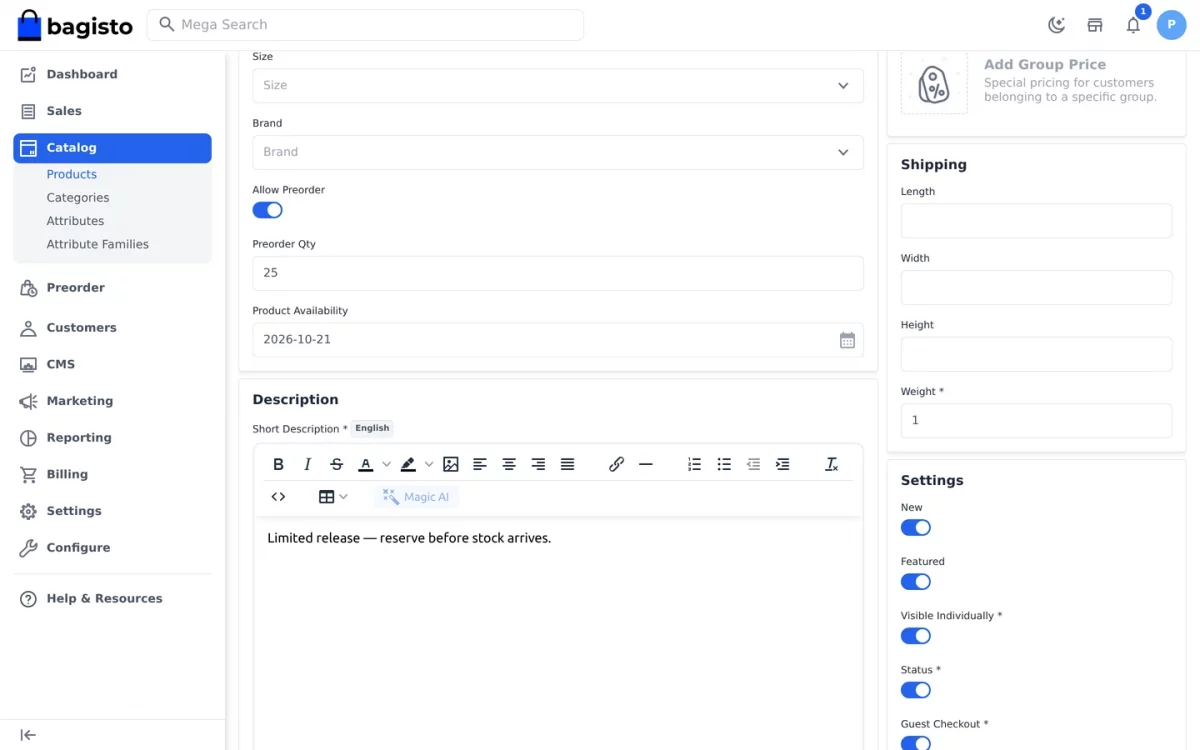
- Allow Preorder enables the preorder option for that product.
- Preorder Qty is the maximum quantity a customer may preorder for the product.
- Product Availability is the date the product should reach stock, which the storefront then shows to customers.
Note: These attributes appear only after the store enables preorder.
In the SaaS setup, the platform creates them for each company and attaches them to the General group of every attribute family.
As a result, they are ready to use the moment a merchant registers a store.
Step-by-Step: Make a Product Preorderable
- Open Catalog > Products in the tenant admin.
- Create or edit a Simple or Configurable product.
- Set its inventory to 0, because preorder applies to out-of-stock items.
- Then switch Allow Preorder on in the General group.
- Enter a Preorder Qty such as 25.
- Pick a future Product Availability date.
- Finally, click Save Product.
Front-end View of Laravel eCommerce PreOrder SaaS
When a preorderable product is out of stock, the storefront replaces Add To Cart with a Preorder button.
Customers reserve the product in advance and complete the purchase when it becomes available.
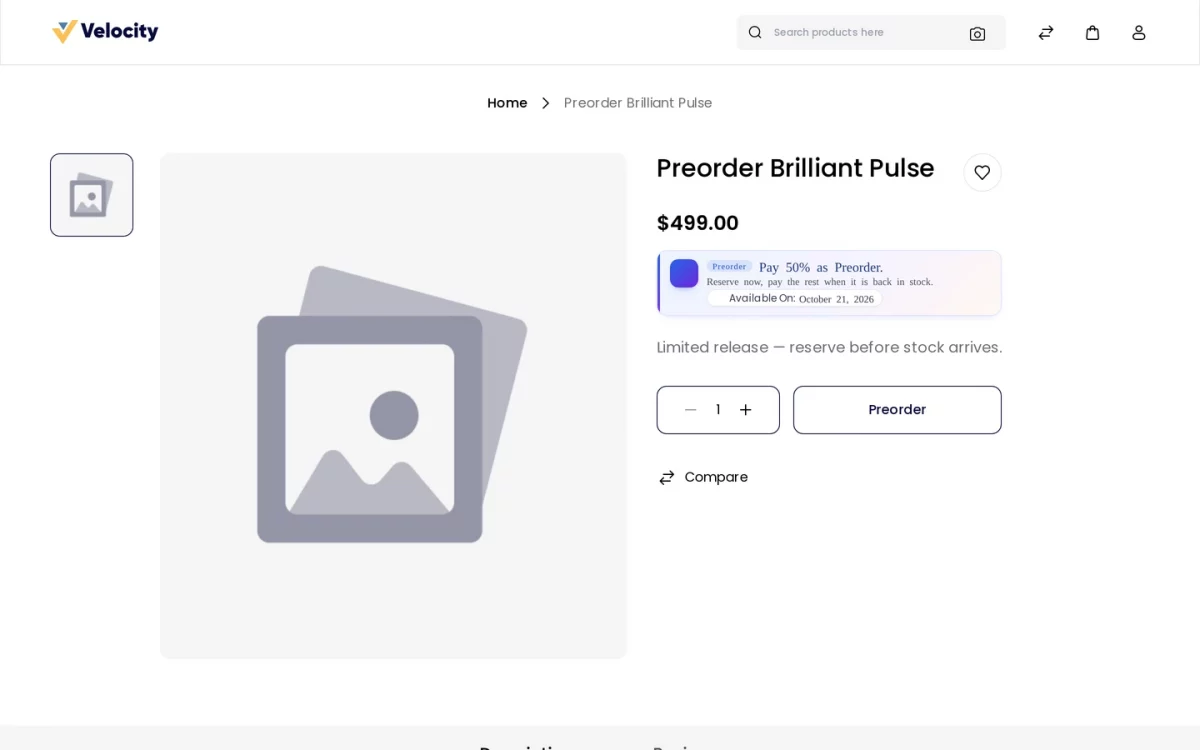
Along with the Preorder button, an information box on the product page shows:
- How much of the price the customer pays now, for a Partial Payment.
- A custom preorder message written by the admin.
- The expected availability date for the product.
Customers then add the preordered product to the cart and check out like a normal order.
Meanwhile, the cart checks the quantity against the Preorder Qty of the product, or the store-wide cap.
Notably, a preorder payment never shares a cart with other products.
Step-by-Step: Place a Preorder as a Customer
- Open the storefront of the tenant and find the preorderable product.
- Read the preorder box showing the percentage, the message and the availability date.
- Set the quantity, keeping it within the allowed preorder limit.
- Click Preorder to reserve the item.
- Open the cart and continue to checkout.
- Finally, fill in the address, choose a shipping and payment method, then place the order.
Stock Notification in Laravel eCommerce PreOrder SaaS
A confirmation email reaches the buyer as soon as the reservation is placed, showing the amount paid and the amount still due.
Once the preordered product is back in stock, the module emails the customer so they can return and finish the payment.
If Enable Automatic Mail is on, that stock-notification email goes out on its own.
Alternatively, the admin sends it from the preorder listing with the Notify Customer mass action.
Furthermore, a daily reminder reaches customers whose item has arrived while the balance is still unpaid.
Each email carries a link to the remaining payment. Logged-in customers land on the order view.
Guests reach a secure token-based complete-preorder page instead.
Both scheduled jobs run once inside every tenant, against that store’s own settings, stock and domain.
Step-by-Step: Notify Customers Manually
- Open the Preorder menu in the tenant admin.
- Tick the reservations whose customers you want to reach.
- Choose Notify Customer from the mass-action list.
- Finally, confirm the action and check that the Email Sent column turns to Yes.
Completing the Preorder in Laravel eCommerce PreOrder SaaS
The customer views and completes their preorder from My Account > Orders.
The order view shows a Preorder Information panel and the item-wise remaining amount.
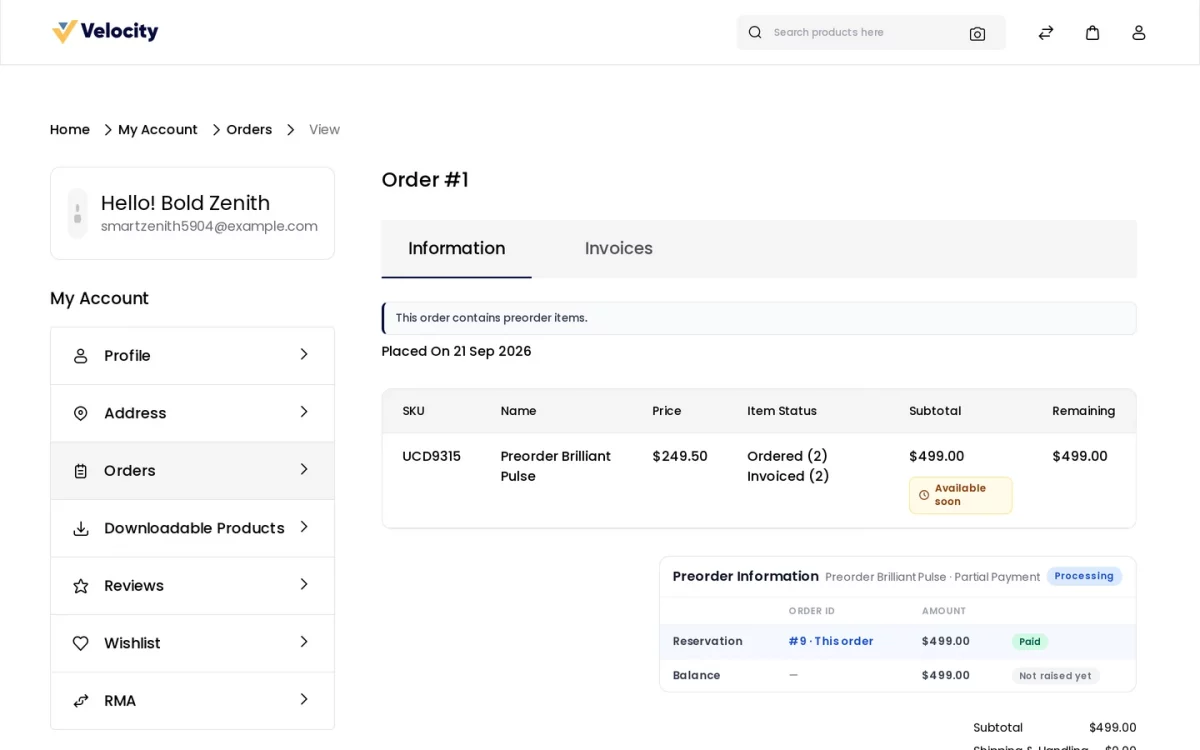
The Preorder Information panel displays:
- Type shows Partial or Complete payment.
- Status shows Pending, Processing, Completed or Canceled.
- Reservation links the original order that took the deposit, with the amount paid.
- Balance shows what is still owed, and the order that settled it once one exists.
- Remaining shows the item-wise amount still owed, straight away.
When the product is in stock, a Complete Preorder button appears with the exact amount still due.
If the product has not arrived, an Available soon note takes its place.
After the customer pays the balance, the status becomes Completed and the remaining amount drops to zero.
Step-by-Step: Pay the Remaining Amount
- Sign in to the storefront and open My Account.
- Choose Orders and open the order that holds the reservation.
- Read the Preorder Information panel to see what is still owed.
- Click Complete Preorder once the item is back in stock.
- Finally, check out the balance order to finish the purchase.
Admin Order View for Laravel eCommerce PreOrder SaaS
On the admin order view, the module adds the same Preorder Information panel the customer sees.
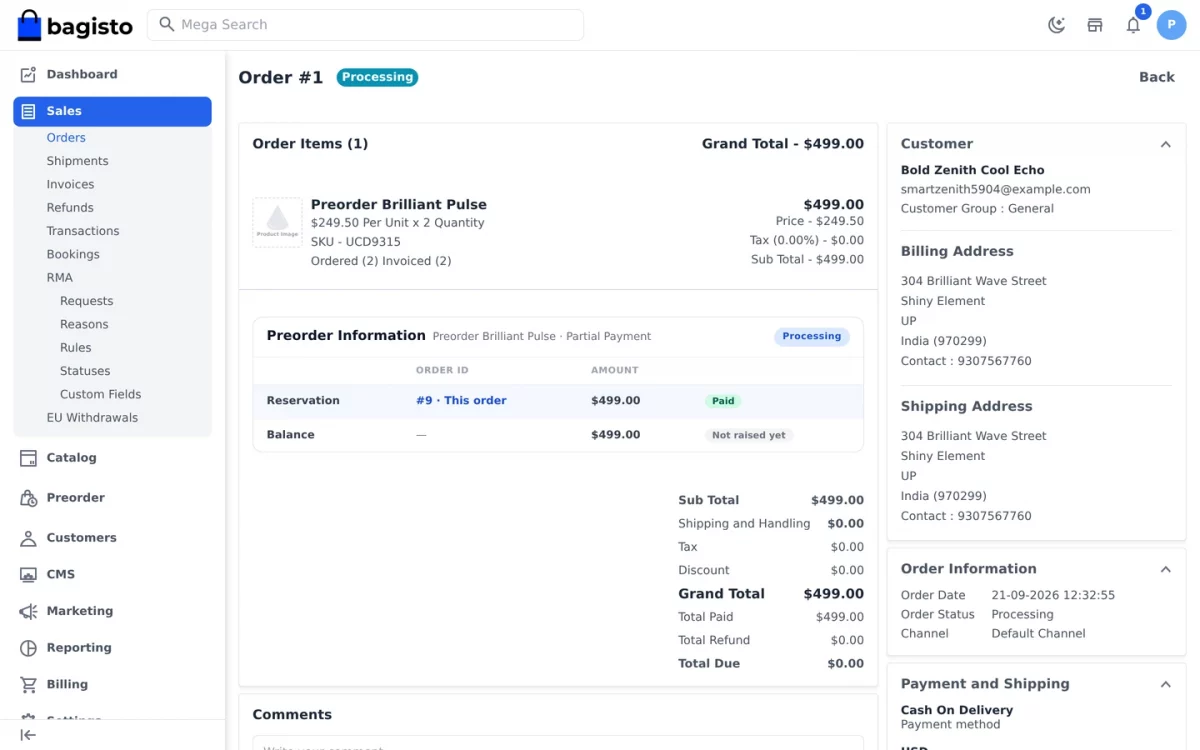
The merchant therefore reads the same story: payment type, status, amount paid and amount still owed.
The Reservation row links to the order that took the deposit, and the Balance row links to the order that settled it.
To keep the flow consistent, shipment and refund stay unavailable while a reservation still owes money.
Once the customer pays the balance, both actions return and the order behaves like any other.
Step-by-Step: Review a Preorder from the Admin Order Page
- Open Sales > Orders in the tenant admin.
- Open the order that contains the reserved item.
- Read the Preorder Information panel below the order items.
- Follow the Balance row link to reach the settling order when it exists.
- Finally, invoice the deposit so the customer can pay the balance.
Manage Preorders in Laravel eCommerce PreOrder SaaS
The admin manages every reservation from the dedicated Preorder menu in the admin panel.
The listing is a datagrid with search, filter and export options.
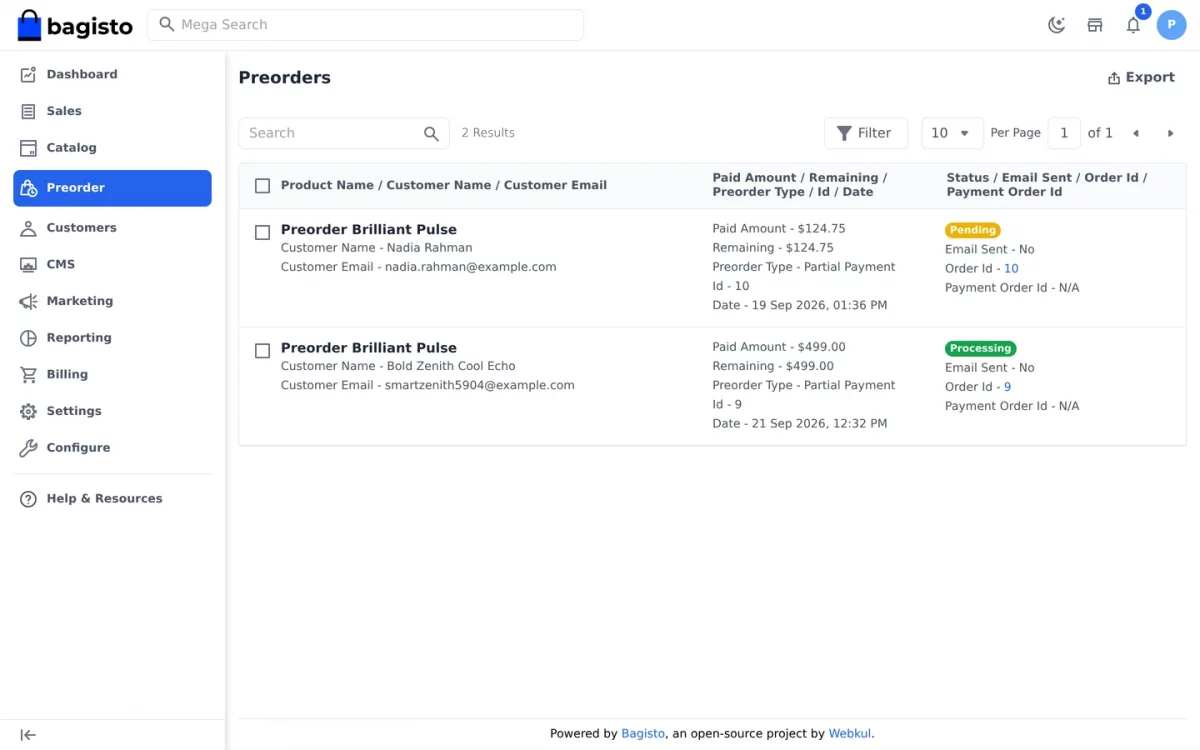
The preorder datagrid shows the following columns:
| Column | Description |
| Id | The preorder item id. |
| Order Id | The original order in which the preorder was placed. |
| Payment Order Id | The order created for the remaining payment (N/A if not applicable). |
| Product Name | The name of the preordered product. |
| Customer Name | The name of the customer. |
| Customer Email | The email of the customer. |
| Paid Amount | The amount already paid by the customer. |
| Remaining | The amount still to be paid (0 once completed). |
| Preorder Type | Partial Payment or Complete Payment. |
| Status | Pending, Processing, Completed or Canceled. |
| Email Sent | Whether the stock-notification email has been sent. |
| Date | When the reservation was placed. |
Admins filter and search the grid by these columns. The Notify Customer mass action emails the selected buyers.
ACL controls access to the preorder listing and the notify action, so you can restrict a role to either one.
Step-by-Step: Work the Preorder Datagrid
- Open the Preorder menu in the tenant admin.
- Search by product, customer name or customer email.
- Use Filter to narrow the list by status or type.
- Open the linked Order Id to inspect the originating order.
- Finally, click Export to download the grid for reporting.
Multi-Tenant Capabilities of Laravel eCommerce PreOrder SaaS
The module extends the base preorder feature across every tenant on your Bagisto SaaS platform.
- Automatic attribute provisioning: when a company registers, the platform creates Allow Preorder, Preorder Qty and Product Availability for it and attaches them to the General group of each attribute family.
- Seeded settings: a new store opens with preorder enabled, a 50% deposit and a storefront message in its own language.
- Per-tenant configuration: every store sets its own preorder type, percentage, message and limits independently.
- Company-scoped data: the module tags preorder records with the company and scopes every query to the current tenant.
- Tenant-aware scheduled jobs: the reminder and auto-cancel jobs run once inside each company, against that store’s own settings, stock and domain.
- Tenant isolation: one company never reaches another company’s preorder attributes or records.
The super admin also gets a read-only panel under Configure > Pre-Order > Settings.
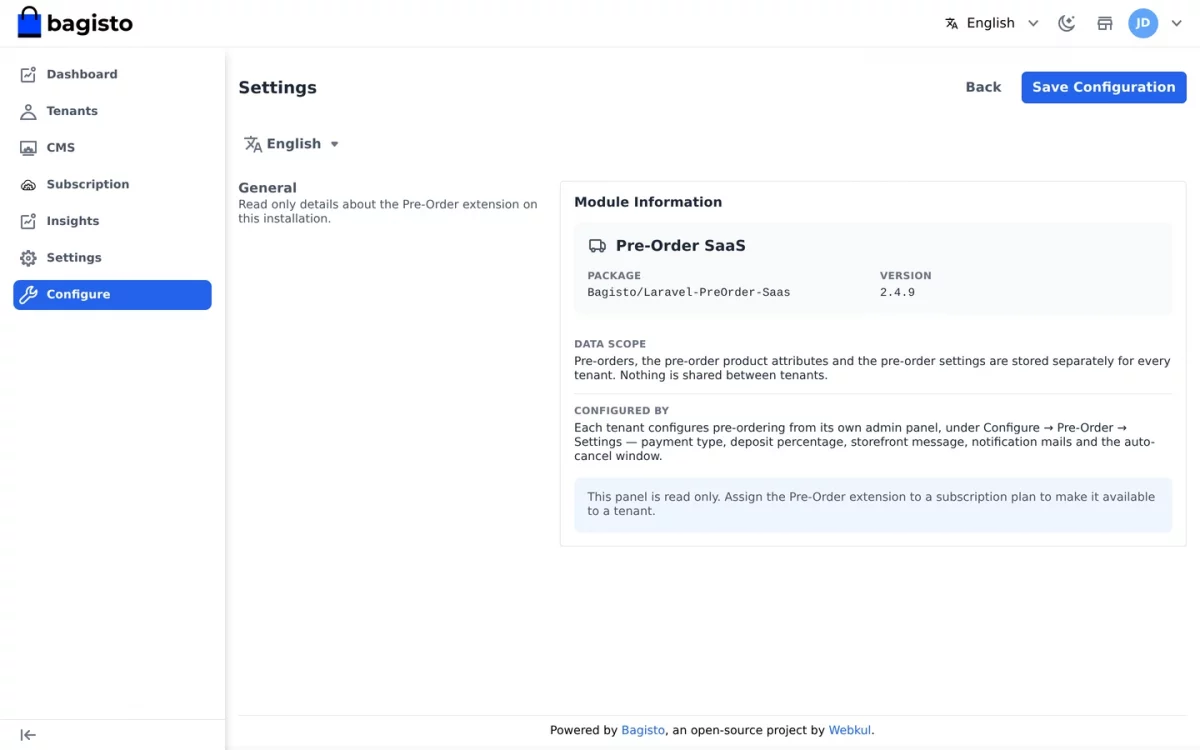
It reports the installed package, its version and how the platform separates preorder data between tenants.
It also points operators to the tenant screen where the real settings live.
Assign the extension to a subscription plan, and only the stores on that plan can offer preorders.
Step-by-Step: Check the Module from the Super Admin
- Sign in to the super admin on your primary domain.
- Open Configure and find the Pre-Order group.
- Click Settings to read the module information panel.
- Finally, open Subscription > Plans and assign the extension to the plans that should include it.
Support for Laravel eCommerce PreOrder SaaS
That is all about the Laravel eCommerce PreOrder SaaS module for Bagisto.
For developer details on extending the platform, visit the Bagisto developer docs.
If you have any issues, please add a ticket and share your views to make the module better at https://bagisto.uvdesk.com/en/
Thanks for reading the blog.
Current Product Version - v2.4.11
Supported Framework Version - v2.4.11

Be the first to comment.