Laravel eCommerce Marketplace Bulk Upload module makes it easy to upload a lot of products at once.
Sellers can use CSV or XLS files to upload their products in bulk, and the admin can also upload products to the seller’s store.
This module is especially helpful for sellers with many products, saving time by allowing them to upload all their products at once instead of entering them one by one.
With this module, you can upload as many products as needed to the Bagisto store.
Features
- Products can be uploaded through CSV or XLS files.
- The seller can upload bulk products.
- Admin can upload the bulk product into the individual seller account.
- This module supports all product types i.e., Simple, Configurable, Bundled & Grouped products except Virtual and downloadable products.
- Add any number of the product there is no limitation.
- Mass upload is compatible with multiple channels.
- It supports multi-lingual.
- Image attachment with the product within CSV / XLS files.
- The admin or seller can upload a zip file for the images.
Note: Make sure the Marketplace Status is enabled before installing the Marketplace Bulk Upload module.
How to install Laravel eCommerce Marketplace Bulk Upload
Unzip the respective extension zip file and merge the “packages” directory into the project root directory.
Goto config/app.php file and add the following line under ‘providers’
Webkul\MpDataTransfer\Providers\MpDataTransferServiceProvider::class,
Goto composer.json file inside the Bagisto root directory and add the following line under ‘psr-4’.
"Webkul\\MpDataTransfer\\": "packages/Webkul/MpDataTransfer/src"
Open the config/bagisto-vite.php file and add the following command under the ‘viters‘ folder.
'mp_data_transfer' => [
'hot_file' => 'mp-data-transfer-vite.hot',
'build_directory' => 'themes/mp_data_transfer/build',
'package_assets_directory' => 'src/Resources/assets',
],
#Run Commands
Next, run these commands below to complete the setup in the bagisto root directory.
composer dump-autoload
php artisan migrate
php artisan vendor:publish --provider="Webkul\MpDataTransfer\Providers\MpDataTransferServiceProvider" --force
php artisan optimize:clear
Marketplace Bulk Upload – Admin Management
After the successful installation of the module Laravel eCommerce marketplace bulk upload, the admin can follow the below given steps to bulk upload the products.
Step 1: Go to the Admin panel of Bagisto click on Settings >> Data Transfer and click on Create Import button

Step 2: Under general configurations select the below fields:
1) Type – Kindly select the type i.e. (Products, Customers, Tax rates, Categories, Seller Products, Seller Categories ) which you want to import.
2) File – Choose the file in your desired format (CSV, XLS, XLSX) and kindly make sure you have all the required fields in the file.
Note – While importing the product data Simple, Configurable, Bundled & Grouped product types can be imported except Virtual and Downloadable products.
3) Download Sample – You can also download the sample files of types (Products, Customers, Tax Rates, Categories, Seller Products, Seller Categories ).
Kindly make sure the file you are uploading is similar to this sample file.
4) Image Directory Path – Use relative path to /project-root/storage/import/app to store images.
5) Upload Images(zip) – Upload all the product images through a zip file.
6) Action – Kindly select from the settings configuration that you want to Create/Update or Delete the records.
7) Validation Strategy – This unique feature allows you to Skip the Errors or to Stop on Errors while Importing the data.
8) Allowed Errors – This feature allows you how much quantity of errors will get neglected while importing the data.
9) Field Separator – This feature allows you to set the fields.
10) Process in Queue – This feature allows you to run your import process in a queue.
So now click on the Save Import Button.

Step 3: Admin can also add seller bulk Product. To add seller products select Type “Seller Product” and Select the Seller on Set Seller option.

Step 4: Now the import process will get started and after it is completed the product import process will be done.

Step 5: Now you will able see to all the products under the Catalog >> Products section as shown in the given image.

Now the bulk products have been uploaded successfully to the eCommerce store.
Creating a sample CSV/XLS file for Laravel eCommerce Marketplace Bulk Upload
After downloading the CSV/XLS sample files the admin /Seller can edit the files according to the products. The admin/seller can upload the ‘n’ numbers of the products.
Let’s take an example to upload the Simple products
For Simple products:-
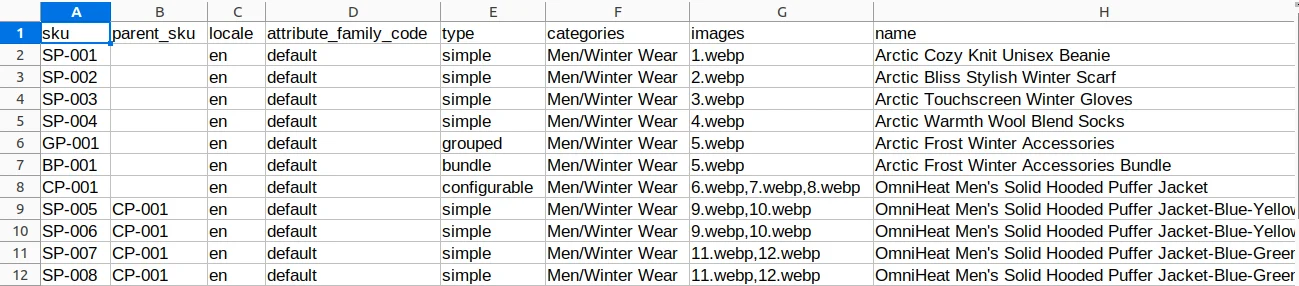
After downloading the sample for the simple product the CSV/XLS file contains several fields as shown in the image below:-
The admin also needs to fill all the fields regarding the product such as:-
- SKU: Enter the SKU for the products.
- Parent_SKU: Enter the product’s parent SKU.
- Locale: Enter the locale for the product.
- Attribute_family_code: Enter the attribute family created or select as default.
- Type: Select Simple for the simple products.
- Categories: Select the category of the product.
- Images: Enter the product image names
- Name: Enter the name of the product.
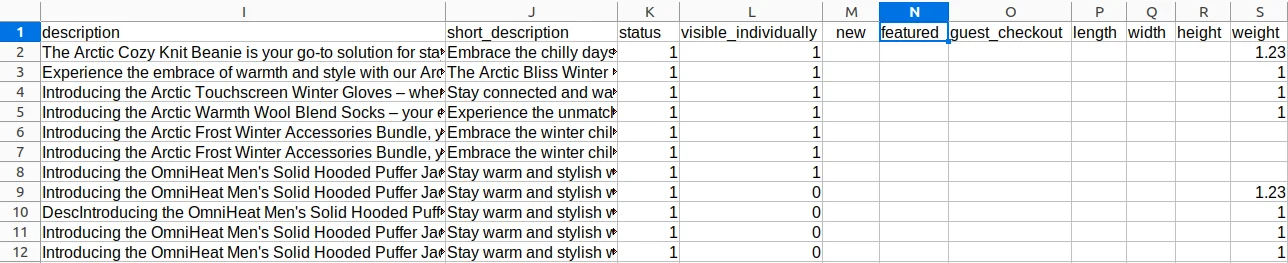
- Description: Enter the description of the product.
- Short Description: Enter the short description of the product.
- Status: To enable the status as active set it as 1 otherwise 0.
- Visible individually: Set it as 1 or 0 according to the requirements.
- New: To set as the new product set it as 1 otherwise 0.
- Featured: To set as featured products set it as 1 otherwise 0.
- Guest_Checkout: Set it as 1 to enable the product for guest checkout other wise set it as 0.
- Length: Enter the length of the products.
- Width: Enter the width of the products.
- Height: Enter the height for the simple products.
- Weight: Enter the weight for the simple products.
- Tax_category_name: Enter the tax category name in this field.
- Price: Here the admin will enter the price for the products.
- Cost: Enter the Cost if required.
- Special_price: The admin can enter the special price for the products if required.
- Special price from: Here the admin can enter the beginning date for the special price regarding the products.
- Special price to: Here the admin can enter the end date for the special price regarding the products.
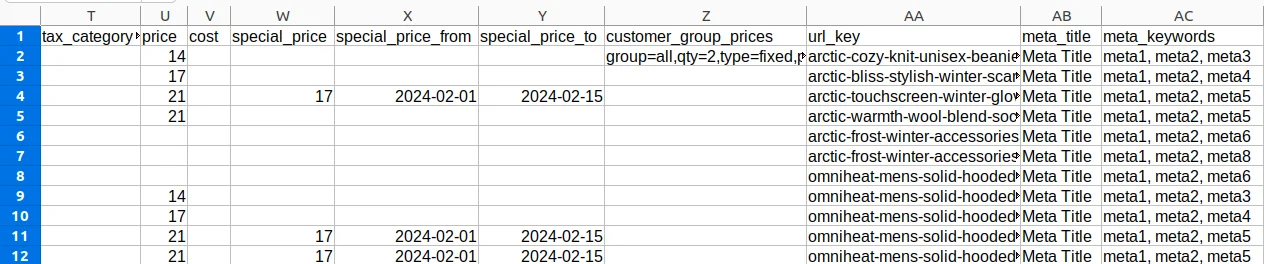
- Customer group price: The admin can set different prices for specific customer groups.
- Url Key: Enter the URL key regarding the products.
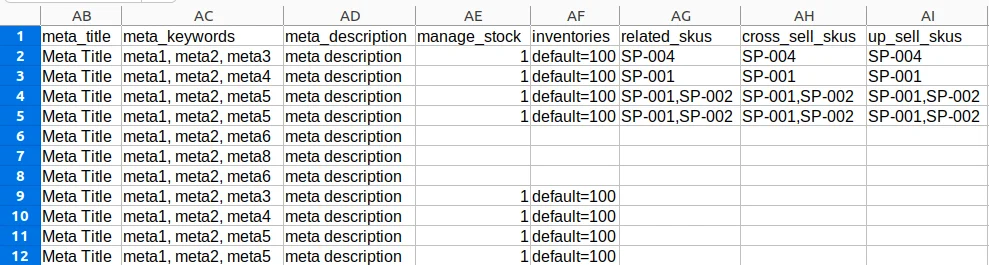
- Meta_title: The admin can also enter the meta title.
- Meta_keyword: The admin can also enter the meta keyword.
- Meta_description: The admin can also enter the meta description.
- Manage_stock: Enter Product stock 0 either 1.
- Inventories: The admin can set the number of products across each inventory in this field.
- Related_skus: Enter SKUs for products that are similar or often bought together
- Cross_sell_skus: Enter SKUs for products suggested to buy with the main product.
- Up_sell_skus: Enter SKUs for better or more expensive versions of the product.
Note:- Save all product images in a separate zip folder to upload them in bulk.
The name of the images for each product should be the same in the CSV/XLS file also.
Marketplace Bulkupload – Seller Management
Sellers can also upload products in bulk using this module. On the profile page, they will find the Data Transfer options, as shown below.

Step 1: Click on the Data Transfer and then you can see the Create Import button click on that as shown below given the screenshot.

Step 2: Now, Under the Create import section select the below fields:
1) Type – Kindly select the type i.e. (Seller Product, Seller Categories) which you want to import.
2) File – Choose the file in your desired format (CSV, XLS, XLSX) and kindly make sure you have all the required fields in the file.
Note – While importing the product data Simple, Configurable, Bundled & Grouped product types can be imported except Virtual and Downloadable products.
3) Download Sample – You can also download the sample files of types (Seller Product, Seller Categories).
4) Image Directory Path – Use relative path to /project-root/storage/import/app to store the images.
5) Upload Images(zip) – Upload all the product images in the form of a zip file.

Under the Settings configuration fill the below-given fields.
6) Action – Kindly select from the settings configuration that you want to Create/Update or Delete the records.
7) Validation Strategy – This unique feature allows you to Skip the Errors or to Stop on Errors while Importing the data.
8) Allowed Errors – it allows you how much of the number of errors will get neglected while importing the data.
9) Field Separator – This allows you to set the fields.
10) Process in Queue – This feature allows you to run your import process in a queue.
Now click on the Save Import Button.

Step 3: After that, the import process will get started and after it is completed the product import process will be done.

Step 4: Now the products are uploaded successfully. you can see the status of imported products in the below image.

Now, Sellers can see all the products under the Products section as shown in the given image.

Now, the bulk products have been uploaded successfully to the eCommerce store from the seller’s end.
Support
So, that was much about the User Guide of Laravel eCommerce Marketplace Bulkupload for any queries or doubts reach out to us at [email protected].
You can also raise a ticket at our HelpDesk System. Please explore our Laravel Development Services and Quality Bagisto Extensions.
Current Product Version - v2.2.2
Supported Framework Version - Bagisto v2.2.2

I’m installing with composer according to the instructions here, but I’m getting an error.
error: Class “Webkul\Ui\DataGrid\DataGrid” not found (View: C:\laragon\www\bagistomasterdortgen\vendor\bagisto\bagisto-bulk-upload\src\Resources\views\admin\bulk-upload\data- flow-profile\index.blade.php)