How proxy.ts Works in Next.js 16 is essential for handling authentication, redirects, request headers, and request interception before a route is processed.
Whether you need authentication, redirects, header manipulation, or localization, proxy.ts allows you to handle these tasks from a single entry point.
Unlike traditional route handlers, proxy.ts executes before route matching, making it ideal for request-level logic that applies across your application.
In this guide, you’ll learn how proxy.ts works in Next.js 16, where it fits into the request lifecycle, and how to use it effectively in production applications.
What Is proxy.ts?
proxy.ts is a special file that intercepts every incoming request before Next.js resolves the destination route.
It enables developers to inspect requests, modify headers, redirect users, rewrite URLs, or block access before rendering a page.
Since it runs early in the request lifecycle, it is commonly used for authentication, localization, feature flags, and security checks.
In previous versions, developers used middleware.ts for request interception.
Next.js 16 renamed this file to proxy.ts to better reflect its purpose of acting as a request proxy instead of traditional middleware.
The new name improves clarity while keeping the overall development experience familiar for existing projects.
When Should You Use proxy.ts?
Not every application requires proxy.ts, but it becomes valuable when request processing must happen before a route is executed.
Instead of repeating logic across multiple pages or API routes, you can centralize it in one location.
- Protect authenticated routes.
- Redirect users based on conditions.
- Handle localization and country detection.
- Add or modify request headers.
- Apply maintenance mode.
- Implement feature flags.
How proxy.ts Works
Every browser request first passes through proxy.ts before Next.js determines which route should handle it.
The file can inspect the request, perform validation, modify information, or redirect the user before continuing.
If no changes are required, the request simply continues to the requested page or API route.
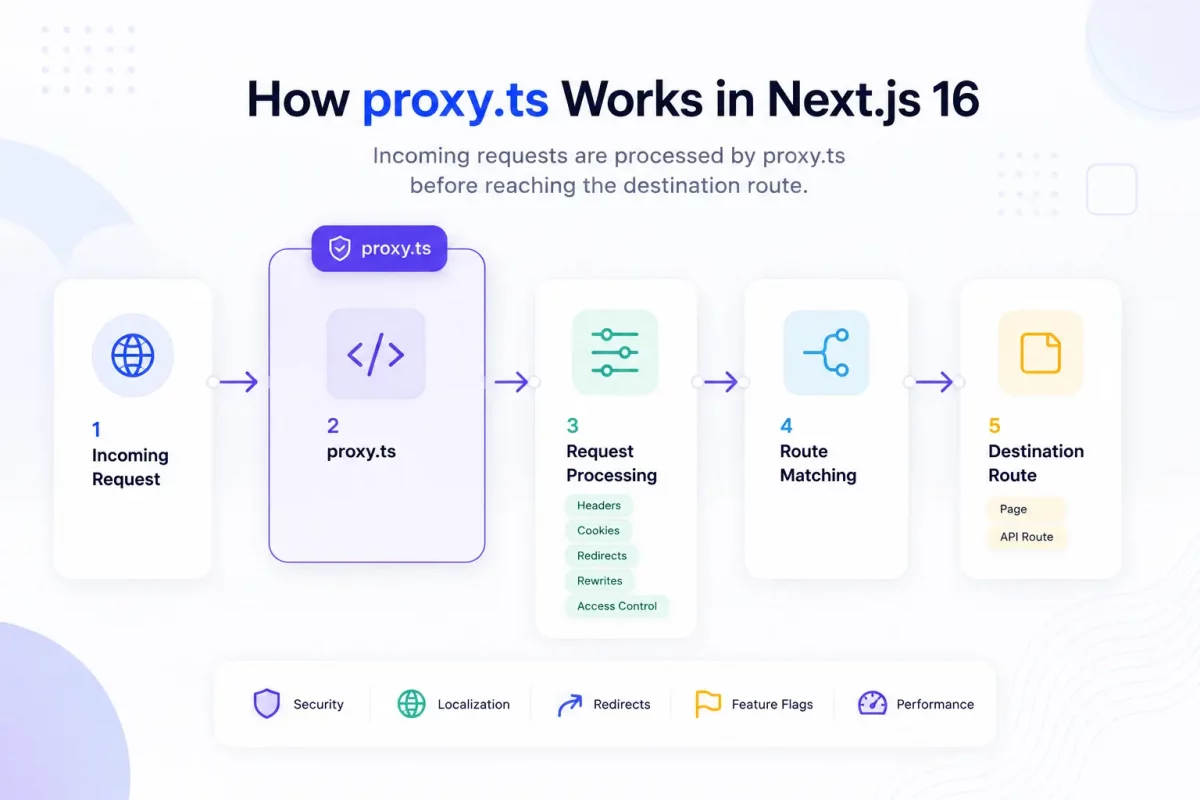
Request Lifecycle in proxy.ts
- User sends a request.
- Next.js executes
proxy.ts. - Request headers and cookies become available.
- Your logic decides whether to continue, rewrite, or redirect.
- Next.js renders the matching route.
This lifecycle allows applications to apply request-level rules before any page or API logic is executed.
Creating Your First proxy.ts
Creating a basic proxy.ts file is straightforward.
The following example allows every request to continue without modification.
import { NextRequest, NextResponse } from 'next/server';

export function proxy(request: NextRequest) {
  return NextResponse.next();
}
This is the simplest implementation of proxy.ts. It receives the incoming request and forwards it to the next stage of the routing process.
From this starting point, you can gradually introduce authentication, redirects, request rewrites, or header modifications without changing your application routes.
Protecting Routes with proxy.ts
One of the most common production use cases for proxy.ts is protecting private routes before they reach your application.
Instead of checking authentication on every page, you can validate the user’s session once inside proxy.ts and redirect unauthenticated users immediately.
This reduces duplicate code and improves security by ensuring protected routes are never rendered for unauthorized users.
import { NextRequest, NextResponse } from 'next/server';

export function proxy(request: NextRequest) {
  const token = request.cookies.get('auth-token');

  if (!token && request.nextUrl.pathname.startsWith('/dashboard')) {
    return NextResponse.redirect(new URL('/login', request.url));
  }

  return NextResponse.next();
}
This example checks for an authentication cookie before allowing access to the dashboard. If no session exists, the user is redirected to the login page.
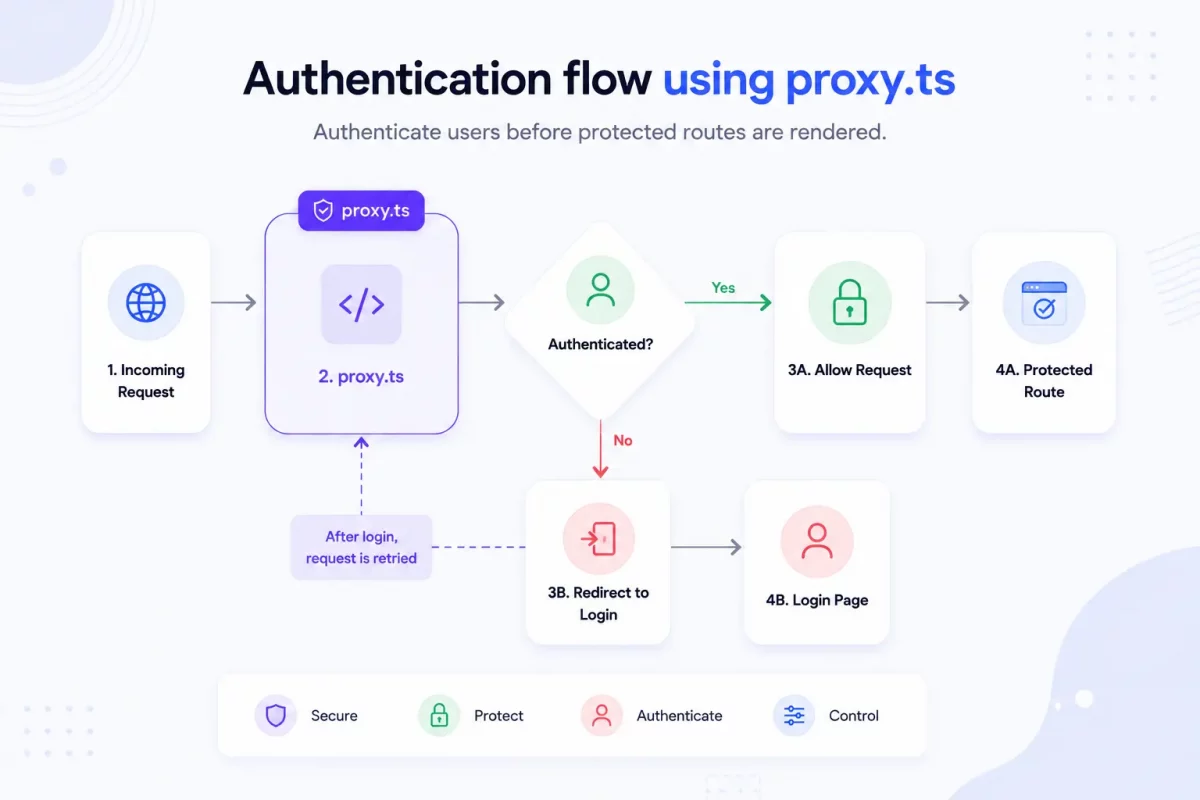
Redirecting Users Before Routing
Besides authentication, proxy.ts is frequently used to redirect users based on application rules.
Common examples include maintenance mode, language detection, legacy URL migration, or redirecting users to region-specific pages.
Handling these redirects before route matching improves performance and keeps routing logic centralized.
import { NextRequest, NextResponse } from 'next/server';

export function proxy(request: NextRequest) {
  const { pathname } = request.nextUrl;

  if (pathname === '/old-blog') {
    return NextResponse.redirect(
      new URL('/blog', request.url)
    );
  }

  return NextResponse.next();
}
This example permanently redirects visitors from an old URL to its new destination before the page is rendered.
Modifying Request Headers
Applications sometimes need to add request metadata before passing control to the requested route.
This is useful for tracking requests, forwarding user information, enabling feature flags, or passing custom headers to downstream services.
import { NextRequest, NextResponse } from 'next/server';

export function proxy(request: NextRequest) {
  const requestHeaders = new Headers(request.headers);

  requestHeaders.set('x-app-version', '1.0.0');
  requestHeaders.set('x-request-source', 'proxy');

  return NextResponse.next({
    request: {
      headers: requestHeaders,
    },
  });
}
The updated headers become available to the rest of the application without modifying individual pages or API routes.
Using Config Matchers
By default, proxy.ts can run for every incoming request. In production, this may introduce unnecessary overhead.
Using a matcher limits execution to only the routes that actually require request interception.
export const config = {
  matcher: [
    '/dashboard/:path*',
    '/account/:path*',
    '/checkout/:path*',
  ],
};
Restricting execution to selected routes improves performance because public pages bypass proxy.ts entirely.
Common Production Use Cases
Although authentication is the most common implementation, proxy.ts supports many production scenarios that benefit from request interception.
- Protect authenticated routes.
- Redirect users during maintenance windows.
- Detect user locale and redirect accordingly.
- Enable feature flags for selected users.
- Add custom security or tracking headers.
- Block suspicious bots or malicious traffic.
- Rewrite legacy URLs without changing application routes.
proxy.ts vs Route Handlers
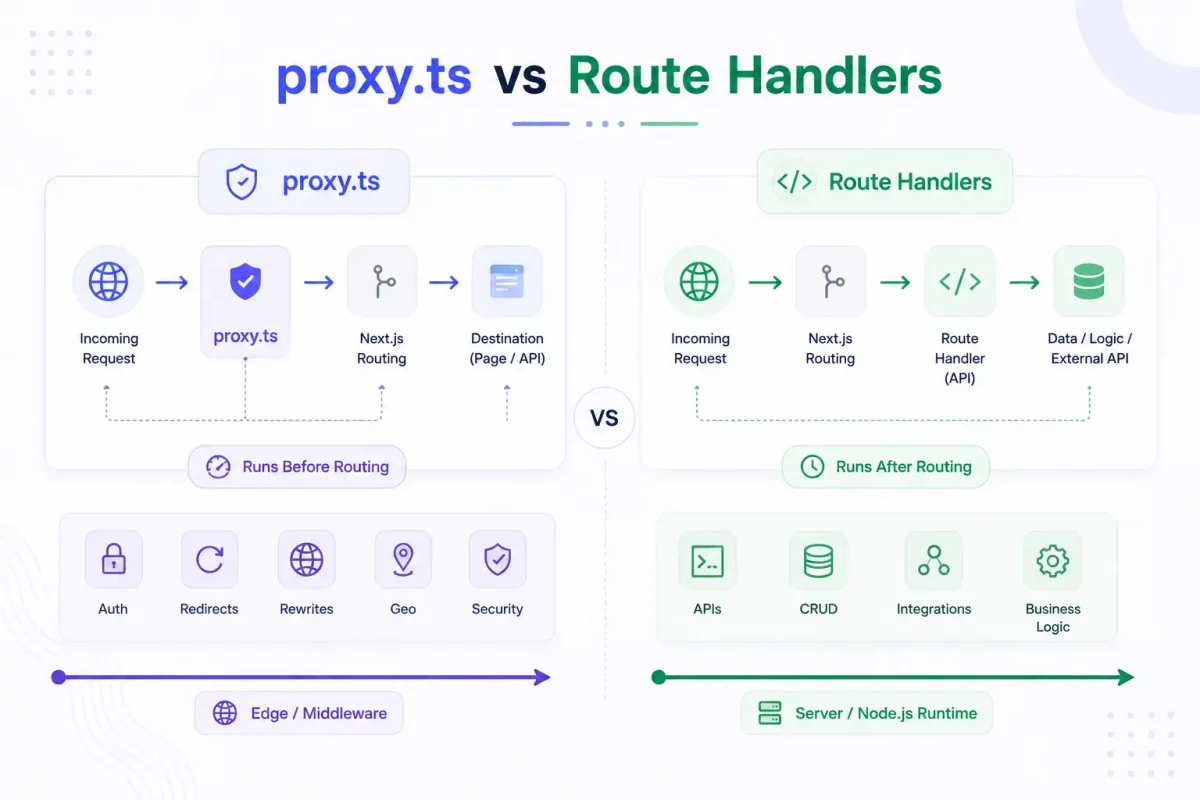
Although both proxy.ts and Route Handlers work with incoming requests, they serve different purposes within a Next.js application.
proxy.ts executes before route matching and is designed for request interception, while Route Handlers process requests after a specific route has been matched.
| Feature | proxy.ts | Route Handlers |
|---|---|---|
| Execution Time | Before route matching | After route matching |
| Primary Purpose | Intercept requests | Handle API requests |
| Authentication | Excellent | Possible |
| Redirects | Recommended | Limited |
| Header Manipulation | Recommended | Limited |
| Database Operations | Not Recommended | Recommended |
Use proxy.ts for request-level decisions and Route Handlers for implementing business logic, database operations, or API endpoints.
proxy.ts vs middleware.ts
If you’ve previously worked with middleware.ts, you’ll notice that the overall development experience remains very similar.
In Next.js 16, the file was renamed to proxy.ts to better describe its responsibility of acting as a request proxy before routing.
Most existing middleware logic can be migrated with minimal code changes, making the transition straightforward for existing applications.
// Before (middleware.ts)

import { NextResponse } from 'next/server';

export function middleware(request) {
  return NextResponse.next();
}

// After (proxy.ts)

import { NextResponse } from 'next/server';

export function proxy(request) {
  return NextResponse.next();
}
For most projects, migrating simply involves renaming the file and updating the exported function from middleware() to proxy().
Performance Best Practices
Because proxy.ts executes before every matched request, keeping it lightweight is essential for maintaining fast response times.
Heavy computations, database queries, and unnecessary external API requests increase request latency for every user.
Instead, limit proxy.ts to lightweight request processing and delegate complex work to Route Handlers or Server Components.
- Use matchers to reduce unnecessary execution.
- Keep request processing lightweight.
- Avoid database queries inside proxy.ts.
- Do not call external APIs whenever possible.
- Perform only request-level operations.
- Move business logic to Route Handlers or Server Actions.
Common Mistakes to Avoid
Many performance issues arise because developers treat proxy.ts as a general-purpose execution layer instead of a lightweight request interceptor.
Understanding its intended role helps keep applications fast, scalable, and easier to maintain.
- Running database queries inside
proxy.ts. - Fetching third-party APIs on every request.
- Executing expensive business logic.
- Running proxy.ts for every route without a matcher.
- Using proxy.ts instead of Route Handlers for API logic.
- Adding unnecessary third-party libraries.
A simple, focused implementation is usually faster, easier to debug, and more reliable than placing excessive logic inside proxy.ts.
Conclusion
proxy.ts provides a centralized way to intercept and process requests before they reach your application’s routes in Next.js 16.
By handling authentication, redirects, localization, and request headers in one place, you can reduce duplicated logic while improving maintainability and performance.
When used correctly, proxy.ts becomes an important part of a production-ready Next.js application, helping teams build secure, scalable, and efficient request handling workflows.

Be the first to comment.